Guidelines for Application of Rumble Strips and Rumble Stripes
Guidelines for Application of Rumble Strips and Rumble Stripes
Guidelines for Application of Rumble Strips and Rumble Stripes

Create successful ePaper yourself
Turn your PDF publications into a flip-book with our unique Google optimized e-Paper software.
<strong>Guidelines</strong> <strong>for</strong> <strong>Application</strong> <strong>of</strong> <strong>Rumble</strong> <strong>Strips</strong><br />
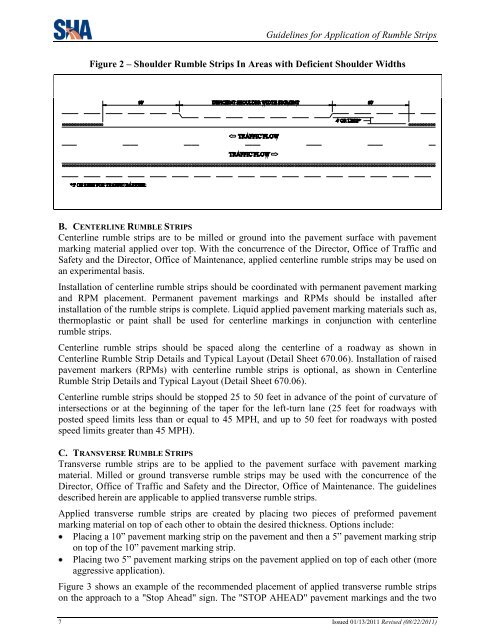
Figure 2 – Shoulder <strong>Rumble</strong> <strong>Strips</strong> In Areas with Deficient Shoulder Widths<br />
B. CENTERLINE RUMBLE STRIPS<br />
Centerline rumble strips are to be milled or ground into the pavement surface with pavement<br />
marking material applied over top. With the concurrence <strong>of</strong> the Director, Office <strong>of</strong> Traffic <strong>and</strong><br />
Safety <strong>and</strong> the Director, Office <strong>of</strong> Maintenance, applied centerline rumble strips may be used on<br />
an experimental basis.<br />
Installation <strong>of</strong> centerline rumble strips should be coordinated with permanent pavement marking<br />
<strong>and</strong> RPM placement. Permanent pavement markings <strong>and</strong> RPMs should be installed after<br />
installation <strong>of</strong> the rumble strips is complete. Liquid applied pavement marking materials such as,<br />
thermoplastic or paint shall be used <strong>for</strong> centerline markings in conjunction with centerline<br />
rumble strips.<br />
Centerline rumble strips should be spaced along the centerline <strong>of</strong> a roadway as shown in<br />
Centerline <strong>Rumble</strong> Strip Details <strong>and</strong> Typical Layout (Detail Sheet 670.06). Installation <strong>of</strong> raised<br />
pavement markers (RPMs) with centerline rumble strips is optional, as shown in Centerline<br />
<strong>Rumble</strong> Strip Details <strong>and</strong> Typical Layout (Detail Sheet 670.06).<br />
Centerline rumble strips should be stopped 25 to 50 feet in advance <strong>of</strong> the point <strong>of</strong> curvature <strong>of</strong><br />
intersections or at the beginning <strong>of</strong> the taper <strong>for</strong> the left-turn lane (25 feet <strong>for</strong> roadways with<br />
posted speed limits less than or equal to 45 MPH, <strong>and</strong> up to 50 feet <strong>for</strong> roadways with posted<br />
speed limits greater than 45 MPH).<br />
C. TRANSVERSE RUMBLE STRIPS<br />
Transverse rumble strips are to be applied to the pavement surface with pavement marking<br />
material. Milled or ground transverse rumble strips may be used with the concurrence <strong>of</strong> the<br />
Director, Office <strong>of</strong> Traffic <strong>and</strong> Safety <strong>and</strong> the Director, Office <strong>of</strong> Maintenance. The guidelines<br />
described herein are applicable to applied transverse rumble strips.<br />
Applied transverse rumble strips are created by placing two pieces <strong>of</strong> pre<strong>for</strong>med pavement<br />
marking material on top <strong>of</strong> each other to obtain the desired thickness. Options include:<br />
Placing a 10‖ pavement marking strip on the pavement <strong>and</strong> then a 5‖ pavement marking strip<br />
on top <strong>of</strong> the 10‖ pavement marking strip.<br />
Placing two 5‖ pavement marking strips on the pavement applied on top <strong>of</strong> each other (more<br />
aggressive application).<br />
Figure 3 shows an example <strong>of</strong> the recommended placement <strong>of</strong> applied transverse rumble strips<br />
on the approach to a "Stop Ahead" sign. The "STOP AHEAD" pavement markings <strong>and</strong> the two<br />
7 Issued 01/13/2011 Revised (08/22/2011)