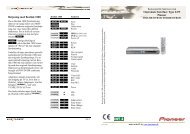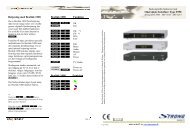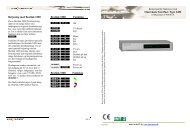
OneRemote DAB/ DAB+/ FM/ WiFi Tuner & Mediaplayer
OneRemote DAB/ DAB+/ FM/ WiFi Tuner & Mediaplayer
OneRemote DAB/ DAB+/ FM/ WiFi Tuner & Mediaplayer

Create successful ePaper yourself
Turn your PDF publications into a flip-book with our unique Google optimized e-Paper software.
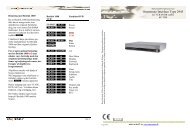
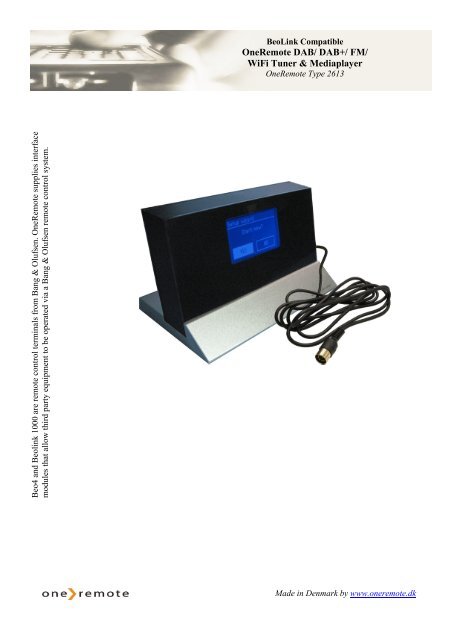
Beo4 and Beolink 1000 are remote control terminals from Bang & Olufsen. <strong>OneRemote</strong> supplies interface<br />
modules that allow third party equipment to be operated via a Bang & Olufsen remote control system.<br />
BeoLink Compatible<br />
<strong>OneRemote</strong> <strong>DAB</strong>/ <strong>DAB</strong>+/ <strong>FM</strong>/<br />
<strong>WiFi</strong> <strong>Tuner</strong> & <strong>Mediaplayer</strong><br />
<strong>OneRemote</strong> Type 2613<br />
Made in Denmark by www.oneremote.dk
Control with Beo4 and Beo5<br />
Select by pressing q<br />
<strong>DAB</strong>/ <strong>FM</strong>/ Internet<br />
Select oo<br />
Display maneuvering A/ S<br />
F/D<br />
Info oD<br />
Main Menu E*1<br />
(alternatively) o F<br />
Play/ pause Q*1<br />
(alternatively) oq<br />
Previous W*1<br />
(alternatively) o A<br />
Next R*1<br />
(alternatively) o S<br />
By selecting the correct source on the<br />
Bang & Olufsen remote control<br />
terminal, the <strong>DAB</strong>/<strong>FM</strong>/<strong>WiFi</strong> tuner is<br />
automatically turned on.<br />
*1<br />
The coloured button functionality is<br />
always available in the Direct Mode,<br />
but not in the CableLink Mode in all<br />
Bang & Olufsen equipment.<br />
*2<br />
Not all Bang & Olufsen equipment<br />
responds to numeric commands.<br />
Using the Direct Mode option is<br />
recommended.<br />
2<br />
Control with Beolink 1000<br />
Select by pressing q<br />
<strong>DAB</strong>/ <strong>FM</strong>/ Internet<br />
Select pp<br />
Display maneuvering Z/ X<br />
C/V<br />
Info pC<br />
Main Menu pV<br />
Play/ pause pq<br />
Previous pZ<br />
Next pX<br />
Setting Favorite Stations<br />
Set Favorite 1 *2 O1<br />
Set Favorite 2 *2 O2<br />
Set Favorite 3 *2 O 3<br />
Set Favorite 4 *2 O 4<br />
Set Favorite 5 *2 O 5<br />
Set Favorite 6 *2 O 6<br />
Set Favorite 7 *2 O 7<br />
Set Favorite 8 *2 O 8<br />
Set Favorite 9 *2 O 9<br />
Set Favorite10*2 O 0
List of Contents<br />
Getting Started .................................................................................... page 4<br />
Direct Mode or CableLink Mode ......................................................... page 4<br />
Examples of Bang & Olufsen Set Ups ................................................. page 5<br />
Setup Wizard........................................................................................ page 6<br />
Access Wireless Network .................................................................... page 8<br />
Local Internet Stations ......................................................................... page 8<br />
Select an Internet Station ..................................................................... page 9<br />
New Internet Stations........................................................................... page 9<br />
Connecting to Wired Network ............................................................. page 10<br />
Shift to Wireless Network.................................................................... page 10<br />
Internet Radio....................................................................................... page 11<br />
Select a Station Podcasting .................................................................. page 11<br />
Access Code......................................................................................... page 12<br />
Add Stations to ’My favourites’........................................................... page 13<br />
Add Stations to ’My added stations’ .................................................... page 14<br />
Changing the Station Information ........................................................ page 15<br />
Music Player Mode .............................................................................. page 16<br />
Windows Media Player 11 Shared Media Set Up ................................ page 16<br />
Play PC-stored Music on the <strong>OneRemote</strong> <strong>Tuner</strong>.................................. page 18<br />
Music Player Mode .............................................................................. page 19<br />
<strong>DAB</strong> Mode........................................................................................... page 20<br />
<strong>FM</strong> Mode ............................................................................................. page 22<br />
General Operation................................................................................ page 23<br />
System Settings.................................................................................... page 24<br />
Networking .......................................................................................... page 24<br />
Time/Date Setting ................................................................................ page 24<br />
Language Setting.................................................................................. page 25<br />
Software Updating ............................................................................... page 25<br />
Start the Setup Wizard ......................................................................... page 26<br />
View the SW Version and the <strong>Tuner</strong> ID .............................................. page 26<br />
Set Up Media Sharing in the MAC OS ................................................ page 27<br />
Troubleshooting ................................................................................... page 28<br />
Connection to Bang & Olufsen Equipment.......................................... page 29<br />
Option Programming............................................................................ page 30<br />
Source and Option Selection................................................................ page 31<br />
3
Getting Started<br />
This <strong>OneRemote</strong> <strong>DAB</strong>/<strong>FM</strong>/<strong>WiFi</strong> tuner has been re-designed for operation in a<br />
Bang & Olufsen remote control system; allowing full control with a Bang & Olufsen<br />
remote control terminal either directly or via connection to Bang & Olufsen equipment.<br />
Thus the tuner is BeoLink compatible.<br />
If the Bang & Olufsen system comprises one or more linkrooms in a BeoLink System<br />
sound may be distributed to these rooms, and in some cases – see below – the tuner might<br />
even be controlled from there.<br />
Direct Mode or CableLink Mode<br />
The <strong>OneRemote</strong> <strong>DAB</strong>/<strong>FM</strong>/<strong>WiFi</strong> tuner is always connected to Bang & Olufsen equipment<br />
with the 7-pin DIN-cable, but through option programming it may be controlled as<br />
follows:<br />
1. Via the tuner’s built in IR-receiver,”Direct Mode”<br />
Direct Mode is used when connection to an input with control data is not<br />
possible.<br />
2. Via the cable connected Bang & Olufsen equipment,”CableLink Mode”<br />
CableLink Mode is used when connection to an input with control data is<br />
possible.<br />
Factory Settings<br />
The factory setting is for control is “Direct Mode”.<br />
The factory setting for input socket and selected source is:<br />
• Beo4 og Beo5 N.MUSIC, A.MEM2 or.TAPE2<br />
• Beolink 1000 SHIFT A.TAPE<br />
If the <strong>OneRemote</strong> <strong>DAB</strong>/<strong>FM</strong>/<strong>WiFi</strong> tuner is connected to a different input, the option<br />
should be programmed accordingly. See page 31 for Option Programming<br />
Installation<br />
• Select option and complete option programming, if required<br />
• Connect the tuner to the correct input socket<br />
• Connect power supply and antenna to the tuner<br />
• Select the source on the remote control terminal<br />
By selecting the correct source on the Bang & Olufsen remote control<br />
terminal, the <strong>DAB</strong>/<strong>FM</strong>/<strong>WiFi</strong> tuner is automatically turned on.<br />
4
Examples of Bang & Olufsen Set Ups<br />
Set Up for Direct Control<br />
The Bang & Olufsen remote terminal controls both the<br />
<strong>OneRemote</strong> <strong>DAB</strong>/<strong>FM</strong>/<strong>WiFi</strong> tuner and the Bang & Olufsen<br />
audio equipment..<br />
When selecting the tuner connected source with the Bang<br />
& Olufsen remote the corresponding input socket is<br />
opened, and the tuner is turned on simultaneously.<br />
The tuner can be listened to in any connected linkroom,<br />
but not controlled from there.<br />
Set Up for CableLink Control<br />
The <strong>OneRemote</strong> tuner is connected as an AV source to an<br />
AV input in a Bang & Olufsen TV.<br />
When selecting the tuner connected source with the Bang<br />
& Olufsen remote terminal the corresponding AV input<br />
socket is opened, control data transmitted via the<br />
connection cable and the tuner is turned on.<br />
A <strong>OneRemote</strong> <strong>DAB</strong>/<strong>FM</strong>/<strong>WiFi</strong> tuner connected via<br />
CableLink can be controlled from any connected<br />
linkroom.<br />
Set Up for CableLink Control<br />
The Bang & Olufsen remote terminal controls the <strong>OneRemote</strong><br />
<strong>DAB</strong>/<strong>FM</strong> /<strong>WiFi</strong> tuner via the Bang & Olufsen audio equipment<br />
that is transmitting control data via the 7-pin DIN connection<br />
cable.<br />
When selecting the tuner connected source with the Bang &<br />
Olufsen remote terminal the corresponding input socket is<br />
opened, control data transmitted via the connection cable and<br />
the tuner is turned on.<br />
Control data is only available via some input sockets in<br />
various Bang & Olufsen audio equipment.<br />
A <strong>OneRemote</strong> <strong>DAB</strong>/<strong>FM</strong>/<strong>WiFi</strong> tuner connected via CableLink<br />
can be controlled from any connected linkroom.<br />
Set Up for Direct Control<br />
A <strong>OneRemote</strong> <strong>DAB</strong>/<strong>FM</strong> /<strong>WiFi</strong> tuner may be connected to any<br />
TV, and with a tuner in each room individual program<br />
selection is possible.<br />
5
Setup Wizard<br />
When the tuner is turned on initially,<br />
“Setup wizard” is being displayed after<br />
a few seconds.<br />
The Setup Wizard is a guide through<br />
the basic set up of the tuner.<br />
Prior to the initial power up the tuner should be connected to the Bang & Olufsen<br />
equipment and programmed correctly. See page 4.<br />
Select”YES” by using A/ S and confirm by pressing OO.<br />
Select 12 or 24 hour format and press<br />
OO.<br />
Select automatic update via <strong>DAB</strong> or<br />
Network and press OO.<br />
Select correct time zone and press<br />
OO.<br />
Decide on automatic daylight saving<br />
change or not and pressOO.<br />
Select the correct WLAN region and<br />
press OO.<br />
Select the appropiate network SSID<br />
and press OO.<br />
If the selected network is not<br />
encrypted the tuner automatically<br />
connects to the internet and display:<br />
6
With an encrypted network the<br />
required password has to be entered<br />
via the displayed entry screen.<br />
Use A/ S to move the<br />
cursor to the desired character and<br />
select by pressing OO.<br />
NOTE! WEP/WPA<br />
passwords are case sensitive!<br />
The entered password is stored<br />
permanently, and no re-entry is<br />
required.<br />
The correct password has been<br />
entered. Press OO to exit<br />
the setup wizard.<br />
BKSP is backspace.<br />
OK enters the written password.<br />
CANCEL returns to latest entry.<br />
7
Access Wireless Network<br />
With the Setup Wizard completed<br />
select and press<br />
OO.<br />
Various internet sources are available:<br />
If is displayed:<br />
- Check the router.<br />
- Relocate the tuner to<br />
obtain a better signal.<br />
- Check the entered password.<br />
Local Internet Stations<br />
Local stations are only available if the<br />
tuner has accessed the local area<br />
network.<br />
Select and<br />
confirm by pressingOO.<br />
Move the cursor to the desired line<br />
and confirm by pressing OO.<br />
8
Select an Internet Station<br />
Select and confirm by<br />
pressing OO.<br />
Select and confirm by<br />
pressing OO.<br />
Select the desired broadcasting<br />
country and confirm by pressing<br />
OO.<br />
Select the genre and confirm by<br />
pressing OO.<br />
Note! Not all stations broadcast around the<br />
clock. Thus they might not always be available.<br />
Some stations have on-demand services<br />
allowing for programs to be re-broadcasted.<br />
New Internet Stations<br />
New stations are added now and then, and the tuner indicates, when the list has been<br />
updated. The update is automatic and ensures that the latest stations added are listed.<br />
9
Connecting to Wired Network<br />
Connect LAN cable to the tuner’s<br />
LAN socket.<br />
Open by pressing<br />
OO.<br />
Move cursor to<br />
and select by pressing OO.<br />
Select and confirm by<br />
pressing OO.<br />
Move cursor to Manual settings><br />
and confirm by pressing OO.<br />
Select and then<br />
and confirm by<br />
pressing OO.<br />
Connection of the tuner to the wired<br />
LAN has been completed.<br />
Shift to Wireless Network<br />
Refer to above display<br />
:<br />
Select by pressing<br />
OO.<br />
Select by<br />
pressingOO.<br />
Enter the name of the router.<br />
Access to the wireless network has<br />
been established.<br />
10
Internet Radio<br />
When in <br />
press q repeatedly until<br />
is displayed.<br />
If the tuner has been connected<br />
correctly the is<br />
displayed:<br />
If is displayed:<br />
- Check the router.<br />
- Check the network cabling.<br />
Select a Station Podcasting<br />
When connected to the network the<br />
tuner can deliver podcasts.<br />
From the menu<br />
select and confirm by<br />
pressing OO.<br />
Select:<br />
- Location<br />
- Genre<br />
- Search podcasts<br />
Confirm by pressing OO.<br />
11
Access Code<br />
With the tuner connected to a network<br />
an access code and FAQ may be<br />
displayed.<br />
Select and then<br />
<br />
Select and confirm by<br />
pressing OO. The tuner’s ID is<br />
displayed.<br />
Select and confirm by<br />
pressing<br />
OO.<br />
12
Add Stations to ’My favourites’<br />
Visit the website: www.wifiradio-frontier.com<br />
Click on ”Register here” and enter the tuner’s access code, see page 12<br />
Creating an account is free of charge and allows for the use of various other features and<br />
services offered by the Frontier Internet Radio Portal.<br />
Stations can be searched for on the internet and added to .<br />
Selected stations are available on the list immediately, and they are<br />
permanently stored in memory, even when the tuner has been re-booted.<br />
13
Add Stations to ’My added stations’<br />
Visit the website: www.wifiradio-frontier.com<br />
Login with your free membership password; see the previous page where login is<br />
described.<br />
Stations can be searched for on the internet and added to .<br />
Selected stations are available on the list immediately, and they<br />
are permanently stored in memory, even when the tuner has been re-booted.<br />
14
Changing the Station Information<br />
When playing an internet station the second line of the tuner’s display contains a variety<br />
of information. Press oD repeatedly to go through all available info being<br />
displayed.<br />
Station Description<br />
Scrolling text information is being displayed. It<br />
may comprise information on music titles or other<br />
program details provided by the broadcaster.<br />
Program Description<br />
This description is provided by the station or by<br />
the broadcaster.<br />
Station Reliability<br />
This information indicates the quality of the<br />
received signal.<br />
Broadcasting Information<br />
The digital bit rate and sampling mode are<br />
indicated.<br />
Playback Buffer<br />
This displays the playback buffer strength of the<br />
current station.<br />
Date<br />
The displayed date is provided by the broadcaster<br />
and is very accurate.<br />
15
Music Player Mode<br />
NOTE! Before starting to play music read through the following<br />
pages thoroughly.<br />
NOTE! The network’s firewall has to allow for the operation of a Windows<br />
Media Player network sharing device.<br />
1. On the network PC select Control Panel > Security<br />
center>Windows Firewall<br />
2. Select “Exception”<br />
3. Mark ”Windows Media Player Network Sharing Service”<br />
Music Player Step 1.<br />
Windows Media Player 11 Shared Media Set Up<br />
With the Windows Media Player 11 installed and the tuner connected to the network<br />
sharing music may be established. The tuner is now able to play the music that is stored<br />
on the PC.<br />
The music sharing set up:<br />
Open the Windows Media Player and<br />
click on the little arrow below<br />
Library.<br />
Then click on Media Sharing.<br />
16
In the Media Sharing dialog box<br />
select the Share my Media check<br />
box.<br />
Check the”Share my media to” box, click Radio *1 and then allow. The selected device<br />
shows a green tick. Click OK.<br />
If the desired device is not listed do as follows:<br />
- From the”Media Player” menu in the tuner, selec ”UPNP Servers”, and a list of<br />
available computers appears.<br />
- Select the desired computer.<br />
This tuner appears in the list. To ensure that this IS the tuner, right click on the device and<br />
select”properties”: the tuner’s MAC-address is shown.<br />
*1 This tuner is named ”Jupiter 6.2”<br />
in the Media Player.<br />
17
Music Player Step 2.<br />
Play PC-stored Music on the <strong>OneRemote</strong> <strong>Tuner</strong><br />
Having installed and configured the tuner and the Windows Media Player music may<br />
now be played via the wireless connection:<br />
1. Select Shared media in the tuner’s Media Player menu.<br />
2. Select the computer with the desired music files.<br />
3. Select category for the music files on the computer using the following criteria:<br />
All music, Genre, All Artists, Contributing Artists, Album artists, Composers,<br />
Albums, Playlists, Folders eller Star Ratings.<br />
Press OO to select.<br />
4. Select the tracks to be played and press OO.<br />
18
Music Player Mode<br />
Play Shared Media<br />
Press qrepeatedly untilis displayed or go through the<br />
Main Menu.<br />
Point at and<br />
confirm by pressing OO. Follow<br />
display prompting to select music to<br />
be played.<br />
Repeat Play Mode<br />
In <br />
may be selcted and confirmed by<br />
pressing OO. The music is then<br />
repeated continuously.<br />
Shuffle Play Mode<br />
In <br />
may be selected and confirmed by<br />
pressing OO. The music is then<br />
played randomly.<br />
19
<strong>DAB</strong> Mode<br />
<strong>DAB</strong> Radio Stations<br />
Press q repeatedly until is displayed or go through the<br />
Maun Menu.<br />
Initially the tuner makes a full scan and stores<br />
in memory the stations listed alphabetically.<br />
After the scan has been completed<br />
any program may be pointed at and<br />
selected by pressing OO.<br />
<strong>DAB</strong> Manual Tune<br />
Point at in the<br />
and confirm by<br />
pressing OO.<br />
Point at the desired frequency.<br />
Start tuning by pressing OO.<br />
<strong>DAB</strong> Prune Invalid<br />
Point at in the<br />
< <strong>DAB</strong> Menu> and select by<br />
pressing OO.<br />
Removal of invalid stations has to be<br />
confirmed.<br />
20
<strong>DAB</strong> - DRC (Dynamic Range Control)<br />
DRC allows for setting of the<br />
compression level for radio stations<br />
thus eliminating differences in the<br />
dynamic range or sound level.<br />
Point at in the < <strong>DAB</strong><br />
menu> , select the desired level and<br />
confirm by pressing OO.<br />
<strong>DAB</strong> Station Order<br />
Point at in the<br />
< <strong>DAB</strong> menu>, select the desired<br />
order and confirm by pressing<br />
OO.<br />
Station order Description<br />
Alphanumeric Display all stations in alphanumeric order.<br />
Ensemble Last active stations prior to inactive stations.<br />
Valid Remove inactive stations from the station<br />
list.<br />
21
<strong>FM</strong> Mode<br />
<strong>FM</strong> – General Operation<br />
Press qrepeatedly until<br />
is displayed or go<br />
through the .<br />
Initially the tuner starts at the lower frequency of the <strong>FM</strong> range, 87.50 MHz. Having<br />
tuned stations the last station listened to is always displayed.<br />
<strong>FM</strong> – Scan Setting<br />
Point at in the < <strong>FM</strong><br />
menu> and start tuning by pressing<br />
OO.<br />
<strong>FM</strong> – Audio Setting<br />
Point at in the < <strong>FM</strong><br />
menu>, select stereo or mono and<br />
confirm by pressing OO.<br />
22
General Operation<br />
Main Menu<br />
Press E or oF repeatedly,<br />
point at and confirm by pressing OO.<br />
Setting Station Presets<br />
The tuner memory stores 10 Internet<br />
stations, 10 <strong>FM</strong> stations and 10 <strong>DAB</strong><br />
stations.<br />
To store the actual station press O<br />
+ the desired preset number.<br />
Selecting a Preset Station<br />
Press q repeatedly to select <strong>DAB</strong>, <strong>FM</strong> or Internet radio.<br />
Then press the desired digit directly.<br />
Setting the Clock<br />
Ingo to on to and<br />
confirm by pressingOO.<br />
Set each value and confirm by<br />
pressing OO .<br />
Sleep Function<br />
This automatic turn off does not make<br />
sense in a Bang & Olufsen set up, as<br />
only the tuner is turned off.<br />
With being displayed the<br />
station may be selected by pressing the number<br />
of the preset directly.<br />
Note! Not all Bang & Olufsen equipment transfers digits to<br />
all inputs. See the tables “Source & Option Selection”below.<br />
Direct Mode may be used alternatively.<br />
23
System Settings<br />
Networking<br />
Learn how to:<br />
- Relocate the tuner to another location.<br />
- Re-scan routers or manually configure the<br />
network parameters.<br />
- View MAC-address and WLAN<br />
region……….View settings.<br />
- Swap between wireless and cabled<br />
network etc.<br />
Point at then Systems settings> then <br />
and select by pressing OO.<br />
Time/Date Setting, Manually<br />
Point at then then< Time/ Date> and<br />
select by pressing<br />
OO.<br />
Time/Date Setting, Automatically<br />
Point at then and select and confirm by<br />
pressing OO.<br />
Hour Format Setting<br />
Point at then and select and confirm by<br />
pressing OO.<br />
Timezone Setting<br />
Point at then and select and confirm by<br />
pressing OO.<br />
24
Daylight Saving<br />
Point at then<br />
and select and<br />
confirm by pressing OO.<br />
Select Language<br />
Point at then<br />
and select and confirm<br />
by pressing OO.<br />
Factory Resetting<br />
Point at then<br />
and select by<br />
pressing OO.<br />
Point at and confirm by<br />
pressing OO.<br />
Software Updating<br />
Point at then<br />
select and<br />
confirm by pressing OO.<br />
Updating may be set to take place<br />
periodically or now.<br />
After updating is being displayed, indicating<br />
that the tuner operates with the most<br />
recent software version available.<br />
NOTE! Do not switch off the tuner<br />
while updating takes place thus<br />
avoiding permanent damage.<br />
25
Start the Setup Wizard<br />
Point at and select<br />
by pressing<br />
OO.<br />
To re-start the tuner select <br />
and confirm by pressing OO.<br />
View SW Version and <strong>Tuner</strong> ID<br />
Point at then<br />
and select by pressing<br />
OO.<br />
The tuner’s software version and the<br />
ID are being displayed.<br />
This information may be requested<br />
when dealing with technical support<br />
issues.<br />
26
Setup Media Sharing in the MAC OS<br />
Using the tuner with a MAC requires Windows File Sharing software. MAC OS 9 and<br />
earlier versions of the OS require extra software to use Windows File Sharing, but MAC<br />
OS X 10.2 and later versions have Windows File Sharing built into the OS already.<br />
Setting Up Windows File Sharing on a MAC<br />
From the 'Dock' click on 'System Preferences'. From the 'System Preferences' window<br />
under the 'Internet &Network' section, click on 'Sharing'.<br />
From the 'Sharing’ window, do the following:<br />
1 Under the 'Services' section enable 'Personal File Sharing' and 'Windows<br />
Sharing'. To do this tick the corresponding boxes or click on 'Start' for each of<br />
these services.<br />
2 Under the 'Firewall' section switch off the firewall.<br />
3 Under the 'Internet’ section switch off 'Internet Sharing'.<br />
Setting Up User Account<br />
- From the 'System Preferences’ window in the 'System' section, click on 'Accounts'.<br />
Select an account and remember its 'Short Name' and password. The tuner is using this to<br />
connect to the MAC.<br />
Setting Up Directories<br />
- From the 'Dock' click on 'Finder'. From 'Finder' click on 'Applications’ and then<br />
‘Utilities'. Click on 'More Info' for 'Directory Access' and make sure that 'Read/Write' is<br />
enabled. Double-click on 'Directory Access' and enable the following:<br />
1 AppleTalk<br />
2 LDAPv3<br />
3 SLP<br />
4 SMB/CIFS<br />
- For 'SMB/CIFS' click on 'Configure' and select a workgroup.<br />
- Copy and paste the mp3 files to 'Documents' in the 'Finder' window.<br />
- Turn on 'AirPort' (wireless sharing).<br />
- Wait for a few minutes.<br />
In the 'Media Player’ > ‘Windows Shares' menu enter the MAC account’s ”short name”<br />
and password. The tuner may now be connected to the MAC.<br />
27
Troubleshooting<br />
If experiencing trouble with the tuner visit the help section on : www.wifiRadiofrontier.com.<br />
If experiencing trouble connection to a wireless network the following steps might resolve<br />
the problem:<br />
1. Check that a <strong>WiFi</strong> connected PC can access the Internet using the same network.<br />
2. Check that a DHCP server is available or that a static IP address has been configured<br />
on the tuner. A static IP address on the tuner may be configured by using the menu<br />
‘System setting -> Network ->Manual settings-> Wireless’ and the selecting ‘DHCP<br />
disable’.<br />
3. Check that the access point does not prohibit connection to particular MAC<br />
addresses. The tuner’s MAC address may be viewed by using the menu ‘System<br />
setting -> Network -> View settings-> MAC address’.<br />
4. With an encrypted network the correct key or password has to be entered into the<br />
tuner. Remember that the text-format keys are case sensitive. If, when attempting to<br />
connect to an encrypted network, the tuner displays ‘Wireless error’ followed by a 5digit<br />
number, then ensure that the correct password has been entered. If the problem<br />
persists, a check of the network configuration might be needed.<br />
5. If the tuner connects to the network successfully but can not play certain stations the<br />
reasons might be:<br />
a. The station is not broadcasting at this time of day, as it might be located in a<br />
different timezone.<br />
b. The station has reached the maximum allowed number of simultaneous<br />
listeners.<br />
c. The station is not broadcasting anymore.<br />
d. The link on the tuner is out of date.<br />
e. The Internet connection between the server and the tuner is slow. They are<br />
often countries apart!<br />
6. If the station can be played via a PC use the form at www.wifiRadio-frontier.com for<br />
notifycation enabling a change of the station data used by the tuner.<br />
28
Connection to Bang & Olufsen Equipment<br />
This <strong>OneRemote</strong> <strong>DAB</strong>/<strong>FM</strong>/<strong>WiFi</strong> tuner may be connected to any Bang & Olufsen<br />
BeoSound, BeoCenter, BeoMaster, BeoSystem or BeoVision TV and controlled with a<br />
Bang & Olufsen remote control terminal, but it may also be connected to equipment of<br />
any other brand and still be controlled with the Bang & Olufsen remote control terminal.<br />
Through the years Bang & Olufsen equipment has had input sockets added, removed and<br />
renamed. A newer Bang & Olufsen remote control has the button N.MUSIC, which is<br />
identical to SHIFT A.TAPE or A.TAPE2 on older remotes.<br />
Below tables are showing available input sockets and their designation on various Bang &<br />
Olufsen equipment. The tables below also show the source that has to be selected to open<br />
a given input.<br />
Thus with identified Bang & Olufsen equipment and the selected input socket the required<br />
option for the tuner to be operable may be determined. Some input sockets allow for the<br />
CableLink option to be selected, whereas most of the newer audio equipment requires the<br />
Direct Mode option to be used.<br />
The Direct Mode Option:<br />
The tuner is controlled directly with the Bang & Olufsen remote control terminal.<br />
Control from a linkroom is not possible, although the tuner may be listened to there.<br />
The CableLink Option:<br />
The tuner is controlled with the Bang & Olufsen remote control terminal through the<br />
connected Bang & Olufsen equipment sending control data via the connection cable. The<br />
tuner may be controlled from any linkroom too.<br />
The CableLink option allows for the tuner to be<br />
listened to and controlled from any linkroom.<br />
29<br />
The Direct Mode option allows for the tuner to be<br />
listened to but not controlled from any linkroom.<br />
The Direct Mode option works in any Bang & Olufsen set up, but the tuner’s IR receiver is not plasma safe.
Antenna Connection<br />
The <strong>OneRemote</strong> <strong>DAB</strong>/<strong>FM</strong>/<strong>WiFi</strong> tuner may be connected to any antenna picking up the<br />
<strong>FM</strong> and the <strong>DAB</strong> frequencies.<br />
If the <strong>FM</strong> signal strength is not sufficient the reception will be noisy.<br />
If the <strong>DAB</strong> signal strength is not sufficient the reception is varying from disturbing<br />
”bubbles” to complete quietness.<br />
Option Programming<br />
Option programming is required only, when installing the tuner. The programming is<br />
performed with a Bang & Olufsen remote control terminal by pressing a 5 button<br />
sequence within 4 seconds after powering up the tuner.<br />
When powering up the tuner the red control lights up for 4 seconds, and the programming<br />
has to take place before the control turns off. If not successful the operation may be<br />
repeated.<br />
Programming starts by pressing STOP and ends by pressing RECORD. All options have<br />
3 digits to be entered in between.<br />
Option 106 is entered like this:<br />
STOP – 1 – 0 – 6 – RECORD<br />
30
Source & Option Selection<br />
The following tables show the available input sockets in various Bang & Olufsen audio<br />
and video products, how to select them using a remote control terminal and what the<br />
corresponding option program of the One Remote <strong>DAB</strong>/<strong>FM</strong>/<strong>WiFi</strong> tuner should be.<br />
The <strong>OneRemote</strong> <strong>DAB</strong>/<strong>FM</strong>/<strong>WiFi</strong> tuner has to be programmed with the right option to<br />
operate correctly. See page 30.<br />
Input Socket Selected Source Direct CableLink Remarks<br />
Option Option<br />
BeoCenter 2 AUX-IN A.AUX<br />
SHIFT RADIO<br />
100 - *2<br />
Input Socket Selected Source Direct CableLink Remarks<br />
Option Option<br />
BeoSound 4 AUX A.AUX<br />
SHIFT RADIO<br />
100 - *2<br />
BeoSound 1<br />
BeoSound Century<br />
Input Socket Selected Source Direct CableLink Remarks<br />
Option Option<br />
AUX A.AUX<br />
SHIFT RADIO<br />
100 - *3<br />
AUX A.MEM,<br />
ATAPE<br />
102 - *3<br />
Input Socket Selected Source Direct CableLink Remarks<br />
Option Option<br />
AUX N.MUSIC<br />
A.MEM2<br />
SHIFT ATAPE<br />
103 - *3<br />
AUX N.RADIO<br />
PHONO<br />
106 - *3<br />
AUX A.AUX<br />
SHIFT RADIO<br />
100 - *3<br />
*1 Input with control data via cable<br />
*2 RCA in/ out<br />
*3 DIN in/ out<br />
*4 No numeric data via cable. The Direct Mode option is recommended as an alternative.<br />
31
BeoSound 9000<br />
BeoSound 3000<br />
BeoSound 3200<br />
BeoSound Ouverture<br />
BeoSystem 2500<br />
Input Socket Selected Source Direct CableLink Remarks<br />
Option Option<br />
AUX A.AUX<br />
SHIFT RADIO<br />
100 - *3<br />
AUX A.MEM<br />
ATAPE<br />
102 - *3<br />
Input Socket Selected Source Direct CableLink Remarks<br />
Option Option<br />
AUX A.AUX<br />
SHIFT RADIO<br />
100 - *3<br />
AUX A.MEM<br />
ATAPE<br />
102 - *3<br />
AUX N.MUSIC<br />
A.MEM2<br />
SHIFT ATAPE<br />
103 - *3<br />
AUX N.RADIO<br />
PHONO<br />
106 - *3<br />
Input Socket Selected Source Direct CableLink Remarks<br />
Option Option<br />
AUX N.MUSIC<br />
A.MEM2<br />
SHIFT ATAPE<br />
103 302 *1 *4<br />
AUX N.RADIO<br />
PHONO<br />
106 206 *1 *4<br />
AUX A.AUX<br />
SHIFT RADIO<br />
100 - *1 *4<br />
Input Socket Selected Source Direct CableLink Remarks<br />
Option Option<br />
AUX A.AUX<br />
SHIFT RADIO<br />
100 - *1 *4<br />
AUX N.MUSIC<br />
A.MEM2<br />
SHIFT ATAPE<br />
103 302 *1 *4<br />
AUX N.RADIO<br />
PHONO<br />
106 206 *1 *4<br />
*1 Input with control data via cable<br />
*2 RCA in/ out<br />
*3 DIN in/ out<br />
*4 No numeric data via cable. The Direct Mode option is recommended as an alternative.<br />
32
BeoCenter 2300<br />
BeoMaster 3500<br />
BeoMaster 4500<br />
BeoMaster 6500<br />
BeoMaster 7000<br />
BeoMaster 3300<br />
BeoMaster 5500<br />
Input Socket Selected Source Direct CableLink Remarks<br />
Option Option<br />
AUX A.AUX<br />
SHIFT RADIO<br />
100 - *1 *4<br />
AUX A.MEM<br />
ATAPE<br />
102 302 *1 *4<br />
AUX N.MUSIC<br />
A.MEM2<br />
SHIFT ATAPE<br />
103 302 *1 *4<br />
AUX N.RADIO<br />
PHONO<br />
106 206 *1 *4<br />
AUX V.TAPE<br />
V.MEM<br />
110 - *5<br />
AUX DTV – SAT 116 - *5<br />
AUX DVD 114 - *5<br />
Input Socket Selected Source Direct CableLink Remarks<br />
Option Option<br />
TP1<br />
A.MEM<br />
ATAPE<br />
102 302 *1<br />
CD CD 104 204 *1<br />
TP2<br />
N.MUSIC<br />
A.MEM2<br />
SHIFT ATAPE<br />
103 302 *1<br />
PHONO N.RADIO<br />
PHONO<br />
106 206 *1<br />
AUX A.AUX 100 -<br />
Input Socket Selected Source Direct CableLink Remarks<br />
Option Option<br />
TP A.MEM<br />
A.TAPE<br />
102 302 *1 *4<br />
CD CD 104 204 *1 *4<br />
*1 Input with control data via cable<br />
*2 RCA in/ out<br />
*3 DIN in/ out<br />
*4 No numeric data via cable. The Direct Mode option is recommended as an alternative.<br />
*5 Audiomaster in option2<br />
33
BeoCenter 8000<br />
BeoCenter 8500<br />
BeoCenter 9000<br />
BeoCenter 9500<br />
BeoCenter 9300<br />
Input Socket Selected Source Direct CableLink Remarks<br />
Option Option<br />
TAPE2 N.MUSIC<br />
A.MEM2<br />
SHIFT A.TAPE<br />
103 302 *1 *4<br />
Input Socket Selected Source Direct CableLink Remarks<br />
Option Option<br />
TAPE2 N.MUSIC<br />
A.MEM2<br />
SHIFT A.TAPE<br />
103 302 *1 *4<br />
AUX A.AUX 100 -<br />
Input Socket Selected Source Direct CableLink Remarks<br />
Option Option<br />
PHONO N.RADIO<br />
PHONO<br />
106 206 *1 *4<br />
TAPE2 N.MUSIC<br />
A.MEM2<br />
SHIFT A.TAPE<br />
103 302 *1 *4<br />
AUX A.AUX 100 -<br />
*1 Input with control data via cable<br />
*2 RCA in/ out<br />
*3 DIN in/ out<br />
*4 No numeric data via cable. The Direct Mode option is recommended as an alternative.<br />
34
LX 2502<br />
LX 2802<br />
L4500<br />
LS 4500<br />
LX 4500<br />
L5000<br />
LS 5000<br />
LX 5000<br />
L5500<br />
LS 5500<br />
LX 5500<br />
L6000<br />
LS 6000<br />
LX 6000<br />
LE 6000<br />
MX 1500<br />
MX 3000<br />
MX 3500<br />
MX 4000<br />
MX 4002<br />
MX 4500<br />
MX 5000<br />
MX 5500<br />
ME 6000<br />
MS 6000<br />
MX 6000<br />
MX 7000<br />
MX 4200<br />
MX 8000<br />
AVANT all models<br />
All newer TV-models may<br />
be connected via the AV<br />
input sockets as well.<br />
*9 connection to an AV input on<br />
the TV using the <strong>OneRemote</strong><br />
Adaptor, type 39207496.<br />
Check the TV user guide for<br />
setting up the AV inputs.<br />
Input<br />
Socket<br />
Scart<br />
AV1<br />
AV2<br />
….<br />
Not decoder<br />
Socket.<br />
Selected Source Direct CableLink Remarks<br />
Option Option<br />
V.MEM<br />
V.TAPE<br />
110 410 *9<br />
V.MEM2<br />
V.TAPE2<br />
SHIFT V.TAPE<br />
110 410 *9<br />
DTV<br />
SAT<br />
116 416 *9<br />
V.AUX 112 412 *9<br />
DVD 114 414 *9<br />
35
2613u1uk<br />
36