Owner's Manual Owner's Manual - Spectrum Industries, Inc.
Owner's Manual Owner's Manual - Spectrum Industries, Inc.
Owner's Manual Owner's Manual - Spectrum Industries, Inc.

You also want an ePaper? Increase the reach of your titles
YUMPU automatically turns print PDFs into web optimized ePapers that Google loves.
Left-Hand<br />
Drawer<br />
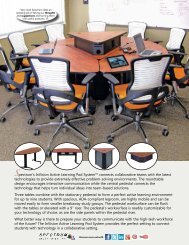
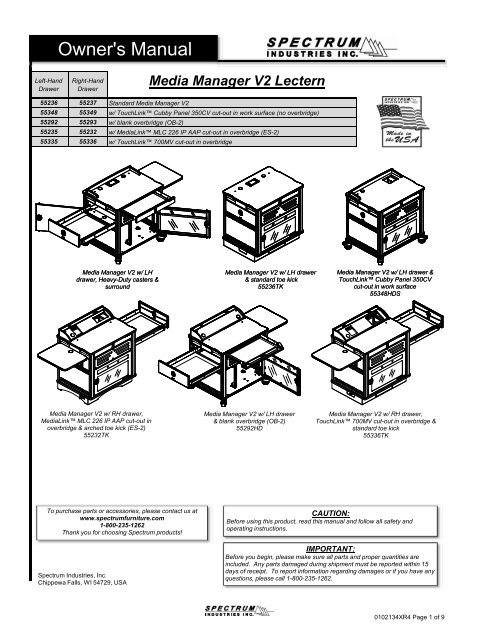
<strong>Owner's</strong> <strong>Manual</strong><br />
Right-Hand<br />
Drawer<br />
55236 55237<br />
55348 55349<br />
55292 55293<br />
55235 55232<br />
55335 55336<br />
Media Manager V2 Lectern<br />
Standard Media Manager V2<br />
w/ TouchLink Cubby Panel 350CV cut-out in work surface (no overbridge)<br />
w/ blank overbridge (OB-2)<br />
w/ MediaLink MLC 226 IP AAP cut-out in overbridge (ES-2)<br />
w/ TouchLink 700MV cut-out in overbridge<br />
Media Manager V2 w/ LH<br />
drawer, Heavy-Duty casters &<br />
surround<br />
Media Manager V2 w/ RH drawer,<br />
MediaLink MLC 226 IP AAP cut-out in<br />
overbridge & arched toe kick (ES-2)<br />
55232TK<br />
To purchase parts or accessories, please contact us at<br />
www.spectrumfurniture.com<br />
1-800-235-1262<br />
Thank you for choosing <strong>Spectrum</strong> products!<br />
<strong>Spectrum</strong> <strong>Industries</strong>, <strong>Inc</strong>.<br />
Chippewa Falls, WI 54729, USA<br />
Media Manager V2 w/ LH drawer<br />
& standard toe kick<br />
55236TK<br />
Media Manager V2 w/ LH drawer<br />
& blank overbridge (OB-2)<br />
55292HD<br />
Media Manager V2 w/ LH drawer &<br />
TouchLink Cubby Panel 350CV<br />
cut-out in work surface<br />
55348HDS<br />
Media Manager V2 w/ RH drawer,<br />
TouchLink 700MV cut-out in overbridge &<br />
standard toe kick<br />
55336TK<br />
CAUTION:<br />
Before using this product, read this manual and follow all safety and<br />
operating instructions.<br />
IMPORTANT:<br />
Before you begin, please make sure all parts and proper quantities are<br />
included. Any parts damaged during shipment must be reported within 15<br />
days of receipt. To report information regarding damages or if you have any<br />
questions, please call 1-800-235-1262.<br />
0102134XR4 Page 1 of 9
● Read this owners manual before assembly or operation<br />
Safety Assembly / Setup<br />
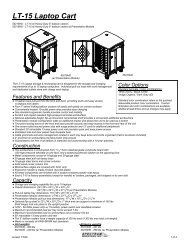
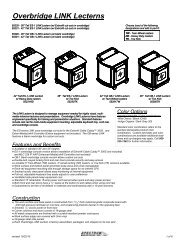
Quick-Release Door Hinge Operation<br />
Tools Required:<br />
Phillips Head<br />
Screwdriver<br />
A. To remove door, pull pull down the quick-release quick-release lever as shown in Figure 1A while removing the door.<br />
B. To re-attach the door, pull down the quick-release lever while while inserting the door hinge pins into into the pin holes. Figure 1. 1.<br />
Release the lever when the upper hinge pin is aligned aligned with with the upper hinge pin hole-this will secure the door.<br />
To raise<br />
handle-side<br />
of door<br />
Figure 1B<br />
Acorn Nut<br />
Lower Hinge<br />
Pin Hole<br />
Upper Hinge<br />
Pin Hole<br />
Upper hinge pin<br />
Quick-Release<br />
Lever Lever<br />
Bottom of Door<br />
To lower<br />
handle-side<br />
of door<br />
Lower<br />
hinge pin<br />
Figure 1A<br />
Door<br />
Figure 1<br />
Note: If the door appears to be misaligned, a slight adjustment can<br />
be made to the bottom hinge-side of the door. Figure 1B.<br />
1. Using the quick-release lever, remove the door.<br />
2. Slightly loosen the acorn nut on the bottom corner of the door<br />
with a 3/8" or adjustable wrench and phillips screwdriver.<br />
3. Reposition the acorn nut and screw as required (repositioning<br />
the acorn nut toward the rear of the door will lift the handleside<br />
of the door upward.)<br />
4. After adjustment, be sure the nut is tightened securely. Reattach<br />
door and check alignment. Repeat this procedure if<br />
necessary.<br />
0102134XR4 Page 2 of 9
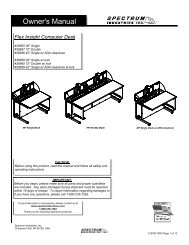
Changing Cord Reel Position<br />
A. Remove all equipment from unit.<br />
B. Lock all four casters. Carefully tip unit on its back. This may require three to four people.<br />
C. Remove the screws from the cord reel mounting bracket. See Figure 2.<br />
D. Place cord reel/bracket assembly in the new position and route the power cord through the grommet.<br />
E. Align the mounting holes and re-attach the cord reel/bracket assembly with the screws and tighten securely.<br />
F. Carefully tip the unit back upright.<br />
Cord Reel<br />
Remove<br />
Screws<br />
New Cord Reel<br />
position<br />
Grommet Hole<br />
Figure 2<br />
0102134XR4 Page 3 of 9
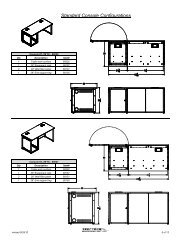
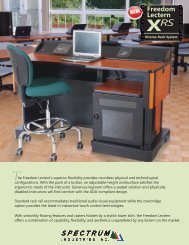
Changing Rack-Rail Position Position<br />
A. A. Rails can be mounted in an inner or outer position (for (for clearance of larger knobs and plugs.) To move,<br />
unscrew unscrew the two mounting screws on each rail and reattach in the new position. Figure 3A.<br />
B. To move the rack rails rails from the left or right mounting mounting positions, remove the 1/4-20 x 5/8" 5/8" PHM screws<br />
attaching the rack rails/brackets rails/brackets as shown in Figure 3B. 3B.<br />
C. Move the rack rails/brackets rails/brackets into into the new new position and reattach with the screws.<br />
Inner rack rail<br />
position<br />
Outer Rack<br />
Rail position<br />
Figure 3A<br />
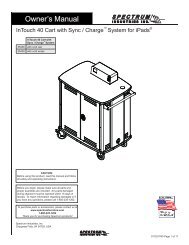
Floor Anchoring (Toe Kick models only)<br />
1/4-20 x 5/8"<br />
PHM Screws<br />
Left position<br />
Right position<br />
Left position<br />
Figure 3B<br />
Right position<br />
A. If your Media Manager is equipped with a toe-kick, and you wish to attach it to the floor, the toe-kick will need to be detached from the<br />
lectern. To detach, remove the (4) 1/4-20 x 35mm JC bolts (one on each corner) from inside the lectern.<br />
B. Carefully lift the lectern off the toe-kick. This will require several people. Figure 4.<br />
C. Determine and locate the toe-kick into its final position on the floor and mark the (4) mounting hole locations on the floor.<br />
(The toe-kick mounting holes are approximately 1/2" dia.)<br />
D. Drill holes into the floor and anchor the toe-kick with appropriate fasteners.<br />
E. Carefully lift the lectern back onto the toe-kick and align the (4) mounting holes.<br />
F. Re-attach the lectern to the toe-kick with the previously removed JC bolts.<br />
Note: (4) fasteners are req'd to<br />
anchor toe-kick to floor.<br />
Figure 4<br />
Lectern<br />
1/4-20 x 35mm<br />
JC bolts<br />
(4) req'd<br />
Toe Kick<br />
0102134XR4 Page 4 of 9
Construction<br />
Capacity<br />
Technical Specs<br />
● The work surface and base panel are constructed from 11 ● The work surface and base panel are constructed from 1 / 16" thick industrial-grade composite board with<br />
.030 high-pressure laminate on one face, and a balancing phenolic backer on the opposing face<br />
● Metal components consist of 16-gauge and 20-gauge steel<br />
● 16-gauge steel doors and corner columns<br />
● Work surface edges are covered with 3mm vinyl<br />
● All metal components are finished with a scratch-resistant powder coat epoxy<br />
● Solid wood corner trim<br />
● Each Media Manager V2 Lectern is factory-assembled w/ casters, packaged, and shipped on its own skid<br />
1 / 16" thick industrial-grade composite board with<br />
.030 high-pressure laminate on one face, and a balancing phenolic backer on the opposing face<br />
● Metal components consist of 16-gauge and 20-gauge steel<br />
● 16-gauge steel doors and corner columns<br />
● Work surface edges are covered with 3mm vinyl<br />
● All metal components are finished with a scratch-resistant powder coat epoxy<br />
● Solid wood corner trim<br />
● Each Media Manager V2 Lectern is factory-assembled w/ casters, packaged, and shipped on its own skid<br />
● Overall dimensions: (See dimensioned drawings)<br />
● Storage drawer/keyboard tray is 283 / 4"W x 15"D x 3"H<br />
● Total internal area of 341 / 2"W x 25"D x 19"H<br />
● The CPU area is 12"W x 25"D<br />
● Standard rack rail provides 11RU<br />
● Pull-out locking document camera drawer is 2215 / 16"W x 2615 / 16"D (8" top to bottom clearance)<br />
● The standard flip-up document camera shelf is 237 / 16"W x 181 / 16"D x 1" thick, and can support a<br />
maximum of 150 lbs. Shelf hinges lock into place in the upright position<br />
● Rectangular work surface grommet is 71 / 4"W x 37 ● Overall dimensions: (See dimensioned drawings)<br />
● Storage drawer/keyboard tray is 28<br />
/ 8"D<br />
● The 4" Heavy-Duty (HD) casters have a weight capacity of 300 lbs each (1200 lbs max total unit weight)<br />
● Standard 15' retractable 15-amp cord reel w/ breaker and 12 ga cord<br />
● Meets or exceeds all ANSI-BIFMA test standards<br />
● Features and specifications subject to change without notice<br />
3 / 4"W x 15"D x 3"H<br />
● Total internal area of 341 / 2"W x 25"D x 19"H<br />
● The CPU area is 12"W x 25"D<br />
● Standard rack rail provides 11RU<br />
● Pull-out locking document camera drawer is 2215 / 16"W x 2615 / 16"D (8" top to bottom clearance)<br />
● The standard flip-up document camera shelf is 237 / 16"W x 181 / 16"D x 1" thick, and can support a<br />
maximum of 150 lbs. Shelf hinges lock into place in the upright position<br />
● Rectangular work surface grommet is 71 / 4"W x 37 / 8"D<br />
● The 4" Heavy-Duty (HD) casters have a weight capacity of 300 lbs each (1200 lbs max total unit weight)<br />
● Standard 15' retractable 15-amp cord reel w/ breaker and 12 ga cord<br />
● Meets or exceeds all ANSI-BIFMA test standards<br />
● Features and specifications subject to change without notice<br />
● Unit weights (nominal):<br />
w/ casters & surround - 254 lbs<br />
w/ toe kick & surround - 274 lbs<br />
w/ overbridge - 235 lbs<br />
● Shipping weights (nominal):<br />
w/ casters & surround - 334 lbs<br />
w/ toe kick & surround - 354 lbs<br />
w/ overbridge - 315 lbs<br />
4" Heavy-Duty caster<br />
(HD)<br />
Top View<br />
Media Manager Lectern Rack Rail<br />
(11 Rack-Units available)<br />
0102134XR4 Page 5 of 9
Left-Side View Cord Reel<br />
Left-Side View<br />
55236HDS<br />
Media Manager V2 w/ Heavy-Duty Casters & Surround<br />
Instructor-Side View<br />
(Shown with door removed)<br />
55236TKS<br />
Media Manager V2 w/ Toe Kick & Surround<br />
Instructor-Side View<br />
(Shown with door removed)<br />
Bottom View<br />
0102134XR4 Page 6 of 9
Custom-Cut Logo Panel<br />
(student-side)<br />
55241<br />
UL Listed Power/Communication Module<br />
w/ 9' power cord, two outlets, two data jacks, &<br />
adapter plate (standard models only)<br />
71 / 8"W x 35 / 8"D x 3 UL Listed Power/Communication Module<br />
w/ 9' power cord, two outlets, two data jacks, &<br />
adapter plate (standard models only)<br />
7 / 4"H<br />
99028<br />
1 / 8"W x 35 / 8"D x 3 / 4"H<br />
99028<br />
TouchLink 350CV cut-out<br />
cover plate<br />
7 1 / 2"W x 6 1 / 4"D (16-gauge steel)<br />
55350<br />
Flat Panel Monitor Arm<br />
95512 (for monitors weighing 4-14.5 lbs)<br />
95522 (for monitors weighing 9-24 lbs)<br />
95509 (for monitors weighing 12-29 lbs)<br />
7-Outlet Power Strip, insured<br />
w/surge protector, bracket, and 12' cord<br />
10"W x 2"D x 1 1 / 8"H<br />
99024<br />
Media Manager V2<br />
Rear Rack Rail Kit<br />
11RU<br />
55238<br />
Options<br />
Riser Podium<br />
18"W x 1713 Riser Podium<br />
18"W x 17 / 16"D<br />
95002<br />
13 / 16"D<br />
95002<br />
Power/Communication Module<br />
w/ 9' power cord, two outlets, & two data jacks<br />
71 / 8"W x 35 Power/Communication Module<br />
w/ 9' power cord, two outlets, & two data jacks<br />
7 / 8"D (standard models only)<br />
99003<br />
1 / 8"W x 35 / 8"D (standard models only)<br />
99003<br />
Cable Cubby 300S cut-out cover plate<br />
(overbridge models only)<br />
5 11 / 16"W x 7"D (20-gauge steel)<br />
96500<br />
Evo Flat Panel Monitor Arm<br />
95523 (for 15"-19" monitors weighing 6-13 lbs)<br />
95524 (for 19"-21" monitors weighing 13-21 lbs)<br />
6-Outlet Power Strip<br />
w/ 12' cord<br />
11 5 / 16"W x 1 1 / 16"D x 1 3 / 16"H<br />
99023<br />
Data Cord Reel<br />
w/ 14' CAT 5 cord & plugs<br />
99026<br />
2-Gang<br />
3-Gang<br />
4-Gang<br />
Extron® Controller Adapter Kit<br />
55239<br />
(can be configured for 2, 3,<br />
or 4-Gang controllers)<br />
Note: Note: This kit is for use with the<br />
MediaLink overbridge and should be<br />
ordered if anything less than a 5-Gang<br />
Extron® unit will be used.<br />
TouchLink 700MV cut-out cover plate<br />
(TouchLink 700MV overbridge models only)<br />
9 3 / 8"W x 6 7 / 16"D (16-gauge steel)<br />
55351<br />
Dual Flat Panel Monitor Arm<br />
23" max center-to-center distance<br />
(4-19 lbs per monitor)<br />
95516<br />
Replacement Key Set<br />
for 2-pt lock<br />
55142<br />
Non-Slip CPU Pad<br />
11"W x 23"D<br />
95518<br />
0102134XR4 Page 7 of 9
Rack-mount Accessories<br />
Locking Drawer (2RU)<br />
interior dims: 153 / 4"W x 1311 / 16"D x 27 Locking Drawer (2RU)<br />
interior dims: 15 / 8"H<br />
(25 lbs max load)<br />
97514<br />
3 / 4"W x 1311 / 16"D x 27 / 8"H<br />
(25 lbs max load)<br />
97514<br />
Locking File Drawer (8RU)<br />
includes file holder<br />
interior dims: 153 / 4"W x 139 / 16"D x 135 Locking File Drawer (8RU)<br />
includes file holder<br />
interior dims: 15 / 16"H<br />
(50 lbs max load)<br />
97515<br />
3 / 4"W x 139 / 16"D x 135 / 16"H<br />
(50 lbs max load)<br />
97515<br />
LT-4 Laptop Storage Unit (7RU)<br />
(stores 4 laptops horizontally)<br />
laptop tray dims:<br />
16 1 / 4"W x 20 1 / 2"D x 2 3 / 16"H<br />
97517<br />
Flexible Halogen Light (1RU)<br />
19"W x 2"D x 1 3 / 4"H<br />
99033<br />
Pull-Out Shelf (2RU)<br />
161 / 2"W x 173 Pull-Out Shelf (2RU)<br />
16 / 4"D<br />
(50 lbs max load)<br />
97505<br />
1 / 2"W x 173 / 4"D<br />
(50 lbs max load)<br />
97505<br />
Pull-Out Shelf (3RU)<br />
161 / 2"W x 213 Pull-Out Shelf (3RU)<br />
16 / 4"D<br />
(80 lbs max load)<br />
97503<br />
1 / 2"W x 213 / 4"D<br />
(80 lbs max load)<br />
97503<br />
Rack-Mount Blanks<br />
(fill (fills rack k spaces where h<br />
components are not needed)<br />
97516 - ( 1 / 2RU)<br />
97510 - (1RU)<br />
97511 - (2RU)<br />
97512 - (3RU)<br />
97513 - (4RU)<br />
9-Outlet Power Strip (1RU)<br />
19"W x 9"D x 1 3 / 4"H<br />
99021<br />
Cantilever Shelf (2RU)<br />
171 / 2"W x 18"D x 31 Cantilever Shelf (2RU)<br />
17 / 2"H<br />
(50 lbs max load)<br />
97504<br />
1 / 2"W x 18"D x 31 / 2"H<br />
(50 lbs max load)<br />
97504<br />
Cantilever Shelf (3RU)<br />
171 / 2"W x 18"D x 51 Cantilever Shelf (3RU)<br />
17 / 4"H<br />
(80 lbs max load)<br />
97502<br />
1 / 2"W x 18"D x 51 / 4"H<br />
(80 lbs max load)<br />
97502<br />
Wire Lace Kit<br />
3 lace straps included<br />
95517<br />
Cooling Fans (3RU)<br />
19"W x 2"D x 5 1 / 4"H<br />
Single Fan-97507<br />
Double Fan-97506<br />
0102134XR4 Page 8 of 9
Warranty<br />
WE WILL MAKE IT RIGHT FOR YOU!<br />
We guarantee all <strong>Spectrum</strong> products to be free of all defects in materials and workmanship, for the original owner, for a period of ten years.<br />
Any item deemed defective by <strong>Spectrum</strong> or the original manufacturer, under normal use conditions, will be repaired or replaced at<br />
<strong>Spectrum</strong>’s discretion. This warranty applies to all products manufactured and distributed by <strong>Spectrum</strong> except the products listed below.<br />
DESIGNED FOR INDOOR USE ONLY - <strong>Spectrum</strong>’s products have been designed and constructed for indoor use only. Moving or using<br />
outdoors, or on excessively rough surfaces, may cause damage to the products and may void the warranty. If an outdoor application is<br />
desired please contact us to discuss potential custom design solutions.<br />
<strong>Spectrum</strong> is committed to provide complete customer satisfaction. Each of our products are manufactured from the best materials available<br />
and each product is stringently monitored throughout the production process through our P.A.C.E. program (Product Assurance to meet<br />
Customer Expectations).<br />
Our Customer Service Help Line 1-800-235-1262 is ready to provide immediate attention to any questions, comments or concerns. We are<br />
available to answer your calls Monday through Friday from 7 am to 5 pm CST. In addition your product comments or concerns are welcome<br />
via e-mail at: spectrum@spectrumfurniture.com.<br />
Items that have a varying warranty include, but are not limited to, the following:<br />
• Adjustable Crank/Electric Desk Legs (1 yr)<br />
• Flat Panel Desk Gas Cylinders (1 yr)<br />
• Adjustable Height Chair Parts – including frames, gas cylinders, wood and plastic parts, and control handles (7 yrs)<br />
• Adjustable Height Chair Parts Casters (2 yrs)<br />
• Adjustable Height Chair Upholstery - In-Stock Upholstery (2 yrs)<br />
• Adjustable Height Chair Upholstery - Graded-In Fabrics and C.O.M (no warranty)<br />
• Height Adjustable Columns and Lifts (1 yr)<br />
• General Use Casters (1 yr)<br />
• Electrical – ECA (1 yr)<br />
• Electrical - Power Strips (1 yr)<br />
• Electrical Surge Suppressors (lifetime)<br />
• Electrical - Retractable Power Cords (1 yr)<br />
• Keyboard/Mouse Trays (1 yr)<br />
• Flat Panel Monitor Arm – General Parts (5 yrs)<br />
• Flat Panel Monitor Arm – Gas Cylinders (2 yrs)<br />
• CRT Monitor Arm (1 yr)<br />
The warranty, as stated above, is effective as of 05/28/2009<br />
0102134XR4 Page 9 of 9