Aerocomm AC4868.pdf - HEAnet Mirror Service
Aerocomm AC4868.pdf - HEAnet Mirror Service
Aerocomm AC4868.pdf - HEAnet Mirror Service

Create successful ePaper yourself
Turn your PDF publications into a flip-book with our unique Google optimized e-Paper software.
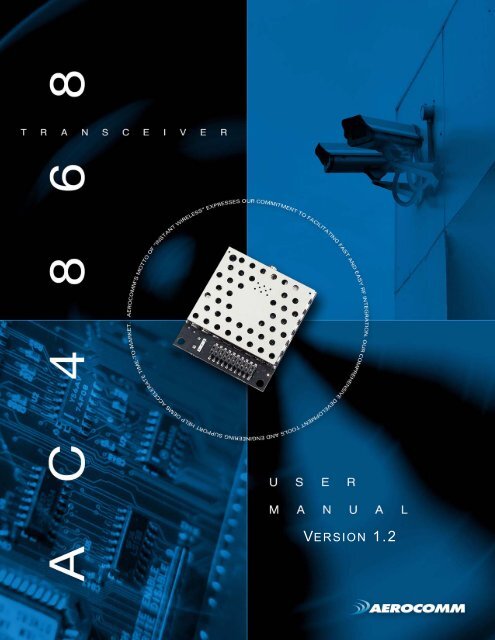
VERSION 1.2
DOCUMENT INFORMATION<br />
Copyright © 2007 AeroComm, Inc. All rights reserved.<br />
The information contained in this manual and the accompanying software programs are copyrighted and all rights are<br />
reserved by AeroComm, Inc. AeroComm, Inc. reserves the right to make periodic modifications of this product without<br />
obligation to notify any person or entity of such revision. Copying, duplicating, selling, or otherwise distributing any<br />
part of this product or accompanying documentation/software without the prior consent of an authorized<br />
representative of AeroComm, Inc. is strictly prohibited.<br />
All brands and product names in this publication are registered trademarks or trademarks of their respective holders.<br />
This material is preliminary<br />
Information furnished by AeroComm in this specification is believed to be accurate. Devices sold by AeroComm are<br />
covered by the warranty and patent indemnification provisions appearing in its Terms of Sale only. AeroComm makes<br />
no warranty, express, statutory, and implied or by description, regarding the information set forth herein. AeroComm<br />
reserves the right to change specifications at any time and without notice.<br />
AeroComm’s products are intended for use in normal commercial and industrial applications. Applications requiring<br />
unusual environmental requirements such as military, medical life-support or life-sustaining equipment are specifically<br />
not recommended without additional testing for such application.<br />
Limited Warranty, Disclaimer, Limitation of Liability<br />
For a period of one (1) year from the date of purchase by the OEM customer, AeroComm warrants the OEM<br />
transceiver against defects in materials and workmanship. AeroComm will not honor this warranty (and this warranty<br />
will be automatically void) if there has been any (1) tampering, signs of tampering; 2) repair or attempt to repair by<br />
anyone other than an AeroComm authorized technician.<br />
This warranty does not cover and AeroComm will not be liable for, any damage or failure caused by misuse, abuse,<br />
acts of God, accidents, electrical irregularity, or other causes beyond AeroComm’s control, or claim by other than the<br />
original purchaser.<br />
In no event shall AeroComm be responsible or liable for any damages arising: From the use of product; From the loss<br />
of use, revenue or profit of the product; or As a result of any event, circumstance, action, or abuse beyond the control<br />
of AeroComm, whether such damages be direct, indirect, consequential, special or otherwise and whether such<br />
damages are incurred by the person to whom this warranty extends or third party.<br />
If, after inspection, AeroComm determines that there is a defect, AeroComm will repair or replace the OEM transceiver<br />
at their discretion. If the product is replaced, it may be a new or refurbished product.
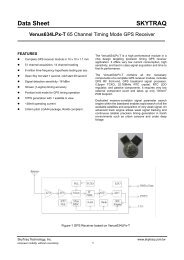
AC4868-250 TRANSCEIVER MODULE 1<br />
The compact AC4868-250 868MHz transceiver can replace miles of cable in harsh industrial environments. Using field-proven<br />
FHSS technology which needs no additional FCC licensing in the Americas, OEMs can easily make existing systems wireless<br />
with little or no RF expertise.<br />
AC4868-250 FEATURES<br />
OVERVIEW<br />
NETWORKING AND SECURITY<br />
• Drop-in replacement for AC4868-250 900 MHz & AC4424 2.4 GHz product families<br />
• Generic I/O digital lines and integrated DAC/ADC functions<br />
• Retries and Acknowledgements<br />
• Low latency and high throughput<br />
EASY TO USE<br />
• Software selectable interface baud rates from 1200 bps to 57.6 kbps<br />
• Low cost, low power and small size ideal for high volume, portable and battery powered<br />
applications<br />
• All modules are qualified for Industrial temperatures (-40°C to 80°C)<br />
• Advanced configuration available using AT commands<br />
The AC4868-250 is a member of AeroComm’s ConnexRF OEM transceiver family. The AC4868-250 is designed for<br />
integration into OEM systems operating under European ETSI regulations for the 868 - 870 MHz band.<br />
AC4868-250 transceivers provide an asynchronous TTL/RS-485 level serial interface for OEM Host communications.<br />
Communications include both system and configuration data. The Host supplies system data for transmission to<br />
other Host(s). Configuration data is stored in the on-board EEPROM. All frequency hopping, synchronization, and RF<br />
system data transmission/reception is performed by the transceiver.<br />
To boost data integrity and security, the AC4868-250 uses AeroComm’s field-proven FHSS technology featuring<br />
optional Data-Encryption Standards (DES). Fully transparent, these transceivers operate seamlessly in serial cable<br />
replacement applications.<br />
AC4868-250 transceivers can operate in a Point-to-Point, Point-to-Multipoint, Client-Server, or Peer-to-Peer<br />
architecture. One transceiver is configured as a Server and there can be one or many Clients. To establish<br />
synchronization between transceivers, the Server emits a beacon. Upon detecting a beacon, the Client transceiver<br />
informs its Host and an RF link is established.<br />
This document contains information about the hardware and software interface between an AeroComm AC4868-250<br />
transceiver and an OEM Host. Information includes the theory of operation, specifications, interface definition,<br />
configuration information and mechanical drawings. The OEM is responsible for ensuring the final product meets all<br />
appropriate regulatory agency requirements listed herein before selling any product.<br />
Note: Unless mentioned specifically by name, the AC4868-250 modules will be referred to as the “radio” or<br />
“transceiver”. Individual naming is used to differentiate product specific features. The host (PC/Microcontroller/Any<br />
device to which the AC4868-250 module is connected) will be referred to as “OEM Host”.<br />
www.aerocomm.com
SPECIFICATIONS 2<br />
Table 1: AC4868-250 Specifications<br />
General<br />
20 Pin Interface Connector Molex 87759-0030, mates with Samtec SMM-110-02-S-D<br />
RF Connector Telegartner J01341C0081, mates with any manufacturer’s MMCX style plug<br />
Antenna AC4868-250: MMCX Connector<br />
Serial Interface Data Rate Baud rates from 1200 bps to 57.6 kbps<br />
Power Consumption (typical) Duty Cycle (TX=Transmit; RX=Receive)<br />
10%TX 50%TX 100%TX 100%RX Pwr-Down Deep Sleep<br />
54mA 138mA 240mA 36mA TBD 24mA<br />
Channels Single Channel<br />
Security One byte System ID. 56-bit DES encryption key.<br />
Interface Buffer Size Input/Output:256 bytes each<br />
Transceiver<br />
Frequency Band Europe 500 mW: 869.4 - 869.65 MHz<br />
RF Data Rate 19.2 kbps or 28.8 kbps dependent on interface baud rate<br />
RF Technology Single Frequency FSK<br />
Output Power Conducted (no antenna) EIRP (2.5dBi gain antenna)<br />
186mW typical 250mW typical<br />
Supply Voltage Pin 10: 3.3 – 5.5V ±50mV ripple<br />
Pin 11: 3.3 ±3%, ±100mV ripple<br />
Sensitivity -103dBm typical @ 28.8kbps RF Data Rate<br />
EEPROM write cycles 20000<br />
Hop period 53 ms<br />
Range, Line of Site (based on 2.5dBi gain<br />
antenna)<br />
Up to 15 km (9.3 miles)<br />
Temperature (Operating) -40°C to 80°C<br />
Temperature (Storage) -50°C to +85°C<br />
Humidity (non-condensing) 10% to 90%<br />
Environmental<br />
Physical<br />
Dimensions Transceiver with MMCX Connector: 1.65” x 1.9” x 0.20”<br />
www.aerocomm.com
PIN DEFINITIONS<br />
www.aerocomm.com<br />
SPECIFICATIONS<br />
The AC4868-250 has a simple interface that allows OEM Host communications with the transceiver. The table below<br />
shows the connector pin numbers and associated functions. The I/O direction is with respect to the transceiver. All<br />
inputs/outputs are 3.3VDC. All inputs are weakly pulled High and may be left floating during normal operation.<br />
Module<br />
Pin<br />
Type<br />
Signal<br />
Name<br />
1 O GO0 Generic Output pin<br />
Table 2: AC4868-250 Pin Definitions<br />
2 O TXD Transmitted data out of the transceiver<br />
I/O RS485 A<br />
(True)<br />
Non-inverted RS-485 representation of serial data<br />
3 I RXD Data input to the transceiver<br />
I/O RS485 B<br />
(Invert)<br />
<strong>Mirror</strong> image of RS-485 A<br />
4 I GI0 Generic Input pin<br />
5, 16 GND GND Signal Ground<br />
Function<br />
6 N/C This pin has an internal connection and should be left disconnected.<br />
7 O CTS Clear to Send – Active Low when the transceiver is ready to accept data for transmission.<br />
8 I RTS Request to Send – When enabled in EEPROM, the OEM Host can take this High when it is not ready to<br />
accept data from the transceiver. NOTE: Keeping RTS High for too long can cause data loss.<br />
9 O GO1 Generic Output pin<br />
10 PWR VCC1 3.3 – 5.5V, ±50mV ripple<br />
11 PWR VCC2 3.3V, ±50mV ripple<br />
12 I Test Test Mode – When pulled logic Low and then applying power or resetting, the transceiver’s serial interface<br />
is forced to a 9600, 8-N-1 rate. To exit, the transceiver must be reset or power-cycled with Test Mode logic<br />
High.<br />
13 N/C This pin has an internal connection and should be left disconnected.<br />
14 I GI1 Generic Input pin<br />
15 I UP_RESET RESET – Controlled by the AC4868-250 for power-on reset if left unconnected. After a stable power-on<br />
reset, a logic High pulse will reset the transceiver.<br />
17 I CMD/Data When logic Low, the transceiver interprets OEM Host data as command data. When logic High, the<br />
transceiver interprets OEM Host data as transmit data.<br />
18 I AD In 10 bit Analog Data Input<br />
19 O DA_Out 10 bit Analog Data Output<br />
20 O In_Range When logic Low, a Client is in range of a Server on same Channel and System ID. Always low on a Server.<br />
3
4<br />
SPECIFICATIONS<br />
ELECTRICAL SPECIFICATIONS<br />
Signal Name<br />
Table 3: Input Voltage Characteristics<br />
Signal Name<br />
High<br />
Min.<br />
High<br />
Max.<br />
Low<br />
Min.<br />
Low<br />
Max.<br />
RS485A/B N/A 12 -7 N/A V<br />
RXD 2.31 3.3 0 0.99 V<br />
GI0 2.31 3.3 0 0.99 V<br />
RTS 2.31 3.3 0 0.99 V<br />
Test 2.31 3.3 0 0.99 V<br />
GI1 2.31 3.3 0 0.99 V<br />
UP_RESET 0.8 3.3 0 0.6 V<br />
Command/Data 2.31 3.3 0 0.99 V<br />
AD In N/A 3.3 0 N/A V<br />
Unit<br />
Table 4: Output Voltage Characteristics<br />
Module<br />
Pin<br />
Type<br />
High<br />
Min.<br />
Low<br />
Max.<br />
GO0 1 O 2.5 @ 8mA 0.4 @ 8mA V<br />
TXD 2 O 2.5 @ 2mA 0.4 @ 2mA V<br />
RS485A/B 2,3 I/O 3.3 @ 1/8 Unit Load N/A V<br />
CTS 7 O 2.5 @ 2mA 0.4 @ 2mA V<br />
GO1 9 O 2.5 @ 2mA 0.4 @ 2mA V<br />
DA_Out 19 O N/A N/A V 1<br />
In Range 20 O 2.5 @ 2mA 0.4 @ 2mA V<br />
1. DA_Out is an unbuffered, high impedance output and must be buffered by the OEM Host when<br />
used.<br />
Unit
THEORY OF OPERATION 3<br />
RF ARCHITECTURE<br />
The AC4868-250 utilizes a Server-Client network where all Clients synchronize their hopping to the Server. The Server<br />
transmits a beacon during the first 1 ms of every hop (53 ms). The Client transceivers listen for this beacon and upon<br />
hearing it assert their In_Range Low and synchronize their hopping with the Server.<br />
Each network should consist of only one Server and there should never be two servers on the same RF Channel<br />
number in the same coverage area as the interference between the two servers will severely hinder RF<br />
communications.<br />
MODES OF OPERATION<br />
The AC4868-250 has three different operating modes; Receive, Transmit, & Command Mode. If the transceiver is not<br />
communicating with another radio, it will be in Receive Mode actively listening for a beacon from the Server. If the<br />
Client determines that the beacon is from a server operating on the same RF Channel and System ID, it will respond<br />
by asserting In_Range Low. A transceiver will enter Transmit or Command mode when the OEM Host sends data over<br />
the serial interface. The state of the Command/Data pin (Pin 17) or the data contents determine which of the two<br />
modes will be entered.<br />
Transmit Mode<br />
All packets sent over the RF are either Addressed or Broadcast packets. Broadcast and Addressed delivery can be<br />
controlled dynamically with the API Control byte and corresponding on-the-fly commands. To prohibit transceivers<br />
from receiving broadcast packets, Unicast only can be enabled.<br />
ADDRESSED PACKETS<br />
When sending an addressed packet, the RF packet is sent only to the receiver specified in destination address. To<br />
increase the odds of successful delivery, Transmit retries are utilized. transparent to the OEM Host; the sending radio<br />
will send the RF packet to the intended receiver. If the receiver receives the packet free of errors, it will return an RF<br />
acknowledge within the same 53 ms hop. If a receive acknowledgement is not received, the radio will use a transmit<br />
retry to resend the packet. The radio will continue sending the packet until either (1) an acknowledgement is received<br />
or (2) all transmit retries have been used. The received packet will only be sent to the OEM Host if and when it is<br />
received free of errors.<br />
BROADCAST PACKETS<br />
When sending a broadcast packet, the RF packet is sent out to every eligible transceiver on the network. To increase<br />
the odds of successful delivery, Broadcast attempts are utilized. Transparent to the OEM Host, the sending radio will<br />
send the RF packet to the intended receiver(s). Unlike transmit retries, all broadcast attempts are used; regardless of<br />
when the RF packet is actually received and without RF acknowledgements. If the packet is received on the first<br />
attempt, the receiver will ignore the remaining broadcast attempts. The received packet will only be sent to the OEM<br />
Host if and when it is received free of errors.<br />
Receive Mode<br />
When a transceiver is not in Transmit or Command mode, it will be in Receive Mode listening for data. While in<br />
Receive Mode, subsequent data of up to 80 bytes can be received every hop (53 ms).<br />
www.aerocomm.com
6<br />
THEORY OF OPERATION<br />
Command Mode<br />
A radio will enter Command Mode when data is received over the serial interface from the OEM Host and either the<br />
Command/Data pin (pin 17) is logic Low or the received data contains the “AT+++” (Enter AT Command Mode)<br />
command. Once in Command Mode, all data received by the radio is interpreted as command data. Command Data<br />
can be either EEPROM Configuration or On-The-Fly commands.<br />
Figure 1: Pending RF and Data in Buffer Flow<br />
Receive Mode<br />
Yes Broadcast<br />
Discard Packet Packet<br />
Discard Packet<br />
Yes<br />
Receive full<br />
packet and<br />
check CRC<br />
Yes<br />
Duplicate<br />
Packet<br />
Send Packet over<br />
RF<br />
Pending RF<br />
Received<br />
Send Packet over<br />
RF<br />
Addressed Packet<br />
Matching<br />
Destination<br />
MAC<br />
Yes<br />
Validate CRC<br />
Yes<br />
Duplicate<br />
Packet<br />
Yes<br />
Send RF<br />
Acknowledge<br />
Command/Data<br />
Mode<br />
Receive Mode<br />
Data in Buffer<br />
Pin 17 Low<br />
AT+++<br />
RF Data<br />
Broadcast Packet Addressed Packet<br />
Transmit Packet Transmit Packet<br />
Decrement<br />
Broadcast<br />
Attem pts<br />
Broadcast<br />
Attempts = 0<br />
Receive ACK<br />
Decrement<br />
Transm it Attempts<br />
Transmit<br />
Attem pts = 0
SERIAL INTERFACE 4<br />
In order for the OEM Host and a transceiver to communicate over the serial interface they need to have the same<br />
serial data rate. Refer to the following sections to ensure that the OEM Host data rate matches the serial interface<br />
baud rate.<br />
SERIAL COMMUNICATIONS<br />
The AC4868-250 is a TTL device which can be interfaced to a compatible UART (microcontroller) or level translator to<br />
allow connection to serial devices. UART stands for Universal Asynchronous Receiver Transmitter and its main<br />
function is to transmit or receive serial data.<br />
Asynchronous Operation<br />
Since there is no seperate clock in asynchronous operation, the receiver needs a method of synchronizing with the<br />
transmitter. This is achieved by having a fixed baud rate and by using START and STOP bits. A typical asynchronous<br />
mode signal is shown below.<br />
Figure 2: Asynchronous Mode Signal<br />
The UART outputs and inputs logic level signals on the TX and RX pins. The signal is high when no data is being<br />
transmitted and goes low when transmission begins.<br />
The signal stays low for the duration of the START bit and is followed by the data bits; LSB first. The STOP bit follows<br />
the last data bit and is always high. After the STOP bit has completed, the START bit of the next transmission can<br />
occur.<br />
Parity<br />
A parity bit is used to provide error checking for a single bit error. When a single bit is used, parity can be either even<br />
or odd. Even parity means that the number of ones in the data and parity sum to an even number and vice-versa. The<br />
ninth data bit can be used as a parity bit if the data format requires eight data bits and a parity bit as shown below.<br />
www.aerocomm.com
8<br />
SERIAL INTERFACE<br />
Figure 3: Even Parity Bit<br />
Note: Enabling parity cuts throughput and the interface buffer in half.<br />
OEM HOST DATA RATE<br />
The OEM Host Data Rate is the rate with which the OEM Host and transceiver communicate over the serial interface..<br />
Possible values range from 1200 bps to 57,600 bps. Note: Enabling Parity cuts throughput in half and the Interface<br />
Buffer size in half. The following asynchronous serial data formats are supported:<br />
Table 5: Supported Serial Formats<br />
Data Bits Parity Stop Bits Transceiver Programming Requirements<br />
8 N 1 Parity Disabled<br />
7 N 2 Parity Disabled<br />
7 E, O, M, S 1 Parity Disabled<br />
9 N 1 Parity Enabled<br />
8 N 2 Parity Enabled<br />
8 E, O, M, S 1 Parity Enabled<br />
7 E, O, M, S 2 Parity Enabled<br />
Mark (M) corresponds to 1 & Space (S) corresponds to 0<br />
SERIAL INTERFACE BAUD RATE<br />
This two-byte value determines the baud rate used for communicating over the serial interface to a transceiver. The<br />
Table below lists values for some common baud rates. Baud rates below 1200 and above 57,600 baud are not
www.aerocomm.com<br />
SERIAL INTERFACE<br />
supported. For a baud rate to be valid, the calculated baud rate must be within ±3% of the OEM Host baud rate. If the<br />
Test pin (Pin 12) is pulled logic Low at reset, the baud rate will be forced to 9,600.<br />
Baud Rate<br />
57,600 1<br />
BaudL<br />
(0x42)<br />
INTERFACE TIMEOUT / RF PACKET SIZE<br />
Interface Timeout (EEPROM address 0x58), in conjunction with RF Packet Size (EEPROM address 0x5B), determines<br />
when a buffer of data will be sent out over the RF as a complete RF packet, based on whichever condition occurs first.<br />
Interface Timeout – Interface Timeout specifies a maximum byte gap between consecutive bytes. When that byte gap<br />
is exceeded, the bytes in the transmit buffer are sent out over the RF as a complete packet. Interface Timeout is<br />
adjustable in 0.5ms increments and has a tolerance of ±0.5ms. Therefore, the Interface Timeout should be set to a<br />
minimum of 2. The default value for Interface Timeout is 0x04 (2ms) and should be adjusted accordingly when<br />
changing the transceiver baud rate.<br />
RF Packet Size – When the number of bytes in the transceiver transmit buffer equals RF Packet Size, those bytes are<br />
sent out as a complete RF packet. It is much more efficient to send a few large packets rather than several short<br />
packets as every packet the transceiver sends over the RF contains extra header bytes which are not included in the<br />
RF Packet Size. However, if the RF Packet Size is set too large, the transceiver will not be able to send any packets<br />
because the AC4868 requires the entire RF packet to be sent in the same hop period (53 ms). The RF packet size if<br />
programmed in EEPROM automatically when Auto Config is enabled. It is strongly recommended that Auto Config be<br />
left enabled to maximize the efficiency of the transceiver.<br />
FLOW CONTROL<br />
Table 6: Baud Rate / Interface Timeout<br />
BaudH<br />
(0x43)<br />
RF Baud<br />
(not<br />
adjustable)<br />
Minium Interface<br />
Timeout (0x58)<br />
Stop Bit Delay (0x3F)<br />
0xFC 0x00 28,800 0x02 0x03<br />
38,400 0xFA 0x00 19,200 0x02 0x08<br />
28,800 0xF8 0x00 28,800 0x02 0x0E<br />
19,200 0xF4 0x00 19,200 0x03 0x19<br />
14,400 0xF0 0x00 28,800 0x04 0x23<br />
9,600 0xE8 0x00 19,200 0x05 0x39<br />
4800 0xD0 0x00 28,800 0x09 0x7A<br />
2400 0xA0 0x00 19,200 0x11 0xFC<br />
1200 0x40 0x00 28,800 0x21 0x00 2<br />
1. 57,600 is the default baud rate<br />
2. 0x00 will yield a stop bit of 421 uS. The stop bit at 1200 baud should actually be 833 uS.<br />
Flow control refers to the control of data flow between transceivers. It is the method used to handle data in the<br />
transmit/receive buffer and determines how data flow between the transceivers is started and stopped. Often, one<br />
9
10<br />
SERIAL INTERFACE<br />
transceiver is capable of sending data much faster than the other can receive and flow control allows the slower<br />
device to tell the faster device when to pause and resume data transmission.<br />
ENGINEER’S TIP<br />
Can I implement a design using just Txd, Rxd and Gnd (Three-wire Interface)?<br />
Yes. However, it is strongly recommended that your hardware monitor the CTS pin of the<br />
radio. CTS is taken High by the radio when its interface buffer is getting full. Your hardware<br />
should stop sending at this point to avoid a buffer overrun (and subsequent loss of data).<br />
You can perform a successful design without monitoring CTS. However, you need to take into<br />
account the amount of latency the radio adds to the system, any additional latency caused by<br />
Transmit Retries or Broadcast Attempts, how often you send data, non-delivery network<br />
timeouts and interface data rate. Polled type networks, where the Server host requests data<br />
from the Client host and the Client host responds, are good candidates for avoiding the use of<br />
CTS. This is because no one transceiver can monopolize the RF link. Asynchronous type<br />
networks, where any radio can send to another radio at any point in time, are much more<br />
difficult to implement without the use of CTS.<br />
HALF DUPLEX / FULL DUPLEX<br />
When Half Duplex communication is chosen, the AC4868-250 will send a packet out over the RF whenever it can.<br />
This can cause packets sent by multiple transceivers at the same time to collide with each other over the RF. To<br />
prevent this, Full Duplex communication can be chosen. Full Duplex shares the bandwidth intelligently to enable twoway<br />
collision-free communication without any collision. This is done by calculating the amount of time until the next<br />
hop to ensure that it has time to send the packet; if there is enough time, it will send the packet and if not, it will wait<br />
until its next appropriate hop. The Server transmits during the even hops while the Client(s) will transmit during the<br />
odd hops. Although there is technically only one frequency bin, the Server still maintains a bin count for the purpose<br />
of handling Full Duplex mode. While the RF hardware is still technically half duplex, the bandwidth sharing it makes<br />
the transceiver seem full duplex. Enabling Full Duplex can cause overall throughputs to be cut in half.<br />
SYSTEM TIMING & LATENCY<br />
Care should be taken when selecting transceiver architecture, as it can have serious effects on data rates, latency,<br />
and overall system throughput. The importance of these three characteristics will vary from system to system and
should be a strong consideration when designing the system.<br />
ENGINEER’S TIP<br />
SYSTEM THROUGHPUT<br />
www.aerocomm.com<br />
SERIAL INTERFACE<br />
In High-density applications, what amount of latency should be expected?<br />
It is not easy to predict the exact amount of latency in high-density applications. There are<br />
many variables that affect system latency. The three variables that most affect the latency are<br />
the network load, the distance between transceivers, and whether the transceivers are<br />
operating in a broadcast or addressed mode. There is no fixed answer as to how much latency<br />
will be introduced in the system when considering high-density applications. In these cases<br />
we can just offer qualitative analysis of the latency in high-density applications. As the network<br />
load increases, then the number of collisions that will occur increases. As the number of<br />
collisions increase, then the system latency increases. As the distance between the<br />
transceivers increases, so to does the system latency. Finally, when transceivers operate in<br />
addressed mode they will retry sending a packet up to the number of time specified in the<br />
transmit retry parameter specified in the EEPROM. As the number of retries increases, the<br />
system latency will increase also.<br />
When operating as shown below, an AC4868-250 transceiver is capable of achieving the listed throughput. However,<br />
in the presence of interference or at longer ranges, the transceiver may be unable to meet the specified throughput.<br />
RF Mode<br />
Table 7: Maximum System Throughput<br />
RF Baud<br />
(detemined by<br />
Interface Baud)<br />
Half Duplex Throughput<br />
(bps)<br />
Full Duplex Throughput<br />
(bps) each way<br />
Addressed 28,800 15k 7.5k<br />
Addressed 19,200 6.8k 3.4k<br />
Broadcast 28,800 18k 9k<br />
Broadcast 19,200 12k 6k<br />
11
SOFTWARE INTERFACE 5<br />
NETWORKING<br />
System ID - System ID (EEPROM address 0x76) is similar to a password character or network number and makes<br />
network eavesdropping more difficult. A transceiver will not establish a Session or communicate with a transceiver<br />
operating on a different System ID or Channel Number.<br />
RF Channel Number -<br />
RF Channel Number<br />
Range (0x40)<br />
DES (Data Encryption Standard) - DES (Data Encryption Standard) – Encryption is the process of encoding an<br />
information bit stream to secure the data content. The DES algorithm is a common, simple and well-established<br />
encryption routine. An encryption key of 56 bits is used to encrypt the packet. The receiver must use the exact same<br />
key to decrypt the packet; otherwise garbled data will be produced.<br />
To enable DES, EEPROM Byte 0x45, bit 6 must be set to a value of 1. To disable DES, set bit 6 to a value of 0. The 7<br />
byte (56 bits) Encryption/Decryption Key is located in EEPROM Bytes 0xD0 – 0xD6. It is highly recommended that this<br />
Key be changed from the default.<br />
RANGE REFRESH<br />
Range Refresh - Range Refresh specifies the maximum amount of time a Client reports in range without having heard<br />
a beacon from the Server. Each time the Client hears a beacon, it resets its Range Refresh timer. If the timer reaches<br />
zero, the Client will go out of range, take its In_Range pin High and enter aquisition mode attempting to find the Server<br />
once again. The range refresh is equal to the hop period (53 ms) x Range refresh value.<br />
Note: Range Refresh should not be set to 0x00.<br />
AUTO CONFIG PARAMETERS<br />
Table 8: RF Channel Number Settings<br />
Frequency Details & Regulatory<br />
requirements<br />
0x38 869.4 - 869.65 MHz (Single Frequency. Up to 500 mW<br />
EIRP @ 10% maximum transmit vs. receive duty cycle<br />
The AC4868-250 has several variables that vary by RF mode and architecture. By default, Auto Config is enabled and<br />
bypasses the values stored in EEPROM and uses predetermined values for the given operating mode. Below is a list<br />
www.aerocomm.com<br />
Countries<br />
Europe
www.aerocomm.com<br />
SOFTWARE INTERFACE<br />
of the variables controlled by Auto Config and their respective predetermined values. If Auto Config is disabled, these<br />
values must be programmed in the transceiver EEPROM for the corresponding mode of operation.<br />
Parameter<br />
MAX POWER<br />
EEPROM<br />
Address<br />
Table 9: Auto Config Parameters<br />
Default RF Baud = 19,200 RF Baud = 28,800<br />
Addressed Broadcast Addressed Broadcast<br />
RF Packet Size 0x5B 0x24 0x24 0x40 0x50 0x60<br />
Max Power provides a means for controlling the RF output power of the AC4868. Output power and current<br />
consumption can vary by as much as ±10% per transceiver for a particular Max Power setting. Contact AeroComm<br />
for assistance in adjusting Max Power.<br />
ENGINEER’S TIP<br />
The max power is set during Production and may vary slightly from one transceiver to another.<br />
The max power can be set as low as desired but should not be set higher than the original<br />
factory setting. A backup of the original power setting is stored in EEPROM address 0x8E.<br />
13
TIMING DIAGRAMS 6<br />
AC4868-250 TIMING DIAGRAMS<br />
Figure 4: Addressed Mode with Timeout<br />
Figure 5: Addressed Mode with Fixed Packet Length<br />
Figure 6: Broadcast Mode with Timeout<br />
www.aerocomm.com
Figure 7: Broadcast Mode with Fixed Packet Length<br />
www.aerocomm.com<br />
TIMING DIAGRAMS<br />
15
HARDWARE INTERFACE 7<br />
Below is a description of all hardware pins used to control the AC4868-250.<br />
PIN DEFINITIONS<br />
Generic I/O<br />
Both GIn pins serve as generic input pins and both GOn pins server as generic output pins. Reading and writing of<br />
these pins can be performed using CC Commands.<br />
TXD & RXD<br />
SERIAL TTL<br />
The AC4868-250 accepts 3.3VDC TTL level asynchronous serial data on the RXD pin and interprets that data as either<br />
Command Data or Transmit Data. Data is sent from the transceiver, at 3.3V levels, to the OEM Host via the TXD pin.<br />
RS-485<br />
When equipped with an onboard RS-485 interface chip, TXD and RXD become the half duplex RS-485 pins. The<br />
transceiver interface will be in Receive Mode except when it has data to send to the OEM Host. TXD is the noninverted<br />
representation of the data (RS485A) and RXD is a mirror image of TXD (RS485B). The transceiver will still use<br />
RTS (if enabled).<br />
Hop Frame<br />
Transitions logic Low at the start of a hop and transitions logic High at the completion of a hop. The OEM Host is not<br />
required to monitor Hop Frame. The AC4868 is a single frequency radio that uses fictitious hops, though it generates<br />
a Hop Frame signal every time it transmits a timing beacon.<br />
CTS<br />
The AC4868-250 has an interface buffer size of 256 bytes. If the buffer fills up and more bytes are sent to the<br />
transceiver before the buffer can be emptied, data loss will occur. The transceiver prevents this loss by asserting CTS<br />
High as the buffer fills up and taking CTS Low as the buffer is emptied. CTS On and CTS Off control the operation of<br />
CTS. CTS On specifies the amount of bytes that must be in the buffer for CTS to be disabled (logic High). Even while<br />
CTS is disabled, the OEM Host can still send data to the transceiver, but it should do so carefully.<br />
Note: The CTS On/Off bytes of the EEPROM can be set to 1, in which case CTS will go high as data is sent in and low<br />
when buffer is empty.<br />
GND<br />
Signal Ground. Pins are internally connected.<br />
RTS<br />
With RTS disabled, the transceiver will send any received data to the OEM Host as soon as it is received. However,<br />
some OEM Hosts are not able to accept data from the transceiver all of the time. With RTS enabled, the OEM Host can<br />
prevent the transceiver from sending it data by disabling RTS (logic High). Once RTS is enabled (logic Low), the<br />
transceiver can send packets to the OEM Host as they are received.<br />
www.aerocomm.com
www.aerocomm.com<br />
HARDWARE INTERFACE<br />
Note: Leaving RTS disabled for too long can cause data loss once the transceiver’s 256 byte receive buffer fills up.<br />
Test / 9600 Baud<br />
When pulled logic Low before applying power or resetting, the transceiver’s serial interface is forced to a 9600, 8-N-1<br />
(8 data bits, No parity, 1 stop bit). To exit, the transceiver must be reset or power-cycled with Test pin logic High. This<br />
pin is used to recover transceivers from unknown baud rates only. It should not be used in normal operation. Instead<br />
the transceiver Interface Baud Rate should be programmed to 9600 baud if that rate is desired for normal operation.<br />
ENGINEER’S TIP<br />
<strong>Aerocomm</strong> does not recommend permantly grounding the Forced_9600 pin. This mode was<br />
intended for recovering transceivers from unknown settings and was not intended to be used<br />
in real-time communications.<br />
UP_Reset<br />
UP_Reset provides a direct connection to the reset pin on the AC4868-250 microprocessor and is used to force a soft<br />
reset. For a valid reset, reset must be asserted High for a minimum of 11ms.<br />
Command/Data<br />
When logic High, the transceiver interprets incoming OEM Host data as transmit data to be sent to other transceivers<br />
and their OEM Hosts. When logic Low, the transceiver interprets OEM Host data as command data.<br />
AD In & DA Out<br />
AD In & DA Out can be used as a cost savings to replace Analog-to-Digital and Digital-to-Analog converter hardware.<br />
Reading of this pin can be performed locally using the Read ADC command found in the On-the-Fly Control<br />
Command Reference. DA Out is an unbuffered, high impedance output and MUST be buffered by the OEM Host<br />
when used.<br />
In Range<br />
Reports logic Low when a Client transceiver is in range of a Server radio operating on the same RF Channel and<br />
system ID. If a Client cannot hear a Server for the amount of time defined by Range Refresh, it will drive In_Range<br />
High and enter search mode looking for a Server. When a server is detected, In_Range will be asserted Low.<br />
In_Range will always report Low on Server transceivers.<br />
17
CONFIGURING THE AC4868-250 8<br />
The AC4868-250 can be configured using the CC Configuration Commands. The CC Commands can be issued using<br />
either Hardware or Software Configuration. To use Hardware Configuration, pin 17 of a transceiver must be asserted<br />
Low. Software Configuration can be used by entering AT Command Mode before issuing the CC Commands.<br />
Figure 8: AC4868-250 Configuration Flow<br />
No<br />
AT+++<br />
(Software<br />
Configuration)<br />
Send CC<br />
Commands<br />
Send CC<br />
Command<br />
Send Another<br />
CC Command<br />
Receive Mode<br />
Use AT<br />
Commands<br />
www.aerocomm.com<br />
No<br />
Take Pin 17 Low<br />
(Hardware<br />
Configuration)<br />
No Exit Command<br />
Mode<br />
No<br />
In AT<br />
Command<br />
Mode<br />
Send Exit AT<br />
Command Mode<br />
Command<br />
No<br />
Take Pin 17 High
AT COMMANDS<br />
www.aerocomm.com<br />
CONFIGURING THE AC4868-250<br />
The AT Command mode implemented in the AC4868-250 creates a virtual version of the Command/Data pin. The<br />
“Enter AT Command Mode” Command asserts this virtual pin Low (to signify Command Mode) and the “Exit AT<br />
Command Mode” Command asserts this virtual pin High (to signify Data). Once this pin has been asserted Low, all<br />
On-the-Fly CC Commands documented in the manual are supported.<br />
On-the-Fly Control Commands<br />
The AC4868-250 transceiver contains static memory that holds many of the parameters that control the transceiver<br />
operation. Using the “CC” command set allows many of these parameters to be changed during system operation.<br />
Because the memory these commands affect is static, when the transceiver is reset, these parameters will revert back<br />
to the settings stored in the EEPROM. While in CC Command mode using pin 17 (Command/Data), the RF interface<br />
of the transceiver is still active. Therefore, it can receive packets from remote transceivers while in CC Command<br />
mode and forward these to the OEM Host.<br />
While in CC Command mode using AT Commands, the RF interface of the transceiver is active, but packets sent from<br />
other transceivers will not be received. The transceiver uses Interface Timeout/RF Packet Size to determine when a<br />
CC Command is complete. Therefore, there should be no delay between each character as it is sent from the OEM<br />
Host to the transceiver or the transceiver will not recognize the command. If the OEM Host has sent a CC Command<br />
to the transceiver and an RF packet is received by the transceiver, the transceiver will send the CC Command<br />
response to the OEM Host before sending the packet. However, if an RF packet is received before the Interface<br />
Timeout expires on a CC Command, the transceiver will send the packet to the OEM Host before sending the CC<br />
Command response.<br />
When an invalid command is sent, the radio scans the command to see if it has a valid command followed by bytes<br />
not associated with the command, in which case the radio discards the invalid bytes and accepts the command. In all<br />
other cases, the radio returns the first byte of the invalid command back to the user and discards the rest.<br />
19
20<br />
CONFIGURING THE AC4868-250<br />
Table 10: Command Quick Reference<br />
Command Name Command (All Bytes in Hex) Return (All Bytes in Hex)<br />
AT Enter<br />
CommandMode<br />
0x41 0x54 0x2B 0x2B 0x2B 0x0D 0xCC 0x43 0x4F 0x4D<br />
Exit AT CommandMode 0xCC 0x41 0x54 0x4F 0x0D - 0xCC 0x44 0x41 0x54<br />
Status Request 0xCC 0x00 0x00 - - - 0xCC Firmware<br />
Version<br />
Change Server/Client 0xCC 0x03 0x00: Server<br />
0x03: Client<br />
- - 0xCC Firmware<br />
Version<br />
0x00: Server<br />
0x01: Client in range<br />
0x03: Client out of<br />
range<br />
0x00: Server<br />
0x03: Client<br />
Sleep Walk Power Down 0xCC 0x06 - - - - 0xCC Channel - -<br />
Sleep Walk Wake Up 0xCC 0x07 - - - - 0xCC Channel -<br />
Broadcast<br />
Packets<br />
0xCC 0x08 0x00: Broadcast<br />
0x01: Addressed<br />
Write Destination Address 0xCC 0x10 Byte 4 of<br />
Dest. MAC<br />
Byte 5 Byte<br />
6<br />
- 0xCC 0x00 or 0x01 - -<br />
0xCC Byte 4 of Dest.<br />
MAC<br />
Read Destination Address 0xCC 0x11 - - - - 0xCC Byte 4 of Dest.<br />
MAC<br />
Auto Destination 0xCC 0x15 bit-0: Auto Destination<br />
bit-4: Enable Auto Destination<br />
Byte 5 Byte 6<br />
Byte 5 Byte 6<br />
0xCC bit-0: Auto Destination<br />
bits-1-7: 0<br />
Read Digital Inputs 0xCC 0x20 - - - - 0xCC bit-0: GI0<br />
bit-1: GI1<br />
Read ADC 0xCC 0x21 0x01: AD In<br />
0x02: Temp<br />
Write Digital<br />
Outputs<br />
0xCC 0x23 bit-0: GO0<br />
bit-1: GO1<br />
Write DAC 0xCC 0x24 Update<br />
Period<br />
Duty<br />
Cycle<br />
- - 0xCC MSB of 10 bit<br />
ADC<br />
- - 0xCC bit-0: GO0<br />
bit-1: GO1<br />
- - 0xCC Update Period Duty<br />
Cycle<br />
- -<br />
LSB of 10 bit ADC<br />
- -<br />
Set Max Power 0xCC 0x25 New Max Power - 0xCC Max Power - -<br />
Transmit Buffer Empty 0xCC 0x30 - - - - 0xCC 0x00 - -<br />
Deep Sleep Mode 0xCC 0x86 - - - - 0xCC Channel - -<br />
Read Temperature 0xCC 0xA4 - - - - 0xCC Temp (C) - -<br />
EEPROM Byte Read 0xCC 0xC0 Start Address Length 0xCC Starting<br />
Address<br />
Length Data<br />
EEPROM Byte Write 0xCC 0xC1 Start Address Length Data Starting Address Length Data<br />
written<br />
Soft Reset 0xCC 0xFF - - - - - - - -<br />
-
COMMAND DESCRIPTIONS<br />
Enter AT Command Mode<br />
Prior to sending this command, the OEM Host must ensure that the<br />
transceiver’s RF transmit buffer is empty. If the buffer is not empty, the<br />
radio will interpret the command as data and it will be sent over the RF.<br />
This can be accomplished by waiting up to one second between the<br />
last packet and the AT command.<br />
Exit AT Command Mode<br />
The OEM Host should send this command to exit AT Command mode<br />
and resume normal operation.<br />
Status Request<br />
The OEM Host issues this command to request the status of the<br />
transceiver.<br />
Change Server/Client<br />
The OEM Host issues this command to change the mode of the<br />
transceiver from Server to Client and vice versa.<br />
Sleep Walk Power-Down<br />
After the Host issues this command, the transceiver will de-assert its<br />
In_Range line after entering power down. A Client in power down will<br />
remain in sync with a Server for a minimum of 2 minutes. To maintain<br />
syncronization with the Server, the Client should re-sync at least once<br />
every 2 minutes. This is done by sending the Power Down wake up<br />
command and waiting for the In_Range line to go active. Once this<br />
occurs, the Client is in sync with the server and can be put back into<br />
power-down mode.<br />
This command is valid only for Client transceivers.<br />
Sleep Walk Power-Down Wake Up<br />
The OEM Host issues this command to bring the transceiver out of<br />
Power Down mode.<br />
www.aerocomm.com<br />
CONFIGURING THE AC4868-250<br />
Command: 0x41 0x54 0x2B 0x2B 0x2B 0x0D<br />
Number of Bytes Returned: 4<br />
Response: 0xCC 0x43 0x4F 0x4D<br />
Command: 0xCC 0x41 0x54 0x4F 0x0D<br />
Number of Bytes Returned: 4<br />
Response: 0xCC 0x44 0x41 0x54<br />
Command: 0xCC 0x00 0x00<br />
Number of Bytes Returned: 3<br />
Response: 0xCC Version Data1<br />
Parameter Range: Data1 = 0x00 for Server, 0x01 for Client in<br />
Range, 0x03 for Client out of Range<br />
Command: 0xCC 0x03 Data1<br />
Number of Bytes Returned: 3<br />
Response: 0xCC FirmwareVersion Data1<br />
Parameter Range: Data1 = 0x00 for Server, 0x03 for Client<br />
Command: 0xCC 0x06<br />
Number of Bytes Returned: 2<br />
Response: 0xCC Channel<br />
Command: 0xCC 0x07<br />
Number of Bytes Returned: 2<br />
Response: 0xCC Channel<br />
21
22<br />
CONFIGURING THE AC4868-250<br />
Broadcast Packets<br />
The OEM Host issues this command to change the transceiver<br />
operation between Addressed Packets and Broadcast Packets. If<br />
Addressed Packets are selected, the transceiver will send all packets to<br />
the transceiver designated by the Destination Address programmed in<br />
the transceiver. If Broadcast Packets are selected, the transceiver will<br />
send its packets to all transceivers on that network. Setting bit-7 of API<br />
Control to 1 can also enable Broadcast Packets.<br />
Write Destination Address<br />
The OEM Host issues this command to the transceiver to change the<br />
Destination Address.<br />
Note: Only the three Least Significant Bytes of the MAC Address are<br />
used for packet delivery.<br />
Read Destination Address<br />
The OEM Host issues this command to the transceiver to read the<br />
destination address.<br />
Note: Only the three Least Significant Bytes of the MAC Address are<br />
used for packet delivery.<br />
Auto Destination<br />
The Host issues this command to change the Auto Destination setting.<br />
When issuing this command, the Auto Destinatiol setting will only be<br />
changed if the corresponding enable bit is set (Control1 Parameter,<br />
EEPROM address 0x56, bits-4,5)<br />
Read Digital Inputs<br />
The OEM Host issues this command to read the state of both digital<br />
input lines.<br />
Read ADC<br />
The OEM Host issues this command to read any of the three onboard<br />
10-bit A/D converters. Because the RF is still active in On-the-Fly<br />
Command Mode, the transceiver will not process the command until<br />
there is no activity on the network.<br />
Analog Voltage = (10 bits / 0x3FF) * 3.3V<br />
Temperature ( o C) = ((Analog Voltage - 0.3) / 0.01) - 30<br />
Command: 0xCC 0x08 Data1<br />
Number of Bytes Returned: 2<br />
Response: 0xCC Data1<br />
Parameter Range: Data1 = 0x00 for Addressed, 0x01 for<br />
Broadcast<br />
Command: 0xCC 0x10 MAC3 MAC2 MAC1<br />
Number of Bytes Returned: 4<br />
Response: 0xCC MAC3 MAC2 MAC1<br />
Parameter Range: 0x00 - 0xFF corresponding to 3 LSB’s of<br />
destination MAC Address<br />
Command: 0xCC 0x11<br />
Number of Bytes Returned: 4<br />
Response: 0xCC MAC3 MAC2 MAC1<br />
Parameter Range: 0x00 - 0xFF corresponding to 3 LSB’s of<br />
destination MAC Address<br />
Command: 0xCC 0x15 Data1<br />
Number of Bytes Returned: 2<br />
Response: 0xCC Data2<br />
Parameter Range: Data1 = bit-0: Auto Destination, bit-4:<br />
Enable Auto Destination modification; Data2 = bit-0: New<br />
Auto Destination setting, bits 1 - 7:0<br />
Command: 0xCC 0x20<br />
Number of Bytes Returned: 2<br />
Response: 0xCC Data1<br />
Parameter Range: Data1 = bit-0: GI0, bit-1: GI1<br />
Command: 0xCC 0x21 Data1<br />
Number of Bytes Returned: 3<br />
Response: 0xCC Data2 Data3<br />
Parameter Range: Data1 = 0x00: AD In, 0x01: Temperature;<br />
Data2 = MSB of requested 10-bit ADC value; Data3 = LSB of<br />
requested 10-bit ADC value
Write Digital Outputs<br />
The OEM Host issues this command to write both digital output lines to<br />
particular states.<br />
Note: This command should only be used when Protocol Status (0xC2)<br />
is not set to 0xE3.<br />
Write DAC<br />
The OEM Host issues this command to write DA_Out to a particular<br />
voltage. The transceiver uses a PWM (Pulse Width Modulator) to<br />
generate the analog voltage. The theory behind a PWM is that a binary<br />
pulse is generated with a fixed duty cycle and rate. As such, this pin<br />
toggles between High & Low. This signal is filtered via an on-board R-C<br />
circuit and an analog voltage is generated. Duty cycle specifies the<br />
ratio of time in one cycle that the pulse spends High proportionate to<br />
the amount of time it spends Low. So, with a duty cycle of 50% (0x80),<br />
the pulse is High 50% of the time and Low 50% of the time; therefore the<br />
analog voltage would be half of 3.3V or 1.15V. A broad filter has been<br />
implemented on the transceiver and there is no advantage to using a<br />
slower update period. Generally, a faster update period is preferred.<br />
Set Max Power<br />
The OEM Host issues this command to limit the maximum transmit<br />
power emitted by the transceiver. This can be useful to minimize<br />
current consumption and satisfy certain regulatory requirements. The<br />
radios are shipped at maximum allowable power.<br />
Transmit Buffer Empty<br />
The OEM Host issues this command to determine when the RF transmit<br />
buffer is empty. The Host will not receive the transceiver response until<br />
that time.<br />
Deep Sleep Mode<br />
The OEM Host issues this command to put the transceiver into Deep<br />
Sleep mode. Once in Deep Sleep mode, the transceiver disables all RF<br />
communications and will not respond to any further commands until<br />
being reset or power-cycled.<br />
This command is valid for both Servers and Clients.<br />
Read Temperature<br />
The OEM Host issues this command to read the onboard temperature<br />
sensor. The transceiver reports the temperature in o C where 0x00 -<br />
0x80 corresponds to 0 - 80 o C and where 0xD8 - 0x00 corresponds to -<br />
40 - 0 o C.<br />
www.aerocomm.com<br />
CONFIGURING THE AC4868-250<br />
Command: 0xCC 0x23 Data1<br />
Number of Bytes Returned: 2<br />
Response: 0xCC Data1<br />
Parameter Range: Data1 = bit-0: GO0, bit-1: GO1<br />
Command: 0xCC 0x24 Data1 Data2<br />
Number of Bytes Returned: 3<br />
Response: 0xCC Data1 Data2<br />
Parameter Range: Data1 = Update Period; Data2 = Duty<br />
cycle<br />
T update<br />
( 255 × ( Data1 + 1)<br />
)<br />
14.7456 6<br />
= -------------------------------------------------<br />
Data2<br />
Vout =<br />
-------------- × 3.3V<br />
0xFF<br />
Command: 0xCC 0x25 Max Power<br />
Number of Bytes Returned: 2<br />
Response: 0xCC Max Power<br />
Command: 0xCC 0x30<br />
Number of Bytes Returned: 2<br />
Response: 0xCC 0x00<br />
Command: 0xCC 0x86<br />
Number of Bytes Returned: 2<br />
Response: 0xCC Channel<br />
Command: 0xCC 0xA4<br />
Number of Bytes Returned: 2<br />
Response: 0xCC Temperature<br />
Parameter Range: Temperature = 0xD8 - 0x80<br />
23
24<br />
CONFIGURING THE AC4868-250<br />
EEPROM Byte Read<br />
Upon receiving this command, a transceiver will respond with the<br />
desired data from the addresses requested by the OEM Host.<br />
EEPROM Byte Write<br />
Upon receiving this command, a transceiver will write the data byte to<br />
the specified address but will not echo it back to the OEM Host until the<br />
EEPROM write cycle is complete (up to 10 ms).<br />
Multiple byte writes of up to 128 bytes are allowed. An EEPROM<br />
boundary exists between addresses 0x7F and 0x80. No single<br />
EEPROM write command shall write to addresses on both sides of that<br />
EEPROM boundary.<br />
Reset<br />
The OEM Host issues this command to perform a soft reset of the<br />
transceiver. Any transceiver settings modified by CC commands will<br />
revert to the values stored in the EEPROM.<br />
Command: 0xCC 0xC0 Data1 Data2<br />
Number of Bytes Returned: 4+<br />
Response: 0xCC Data1 Data2 Data3<br />
Parameter Range: Data1 = EEPROM address; Data2 =<br />
Length (0x00 - 0x80); Data3 = Requested data<br />
Command: 0xCC 0xC1 Data1 Data2<br />
Number of Bytes Returned: 4+<br />
Response: 0xCC Data1 Data2 Data<br />
Parameter Range: Data1 = EEPROM address; Data2 =<br />
Length (0x00 - 0x80); Data3 = Data written<br />
Command: 0xCC 0xFF<br />
Number of Bytes Returned: None<br />
Response: None
EEPROM PARAMETERS 9<br />
The OEM Host can program various parameters that are stored in EEPROM which become active after a power-on<br />
reset. The table below gives the locations and descriptions of the parameters that can be read/written by the OEM<br />
Host. Factory default values are also shown. Do not write to any EEPROM addresses other than those listed below.<br />
Do not copy one transceiver’s EEPROM to another transceiver as doing so may cause the transceiver to malfunction.<br />
Parameter<br />
EEPROM<br />
Address<br />
Table 11: EEPROM Parameters<br />
Length<br />
(Bytes)<br />
Range Default Description<br />
Product ID 0x00 40 40 bytes - Product identifier string. Includes revision<br />
information for software and hardware.<br />
Beacon Period 0x3C 2 0x01 -<br />
0xFF<br />
Range Refresh 0x3D 1 0x01 -<br />
0xFF<br />
Stop Bit Delay 0x3F 1 0x00 -<br />
0xFF<br />
Channel Number 0x40 1 0x38 0x38<br />
Server/Client Mode 0x41 1 0x01 -<br />
0x02<br />
Baud Rate Low 0x42 1 0x00 -<br />
0xFF<br />
www.aerocomm.com<br />
0x14 Specifies the number of hop periods between Server beacon<br />
transmissions (equal to 53ms * value). Note that each<br />
transceiver should only transmit 10% of the time and<br />
beacons count as transmissions.<br />
0x18 Specifies the maximum amount of time a transceiver will<br />
report In Range without having heard a Server’s beacon<br />
(equal to hop period * value). Do not set to 0x00.<br />
0xFF For systems employing the RS-485 interface or Parity, the<br />
serial stop bit might come too early. Stop bit delay controls<br />
the width of the last bit before the stop bit occurs.<br />
0xFF = Disable Stop Bit Delay (12 us)<br />
0x00 = (256 * 1.6 us) + 12 us<br />
0x01 - 0xFE = (value * 1.6 us) + 12 us<br />
0x02 0x01 = Server<br />
0x02 = Client<br />
0xFC Low byte of the interface baud rate. Default baud rate is<br />
57,600.<br />
Baud Rate High 0x43 1 0x00 0x00 High byte of interface baud. Always 0x00<br />
Control 0 0x45 1 0x00 -<br />
0xFF<br />
Transmit Retries 0x4C 1 0x01 -<br />
0xFF<br />
0x14 Settings are:<br />
bit-7: <strong>Aerocomm</strong> Use Only<br />
bit-6: DES Enable<br />
bit-5: <strong>Aerocomm</strong> Use Only<br />
bit-4: <strong>Aerocomm</strong> Use Only<br />
bit-3: <strong>Aerocomm</strong> Use Only<br />
bit-2: <strong>Aerocomm</strong> Use Only<br />
bit-1: RF Delivery<br />
0 = Addressed packets<br />
1 = Broadcast packets<br />
bit-0: <strong>Aerocomm</strong> Use Only<br />
0x10 Maximum number of times a packet is sent out when<br />
Addressed packets are selected.
26<br />
EEPROM PARAMETERS<br />
Parameter<br />
EEPROM<br />
Address<br />
Broadcast Attempts 0x4D 1 0x01 -<br />
0xFF<br />
API Control 0x56 1 0x00 -<br />
0xFF<br />
Interface Timeout 0x58 1 0x02 -<br />
0xFF<br />
RF Packet Size 0x5B 1 0x01 -<br />
0xFF<br />
CTS On 0x5C 1 0x01 -<br />
0xFF<br />
CTS Off 0x5D 1 0x00 -<br />
0xFE<br />
Max Power 0x63 1 0x00 -<br />
0x60<br />
Parity 0x6F 1 0xE3,<br />
0xFF<br />
Destination ID 0x70 6 0x00 -<br />
0xFF<br />
System ID 0x76 1 0x00 -<br />
0xFF<br />
RS-485 DE 0x7F 1 0xE3,<br />
0xFF<br />
Table 11: EEPROM Parameters<br />
Length<br />
(Bytes)<br />
Range Default Description<br />
0x04 Maximum number of times a packet is sent out when<br />
Broadcast packets are selected.<br />
0x43 Settings are:<br />
bit-7: <strong>Aerocomm</strong> Use Only<br />
bit-6: <strong>Aerocomm</strong> Use Only<br />
bit-5: Unicast Only<br />
0 = Disabled<br />
1 = Enabled<br />
bit-4: Auto Destination<br />
0 = Use destination address<br />
1 = Use auto destination<br />
bit-3: <strong>Aerocomm</strong> Use Only<br />
bit-2: RTS Enable<br />
0 = Ignore RTS<br />
1 = Transceiver obeys RTS<br />
bit-1: Duplex<br />
0 = Half Duplex<br />
1 = Full Duplex<br />
bit-0: Auto Config<br />
0 = Use EEPROM values<br />
1 = Auto Configure values<br />
0x04 Specifies a byte gap timeout, used in conjunction with RF<br />
Packet Size to determine when a packet coming over the<br />
interface is complete (0.5 ms per increment).<br />
0x24 Used in conjunction with Interface Timeout; specifies the<br />
maximum size of an RF packet. When Auto Config is<br />
enabled, this value is overridden based on the Interface Baud<br />
Rate and RF Delivery mode.<br />
0xC0 CTS will be deasserted (High) when the transmit buffer<br />
contains at least this many characters.<br />
0xB0 Once CTS has been deasserted, CTS will be reasserted<br />
(Low) when the transmit buffer is contains this many or less<br />
characters.<br />
Set in<br />
Production<br />
& can vary<br />
Used to increase/decrease the output power. The<br />
transceivers are shipped at maximum allowable power.<br />
0xFF 0xE3 = Enable Parity<br />
0xFF = Disable Parity<br />
Note: Enabling parity cuts throughput and the interface buffer<br />
size in half.<br />
0xFF Specifies destination for RF packets<br />
0x01 Similar to network password. Radios must have the same<br />
system ID to communicate with each other.<br />
0xFF 0xE3 = GO0 is active Low DE for control of external RS-485<br />
hardware<br />
0xFF = Disable RS-485 DE
Parameter<br />
EEPROM<br />
Address<br />
MAC ID 0x80 6 0x00 -<br />
0xFF<br />
Original Max Power 0x8E 1 Set in<br />
Production<br />
and can vary<br />
www.aerocomm.com<br />
EEPROM PARAMETERS<br />
Factory programmed unique IEEE MAC address.<br />
Copy of original max power EEPROM setting. This address<br />
may be referenced but should not be modified.<br />
Product ID 0x90 15 0x90 - 0x93: Product ID<br />
0x94 - 0x95: Prefix (AC)<br />
0x96 - 0x99: Power (250M)<br />
0x9A - 0x9C: Interface (485, TTL)<br />
0x9D - 0x9E: Setup script (01 is stock)<br />
0x9F: Reserved for future use; always 0xFF<br />
DES Key 0xD0 7 0x00 -<br />
0xFF<br />
Table 11: EEPROM Parameters<br />
Length<br />
(Bytes)<br />
Range Default Description<br />
56-bit Data Encryption key<br />
27
DIMENSIONS 10<br />
MECHANICAL DRAWINGS<br />
Interface Connector - 20 pin OEM Interface connector (Molex 87759-0030, mates with Samtec SMM-110-02-S-D<br />
MMCX Jack - Antenna Connector (Johnson Components 135-3711-822)<br />
Figure 9: AC4868-250 (with MMCX connector) Mechanical<br />
0.157<br />
0.062<br />
0.000<br />
1.650<br />
1.550<br />
1.010<br />
0.100<br />
0.000<br />
pins<br />
1 2<br />
0.000<br />
0.100<br />
0.150<br />
J1<br />
0.435<br />
20 pin header, 0.020 sq. posts<br />
on 0.079 inch (2mm) centers<br />
0.125 dia non-plated holes<br />
(2) places<br />
1.760<br />
www.aerocomm.com<br />
1.875<br />
1.900<br />
0.067<br />
MMCX jack<br />
1.650<br />
1.320<br />
0.825<br />
0.000<br />
0.180<br />
MMCX jack 0.145 dia<br />
0.100 dia non-plated hole<br />
(1) place, under shield
ORDERING INFORMATION 11<br />
PRODUCT PART NUMBER TREE<br />
DEVELOPER KIT PART NUMBERS<br />
All of the above part numbers can be ordered as a development kit by prefacing the part number with “SDK-”. As an<br />
example, part number AC4868-250M can be ordered as a development kit using the part number: SDK-AC4868-<br />
250M.<br />
All developer’s kits include (2) transceivers, (2) development boards, (2) 7.5 VDC unregulated power supplies, (2)<br />
serial cables, (2) USB cables, (2) antennas, configuration/testing software and integration engineering support.<br />
www.aerocomm.com
COMPLIANCY INFORMATION 12<br />
AGENCY IDENTIFICATION NUMBERS<br />
Agency compliancy is a very important requirement for any product development. AeroComm has obtained modular<br />
approval for its products so the OEM only has to meet a few requirements to be eligible to use that approval. The<br />
corresponding agency identification numbers and approved antennas are listed below.<br />
APPROVED ANTENNA LIST<br />
The following antennas are approved for use with the AC4868-250 as identified. The OEM is free to choose another<br />
vendor’s antenna of like type and equal or lesser gain as a listed antenna and still maintain compliance.<br />
AeroComm<br />
Part<br />
Number<br />
Table 12: Agency Identification Numbers<br />
Part Number EUR/EN<br />
AC4868-250M Approved<br />
Table 13: AC4868-250 Approved Antennas<br />
Manufacturer Part<br />
Number<br />
Manufacturer Type<br />
OEM EQUIPMENT LABELING REQUIREMENTS<br />
WARNING: The OEM must ensure that the appropriate labeling requirements are met. Following are the requirements<br />
for labeling equipment:<br />
1 If the CE marking is reduced or enlarged, the proportions given in the following graduated drawing must be<br />
respected.<br />
2 The CE marking must have a height of at least 5 mm except where this is not possible on account of the nature of the<br />
apparatus.<br />
3 The CE marking must be affixed to the product or to its data plate. Additionally, it must be affixed to the packaging, if<br />
any, and to the accompanying documents.<br />
4 The CE marking must be affixed visibly, legibly, and indelibly.<br />
5 The exclamation point must be included with the CE mark (as shown below) to alert the user to the fact that there are<br />
restrictions placed on usage in certain countries. It must have the same height as the CE mark.<br />
www.aerocomm.com<br />
Gain<br />
(dBi)<br />
0600-00020 S467-FL-6-RMM-868S Nearson 1/2 Wave Dipole 2 - X X<br />
2<br />
0<br />
0<br />
A<br />
2<br />
0<br />
0<br />
M<br />
1<br />
0<br />
0<br />
0<br />
M
COUNTRY RESTRICTIONS<br />
www.aerocomm.com<br />
COMPLIANCY INFORMATION<br />
The exclamation point included with the CE mark denotes that the equipment has restrictions in certain countries.<br />
Following is a list of countries having restrictions on the AC4868 and a description of those restrictions. The OEM is<br />
responsible for ensuring that these restrictions are met.<br />
COUNTRY NOTIFICATION<br />
Table 14: AC4868 Country Restrictions<br />
RF Channel Country Restriction Reason/Remarks<br />
0x38 All countries (unless otherwise noted) Maximum ERP of 500 mW and maximum<br />
transmit duty cycle of 10% (amortized over<br />
one hour)<br />
0x38 Bulgaria Not implemented<br />
0x38 Finland Audio and voice are not permitted<br />
0x38 Germany Audio and voice are not permitted<br />
0x38 Italy Maximum ERP of 25 mW Military applications<br />
0x38 Slovak Republic Not implemented Military<br />
The OEM is responsible for notifying ANY country of the intent to ship product to that country containing the AC4868<br />
four weeks prior to shipping.<br />
31
32<br />
COMPLIANCY INFORMATION<br />
DECLARATION OF CONFORMITY<br />
<strong>Aerocomm</strong> has issued a Declaration of Conformity for the AC4868-250M transceiver module concerning emissions,<br />
EMC, and safety. The Declaration of Conformity is a document that lists the product name and band of use and must<br />
appear in the OEM user’s manual.
APPENDIX I - SAMPLE POWER SUPPLY I<br />
Below is a simple switching power supply that provides enough current to easily power any <strong>Aerocomm</strong> OEM module.<br />
It utilizes low cost, off the shelf components that fit into a small area. This supply has an input voltage range of +6<br />
volts to +18 volts and will output +3.4 volts at 1.5 amps.<br />
Included is a schematic, bill of materials with manufacture's name and part numbers and a sample PCB layout. It is<br />
important to follow the layout suggestions and use large areas of copper to connect the devices as shown in the<br />
layout. It is also important to hook up the ground traces as shown and use multiple vias to connect input and output<br />
capacitors to the bottom side ground plane.<br />
If the input voltage will be less than 12 volts then C1 and C2 can be replaced with a single 100uF 20 volt capacitor<br />
(same part number as C7). This will reduce board space and lower costs further. If you are powering an AC5124<br />
module, R1 can be changed to a 373 ohm 1% resistor. This will change the output to +5 volts at 1.0 amps.<br />
BILL OF MATERIALS<br />
Table 15: Power Supply Bill of Materials<br />
Qty Reference Value Description Mfg. Mfg. part number<br />
1 R1 210 Res, 0603, 210, 1/16W, 1% KOA RK73H1JT2100F<br />
1 R2 127 Res, 0603, 127, 1/16W, 1% KOA RK73H1JT1270F<br />
2 C1 C2 47uF Cap, Tant, 7343, 47uF, 35V AVX TPSE476M035R0200<br />
3 C3 C4 C5 0.1uF Cap, Cer, 0603, 0.1uF, Y5V, 25V Murata GRM39Y5V104Z025AD<br />
1 C6 3300pF Cap, Cer, 0603, 3300pF, X7R, 50V Murata GRM39X7R332K050AD<br />
1 C7 100uF Cap, Tant, 7343, 100uF, 20V Kemet T491X107K020A5<br />
1 D1 B230/A Diode, SMB, B230/A, 2A, Schottkey<br />
1 D2 LL4148 Diode, MELF, LL4148, Switch<br />
Diode<br />
www.aerocomm.com<br />
Diodes, Inc. B230/A<br />
Diodes, Inc. LL4148<br />
1 L1 15uH Xfmr, 2P, SMT, 15uH, 2A Coiltronics UP2.8B150<br />
1 U1 CS51413 IC, CS51413, 8P, SO, Switch Reg<br />
Ctrl.<br />
On-Semicond.<br />
CS51413
34<br />
APPENDIX I - SAMPLE POWER SUPPLY<br />
SCHEMATIC<br />
PCB LAYOUT
www.aerocomm.com<br />
APPENDIX I - SAMPLE POWER SUPPLY<br />
35
APPENDIX II - 5V TO 3.3V LEVELS II<br />
All inputs on the AC4868-250 are weakly pulled high via 10 kohm resistors. The AC4868-250 has 3.3V only inputs.<br />
Some of the most common voltage conversion methods are described below.<br />
Voltage Level Conversion IC’s<br />
This is the easiest and most efficient method. <strong>Aerocomm</strong> recommends the TI SN74LVC244A Octal Buffer/Driver.<br />
Inputs can be driven from either 3.3 or 5V systems, allowing the device to be used in a mixed 3.3/5V system.<br />
1<br />
1OE<br />
2<br />
1A0<br />
3<br />
2Y3<br />
4<br />
1A1<br />
5<br />
2Y2<br />
6<br />
1A2<br />
7<br />
2Y0 2Y1<br />
8<br />
GND 1A3<br />
9<br />
2Y0<br />
10<br />
GND<br />
74LVC244<br />
20<br />
VCC<br />
19<br />
2OE<br />
18<br />
1Y0<br />
17<br />
2A3<br />
16<br />
1Y1<br />
15<br />
2A2<br />
14<br />
1Y3 1Y2<br />
13<br />
2A0 2A1<br />
12<br />
1Y3<br />
11<br />
2A0<br />
Passive Resistor Voltage Divider<br />
While a resistor voltage divider can successfully drop the 5V to the required 3.3V, it will draw static current all of the<br />
time. Typically this method is only suitable for one-way 5V to 3.3V conversion. When choosing the resistor values,<br />
one needs to include the radio’s internal 10 kohm resistors on the input signals.<br />
www.aerocomm.com<br />
1<br />
18<br />
Y0 OE A0<br />
2<br />
16<br />
Y1<br />
A1<br />
4<br />
14<br />
Y2<br />
A2<br />
6<br />
12<br />
Y3<br />
A3<br />
8<br />
74LVC244<br />
Input A<br />
Input B<br />
Input C<br />
Input D