Water Dispenser Use & Care Manual - Hamilton Beach
Water Dispenser Use & Care Manual - Hamilton Beach
Water Dispenser Use & Care Manual - Hamilton Beach

Create successful ePaper yourself
Turn your PDF publications into a flip-book with our unique Google optimized e-Paper software.
_________________________________<br />
<strong>Water</strong> <strong>Dispenser</strong><br />
<strong>Use</strong> & <strong>Care</strong> <strong>Manual</strong><br />
Model 2202<br />
Modelo 2202
INTRODUCTION TO YOUR NEW HAMILTON BEACH<br />
WATER DISPENSER (model 2202)<br />
Congratulations, you have acquired a high quality <strong>Hamilton</strong> <strong>Beach</strong> <strong>Water</strong> <strong>Dispenser</strong> for<br />
bottled water. This unit is packed with many extra features that you will find convenient to use.<br />
Multi-temperature capability allows you to enjoy a cool drink, hot beverage or simply cook your<br />
meals. It will provide you with many years of trouble free use if you follow the safety<br />
precautions and operating instructions provided in this easy-to-use manual. Please take the time<br />
to read it, and save these instructions for future use. Please also remember to record the model<br />
and series code. They are on a label in back of the unit.<br />
_________________ ___________________ __________________<br />
Model number Series code Date of purchase<br />
READ ALL INSTRUCTIONS BEFORE USING!<br />
IMPORTANT SAFEGUARDS<br />
When using electrical appliances, basic safety precautions should be followed, including the<br />
following:<br />
• WARNING: BURN HAZARD. The<br />
dispenser heats water to a temperature of<br />
approximately 190°F (88°C). <strong>Water</strong><br />
temperatures above 125°F (52°C) can<br />
cause severe burns or death from<br />
scalding. Children, the disabled and the<br />
elderly are at highest risk of being<br />
scalded. Children should be supervised by<br />
an adult when using this product.<br />
• WARNING: CRUSH AND FALL<br />
HAZARD. Do not allow children to<br />
climb, stand or hang on the outside of the<br />
dispenser, or on the shelves inside the<br />
storage cabinet. They could tip the<br />
dispenser over or fall and seriously<br />
injure themselves. Children should be<br />
supervised by an adult when using this<br />
product.<br />
• WARNING: FIRE HAZARD. Do not<br />
store or use gasoline or other flammable<br />
vapors and liquids in the vicinity of this<br />
1<br />
or any other appliance. Do not operate<br />
dispenser with a damaged cord. Do not<br />
use with an underrated extension cord.<br />
• WARNING: SHOCK HAZARD. Unplug<br />
the water dispenser before cleaning or<br />
wiping up spilled water on unit. Do not<br />
attempt to service the dispenser. Do not<br />
operate dispenser with a damaged cord.<br />
• WARNING: TOXIC SUBSTANCE<br />
HAZARD. Do not use with water that is<br />
microbiologically unsafe or of unknown<br />
quality. Do not dispense anything other<br />
than water of known quality.<br />
• CAUTION: SPOILED FOOD HAZARD.<br />
The storage compartment in this unit is<br />
not a refrigerator. Do not store<br />
perishable food in compartment.
DANGER: CHILD ENTRAPMENT HAZARD.<br />
PROPERLY DISPOSE OF THE WATER DISPENSER AS<br />
DIRECTED BELOW.<br />
Child entrapment and suffocation are not<br />
problems of the past. Junked or abandoned<br />
dispensers with storage areas are still<br />
dangerous…even if they will sit for “just a<br />
few days.” If you are getting rid of your old<br />
water dispenser, please follow these<br />
instructions to help prevent accidents.<br />
BEFORE YOU THROW AWAY YOUR<br />
OLD DISPENSER:<br />
• Take off the doors and discard<br />
separately.<br />
• Leave the shelves in place so that<br />
children may not easily climb inside.<br />
• If the dispenser door has a lock, make it<br />
unusable.<br />
SAVE THESE INSTRUCTIONS!<br />
2<br />
REFRIGERANT DISPOSAL:<br />
Your old water dispenser may have used a<br />
regulated refrigerant in its cooling system.<br />
These refrigerants are believed to harm<br />
stratospheric ozone. If you are throwing<br />
away your old dispenser, make sure the<br />
refrigerant is removed and recovered for<br />
proper disposal by an EPA-certified<br />
technician. If you intentionally release this<br />
refrigerant, you can be subject to fines and<br />
imprisonment under provisions of<br />
environmental legislation.
PROPER INSTALLATION AND LOCATION<br />
1) <strong>Dispenser</strong> is for indoor use only. Do<br />
not use outdoors.<br />
2) To prevent algae growth, find a<br />
location for your dispenser that is<br />
protected from direct sunlight and<br />
other sources of heat (e.g., radiators,<br />
baseboard heaters, cooking appliances,<br />
etc). Do not use when relative<br />
humidity is greater than 90%.<br />
3) Do not install the dispenser where the<br />
surrounding air temperature will be<br />
above 100°F (38°C) or below 50°F<br />
(10°C).<br />
4) Place the dispenser on a level surface<br />
that can support its weight with a full<br />
water bottle on it.<br />
5) To ensure that your water dispenser<br />
works at the maximum efficiency,<br />
leave at least 2 inches of clearance<br />
between all sides of the dispenser and<br />
any walls.<br />
6) To prevent damage to dispenser, do<br />
not plug dispenser into the power<br />
outlet until reading the instructions<br />
first!<br />
GROUNDING INSTRUCTIONS<br />
WARNING – Improper use of the grounding plug can result in a risk of<br />
electric shock.<br />
• This appliance must be grounded. In the<br />
event of an electrical short circuit,<br />
grounding reduces the risk of electric<br />
shock.<br />
• This appliance is equipped with a power<br />
cord having a grounding wire with a<br />
grounding plug. The plug must be<br />
plugged into an outlet that is properly<br />
installed and grounded.<br />
• Consult a qualified electrician if the<br />
grounding instructions are not completely<br />
understood, or if doubt exists as to<br />
whether the appliance is properly<br />
grounded.<br />
• If the outlet is a standard 2-prong wall<br />
outlet, it is your personal responsibility<br />
and obligation to have<br />
it replaced with a properly grounded 3prong<br />
wall outlet.<br />
3<br />
• Do not under any circumstances cut or<br />
remove the third (ground) prong from the<br />
power cord.<br />
• Do not use an adapter plug with this<br />
appliance.<br />
• Do not use an extension cord with this<br />
appliance. If the power cord is too short,<br />
have a qualified electrician install an<br />
outlet near the appliance<br />
• For best operation, plug the appliance<br />
into its own electrical outlet on a<br />
dedicated circuit to prevent flickering<br />
of lights, blowing of fuse, or tripping<br />
of circuit breaker.
GETTING FAMILIAR WITH YOUR HAMILTON BEACH<br />
WATER DISPENSER<br />
Features:<br />
• Designed for in home or office use.<br />
• Front panel has three indicator lights, to see if the power, heating and cooling are on.<br />
• Two power switches are located on the back of the dispenser. One is for cooling and one<br />
for heating.<br />
• Designed with distinctive thermal isolation technology, this dispenser can minimize<br />
thermal exchange between hot and cold water.<br />
• Both hot water tank and cooling tank are 304 stainless steel.<br />
• Convenient, built-in, 0.50 cubic foot storage compartment for non-perishable items.<br />
• Chilling compressor is quiet and durable.<br />
• There are two high-flow faucets on the front of the unit. The faucet with the red childsafety<br />
button is for hot water and blue is for cold water.<br />
• Hot water faucet has a child resistant hot water guard. To operate it, push the tab<br />
clockwise to disengage the locking device, then push the push button inward.<br />
• Removable, easy-to-clean drip tray.<br />
• The power cord has a grounded plug. Please make sure that your outlet is properly<br />
grounded.<br />
• Rated power is 420W for heating and 90W for cooling<br />
• Fits 3 or 5 gallon bottles<br />
4
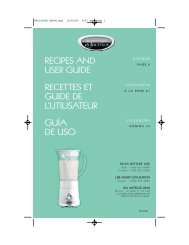
Parts Listing:<br />
Part No. Part Name Part No. Shown<br />
on Diagram<br />
5<br />
1<br />
2<br />
Part No. Part Name Part No. Shown<br />
on Diagram<br />
HB-BS-1003 Bottle Supporter 1 HB-DT-1012 Drip Tray 9<br />
HB-SE-1004 Separator 2 HB-SD-1013 Storage Door 10<br />
HB-CT-1005 Cold <strong>Water</strong> Tank 2B HB-RS-1014 Removable Shelf 10B<br />
HB-GIL-1006 Green Indicator Light 3 HB-HS-1015 Heating Switch 11<br />
HB-RIL-1007 Red Indicator Light 4 HB-CS-1016 Cooling Switch 12<br />
HB-BIL-1008 Blue Indicator Light 5 HB-TH-1017 Thermostat 13<br />
(Do not touch) (under panel)<br />
HB-CWF-1009 Cold <strong>Water</strong> Faucet 6 HB-PC-1018 Power Cord 14<br />
HB-HWF-1010 Hot <strong>Water</strong> Faucet 7 HB-DOC-1019 Drain Outlet Cap 15<br />
HB-CAS-1011 Casing 8 HB-SS-1020 Silicon Stopper 15B
PREPARING, LOADING & OPERATING YOUR DISPENSER<br />
1) Make sure that the dispenser is not plugged into the electrical outlet and that both the<br />
hot and cold power switches (on the back of the dispenser) are set to the OFF position.<br />
2) Sanitize the dispenser water tanks prior to installing a full bottle of water for the first<br />
time (see “Proper <strong>Care</strong> and Cleaning of <strong>Dispenser</strong>”).<br />
3) The water bottle will have a cap. The cap may have a stopper that is intended to be<br />
pushed into the bottle. (Sometimes these stoppers are covered by a removable<br />
paper/foil seal.) If your bottle has a cap with a stopper, simply hold the water bottle<br />
vertically straight upside down and place the water bottle into the support collar on<br />
top of the water dispenser. The post in the collar will push the stopper into the bottle.<br />
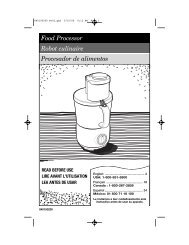
If the water bottle cap does not have a stopper that is intended to be pushed into the<br />
bottle, first remove the support collar of the water dispenser by turning it<br />
counterclockwise and pulling it straight up and off. Then remove the cap from the<br />
water bottle. Quickly lift the water bottle, turn it upside down, and place the water<br />
bottle onto the top of the water dispenser. Wipe up any water that spills on to the<br />
water dispenser or floor.<br />
________Rotate counterclockwise<br />
and pull straight off<br />
a. Press the hot and cold dispenser buttons until water runs from all faucets.<br />
NOTICE: To avoid damage to the dispenser, do not plug in the power cord or turn<br />
on the heating switch (red) until water runs freely from the hot water faucet when<br />
the hot water faucet is activated.<br />
b. Plug in the dispenser into a grounded power outlet (see Grounding Instructions).<br />
c. Set the HOT and COLD power switch (located on the rear of the dispenser) to the<br />
ON position. Indicators light up accordingly once the dispenser is functioning.<br />
NOTICE: To prevent damage to dispenser, give the dispenser four hours to warm<br />
up to room temperature before plugging it in if the dispenser is brought in from<br />
outside in the winter time.<br />
4) Allow 30 minutes for water to reach hot and cold temperatures.<br />
6
5) The hot water temperature is preset to 190 degrees Fahrenheit (88 degrees Celsius).<br />
The HOT dispenser button is equipped with a child safeguard that reduces the risk of<br />
hot water being dispensed accidentally or by small children.<br />
WARNING: BURN HAZARD. The dispenser heats water to a temperature of<br />
approximately 190 ° F (88 ° C). <strong>Water</strong> temperatures above 125 ° F (52 °C) can<br />
cause severe burns or death from scalding. Children, the disabled and the elderly<br />
are at highest risk of being scalded. Children should be supervised by an adult<br />
when using this product.<br />
6) Before the dispenser leaves the factory, the cold water thermostat is properly set. Do<br />
not adjust the thermostat.<br />
7) When bottle is empty, vertically pull it out by two hands, then replace it with another<br />
bottle.<br />
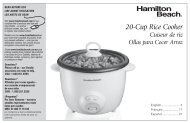
8) The spilled water in the drip tray must be removed regularly and cleaned properly. To<br />
remove it, slide tray out.<br />
________ Drip Tray Grille<br />
________Drip Tray<br />
9) In case hot or cold water is not needed for an extended period of time, turn off the<br />
switch accordingly to save power.<br />
NOTICE: To prevent damage to dispenser, do not turn cold water switch back on<br />
within 3 minutes of having turned it off.<br />
PROPER CARE AND CLEANING OF DISPENSER_____________________<br />
WARNING: SHOCK HAZARD. Unplug the water dispenser before cleaning.<br />
Cleaning the Outside and Storage Compartment:<br />
IMPORTANT: Set both power switches (on the back of the dispenser) to the OFF position and<br />
unplug the water dispenser before cleaning.<br />
The inside and outside of the cabinet can be washed with mild soap and water. Rinse thoroughly<br />
with clear water. Never use commercial cleaners or abrasive scouring powders.<br />
Sweep away or vacuum any dust from the condenser coils on the back of the unit. For best results,<br />
use a brush specially designed for this purpose. It is available at most appliance stores.<br />
Cleaning the Inside of the Storage Compartment:<br />
For prevention of odor, place an open box of baking soda in the storage compartment.<br />
7
IMPORTANT: Set both power switches (on the back of the dispenser) to the OFF position and<br />
unplug the water dispenser before cleaning.<br />
<strong>Use</strong> a solution of warm water and baking soda (approximately one tablespoon of baking soda to<br />
one quart of water). This will clean and neutralize odors. Then rinse and wipe dry.<br />
Other parts of the storage compartment including door gaskets and plastic parts can be cleaned in<br />
the same manner.<br />
NOTICE: To prevent damage to the water dispenser, the plastic storage parts are not to be<br />
washed in the dishwasher.<br />
Draining Instruction:<br />
The dispenser should be drained before cleaning the tanks and before leaving for long vacations or<br />
absences.<br />
1) Set both power switches (on the back of the dispenser) to the OFF position and unplug<br />
the dispenser.<br />
2) Dispense water from both buttons into container(s) until no more water can be<br />
dispensed (about 1 quart of water still remains in the dispenser). Put a container that<br />
will withstand hot water under the hot water faucet.<br />
3) Remove the water bottle from the dispenser.<br />
4) Place a large bucket beneath the drain outlet on the rear of the dispenser.<br />
5) Using a Phillips screwdriver, loosen the screws on the bracket covering the drain outlet<br />
cap. Rotate the bracket out of the way to allow access to the cap.<br />
6) Remove the cap and silicon stopper from the drain outlet and allow water to drain.<br />
8
WARNING: BURN HAZARD. The dispenser heats water to a temperature of<br />
approximately 190 ° F(88 ° C). <strong>Water</strong> temperatures above 125 ° F (52 °C) can<br />
cause severe burns or death from scalding. Children, the disabled and the elderly<br />
are at highest risk of being scalded. Children should be supervised by an adult<br />
when using this product.<br />
After draining, replace the silicon stopper and cap.<br />
7) Rotate the bracket back into place and tighten screws.<br />
8) Make sure to install a full bottle and dispense water from both water faucets before<br />
plugging in and turning on the dispenser (see Preparing, Loading and Operating Your<br />
<strong>Dispenser</strong>).<br />
Cleaning the Drip Tray and Grill:<br />
The drip tray is not self-draining. To reduce water spotting or deposits, the tray and its grill should<br />
be emptied, cleaned and wiped dry regularly. Clean with mild soap or on the top rack in the<br />
dishwasher.<br />
Cleaning the Separator:<br />
1) IMPORTANT: Set both power switches (on the back of the dispenser) to the OFF<br />
position and unplug the water dispenser before cleaning.<br />
2) Remove the water bottle and drain the dispenser (see Draining Instruction).<br />
3) Remove the support collar by turning counterclockwise and pulling straight off.<br />
________Rotate counterclockwise<br />
and pull straight off<br />
9
4) Remove the plastic separator by pulling straight out (you may need to twist slightly to<br />
loosen).<br />
5) Clean the separator with dish soap and water or in the top rack of the dishwasher.<br />
6) Dry the separator thoroughly on both sides.<br />
7) Using a clean cloth or paper towel, thoroughly dry the cold water reservoir.<br />
8) Place the separator back in the dispenser. Make sure the long, tapered end of the separator<br />
is positioned firmly on the metal plug on the bottom of the reservoir.<br />
9) Replace the support collar and turn clockwise until it is firmly in place.<br />
10) Install a full water bottle on the dispenser (see Preparing and Loading Your <strong>Dispenser</strong> for<br />
<strong>Use</strong>).<br />
Sanitizing and Cleaning the <strong>Water</strong> Tanks:<br />
Important: Periodically the water dispenser tanks must be sanitized to prevent unpleasant tastes in<br />
the water and cleaned to remove mineral deposits that can impair flow.<br />
To Sanitize:<br />
Important: Before cleaning, set both power switches (on the back of the dispenser) to the OFF<br />
position and unplug the water dispenser. Note: For first time installation, skip next three steps.<br />
1) Empty the water bottle, then remove it from the dispenser.<br />
2) Drain the water tanks (see Draining Instruction)<br />
10
3) Reinstall the silicon stopper and drain cap (see Draining Instruction)<br />
4) DO NOT ADD BLEACH FIRST OR DIRECTLY TO THE DISPENSER.<br />
Concentrated bleach may damage plastic.<br />
5) Add ½ teaspoon (2.5 ml) of ordinary 6.0% maximum household bleach to a 2 quart (2 liter)<br />
pitcher filled with tap water.<br />
6) Pour the solution in the opening at the top of the dispenser.<br />
7) Repeat last two steps until the dispenser is full.<br />
8) Press the hot and cold dispenser buttons until the water just begins to flow from the faucets.<br />
9) Allow to sit for 15-20 minutes.<br />
10) Rinse out the bleach solution.<br />
11) Drain the water tanks into a large bucket (see Draining Instruction).<br />
12) Make sure that the silicon stopper is NOT installed.<br />
13) IMPORTANT: Remove the separator and wipe out the cold water reservoir<br />
(see Cleaning the Separator).<br />
14) Clean, then reinstall the separator and collar (see Cleaning the Separator).<br />
15) Pour approximately 1 gallon (4 quarts or 4 liters) of fresh tap water into the top and allow<br />
to drain into the bucket.<br />
16) Flush with an additional 1 gallon (4 quarts or 4 liters) of fresh tap water and allow to drain<br />
into the bucket.<br />
17) Reinstall the silicon stopper and drain cap (see Draining Instruction).<br />
18) Install a fresh water bottle (see Preparing and Loading Your <strong>Dispenser</strong> for <strong>Use</strong>).<br />
19) Dispense 1 quart (1 liter) of water from each faucet and taste to make sure the bleach<br />
solution is completely removed.<br />
20) If you continue to taste the chlorine from the bleach solution, repeat steps 11 – 20 until the<br />
taste is gone.<br />
21) Plug in the dispenser. Then turn on the hot and cold power switches (on the back of the<br />
dispenser).<br />
11
To Remove Mineral Deposits:<br />
Mix 2 quarts (2 liters) of water with two quarts of vinegar OR mix 1 gallon of water (4 liters) with<br />
16 ounces (454 g) of citric acid crystals. Bleach does not remove mineral deposits. Do this in<br />
place of step 6 above when removing mineral deposits.<br />
Preparing for Vacation:<br />
For long vacations or absences, set both power switches (on back of the dispenser) to the OFF<br />
position.<br />
Unplug the water dispenser.<br />
Remove the water bottle.<br />
Drain the water tanks (see Draining Instructions)<br />
Dry the separator thoroughly on both the top and bottom (see Cleaning the Separator).<br />
After returning from vacation, make sure to sanitize the water tanks before using the dispenser (see<br />
Sanitizing and Cleaning the <strong>Water</strong> Tank).<br />
TROUBLE SHOOTING_____________________________________________<br />
PROBLEM POSSIBLE CAUSES SOLUTION<br />
No hot or cold water 1. over consumption of hot or 1. wait 30 minutes<br />
cold water in short period before using again<br />
of time<br />
2. no power supply 2. connect plug to socket,<br />
turn on heating or<br />
cooling switch.<br />
<strong>Water</strong> is not cool <strong>Dispenser</strong> is unplugged Push plug completely into<br />
outlet<br />
Cooling switch not on Check to be sure cooling<br />
switch is turned to ON<br />
The fuse is blown/circuit Replace house fuse or reset<br />
breaker is tripped circuit breaker.<br />
12<br />
If too many items are<br />
plugged into a single<br />
circuit, move some items<br />
to a different circuit
Temperature limiter tripped Set the hot and cold power<br />
switches to OFF position.<br />
Wait five minutes, then set<br />
switches to ON position.<br />
Wait 30 minutes for water<br />
to heat or cool.<br />
<strong>Water</strong> is not hot <strong>Dispenser</strong> is unplugged Push plug completely into<br />
outlet<br />
Heating switch not on Check to be sure heating<br />
switch is turned to ON<br />
The fuse is blown/circuit Replace house fuse or reset<br />
breaker is tripped circuit breaker.<br />
If too many items are<br />
plugged into a single<br />
circuit, move some items<br />
to a different circuit<br />
Temperature limiter tripped Set the hot and cold power<br />
switches to OFF position.<br />
Wait five minutes, then set<br />
switches to ON position.<br />
Wait 30 minutes for water<br />
to heat or cool.<br />
PROBLEM POSSIBLE CAUSES SOLUTION<br />
No water running 1. empty bottle 1. replace with new bottle<br />
out from faucets 2. inlet of bottle supporter 2. clean out wasted paper<br />
blocked by bottle seal and bottle seal, install<br />
bottle again<br />
<strong>Water</strong> dispenser does 1. empty water bottle 1. replace with new bottle<br />
not work 2. mineral deposits clogging tank 2. see <strong>Care</strong> and Cleaning.<br />
<strong>Water</strong> dispenser leaks crack or pin hole in bottle replace with new bottle<br />
from the outside<br />
Compressor runs too 1. room temperature is hotter This may be necessary to<br />
frequently than normal maintain a constant<br />
temperature during hot<br />
and humid days<br />
2. dispenser does not have Check to be sure unit is<br />
proper clearance properly located to ensure<br />
adequate airflow<br />
Noisy operation improper installation place the machine on level<br />
surface<br />
13
Bottle making a gurgling noise this is normal<br />
Hot water boiling sound this is normal<br />
<strong>Dispenser</strong> or water bottle this is normal<br />
shakes when the cooling<br />
system cycles off<br />
Particles floating in <strong>Water</strong> has high mineral find a water source with<br />
<strong>Water</strong> content lower hardness<br />
<strong>Water</strong> in bottle is hot <strong>Water</strong> is boiling in the hot press the hot dispenser<br />
tank and bubbling up into button until water flows to<br />
the bottle remove air from the hot tank<br />
Foul odor in air around Hot water tank is empty or press the hot dispenser<br />
dispenser not completely full button until water flows to<br />
remove air from the hot tank<br />
<strong>Water</strong> has poor taste Separator needs cleaning See Cleaning the Separator<br />
or odor<br />
Unit needs to be sanitized See Cleaning and Sanitizing<br />
the <strong>Water</strong> Tanks.<br />
14
Consumer Support__________________________________________________<br />
Questions? How to contact us: Telephone 800-488-5080 (Monday – Friday 8:00AM-5:00 PM ET)<br />
E-mail: sales@hbwaterdispensers.com<br />
15<br />
support@hbwaterdispensers.com
What does this warranty cover?<br />
- Any defect in materials or workmanship in the manufactured<br />
product<br />
What does this warranty not cover?<br />
- <strong>Water</strong> Bottles<br />
- Service trips to your home to teach you how to use the<br />
product.<br />
- Improper installation.<br />
- Failure of the product if it is abused, misused, altered or<br />
used for other than the intended purpose.<br />
- Products that are used outside a residential or office<br />
envinronment.<br />
- Replacement of house fuses or resetting of circuit<br />
breakers.<br />
- <strong>Use</strong> of this product where water is microbiologically<br />
unsafe or of unknown quality.<br />
- Damage to the product if used to dispense anything other<br />
than water.<br />
- Damage to the product caused by accident, fire, floods or<br />
acts of God.<br />
- Any service to the product<br />
- Incidental or consequential damage caused by possible<br />
defects with this appliance, its installation or repair.<br />
For how long after the original purchase?<br />
- One (1) year.<br />
LIMITED 1-YEAR WARRANTY<br />
How do I make a warranty claim?<br />
- Return to the retailer from which it was purchased, along with a<br />
copy of the store receipt within the given period of time allowed<br />
for returns by the retailer (i.e. 90 days). After this period of time,<br />
contact TTI Appliances at 1 800 579 7990. A refund will be<br />
provided once the defective unit and a copy of the receipt has been<br />
shipped to and received by TTI Appliances. This warranty<br />
excludes any cost of shipping to or from TTI Appliances.<br />
How does state law relate to this warranty?<br />
- This warranty is extended to the original purchaser and<br />
any succeeding owner for products purchased for home<br />
or office use within the USA. Some states do not allow<br />
the exclusion or limitation of incidental or<br />
consequential damages. This warranty gives you<br />
specific legal rights, and you may also have other<br />
rights which vary from state to state. To know what<br />
your legal rights are, consult your local or state<br />
consumer affairs office or your state’s Attorney<br />
General.<br />
Exclusion of implied warranties: Except where prohibited or<br />
restricted by law, there are no warranties, whether express,<br />
oral or statutory which extend beyond the description on the<br />
face hereof, including specifically the implied warranties of<br />
merchantability or fitness for a particular purpose.<br />
Warrantor: TTI Appliances, Los Angeles, CA 90025<br />
------------------------------------------------------------------------------------------------------------------------------------------------------------<br />
16
IMPORTANT NOTICES<br />
1. TO PREVENT DAMAGE TO WATER<br />
DISPENSER, LET UNIT STAND UPRIGHT<br />
FOR A MINIMUM OF FOUR HOURS<br />
BEFORE PLUGGING IN POWER<br />
CORD.<br />
2. TO PREVENT DAMAGE TO WATER<br />
DISPENSER, DO NOT PLUG IN OR TURN<br />
ON YOUR WATER DISPENSER<br />
UNLESS THERE IS WATER<br />
IN THE SYSTEM.<br />
3. ODORS MAY RESULT IF THE<br />
WATER HEATER COMES ON<br />
WHEN THERE IS NO WATER<br />
IN THE TANK.<br />
4. PRIOR TO FIRST USE, PLEASE<br />
REMOVE CARBON ABSORBENT BAG<br />
ATTACHED TO THE OUTSIDE OF<br />
CONDENSOR ON THE BACK OF YOUR<br />
NEW DISPENSER, AND DISPOSE OF<br />
PROPERLY.<br />
QUICK START<br />
INSTRUCTIONS<br />
1. ENSURE THE DISPENSER<br />
IS UNPLUGGED AND SWITCHED OFF.<br />
2. CLEAN AND SANITIZE<br />
THIS DISPENSER BEFORE USE.<br />
NOTICE: TO PREVENT DAMAGE TO<br />
DISPENSER, FOLLOW THE DIRECTIONS<br />
IN YOUR OWNER’S MANUAL.<br />
3. LOAD A NEW BOTTLE.<br />
NOTICE: TO PREVENT DAMAGE TO<br />
DISPENSER, FOLLOW THE<br />
DIRECTIONS IN YOUR OWNER’S<br />
MANUAL.<br />
4. DISPENSE A SMALL AMOUNT<br />
OF WATER FROM EACH FAUCET.<br />
5. PLUG IN AND TURN ON YOUR<br />
DISPENSER<br />
QUESTIONS? Call 1-800-488-5080<br />
NOTA IMPORTANTE<br />
PARA PREVENIR DAÑOS DEJE LA<br />
UNIDAD DE PIE POR UN MÍNIMO DE<br />
CUATRO HORAS ANTES DE<br />
CONECTAR EL CABLE ELÉCTRICO.<br />
PARA PREVENIR DAÑOS NO ENCHUFE O<br />
ENCIENDA SU DISPENSADOR DE AGUA<br />
A NO SER QUE HAYA AGUA EN EL<br />
SISTEMA<br />
PODRÍAN RESULTAR MALOS OLORES<br />
SI EL CALENTADOR DE AGUA ES<br />
ENCENDIDO CUANDO NO HAY<br />
AGUA EN EL TANQUE<br />
ANTES DE USARLO POR PRIMERA VEZ,<br />
REMUEVA LA BOLSA DE CARBON<br />
ABSORBENTE ADHERIDO A LA PARTE<br />
POSTERIOR DE ESTE DISPENSADOR, Y<br />
PONGALE EN LA BASURA.<br />
INSTRUCCIONES RÁPIDAS<br />
ASEGÚRESE DE QUE EL DISPENSADOR<br />
ESTA DESCONECTADO Y APAGADO<br />
LIMPIE Y DESINFECTE ESTE<br />
DISPENSADOR ANTES DE USAR. NOTA:<br />
PARA PREVENIR DAÑOS SIGA LAS<br />
INSTRUCCIONES EN SU MANUAL DE<br />
PROPIETARIO.<br />
COLÓQUESE UNA BOTELLA<br />
LLENA. PARA PREVENIR DANOS<br />
SIGA LAS INSTRUCCIONES EN U S<br />
MANUAL DE PROPIETARIO<br />
DEJE CORRER PEQUEÑA PORCIÓN<br />
DE AGUA DE CADA GRIFO.<br />
ENCHUFE Y ENCIENDA SU<br />
DISPENSADOR<br />
PREGUNTAS? LLAME AL 1-800-488-5080<br />
HAMILTON BEACH WATER<br />
DISPENSER QUICK START<br />
GUIDE<br />
GUIA RAPIDA PARA<br />
DISPENSADOR DE AGUA<br />
HAMILTON BEACH . . .<br />
WELCOME TO ANOTHER<br />
GREAT HAMILTON BEACH <br />
PRODUCT<br />
BIENVENIDO A OTRO<br />
FABULOSO PRODUCTO DE<br />
HAMILTON BEACH<br />
OFF<br />
position<br />
Posicion APAGADO (OFF)<br />
ON<br />
position<br />
Posicion ENCENDIDO (ON)