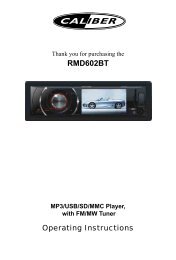
Create successful ePaper yourself
Turn your PDF publications into a flip-book with our unique Google optimized e-Paper software.
Warnings<br />
When Driving<br />
Keep the volume level Iow enough to aware of the road and traffic<br />
conditions.<br />
When Car Washing<br />
Do not expose the product to water or excessive moisture. This could<br />
cause electrical shorts, fire or other damage.<br />
CAUTION<br />
In order to avoid any accident, the driver must not watch video<br />
while driving. This unit is designed to not allow watching video<br />
while driving. Park your car in a safe place and engage the<br />
'parking brake' before watching video.<br />
When Parked<br />
Parking in direct sunlight can produce very high temperatures inside your<br />
vehicle. Give the interior a chance to cool down before starting playback.<br />
Use the Proper Power Supply<br />
This product is designed to operate with a 12 volt DC, negative ground<br />
battery system (the regular system in a North American car).<br />
Protect the Disc Mechanism<br />
Avoid inserting any foreign objects into the slot of this player. Failure to<br />
follow this may cause malfunction or permanent damage due to the<br />
precise mechanism of this unit.<br />
E - 2<br />
CAUTION<br />
THIS MOBILE DVD PLAYER IS A CLASS I LASER PRODUCT. THIS<br />
UNIT USES A VISIBLE/INVISIBLE LASER BEAM WHICH COULD<br />
CAUSE HAZARDOUS RADIATION IF EXPOSED DIRECTLY. BE<br />
SURE TO OPERATE THE MOBILE DVD PLAYER CORRECTLY AS<br />
INSTRUCTED.<br />
USE OF CONTROLS OR ADJUSTMENTS OR PERFORMANCE OR<br />
PROCEDURES OTHER THAN THOSE SPECIFIED HEREIN MAY<br />
RESULT IN HAZARDOUS RADIATION EXPOSURE.<br />
DO NOT OPEN COVERS AND DO NOT REPAIR BY YOURSELF<br />
PLEASE REFER SERVICING TO A QUALIFIED TECHNICIAN.<br />
NOTE<br />
To reduce the risk of fire or electric shock, do not expose this equipment<br />
to rain or moisture.<br />
To reduce the risk of fire or electric shock, and annoying interference,<br />
use only the recommended accessories.<br />
This device is intended for continuous operation.<br />
This product incorporates copyright protection technology that is<br />
protected by method claims of certain U.S. Patents and other intellectual<br />
property rights owned by Macrovision Corporation and other rights<br />
owners. Use of this copyright protection technology must be authorized<br />
by Macrovision Corporation, and is intended for home and other limited<br />
viewing uses only unless<br />
otherwise authorized by Macrovision Corporation. Reverse engineering<br />
or disassembly is prohibited.
Installation<br />
1. Before finally installing the unit, connect the wiring temporarily and<br />
make sure it is all connected up properly and the unit and system work<br />
properly.<br />
2. Use only the parts included with the unit to ensure proper installation.<br />
The use of un-authorized parts can cause mal functions.<br />
3. Consult with your nearest dealer if install-ation requires the drilling of<br />
holes or other modifications of the vehicle.<br />
4. Install the unit where it does not get in the driver's way and cannot<br />
injure the passenger if there is a sudden stop, like an emergency stop.<br />
5. If installation angle exceeds 30° from horizontal, the unit might not give<br />
its optimum performance.<br />
6. Avoid installing the unit where it would be subject to high temperature,<br />
such as from direct sunlight, or from hot air, from heater, or where it<br />
would be subject to dust dirt or excessive vibration.<br />
Installation with the half sleeve<br />
After inserting the half sleeve into the dashboard, select the appropriate<br />
tab according to the thickness of the dashboard material and bend them<br />
inwards to secure the holder in place.<br />
111<br />
182<br />
Half Sleeve<br />
Screw<br />
INSTALLATION CAUTION<br />
Dashboard<br />
Attach the trim ring<br />
Trim ring<br />
E - 3<br />
Installation using the screw holes on the side of<br />
the unit<br />
Select a position where the screw holes of the bracket and the screw<br />
holes of the main unit become aligned (are fitted) and tighten the screws<br />
at 2 places on each side.<br />
Factory radio<br />
mounting<br />
bracket<br />
Screw<br />
Hook<br />
Hook<br />
NOTE<br />
The outer trim ring, and half-sleeve are not used<br />
for this installation.<br />
The mounting box, metal half-sleeve, hook &<br />
screws are not included in the packing.<br />
Attached the Front Panel<br />
To attach the front panel back to the<br />
unit chassis, please insert the right side<br />
of the panel in the chassis until it is<br />
correctly engaged. Press the left side<br />
of the panel until the mechanism locks<br />
it into place.<br />
Screw<br />
2<br />
Dashboard or<br />
console<br />
1
Installation<br />
Detach the Front Panel<br />
Press the REL button on the front panel<br />
to release the panel, and push the left<br />
side of the panel rightward, then pull<br />
the panel towards you to disengage it<br />
from the chassis.<br />
Resetting the unit<br />
After releasing the front<br />
panel, use a stick or any<br />
non-metalic object to press<br />
& hold the reset button for<br />
five seconds to reset the<br />
unit.<br />
Reset Button<br />
2<br />
1<br />
E - 3
Connecting the System<br />
PIN WIRE COL OR<br />
FUNCTION/LABEL<br />
A4 YELLOW BATTERY(+)<br />
A5 BLUE CONNECT TO SYSTEM CONTROL TERMINAL<br />
OF THE POWER AMP OR AUTO ANTENNA<br />
RELACONTROL TERMINAL (max 150mA 12VDC)<br />
A7 RED<br />
IGNITION (ACC)<br />
A8 BLACK GROUND<br />
B1 VIOLET RIGHT REAR SPEAKER (+)<br />
B2 VIOLET/BLACK RIGHT REAR SPEAKER (-)<br />
B3 GREY RIGHT FRONT SPEAKER (+)<br />
B4 GREY/BLACK RIGHT FRONT SPEAKER (-)<br />
B5 WHITE LEFT FRONT SPEAKER (+)<br />
B6<br />
B7<br />
B8<br />
B<br />
A<br />
1<br />
2<br />
3<br />
4<br />
ISO Male Connector<br />
(not included)<br />
4<br />
5<br />
6<br />
7<br />
8<br />
5 7<br />
8<br />
WHITE/BLACK<br />
GREEN<br />
F US E<br />
FUSE<br />
LEFT FRONT SPEAKER (-)<br />
LEFT REAR SPEAKER (+)<br />
GREEN/BLACK LEFT REAR SPEAKER (-)<br />
Audio<br />
In R<br />
Audio<br />
In L<br />
Video<br />
In<br />
Video<br />
out 1<br />
Front<br />
RCA L<br />
Front<br />
RCA R<br />
Sub-W<br />
Rear<br />
RCA L<br />
Rear<br />
RCA R<br />
Camera<br />
In<br />
E - 4<br />
Antenna<br />
Extender Cable<br />
RCA TO RCA CABLE<br />
(Notsupplied)<br />
Back Up<br />
Camera Wire<br />
(Orange)<br />
P arking Wire (Pink)<br />
Gearbox<br />
switch<br />
Extrenal Microphone (B lack)<br />
Reverse gear signal<br />
Back Lamp Lead +<br />
Brake Switch<br />
Ground<br />
Camera In<br />
Rear Line Out R-CH<br />
Rear Line Out L-CH<br />
Subwoofer Out<br />
Front Line Out R-CH<br />
Front Line Out L-CH<br />
Video out 1<br />
Audio In R-CH<br />
Audio In L-CH<br />
Video In
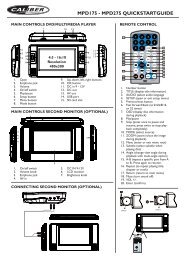
Overview Of The Main Unit<br />
1<br />
2<br />
6<br />
Release<br />
1 2 3 4 5 6 7<br />
FUNC XBS<br />
LIST<br />
EQ<br />
VOLUME<br />
DN UP<br />
SOURCE<br />
SETUP<br />
PUSH PUSH<br />
CLOCK<br />
BAND SUB-W<br />
INFO TRACK<br />
DN UP<br />
15 14 13 12 11 10 9 8<br />
Press to detach the front panel.<br />
Press to turn the unit on, press and hold turn the unit off.<br />
3 FUNC/XBS<br />
Press this button enter into the function mode.<br />
Hold & press this button to turn on or off the Bass booster function<br />
4<br />
5<br />
Power<br />
Source<br />
Press this button to select different source playback mode:<br />
TUNER / DISC / USB / SD CARD / AV1-IN / BT AUDIO / TV<br />
BAND/SUB-W<br />
Under Radio mode, press to change between BAND FM1,FM2,<br />
FM3, AM1(MW1) or AM2 (MW2).<br />
Hold & press to enter into the Subwoofer setting mode.<br />
DIMMER<br />
7<br />
8<br />
9<br />
10<br />
11<br />
INFO<br />
14<br />
Under the Bluetooth Handfree mode, press to answer an incoming<br />
call. Hold & press to enter into call Tansfer back to Mobile Phone.<br />
Under DVD playback mode, press repeatedly to view play 15<br />
information: Title--->Chapter--->Play time<br />
E - 5<br />
12<br />
13<br />
Eject<br />
Press this button to eject the Disc.<br />
Track Up/Down<br />
Under Radio mode, turn these buttons to enter into the Auto Seek<br />
mode, turn and hold to enter into the <strong>Manual</strong> Seek mode.<br />
Under Media playback mode, turn to skip a chapter/track/scene/file.<br />
Under Media playback mode, turn and hold momentarily to fast<br />
forward /backward.<br />
Pause<br />
Under Media playback mode, press to Pause/ Resume Play the music.<br />
Clock<br />
Press to view the Clock, press again to return to previous mode.<br />
Under the Bluetooth Handfree mode, press to end or reject an incoming call.<br />
Press to quick return previous menu or mode.<br />
Hold & press this button to adjust the Dimmer High or Low.<br />
List / EQ<br />
DIMMER<br />
Under tuner mode, press this button to show the List of stored station.<br />
Under media playback mode, press this button to list the searching of<br />
tracks or files on the media playback mode.<br />
Under DVD/MP4 mode, press this button to list the searching of DVD<br />
root menu or files on the playback mode.<br />
Under VCD mode, press this button to turn On/Off the PCB function.<br />
Hold & press this button to enter into the EQ setting mode.<br />
Setup<br />
Press this button to enter into the Setup mode.<br />
Mute<br />
Press to Mute or restore the volume.<br />
Encoder Volume Knob<br />
Rotate the Encoder Volume Knob to increase/decrease the volume.
Overview Of The Remote Control<br />
1<br />
2<br />
12<br />
3<br />
4<br />
13<br />
DIMMER<br />
LIST FUNC<br />
OK<br />
FUNCTION<br />
VOLUME<br />
SETTING<br />
6<br />
7<br />
5<br />
14<br />
15<br />
10<br />
11<br />
/ BAND<br />
Under Tuner mode, press this button to change the radio band.<br />
Under Media playback mode, press this button to Pause or Resume play.<br />
DVD AUDIO<br />
Under DVD playback mode, press this button to select audio<br />
language or audio channel.<br />
DVD MENU<br />
Under DVD mode, press this button access into DVD main menu.<br />
9<br />
10<br />
11<br />
BAND<br />
DVD<br />
AUDIO<br />
DVD<br />
MENU<br />
XBS<br />
DVD<br />
TITLE<br />
EQ<br />
DBSS<br />
16<br />
17<br />
18<br />
19<br />
12 LIST<br />
Under tuner mode, press this button to show the List of stored station.<br />
Under media playback mode, press this button to list the searching of<br />
tracks or files on the media playback mode.<br />
Under DVD/MP4 mode, press this button to list the searching of DVD<br />
8<br />
root menu or files on the playback mode.<br />
1 MUTE<br />
Under VCD mode, press this button to turn On/Off the PCB function.<br />
Press this button to turn the mute On / Off.<br />
13 /<br />
2<br />
3<br />
DIMMER<br />
Access into dimmer settings.<br />
/<br />
Under Tuner mode, press these buttons to tune for radio station.<br />
Under Media playback mode, press these buttons to skip to<br />
previous / next track / chapter. Press & hold these buttons to play<br />
fast backward / forward.<br />
Under tuner mode, skip to the previous/next preset station. 14<br />
Or under other modes use these button to move cursor Up/Down. Press this button to return to previous menu or exit.<br />
4 HOME<br />
15 SETTING<br />
Access into the HOME menu.<br />
Press this button enter into the Setting mode.<br />
5 /<br />
16 EQ<br />
Increase/Decrease the volume.<br />
Press this button access into equalizer setting menu.<br />
6 /POWER<br />
17 XBS<br />
Press this button to turn the unit on or off.<br />
Press this button to turn on or off the iX-BASS booster function.<br />
7 FUNCTION<br />
18 DBSS<br />
Press this button enter into the function mode.<br />
Press this button to turn on or off dynamic bass boost sound.<br />
8 OK<br />
19 DVD TITLE<br />
Use this button to confirm the selection.<br />
E - 6<br />
Under DVD mode, press this button to select DVD subtitle language.<br />
9
Adjust Settings<br />
Press the SETUP button on the front<br />
panel to access into the setup mode.<br />
User can rotate the Encoder Volume<br />
Knob to select the options, then<br />
press to confirm.<br />
Adjust Speaker Setting<br />
User can rotate the Encoder Volume<br />
Knob to adjust the Front and Rear<br />
speaker fader, the Left and Right<br />
speaker balance settings value from -<br />
12 to +12.<br />
Adjust EQ Setting<br />
User can rotate the Encoder Volume<br />
Knob to select the Preset Equalizer:<br />
USER / VOCAL / JAZZ / CLASSIC /<br />
ROCK / TECHNO / POP / EQ OFF.<br />
1. Press button to select the<br />
below settings, and rotate the<br />
Encoder Volume Knob to adjust<br />
the level.<br />
[BASS]:bass level range -15dB to +15dB.<br />
[MIDDLE]:middle level range -15dB to +15dB.<br />
[TREBLE]:treble level range -15dB to +15dB.<br />
[LPF]:low pass filter as 60Hz, 80Hz, 100Hz or 200Hz.<br />
[MPF]:middle pass filter level range 500Hz, 1KHz, 1.5KHz or 2.5KHz.<br />
[HPF]:high pass filter level range 10KHz, 12.5KHz, 15KHz or17.5KHz.<br />
E - 7<br />
2. Press RESET button to restore the above settings into default<br />
NOTE<br />
Hold & press LIST button on the front panel is to quick get into the<br />
Preset Equalizer Setting menu.<br />
Subwoofer Setting<br />
User can rotate the Encoder Volume<br />
Knob to turn on or off the subwoofer<br />
function.<br />
Press to select the settings, and<br />
rotate Encoder Volume Knob to<br />
adjust value of subwoofer level and<br />
subwoofer low pass filter.<br />
NOTE<br />
Hold & press BAND button on the front panel is to quick get into the<br />
Subwoofer Setting menu.<br />
Tuner Setting<br />
User can rotate the Encoder Volume<br />
Knob to select the below settings:<br />
[Tuner Area]: This option allows<br />
the selection of the frequency<br />
spacing appropriate for your area.<br />
Press to select the Tuner Area:<br />
U.S.A, <strong>Europe</strong>, Oirt, Latin.<br />
This unit is default to “<strong>Europe</strong>”.<br />
[RDS On/Off]: Press to turn On or Off the RDS function.
Adjust Settings<br />
Adjust System Setting<br />
User can rotate the Encoder Volume<br />
Knob to select the System Settings,<br />
then press to enter into adjust<br />
the below options:<br />
[Sound]: User can rotate the<br />
Encoder Volume Knob to select the<br />
Sound mode, and press to<br />
turn on or off the selection.<br />
[Date/Time]: Rotate the Encoder Volume Knob to adjust the Date /<br />
Time, and then press to confirm.<br />
E - 8<br />
Adjust Dimmer Setting<br />
Press button to adjust the TFT<br />
backlight level between High or Low.
Tuner Operations<br />
Adjust Tuner Function<br />
Press the FUNC button on front panel<br />
under Tuner playback mode access<br />
into the Tuner Function menu. User<br />
can rotate the Encoder Volume Knob<br />
to select the below options:<br />
[<strong>Manual</strong> Store]: Use this function to saved the current frequency to<br />
memory stations. User can press to enter into the manual store<br />
memory stations.<br />
[Auto Store]: After Auto Stored & saved the 6 strongest stations, the<br />
unit will automatically enter present scan one time.<br />
[Local Seek]: To receive more radio stations or only stations with<br />
strong signal, you can adjust the tuner sensitivity. User can press<br />
to turn On/Off the Local Seek mode.<br />
Local Seek On: Only stations with strong signal can be broadcast.<br />
Local Seek Off: Stations with strong and weak signals can be broadcast.<br />
[PTY Seek]: User can press button get into the PTY List to select<br />
the desired PTY mode.<br />
OFF<br />
[AF On/Off]: User can press button to turn the AF On or Off.<br />
[TA On/Off]: User can press button to turn the TA On or Off.<br />
Tune To Radio Station<br />
Press BAND button on front panel under Tuner playback mode to change<br />
between FM bands and AM(MW) bands.<br />
E - 9<br />
Tune To Preset Station<br />
Press the LIST button on front panel under Tuner playback mode to get<br />
into the preset stations list, and user can use the Encoder Volume Knob<br />
to select which preset station he would listen to, and press to<br />
confirm the selection.<br />
<strong>Manual</strong> Seek<br />
Turn and hold the Track Up / Down button on fron panel under Tuner<br />
playback mode to access into the <strong>Manual</strong> Seek mode.<br />
Auto Seek<br />
Turn the Track Up / Down button on front panel under Tuner playback<br />
mode to access into the Auto Seek mode, and the unit will auto search<br />
for the next radio station.
About RDS<br />
The RDS (Radio Data System) function operates only in areas with FM<br />
stations broadcasting RDS signals. If you tune to an RDS station, an RDS<br />
icon and information about the presenter, station or program is displayed<br />
This unit support below RDS features:<br />
PTY (Program Type)<br />
Before tuning to RDS stations, you can select program type and let the<br />
unit search only for programs of the selected category.<br />
MUSIC GROUP<br />
POP M , ROCK M<br />
EASY M, LIGHT M<br />
CLASSICS, OTHER M<br />
JAZZ M, COUNTRY<br />
NATION M, OLDIES M<br />
FOLK M, A-TEST, ALARM<br />
SPEECH GROUP<br />
NEWS, AFFAIRS, INFO<br />
SPORT, EDUCATE, DRAMA<br />
CULTURE, SCIENCE, VARIED<br />
WEATHER,FINANCE, CHILDREN<br />
SOCIAL, RELIGION, PHONE IN<br />
TRAVEL, LEISURE, DOCUMENT<br />
E - 10<br />
AF (Alternate Frequencies)<br />
If the radio signal come from the current station is poor, you can turn on<br />
the AF (Alternate Frequency) function to let the unit searches for another<br />
station with stronger signal but with the same program identification as<br />
the current station automatically.<br />
TA (Receive Traffic Announcement )<br />
If you do not want to miss traffic announcement during enjoying music,<br />
you can turn on the TA (Traffic Announcement) function.<br />
TA On<br />
TA Off<br />
When there is traffic announcement, the unit switches to<br />
the tuner mode (regardless of the current mode) and<br />
begins to broadcast the announcement on traffic<br />
conditions. When the traffic announcement is over, it<br />
returns to the previous mode.<br />
CT (Clock Time)<br />
Traffic announcement does not cut in.<br />
The RDS signal broadcast together with the clock time to the unit<br />
automatically.
Media Player Operations (Disc/USB/SD Card)<br />
This unit can play various video / audio stored into Disc / USB or SD Card<br />
on Media Player.<br />
You can play commercially available audio CDs and these Discs:<br />
Digital Versatile Discs (DVDs)<br />
Video Cds (VCDs)<br />
Digital Versatile Discs Recordable (DVD+/-R)<br />
Digital Versatile Discs Rewritable (DVD+/-RW)<br />
Compact Discs (CDs)<br />
CD Recordable (CD-R)<br />
CD Rewritable (CD-RW)<br />
NOTE<br />
Please ensure that the disc contains playable content.<br />
1. Insert the disc into the Disc Slot with label side facing up, the unit will<br />
play starts automatically.<br />
2. Press on front panel to take out the CD. When the disc is ejected,<br />
the unit switches to the previous source, if connected. Otherwise, the<br />
unit switches to radio mode automatically.<br />
Press the button on front panel to pause the music play.<br />
Press this button again to resume music play.<br />
Turn the Track Up / Down button on front panel to skip forward to<br />
the beginning of the next or previous chapter.<br />
Turn and hold Track Up / Down button on front panel to fast<br />
forward or fast rewind through the disc. Turn the button again to<br />
resume normal playback.<br />
USB Device Operation<br />
Insert the USB Device<br />
Open the cover marked on the<br />
front panel, insert the USB device into<br />
the USB socket. The unit starts playing<br />
from the USB device automatically.<br />
NOTE<br />
Ensure that the USB device contains<br />
playable music.<br />
Memory Card Operation<br />
Insert the Memory Card<br />
Detach the front panel first, the SD card<br />
slot is located on the main body of this<br />
unit, insert the card into the card slot in<br />
the correct direction until a “ CLICK”<br />
sound is heard, then the unit starts<br />
playing from the card automatically.<br />
NOTE<br />
Ensure that the memory card contains<br />
playable music.<br />
Remove the Memory Card<br />
Detach the front panel first, press the card until you hear a click<br />
sound, the card is now disengaged. then remove the card.<br />
E - 11
Media Player Operations (Disc/USB/SD Card)<br />
Media Playing<br />
Repeat<br />
During the media playback, press the FUNC button on front panel to<br />
access into Media Function menu to adjust the different Repeat mode.<br />
For MP3/WMA/CD mode<br />
[Repeat All]: play all tracks repeatedly<br />
[Repeat One]: play the current track repeatedly<br />
[Repeat Folder]: play all tracks in the current folder repeatedly<br />
Random<br />
User can play audio tracks/files or VCD videos in random order. During<br />
the media playback, press the FUNC button on front panel enter into the<br />
media function menu, and press to turn On or Off the random function.<br />
Skip/Search<br />
1. Under the media playback, press<br />
the LIST button on front panel to<br />
access into the playlist menu,<br />
and rotate the Encoder Volume<br />
Knob to select folder / file:<br />
: to display all available audio folders / track.<br />
: to display all available pictures folders / files<br />
: to display all available video folders / files.<br />
DVD Function<br />
During the DVD playback, press the FUNC button on front panel to enter<br />
into the DVD Function menu, and press to adjust the below options:<br />
E - 12<br />
Repeat<br />
[Repeat CH]: repeat playback the current the chapter.<br />
[Repeat TT]: repeat playback the current title.<br />
[Repeat Off]: cancel all the repeat function.<br />
DVD Audio<br />
During DVD playback to change the audio language (DVD/Divx only).<br />
Subtitle<br />
During the DVD playback to turn On or Off the subtitles and change the<br />
subtitles (DVD only).<br />
Angle<br />
User can tap on Aangle while playing a scene recorded with multiple<br />
angles to change the angle (DVD only).<br />
Aspect Ratio<br />
User Selecting the TV Aspect setting allows the user to select the aspect<br />
ratio of the TV (DVD and VCD only). The following options are available:<br />
4:3=Aspect ratio of TV is 4:3<br />
16:9=Aspect ratio of TV is 16:9. Both wide screen and 4:3 contents will fill<br />
the entire screen.<br />
Video Setting<br />
Under DVD/VCD playback, tap on Video Setting mode access into the<br />
below Setup menu to adjust the options:<br />
[Bright]: change the Bright level from<br />
0 to 8.<br />
[Contrast]: change the Contrast level<br />
from 0 to 8.<br />
[Color]: change the Color level from 0<br />
to 8.<br />
[Reset]: reset to default setting.
AV-In Mode<br />
Select the AV Mode About the Parking Wire<br />
You can connect up to 2 optional devices. Press the SOURCE button on<br />
front panel to enter into the Source menu to select the AV-In mode.<br />
AV1- IN=Front panel AV-In<br />
AV2-IN=RCA back of unit<br />
AV1-IN<br />
This unit is allowed to connect with external Audio / Video system such<br />
like Digital Camera or Game Console. User can connect the external A / V<br />
system thru the A / V in jack on front panel.<br />
NOTE<br />
If there is no any external AV System input, then the TFT will be show<br />
“No Video Signal”.<br />
E - 13<br />
CAUTION<br />
In order to avoid any accident, the driver must not watch video while<br />
driving. This unit is designed to not allow watching video while driving.<br />
Park your car in a safe place and engage the 'parking brake' before<br />
watching video.<br />
NOTE<br />
The Video Blocking system under Parking Brake NOT ENGAGED<br />
only control this unit's display. This system will not affect the Video<br />
Output thru the rear RCA Video Out put.<br />
If watch moving video from Disc or AV<br />
In source but Parking Brakeis NOT<br />
PROPERLY CONNECTED, the video<br />
signal will be blocked by the system<br />
and the display will be show:<br />
The Reverse Wire For Back Up Camera System<br />
If user connected a backup camera system to this unit, the vehicle is in<br />
reverse Gear (Back Up mode), the front indash TFT display will<br />
automatically switch to Back Up Camera Video signal regardless what<br />
ever mode is currently displayed on the front indashTFT.
Bluetooth Operations<br />
User Guide For Bluetooth<br />
1. When user use our Bluetooth HEAD UNIT, please make sure the mobile<br />
phone you use must/does support Bluetooth functions (Headset or<br />
Handsfree profiles or both)<br />
2. Before you start to use our Bluetooth HEAD UNIT, please make sure<br />
complete pairing with your mobile phone first. Please refer to the user<br />
manual, section “PAIRING” for detail “PAIRING” instruction. To ensure the<br />
best reception for Pairing or Re-connection, please make sure the Phone<br />
Battery is fully charged when making the Pairing or Re-connection.<br />
3. Please always try pairing the Mobile Phone with Head unit after a few minutes<br />
of the Mobile Phone was Switched On to ensure the best pairing result.<br />
4. “ <strong>Caliber</strong> ” is this unit device model number which is displayed on the mobile<br />
phone.<br />
5. To achieve the best performance, please always keep the Mobile Phone<br />
within 3 meters of the Head unit.<br />
6. Please always keep a clear path between the Mobile Phone & the Head unit.<br />
7. Never put any metal object or any obstacle between the path of the Mobile<br />
Phone & the Head unit.<br />
8. Some brand of Mobile Phone like Sony Ericsson may have "Power Saving<br />
Mode" selection when Bluetooth mode is switched on. PLEASE DO NOT<br />
Switches ON Power saving Mode when operating with this Head Unit, as<br />
some abnormal communication behavior will happen occasionally if Power<br />
Saving Mode is switched on.<br />
9. Before user make Outgoing call or Incoming call, make sure the mobile<br />
phone's “Bluetooth function” was switched “ON”.<br />
10. To ensure the best conversation quality / performance, please always<br />
keep talking within 1 meter of the Head Unit.<br />
11. If user want to Dis-connect the Head unit with the Mobile Phone, please<br />
switch “OFF" Bluetooth connectivity on the Mobile Phone,or go to the<br />
system menu, "dis-connect" to disconnect the bluetooth connectivity<br />
manually. ( please refer to the user manual, section "dis-connection of the<br />
bluetooth system for details instruction. )<br />
12. Some Mobile Phones can support “IN BAND RING TONE”, such as Nokia.<br />
In such case, the Incoming Ringing Tone will be same as the original Ringtone<br />
of the Mobile Phone. But some Mobile Phones like Sony Ericsson do<br />
not support this feature. The Ring-tone will be using the standard Ringtone<br />
of the Head unit.<br />
E - 14<br />
13. When in telephone mode, during talking, it is highly recommended to set<br />
the volume to below “30” in order to achieve the best sound quality. As if<br />
the volume is too high, it may create unwanted echo inside the car, and<br />
this unwanted echo may feedback into the microphone.<br />
14. If the Bluetooth related operation is not performing normally, like cannot<br />
make pairing, cannot making an outgoing call, User can try to make a<br />
SOFT-RESET of the Bluetooth module by removing / detaching the panel<br />
from the main unit and waiting for about 1 min. Then re-attach the panel to<br />
the unit & retry the Bluetooth operation again. Or user can RESET the<br />
whole unit by pressing the RESET button behind the panel.<br />
By pressing the RESET button all the stored memory will resume to<br />
factory default.<br />
Frequency Asking Questions<br />
Q: Under phone conversation, if the voice output from the car's speakers<br />
is not loud enough.<br />
A: Try increase the volume level of the head unit to a suitable sound level<br />
Q: Under phone conversation, the “Listener” cannot hearing my voice loud<br />
enough<br />
A: First, try asking the 'Listener” increase the volume level on his/her mobile<br />
phone, if still not loud enough, try to increase your mobile phone's volume.<br />
Q: Under Phone conversation, the “Listener' can hear echo feedback.<br />
A: Your unit's speaker volume level is too loud which cause the voice<br />
feedback into the built-in microphone, this can be corrected by decreasing<br />
the volume level.<br />
Q: Under Phone conversation, the “Listener' complain the background is<br />
too noisy<br />
A: May be you are in a noisy environment. Try close the car's window to shield<br />
the environment / background noise under phone conversation.<br />
Q: If the Mobile Phone already paired with the headunit, but after several<br />
calls, the incoming calls cannot access thru the headunit.<br />
A: May be the paired Mobile Phone lost the Bluetooth connection with the<br />
headunit. in this case, please go to the "MENU" & select "re-connect" to<br />
reconnect the headunit with the paired Mobile Phone. For details, please<br />
refer to the MENU operation "re-connection”.
Bluetooth Operations<br />
Handfree Operations<br />
P airing The Bluetooth System Between Mobile<br />
Phone & The Unit<br />
Open your Mobile Phone and switch Bluetooth to on, and search<br />
Bluetooth device.<br />
“<strong>Caliber</strong>” should appear in the pairing list on the Mobile Phone. User<br />
need to select “ <strong>Caliber</strong> ” and then input the password “1234” .<br />
If the pairing is successful, the<br />
below display will show on TFT for<br />
a while, and the unit will switch<br />
back to the previous mode<br />
automatically.<br />
Disconnecting of the Bluetooth System<br />
Open your Mobile Phone and disconnect the Bluetooth System with the<br />
unit.<br />
If the Disconnection is successful,<br />
the below display will show on<br />
TFT, and the unit will switch back<br />
t o t h e p r e v i o u s m o d e<br />
automatically.<br />
P3<br />
E - 15<br />
Answering An Incoming Call<br />
When there is an incoming call, the display will show the Phone<br />
Number. If the incoming call has no caller I.D. number, the LCD will<br />
display “ Phone In ”, user can press the button on front panel<br />
to answer / accept the call.<br />
User can use the Encoder Volume Knob to adjust the volume level.<br />
To end the conversation, press the button on fron panel. The unit<br />
will switch back to the previous mode automatically and release the<br />
mute of the previous mode at the same time.<br />
NOTE<br />
An Incoming call under stand by mode (Ignition on & Power Off), the<br />
system will automatically switch on the head unit.<br />
Rejecting An Incoming Call<br />
User can press the button on front panel to reject the incoming<br />
call.<br />
NOTE<br />
The audio output of the present mode will be muted and the ringing<br />
tones will be heard if an incoming call is not being answered. After<br />
pressing the button, the mute of the present mode will be<br />
released.
Bluetooth Operations<br />
Making A Call<br />
User can use his / her Mobile<br />
Phone to dial and make an<br />
outgoing call. Once the user has<br />
completed the dialing, the below<br />
display will show on TFT:<br />
User can use the Encoder Volume Knob to adjust the volume level.<br />
To end the conversation, press the button on fron panel. The unit<br />
will switch back to the previous mode automatically and release the<br />
mute of the previous mode at the same time.<br />
Call Transfer<br />
During the talking mode, hold & press the button on front panel to<br />
transfer the audio from the unit back to the Mobile Phone for privacy<br />
reason.<br />
NOTE<br />
After the pressed the , the present mode will be muted at<br />
the same time, user can press the button to release the<br />
Mute.<br />
E - 16<br />
Bluetooth Audio Streaming A2DP<br />
If the connected Bluetooth device supports Advanced Audio Distribution<br />
Profile (A2DP), you can listen to the music stored on the device through<br />
the unit. If the device also supports Audio Video Remote Control Profile<br />
(AVRCP) profile, you can use the control on the unit or its remote control<br />
to play music stored on the device.<br />
1. Pair the phone with the unit.<br />
2. Press the SOURCE button on front panel to return to SOURCE menu.<br />
3. Rotate the Encoder Volume Knob to select , then press the<br />
to access into the Bluetooth mode, the music via device start to play.<br />
4. If the device support Audio Video Remote Control Profile (AVRCP), press<br />
the , and then press the to start playing.
Product Information<br />
General<br />
Power Supply<br />
Fuse<br />
Suitable Speaker<br />
Impedance<br />
Power output<br />
Pre-AMP output<br />
voltage<br />
Aux-In level<br />
Subwoofer output<br />
voltage<br />
TFT Screen Section<br />
Screen Size<br />
Display Resolution<br />
Screen Type<br />
Disc Player<br />
System<br />
Frequency Response<br />
Signal to Nosie Ratio<br />
Channel Separation<br />
Video signal format<br />
Video Output<br />
12 V DC (11-14 V), Negative Ground<br />
15A<br />
4 - 8<br />
Mosfet 75W x 4 channels<br />
2.0 V (USB play mode; 1KHZ, 0dB,<br />
10k load)<br />
300mV<br />
2.0 V (USB play mode; 120HZ, 0dB,<br />
10k load)<br />
4.3 inches<br />
800 x 480 dots<br />
TFT Liquid Crystal Display active matrix<br />
DVD/CD audio/MP3 system<br />
20Hz to 20KHz +/-3dB<br />
90dB<br />
2 Channel(Stereo)>60dB@1KHz<br />
NTSC only<br />
1+/- 0.2V<br />
E - 17<br />
Radio<br />
-FM<br />
Frequency Range<br />
Usable Sensitivity<br />
-AM(MW)<br />
Frequency Range<br />
Usable Sensitivity<br />
USB devices<br />
USB flash memory<br />
Bluetooth<br />
Output power<br />
Frequency band<br />
Range<br />
Standard<br />
87.5 - 108MHz (100KHz<br />
per step in auto search and 50KHz per<br />
step in manual search)<br />
Better than 15dB at S/N 30dB<br />
522 -1620KHz<br />
Better than 45dB<br />
USB 1.1, & 2.0 compatible<br />
0dBm (Class II)<br />
2.4000GHz-2.4835GHz ISM Band<br />
3 meters (free space)<br />
Bluetooth 2.1 specification
Product Information<br />
•<br />
•<br />
•<br />
•<br />
•<br />
•<br />
•<br />
•<br />
•<br />
•<br />
•<br />
•<br />
Supports Formats<br />
MP3/WMA bit rate (data rate): 32-320 Kbps & VBR<br />
WMA Version V9 or earlier<br />
Directory nesting up to a maximum of 8 levels<br />
Number of albums/ folders: maximum 99<br />
Number of tracks/titles: maximum 999<br />
ID3 tag V1.0/1.1/2.0/2.3 (Max 32 Byte)<br />
File name in Unicode UTF8 (maximum length: 128 bytes)<br />
Unsupported formats<br />
Empty albums: an empty album is an album that does not contain<br />
MP3/WMA files, and is not be shown in the display.<br />
Unsupported fle formats are skipped. For example, Word,<br />
d ocuments (.doc) or MP3 fles with e xtension.dlf are ignored and<br />
not p layed.<br />
AAC, WAV, PCM audio fles<br />
DRM protected WMA fles (.wav, .m4a, .m4p, .mp4, .aac)<br />
WMA fles in Lossless format<br />
•<br />
•<br />
•<br />
•<br />
•<br />
•<br />
•<br />
E - 18<br />
Supported MP3 disc format<br />
ISO9660, Joliet<br />
Maximum title number: 512 (depending on fle name length)<br />
Maximum album number: 255<br />
Supported sampling frequencies: 32 kHz, 44.1kHz, 48 kHz<br />
Supported Bit-rates: 32-320 Kbps and variable bit rate<br />
Supported video formats<br />
DVD<br />
Xvid<br />
NOTE<br />
Product information is subject to change without prior notice.
Troubleshooting<br />
Before going through the check list, check wiring connection. If any of<br />
the problems persist after check list has been made, consult your<br />
nearest service dealer.<br />
No power or no sound<br />
Car engine is not on. Turn the car engine on.<br />
Cable is not correctly connected. Check connections.<br />
Fuse is burnt. Replace fuse.<br />
Volume is in minimum. Adjust volume to a desired level.<br />
If the above solutions cannot help, press the RESET button.<br />
Ensure that the track played is of a compatible format.<br />
Noise in broadcasts<br />
Signals are too weak. Select other stations with stronger signals.<br />
Check the connection of the car antenna.<br />
Change broadcast from Stereo to mono.<br />
Cannot play disc<br />
Disc is upside down. Ensure the printed side is upwards.<br />
Disc is dirty. Clean the disc with a clean,soft,lint-freecloth.Wipe<br />
the disc o utwards from the center.<br />
Disc is defective. Try another disc.<br />
Incompatible disc is used. Try another disc.<br />
Disc rating exceeds the restrict setting. Change the rating settings<br />
to lower one.<br />
Disc region code is not compatible with the unit. Use disc with<br />
proper region code.<br />
E - 19<br />
The CD Skips tracks<br />
Ensure that the CD is not damaged or dirty.<br />
Ensure that random mode is deactivated.<br />
Disc cannot be ejected.<br />
Press and hold .<br />
Preset stations lost<br />
Battery cable is not correctly connected. Connect the battery cable<br />
to the terminal that is always live.<br />
Display show ERR-1<br />
The disc, USB or SD device cannot be red in two minutes<br />
Display show ERR-3<br />
USB/SD data error.<br />
Disc is upside down. Ensure the printed side is facing up.<br />
Display show ERR-5<br />
Communication error or component is damged.