Operating Manual T91 - Ersatzteilbox
Operating Manual T91 - Ersatzteilbox
Operating Manual T91 - Ersatzteilbox

Create successful ePaper yourself
Turn your PDF publications into a flip-book with our unique Google optimized e-Paper software.
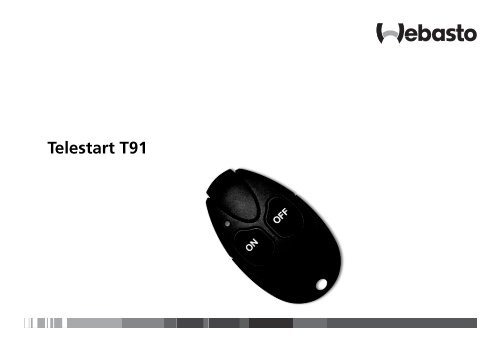
Telestart <strong>T91</strong>
GB<br />
<strong>Operating</strong> Instructions for Telestart <strong>T91</strong><br />
General Information<br />
Dear Webasto customer!<br />
We are delighted that you have selected this Webasto product.<br />
We presume that the principle and mode of operation of this product has been<br />
explained to your complete satisfaction by the workshop/service centre which installed<br />
it. In these operating instructions we would like to once again provide you<br />
with an overview of the safe use of this product.<br />
The Telestart <strong>T91</strong> heater control complies with the homologation approval in<br />
accordance with the directive 72/245/EEC (EMC).<br />
Note: The battery used is fully operational, however is<br />
subject to function-dependent discharging when installed.<br />
Therefore, we expressly recommend observing the<br />
information on Page 32 when the Telestart is not used for<br />
longer periods.<br />
18
Danger of fire, explosion<br />
and suffocation<br />
The heater must not be operated:<br />
In filling stations and tank farms.<br />
At locations at which highly flammable gases<br />
or dusts can form, and at locations at which<br />
highly flammable liquids or solid materials are<br />
stored (e.g. near fuel, coal and wood dust,<br />
grain warehouses, dry grass and leaves, cardboard,<br />
paper, etc.)<br />
In enclosed rooms (e.g. garages), not even via<br />
the timer or Telestart.<br />
Care and Handling<br />
Note the following points to avoid damage to the Telestart <strong>T91</strong>:<br />
Do not expose to heat above 70 °C (e.g. direct sunlight).<br />
<strong>Operating</strong> temperature between 0 °C and +50 °C.<br />
Only store in a dry place where there is little dust.<br />
Do not immerse in water.<br />
19<br />
GB
GB<br />
Use<br />
With the Webasto Telestart <strong>T91</strong>, the Webasto heaters of the Thermo Top series or<br />
the vehicle fan can be switched on and off wirelessly from a great distance.<br />
With the Thermo Top Evo heater which is connected to the Telestart <strong>T91</strong> via W bus<br />
communication, a change in the mode must be carried out on the transmitter to<br />
switch on the parking ventilation (ventilation of the vehicle interior) (see the point<br />
"Setting Mode").<br />
For Thermo Top E and C heaters with an analogue connection to the Telestart <strong>T91</strong>,<br />
the parking ventilation function (ventilation of the vehicle interior) can only be ensured<br />
by also installing a summer/winter switch (option). A mode change on the<br />
transmitter is not required for this purpose, as the "parking heating" or "parking<br />
ventilation" function is determined by the switch position of the summer/winter<br />
switch.<br />
Restrictions of the range of functions can occur when factory-installed heaters are<br />
retrofitted. Please have these explained by your installation partner.<br />
20
Optimum signal transmission is achieved out in the open or from a position higher<br />
than the vehicle. In this case, the parking heater can be operated at a distance of<br />
approx. 1000 m from the vehicle. When operating the transmitter, please hold it<br />
vertically pointing upward and do not cover the upper side (see illustration).<br />
If you determine from the lack of feedback that the operating signal has not<br />
reached the vehicle, then you must change your position by a few metres. Reception<br />
quality is impaired accordingly in heavily built-up areas.<br />
After the selected switch-on duration expires, the transmission of the switch-on<br />
signal to the heater is interrupted and the function currently running (parking<br />
heating or parking ventilation) is ended automatically.<br />
21<br />
GB
GB<br />
Teaching In Telestart Transmitter for Thermo Top E and C<br />
1. Insert the battery in the battery compartment of the transmitter.<br />
2. Remove the 1 A fuse (black) from the heater's fuse holder (voltage interruption<br />
of receiver).<br />
3. Wait at least 5 seconds and refit the fuse.<br />
4. After approximately 2 seconds, however within 6 seconds, press the OFF button<br />
on the transmitter for at least 1 second.<br />
5. Teaching is completed.<br />
A maximum of 4 hand-held transmitters can be taught in this way. During additional<br />
teaching processes, the "oldest" transmitter will be deleted each time.<br />
22<br />
min. 5 s. min. 2 s.<br />
max. 6 s.<br />
min.<br />
1s.
Teaching in Telestart Transmitter for Thermo Top Evo<br />
As described above for the Thermo Top E and C, however remove either 1 A fuse<br />
(black, vehicle interior) or 30 A fuse (green, engine compartment) (voltage interruption<br />
for receiver).<br />
min.<br />
5s.<br />
or<br />
min.<br />
5s.<br />
min. 2 s.<br />
max. 6 s.<br />
min. 1 s.<br />
23<br />
GB
GB<br />
Checking Mode<br />
Simultaneously press and hold down the ON- and OFF-buttons.<br />
LED lights up:<br />
red = Heating mode<br />
green = Ventilation mode*<br />
LED extinguishes:<br />
– when the buttons are released, or<br />
– after 3 seconds<br />
* Please observe the information under "Use".<br />
Setting Mode<br />
Depress the ON- and OFF buttons simultaneously twice<br />
within one second.<br />
Upon the second actuation, the LED will change its colour<br />
and illuminate until the buttons are released (illuminates for<br />
max. 3 seconds).<br />
The new mode is stored when the button is released.<br />
24<br />
2 x
Feedback from Transmitter Upon Turning On/Off<br />
The LED on the transmitter<br />
lights up for 2 seconds:<br />
red = Heating mode<br />
green = Ventilation mode*<br />
The LED on the transmitter<br />
flashes for 2 seconds.<br />
The signal has been received and the heater /<br />
vehicle fan switched on or off.<br />
Error during signal transmission.<br />
Change your location and repeat transmission.<br />
Switching On Heater or Ventilation*<br />
Hold the transmitter with the aerial upright and press the<br />
ON button until the LED lights up (approx. 1 second).<br />
The Telestart receiver in the vehicle transmits a confirmation<br />
of the reception (see overview above: "Feedback").<br />
Then the forwarding of the signal to the heater is confirmed<br />
with brief flashing signals (every 2 seconds).<br />
The operation indicator extinguishes:<br />
– After the preset operating time has elapsed<br />
– After switching off with Telestart.<br />
* Please observe the information under "Use".<br />
25<br />
GB
GB<br />
NOTE:<br />
If no special instructions on adjusting the vehicle heater during parking heating<br />
operation are available, then the vehicle heater must be set to "warm" before<br />
switching on the heater.<br />
In the heating and ventilation modes, the vehicle fan switch is to be turned to position<br />
1 in the case of 3-speed blower fans, and to position 2 in the case of 4-speed<br />
blower fans.<br />
In the case of infinitely variable fans adjust to at least 1/3 of the fan's capacity.<br />
Switching Off Heater or Ventilation<br />
Hold the transmitter with the aerial upright and press the<br />
OFF button until the LED lights up (approx. 1 second).<br />
The Telestart <strong>T91</strong> in the vehicle will send a feedback signal.<br />
Switching Off Using Pushbutton Switch<br />
If the heater was activated by means of Telestart, the pushbutton switch must be<br />
pressed once for deactivation.<br />
26
Switching On/Off Using Pushbutton Switch<br />
The parking heating or parking ventilation mode is indicated by a light in the pushbutton.<br />
NOTE:<br />
When the pushbutton switch is used for activating the heater, the operating mode<br />
(parking heating or parking ventilation) and the operating duration most recently<br />
used with Telestart <strong>T91</strong> will be selected.<br />
Switching On Using a Digital Timer (Immediate Heat Button)<br />
Operation is indicated on the digital timer. The display lighting lights up.<br />
NOTE:<br />
When switching on with the digital timer (immediate heat button), the parking<br />
heating mode is always selected. The switch-on duration is specified by the digital<br />
timer.<br />
27<br />
GB
GB<br />
Switching On with Telestart <strong>T91</strong> with Digital Timer Installed<br />
Operation is indicated on the digital timer. The display lighting lights up.<br />
NOTE:<br />
This display is only possible with the Thermo Top Evo heater, as it is connected to<br />
the Telestart <strong>T91</strong> via W bus communication.<br />
Switching Off Using a Digital Timer<br />
If the heater was activated using Telestart, the immediate heat button must be<br />
pressed twice to deactivate the heater.<br />
When connecting the Telestart <strong>T91</strong> and the digital timer to a Thermo Top Evo, only<br />
a single press of the button is required due to the connection via W bus communication.<br />
Switching On with Telestart <strong>T91</strong> with Summer/Winter Switch Installed<br />
(Option)<br />
The "parking ventilation" or "parking heating" function is determined by the<br />
switch position of the summer/winter switch. Please also observe the point "Use"<br />
for this purpose.<br />
28
Checking and Setting <strong>Operating</strong> Time<br />
The operating time of the heater or the vehicle's fan can be preset on the transmitter<br />
in increments of 10 minutes. The operating time is factory-set at 30 minutes.<br />
NOTE:<br />
Make sure that the car battery is recharged sufficiently if you use the system frequently<br />
and for a long period.<br />
We recommend setting the heating time according to the drive time.<br />
Example: The vehicle is used for travelling to work and back.<br />
With a driving time of approx. 30 minutes (one way), we recommend setting an<br />
operating time of 30 minutes.<br />
29<br />
GB
GB<br />
Checking <strong>Operating</strong> Time<br />
Simultaneously briefly press the ON and OFF button three<br />
times consecutively.<br />
The LED flashes in accordance with the preset operating<br />
time.<br />
No. of coded flashing<br />
signals<br />
1 2 3 4 5 6<br />
<strong>Operating</strong> time 10 min. 20 min. 30 min. 40 min. 50 min. 60 min.<br />
No. of coded flashing<br />
signals<br />
7 8 9 10 11 12<br />
<strong>Operating</strong> time 70 min. 80 min. 90 min. 100 min. 110 min. 120 min.<br />
NOTE:<br />
The first coded flashing signal that is emitted immediately upon the third<br />
actuation of both buttons has to be included into the count.<br />
30<br />
3 x
Setting <strong>Operating</strong> Time<br />
Press the OFF button to call up the next operating time.<br />
To store the setting:<br />
– do not actuate any button for 10 seconds, or<br />
– actuate the ON button.<br />
Returning to Factory Setting<br />
Simultaneously press the ON and OFF button for at least 15<br />
seconds.<br />
NOTE:<br />
Colour changes on the LED which occur in the process can<br />
be ignored.<br />
Factory setting:<br />
– Mode: Heating<br />
– <strong>Operating</strong> time: 30 minutes<br />
31<br />
GB
GB<br />
Procedure after not using for longer time<br />
When the hand-held transmitter is not used for longer periods, we recommend<br />
removing the battery from the hand-held transmitter to increase battery life.<br />
Caution:<br />
Do not store in the vehicle, but instead in a dry place at room temperature.<br />
Returning to use:<br />
1. Insert the battery in the battery compartment of the transmitter.<br />
2. Press the OFF button six times for 2 seconds at intervals of approx. 2 seconds.<br />
3. Observe a waiting time of approx. two minutes.<br />
If the hand-held transmitter does not function after returning it to use, then an<br />
operating test of the battery (see point "Checking Battery") must be carried out.<br />
32
Checking Battery<br />
Press the ON or OFF button.<br />
LED Battery Action<br />
lights up for 2 seconds<br />
in green or<br />
red<br />
flashes for 2 seconds<br />
in green or<br />
red<br />
lights up for 2 seconds<br />
in orange<br />
flashes orange very<br />
quickly for 5 seconds<br />
full Battery OK<br />
ATTENTION:<br />
Heater could be activated or<br />
deactivated in the process.<br />
full Battery OK<br />
ATTENTION:<br />
Receiver too far away or transmitter<br />
not taught.<br />
almost spent replace battery as soon as possible<br />
or warm up transmitter<br />
discharged Replace battery.<br />
no display drained Replace battery.<br />
or<br />
33<br />
GB
GB<br />
Battery Change/Disposal Information<br />
NOTE:<br />
Batteries and electronic devices are the object of the<br />
European Directive 2006/66/EC or 2002/96/EC in<br />
the current versions and must not be disposed of as<br />
household waste.<br />
Every consumer is therefore legally obligated to<br />
dispose of batteries and used/scrap electronic<br />
devices in the marked recycling containers at a<br />
waste collection point or in the retail trade. Return<br />
is free of charge.<br />
CAUTION:<br />
There is a danger of explosion in case of improper<br />
battery replacement! Ensure proper polarity when<br />
inserting the battery.<br />
34
Bei mehrsprachiger Ausführung ist Deutsch verbindlich.<br />
Die Telefonnummer des jeweiligen Landes entnehmen Sie bitte dem Webasto Servicestellenfaltblatt oder<br />
der Webseite Ihrer jeweiligen Webasto-Landesvertretung.<br />
In multilingual versions the German language is binding.<br />
The telephone number of each country can be found in the Webasto service center leaflet or the website<br />
of the respective Webasto representative of your country.<br />
Dans le cas d'une version rédigée en plusieurs langues, l'allemand est alors la langue qui fait foi.<br />
Pour trouver le numéro de téléphone du pays concerné, veuillez consulter le dépliant des points-service<br />
Webasto ou la page web de la représentation Webasto de votre pays.<br />
Nel caso di una versione plurilingue il tedesco è vincolante.<br />
I numeri di telefono dei diversi Paesi sono riportati sul pieghevole relativo ai centri di assistenza Webasto<br />
oppure sul sito Internet del proprio rappresentante di riferimento Webasto.<br />
Este manual esta traducido en varios idiomas, le informamos que sólo la versión en alemán será<br />
vinculante.<br />
Consulte el número de teléfono del país correspondiente en el folleto de los servicios autorizados<br />
Webasto, o en la página web de su representante Webasto.<br />
Webasto Thermo & Comfort SE<br />
Postfach 1410<br />
82199 Gilching<br />
Germany<br />
Visitors' address:<br />
Friedrichshafener Str. 9<br />
82205 Gilching<br />
Germany<br />
Internet: www.webasto.com<br />
Ident-Nr. 1314649B04 • 10/12 • Errors and omissions excepted • Printed in Germany<br />
© Webasto Thermo & Comfort SE, 2012<br />
D