CVT Audi installation instructions - Euro Systems Automotive ...
CVT Audi installation instructions - Euro Systems Automotive ...
CVT Audi installation instructions - Euro Systems Automotive ...

Create successful ePaper yourself
Turn your PDF publications into a flip-book with our unique Google optimized e-Paper software.
<strong>Audi</strong> <strong>CVT</strong> Installation and Adaptation Instructions<br />
Any time a <strong>CVT</strong> transmission is installed or serviced, it is important that you follow the exact<br />
maintenance and adaptation procedures. If not, serious transmission damage will occur!<br />
Adaptation procedures are mandatory on the <strong>CVT</strong> because an alternate a clutch resides within<br />
the transmission in place of a torque converter. If adaptation procedures are not performed after<br />
any repairs or fault deletions, drivability problems and transmission failures will follow. Note that<br />
these procedures do exist and must be performed for all replacements and service maintenance.<br />
To refill the transmission you must have the proper tool or build your own. The <strong>Audi</strong> CTV models<br />
not only have a clutch adaptation procedure, but also a special procedure for changing the fluid.<br />
All four wheels must be off the ground a minimum of 20 centimeters (8 inches), and each wheel<br />
must be able to be rotated freely by hand. While observing the Tiptronic indicator, shift the <strong>CVT</strong><br />
from its lowest ratio to its highest (six or seven speeds), accelerating moderately after each shift<br />
but never exceeding 56 kilometers (35 mph). Shift the transmission back down to 1st gear and<br />
gently apply the brake until the vehicle comes to a complete stop. Once the vehicle is stopped,<br />
place the transmission in Reverse, release the brake and moderately accelerate to a Reverse<br />
gear speed of 19 kilometers (12 mph). Once again, gently apply the brakes until the vehicle<br />
comes to a complete stop. Place the selector lever to Drive and repeat these steps five more<br />
times. When completed, place the selector lever in Park and turn the engine off. Lower the<br />
vehicle to the ground. Prepare for the relearning process for reverse and forward adaptation.<br />
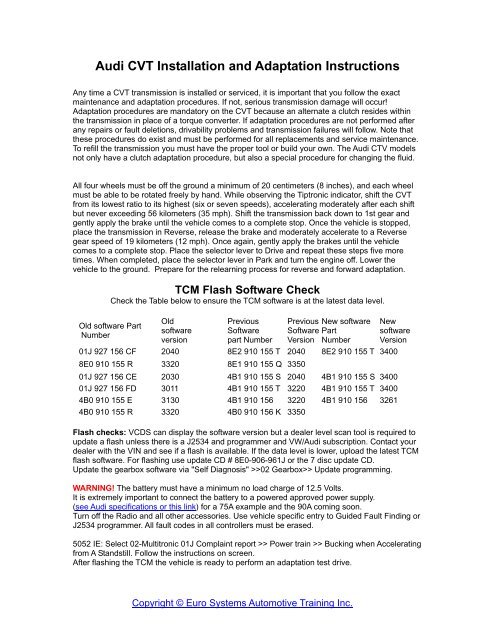
TCM Flash Software Check<br />
Check the Table below to ensure the TCM software is at the latest data level.<br />
Old software Part<br />
Number<br />
Old<br />
software<br />
version<br />
Previous<br />
Software<br />
part Number<br />
Previous New software<br />
Software Part<br />
Version Number<br />
New<br />
software<br />
Version<br />
01J 927 156 CF 2040 8E2 910 155 T 2040 8E2 910 155 T 3400<br />
8E0 910 155 R 3320 8E1 910 155 Q 3350<br />
01J 927 156 CE 2030 4B1 910 155 S 2040 4B1 910 155 S 3400<br />
01J 927 156 FD 3011 4B1 910 155 T 3220 4B1 910 155 T 3400<br />
4B0 910 155 E 3130 4B1 910 156 3220 4B1 910 156 3261<br />
4B0 910 155 R 3320 4B0 910 156 K 3350<br />
Flash checks: VCDS can display the software version but a dealer level scan tool is required to<br />
update a flash unless there is a J2534 and programmer and VW/<strong>Audi</strong> subscription. Contact your<br />
dealer with the VIN and see if a flash is available. If the data level is lower, upload the latest TCM<br />
flash software. For flashing use update CD # 8E0-906-961J or the 7 disc update CD.<br />
Update the gearbox software via "Self Diagnosis" >>02 Gearbox>> Update programming.<br />
WARNING! The battery must have a minimum no load charge of 12.5 Volts.<br />
It is extremely important to connect the battery to a powered approved power supply.<br />
(see <strong>Audi</strong> specifications or this link) for a 75A example and the 90A coming soon.<br />
Turn off the Radio and all other accessories. Use vehicle specific entry to Guided Fault Finding or<br />
J2534 programmer. All fault codes in all controllers must be erased.<br />
5052 IE: Select 02-Multitronic 01J Complaint report >> Power train >> Bucking when Accelerating<br />
from A Standstill. Follow the <strong>instructions</strong> on screen.<br />
After flashing the TCM the vehicle is ready to perform an adaptation test drive.<br />
Copyright © <strong>Euro</strong> <strong>Systems</strong> <strong>Automotive</strong> Training Inc.
Adaptation Forward and Reverse<br />
NOTE! Complete each step to adapt the Transmission Control Module (TCM)<br />
The engine must be running and the transmission oil temperature must be between 60° C and<br />
90° C. Confirm that the ATF is at a minimum 65° C by checking data block 010 field 3.<br />
This setup is adapted and completed with Ross-Tech’s VCDS<br />
Connect the VAG scan tool and enter address 02 Transmission Electronics. (Leave it connected)<br />
There must be NO fault codes stored in engine and transmission control modules.<br />
All driving and braking has to be done in partial load, avoid full throttle and braking!<br />
Shift vehicle into position D<br />
Drive forward in part load approximately 10 meters (33 feet), then apply brake pedal to a stop and<br />
continue to apply brake pedal for at least 10 seconds.<br />
Repeat this step two to four times.<br />
Shift vehicle into R and release brake pedal.<br />
Drive backwards at part load approximately 10 meters (33 feet), then apply brake pedal to a stop<br />
and continue to apply brake pedal for at least 10 seconds.<br />
Repeat this step two to four times.<br />
Select address 02 Transmission Electronics and view Data Block Function 08 Group 010 and Go.<br />
Watch the second field in that block. The field must change from "ADP RUN" to "ADP OK"<br />
The procedure may need to be repeated at least 3 times but possibly as many as 5 times, until<br />
the measuring values show APD OK.<br />
If the second field displays APD OK push Done, Go Back.<br />
Select address 02 Transmission Electronics and view Data Block Function 08 Group 011 and Go.<br />
Watch the second field in the block. The field must change from "ADP RUN" to "ADP OK"<br />
The procedure may need to be repeated at least 3 times but possibly as many as 5 times, until<br />
the measuring values show APD OK.<br />
If the second field displays APD OK push Done, Go Back.<br />
"ADP" is the abbreviation for Adaptation. Adaptation means “adapting to an internally specified<br />
value”. If for some reason the values don't switch to APD OK read the fault codes at Address 02<br />
Transmission Electronics and repair those faults. Clear all faults BEFORE proceeding forward to<br />
any adaptations.<br />
“TCM” is the abbreviation for Transmission Control Module<br />
“<strong>CVT</strong>” is the abbreviation for Continuously Variable Transmission<br />
“ATF” is the abbreviation for Automatic Transmission Fluid<br />
“Data Block” is a common term relating to measured or live values<br />
“Field” is a common term relating to one of the four data displays within a group<br />
“Function” is a common term relating to an execution parameter built within the software<br />
“Address” is a common term relating to a controller ie: 01 Engine, 02 Transmission, 03 ABS<br />
VW and <strong>Audi</strong> training with technical support<br />
Call 1-866-245-7602 Email:esatinc@esatinc.ca<br />
Copyright © <strong>Euro</strong> <strong>Systems</strong> <strong>Automotive</strong> Training Inc.