
Create successful ePaper yourself
Turn your PDF publications into a flip-book with our unique Google optimized e-Paper software.
www.estesrockets.com<br />
ESTES INDUSTRIES<br />
1295 H Street<br />
Penrose CO 81240<br />
PRINTED IN CHINA<br />
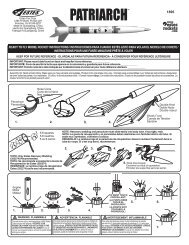
ASSEMBLY TIP: Read all instructions before beginning work<br />
on your model. Make sure you have all parts and supplies.<br />
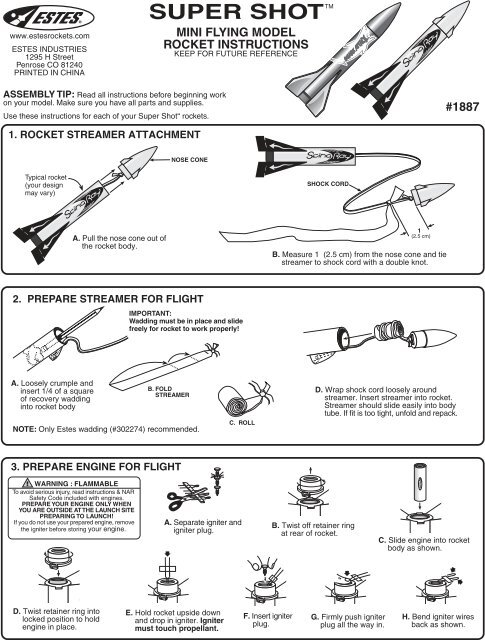
Use these instructions for each of your <strong>Super</strong> <strong>Shot</strong>“ rockets.<br />
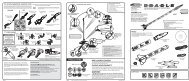
1. ROCKET STREAMER ATTACHMENT<br />
Typical rocket<br />
(your design<br />
may vary)<br />
2. PREPARE STREAMER FOR FLIGHT<br />
A. Loosely crumple and<br />
insert 1/4 of a square<br />
of recovery wadding<br />
into rocket body<br />
3. PREPARE ENGINE FOR FLIGHT<br />
D. Twist retainer ring into<br />
locked position to hold<br />
engine in place.<br />
A. Pull the nose cone out of<br />
the rocket body.<br />
MINI FLYING MODEL<br />
ROCKET INSTRUCTIONS<br />
KEEP FOR FUTURE REFERENCE<br />
NOSE CONE<br />
IMPORTANT:<br />
Wadding must be in place and slide<br />
freely for rocket to work properly!<br />
B. FOLD<br />
STREAMER<br />
NOTE: Only <strong>Estes</strong> wadding (#302274) recommended.<br />
WARNING : FLAMMABLE<br />
To avoid serious injury, read instructions & NAR<br />
Safety Code included with engines.<br />
PREPARE YOUR ENGINE ONLY WHEN<br />
YOU ARE OUTSIDE AT THE LAUNCH SITE<br />
PREPARING TO LAUNCH!<br />
If you do not use your prepared engine, remove<br />
the igniter before storing your engine.<br />
SUPER SHOT<br />
A. Separate igniter and<br />
igniter plug.<br />
E. Hold rocket upside down<br />
and drop in igniter. Igniter<br />
must touch propellant.<br />
C. ROLL<br />
F. Insert igniter<br />
plug.<br />
TM<br />
SHOCK CORD<br />
B. Measure 1 (2.5 cm) from the nose cone and tie<br />
streamer to shock cord with a double knot.<br />
B. Twist off retainer ring<br />
at rear of rocket.<br />
D. Wrap shock cord loosely around<br />
streamer. Insert streamer into rocket.<br />
Streamer should slide easily into body<br />
tube. If fit is too tight, unfold and repack.<br />
G. Firmly push igniter<br />
plug all the way in.<br />
¤<br />
1<br />
(2.5 cm)<br />
#1887<br />
C. Slide engine into rocket<br />
body as shown.<br />
H. Bend igniter wires<br />
back as shown.
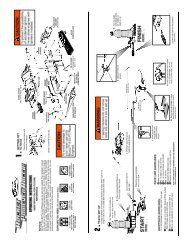
COUNTDOWN AND LAUNCH<br />
KEY ALWAYS OUT UNTIL<br />
FINAL COUNTDOWN!<br />
1...<br />
Masking<br />
Tape<br />
PRECAUTIONS<br />
4" (10.2 cm)<br />
NAR Safety Code<br />
2...<br />
NO DRY GRASS<br />
OR WEEDS<br />
LAUNCH BUTTON<br />
3...<br />
5...<br />
ESTES LAUNCH SUPPLIES<br />
(Sold Separately)<br />
¥ <strong>Super</strong> <strong>Shot</strong>“ Launch Pad and Controller or<br />
Porta Pad¤ II Launch Pad and Electron Beam¤<br />
Launch Controller<br />
¥ Recovery Wadding<br />
¥ Igniters (with Engines)<br />
¥ Igniter Plugs (with Engines)<br />
¥ Recommended Engines: 1/4A3-3T, 1/2A3-4T,<br />
A3-4T, A10-3T<br />
15 FT. (5 M)<br />
4...<br />
4... 3... 2... 1...<br />
HOLD KEY DOWN AND<br />
PRESS LAUNCH BUTTON<br />
UNTIL LIFT-OFF!<br />
FLYING YOUR ROCKET<br />
Choose a large field (250 ft. [76 m] square) free of dry weeds and<br />
brown grass. The larger the launch area, the better your chance of<br />
recovering your rocket. Football fields and playgrounds are great.<br />
Launch only with little or no wind and good visibility.<br />
Always follow the National Association of Rocketry (NAR) Safety Code.<br />
MISFIRES<br />
TAKE THE KEY OUT OF THE CONTROLLER. WAIT ONE MINUTE<br />
BEFORE GOING NEAR THE ROCKET! Disconnect the igniter clips and<br />
remove the engine. Take the plug and igniter out of the engine. If the igniter<br />
has burned, it worked but did not ignite the engine because it was not<br />
touching the propellant inside the engine. Put a new igniter all the way<br />
inside the engine without bending it. Push the plug in place. Repeat the<br />
steps under Countdown and Launch.<br />
' 2004 <strong>Estes</strong>-Cox Corp. All rights reserved.<br />
INSERT KEY.<br />
PUSH DOWN<br />
AND HOLD.<br />
P/N 61000 (12/04)