ETA130266 HB ERSF CE Rebar - ETA-Danmark
ETA130266 HB ERSF CE Rebar - ETA-Danmark
ETA130266 HB ERSF CE Rebar - ETA-Danmark

Create successful ePaper yourself
Turn your PDF publications into a flip-book with our unique Google optimized e-Paper software.
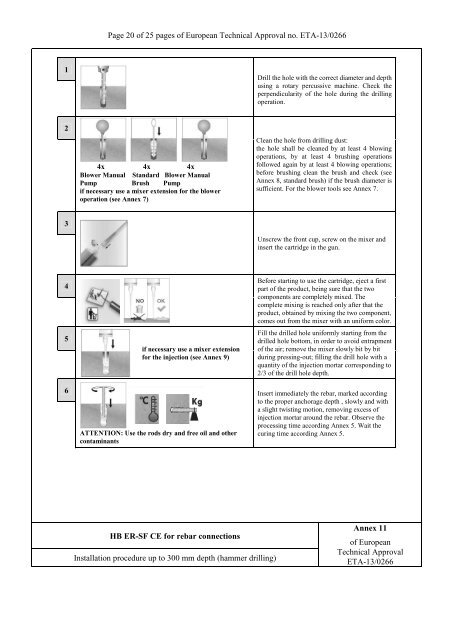
1<br />
2<br />
3<br />
4<br />
5<br />
6<br />
Page 20 of 25 pages of European Technical Approval no. <strong>ETA</strong>-13/0266<br />
4x 4x 4x<br />
Blower Manual Standard Blower Manual<br />
Pump Brush Pump<br />
if necessary use a mixer extension for the blower<br />
operation (see Annex 7)<br />
if necessary use a mixer extension<br />
for the injection (see Annex 9)<br />
ATTENTION: Use the rods dry and free oil and other<br />
contaminants<br />
<strong>HB</strong> ER-SF <strong>CE</strong> for rebar connections<br />
Installation procedure up to 300 mm depth (hammer drilling)<br />
Drill the hole with the correct diameter and depth<br />
using a rotary percussive machine. Check the<br />
perpendicularity of the hole during the drilling<br />
operation.<br />
Clean the hole from drilling dust:<br />
the hole shall be cleaned by at least 4 blowing<br />
operations, by at least 4 brushing operations<br />
followed again by at least 4 blowing operations;<br />
before brushing clean the brush and check (see<br />
Annex 8, standard brush) if the brush diameter is<br />
sufficient. For the blower tools see Annex 7.<br />
Unscrew the front cup, screw on the mixer and<br />
insert the cartridge in the gun.<br />
Before starting to use the cartridge, eject a first<br />
part of the product, being sure that the two<br />
components are completely mixed. The<br />
complete mixing is reached only after that the<br />
product, obtained by mixing the two component,<br />
comes out from the mixer with an uniform color.<br />
Fill the drilled hole uniformly starting from the<br />
drilled hole bottom, in order to avoid entrapment<br />
of the air; remove the mixer slowly bit by bit<br />
during pressing-out; filling the drill hole with a<br />
quantity of the injection mortar corresponding to<br />
2/3 of the drill hole depth.<br />
Insert immediately the rebar, marked according<br />
to the proper anchorage depth , slowly and with<br />
a slight twisting motion, removing excess of<br />
injection mortar around the rebar. Observe the<br />
processing time according Annex 5. Wait the<br />
curing time according Annex 5.<br />
Annex 11<br />
of European<br />
Technical Approval<br />
<strong>ETA</strong>-13/0266