Hotsy 1200 97-6268 0608 - ETS Company Pressure Washers and ...
Hotsy 1200 97-6268 0608 - ETS Company Pressure Washers and ...
Hotsy 1200 97-6268 0608 - ETS Company Pressure Washers and ...

Create successful ePaper yourself
Turn your PDF publications into a flip-book with our unique Google optimized e-Paper software.
OPERATOR’S MANUAL PRESSURE WASHER<br />
10<br />
before starting<br />
WARNING: Check hoses, fittings, w<strong>and</strong>, trigger gun<br />
<strong>and</strong> fuel connections daily for signs of wear, cracks<br />
<strong>and</strong> looseness, replace as required.<br />
1. Read all manuals provided with this pressure washer.<br />
Become familiar with location <strong>and</strong> function of all operating<br />
<strong>and</strong> safety controls.<br />
2. Connect the water supply hose to the float tank water<br />
inlet (st<strong>and</strong>ard garden hose connector). The water<br />
faucet <strong>and</strong> supply hose must be capable of providing<br />
6.0 GPM.<br />
3. Fill the burner fuel tank. Use kerosene, #1 grade<br />
home heating oil, #1 or #2 diesel fuel. do not use<br />
Gasoline.<br />
4. Fill the gasoline tank. Use lead free gasoline minimum<br />
86 octane. do not use gasoline containing more<br />
than 10% ethanol, 15% MTBE, or 5% methanol.<br />
5. Check pump <strong>and</strong> engine oil levels.<br />
6. If detergents are to be used, only use detergent for<br />
pressure washers. Follow instructions on detergent<br />
container.<br />
IMPORTANT: Before installing the pressure nozzle<br />
on initial start-up, turn on the water supply <strong>and</strong> allow<br />
water to run from the end of the w<strong>and</strong> until clear to<br />
prevent the pressure nozzle from clogging.<br />
IMPORTANT: If the pressure washer has not been<br />
used for an extended period of time, remove the pressure<br />
nozzle from the end of the w<strong>and</strong> <strong>and</strong> turn on the<br />
water supply. Allow water to run from the end of the<br />
w<strong>and</strong> until clear.<br />
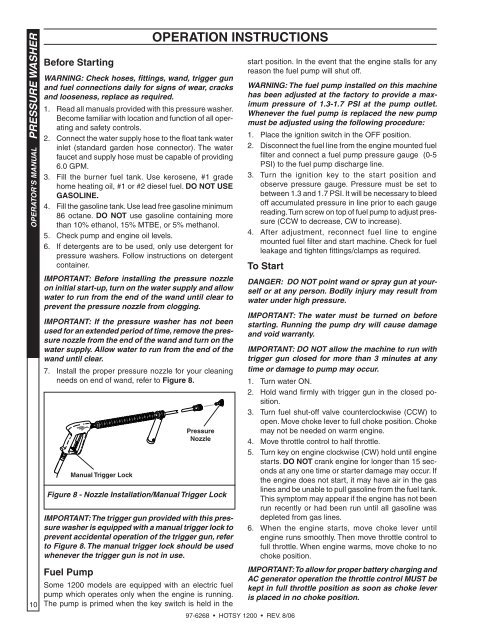
7. Install the proper pressure nozzle for your cleaning<br />
needs on end of w<strong>and</strong>, refer to figure 8.<br />
IMPORTANT: The trigger gun provided with this pressure<br />
washer is equipped with a manual trigger lock to<br />
prevent accidental operation of the trigger gun, refer<br />
to Figure 8. The manual trigger lock should be used<br />
whenever the trigger gun is not in use.<br />
fuel pump<br />
manual trigger lock<br />
Some <strong>1200</strong> models are equipped with an electric fuel<br />
pump which operates only when the engine is running.<br />
The pump is primed when the key switch is held in the<br />
operation instructions<br />
pressure<br />
nozzle<br />
Figure 8 - Nozzle Installation/Manual Trigger Lock<br />
<strong>97</strong>-<strong>6268</strong> • HOTSY <strong>1200</strong> • REV. 8/06<br />
start position. In the event that the engine stalls for any<br />
reason the fuel pump will shut off.<br />
WARNING: The fuel pump installed on this machine<br />
has been adjusted at the factory to provide a maximum<br />
pressure of 1.3-1.7 PSI at the pump outlet.<br />
Whenever the fuel pump is replaced the new pump<br />
must be adjusted using the following procedure:<br />
1. Place the ignition switch in the OFF position.<br />
2. Disconnect the fuel line from the engine mounted fuel<br />
filter <strong>and</strong> connect a fuel pump pressure gauge (0-5<br />
PSI) to the fuel pump discharge line.<br />
3. Turn the ignition key to the start position <strong>and</strong><br />
observe pressure gauge. <strong>Pressure</strong> must be set to<br />
between 1.3 <strong>and</strong> 1.7 PSI. It will be necessary to bleed<br />
off accumulated pressure in line prior to each gauge<br />
reading. Turn screw on top of fuel pump to adjust pressure<br />
(CCW to decrease, CW to increase).<br />
4. After adjustment, reconnect fuel line to engine<br />
mounted fuel filter <strong>and</strong> start machine. Check for fuel<br />
leakage <strong>and</strong> tighten fittings/clamps as required.<br />
to start<br />
DANGER: DO NOT point w<strong>and</strong> or spray gun at yourself<br />
or at any person. Bodily injury may result from<br />
water under high pressure.<br />
IMPORTANT: The water must be turned on before<br />
starting. Running the pump dry will cause damage<br />
<strong>and</strong> void warranty.<br />
IMPORTANT: DO NOT allow the machine to run with<br />
trigger gun closed for more than 3 minutes at any<br />
time or damage to pump may occur.<br />
1. Turn water ON.<br />
2. Hold w<strong>and</strong> firmly with trigger gun in the closed position.<br />
3. Turn fuel shut-off valve counterclockwise (CCW) to<br />
open. Move choke lever to full choke position. Choke<br />
may not be needed on warm engine.<br />
4. Move throttle control to half throttle.<br />
5. Turn key on engine clockwise (CW) hold until engine<br />
starts. do not crank engine for longer than 15 seconds<br />
at any one time or starter damage may occur. If<br />
the engine does not start, it may have air in the gas<br />
lines <strong>and</strong> be unable to pull gasoline from the fuel tank.<br />
This symptom may appear if the engine has not been<br />
run recently or had been run until all gasoline was<br />
depleted from gas lines.<br />
6. When the engine starts, move choke lever until<br />
engine runs smoothly. Then move throttle control to<br />
full throttle. When engine warms, move choke to no<br />
choke position.<br />
IMPORTANT: To allow for proper battery charging <strong>and</strong><br />
AC generator operation the throttle control MUST be<br />
kept in full throttle position as soon as choke lever<br />
is placed in no choke position.