USER GUIDE Digital Light Meter - Extech Instruments
USER GUIDE Digital Light Meter - Extech Instruments
USER GUIDE Digital Light Meter - Extech Instruments

Create successful ePaper yourself
Turn your PDF publications into a flip-book with our unique Google optimized e-Paper software.
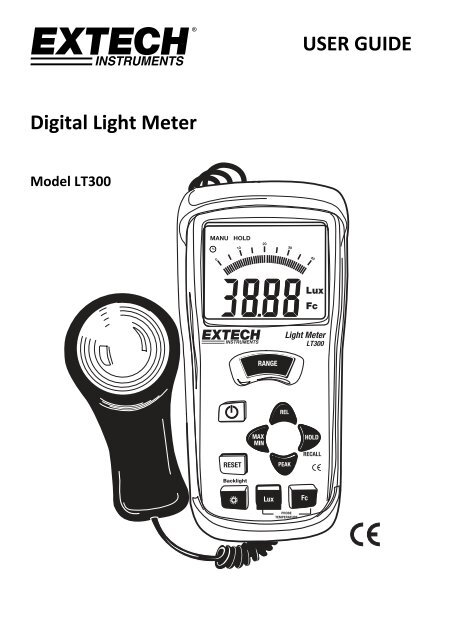
<strong>Digital</strong> <strong>Light</strong> <strong>Meter</strong><br />
Model LT300<br />
<strong>USER</strong> <strong>GUIDE</strong>
Introduction<br />
Congratulations on your purchase of the <strong>Extech</strong> LT300 <strong>Digital</strong> <strong>Light</strong> <strong>Meter</strong>. The LT300 measures<br />
light level (illuminance) to 400,000 Lux (40,000 Fc). The LT300 offers a backlit display, MAX/MIN,<br />
Data Hold, Relative, Peak, and Reset features. This instrument is shipped fully tested and calibrated<br />
and, with proper use, will provide years of reliable service. Please visit our website<br />
(www.extech.com) to check for the latest version of this User Guide, Product Updates, and<br />
Customer Support.<br />
<strong>Meter</strong> Description<br />
1. Sensor cable<br />
2. Analog bargraph<br />
3. Numerical display<br />
4. RANGE button<br />
5. ON/OFF button<br />
6. MAX/MIN button<br />
7. RESET button<br />
8. LCD Backlight button<br />
9. LUX button<br />
10. Fc foot candle button<br />
11. Protective rubber jacket<br />
12. RELATIVE button<br />
13. Data HOLD button<br />
14. PEAK button<br />
15. Photo sensor dome<br />
2<br />
15<br />
1<br />
2<br />
3<br />
4<br />
5<br />
6<br />
7<br />
8<br />
9 10<br />
Notes: Protective sensor cap not shown. Battery compartment, Tilt Stand, and Tripod Mount<br />
are located on the rear of the instrument. The protective rubber jacket must be removed<br />
from meter to access battery compartment.<br />
11<br />
12<br />
13<br />
14<br />
LT300-EU-EN V2.3 2/13
Operation<br />
<strong>Light</strong> sensor<br />
1. The light sensor is permanently attached to<br />
the meter by the coiled cable.<br />
2. Remove the protective cap by unsnapping it<br />
to expose the white domed light sensor.<br />
When the sensor’s protective cap is removed, the white domed light sensor lens will begin to<br />
capture light. Replace the cap when the meter is not in use.<br />
Turn Power ON or OFF<br />
Press the button to turn power on or off. If the display does not switch on, check that the 9V<br />
battery is installed and is fresh.<br />
Selecting Lux or Foot candle units of measure<br />
Press the LUX button to select lux units or the Fc button to select foot candle units.<br />
Measurement Procedure<br />
1. Remove the protective cap from the sensor so that the white domed light sensor is exposed<br />
to the light. For overhead lighting, the sensor can be placed on a desk or table top. A tripod<br />
mount and a tilt stand are located on the rear of the meter for convenience.<br />
2. The display will indicate the light level in Fc or Lux.<br />
3. Press the RANGE button to select the range that provides the maximum resolution. If the<br />
‘OL’ appears the light measurement is out of range. Select another range using the RANGE<br />
button.<br />
4. Press the backlight button to illuminate the LCD display if needed.<br />
MAX/MIN<br />
The Max/Min function allows for recording and display of the maximum and minimum light<br />
levels over time.<br />
1. Press the MAX/MIN button. The MAX display icon will appear and meter will now display<br />
and hold only the highest reading. The display will update only when a higher reading is<br />
measured.<br />
2. Press MAX/MIN button. The MIN display icon will appear and meter will now display and<br />
hold only the lowest reading. The display will update only when a lower reading is measured<br />
3. Press MAX/MIN again. The MAX MIN display icons will appear flashing and meter will now<br />
display the current reading, but will continue to record the highest and lowest values.<br />
4. Press MAX/MIN again to cycle through MAX and MIN displays.<br />
5. To exit the MAX MIN mode, press and hold the MAX/MIN button until the MAX and MIN<br />
icons completely disappear.<br />
Data Hold<br />
Press the HOLD button to freeze the displayed reading. The ” MANU HOLD” hold icon will appear<br />
on the display. Press the HOLD button again to return to normal operation. When the Data Hold<br />
function is enabled the analog bar graph will continue to display level changes.<br />
3<br />
LT300-EU-EN V2.3 2/13
Peak Hold<br />
The Peak Hold feature allows the meter to captures light pulses that rise or fall down to 10µs.<br />
1. Press and hold the PEAK button until CAL appears in the display.<br />
2. Momentarily press the PEAK button. The ‘PMAX’ icon will appear on the LCD. The meter will<br />
then measure and display any light pulses. The display will hold the results until a higher<br />
pulse appears.<br />
3. Press the PEAK button again to display the “PMIN” values.<br />
4. To exit the Peak Hold mode, press and hold the PEAK button until the ‘PMAX’ or ‘PMIN’ icon<br />
disappears.<br />
Relative mode<br />
Measurements can be displayed as a difference between the measured light level and a stored<br />
reference value. To store a reading as a reference, press the REL button when the desired<br />
reference measurement is on the LCD (the REL icon will switch on). All subsequent displayed<br />
readings will be “relative” to the stored reference value. For example, if the reference value is<br />
100 and the actual light level is 125, the meter will display 25. To view the reference value, press<br />
the REL button again so that the REL icon begins to flash. The displayed value will be the<br />
reference value. To exit the Relative mode, press and hold the REL button until the REL icon<br />
disappears.<br />
RESET<br />
Press the RESET button to clear the memory and exit from REL, HOLD, PEAK and MAX/MIN. The<br />
RESET will also reset the auto power off timer.<br />
Backlight<br />
Press the “ “ button to turn the backlight on. Press again to turn it off.<br />
4<br />
LT300-EU-EN V2.3 2/13
Maintenance<br />
Cleaning and storage<br />
1. The white plastic sensor dome should be cleaned with a damp cloth when necessary. Use<br />
only a mild soap if needed. Do not use solvents, abrasives, or harsh detergents to clean the<br />
dome.<br />
2. Store the meter in an area with moderate temperature and humidity (refer to the operating<br />
and storage range in the ‘Specifications’ section).<br />
Battery Replacement<br />
When the battery power begins to fail the low battery symbol “ ”will appear on the LCD. Replace<br />
the 9V battery by first removing protective jacket that encases the meter. Remove the rear<br />
(center) battery compartment screw to access the battery compartment. Ensure that the<br />
compartment cover is securely fastened and that the protective jacket is properly installed<br />
before using the meter.<br />
Never dispose of used batteries or rechargeable batteries in household waste.<br />
As consumers, users are legally required to take used batteries to appropriate<br />
collection sites, the retail store where the batteries were purchased, or wherever<br />
batteries are sold.<br />
Disposal: Do not dispose of this instrument in household waste. The user is<br />
obligated to take end‐of‐life devices to a designated collection point for the disposal<br />
of electrical and electronic equipment.<br />
Other Battery Safety Reminders<br />
o Never dispose of batteries in a fire. Batteries may explode or leak.<br />
o Never mix battery types. Always install new batteries of the same type.<br />
5<br />
LT300-EU-EN V2.3 2/13
Specifications<br />
Lux<br />
Ranges and Resolution Accuracy<br />
40.00, 400.0, 4000, 40.00k, 400.0kLux ± (5% Rdg + 0.5% Full Scale)<br />
Foot candle (Fc)<br />
40.00, 400.0, 4000, 40.00kFc ± (5% Rdg + 0.5% Full Scale)<br />
General Specifications<br />
Display Multi‐function 3‐3/4 (3999) digit LCD with Bargraph indicator<br />
Over range indication LCD displays ‘OL’<br />
Spectral response CIE photopic (CIE human eye response curve)<br />
Spectral accuracy CIE V function (f 1 6%)<br />
Measurement Repeatability ±2%<br />
Temperature coefficient ±0.1% per o C<br />
Sampling rate 13.3 times per second (bargraph); 1.3 times per second (digital<br />
display)<br />
Photo detector Silicon photo‐diode with spectral response filter<br />
Peak Hold Capture light peaks to 10µS<br />
Operating conditions Temperature: 0 to 40 o C (32 to 104 o F); Humidity: < 80% RH<br />
Storage conditions Temperature: ‐10 to 50 o C (14 to 140 o F); Humidity: < 80% RH<br />
Dimensions 165 x 76 x 43mm (6.5 x 3.0 x 1.7")<br />
Weight Approx. 403g (14.2 oz.) with battery installed<br />
Low battery indication “ ” appears on the LCD<br />
Power supply 9V battery<br />
Copyright © 2013 FLIR Systems, Inc.<br />
All rights reserved including the right of reproduction in whole or in part in any form<br />
ISO‐9001 Certified<br />
www.extech.com<br />
6<br />
LT300-EU-EN V2.3 2/13
Appendix<br />
Typical <strong>Light</strong> Levels<br />
Lux Foot<br />
Candles<br />
Lux Foot<br />
Candles<br />
Factories Home<br />
20‐75 2‐7 Emergency Stairs, Warehouse 100‐150 10‐15 Washing<br />
75‐150 7‐15 Exit/Entrance Passages 150‐200 15‐20 Recreational<br />
Activities<br />
150‐300 15‐30 Packing Work 200‐300 20‐30 Drawing Room,<br />
Table<br />
300‐750 30‐75 Visual Work: Production Line 300‐500 30‐50 Makeup<br />
750‐1,500 75‐150 Typesetting: Inspection Work 500‐1,500 50‐150 Reading, Study<br />
1,500‐3,000 150‐300 Electronic Assembly, Drafting 1,000‐2,000 100‐200 Sewing<br />
Office Restaurant<br />
75‐100 7‐10 Indoor Emergency Stairs 75‐150 7‐15 Corridor Stairs<br />
100‐200 10‐20 Corridor Stairs 150‐300 15‐30 Entrance,<br />
Wash Room<br />
200‐750 20‐75 Conference,<br />
300‐750 30‐75 Cooking Room,<br />
Reception Room<br />
Dining Table<br />
750‐1,500 75‐150 Clerical Work 750‐1,500 75‐150 Show Window<br />
1,500‐2,000 150‐2000 Typing, Drafting<br />
Store Hospital<br />
75‐150 7‐15 Indoors 30‐75 3‐7 Emergency Stairs<br />
150‐200 15‐20 Corridor/Stairs 75‐100 7‐10 Stairs<br />
200‐300 20‐30 Reception 100‐150 10‐15 Sick Room,<br />
Warehouse<br />
300‐500 30‐50 Display Stand 150‐200 15‐20 Waiting Room<br />
500‐750 50‐75 Elevator 200‐750 20‐75 Medical Exam Room<br />
750‐1,500 75‐150 Show Window,<br />
Packing Table<br />
750‐1,500 75‐150 Operating Room<br />
1,500‐3,000 150‐300 Storefront, Show Window 5,000‐10,000 500‐1000 Eye Inspection<br />
Spectral Sensitivity<br />
R<br />
e<br />
l<br />
a<br />
t<br />
i<br />
v<br />
e<br />
R<br />
e<br />
s<br />
p<br />
o<br />
n<br />
s<br />
e<br />
1<br />
0.8<br />
0.6<br />
0.4<br />
0.2<br />
0<br />
400 450 500 550 600 650 700<br />
Wavelength (nm)<br />
- - - - - <strong>Light</strong> <strong>Meter</strong> Response _____ CIE Response<br />
7<br />
LT300-EU-EN V2.3 2/13