Audi R8 V10 Supersport Exhaust Installation - Fabspeed
Audi R8 V10 Supersport Exhaust Installation - Fabspeed
Audi R8 V10 Supersport Exhaust Installation - Fabspeed

You also want an ePaper? Increase the reach of your titles
YUMPU automatically turns print PDFs into web optimized ePapers that Google loves.
<strong>Audi</strong> <strong>R8</strong> <strong>V10</strong> <strong>Supersport</strong> <strong>Exhaust</strong> <strong>Installation</strong><br />
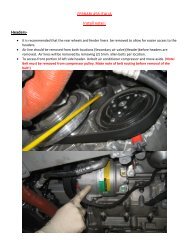
1. Begin exhaust removal by raising the vehicle and removing both rear wheels.<br />
2. Using a T30 torx driver, remove the fasteners securing the rear fender liners. (16 per side) Note<br />
the location of each fastener as it’s being removed as there are two different styles of fasteners<br />
used.<br />
3. Remove the lower engine cover using a T30 torx driver. There are 28 fasteners securing the<br />
cover and air ducts. Again, be sure to note the location of the fasteners.<br />
4. At the rear of the intake manifold, between the MAF sensors is a cosmetic cover. This can be<br />
removed by gently pulling up and off.<br />
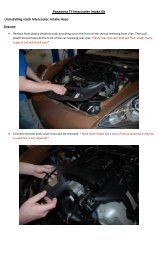
5. Begin removal of the engine compartment side covers by loosening all the quarter turn<br />
fasteners and removing the power steering cap.<br />
6. Making sure the rear hatch is supported, remove each gas support strut one at a time and pull<br />
each engine compartment cover out.<br />
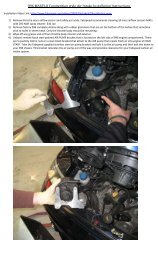
7. Using a flatblade screwdriver or a 7mm socket, loosen the hose clamps securing the hoses to<br />
each throttle body.<br />
8. Using a T30 torx driver, remove the 4 screws securing the air box to the chassis.<br />
9. Pull the rubber intake hoses off the throttle bodies and lift the air box out of the vehicle.<br />
10. With the rear spoiler fully raised there will be two screens visible. (One on each side, between<br />
the spoiler and deck.) Using a T20 and T30 torx driver remove all fasteners securing the screens<br />
(6 total).<br />
11. Using a T30 torx driver remove the 5 fasteners securing the rear bumper cover along the top<br />
panel and the 2 fasteners along the lower edge of the panel.<br />
12. Using a small flat blade screwdriver, remove the license plate lights by gently releasing the tabs.<br />
13. Using a T15 torx driver, remove the reverse camera and disconnect all electrical connectors for<br />
the lights and camera.<br />
14. Using a T30 torx driver remove the 2 fasteners on the lower edge of the panel that were<br />
covered by the license plate lights.<br />
15. Remove the rear panel and disconnect the wire from the rear antenna.<br />
16. Using a T30 torx driver, remove the fasteners securing the heat shields to the rear bumper<br />
cover. (located in the rear wheel wells)<br />
17. Using a T30 torx driver, remove the two screws found behind the rear license plate.<br />
18. Disconnect the large electrical connector found behind the left heat shield, and the connectors<br />
for each side marker light.<br />
155 Commerce Drive 888-646-4945<br />
Fort Washington, PA 19034 info@fabspeed.com
19. Using a T30 torx driver, remove the fasteners securing the rear bumper cover to the quarter<br />
panel. (two per side)<br />
20. Using a T30 torx driver remove the 2 fasteners on the underside of the car, securing the bumper<br />
cover to the chassis.<br />
21. Using a T30 torx driver, remove the fasteners found underneath each tail light in the ventilation<br />
grilles. (these are captured bolts that will remain in the bumper cover)<br />
22. Remove the two T30 fasteners along the top edge of the bumper cover and remove the rear<br />
bumper cover.<br />
23. Using a T30 and T25 torx driver, remove all fasteners securing the heat shield to the vehicle.<br />
24. Remove the heat shield.<br />
25. Remove the wiring from the rear bumper bar.<br />
26. Using a 10mm triple square and a 13mm socket, remove the four bolts securing rear bumper bar<br />
to the chassis and remove the bumper bar.<br />
27. Remove the two T25 bolts found under each tail light assembly<br />
28. With a 10mm wrench remove the two nuts securing each tail light assembly and remove the<br />
lights by pulling straight back.<br />
29. Using a T30 torx driver and a 13mm socket remove all hardware securing the exhaust heat<br />
shields.<br />
30. Disconnect the vacuum hoses to each exhaust valve.<br />
31. With a 16mm socket or wrench, remove the two bolts securing the muffler to the lower<br />
hangers.<br />
32. With a 13mm wrench, remove the four bolts securing the two upper exhaust hangers to the<br />
chassis.<br />
33. Using a T10 inverted torx driver remove both V band exhaust clamps securing the muffler to the<br />
cat pipes.<br />
34. Remove the muffler and heat shield from the vehicle together.<br />
35. Remove the two 16mm bolts securing the upper hangers to the muffler.<br />
36. Using a T25 torx driver remove the 18 fasteners securing the heat shield to the muffler and<br />
remove the heat shield.<br />
37. <strong>Installation</strong> of the <strong>Fabspeed</strong> <strong>Supersport</strong> exhaust X-pipe is opposite of OEM exhaust removal<br />
with a few exceptions.<br />
1. Only the lower exhaust hangers are necessary for support due to the reduced weight of<br />
the <strong>Fabspeed</strong> system. The upper hangers can be set aside.<br />
2. The tail pipe extensions are secured to the X-pipe with quick release V band clamps. Be<br />
sure the extensions are aligned and secure before final assembly of the rear bumper<br />
cover.<br />
155 Commerce Drive 888-646-4945<br />
Fort Washington, PA 19034 info@fabspeed.com