Ferrari 360 Sport Cats and Catbypass Pipes - Fabspeed
Ferrari 360 Sport Cats and Catbypass Pipes - Fabspeed
Ferrari 360 Sport Cats and Catbypass Pipes - Fabspeed

You also want an ePaper? Increase the reach of your titles
YUMPU automatically turns print PDFs into web optimized ePapers that Google loves.
<strong>Fabspeed</strong> Motorsport<br />
Performance For The Next Millennium<br />
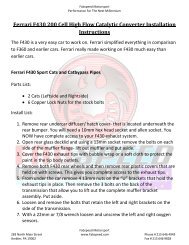
<strong>Ferrari</strong> <strong>360</strong> <strong>Sport</strong> Cataytic Converter <strong>and</strong> <strong>Catbypass</strong> Pipe<br />
Installation Instructions<br />
The F<strong>360</strong> is an easy car to work on. Don’t be intimidated because it is a <strong>Ferrari</strong>.<br />
<strong>Ferrari</strong> <strong>360</strong> <strong>Sport</strong> <strong>Cats</strong> <strong>and</strong> <strong>Catbypass</strong> <strong>Pipes</strong><br />
1. Remove both F<strong>360</strong> rear wheels <strong>and</strong> then remove rear plastic covers that are<br />
held on with screws. This gives you complete access to the rear bumper<br />
bolts.<br />
2. Tape over the top of the rear bumper with blue painters tape. This protects<br />
the rear bumper’s top <strong>and</strong> side painted areas when you slip off the rear<br />
bumper.<br />
3. Under the <strong>360</strong> remove the 10mm bolts that attach the flat underbody panels<br />
to the rear 1 piece bumper assembly.<br />
4. Unbolt the 2 large bolts <strong>and</strong> then the two small bolts inside each rear wheel<br />
fender area on the <strong>360</strong>. Then with a 2nd person/helper pull off the rear<br />
bumper <strong>and</strong> unhook the wire clips for the rear license plate lights. To gain<br />
easy access to the <strong>360</strong> factory catalytic converters simply remove the rear<br />
under tray <strong>and</strong> then you will now have complete access to your <strong>360</strong> exhaust<br />
system.<br />
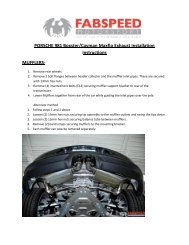
5. Remove factory <strong>and</strong> or any Tubi or other <strong>360</strong> muffler from the car. This<br />
allows access to the stock catalytic converters. Then with a 22mm or 7/8<br />
wrench loosen <strong>and</strong> unscrew the left <strong>and</strong> right oxygen sensors from the<br />
catalytic converters.<br />
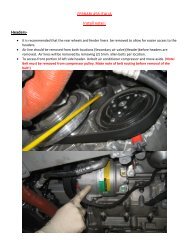
6. Using a 13mm socket <strong>and</strong> extension unbolt the 2 bolts that connect the<br />
catalytic converters to the headers. Save the hardware <strong>and</strong> try not to drop<br />
anything under the engine. IF you drop anything get a long flexible magnet at<br />
any auto parts store.<br />
7. Reverse the process to install your Maxflo high performance catalytic<br />
converters. Use antiseize on all the bolts <strong>and</strong> nuts.<br />
8. VERY IMPORTANT‐ on European cars install the 1st/primary oxygen sensor in<br />
the oxygen sensor bung before the <strong>Fabspeed</strong> catalytic converter <strong>and</strong> then<br />
<strong>Fabspeed</strong> Motorsport<br />
283 North Main Street www.<strong>Fabspeed</strong>.com Phone # 215 646 4945<br />
Ambler, PA 19002 Fax # 215 646 9828
<strong>Fabspeed</strong> Motorsport<br />
Performance For The Next Millennium<br />
install the 2ndary O2 sensor after the <strong>Fabspeed</strong> 200 cell catalytic converter.<br />
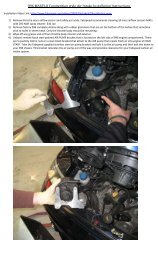
On USA North America <strong>360</strong> cars you must install the 2ndary oxygen sensor<br />
after the catalytic converter <strong>and</strong> leave the block off in the pipe. Get extra<br />
length for the 2ndary O2 sensor by removing the adelle clamps on the<br />
airintake <strong>and</strong> putting the wires around the airbox to reach the 2ndary O2<br />
sensor bung after the cat. All the above is very simple.<br />
9. REVERSE the above procedures to put the <strong>360</strong> back together. You now have<br />
more power guaranteed <strong>and</strong> increased <strong>Ferrari</strong> F1 style sound that works with<br />
any rear muffler.<br />
<strong>Ferrari</strong> <strong>360</strong> Quad Tips<br />
The F<strong>360</strong> is an easy car to work on. Don’t be intimidated because it is a <strong>Ferrari</strong>.<br />
1. Remove both F<strong>360</strong> rear wheels <strong>and</strong> then remove rear plastic covers that are<br />
held on with screws. This gives you complete access to the rear bumper<br />
bolts.<br />
2. Tape over the top of the rear bumper with blue painters tape. This protects<br />
the rear bumper’s top <strong>and</strong> side painted areas when you slip off the rear<br />
bumper.<br />
3. Under the <strong>360</strong> remove the 10mm bolts that attach the flat underbody panels<br />
to the rear 1 piece bumper assembly.<br />
4. Unbolt the 2 large bolts <strong>and</strong> then the two small bolts inside each rear wheel<br />
fender area on the <strong>360</strong>. Then with a 2nd person/helper pull off the rear<br />
bumper <strong>and</strong> unhook the wire clips for the rear license plate lights.<br />
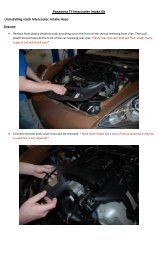
5. Open rear glass deck lid <strong>and</strong> using a 13mm socket remove the bolts on each<br />
side of the muffler flange‐ <strong>and</strong> remove exhaust tips <strong>and</strong> replace with<br />
<strong>Fabspeed</strong> QUAD tips. <strong>Fabspeed</strong> tips will add horsepower <strong>and</strong> torque as our<br />
tips DON’T have any restrictive valve.<br />
6. REVERSE the above procedures to put the <strong>360</strong> back together. You now have<br />
the world’s coolest tips for your <strong>360</strong> <strong>and</strong> more power guaranteed <strong>and</strong><br />
increased <strong>Ferrari</strong> F1 style sound that works with any rear muffler.<br />
<strong>Fabspeed</strong> Motorsport<br />
283 North Main Street www.<strong>Fabspeed</strong>.com Phone # 215 646 4945<br />
Ambler, PA 19002 Fax # 215 646 9828