fledge Twirling Swirl Skirt Laguna - Farbenmix
fledge Twirling Swirl Skirt Laguna - Farbenmix
fledge Twirling Swirl Skirt Laguna - Farbenmix

You also want an ePaper? Increase the reach of your titles
YUMPU automatically turns print PDFs into web optimized ePapers that Google loves.
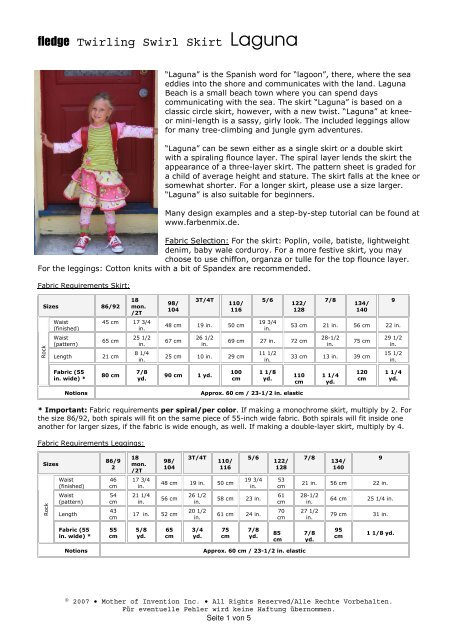
<strong>fledge</strong> <strong>Twirling</strong> <strong>Swirl</strong> <strong>Skirt</strong> <strong>Laguna</strong><br />
“<strong>Laguna</strong>” is the Spanish word for “lagoon”, there, where the sea<br />
eddies into the shore and communicates with the land. <strong>Laguna</strong><br />
Beach is a small beach town where you can spend days<br />
communicating with the sea. The skirt “<strong>Laguna</strong>” is based on a<br />
classic circle skirt, however, with a new twist. “<strong>Laguna</strong>” at knee-<br />
or mini-length is a sassy, girly look. The included leggings allow<br />
for many tree-climbing and jungle gym adventures.<br />
“<strong>Laguna</strong>” can be sewn either as a single skirt or a double skirt<br />
with a spiraling flounce layer. The spiral layer lends the skirt the<br />
appearance of a three-layer skirt. The pattern sheet is graded for<br />
a child of average height and stature. The skirt falls at the knee or<br />
somewhat shorter. For a longer skirt, please use a size larger.<br />
“<strong>Laguna</strong>” is also suitable for beginners.<br />
Many design examples and a step-by-step tutorial can be found at<br />
www.farbenmix.de.<br />
Fabric Selection: For the skirt: Poplin, voile, batiste, lightweight<br />
denim, baby wale corduroy. For a more festive skirt, you may<br />
choose to use chiffon, organza or tulle for the top flounce layer.<br />
For the leggings: Cotton knits with a bit of Spandex are recommended.<br />
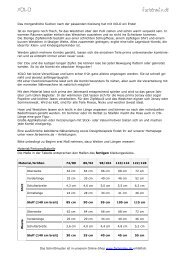
Fabric Requirements <strong>Skirt</strong>:<br />
Rock<br />
Sizes 86/92<br />
Waist<br />
(finished)<br />
Waist<br />
(pattern)<br />
18<br />
mon.<br />
/2T<br />
45 cm 17 3/4<br />
in.<br />
65 cm<br />
Length 21 cm<br />
Fabric (55<br />
in. wide) *<br />
80 cm<br />
25 1/2<br />
in.<br />
8 1/4<br />
in.<br />
7/8<br />
yd.<br />
98/<br />
104<br />
3T/4T<br />
110/<br />
116<br />
48 cm 19 in. 50 cm<br />
67 cm<br />
26 1/2<br />
in.<br />
25 cm 10 in. 29 cm<br />
90 cm 1 yd.<br />
© 2007 • Mother of Invention Inc. • All Rights Reserved/Alle Rechte Vorbehalten.<br />
Für eventuelle Fehler wird keine Haftung übernommen.<br />
Seite 1 von 5<br />
5/6<br />
19 3/4<br />
in.<br />
122/<br />
128<br />
69 cm 27 in. 72 cm<br />
100<br />
cm<br />
11 1/2<br />
in.<br />
1 1/8<br />
yd.<br />
Notions Approx. 60 cm / 23-1/2 in. elastic<br />
7/8<br />
134/<br />
140<br />
53 cm 21 in. 56 cm 22 in.<br />
28-1/2<br />
in.<br />
75 cm<br />
33 cm 13 in. 39 cm<br />
* Important: Fabric requirements per spiral/per color. If making a monochrome skirt, multiply by 2. For<br />
the size 86/92, both spirals will fit on the same piece of 55-inch wide fabric. Both spirals will fit inside one<br />
another for larger sizes, if the fabric is wide enough, as well. If making a double-layer skirt, multiply by 4.<br />
Fabric Requirements Leggings:<br />
Sizes<br />
Rock<br />
Waist<br />
(finished)<br />
Waist<br />
(pattern)<br />
Length<br />
Fabric (55<br />
in. wide) *<br />
86/9<br />
2<br />
46<br />
cm<br />
54<br />
cm<br />
43<br />
cm<br />
55<br />
cm<br />
18<br />
mon.<br />
/2T<br />
17 3/4<br />
in.<br />
21 1/4<br />
in.<br />
98/<br />
104<br />
3T/4T<br />
110/<br />
116<br />
48 cm 19 in. 50 cm<br />
56 cm<br />
17 in. 52 cm<br />
5/8<br />
yd.<br />
65<br />
cm<br />
26 1/2<br />
in.<br />
20 1/2<br />
in.<br />
5/6<br />
19 3/4<br />
in.<br />
58 cm 23 in.<br />
61 cm 24 in.<br />
122/<br />
128<br />
Notions Approx. 60 cm / 23-1/2 in. elastic<br />
3/4<br />
yd.<br />
75<br />
cm<br />
7/8<br />
yd.<br />
53<br />
cm<br />
61<br />
cm<br />
70<br />
cm<br />
85<br />
cm<br />
110<br />
cm<br />
7/8<br />
1 1/4<br />
yd.<br />
134/<br />
140<br />
120<br />
cm<br />
21 in. 56 cm 22 in.<br />
28-1/2<br />
in.<br />
27 1/2<br />
in.<br />
7/8<br />
yd.<br />
9<br />
9<br />
29 1/2<br />
in.<br />
15 1/2<br />
in.<br />
1 1/4<br />
yd.<br />
64 cm 25 1/4 in.<br />
79 cm 31 in.<br />
95<br />
cm<br />
1 1/8 yd.
<strong>fledge</strong> <strong>Twirling</strong> <strong>Swirl</strong> <strong>Skirt</strong> <strong>Laguna</strong><br />
Piece List<br />
<strong>Skirt</strong><br />
1 – <strong>Skirt</strong> piece cut 2<br />
2 – Waistband cut 1<br />
Leggings<br />
3 – Legging cut 2<br />
To start, please take measurements, especially the length and the waist measurements.<br />
Select the size based upon the final length of the skirt you would like to have.<br />
Making a Single LAGUNA<br />
Cutting:<br />
1. Trace the spiral-shaped pattern piece onto<br />
another piece of paper. Lay the fabric<br />
unfolded on the cutting surface.<br />
2. Lay the paper with the spiral shape on the<br />
fabric. Be sure to place the spiral such<br />
that you will have room to cut the second<br />
spiral from the material. For example,<br />
place the outside point, the “tail of the<br />
snail”, more toward the selvedge. Leave<br />
also ample room at the lower edge of the<br />
fabric.<br />
3. Cut through the paper along the traced<br />
line and through the fabric. The spiral is<br />
graded to size: There is no need to add<br />
an additional seam allowance.<br />
4. After cutting the first spiral, carefully remove the scrap paper from around the pattern<br />
piece. Turn the pattern piece clockwise, so that the pattern piece lays on and between the<br />
cutting lines of the first spiral until the inner point is at the mark directly opposite the first<br />
cut inner point. The outer spiral point will also be directly opposite the outer point already<br />
cut. In laying the pattern piece so, the second spiral is “halfway” cut. As such, only the tail<br />
end and the inner waist edge remain to be cut on the second spiral.<br />
5. Cut the second spiral.<br />
6. Cut the waistband and set aside.<br />
Sewing a single LAGUNA:<br />
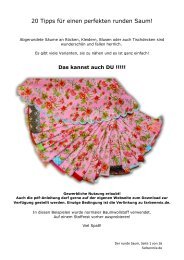
1. Align and pin one spiral to the other at the mark.<br />
Turn the pattern piece<br />
clockwise and lay the<br />
pattern piece along the<br />
cutting line of the first<br />
cut spiral. Lay the<br />
inner point directly<br />
opposite the cut inner<br />
point at the mark.<br />
First cut spiral<br />
2. Stitch this seam right sides together (both “pretty” sides of the fabric facing each other).<br />
Finish the seam with a four-thread overedge stitich or zig zag stitch. Press upwards and<br />
topstitch the seam.<br />
3. Lay the skirt down. Pin the second spiral to the first at the opposite mark at the waist. The<br />
outside edge of the inner spiral will be stitched to the inside edge of the outer spiral. It is<br />
recommended to pin this seam the first time you sew this skirt, as it is easy for this spiral to<br />
become twisted. With practice, this skirt can be sewn without pinning. Note: The LAGUNA<br />
© 2007 • Mother of Invention Inc. • All Rights Reserved/Alle Rechte Vorbehalten.<br />
Für eventuelle Fehler wird keine Haftung übernommen.<br />
Seite 2 von 5
<strong>fledge</strong> <strong>Twirling</strong> <strong>Swirl</strong> <strong>Skirt</strong> <strong>Laguna</strong><br />
skirt is based on a circle skirt. Should the spiral pieces prove confusing, lay them down flat<br />
again and find the circle.<br />
4. Stitch the second spiral seam. Finish the seam, press and topstitch.<br />
5. Hem the skirt.<br />
6. Attach the waistband (one method; please use your preferred method):<br />
Stitch the short ends of the waistband together to form a ring. Press and topstitch<br />
this seam.<br />
Fold the ring in half lengthwise and press the fold. Stitch a line along this folded<br />
edge approx. 1/8” (4 mm) from the edge.<br />
Stitch a line below this line to form a casing to fit your elastic (or two lines if using<br />
two pieces of thinner elastic). Be sure to leave a small opening for inserting the<br />
elastic.<br />
Turn the waistband upside down and place over the waist edge of the skirt. Pin the<br />
one inside half of the two fabric layers of the waistband to the waist edge of the<br />
skirt, fabric right side to fabric right side. Stitch the one outer half of the waistband<br />
all the way around the skirt.<br />
Fold the waistband up and over the waist edge of the skirt. Pin the other edge of the<br />
waistband to waist edge inside the skirt. Tuck under the lower edge of the waistband<br />
before pinning for a more finished look. Stitch from the right side. Be sure to leave a<br />
small opening for inserting the elastic.<br />
Insert the elastic into the casing(s), cinch to the desired fit and secure the ends of<br />
the elastic with small zig zag stitches. Tuck in the elastic and close the small<br />
openings with straight stitch.<br />
Sewing a double LAGUNA skirt:<br />
Cutting: Lay two pieces of fabric unfolded on the cutting surface, one fabric directly on top of the<br />
other. To prevent slipping, you choose to use a temporary spray adhesive sparingly between the<br />
layers of fabric while cutting.<br />
Follow the cutting directions above. The only exception here is that you are cutting two layers of<br />
fabric at once. You will have four spirals altogether, or, in other words, two sets of two spirals.<br />
Once you have cut the pieces, decide if you would like a monochromatic skirt or a two-tone skirt. A<br />
monochromatic skirt would have two outer flounce layers the same and the under layer in a<br />
different fabric. A two-tone skirt would have two contrasting fabrics for the outer flounce layers. If<br />
you would like a two-tone skirt, interchange the stacking order of one set of spirals.<br />
Important: Trim approximately 1-1/2” – 2” (3 - 4-1/2 cm) from the outer tip (hem tip) of each of<br />
the bottom spirals. Trim this tip into a point. This step is important for hemming the double skirt<br />
in a latter step.<br />
Sewing a double LAGUNA skirt<br />
© 2007 • Mother of Invention Inc. • All Rights Reserved/Alle Rechte Vorbehalten.<br />
Für eventuelle Fehler wird keine Haftung übernommen.<br />
Seite 3 von 5
<strong>fledge</strong> <strong>Twirling</strong> <strong>Swirl</strong> <strong>Skirt</strong> <strong>Laguna</strong><br />
1. Take one set of two spirals and stitch the two spirals of one spiral set together, right side to<br />
wrong side (both “pretty” sides facing up) together along the inner curving edge<br />
approximately 1/8” (4 mm) from the fabric edge. Do not finish this edge.<br />
2. Repeat for the opposite set of two spirals. You now have two separate sets of two spirals,<br />
each stitched along the inner curving edge. The bottom layer of each set will be a bit<br />
shorter because of the trimming at the tip in an earlier step.<br />
3. Stitch one set of spirals to the other set. Begin at the mark on the waist and stitch the<br />
outer spiral edge of the bottom layer to the inner spiral edge of the opposing spiral set. In<br />
other words, unfold the top from the bottom layer from one set of spirals. Stitch the outer<br />
edge of the bottom spiral to both layers on the inner edge of the opposite spiral set.<br />
Stitch right sides together (“pretty” sides facing each other). Finish the edge of the seam<br />
with four-thread overedge stitch or zig zag stitch. Press and topstitch the seam.<br />
4. Repeat for the opposite side. Now, the basic form of the skirt has been sewn. Note: The<br />
LAGUNA skirt is based on a circle skirt. Should the spiral pieces prove confusing, lay them<br />
down flat again and find the circle.<br />
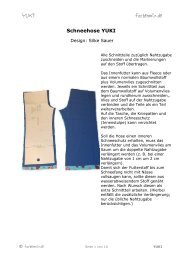
5. The double LAGUNA design requires<br />
hemming before attaching the waistband.<br />
Begin hemming where one set of spirals Begin hemming here<br />
meets the other at the hem. You will see<br />
where you trimmed the tip of the bottom<br />
layer in an earlier step. Begin on the<br />
bottom layer of one set of spirals (see<br />
arrow). You will hem along the bottom<br />
layer of the skirt until the halfway point<br />
around the skirt. At this point, you will<br />
come to the transition to the top flounce<br />
Trimmed 3-4 cm<br />
layer. You will continue automatically<br />
hemming up the flounce edge. If you<br />
trimmed the point of the bottom spiral, the bottom layer will not interfere in this transition.<br />
Continue stitching upwards along the edge of the flounce until you reach the waist.<br />
6. Repeat this hemming for the opposite side<br />
7. Attach the waistband as instructed above.<br />
LAGUNA Leggings<br />
Cutting the LAGUNA Leggings: Lay the pattern piece on folded fabric observing the grain. Cut<br />
and include an additional seam allowance. Please note that the leggings pattern piece requires an<br />
additional seam allowance.<br />
Sewing the Leggings:<br />
1. Stitch each of the inner seams of the leggings. If using a conventional machine, finish this<br />
seam with a zig zag stitch.<br />
2. Turn one leg right side out. Place this leg inside the other leg, turned right side in.<br />
3. Stitch the crotch seam. Finish the seam with zig zag if using a conventional machine.<br />
© 2007 • Mother of Invention Inc. • All Rights Reserved/Alle Rechte Vorbehalten.<br />
Für eventuelle Fehler wird keine Haftung übernommen.<br />
Seite 4 von 5
<strong>fledge</strong> <strong>Twirling</strong> <strong>Swirl</strong> <strong>Skirt</strong> <strong>Laguna</strong><br />
4. Fold over the waist edge to form a casing for the elastic and pin. It is recommended to pin<br />
a small loop of ribbon in the back in this seam to help distinguish the back from the front.<br />
Stitch the waistband casing, leaving a small opening for inserting the elastic.<br />
5. Measure the length and trim if necessary. Hem the legging cuffs with a stretching stitch,<br />
such as the three-step zig zag stitch.<br />
6. Insert the elastic, cinch and trim to the desired fit. Stitch the ends of the elastic together<br />
with small zig zag stitches. Tuck in the elastic and close the small opening of the casing.<br />
© 2007 Mother of Invention • All Rights Reserved. Terms of Use: Single sewn examples of this<br />
design may be sold by private, individual seamstresses to private, individual buyers. No sale of the<br />
sewn design to wholesale and/or retail for resale. This design may be sewn for sale a maximum of<br />
20 times by a private individual seamstress to private, individual buyers. The name of the courtier,<br />
Nancy Langdon, Mother of Invention and/or studioTANTRUM/Fledge, must be indicated when<br />
selling the design. NO MASS PRODUCTION of the finished design. This pattern sheet, the<br />
instructions, and/or pattern pieces may not be exported, resold, photocopied, photographed,<br />
posted on the Internet, videographed or otherwise reproduced and/or transmitted without express<br />
written consent from Mother of Invention Inc.. Purchase and/or sewing of the pattern constitutes<br />
agreement to the Terms of Use. Fledge is a registered trademark of Mother of Invention Inc.<br />
© 2007 • Mother of Invention Inc. • All Rights Reserved/Alle Rechte Vorbehalten.<br />
Für eventuelle Fehler wird keine Haftung übernommen.<br />
Seite 5 von 5