344 SAFETY ALARM PEDOMETER - Sportline
344 SAFETY ALARM PEDOMETER - Sportline
344 SAFETY ALARM PEDOMETER - Sportline

You also want an ePaper? Increase the reach of your titles
YUMPU automatically turns print PDFs into web optimized ePapers that Google loves.
IMPORTANT: READ THROUGH ALL INSTRUCTIONS BEFORE BEGINNING TO USE YOUR <strong>PEDOMETER</strong><br />
BATTERY CAUTION:<br />
Non-rechargeable batteries are not to be recharged<br />
Rechargeable batteries must be removed before recharging<br />
Rechargeable batteries only to be recharged under adult supervision<br />
Different types of batteries must not be mixed<br />
New and used batteries not to be mixed<br />
Exhausted batteries to be removed<br />
Do not dispose of battery in fire; battery may explode or leak<br />
Do not dispose of product in fire; battery may explode or leak<br />
This pedometer is designed to continuously monitor calories burned, distance traveled and the time you actually spend on walking and jogging in daily activity. It also includes a real time clock with an alarm, and a safety alarm which helps you draw<br />
attention in time of need.<br />
FEATURES:<br />
Manual Voice Announcement – announces the calories burned, number of steps taken, distance traveled and time you have walked or jogged when TALK button is pressed.<br />
Auto Voice Announcement – automatically announces calories, distance, step-count and elapsed workout time according to a preset interval.<br />
Intelligent Counting – calculates calories, distance and track time based on actual walking by ignoring false step counts.<br />
Safety Alarm – gives pulsing alarm sound to help you summon help in case of emergency.<br />
Clock with Alarm – announces time of day when TALK button is pressed and when the alarm set time is reached.<br />
IMPORTANT INFORMATION ABOUT THE DISPLAYED VALUES<br />
This calorie counter/pedometer detects the up-and-down motions made by the user to count and register the steps. However, in addition to walking and jogging, there are other motions contributing to step-count, such as sitting up and down, jumping<br />
or simply moving around. These non-walking/jogging motions contribute to erroneous step-counts that result in wrong distance, calories and time, which are calculated from the step-count. This is the reason why other pedometers are good only for<br />
use by walkers and joggers, but not for an average person who may want to use the pedometer all day long around the house, in the office or while shopping.<br />
To circumvent this problem, this pedometer has an intelligent counting mechanism which can distinguish step-count of walking/jogging, then use the former to calculate distance, calories and elapsed time.<br />
The displayed step-count on the LCD represents the counts generated from all up-and-down motions including those from non-walking/jogging. The displayed distance, calories and elapsed time represent the actual distance, calories and time from<br />
your walking/jogging.<br />
Depending on your daily activity, you may have a large step-count but a small value for distance, calories and time if your activity at the office or home where most of the step-counts are not from walking.<br />
SELECTING KM/MILE; KG/LBS; INCHES/CMS<br />
1. Press and hold MODE until you hear a "BEEP".<br />
2. Press /<strong>ALARM</strong> to select KM or MI.<br />
3. Press MODE until you hear two "BEEP's" to return to default mode.<br />
SETTING THE STRIDE LENGTH AND WEIGHT<br />
In order to calculate the distance and calories, the talking pedometer needs your step (stride) length and weight. Follow these steps to obtain and enter your stride length and weight.<br />
1. Measure your stride length toe-to-toe or heel-to-heel. For more accurate results, measure the distance of 10 steps and average them by dividing by 10 to get the step length. For your reference, the average stride length is around 22 inches (55.9 cms).<br />
2. To enter the step length and weight, press and hold down MODE until you hear "Enter your step length". Repeatedly press and to set your step length between 10 inches (25.4 cms) and 80 inches (203.2 cms). Press MODE again<br />
you hear "Enter your weight". Repeatedly press and , to set your weight between 40 pounds (18 kg) and 300 pounds (136 kg).<br />
3. Press MODE once, the pedometer returns to normal display mode.<br />
ANNOUNCING CALORIES, NUMBER OF STEPS, DISTANCE AND ACCUMULATED TIME<br />
Press TALK, to set your pedometer to announce the numbers displayed on the LCD. To announce other functions, press MODE repeatedly until you hear the one you want, then press TALK to hear the announcement. For example if you want to hear<br />
the calories announcement, repeatedly press MODE until you see "Calories" on the LCD then press TALK.<br />
To hear the entire announcement at any mode, press and hold down TALK, the unit announces the current displayed number followed by the rest. You can release the TALK button after the unit has started announcing the next number.<br />
USING AUTOMATIC VOICE ANNOUNCEMENT<br />
You can set the unit so it announces the "current" displayed function automatically according to the following table. For example if the unit is displays CALORIE on the LCD, you will hear the calories announcement automatically for every 50 calories<br />
you have burned.<br />
Function Voice Announcement<br />
Number of Steps<br />
Distance<br />
Calories<br />
Time<br />
Every 1000 steps<br />
Every 0.5 miles<br />
Every 50 Calories (1 Calorie = 1 Kcal)<br />
Every 10 minutes<br />
To turn on and off automatic announcement, follow these steps:<br />
a) In any mode, press and hold down MODE until you hear a "BEEP".<br />
b) Press MODE repeatedly untilyou hear a "BEEP" then repeatedly press /<strong>ALARM</strong> until you hear "Auto report is on". A steady "((.))" appears on the display when returning to the normal operation mode.<br />
c) To turn off, /<strong>ALARM</strong> again until you hear "Auto report is off" and "((.))" disappears when returning to the normal operation mode.<br />
USING THE <strong>PEDOMETER</strong><br />
1. Press and hold CLEAR until you hear "All clear" to reset all numbers to "O".<br />
2. Clip the pedometer on your belt. The pedometer must be in a vertical position, otherwise, incorrect readings may result.<br />
3. Start to walk or jog to begin your normal activities. You can wear the pedometer the entire day and it will accumulate the time,<br />
distance and calories burned over the course of the day.<br />
USING THE <strong>SAFETY</strong> <strong>ALARM</strong><br />
The alarm will activate when the safety alarm pin is pulled from the pedometer.<br />
1. Pull the cord to detach the pin from the pedometer.<br />
2. To stop the alarm, simply reconnect the pin to its socket.<br />
NOTE: Test the alarm function every time when you use the pedometer.<br />
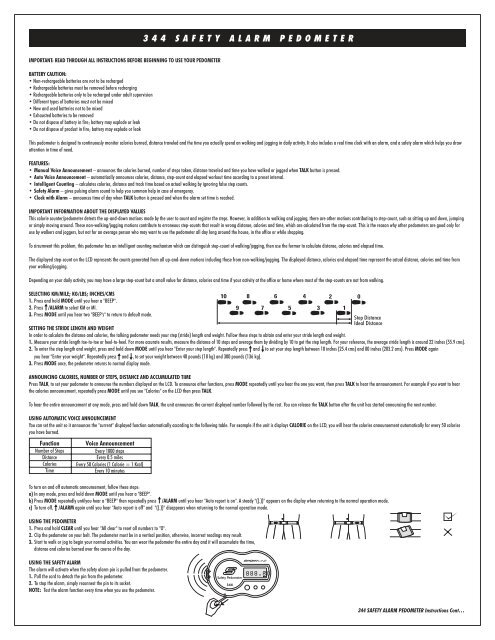
<strong>344</strong> <strong>SAFETY</strong> <strong>ALARM</strong> <strong>PEDOMETER</strong><br />
10<br />
9<br />
Safety Pedometer<br />
<strong>344</strong><br />
8<br />
7<br />
MI<br />
888.80<br />
6<br />
5<br />
4<br />
3<br />
2 0<br />
1<br />
Step Distance<br />
Ideal Distance<br />
<strong>344</strong> <strong>SAFETY</strong> <strong>ALARM</strong> <strong>PEDOMETER</strong> Instructions Cont…
<strong>344</strong> <strong>SAFETY</strong> <strong>ALARM</strong> <strong>PEDOMETER</strong> Instructions Cont…<br />
SETTING THE TIME<br />
1. In normal operation mode, press and hold MODE until you hear a "BEEP".<br />
2. Repeatedly press MODE until you hear "Time Set".<br />
3. Repeatedly press /<strong>ALARM</strong> to set the hour, and press /CLEAR to set the minute.<br />
4. Press MODE three times, and you hear "BEEP, BEEP" and the unit returns to the normal default mode.<br />
ANNOUNCING THE TIME<br />
Repeatedly press MODE until you hear "Time". Press TALK to hear the time.<br />
SETTING THE <strong>ALARM</strong><br />
1. Press and hold MODE until you hear a "BEEP".<br />
2. Repeatedly press MODE until you hear "Alarm Set", AL.SET appears on the display and the display time flashes.<br />
3. Repeatedly press and hold down /<strong>ALARM</strong> until the correct hour appears.<br />
4. Repeatedly press and hold down /CLEAR until the correct minute appears.<br />
5. Press MODE twice, the clock beeps twice and returns to default mode.<br />
TURNING <strong>ALARM</strong> ON/OFF<br />
To turn on the alarm, in default mode press and hold down /<strong>ALARM</strong> until you hear "Alarm On" and " " appears.<br />
To turn off the alarm, press and hold /<strong>ALARM</strong> until you hear "Alarm Off" and " " disappears.<br />
RESETTING THE UNIT<br />
When your pedometer shows an abnormal function, such as "frozen display", "broken display", "no response to button pressing", etc., you need to reinitialize the unit by pressing RESET using a pointed object such as a paper clip. The RESET button is<br />
located on the back of the unit.<br />
CAUTION: BATTERY SHOULD BE REMOVED AND REPLACED BY ADULTS ONLY.<br />
Do not mix old and new batteries. Do not mix alkaline, standard (carbon-zinc) or rechargeable (nickel-cadmium) batteries. Do not use rechargeable batteries. To avoid explosion or leakage, do not dispose of batteries in a fire or attempt to recharge<br />
standard or alkaline batteries. Be sure to insert batteries with the correct polarities and always follow the battery manufacturer’s instructions. Remove batteries and store them in a cool dry place when not in use. Always remove old and dead batteries<br />
from the product. The supply terminals are not to be short circuited.<br />
REPLACING BATTERIES<br />
This pedometer uses 4 AG13 or L1154 or equivalent button cell batteries for power.<br />
1. Make sure that the safety alarm pin is securely inserted in its socket. If the safety alarm pin is detached from the pedometer,<br />
you will need to reset the pedometer after the batteries are installed by pressing RESET on the back.<br />
2. Slide the battery compartment cover on the back in the direction of the arrow to remove it.<br />
3. Remove the old batteries and reuse the two plastic caps.<br />
4. Place the plastic caps on the two new AG13 button cell batteries.<br />
5. Insert four AG13 button cell batteries in the compartment as indicated by the polarity symbols (+ and –) marked inside and<br />
the two plastic-capped cells are in the position as shown in the diagram below.<br />
6. Replace the cover.<br />
Wait for 5 seconds after the batteries are installed, the pedometer will beep three times. If LCD displays blank or random numbers, press RESET on the back to reset.<br />
NOTE: If the sound weakens, distorts or the display dims—it is time to replace batteries.<br />
WARNING:<br />
Always consult a physician before performing any physical activity. No liability or responsibility is assumed by the manufacturer for any injury incurred as a result of using this product.<br />
RESET<br />
Button Cells with Plastic Caps<br />
OPEN<br />
Please note: Before using your<br />
pedometer, remove battery<br />
insulation strip. (Insulation strip<br />
designed to preserve battery power)<br />
If at any time within one (1) year from the purchase date of this product, it fails to perform properly because of defects in material or manufacturing, return it prepaid to:<br />
E&B GIFTWARE, LLC, 585 Oak Ridge Road, Hazleton, PA 18202<br />
Complete this Guarantee Certificate and enclose it (or a copy of it) with the product. To expedite replacement or repair, do not return the defective unit to the store<br />
from which it was purchased but return it directly to SPORTLINE. (PLEASE PRINT CLEARLY)<br />
NAME TEL<br />
ADDRESS<br />
CITY<br />
STATE ZIP<br />
STORE PURCHASED FROM<br />
DATE OF PURCHASE PURCHASE PRICE<br />
PROBLEM WITH PRODUCT<br />
GUARANTEE CERTIFICATE<br />
REPLACEMENT<br />
This product has been carefully designed, manufactured and packaged. If any parts are missing or damaged, please contact us at the address above and we will replace<br />
unit at no charge. (Guarantee does not cover crystal or battery.) By contacting SPORTLINE, Inc. rather than the company from which you purchased this product, we will<br />
be able to more rapidly service your needs.<br />
AFTER WARRANTY<br />
If the warranty period has expired and the unit is returned to <strong>Sportline</strong> for servicing, enclose $7.50 for postage<br />
and handling. Send your unit insured to our Service Department at the address shown. If you are located outside T H E P R O F E S S I O N A L ’ S C H O I C E<br />
the United States either return the unit by insured mail or to the dealer/distributor where purchased. E&B GIFTWARE, LLC, 585 Oak Ridge Road, Hazleton, PA 18202