
You also want an ePaper? Increase the reach of your titles
YUMPU automatically turns print PDFs into web optimized ePapers that Google loves.
2. Drain the oil, then use a lift or jack the front of the car up relatively high, preferably putting the front<br />
wheels on ramps (be sure to chock the rear wheels or put the rear of the car on jack stands);<br />
3. Remove the 2 bolts in the frame holding the idler arm on the passenger's side of the steering links and<br />
lower the center link. Remove the exhaust crossover pipe;<br />
4. Disconnect the battery ground cable and remove the starter (heavy!). To do this, unscrew both of the<br />
small wires that attach to the solenoid, noting which one connects to which terminal. Place a rag on the<br />
frame rail and rest the starter on it. The positive cable will hold it there satisfactorily, so there is no need to<br />
undo any of the other wires;<br />
5. Remove the oil pan and the lower flywheel cover (heavy) to provide working room to get at the seal.<br />
Inspect and repair any "dished" bolt holes in the pan -- the oil pan surface should be flat. Often, when an<br />
oil pan or valve cover is leaking, some ham-fisted mechanic or owner will over-tighten the bolts trying to<br />
stop the leak. This deforms the pan or valve cover and ensures that it will leak from now on. If need be,<br />
hammer the bolt holes flat with a small hammer and a narrow block of wood to act as an anvil. Re-check<br />
for flatness. Use a long, STRAIGHT board with a long piece of sand paper to flatten and re-surface the<br />
bolt pattern surface, if desired.;<br />
6. Remove the windage pan, the tray-like baffle bolted to the bottom of the block and the oil pump;<br />
7. Remove the rear main bearing cap. Remove or, better yet, just loosen the 3 middle main bearing caps,<br />
leaving the front one alone. (Note the direction the middle bearing caps face if you remove them, as it is<br />
important to replace them in exactly the same position.) You do this to let the crankshaft droop just a<br />
fraction of an inch or so to slightly free up the upper half of the rear main seal;<br />
8. Screw a slender wood screw into one end of the upper half of the rope seal and grab the screw with<br />
pliers. Using a brass, wooden or plastic rod (in order to not scratch the crankshaft journal), push up on the<br />
other side of the upper half of the existing rear main seal, while pulling down on the pliers to draw the rope<br />
seal out of the crankshaft journal. Once it protrudes out a bit, you can grab the seal itself and pull it<br />
with the pliers.<br />
9. Installation of the rubber seal requires no tools -- just slip it into place in the upper half. NOTE: the<br />
direction/orientation of the new rubber seal is critical. Follow the directions on this that come with the seal.<br />
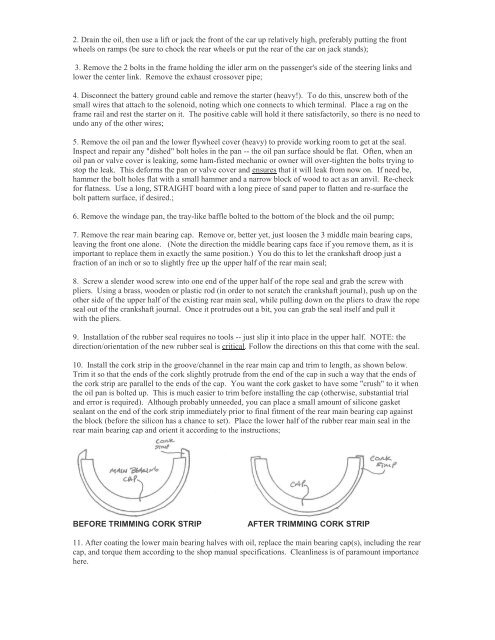
10. Install the cork strip in the groove/channel in the rear main cap and trim to length, as shown below.<br />
Trim it so that the ends of the cork slightly protrude from the end of the cap in such a way that the ends of<br />
the cork strip are parallel to the ends of the cap. You want the cork gasket to have some "crush" to it when<br />
the oil pan is bolted up. This is much easier to trim before installing the cap (otherwise, substantial trial<br />
and error is required). Although probably unneeded, you can place a small amount of silicone gasket<br />
sealant on the end of the cork strip immediately prior to final fitment of the rear main bearing cap against<br />
the block (before the silicon has a chance to set). Place the lower half of the rubber rear main seal in the<br />
rear main bearing cap and orient it according to the instructions;<br />
BEFORE TRIMMING CORK STRIP AFTER TRIMMING CORK STRIP<br />
11. After coating the lower main bearing halves with oil, replace the main bearing cap(s), including the rear<br />
cap, and torque them according to the shop manual specifications. Cleanliness is of paramount importance<br />
here.