
You also want an ePaper? Increase the reach of your titles
YUMPU automatically turns print PDFs into web optimized ePapers that Google loves.
12. Take apart and clean the oil pump. If the lower plate upon which the gears rest is worn, send the pump<br />
away for rebuilding. Unless it is broken, I would retain and re-use the same oil pressure regulator relief<br />
valve spring, since some rebuilders install a stiffer spring which would increase the oil pressure excessively<br />
and maybe cause more oil leaks! Before replacing the pump, fill it with Vaseline so that it is primed and<br />
will have pressure when you first start the engine. The Vaseline will then melt away.<br />
13. Install the front cork seal, after trimming to length. This trimming is a careful, slow, iterative process<br />
of stuffing it in the groove, noting the excess length, removing the cork, trimming it slightly and test fitting<br />
it again and repeating as needed until done. Trim small amounts and sneak up on the final trimmed length.<br />
Again, you want a slight crush to the cork seal. Also, you want the ends of the cork seal to be parallel to<br />
the machined engine block surface. Here, as contrasted with the rear cork seal, you definitely want to seal<br />
the ends (tops) of the cork seal with a dab of silicone sealant just prior to final fitting (and just prior to<br />
installing the pan).<br />
14. With the front and back cork seals now trimmed and in place, next test fit the side gaskets and trim<br />
them to closely abut the sides of the cork gaskets. Use as little silicone sealant as needed to seal the side<br />
gaskets to the cork gaskets. Use gasket sealant to hold the side gaskets in place against the underside of the<br />
block while you bolt the oil pan in place. Apply the gasket sealant only to the top surface of the gasket,<br />
since it will be easier to scrape the gasket off the machined engine block than off the ribbed surface of the<br />
oil pan next time this job has to be done.<br />
15. Replace all parts mentioned in steps 3 through 7. When installing the oil pan, torque it to proper specs<br />
(10ft-lbs max). Do NOT over-torque or the pan will distort in the vicinity of the bolts and cause leaks.<br />
16. When you start the motor, the first thing to do is make sure the oil pressure is normal. Then check for<br />
leaks. After 500 miles, re-torque all bolts, especially the oil pan bolts. Two of the oil pan bolts are above<br />
the starter, which will have to be removed temporarily to get at them.<br />
If the engine has a lot of miles, then it would be prudent to replace the main bearings while doing the rear<br />
seal (and won't cost much). If you were going to do more than just the main bearings and these seals, you<br />
would remove the engine, but this job can be done with the engine in the car. There is a trick to "spinning"<br />
the top half of the bearings out (using a flattened cotter pin inserted in the oil hole of the crank and turning<br />
the crank by hand). Taking off one bearing cap at a time, after installing the new bearings halves re-install<br />
and torque the bearing cap back on twice: the first time for a preliminary bearing clearance check with<br />
Plastigage; the second a permanent installation.<br />
By the way, on a lift this job can be done in 4-6 hours, maybe a good bit less. It took me the better part of a<br />
weekend on a creeper since extra time was spent over-restoring some parts (powder coating the oil pan and<br />
some bolts, etc). NOTE: A high-quality torque wrench is the key to this job. You probably need two<br />
different torque wrenches. A low torque unit for the pan bolts (probably 1/4" drive" and a stronger one for<br />
the main caps (probably 1/2" drive). The specified torque on the pan bolts (and the valve covers) is so low<br />
that there is a substantial risk that you will over tighten them or under tighten them by a good bit if you use<br />
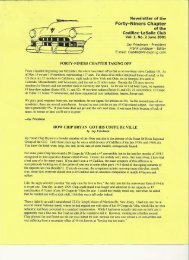
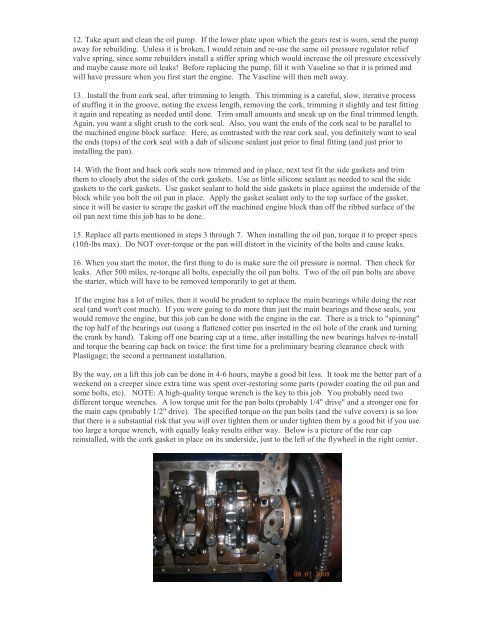
too large a torque wrench, with equally leaky results either way. Below is a picture of the rear cap<br />
reinstalled, with the cork gasket in place on its underside, just to the left of the flywheel in the right center.