OS 91sz-h.pdf
OS 91sz-h.pdf
OS 91sz-h.pdf

You also want an ePaper? Increase the reach of your titles
YUMPU automatically turns print PDFs into web optimized ePapers that Google loves.
SUBSEQUENT READJUSTMENTS<br />
Once the engine has been run-in and the<br />
carburetor controls properly set up, it should be<br />
unnecessary to alter the mixture settings, except to<br />
make minor changes to the Main (High-Speed)<br />
Needle Valve occasionally, to take account of<br />
differences in climatic condisitions.<br />
However, as previously mentioned, the use of a<br />
different fuel, particularly one containing more, or<br />
less, nitromethane and / or a different type or<br />
proportion of lubricating oil, is likely to call for some<br />
modification to the High-Speed Needle-Valve<br />
adjustment.<br />
As a safety measure, it is advisable to increase the<br />
High-Speed Needle Valve setting by an extra halfturn<br />
counter-clockwise, prior to establishing the<br />
new setting. The same applies if the silencer type is<br />
changed. A different silencer may alter the exhaust<br />
pressure applied to the fuel feed and call for a<br />
revised Needle-Valve setting.<br />
The use of a different glowplug, or changes to the<br />
main rotor and its pitch angles may also require<br />
compensating carburetor readjustments.<br />
26<br />
CARBURETOR CLEANLINESS<br />
The correct functioning of the carburetor depends<br />
on its small fuel orifices remaining clear.<br />
The minute particles of foreign matter that are<br />
present in any fuel can easily partially obstruct<br />
these orifices and upset mixture strength so that<br />
engine performance becomes erratic and<br />
unreliable.<br />
It is recommended that fuel is passed through a<br />
filter when the tank is filled and that a good in-line<br />
filter is installed between the fuel tank and<br />
carburetor and, furthermore, that this filter is<br />
frequently cleaned to remove dirt and lint that<br />
accumulates on the filter screen.<br />
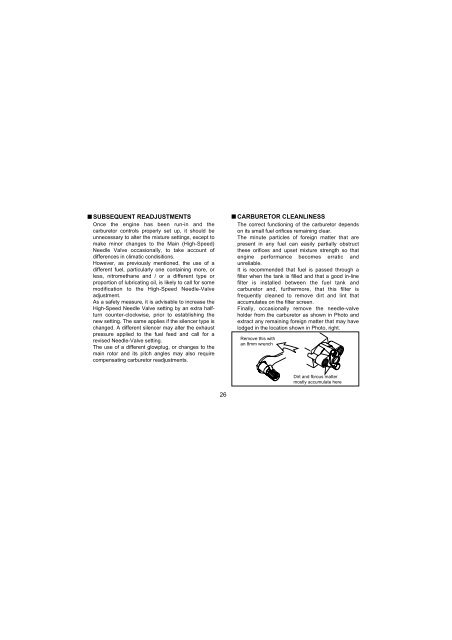
Finally, occasionally remove the needle-valve<br />
holder from the carburetor as shown in Photo and<br />
extract any remaining foreign matter that may have<br />
lodged in the location shown in Photo, right.<br />
Remove this with<br />
an 8mm wrench<br />
Dirt and fbrous matter<br />
mostly accumulate here