Instruction for setting the ICE2 HV 120 governor mode with 800MX
Instruction for setting the ICE2 HV 120 governor mode with 800MX
Instruction for setting the ICE2 HV 120 governor mode with 800MX

You also want an ePaper? Increase the reach of your titles
YUMPU automatically turns print PDFs into web optimized ePapers that Google loves.
<strong>Instruction</strong> <strong>for</strong> <strong>setting</strong> <strong>the</strong> <strong>ICE2</strong> <strong>HV</strong> <strong>120</strong> <strong>governor</strong> <strong>mode</strong> <strong>with</strong> <strong>800MX</strong><br />
We recommend using <strong>the</strong> <strong>governor</strong> <strong>mode</strong> of ESC <strong>with</strong> <strong>800MX</strong> motor. If you are using <strong>the</strong><br />
<strong>governor</strong> <strong>mode</strong> in Castle <strong>ICE2</strong> <strong>HV</strong> <strong>120</strong> ESC, we recommend <strong>setting</strong> <strong>the</strong> headspeed at<br />
around 2200RPM as <strong>the</strong> baseline, and <strong>the</strong>n adjust according to your flight per<strong>for</strong>mance<br />
preference. (Warning: For safety reasons, do not set up <strong>for</strong> excessive speeds)<br />
The factory default <strong>setting</strong> of Castle <strong>ICE2</strong> <strong>HV</strong> <strong>120</strong> is not set to <strong>governor</strong> <strong>mode</strong>. There<strong>for</strong>e,<br />
<strong>for</strong> <strong>governor</strong> <strong>mode</strong>, you need to go through Castlelink on <strong>the</strong> PC to make some<br />
configuration changes.<br />
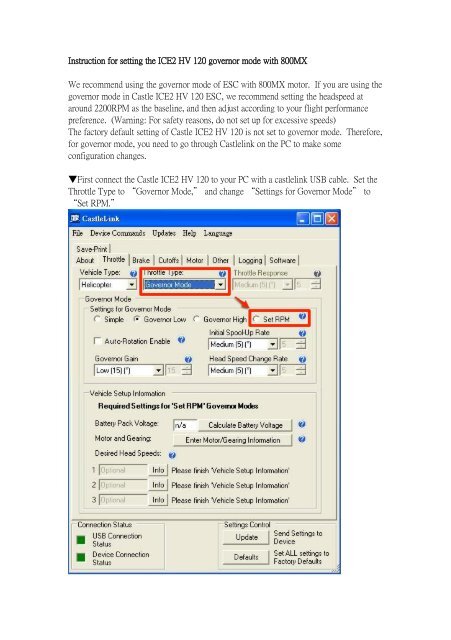
▼First connect <strong>the</strong> Castle <strong>ICE2</strong> <strong>HV</strong> <strong>120</strong> to your PC <strong>with</strong> a castlelink USB cable. Set <strong>the</strong><br />
Throttle Type to “Governor Mode,” and change “Settings <strong>for</strong> Governor Mode” to<br />
“Set RPM.”
After selecting “Set RPM,” you will be prompted to enter o<strong>the</strong>r necessary <strong>setting</strong>s, such<br />
as battery voltage, Gearing In<strong>for</strong>mation. Should <strong>the</strong>se parameters need to be adjusted in<br />
<strong>the</strong> future, click on “Calculate Battery Voltage” or “Enter Motor/Gearing<br />
In<strong>for</strong>mation.”<br />
▼The first window prompt is <strong>for</strong> battery voltage. Using 700E DFC <strong>with</strong> <strong>800MX</strong> 520KV<br />
motor as an example, enter 12 in “Number of cells in series.”
▼Next you will be prompted to enter Motor and Gearing in<strong>for</strong>mation. There are 4<br />
<strong>setting</strong>s that need to be completed: teeth on Pinion, teeth on Main Gear, kV of Motor, and<br />
Magnetic Poles in Motor. Take extra caution when entering <strong>the</strong>se parameters, as incorrect<br />
values could lead to overheating of motor and ESC, affecting speed <strong>governor</strong> per<strong>for</strong>mance.<br />
Headspeed Setting<br />
Now we will set <strong>the</strong> headspeed under <strong>governor</strong> <strong>mode</strong>. 3 headspeeds can be selected by<br />
using different throttle curves. The throttle curves on your transmitter is set to 30%, 70%,<br />
and 100%.<br />
Normal IDEL 1 IDLE 2<br />
30%<br />
70%<br />
100%
Governor Gain<br />
In addition, <strong>the</strong> Governor Gain <strong>setting</strong> in CastleLink works <strong>the</strong> same as <strong>the</strong> gain on your<br />
gyro. Too little, and <strong>the</strong> <strong>governor</strong> rpm response can appear mushy, and too much can<br />
induce oscillation. Generally if <strong>the</strong> main rotor can sustain <strong>the</strong> headspeed set in <strong>governor</strong><br />
<strong>mode</strong>, lower <strong>governor</strong> gain value is always better to increase ESC longevity. The default<br />
factory <strong>setting</strong> <strong>for</strong> <strong>governor</strong> gain is 15, and can be adjusted in <strong>the</strong> range of 1 to 50; higher
<strong>the</strong> gain value equals higher <strong>the</strong> gain. Motors <strong>with</strong> higher torque requires less <strong>governor</strong><br />
gain value.<br />
Align <strong>800MX</strong> motor has an excellent torque characteristic, thus we recommend <strong>governor</strong><br />
gain to be set between 5 to 8. Using team pilot Kenny Ko as an example, he believes<br />
<strong>800MX</strong> exhibits enough torque to maintain consistent headspeed during most flight<br />
conditions, thus does not need <strong>the</strong> <strong>governor</strong> intervention to catchup <strong>the</strong> loss in headspeed;<br />
so he sets his <strong>governor</strong> gain to 6.
Head Speed Change Rate<br />
This <strong>setting</strong> controls how quickly <strong>the</strong> power is ramped up or down in two different<br />
situations. First, it is used to control <strong>the</strong> power ramp when switching from one head speed<br />
to ano<strong>the</strong>r in any of <strong>the</strong> <strong>governor</strong> <strong>mode</strong>s. Secondly, it is also used to control how fast <strong>the</strong><br />
power will ramp when recovering from an Auto-Rotate motor stop. This <strong>setting</strong> will only<br />
work if you have selected a heli, control-line, or external <strong>governor</strong> vehicle-type. The<br />
higher <strong>the</strong> value, <strong>the</strong> faster <strong>the</strong> head will accelerate to <strong>the</strong> new head speed. The range <strong>for</strong><br />
this <strong>setting</strong> is 0 to 20, <strong>with</strong> factory default value of 5.<br />
<strong>800MX</strong> already has fast acceleration rate, so we recommend <strong>setting</strong> of 15 to 20. For<br />
example, auto-rotation bailout or mid-air blade stop requires rapid acceleration to flying<br />
headspeed. <strong>800MX</strong> has <strong>the</strong> ability to restore to flying headspeed very quickly.
▼<strong>setting</strong>s under <strong>the</strong> Motor tab. We recommend using <strong>the</strong> default <strong>setting</strong>s <strong>for</strong> <strong>800MX</strong><br />
motor.<br />
Motor Start Power:<br />
This <strong>setting</strong> controls how much power is allowed into <strong>the</strong> motor to get it started <strong>for</strong> <strong>the</strong><br />
first few revolutions from a dead stop. Stuttering motor startup is a good indication of too<br />
low of starting power, which can be resolved increasing this <strong>setting</strong>. Make sure <strong>the</strong><br />
stuttering is not caused by obstruction of <strong>for</strong>eign object, <strong>the</strong>n start <strong>with</strong> a low <strong>setting</strong> first,<br />
and experiment to find which looks best to you from <strong>the</strong>re. The <strong>setting</strong> range is 0 to 100,<br />
<strong>with</strong> higher number equaling to higher power. Factory default <strong>setting</strong> is 59.<br />
<strong>800MX</strong> is highly efficient <strong>with</strong> minimal start power requirement, so we recommend <strong>the</strong><br />
default “Medium (59)” <strong>setting</strong>.
Motor Timing:<br />
Motor timing advance changes <strong>the</strong> timing advance range used on <strong>the</strong> motor. Generally,<br />
low advance gives more efficiency and less power. High advance gives more power at <strong>the</strong><br />
expense of efficiency (motor heat). Every system will respond to changes in advance<br />
differently. All Castle Creations controllers automatically determine <strong>the</strong> correct and best<br />
range of timing advance <strong>for</strong> any motor <strong>the</strong>y are plugged into when running in sensoreless<br />
<strong>mode</strong>. You can move up or down <strong>with</strong>in that range via <strong>the</strong>se <strong>setting</strong>s. The <strong>setting</strong><br />
parameter is 0 to 20, higher value equals higher advancement. Default factory <strong>setting</strong> is<br />
Normal (5).<br />
<strong>800MX</strong> features high torque, allowing rapid startups <strong>with</strong>out advancing timing. We<br />
recommend “Low (0)” or “Normal (5)” <strong>setting</strong>s.<br />
PWM Rate:<br />
This <strong>setting</strong> changes <strong>the</strong> frequency <strong>with</strong> which <strong>the</strong> controller sends power pulses to <strong>the</strong><br />
motor. With some motor types, <strong>the</strong> higher <strong>the</strong> frequency <strong>the</strong> more efficient <strong>the</strong> motor will<br />
run, but always at <strong>the</strong> expense of increased heat <strong>with</strong>in <strong>the</strong> controller. If you decide to<br />
experiment <strong>with</strong> changes to PWM, use a wattmeter, a tachometer and a temperature gun to<br />
find out how changes affect your entire power system. An increase in PWM frequency<br />
will always increase <strong>the</strong> controller temperature. It may or may not decrease <strong>the</strong><br />
temperature of <strong>the</strong> motor.<br />
<strong>800MX</strong>’s unique winding and magnet design contributes to an already efficient motor,<br />
so even <strong>with</strong> increased PWM values, <strong>the</strong> motor can continue to keep <strong>the</strong> operating<br />
temperature low. O<strong>the</strong>r brands of motors <strong>with</strong> single winding will not be able to handle<br />
higher PWM <strong>setting</strong>s (<strong>the</strong>y recommend 8Khz). For <strong>800MX</strong> motor, we recommend PWM<br />
value of 8 to 12 Khz, or <strong>the</strong> “Outrunner Mode.”<br />
Warning tones and LED signals:<br />
Castle <strong>ICE2</strong> <strong>HV</strong> <strong>120</strong> provides 6 different LED signals, as well as warning beeps, to alert<br />
you any abnormalities that occurred in flight, such as loss of power or loss of signal.<br />
In case you were <strong>for</strong>ced to land by an abnormal incidence, do not unplug <strong>the</strong> ESC power<br />
immediately; observe <strong>the</strong> warning LED and beeps to understand <strong>the</strong> cause of abnormality.<br />
1 beep and flash Start failure: The motor was jammed or locked.<br />
2 beeps and flashes Low Voltage Cutoff: Your batteries are likely discharged.<br />
Check that batteries are fully charged and that Phoenix<br />
detects <strong>the</strong> proper number of cells at power-up.<br />
3 beeps and flashes Over-Current: Current draw exceeded <strong>the</strong> safe capacity of<br />
<strong>the</strong> controller. Reduce current draw by changing to a<br />
smaller propeller, different gear combination, or fewer<br />
cells.<br />
4 beeps and flashes Motor Anomaly: Controller encountered abnormal motor<br />
behavior such as a prop strike or o<strong>the</strong>r physical<br />
interference. May also indicate lost synchronization or<br />
magnetic overload <strong>with</strong>in <strong>the</strong> motor.<br />
5 beeps and flashes Radio Signal: Signal from receiver is corrupt or nonexistent.<br />
Check transmitter and receiver.<br />
6 beeps and flashes Over temperature