Solid wood planks Life-long quality - Berthold
Solid wood planks Life-long quality - Berthold
Solid wood planks Life-long quality - Berthold

Create successful ePaper yourself
Turn your PDF publications into a flip-book with our unique Google optimized e-Paper software.
22<br />
berthold solid <strong>wood</strong> <strong>planks</strong><br />
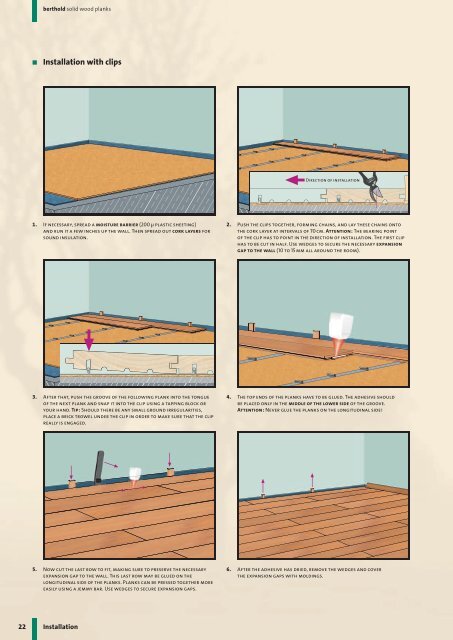
■ Installation with clips<br />
1. If necessary, spread a moisture barrier (200 µ plastic sheeting)<br />
and run it a few inches up the wall. Then spread out cork layers for<br />
sound insulation.<br />
3. After that, push the groove of the following plank into the tongue<br />
of the next plank and snap it into the clip using a tapping block or<br />
your hand. Tip : Should there be any small ground irregularities,<br />
place a brick trowel under the clip in order to make sure that the clip<br />
really is engaged.<br />
5. Now cut the last row to fit, making sure to preserve the necessary<br />
expansion gap to the wall. This last row may be glued on the<br />
<strong>long</strong>itudinal side of the <strong>planks</strong>. Planks can be pressed together more<br />
easily using a jemmy bar. Use wedges to secure expansion gaps.<br />
Installation<br />
Direction of installation<br />
2. Push the clips together, forming chains, and lay these chains onto<br />
the cork layer at intervals of 70 cm. Attention : The bearing point<br />
of the clip has to point in the direction of installation. The first clip<br />
has to be cut in half. Use wedges to secure the necessary expansion<br />
gap to the wall (10 to 15 mm all around the room).<br />
4. The top ends of the <strong>planks</strong> have to be glued. The adhesive should<br />
be placed only in the middle of the lower side of the groove.<br />
Attention : Never glue the <strong>planks</strong> on the <strong>long</strong>itudinal side !<br />
6. After the adhesive has dried, remove the wedges and cover<br />
the expansion gaps with moldings.