Download the XML410 English User Manual in PDF format - Samson
Download the XML410 English User Manual in PDF format - Samson
Download the XML410 English User Manual in PDF format - Samson

You also want an ePaper? Increase the reach of your titles
YUMPU automatically turns print PDFs into web optimized ePapers that Google loves.
Basic Operation<br />
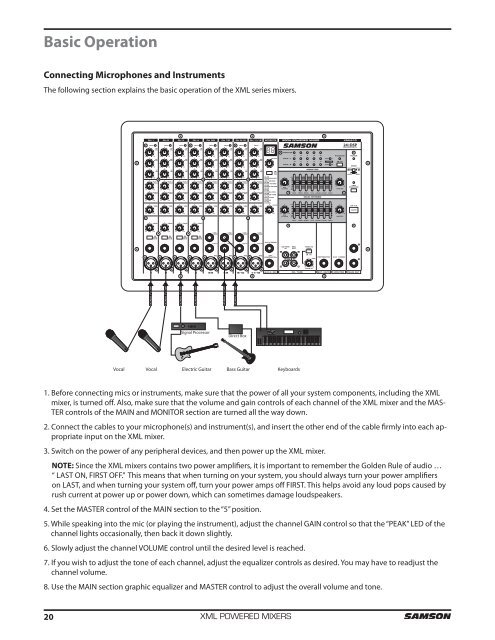
Connect<strong>in</strong>g Microphones and Instruments<br />
The follow<strong>in</strong>g section expla<strong>in</strong>s <strong>the</strong> basic operation of <strong>the</strong> XML series mixers.<br />
20<br />
Signal Processor<br />
Direct Box<br />
Vocal Vocal Electric Guitar Bass Guitar Keyboards<br />
1. Before connect<strong>in</strong>g mics or <strong>in</strong>struments, make sure that <strong>the</strong> power of all your system components, <strong>in</strong>clud<strong>in</strong>g <strong>the</strong> XML<br />
mixer, is turned off. Also, make sure that <strong>the</strong> volume and ga<strong>in</strong> controls of each channel of <strong>the</strong> XML mixer and <strong>the</strong> MAS-<br />
TER controls of <strong>the</strong> MAIN and MONITOR section are turned all <strong>the</strong> way down.<br />
2. Connect <strong>the</strong> cables to your microphone(s) and <strong>in</strong>strument(s), and <strong>in</strong>sert <strong>the</strong> o<strong>the</strong>r end of <strong>the</strong> cable firmly <strong>in</strong>to each appropriate<br />
<strong>in</strong>put on <strong>the</strong> XML mixer.<br />
3. Switch on <strong>the</strong> power of any peripheral devices, and <strong>the</strong>n power up <strong>the</strong> XML mixer.<br />
NOTE: S<strong>in</strong>ce <strong>the</strong> XML mixers conta<strong>in</strong>s two power amplifiers, it is important to remember <strong>the</strong> Golden Rule of audio …<br />
“ LAST ON, FIRST OFF.” This means that when turn<strong>in</strong>g on your system, you should always turn your power amplifiers<br />
on LAST, and when turn<strong>in</strong>g your system off, turn your power amps off FIRST. This helps avoid any loud pops caused by<br />
rush current at power up or power down, which can sometimes damage loudspeakers.<br />
4. Set <strong>the</strong> MASTER control of <strong>the</strong> MAIN section to <strong>the</strong> “5” position.<br />
5. While speak<strong>in</strong>g <strong>in</strong>to <strong>the</strong> mic (or play<strong>in</strong>g <strong>the</strong> <strong>in</strong>strument), adjust <strong>the</strong> channel GAIN control so that <strong>the</strong> “PEAK” LED of <strong>the</strong><br />
channel lights occasionally, <strong>the</strong>n back it down slightly.<br />
6. Slowly adjust <strong>the</strong> channel VOLUME control until <strong>the</strong> desired level is reached.<br />
7. If you wish to adjust <strong>the</strong> tone of each channel, adjust <strong>the</strong> equalizer controls as desired. You may have to readjust <strong>the</strong><br />
channel volume.<br />
8. Use <strong>the</strong> MAIN section graphic equalizer and MASTER control to adjust <strong>the</strong> overall volume and tone.<br />
XML POWERED MIXERS