User Manual - Fusion
User Manual - Fusion
User Manual - Fusion

Create successful ePaper yourself
Turn your PDF publications into a flip-book with our unique Google optimized e-Paper software.
ENCOUNTER<br />
ACTIVE ENCLOSURES<br />
EN-AT1100, EN-AT1120<br />
Disclaimer<br />
The provided self adhesive feet are intended for initial site placement only, and are not to be considered a suitable method<br />
of securing the Active Enclosure. Always ensure the Active Enclosure is securely attached, to avoid movement.<br />
FUSION accepts no responsibility for damage or injury in relation to inappropriate securing of this product<br />
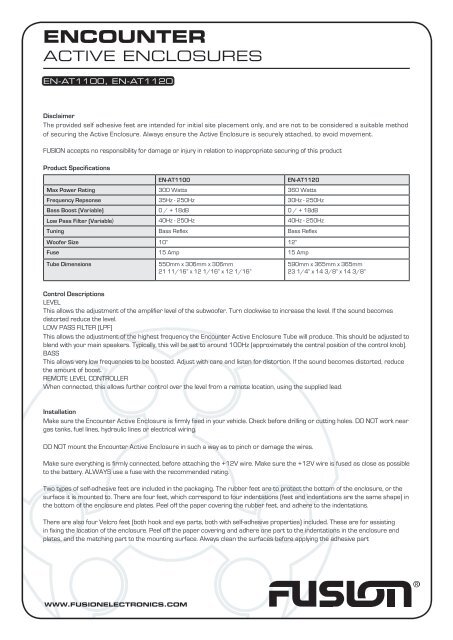
Product Specifications<br />
EN-AT1100 EN-AT1120<br />
Max Power Rating 300 Watts 360 Watts<br />
Frequency Repsonse 35Hz - 250Hz 30Hz - 250Hz<br />
Bass Boost (Variable) 0 / + 18dB 0 / + 18dB<br />
Low Pass Filter (Variable) 40Hz - 250Hz 40Hz - 250Hz<br />
Tuning Bass Reflex Bass Reflex<br />
Woofer Size 10” 12”<br />
Fuse 15 Amp 15 Amp<br />
Tube Dimensions 550mm x 306mm x 306mm<br />
21 11/16” x 12 1/16” x 12 1/16”<br />
Control Descriptions<br />
LEVEL<br />
This allows the adjustment of the amplifier level of the subwoofer. Turn clockwise to increase the level. If the sound becomes<br />
distorted reduce the level.<br />
LOW PASS FILTER (LPF)<br />
This allows the adjustment of the highest frequency the Encounter Active Enclosure Tube will produce. This should be adjusted to<br />
blend with your main speakers. Typically, this will be set to around 100Hz (approximately the central position of the control knob).<br />
BASS<br />
This allows very low frequencies to be boosted. Adjust with care and listen for distortion. If the sound becomes distorted, reduce<br />
the amount of boost.<br />
REMOTE LEVEL CONTROLLER<br />
When connected, this allows further control over the level from a remote location, using the supplied lead.<br />
Installation<br />
Make sure the Encounter Active Enclosure is firmly fixed in your vehicle. Check before drilling or cutting holes. DO NOT work near<br />
gas tanks, fuel lines, hydraulic lines or electrical wiring.<br />
DO NOT mount the Encounter Active Enclosure in such a way as to pinch or damage the wires.<br />
590mm x 365mm x 365mm<br />
23 1/4” x 14 3/8” x 14 3/8”<br />
Make sure everything is firmly connected, before attaching the +12V wire. Make sure the +12V wire is fused as close as possible<br />
to the battery. ALWAYS use a fuse with the recommended rating.<br />
Two types of self-adhesive feet are included in the packaging. The rubber feet are to protect the bottom of the enclosure, or the<br />
surface it is mounted to. There are four feet, which correspond to four indentations (feet and indentations are the same shape) in<br />
the bottom of the enclosure end plates. Peel off the paper covering the rubber feet, and adhere to the indentations.<br />
There are also four Velcro feet (both hook and eye parts, both with self-adhesive properties) included. These are for assisting<br />
in fixing the location of the enclosure. Peel off the paper covering and adhere one part to the indentations in the enclosure end<br />
plates, and the matching part to the mounting surface. Always clean the surfaces before applying the adhesive part
Wiring<br />
• Connect the ground wire to the vehicle first (clean dirt and paint to bare metal).<br />
• Connect the 12 volt (red wire) to the positive battery terminal. Make sure the fuse is<br />
close to the battery.<br />
• Connect the remote on (blue wire)<br />
• Connect the RCA cables if applicable, OR<br />
• Connect the speaker level wire by splicing into the headunits speaker wires.<br />
See Note 1<br />
• Connect the remote level controller with the supplied lead.<br />
• Check all connections.<br />
• Finally, connect the power plug end of the power harness to the unit.<br />
For further product and installation information please visit www.fusionelectronics.com<br />
Para obtener más información sobre los productos o su instalación, visite www.fusionelectronics.com<br />
Weitere Informationen zum Produkt und zur Installation finden Sie auf folgender Website: www.fusionelectronics.com<br />
Ga naar www.fusionelectronics.com voor meer product- en montage-informatie<br />
Pour plus de renseignements sur les produits et l’installation, veuillez consulter www.fusionelectronics.com<br />
Per ulteriori informazioni su prodotto e installazione, potete visitare www.fusionelectronics.com<br />
За дополнительной информацией о продукции и установке обращайтесь на www.fusionelectronics.com<br />
Specifications and design are subject to change without notification<br />
RECORD YOUR PURCHASE DETAILS HERE:<br />
MODEL NUMBER __________________________ DATE OF PURCHASE__________________________<br />
AFFIX RECEIPT HERE<br />
L+<br />
L -<br />
HIGH<br />
INPUT<br />
R+<br />
R -<br />
REMOTE<br />
LOW INPUT<br />
Right<br />
Left<br />
L.P.F BASS POWER<br />
PROT REM<br />
MIN MAX 40Hz 250Hz 0dB 18dB<br />
WARNING! Audio Systems can produce sound levels over 135dB. Continuous exposure to sound pressure levels over 100dB may<br />
cause permanent hearing loss! Please watch for emergency vehicles as warning signals may not be heard. USE COMMON SENSE!<br />
V 2.0<br />
Speaker Level<br />
Input Plug<br />
See note 1<br />
Splice into source<br />
unit’s speaker wires<br />
(R+) Grey/White<br />
(R- ) Grey<br />
(L+) Green/White<br />
(L- ) Green<br />
Connect the remote<br />
level controller lead to<br />
the amplified tube<br />
LEVEL<br />
EN-AT110<br />
POWER<br />
+12 GND<br />
FUSE<br />
Connect red wire to<br />
positive (+12V) battery<br />
terminal<br />
Connect blue wire to<br />
source unit’s accessory<br />
lead or switched 12 volt<br />
source (REM)<br />
Remote Level Controller<br />
*Note 1 Take care to make<br />
sure the wires are spliced in<br />
the correct phase. Positive to<br />
positive, negative to negative.<br />
Failure to do this correctly could<br />
result in loss of bass.<br />
Power Plug<br />
Positive<br />
Vehicle Battery<br />
Connect black<br />
wire to chassis<br />
ground of vehicle<br />
(Ground)