No turkeys - Valgame
No turkeys - Valgame
No turkeys - Valgame

You also want an ePaper? Increase the reach of your titles
YUMPU automatically turns print PDFs into web optimized ePapers that Google loves.
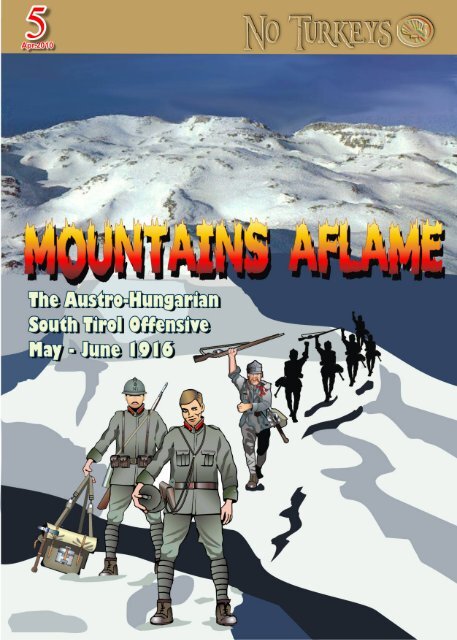
<strong>No</strong> Turkeys 5 – 2010 Aprile pag - 1<br />
TThhee Of fff ffeenns si iivvee iinn i<br />
SSoouut thh<br />
TTi iir rool ll<br />
also called “ the Strafexpedition “<br />
– May 15 – June 24 1916<br />
In Trentino, during 1915, the Italian troops actually<br />
had pushed themselves in the valley of<br />
Chiese and in val of Ledro, up to few kilometers<br />
from Riva del Garda. Were also occupied the<br />
Altissimo, besides Val Lagarina, the Vallarsa,<br />
Borgo Valsugana and, more east, Cortina and<br />
the Tofanes.<br />
This was the real situation to the eve of the<br />
Austro-hungarian offensive launched in the<br />
Trentino (May 15th 1916) and historically know<br />
as the “Strafexpedition”, punitive expedition, for<br />
the supposed Italian betrayal vs the former<br />
allied: Austria-Hungary. After a notable<br />
concentration of men and a materials, Austria attacked<br />
between the rivers Adige and Brenta,<br />
with the objective to go ahead, down in the<br />
lowlands, through the valleys of the Vicenza’s<br />
territory, in order to cut off the Italian troops<br />
displayed in Cadore and along the Isonzo front.<br />
A month later, however, Austria will be forced to<br />
abandon the attacks without having reached the<br />
hoped results. Actually they surely made a strategic<br />
retreat, but the Austro-hungarian failure<br />
was also determined by a tough and, moreover,<br />
surprising Italian resistance.<br />
That operation, maybe the most important<br />
mountain warfare example (it involved three<br />
armies) not only of the Great War, but also exclusive<br />
in the history of war, had very low outcomes<br />
among the anglosaxon historical researchers;<br />
they had only one word for WW1 Italy,<br />
Caporetto.<br />
The Strafexpedition was a serious Austrohungarian<br />
attempt to inflict a deadly hit to their<br />
adversaries and at the same time an hard test for<br />
the defensive skills of the young Italian army.<br />
Above all it was a clash of exceptional intensity<br />
with a lot of losses among both the parts.<br />
The Italians’ Situation and the Hellfire<br />
The Italian frontline was somehow weak. Italian<br />
Commands had tried, with a lot of confused<br />
orders, to reinforce the first lines, directly close<br />
to the enemy, in order to launch some attacks<br />
towards Trento.<br />
Their Second Line (Advanced Defense Line) was<br />
not ready and trenches almost covered with<br />
snow. Here they deployed their artillery, some<br />
old guns and howitzers, since the better pieces<br />
were in the Isonzo front.<br />
The main frontline originated (in the Italian left)<br />
in front of the town of Rovereto and went along<br />
the Val Terragnolo, going there uphill till the<br />
higher Serrada and Folgaria plateaus. There was<br />
the center of the whole sector.<br />
From there the line went down inside the deep<br />
Val d’Astico and it went up again along a steep<br />
slant toward Luserna and the highlands of Vezzena.<br />
Here Austria-Hungary had six strong armored<br />
fortresses, which were the pivot point of<br />
their local defense.<br />
X-hour of the attack struck at 6 PM of May 15.<br />
Weather was fine when 369 pieces, with many<br />
heavy mortars, begun their destructive bombardment.<br />
The local Austro-Hungarian commander<br />
(XX Corps) was the Archduke Charles,<br />
the future Emperor, observed the violent “carpet<br />
bombing” in a nearby peak.<br />
After three hours of intensive fire, at 9 AM, the<br />
artillery bombardment raised at its top into what<br />
was called the “annihilating fire”. The effects<br />
were terrifying. In addition to the large amount<br />
of pieces firing, the mountains’ echo amplified<br />
the fearful noise forcing the Italians to squat<br />
inside their holes.<br />
A true grenades’ Hell for the defenders, a concentration<br />
of shells on and over 6 km of frontline,<br />
with few caverns and recover positions.<br />
Fired all the 250 pieces of the Archduke’s XX<br />
Corps together with the 119 pieces of the III<br />
Corps (in Lavarone), which attack had been delayed.<br />
33 mortars and heavy howitzers were<br />
hammer of very large caliber; from 305 mm till<br />
420. The snow gave some help to the Italians<br />
and many shells did not explode, slipping on<br />
the icy ground like cobblestones launched on<br />
the water.<br />
In every case it was a memorable bombardment;<br />
from then, the May 15th, it will be the Celebration<br />
Day of the Austro-Hungarian artillery.<br />
The attacks against the peaks<br />
The Austro-hunngarian troops launched their<br />
attacks from 10 AM with the storming swarms<br />
systems (Jagdstaffeln), a kind of mountain warfare<br />
which they knew well. The high peaks of<br />
the Italian Second Lines (Zugna, Pasubio, Coston,<br />
Maggio) fell one after the other in 4 days of<br />
tough fights. The Austro-Hungarians kept a very<br />
advanced position, rather a breakthrough, flanking<br />
the Italian positions of the colese Asiago plateau.<br />
There, the Imperial Commands managed<br />
to open their second front, intervening with the<br />
IIIrd Army.<br />
May 20, 1916 – Asiago Battle<br />
On May 20, at 5 AM began the intensive artillery<br />
fire against the Italian lineas of the Vezzena<br />
highlands. The Austro-hungarian attack was<br />
frontal but met the initial strong Italian defense.<br />
Otherwise a long column of the 3rd regiment<br />
Landwehr (Austrian national infantry) ran along<br />
the high crest over the deep Val Sugana, overran<br />
the Italian outpost and seized the main Italian<br />
artillery location at Porta Manazzo.<br />
In two days the whole defensive system collapsed<br />
and the Italians began to retreat towards<br />
their (supposed) third lines. The weather was<br />
now very bad, cold with an icy rainstorm. So the<br />
Italian were unable to defend the high peaks of<br />
their thirs line (Linea di Difesa ad Oltranza or<br />
Final Defensive Line). Their Commands simply<br />
had no more Reserve to employ in battle. The<br />
first units sent to support the battle, were (al-
<strong>No</strong> Turkeys 5 – 2010 Aprile pag - 2<br />
most all) taken prisoners by the enemies. The<br />
important peaks (and fortresses) remained unwatched<br />
and fell in the Austro-hungarian hands:<br />
mount Verena, Campolongo and finally the high<br />
crest of Portule called the “fortress of the Plateau”.<br />
The imperial soldiers now managed to<br />
advance artilleries: first breakthrough was complete.<br />
On May 28 the main local town, Asiago, went<br />
down in flames, the mountains too were aflame!<br />
Having reorganized their Commands, the Italians,<br />
had formed a new Reserve army down in<br />
the plains between Padua and Vicenza.<br />
They began to send reinforcement up to the<br />
new frontline, which was a line on the<br />
maps, however, lacking of trenches, repairs<br />
and “blockhaus”. The first resistance was<br />
deciden to be fulfilled in the Cengio sector,<br />
west of Asiago. For this, the Italians, employed<br />
their elite regiments “the Sardegna<br />
Grenadiers”, come from Isonzo.<br />
After a sharp struggle, on May 30 and June<br />
1,2,3a nd 4, also the Grenadiers brigade<br />
dissolved itself, the largest part of its men<br />
taken prisoners after a brave fighting. <strong>No</strong>w<br />
the situation was very risky for the Italian Army.<br />
The Austro-Hungarian advanced patrols were<br />
close to the slopes which led directly into the<br />
plains, where Italians had no line to be defended.<br />
Their new lines, south of Asiago, were<br />
into the pinewoods, on some woody hills like<br />
Lémerle, Ma-gnaboschi and Kaberlaba or in<br />
open lawns like on the Zovetto. East of Asiago<br />
they did some resistance on the high peaks of<br />
the Melette mountains, but in a very weak position.<br />
Evenmore the Italians withstood, in the first ten<br />
days of June, sacrificing themselves on the precarious<br />
new lines dug in lawns and woods. Bloody<br />
battles were fought on the Zovetto, on the<br />
Lémerle, on the Melette, which didn't allow the<br />
Imperials to spread themselves ahead and in the<br />
lowlands. The Russian Brussilov’s Offensive in<br />
Galicia gave an hard beat to the Austrohungarian<br />
logistic reserves of materials and, so,<br />
the Chieff of General Staff, general Conrad, gave<br />
the order to stop the offensive in Trentino.<br />
On June 24, Austro-Hungarians abandoned their<br />
lines to reach a safer frontline, on the moun-<br />
tains, and to maintain that new front till the<br />
winter: the so called “Winterstellung”.<br />
This retreat surprised the Italian Commands,<br />
which launched their patrols too late in pursuit.<br />
The now advancing Regio Esercito had to stop<br />
in front of the new, strong, higher Austrohungarian<br />
lines. All the June’s end and the first<br />
half of July were dedicated to repeated counteroffensive<br />
attempts. This, however, caused the<br />
Italians to suffer massive losses, without any<br />
gain or progression. In the same way went all<br />
the other counteroffensive attacks of the Italians<br />
in the other sectors of the new front.<br />
Aftermath of the Austro-Hungarian Offensive<br />
As per the Official Austro-Hungarian Staff Reports<br />
(Glaise-Horstenau Edmund – ed. by-, Österreichs-Ungarns<br />
Letzter Krieg 1914-1918,<br />
band IV, Das Kriegsjahr 1916, Wien 1930) the<br />
Imperial army losses were, on June 18, 5000<br />
dead, 23000 wounded, 14000 not fit to duty<br />
and 2000 prisoners in the Italian hands: a total<br />
of 44000 men out of combat. The Austrohungarians<br />
told they had captured around<br />
43.000 Italians during the Offensive, so balacing<br />
their own losses.<br />
On July 31, 1916, Austria-Hungary will lose o-<br />
Period Event Dead Wounded<br />
Missing<br />
Prisoners<br />
May 15 – 31 1st Austro-Hun. Advance 2201 9767 32770<br />
June 1 – 15 Last Austro-Hun. Attack 3563 14656 10185<br />
Totals Offensive Strafexpedition 5764 24423 42955<br />
June 16 – 29<br />
1st Italian Counteroffensive<br />
5297 23115 7864<br />
June 30- July 14<br />
2nd Italian Counteroffensive<br />
4657 19697 3791<br />
July 15 – 31 Final Phase 1663 7670 1025<br />
Grand Total Italian Losses 17381 74905 55635<br />
ther 52.815 men,<br />
for a final total<br />
of 96.815 men<br />
out of combat in<br />
two months of<br />
attacks (12000<br />
dead and 7000<br />
prisoners made<br />
by Italians).<br />
The Italian Army<br />
Official Reports<br />
(Ufficio Storico,<br />
L’'Esercito Italiano<br />
nella Gran-<br />
de Guerra (1915-1918), vol.III, Le operazioni<br />
del 1916, Roma 1936) on June 18 Italians lost<br />
9769 dead, 24043 wounded (almost all troopers)<br />
and 41000 missing (among whose the prisoners<br />
made by Austro-hungarians); a total of<br />
74812 men out of combat. This was an exaggeration<br />
while considering that, in mountain<br />
warfare attacks, the odds between the attacker<br />
losses and those of the defender were commonly<br />
2 or 3 to 1.<br />
At the July’s end, Italians had around 150.000<br />
men lost, among whom many were the wounded<br />
during Counteroffensive. A Report of the Italian<br />
Marshal count Guglielmo Pecori – Giraldi,<br />
commander of the 1st Army, gave more detailed<br />
data on the Italian losses (see table above).<br />
Italians lost a total of 147.921 men, of whom<br />
half during the first phase, before the enemy’s<br />
stop to the Offensive. Of the 55.635 missing Italians<br />
a lot (42955 as per the 1st Army, more for<br />
the Austro-hungarians), remained prisoners of<br />
war forcing the Imperial Government to reform<br />
the POW camps in Austria and Hungary. The<br />
Lagers were multiplied per 10, organizing new<br />
camps near the already known Sigmundsherberg<br />
e Mauthausen.
<strong>No</strong> Turkeys 5 – 2010 Aprile pag - 3<br />
DDees si iiggnneer r N<strong>No</strong>ot tees s<br />
by Andrea Brusati<br />
The idea for this game was born from another<br />
game, and system, Michael Resch’s “Battle for<br />
Galicia, 1914”.<br />
I enjoyed so much the system, that I made the<br />
trial to move it in a situation very familiar to me:<br />
The 1916 Austro-Hungarian Spring Offensive on<br />
the Italian Front.<br />
This offensive was very close to success, and<br />
could have cut off the whole northeastern front<br />
in Italy. The battle that could have been around<br />
Vicenza is one of the big “What if” of WW 1 history.<br />
The situation and the scale of the offensive was<br />
matching the characteristics for a “<strong>No</strong> Turkeys”<br />
game. So I contacted Michael Resch, to ask for<br />
the permission to use his system.<br />
He was very happy of this, and the job started.<br />
The historical research was ready, already made<br />
for a bigger and more detailed game, “Strafexpedition:<br />
The Spring Offensive Against Italy”,<br />
that’s going to be published by Europa Simulazioni.<br />
The original Battle for Galicia system had to be<br />
“upgraded”, including the mountain warfare.<br />
Thereafter the limit on stacking on mountain<br />
was included.<br />
Also the rigid ZOC from units on higher level<br />
was added, to give importance to the high<br />
ground, still in the doctrine of both Italian and<br />
Austro-Hungarian Higher Commands (Infiltration<br />
tactics were not developed yet).<br />
High ground also reduce the effectiveness of<br />
attacking upslope, and increase the efficiency of<br />
artillery, mostly due to better spotting.<br />
Mountain units better performance on mountain<br />
terrain is the last, but not the least, rule to<br />
simulate the mountain warfare on the Italian<br />
Theatre. Something more added to the Michael<br />
Resch’s system are the artillery units and the<br />
Fortresses (you can see in the previous image –<br />
blue areas - the so-called “Iron Belt” of the<br />
Austro-hungarian armored fortresses).<br />
Artillery gives further artillery support to the<br />
front line units. Austria-hungary made extensive<br />
and effective use of artillery barrage during this<br />
offensive.<br />
Fortresses are very useful supports for defence,<br />
but weaker than what it seems.<br />
In reality, they mostly had impact at the beginning<br />
of the offensive only, when Austrohungarian<br />
Fortresses supported the initial barrage.<br />
Italian Fortresses, however, were undermanned<br />
and in poor conditions, the general<br />
disorganization in Italian command following<br />
the offensive made the rest.<br />
In the game, they are very useful if you don’t let<br />
them alone.<br />
Play hints: no one ! The Austro-hungarian player<br />
has several offensive directions to follow, but he<br />
cannot go everywhere. Try your favourite ways.<br />
Italian player has a defensive role, even if at the<br />
end of the game can have a numerical superiority.<br />
But allocation of resources and reserves is<br />
the key of its result.<br />
Have Fun ! Andrea<br />
CCr reeddi iit ts s<br />
Original Special Rules :<br />
graphics: Andy Brusati<br />
development:<br />
System Basic Rules: Mike Resch<br />
Copyright © : Oregon ConSim<br />
Mountains Aflame<br />
1916<br />
The Austro-Hungarian Offensive<br />
against Italy<br />
11. ..00<br />
TABLE OF CONTENTS<br />
IINNT I TRROODDUUCCT TI IIOONN<br />
1.1 Preparation for Play<br />
1.2 Abbreviations<br />
1.3 Game Map<br />
22. ..00<br />
THHEE T PPL LAAYYI IINNGG PPI IIEECCEESS<br />
2.1 How to Read the Units<br />
2.2 Unit Type Summary<br />
2.3 Color Scheme<br />
2.4 Informational Markers<br />
2.5 Combat Units<br />
33. ..00<br />
SSEEQQUUEENNCCEE<br />
OOF F PPL LAAYY<br />
3.1 Game Turn Sequence of Play Outline<br />
3.2 Narrative Sequence of Play<br />
44. ..00<br />
MMOOVVEEMMEENNT T<br />
4.1 Movement Allowance (MA)<br />
4.2 How to Move Units<br />
4.3 Minimum Movement<br />
4.4 Combat Effectiveness Recovery<br />
4.5 Special Movement Restrictions<br />
4.6 Other Limitations on Movement<br />
55. ..00<br />
SST TAACCKKI IINNGG<br />
5.1 Staking Limits<br />
5.2 Overstacking Penalty<br />
5.3 Order of Stacking<br />
5.4 Limited Intelligence<br />
66. ..00<br />
ZZOONNEESS OOF F CCOONNT TRROOL L ((ZZOOCC) ( ))<br />
6.1 Terrain and ZOC<br />
6.2 ZOC and Supply<br />
6.3 EZOC and Movement<br />
6.4 EZOC and Movement<br />
in Mountain Terrain<br />
6.5 Other Effects of EZOC<br />
77. ..00<br />
CCOOMMBBAAT T<br />
7.1 Multi-Hex Combat<br />
7.2 Attacker Command Limitations<br />
7.3 Defender Characteristics<br />
7.4 Modified Combat Strenght of Zero<br />
7.5 Artillery Units in Combat<br />
7.6 Withheld Units<br />
7.7 Effects of Terrain on Combat<br />
7.8 Flank Attacks
<strong>No</strong> Turkeys 5 – 2010 Aprile pag - 4<br />
88. ..00<br />
CCOOMMBBAAT T PPRROOCCEEDDUURREE<br />
8.1 Determine Initial Combat Ratio<br />
8.2 Determine CRT Column Shifts<br />
8.3 Attack Resolution<br />
8.4 Determine Magnitude<br />
8.5 Loss Resolution<br />
99. ..00<br />
EEXXPPL LAANNAAT TI IIOONN<br />
OOF F<br />
CCOOMMBBAAT T<br />
9.1 Combat Results Table (CRT)<br />
9.2 Retreats<br />
9.3 Advance After Combat<br />
9.4 Loss Results Table (LRT)<br />
1100. ..00<br />
CCOOMMBBAAT T EEF FF FEECCT TI IIVVEENNEESSSS<br />
AANNDD SST TEEPP LOOSSSSEESS L<br />
10.1 Effects of Reduced<br />
Combat Effectiveness<br />
10.2 Indicating Step Losses<br />
10.3 Combat Effectiveness<br />
and Step Recovery<br />
1111. ..00<br />
SSUUPPPPL LYY<br />
11.1 Supply Effects<br />
11.2 Supply Sources<br />
11.3 Tracing a Supply Path<br />
11.4 Supply Path Range<br />
11.5 Attrition<br />
1122. ..00<br />
SSPPEECCI IIAAL L<br />
RRUUL LEESS<br />
12.1 Mountain Units<br />
12.2 Fortress Units<br />
12.3 Artillery Units<br />
12.4 First Turn Special Rules<br />
1133. ..00<br />
1144. ..00<br />
11. ..00<br />
RREEI IINNF FOORRCCEEMMEENNT TSS<br />
VVI IICCT TOORRYY<br />
IINNT I TRROODDUUCCT TI IIOONN<br />
CCOONNDDI IIT TI IIOONNSS<br />
RREESSUUL LT TSS<br />
Mountains Aflame is a game about the Spring<br />
1916 Austro-Hungarian offensive on the Italian<br />
Front, aimed to drive to Vicenza and the Veneto<br />
plain, west of Venice, cutting off the whole front<br />
in Carnia and along the Isonzo river. One player<br />
controls the Austro-Hungarian forces, the other<br />
the Italian forces. Each player attempts to<br />
achieve, or maintain, geographical objectives to<br />
attain the victory.<br />
SCALE: 2 Km per hex, 2 days per turn.<br />
To play Mountains Aflame you need the following<br />
items:<br />
The A3 (27,9 cm x 42 cm) map<br />
The 140 counters, to cut and mount.<br />
This Rule booklet<br />
The Player Aid Card<br />
Also you need two six sided dice.<br />
11. ..11 PPr reeppaar raat tti iioonn<br />
ffoor f r<br />
PPl llaayy<br />
Once the components have been printed and<br />
mounted, sort out and set up the units. Each<br />
unit’s set up hex or game turn (GT) of arrival is<br />
print on the unit counter.<br />
The game begins with the Austro-hungarian (A-<br />
H) Combat Phase of GT 1. The game then proceeds<br />
following the GT sequence of play (3.0).<br />
11. ..22 AAbbbbr reevvi iiaat tti iioonns s<br />
A-H: Austro-Hungarian<br />
AV: Artillery Value<br />
DRM: Die (Dice) Roll Modifier<br />
GT: Game Turn<br />
ID: Identification<br />
MA: Movement Allowance<br />
MP: Movement Points<br />
VP: Victory Points<br />
ZOC: Zone of Control<br />
EZOC: Enemy Zone of Control<br />
1d6 (2d6): one six sided die (two dice)<br />
22. ..00 THHEE T<br />
22. ..11<br />
PPL LAAYYI IINNGG PPI IIEECCEESS<br />
HHooww ttoo t RReeaadd tthhee t UUnni iit tts s<br />
ATTACK AND DEFENSE STRENGHT: A quantification<br />
of a unit’s combat strength.<br />
MOVEMENT ALLOWANCE (MA): The number of<br />
Movement Points a unit can use while moving.<br />
ARTILLERY VALUE (AV): A measure of a unit’s<br />
artillery strength and effectiveness.<br />
UNIT IDENTIFIER (ID): A unit’s ID is its historical<br />
designation. The first or only code is the<br />
name or number of the brigade. The second<br />
number (if any) found inside a colored box is<br />
the Corps number. Only the Corps number (or<br />
lack of) is relevant in game play – see rules 7.2<br />
and 7.3.<br />
UNIT SIZE INDICATOR: A unit’s size is one of<br />
the following:<br />
X = Brigade; III = Regiment.<br />
SET UP INFORMATION: This information indicates<br />
the hex the unit begins set up in or the GT<br />
the unit arrives as reinforcement.<br />
22. ..22 UUnni iit tt Tyyppee T SSuummmmaar ryy<br />
Infantry<br />
Artillery<br />
Mountain Troops<br />
Fortress<br />
22. ..33 CCool lloor r SSc chheemmee<br />
A unit’s nationality is indicated by its counter’s<br />
background color:<br />
Green-Grey: Italian<br />
Grey Blue: Austro-Hungarian<br />
22. ..44 IInnf I ffoor rmmaat tti iioonnaal ll MMaar rkkeer rs s<br />
Markers include:<br />
Reduced Combat Effectiveness -1/ Severely Reduced<br />
Combat Effectiveness -2<br />
Low Supply -1/ Out of Supply -2, AV=0<br />
22. ..55<br />
CCoommbbaat tt<br />
UUnni iit tts s<br />
Combat units are any units with a printed Defense<br />
Strenght of one or more (i.e. artillery is<br />
not considered “Combat Unit”)<br />
33. ..00 SSEEQQUUEENNCCEE<br />
OOF F PPL LAAYY<br />
Mountains Aflame is played in Game Turns<br />
(GT). Each GT consists of two “Player Turns” –<br />
an Austro-Hungarian Player Turn, followed by<br />
an Italian Player Turn.<br />
EXCEPTION: GT 1 start with AH Combat Phase<br />
(skip the AH Supply, Reinforcement, and<br />
Movement Phases).<br />
33. ..11 GGaammee Tuur T rnn SSeeqquueennc cee oof ff PPl llaayy OOuut ttl lli iinnee<br />
A. Advance the Game Turn Marker<br />
The GT marker is advanced on the GT Track<br />
and flipped to the AH Player Turn side.<br />
B. Austro-Hungarian Player Turn<br />
1. Supply Phase<br />
2. Reinforcement Phase<br />
3. Movement Phase<br />
4. Combat Phase<br />
After the Austro-Hungarian Player Turn is completed,<br />
flip the GT Marker to its Italian Player<br />
side.<br />
C. Italian Player Turn<br />
The Italian Player Turn is identical to the Austro-<br />
Hungarian Player Turn<br />
33. ..22 NNaar rr raat tti iivvee SSeeqquueennc cee oof ff PPl llaayy<br />
During the Austro-Hungarian player’s Turn, the<br />
Austro-Hungarian player is referred to as the<br />
phasing player and the Italian player is referred<br />
to as the non-phasing player.
<strong>No</strong> Turkeys 5 – 2010 Aprile pag - 5<br />
During the Italian player turn, reverse the references.<br />
AA. ..<br />
THHEE T PPL LAAYYEERR<br />
TUURRNN T<br />
1. SUPPLY PHASE<br />
The phasing player checks the Supply Status of<br />
all his units (11.0). Units found to be Out of<br />
Supply or in Low Supply are marked as such.<br />
Units that are Out of Supply for two or more<br />
consecutive GTs may suffer Attrition (11.5)<br />
2. REINFORCEMENT PHASE<br />
The phasing player places any available reinforcements<br />
on the map (14.0).<br />
3. MOVEMENT PHASE<br />
The phasing player may move his units (4.0), he<br />
may move all, some, or none of his units as he<br />
sees fit. At this time units may be able to recover<br />
from reduced Combat Effectiveness (10.3)<br />
4. COMBAT PHASE<br />
The phasing player may attack adjacent enemy<br />
units (7.0).<br />
44. ..00 MMOOVVEEMMEENNT T<br />
44. ..11<br />
MMoovveemmeennt tt<br />
AAl lll lloowwaannc cee<br />
((MMAA) ( ))<br />
Each unit has a Movement Allowance that is the<br />
maximum number of MPs it may expend during<br />
a Movement Phase.<br />
A unit can never enter a hex occupied by an enemy<br />
combat unit.<br />
44. ..22 HHooww ttoo t MMoovvee UUnni iit tts s<br />
Units move by tracing a path through adjacent<br />
hexes, expending Movement Points (MP) for<br />
each hex entered (and possibly a hexside<br />
crossed) according to the Terrain Effects Chart.<br />
Units can move individually or in stacks.<br />
maintaining a running total of expended Movement<br />
Points.<br />
44. ..33 MMi iinni iimmuumm MMoovveemmeennt tt<br />
A unit may always move a minimum of one hex<br />
regardless of MP costs. A unit exercising Minimum<br />
Movement cannot expend MP during the<br />
player turn.<br />
44. ..44<br />
CCoommbbaat tt<br />
EEf fff<br />
ffeec ct tti iivveennees ss s<br />
RReec coovveer ryy<br />
Any eligible unit suffering from reduced Combat<br />
Effectiveness (10.0) may expend MP (while stationary)<br />
to recover Combat Effectiveness – see<br />
10.3.<br />
44. ..55<br />
iiaal ll<br />
SSppeec ci<br />
MMoovveemmeennt tt<br />
<strong>No</strong> unit can cross crag hexsides.<br />
44. ..66 OOt tthheer r Li Liimmi<br />
iit ttaat tti iioonns s oonn<br />
EZOC and Movement – see 6.3.<br />
55. ..00 SST TAACCKKI IINNGG<br />
RRees st ttr ri iic ct tti iioonns s<br />
MMoovveemmeennt tt<br />
Stacking is when more than one unit is in a hex.<br />
55. ..11 SSt ttaac ckki iinngg Li Liimmi<br />
iit tts s<br />
The number of steps of combat units that can<br />
occupy a hex is written on the Terrain Effects<br />
Chart. The limit cannot be exceeded at the END<br />
of any friendly movement phase or any combat<br />
phase. Game markers do not affect stacking.<br />
Moving and retreating units can freely enter and<br />
pass through stacks of friendly units.<br />
Two steps units are back printed with the reduced<br />
value. The reduced side is indicated by a<br />
horizontal bar in the middle of the unit. Reduced<br />
units, and units without reduced values<br />
backprinted, are one step units.<br />
55. ..22 OOvveer rs st ttaac ckki iinngg PPeennaal llt ttyy<br />
At the end of any friendly Movement Phase or<br />
retreat after combat, any hex in violation of<br />
stacking limits must eliminate any excess units<br />
(the owning player may choose which units to<br />
eliminate).<br />
55. ..33 OOr rddeer r oof ff SSt ttaac ckki iinngg<br />
The unit with the largest attack strength<br />
(printed on the counter) must always be the<br />
top-most unit in a stack and is therefore the unit<br />
revealed to the opponent.<br />
The position of a unit within a stack has no effect<br />
on play (however see Limited Intellingence<br />
5.4).<br />
55. ..44 Li Liimmi<br />
iit tteedd IInnt I tteel lll lli iiggeennc cee<br />
IMPORTANT: A PLAYER CANNOT EXAMINE<br />
THE CONTENTS OF AN ENEMY OCCUPIED HEX<br />
EXCEPT BY OBSERVING THE UNIT PLACED ON<br />
TOP OF THE STACK.<br />
A player that has initiated an attack against a hex<br />
may ask to know the ID and unit type of any<br />
other units in the hex. At no time may a player<br />
lift up, turn over, or in any way expose the nature<br />
of a unit in any enemy hex. In no case may<br />
a player examine the strength of an opponent’s<br />
units (i.e. he may not look at any combat effectiveness<br />
or supply state markers).<br />
Play <strong>No</strong>te: Informational markers are also<br />
placed under the effected unit.<br />
66. ..00 ZZOONNEESS<br />
OOF F CCOONNT<br />
TRROOL L ((ZZOOCC) ( ))<br />
The six hexes that surround a combat unit constitute<br />
that unit’s Zone of Control. ZOC affect<br />
supply and movement. All combat units exert a<br />
ZOC.<br />
66. ..11 Teer T rr raai iinn aanndd ZZOOCC<br />
ZOCs extend into and out of any hex and over<br />
any hexside with the following exception: ZOCs<br />
do not extend across crag hexsides.<br />
Roads can be use moving along them only, and<br />
not in EZOC.<br />
66. ..22 EEZZOOCC aanndd SSuuppppl llyy<br />
The presence of an EZOC in a hex prohibits<br />
supply from being traced through that hex. For<br />
supply purpose, friendly units negate the presence<br />
of an enemy ZOC in the hex they occupy.<br />
66. ..33 EEZZOOCC aanndd MMoovveemmeennt tt<br />
The cost to enter or exit an EZOC is +1 MP. To<br />
move directly from one EZOC to another EZOC<br />
costs +2 MPs.<br />
Friendly units DO NOT negate the presence of<br />
an EZOC in the hex they occupy, for this rule.<br />
66. ..44 EEZZOOCC<br />
AAr reeaas s<br />
aanndd MMoovveemmeennt tt iinn i<br />
MMoouunnt ttaai iinn<br />
To move directly from one EZOC to another<br />
EZOC is prohibited if the EZOC is by the same<br />
enemy unit at an altitude higher than both of<br />
the EZOC hexes.<br />
Friendly units DO negate the presence of an<br />
EZOC in the hex they occupy, for this rule.<br />
66. ..55 OOt tthheer r EEf fff ffeec ct tts s oof ff EEZZOOCC<br />
Flank Attacks – see 7.8<br />
EZOC and Retreat after Combat – see 9.2.1<br />
Supply – see 11.3<br />
Reinforcements – see 14.0<br />
77. ..00 CCOOMMBBAAT T<br />
During a phasing player’s combat phase friendly<br />
units may attack adjacent enemy units. Attacking<br />
is voluntary, no unit is ever forced to attack.<br />
<strong>No</strong> unit may attack or be attacked more than<br />
once per combat phase.<br />
77. ..11<br />
MMuul llt tti ii- -HHeexx<br />
CCoommbbaat tt<br />
The attacker may attack only one hex at a<br />
time; he may not target two hexes in a single<br />
combat.<br />
Units in the same hex may attack adjacent<br />
defenders in different hexes in separate<br />
combats (i.e. all units in a hex that conduct<br />
an attack need not attack the same defending<br />
hex).<br />
Attacking units from two or more defending<br />
hexes may combine their combat<br />
strength to attack a single adjacent hex.<br />
<strong>No</strong> unit may split its attack strength to attack<br />
a second hex in a separate attack.<br />
77. ..22<br />
AAt ttt ttaac<br />
ckkeer r CCoommmmaanndd Li Liimmi<br />
iit ttaat tti iioonns s<br />
The number of units that may take part in an<br />
attack is limited. The attacker’s forces may include<br />
either: (1) all the units attached to one
<strong>No</strong> Turkeys 5 – 2010 Aprile pag - 6<br />
corps plus two units (independent, or attached<br />
to a different corps), or (2) three independent<br />
units.<br />
Play <strong>No</strong>te 1: All units bearing the same corps ID<br />
number (2.1) are considered to be attached to<br />
the same corps.<br />
Play <strong>No</strong>te 2: Italian units have not corps ID, all<br />
of them are independent units (there were no<br />
organization, or planning for extensive offensive<br />
action by Italian HQs during the period covered<br />
by the game).<br />
77. ..33 DDeef ffeennddeer r<br />
CChhaar raac ct tteer ri iis st tti iic cs s<br />
All units selected to defend in a hex defend<br />
as a single defending strength.<br />
All units in an attacked hex must participate<br />
in combat unless unable due to<br />
Command Limitations.<br />
7.3.1 Command Limitations: The number of<br />
units that may take part in the defence of a hex<br />
is limited. The defender’s forces may include<br />
either, (1)all the units attached to one corps<br />
plus one unit (indipendent or attached to another<br />
corps), or (2) two indipendent units. If<br />
units of more than two corps (or indipendent<br />
units) are stacked in one hex, the excess units<br />
MUST be withheld.<br />
EXAMPLE: Three indipendent units are stacked<br />
toghether in a hex under attack. Due to Command<br />
Limitations, one of the three units must<br />
be withheld (defender’s choice).<br />
77. ..44<br />
CCoommbbaat tt<br />
SSt ttr<br />
reenngghht tt<br />
oof ff ZZeer roo<br />
Attack: A unit with a modified attack<br />
strenght of zero or less cannot attack.<br />
Defense: A unit with a modified defense<br />
strenght of zero or less must be withheld<br />
from combat if stacked with another unit.<br />
If such units are the only units in a defending<br />
hex, no units can be withheld and the<br />
stack defends with a strenght of ONE.<br />
77. ..55<br />
See 12.3<br />
77. ..66<br />
AAr rt tti iil lll lleer ryy UUnni iit tts s iinn i<br />
WWi iit tthhhheel lldd<br />
UUnni iit tts s<br />
CCoommbbaat tt<br />
In some cases units may or must be withheld<br />
from a combat.<br />
Units withheld that are stacked with an<br />
attacking units are never involuntarily affected<br />
by combat results. If friendly attacking<br />
units are forced to retreat, withheld<br />
units can choose to retreat with the<br />
friendly units or not to retreat.<br />
Units withheld that are stacked with a defending<br />
unit are affected by retreat results<br />
(only). Such units are considered to have<br />
been “attacked” that combat phase.<br />
EXCEPTION: If all units defending in a hex are<br />
eliminated (but did not suffer a retreat result)<br />
leaving only withheld units, retreat the withheld<br />
units one hex.<br />
77. ..77<br />
EEf fff<br />
ffeec ct tts s oof ff Teer T rr raai iinn oonn<br />
CCoommbbaat tt<br />
The maximum number of steps that can<br />
attack from each hex, is the stacking limit<br />
of the defending hex.<br />
EXAMPLE: A defending hex in high mountain<br />
terrain can be attacked by two steps in each attacking<br />
hex.<br />
Each unit attacking upslope (from a lower<br />
to a higher altitude) have the attacking<br />
strength reduced by ONE (1).<br />
Each unit attacking from higher altitude<br />
than the defender, has the artillery value<br />
increased by ONE (1).<br />
Each unit defending in higher altitude than<br />
ALL the attackers, has the artillery value increased<br />
by ONE (1).<br />
<strong>No</strong> unit can attack across crag hexsides.<br />
77. ..88 Fl Fllaannkk<br />
AAt ttt ttaac ckks s<br />
If five of the six hexes adjacent to the defender<br />
are either occupied by an enemy unit or in the<br />
ZOC of an attacking enemy unit and none of<br />
these five hexes are occupied by a friendly unit,<br />
the defender is considered “Flanked”.<br />
IMPORTANT: The only significant EZOCs are<br />
those projected by the units that are actually<br />
involved in attacking the unfortunate unit. The<br />
ZOCs of units not involved in the specific combat<br />
are not considered.<br />
7.8.1 Effects: If the defender is Flanked, the CRT<br />
odds column is shifted two to the right (in the<br />
attacker’s favour) and the defender receives a<br />
Loss Reslts Table DRM of +2 (9.4.1).<br />
7.8.2 Map Edge and Flank Attacks: A defender in<br />
a map-edge hex cannot be flanked.<br />
EXAMPLE 1: In Case 1, the 15th brigade is not<br />
participating in the attack, therefore its ZOC is<br />
not considered. In case 2 it is attacking, creating<br />
a Flank Attack situation.<br />
EXAMPLE 2: In Case 3, Mantova brigade negates<br />
the ZOC of the attacking 15th brigade.<br />
EXAMPLE 3: In Case 4, although the 55th brigade<br />
is not attacking, its presence in the hex<br />
creates a Flank Attack situation.<br />
88. ..00<br />
CCOOMMBBAAT T PPRROOCCEEDDUURREE<br />
In Mountains Aflame, 1916 each individual<br />
combat is resolved in five stages:<br />
1 Determine the Combat Ratio.<br />
2 Determine CRT Column Shits<br />
3 Attack Resolution<br />
4 Determine the Magnitude<br />
5 Loss Resolution<br />
88. ..11 SSt ttaaggee OOnnee ––<br />
DDeet tteer rmmi iinnee IInni I iit tti iiaal ll<br />
CCoommbbaat tt<br />
RRaat tti iioo<br />
First the attacker identifies the attacker and defending<br />
hexes. The ID and unit type of all units<br />
in the attacking and defending hexes is revealed<br />
(but not their Combat Effectiveness or Supply<br />
Status). Both players then announce if units are<br />
to be withheld (attacker followed by defender).<br />
Next, the combined attack strength of the participating<br />
attacking units is compared to the<br />
combined defense strength of the defending<br />
units (taking into consideration strength modifications<br />
due to Combat Effectiveness and Supply<br />
Status), and this comparison is stated as a<br />
probability ratio (attacker/defender). Divide the<br />
total attacking strength by the total defending<br />
strength to arrive at a combat odds ratio, which<br />
is rounded off, always in favour of the defender,<br />
to the nearest ratio listed on the Combat Results<br />
Table.<br />
88. ..22 SSt ttaaggee Twwoo T ––<br />
DDeet tteer rmmi iinnee CCRRT T CCool lluummnn SShhi iif fft tts s<br />
The Combat ratio derived in Stage One above<br />
can be shifted in two cases: Flank Attacks (7.8).<br />
Apply applicable shifts to find the final odds ratio.<br />
Combats with a final ratio of less than 1:3<br />
are not allowed; combat with a final odds<br />
greater than 4:1 are resolved at 4:1.<br />
88. ..33 SSt ttaaggee Thhr T reeee –– AAt ttt ttaac ckk RRees sool lluut tti iioonn<br />
To determine if there is a retreat and if there<br />
will be DRMs during loss determination, the<br />
players reference the Combat Results Table<br />
(9.1). The attacker rolls 2d6 and cross reference<br />
the result with the final odds ratio column.<br />
Players immediately implement the results, performing<br />
(if any) retreats (9.2) and advances after<br />
combat (9.3).<br />
88. ..44 SSt ttaaggee Foouur F r –– DDeet tteer rmmi iinnee MMaaggnni iit ttuuddee<br />
To determine losses suffered, Magnitude must<br />
first be determined. Magnitude is determined by<br />
summing the total number of steps (of both<br />
sides) that participated in the combat.<br />
SMALL: If the combat includes a total sum<br />
of less than seven steps.<br />
LARGE: If the combat includes a total sum<br />
of seven or more steps.<br />
88. ..55 SSt ttaaggee Fi Fiivvee<br />
–– Loos L ss s RRees sool lluut tti iioonn<br />
Next the players proceed to the Loss Results<br />
Table (9.4). The attacker and defender each roll
<strong>No</strong> Turkeys 5 – 2010 Aprile pag - 7<br />
1d6 individually, applying the appropriate DRMs<br />
(9.4.1). Both players cross reference their individual<br />
result on the column corresponding to<br />
the attack’s Magnitude and apply all Combat<br />
Effectiveness Reductions (9.4.2)<br />
99. ..00 EEXXPPL LAANNAAT TI IIOONN<br />
99. ..11<br />
CCoommbbaat tt RRees<br />
OOF F<br />
CCOOMMBBAAT T<br />
suul llt tts s Taabbl T llee ((CCRRT ( T) ))<br />
RREESSUUL LT TSS<br />
The CRT is referenced during Stage Three of the<br />
Combat Resolution Process. Results to the left<br />
pertain to the attacker, to the right to the defender.<br />
POSSIBLE RESULTS:<br />
- : <strong>No</strong> Effects<br />
+/-# : Loss Results Table DRM<br />
R# : Retreat # of hexes and LRT DRM<br />
99. ..22<br />
RReet ttr<br />
reeaat tts s<br />
All retreats are expressed in hexes, not Movement<br />
Points.<br />
Retreating units always retreat as a stack<br />
and may not split up EXCEPT in the last<br />
hex of retreat to avoid an over-stack situation.<br />
If an overstack situation would occur<br />
in the last hex of retreat, some, or all, of<br />
the retreating units may retreat additional<br />
hexes, but only is avoiding an overstack.<br />
Example: Two A-H brigades in low mountain<br />
terrain, each consisting of 2 steps, receive<br />
an R1 CRT result and are forced to<br />
retreat into a low mountain hex containing<br />
a friendly brigade (2 steps). Since this<br />
would create an overstack situation (6<br />
steps), one of the two retreating brigades<br />
must retreat an additional hex. <strong>No</strong>te that<br />
only one of the two brigades continues its<br />
retreat, not all two.<br />
Units can retreat into an overstack situation,<br />
thereby causing an additional hex retreat,<br />
to comply with the Retreat Guidelines<br />
in 9.2.1 (e.g. to avoid entering an<br />
EZOC).<br />
Each CRT mandated hex retreat result<br />
modifies the LRT die roll for the retreating<br />
stack by +1 (9.4.1).<br />
9.2.1 Retreat Guidelines: The owning player<br />
may determine the path of retreat but must<br />
abide by the following guidelines:<br />
(1) Avoid entering an empty hex in an EZOC, if<br />
possible.<br />
(2) Retreat must always be toward any supply<br />
source within 12 hexes. A unit that suffers a<br />
one-hex retreat result that does not move further<br />
from the chosen supply source is considered<br />
to have fulfilled this guideline.<br />
IMPORTANT: If a stack is unable to fulfil either<br />
one of the above guidelines it suffers a +2 DRM<br />
on the upcoming LRT die roll.<br />
9.2.2 Retreating Across a Minor River: Each unit<br />
that retreats across an unbridged river hexside<br />
suffers one Combat Effectiveness reduction.<br />
9.3 Advance After Combat<br />
If a defender’s hex is vacated the victorious attacking<br />
units can advance into the vacated hex<br />
subject to stacking limitations.<br />
(Withheld units may not advance.) A victorious<br />
defender may never advance after combat.<br />
99. ..44 Loos L ss s RRees suul llt tt Taabbl T llee ((L ( LRRT T) ))<br />
The LRT is referenced during Stage Five of the<br />
Combat Resolution process.<br />
POSSIBLE RESULTS:<br />
- : <strong>No</strong> Effect<br />
# : # of Combat Effectiveness Reductions.<br />
9.4.1 Loss Results Table DRMs: The following<br />
DRMs affect final LRT results:<br />
(1) CRT result : -2 to +2.<br />
(2) Opponent’s Artillery Value:<br />
0-2: +0<br />
3-5: +1<br />
6-9: +2<br />
10-13: +3<br />
14 or greater: +4<br />
(3) Defender Flanked: +2<br />
(4) Each CRT Retreat Result: +1<br />
(5) Unable to fulfil retreat priorities or Unable<br />
to retreat: +2.<br />
(6) High Odds: Each odds ratio over 4:1: +1 for<br />
defender. (Example: if odds were 6:1 = +2)<br />
9.4.2 Which Units Suffer Reduction of Combat<br />
Effectiveness: Combat Effectiveness (CE) reduction<br />
results are assigned to individual units by<br />
the owning player. CE reductions must be<br />
equally distributed. All partecipating units must<br />
take one CE reduction before any one unit takes<br />
two (and so on), except if this would eliminate<br />
the unit.<br />
Units withheld from combat may not be allocated<br />
CE reductions.<br />
To record a Combat Effectiveness Reduction,<br />
place a “Reduced CE -1” marker on the unit. To<br />
record the second reduction, flip the marker to<br />
its “Reduced CE -2” side. When a unit suffers a<br />
third CE reduction, remove the reduced CE<br />
marker and flip (or remove) the unit, it suffers a<br />
step loss.<br />
EXAMPLE OF COMBAT: The Austro-Hungarian<br />
player declares an attack upon the Italian SAS-<br />
SARI Brigade. Due to the Attacker Command<br />
Limitations (7.2) all four A-H brigades will not<br />
be able to partecipate. The A-H player decides to<br />
attack with three brigades (one from each hex).<br />
The 15 Inf. Brigade will be withheld from the<br />
combat.<br />
Stage One: The first step is to determine the<br />
combat ratio. The Sassari brigade’s defensive<br />
strength is 7. Compared to this is the sum of the<br />
A-H brigades attack strengths, in this case is 13<br />
(5+4+4). The ratio is therefore 13:7 and is<br />
rounded in favour of the defender to 1.5:1.<br />
Stage Two: Since the attack is not a Flank Attack,<br />
there are no odds ratio shifts.<br />
Stage Three: The A-H player now rolls 2d6 with<br />
a result of 9. He cross references the 9 result on<br />
the 1.5:1 column determining the CRT result to<br />
be +2/-1 (attacker + 2 LRT modifier/ defender<br />
1– LRT modifier). The result does not contain a<br />
retreat obligation so the players immediately<br />
proceed to the Loss Results Table.<br />
Stage Four: Here the first step is to determine<br />
the Magnitude of the battle. Since four brigades,<br />
each consisting of two steps, participated in the<br />
battle (a total of eight steps) the battle is of<br />
“Large” Magnitude.<br />
Stage Five: Next any LRT DRMs are determined.<br />
The A-H player’s die roll will be modified for<br />
two factors: the CRT result (+2), and the Italian<br />
artillery present. The Sassari brigade has an Artillery<br />
Value (AV) of 4 which corresponds with a<br />
DRM of +1. This results in a total A-H DRM of<br />
+3.<br />
The Italian modifiers will be: -1 for the CRT result<br />
and +3 for the A-H artillery (4+4+2=10<br />
AV). So the Italian modifier is +2. Each player<br />
now rolls 1d6, with the A-H player rolling a 5 (a<br />
modified result of 8) and the Italian a 2 (a modified<br />
result of 4). The players now find their result<br />
within the Large Magnitude column and<br />
read to the left to determine the result. In this<br />
case, the Italians suffers 1 Combat Effectiveness<br />
Reduction, while the A-H player suffers 3 CE<br />
reductions. According to rule 9.4.2, the A-H<br />
player must distribute these three reductions<br />
equally among his attacking units, so each of his<br />
brigades suffers 1 CE reduction. This completes<br />
the combat sequence.<br />
1100. ..00 CCOOMMBBAAT T EEF FF FEECCT TI IIVVEENNEESSSS<br />
AANNDD SST TEEPP LOOSSSSEESS L<br />
Design <strong>No</strong>te: In Mountains Aflame, 1916 Combat<br />
Effectiveness measures tangibles such as<br />
casualties and stragglers, and intangibles such as<br />
organization, training, leadership, morale and<br />
stamina.<br />
Units have their combat effectiveness reduced<br />
due to combat – see 9.4.<br />
Combat Effectiveness reductions do not affect<br />
artillery values. The number of steps a unit has<br />
is found in rule 5.1.<br />
1100. ..11 EEf fff ffeec ct tts s<br />
tti tiivveennees<br />
ss s<br />
oof ff RReedduuc ceedd<br />
CCoommbbaat tt<br />
EEf fff<br />
ffeec c- -<br />
A unit bearing a Reduced Combat Effectiveness -<br />
1 or -2 marker has its attack and defense<br />
strenght reduced by 1 or 2 respectively.
<strong>No</strong> Turkeys 5 – 2010 Aprile pag - 8<br />
1100. ..22 IInnddi I iic caat tti iinngg SSt tteepp Loos L ss sees s<br />
Step losses are suffered when a unit udergoes a<br />
THIRD Combat Effectiveness reduction. Flipping<br />
a unit over (while removing the CE reduction<br />
marker) indicates the unit has suffered a<br />
step loss. Units with two steps are removed<br />
from play after the second step loss. Units with<br />
only one step are removed when they lose one<br />
step.<br />
1100. ..33 CCoommbbaat tt EEf fff ffeec ct tti iivveennees ss s ((CCEE) ( )) aanndd<br />
SSt tteepp RReec coovveer ryy<br />
Infantry and Mountain type units can recover<br />
from reduced Combat Effectiveness and lost<br />
steps through a process termed “Combat Effectiveness<br />
Recovery”.<br />
A unit that conducts Combat Effectiveness Recovery<br />
can remove a “Reduced CE -1” marker or<br />
flip a “Reduced CE -2” marker, or flip a step reduced<br />
unit to its front side while placing a “Reduced<br />
CE -2” marker upon the unit.<br />
Design <strong>No</strong>te: Effectiveness Recovery represents<br />
rest, recuperation and incorporating replacements.<br />
10.3.1 Requirements: To conduct Combat Effectiveness<br />
Recovery, a unit must be in-Supply e<br />
must expend 4MP (while stationary). In addition,<br />
the unit must be either (1) three hexes<br />
away from the nearest enemy unit (i.e. two intervenng<br />
hexes) OR (2) two hexes away from<br />
the nearest enemy unit with all intervening<br />
hexes occupied by a friendly unit (i.e. one<br />
friendly occupied intervening hex).<br />
10.3.2 Eliminated Units: Units that are completely<br />
eliminated cannot be returned to play.<br />
1111. ..00 SSUUPPPPL LYY<br />
A unit is always in one of three possible supply<br />
states: In Supply, Low Supply, or Out of Supply.<br />
The supply state of a player’s units is determined<br />
during the friendly supply phase, and<br />
always last until that player’s next supply phase.<br />
If a unit is a Low or Out of Supply state, place a<br />
supply marker under the unit to denote this.<br />
1111. ..11 SSuuppppl llyy<br />
EEf fff<br />
ffeec ct tts s<br />
A unit’s current supply status affects only its<br />
combat strength. In supply units are full<br />
strength; Low Supply units suffer a -1 strenght<br />
reduction; Out of Supply units suffer a -2<br />
strenght reduction AND their Artillery Value<br />
(AV) is considered to be zero for combat.<br />
1111. ..22 SSuuppppl llyy<br />
SSoouur rc cees s<br />
There are two types of Supply Sources:<br />
(1) A friendly map edge with a supply symbol<br />
printed on it, and (2) a hex containing a road<br />
connected to a friendly map edge supply source<br />
hex by a continous path of connected road<br />
hexes. The road line is blocked by enemy units<br />
or their ZOCs.<br />
Friendly map edge supply sources on map edge<br />
are with grey symbol for A-H units, and greygreen<br />
for Italian units.<br />
1111. ..33 Tr Traac<br />
ci iinngg aa<br />
SSuuppppl llyy PPaat tthh<br />
A supply path is traced through contiguous<br />
hexes from the unit to the supply source. A valid<br />
supply path may not pass through:<br />
(1) A hex occupied by an enemy unit:<br />
(2) More than one hex in a non negated EZOC.<br />
Friendly units negate the presence of an EZOC<br />
in the hex they occupy for purposes of tracing a<br />
supply line (i.e. supply can be traced through<br />
one hex in a non negated EZOC).<br />
1111. ..44 SSuuppppl llyy PPaat tthh RRaannggee<br />
For a unit to be “In Supply”, it must be able to<br />
trace a valid supply path no longer than 4 hexes<br />
in length. If the path is between 5 and 8 hexes<br />
in length, the unit is in Low Supply. If the path<br />
is longer than 8 hexes, or the unit is unable to<br />
trace any valid path, the unit is Out of Supply.<br />
1111. ..55 AAt ttt ttr ri iit tti iioonn<br />
If a unit that was determined to be Out of Supply<br />
during the last friendly supply phase is<br />
found once again to be Out of Supply, it suffers<br />
Attrition. (i.e. A unit Out of Supply on consecutive<br />
GTs suffer Attrition.)<br />
11.5.1 Effects of Attrition: A unit that suffers attrition<br />
has its Combat Effectiveness reduced by<br />
2. (This reduction is applied as if the unit had<br />
suffered losses in combat.)<br />
1122. ..00 SSPPEECCI<br />
IIAAL L<br />
RRUUL LEESS<br />
1122. ..11 MMoouunnt ttaai iinn UUnni iit tts s<br />
Mountain units were made by troops trained<br />
and used to combat in mountain terrain, so they<br />
are better suited to fight in Mountain a High<br />
Mountain terrain. When fighting against normal<br />
Infantry (only), Mountain Infantry units attack<br />
and defense strength are increased by 1 in<br />
Mountain and High Mountain terrain (consider<br />
the terrain in the defender’s hex).<br />
1122. ..22 Foor F rt ttr rees ss s UUnni iit tts s<br />
Fortress units represent forts built for defensive<br />
and support role. They act like normal units,<br />
and can support with their Artillery Value like<br />
artillery units.<br />
They have no ZOC, does NOT affect stacking,<br />
and are subject to supply rule like any other<br />
unit.<br />
Units defending with fortress units cannot be<br />
Flanked.<br />
1122. ..33 AAr rt tti iil lll lleer ryy UUnni iit tts s<br />
Artillery units are not Combat Units, so they<br />
have no ZOC.<br />
Artillery units may add their artillery value to<br />
any non artillery unit adjacent to it, or stacked<br />
with, both in attack and in defense.<br />
Artillery units cannot attack alone, and in defence<br />
must be withheld, but adding the artillery<br />
value to the stack. If artillery are the only units<br />
in a defending hex, the stack defends with a<br />
strength of ONE, and artillery value ZERO.<br />
Artillery units that move are flipped to their<br />
“Moved” side. An artillery unit not moving during<br />
a Movement Phase can be flipped to its<br />
normal side.<br />
“Moved” artillery units cannot support any<br />
combat.<br />
1122. ..44 Fi Fiir<br />
rs st tt Tuur T rnn<br />
iiaal ll<br />
SSppeec ci<br />
RRuul llees s<br />
The beginning of the offensive was very well<br />
planned, and the A-H initial artillery barrage<br />
devastated the Italian front. On GT 1, all Italian<br />
units attacked by artillery units (also) are considered<br />
“Flanked”.<br />
On GT 1 and GT 2, the following Italian units<br />
cannot move, unless attacked: Ivrea, Salerno,<br />
Lambro infantry brigades, and artillery unit set<br />
up in hex 2903. They have an orange dot beside<br />
the set up hex.<br />
GT 1 starts with AH Combat Phase (skip the AH<br />
Supply, Reinforcement, and Movement Phases).<br />
1133. ..00 RREEI IINNF FOORRCCEEMMEENNT TSS<br />
Reinforcements are found on the last page of<br />
the rules booklet ordered by GT of arrival. Upon<br />
the arrival, place the unit ON THE MAP in the<br />
hex specified (all multiple hex arrival listings are<br />
inclusive).<br />
If a unit’s scheduled entry hex(es) is enemy occupied,<br />
the reinforcing unit may enter at the<br />
nearest unblocked friendly map edge hex (expending<br />
MPs to enter the map).<br />
a - Friendly Map Edges: Italian – west edge<br />
south of 1015, all the south edge, and east edge<br />
south of 3906. A-H - north edge between 1501<br />
and 2201.<br />
1144. ..00 VVI IICCT TOORRYY<br />
CCOONNDDI IIT TI IIOONNSS<br />
Victory Points (VP) are used to determine which<br />
player is victorious. At the end of the game (following<br />
GT 14), the VP level determines the victorious<br />
player, if any.<br />
At the end of the game, the AH player will add<br />
VPs as they are earned according to the following<br />
VP schedule.<br />
Geographical Objectives: These small and large<br />
towns earn VP for the A-H player. The Italian<br />
player doesn’t earn VP, just deny them to the A-<br />
H player.<br />
Small Towns earn 1 VP, while Big Towns earn 5<br />
VP. Large Towns are Rovereto (1206), Ala<br />
(1015), Recoaro (2117), Arsiero (2611), Schio<br />
(2617), Thiene (3117), Asiago (3307), Marostica<br />
(3816), and Valstagna (3909). All of the other<br />
towns are small ones.<br />
Eliminated Enemy Units: For every eliminated<br />
Italian brigade 1 VP is added; for every eliminated<br />
AH brigade 1 VP is subtracted.
<strong>No</strong> Turkeys 5 – 2010 Aprile pag - 9<br />
0-29 VP: Italian Victory<br />
30-45 VP: Draw<br />
46+ VP: A-H Victory<br />
UUnni iit tt IIDDs I s<br />
aabbbbr reevvi iiaat tti iioonns s: ::<br />
- V.L. + M.B. = Battalions Val Leogra + Monte<br />
Berico<br />
- Gr. Alp. = Gruppo Alpini<br />
- Ragg. Bers. C. = Raggruppamento Bersaglieri<br />
Ciclisti<br />
- Gran. Sard. = Granatieri di Sardegna<br />
- Ragg. RGF = Raggruppamento Regia Guardia<br />
di Finanza<br />
- Bers. = Bersaglieri<br />
- K.J. = Kaiserjäger<br />
- Gebirg = Gebirgjäger<br />
- Sch.= Schützen<br />
- L.Sch = Landesschützen<br />
BBI IIBBL LI IIOOGGRRAAPPHHYY<br />
o Enrico Acerbi – “Strafexpedition”. Ed. Rossato<br />
o Karl Schneller – “1916: Mancò un soffio”.<br />
Ed. Mursia<br />
o Vari – Atti del convegno: “1916: La Strafexpedition.<br />
Gli altipiani Vicentini nella tragedia<br />
della Grande Guerra”. Ed. Gaspari<br />
o Alessandro Massignani, Paolo Pozzato –<br />
“Austriaci all’attacco”. Ed. Itinera Progetti<br />
o Gianni Pieropan – “Storia della Grande<br />
Guerra sul fronte Italiano”. Ed. Mursia<br />
o Pompilio Schiarini – “L’Armata del Trentino”<br />
– Ed. Mondadori<br />
o Ufficio Storico dell’Esercito Italiano –<br />
“L’Esercito Italiano nella Grande Guerra<br />
(1915-18) - Vol. III”. Ist. Poligrafico dello<br />
Stato<br />
o Leonardo Malatesta – “Altipiani di Fuoco” -<br />
ISTRIT<br />
GGAAMMEESS<br />
o Andrea Brusati – “Strafexpedition: The<br />
Spring Offensive against Italy, May-June<br />
1916” - Europa Simulazioni (to be published)<br />
AAUUSST TRROO- -HHUUNNGGAARRI IIAANN RREEI IINNF FOORRCCEEMMEENNT TSS<br />
Game Turn 2<br />
43 Sch. Brigade – 2001<br />
Game Turn 4<br />
88 L.Schutz, 98 L.Schutz, 44 Infantry, 87 Infantry<br />
Brigades - 1501<br />
11 Infantry, 12 Infantry Brigades - 2001<br />
Game Turn 7<br />
67 Infantry, 68 Infantry Brigades – 2001<br />
Game Turn 8<br />
59 Infantry, 86 Infantry Brigades – 2001<br />
Game Turn 10<br />
20 Infantry, 21 Infantry Brigades – 2001<br />
IIT ITAAL<br />
LI IIAANN<br />
RREEI IINNF FOORRCCEEMMEENNT TSS<br />
Game Turn 2<br />
Gr.Alp. E/2, Bisagno, <strong>No</strong>vara Brigades – 3816<br />
Volturno Brigade - 2218<br />
Game Turn 3<br />
Verona, Puglie, Sele Brigades – 2818 or 3218<br />
Game Turn 4<br />
Alessandria Brigade, Ragg.Bers.C. – 3307<br />
Granatieri di Sardegna Brigade, 5th Bers – 3218<br />
Lombardia Brigade - 3816<br />
Game Turn 5<br />
Etna, Catanzaro Brigades – 3906<br />
Padova Brigade – 1015<br />
Game Turn 7<br />
Gp. Alp. Foza, 14th Bers. – 3906<br />
Pescara Brigade – 3816<br />
Game Turn 8<br />
Pistoia, Catania, Ravenna Brigades – 2818 or<br />
3218<br />
Game Turn 9<br />
Trapani, Modena, Udine, Liguria Brigades - 2818<br />
or 3218 or 3816<br />
Game Turn 10<br />
Piacenza, Bari, Barletta, Sassari Brigades - 2818<br />
or 3218 or 3816<br />
Game Turn 11<br />
Piemonte Brigade – 3816<br />
Forlì Brigade – 3218<br />
11991144: ::<br />
Thhee T<br />
OOf fff<br />
ffeenns si iivvee àà<br />
WWees st tteer rnn<br />
Fr Froonnt<br />
tt iinn i<br />
oouut ttr raannc cee, ,,<br />
WWWWI II<br />
MMi iikkee RRees sc chh (Oregon Consim Games) sta playtestando<br />
il suo nuovo “mostro”, tutte le battaglie<br />
del 1914 combattute in Belgio, Francia, e<br />
Germania da Agosto sino a metà <strong>No</strong>vembre. Il<br />
sistema di gioco sarà una diretta derivazione (o<br />
meglio un’evoluzione) del cavallo di battaglia<br />
1914: Twilight in the East.
Mountains Aflame 1916<br />
TERRAIN EFFECTS CHART (TEC)<br />
* <strong>No</strong>t in EZOC<br />
Clear<br />
Hills<br />
Low Mountains<br />
Mountains<br />
High Mountains<br />
Crag<br />
Stream<br />
River<br />
Road *<br />
Minor Road *<br />
COMBAT RESULTS TABLE (CRT)<br />
Charts and Tables<br />
VICTORY POINTS SCHEDULE (14.0)<br />
Victory points can be earned by occupation of Towns<br />
at the end of the game by the A-H player.<br />
MP Cost Combat Effect Stacking Large Towns VP Small Towns VP<br />
1 <strong>No</strong>ne<br />
6 Rovereto (1206) 5 Each of the others 1<br />
1 See 7.7 4 Ala (1015) 5<br />
1 See 7.7 4 Recoaro (2117) 5<br />
1 See 7.7 2 Arsiero (2611) 5<br />
2 See 7.7 2 Schio (2617) 5<br />
P P<br />
NE Thiene (3117) 5<br />
+1 <strong>No</strong>ne NE Asiago (3307) 5<br />
P P<br />
NE Marostica (3816) 5<br />
1/3 <strong>No</strong>ne NE Valstagna (3909) 5<br />
1/2 <strong>No</strong>ne NE<br />
Action<br />
MOVEMENT POINTS SUMMARY<br />
MP Cost<br />
Enter EZOC<br />
+1<br />
Exit EZOC<br />
+1<br />
EZOC to EZOC (but see 6.4) +2<br />
Combat Effectiveness Recover 4<br />
Procedure<br />
1- Compare the opposing strengths and determine<br />
the initial Combat Odds Ratio<br />
2- Apply any applicable Odds Column Shifts<br />
3-Attacker rolls 2d6. Cross reference the result on the<br />
proper odds ratio column and applies the results.<br />
Odds Column Shifts<br />
- Flank Attack: 2 right<br />
Results (apply to attacker/defender)<br />
- = no effect<br />
+/-#=LRTmodifier<br />
R# = Retreat # of hexes and LRT modifier<br />
(9.1)<br />
LOSS RESULTS TABLE (LRT)<br />
(9.4)<br />
MAGNITUDE RESULTS<br />
SMALL LARGE CE<br />
(x7 steps) Reductions<br />
_4<br />
_1<br />
0<br />
5, 6, 7 2, 3, 4 1<br />
8, 9, 10 5, 6, 7 2<br />
11+<br />
8, 9, 10 3<br />
11, 12, 13 4<br />
14+<br />
5<br />
Procedure<br />
1- Add the number of steps for both sides involved in the combat<br />
2- Determine the die roll modifier for each side<br />
3- Each side rolls 1d6, finds the modified result under the appropriate<br />
magnitude column, and reads to the right to find the Combat Effectiveness<br />
Levels lost.<br />
DRMs<br />
- CRT result (+2 to -2)<br />
- each CRT hex retreat result<br />
- Total Strength of opponent’s artillery value<br />
0-2: +0 3-5: +1 6-9: +2 10-13: +3 14+: +4<br />
- Defender Flanked: +2<br />
- Unable to fulfill Retreat Guidelines or Unable to Retreat: +2<br />
- Defending at high odds: +1 for each odds ratio over 4:1<br />
Die<br />
Roll 1:3 1:2 1:1,5 1:1 1,5:1 2:1 2,5:1 3:1 4:1<br />
Die<br />
Roll<br />
2 +1/R1 -/R1 +1/R2 +1/R2 -/R2 -/R3 -/R3 -1/R3 -/R4 2<br />
3 +1/-1R1 +1/R1 -/R1 -/R1 +1/R2 -/R2 -/R3 -/R3 -1/R3 3<br />
4 +1/- +1/-1R1 +1/R1 +1/R1 -/R1 +1/R2 -/R2 -/R2 -/R3 4<br />
5 +1/-1 +1/- +2/-1R1 +1/-1R1 +1/R1 -/R1 +1/R2 +1/R2 -/R2 5<br />
6 -/-2 +1/-1 +1/- +1/- +1/-1R1 +1/R1 -/R1 -/R1 +1/R2 6<br />
7 +1/-2 +1/-2 +1/-1 +1/-1 +1/-1 +1/-1R1 +1/R1 +1/R1 -/R1 7<br />
8 +2/-2 +2/-1 +1/-2 +1/-1 +1/-1 +1/-1 +1/-1R1 +1/-1R1 -/-1R1 8<br />
9 +1R1/-2 +2/-2 +2/-1 +2/-1 +2/-1 +1/-1 +1/- -/-1R1 +1/-1R1 9<br />
10 +2R1/-1 +1R1/-2 +2/-2 +2/-2 +2/-2 +2/-1 +1/-1 -/-1 -/-1R1 10<br />
11 +2R1/-2 +2R1/-1 +1R1/-2 +1R1/-1 +1R1/-1 +2/-2 +2/-1 +1/-1 -/-1 11<br />
12 +2R1/-2 +2R1/-2 +2R1/-1 +1R1/-2 +1R1/-1 +1R1/-1 +2/-2 +1/-2 +1/-1 12<br />
Modified Die Roll
Front side Back side<br />
Taro<br />
Mantova<br />
Sicilia<br />
Padova<br />
Roma<br />
Sesia<br />
Volturno<br />
Volturno<br />
Sesia<br />
V.L.+M.B.<br />
Roma<br />
Art.<br />
Padova<br />
Sicilia<br />
Campolongo<br />
Mantova<br />
Taro<br />
Mountains Aflame 1916<br />
x<br />
x<br />
x<br />
x<br />
Moved<br />
x<br />
x<br />
x<br />
x<br />
x<br />
x<br />
x<br />
x<br />
x<br />
x<br />
x<br />
x<br />
2<br />
2<br />
2<br />
2<br />
1<br />
1<br />
2<br />
GT 2<br />
3<br />
3816<br />
3<br />
1807<br />
1<br />
1607<br />
3<br />
1109<br />
4<br />
GT 5<br />
3<br />
1015<br />
3<br />
2807<br />
c<br />
1108<br />
3<br />
1307<br />
3<br />
3-6-4<br />
2-2-5<br />
3-6-4<br />
\-\-2<br />
4-6-4<br />
4-7-4<br />
c<br />
3<br />
2-3-4<br />
2-3-4<br />
2-4-4<br />
2-3-4<br />
1-3-4<br />
1-3-4<br />
2-4-4<br />
4-7-4<br />
\-2-\<br />
c c<br />
4-6-4<br />
4-6-4<br />
Gr.Alp. E/1<br />
Sele<br />
Verona<br />
Puglie<br />
Cagliari<br />
Ancona<br />
<strong>No</strong>vara<br />
Gr.Alp. E/2<br />
Bisagno<br />
Bisagno<br />
Gr.Alp. E/2<br />
<strong>No</strong>vara<br />
Art.<br />
Ancona<br />
Cagliari<br />
Puglie<br />
Verona<br />
Sele<br />
Gr.Alp. E/1<br />
x<br />
x<br />
x<br />
x<br />
x<br />
x<br />
Moved<br />
x<br />
x<br />
x<br />
x<br />
x<br />
x<br />
x<br />
x<br />
x<br />
x<br />
x<br />
x<br />
x<br />
1<br />
1<br />
1<br />
1<br />
2<br />
2<br />
1<br />
1<br />
1<br />
GT 2<br />
3<br />
GT 2<br />
1<br />
GT 2<br />
3<br />
2207<br />
4<br />
2007<br />
3<br />
2206<br />
3<br />
GT 3<br />
3<br />
GT 3<br />
3<br />
GT 3<br />
2<br />
3816<br />
1<br />
2-3-5<br />
1-3-4<br />
1-3-4<br />
1-3-4<br />
2-3-4<br />
2-3-4<br />
1-3-4<br />
2-3-5<br />
1-3-4<br />
3-6-4<br />
4-5-5<br />
3-6-4<br />
\-\-2<br />
4-6-4<br />
4-6-4<br />
3-6-4<br />
3-6-4<br />
3-5-4<br />
4-5-5<br />
Pistoia<br />
Catania<br />
Ravenna<br />
Ivrea<br />
Salerno<br />
Lambro<br />
LOMBARDIA<br />
Lombardia<br />
xx<br />
Catanzaro<br />
Catanzaro<br />
Lombardia<br />
Art.<br />
Lambro<br />
Salerno<br />
Ivrea<br />
Ravenna<br />
Catania<br />
Pistoia<br />
Verena<br />
x<br />
x<br />
x<br />
x<br />
x<br />
x<br />
Moved<br />
31<br />
x<br />
x<br />
x<br />
x<br />
x<br />
x<br />
x<br />
x<br />
x<br />
x<br />
1<br />
1<br />
1<br />
2<br />
2<br />
2<br />
GT 4<br />
1<br />
GT 5<br />
3<br />
GT 4<br />
3<br />
2903<br />
4<br />
3307<br />
3<br />
2803<br />
3<br />
2805<br />
3<br />
GT 8<br />
3<br />
GT 8<br />
2<br />
GT 8<br />
3<br />
2904<br />
c<br />
4-6-4<br />
\-\-2<br />
4-6-4<br />
4-6-4<br />
4-6-4<br />
3-6-4<br />
3-5-4<br />
3-6-4<br />
c<br />
3<br />
1-3-4<br />
1-3-4<br />
1-3-4<br />
2-3-4<br />
2-3-4<br />
2-3-4<br />
4-6-4 2-3-4<br />
1-3-4<br />
3-6-4<br />
\-2-\<br />
Udine<br />
Modena<br />
Trapani<br />
Pescara<br />
Gr.Alp. Foza<br />
Ragg. Bers. C.<br />
Etna<br />
Alessandria<br />
Gran. Sard.<br />
x<br />
x<br />
x<br />
x<br />
x<br />
GT 9<br />
3<br />
GT 9<br />
3<br />
GT 9<br />
2<br />
GT 7<br />
2<br />
III<br />
x<br />
x<br />
x<br />
GT 7<br />
1<br />
GT 4<br />
GT 5<br />
2<br />
GT 4<br />
2<br />
GT 4<br />
4<br />
3-6-4<br />
4-6-4<br />
3-5-4<br />
3-5-4<br />
5-7-5<br />
3-4-6<br />
3-5-4<br />
3-6-4<br />
5-7-4<br />
14° Bers.<br />
5° Bers.<br />
Ragg. RGF<br />
Piemonte<br />
Forlì<br />
Barletta<br />
Bari<br />
Piacenza<br />
Sassari<br />
III III III III<br />
x<br />
GT 7<br />
GT 4<br />
2406<br />
GT 11<br />
x<br />
4<br />
GT 11<br />
x<br />
3<br />
GT 10<br />
x<br />
3<br />
GT 10<br />
x<br />
3<br />
GT 10<br />
x<br />
3<br />
GT 10<br />
4<br />
2-3-5<br />
2-3-5<br />
1-2-4<br />
5-7-4<br />
3-6-4<br />
3-6-4<br />
3-6-4<br />
4-6-4<br />
5-7-4<br />
8<br />
18 Gebirg.<br />
8<br />
10 Gebirg.<br />
8<br />
9 Gebirg<br />
8<br />
6 Gebirg.<br />
20<br />
Art.<br />
20<br />
Art.<br />
20<br />
180 K.J.<br />
20<br />
58 K.J.<br />
20<br />
15 INF.<br />
20<br />
5INF.<br />
x<br />
x<br />
x<br />
x<br />
x<br />
x<br />
x<br />
x<br />
x<br />
x<br />
1706<br />
4<br />
1506<br />
4<br />
1407<br />
4<br />
1207<br />
4<br />
2104<br />
5<br />
2005<br />
5<br />
2006<br />
4<br />
1906<br />
4<br />
2205<br />
4<br />
2105<br />
4<br />
4-5-5<br />
4-5-5<br />
4-5-5<br />
4-5-5<br />
\-\-2<br />
\-\-2<br />
6-7-5<br />
6-7-5<br />
5-6-4<br />
5-6-4<br />
8<br />
12 Gebirg.<br />
8<br />
11 Gebirg.<br />
8<br />
Art.<br />
8<br />
Art.<br />
3<br />
12 INF.<br />
3<br />
11 INF.<br />
3<br />
43 Sch.<br />
3<br />
18 INF.<br />
3<br />
56 INF.<br />
3<br />
55 INF.<br />
x<br />
x<br />
x<br />
x<br />
x<br />
x<br />
x<br />
x<br />
x<br />
x<br />
1501<br />
4<br />
1501<br />
4<br />
1606<br />
5<br />
1206<br />
5<br />
GT 4<br />
4<br />
GT 4<br />
4<br />
GT 2<br />
4<br />
2703<br />
4<br />
2704<br />
4<br />
2504<br />
4<br />
4-5-5<br />
5-6-5<br />
\-\-2<br />
\-\-2<br />
4-6-4<br />
4-6-4<br />
4-6-4<br />
5-7-4<br />
4-6-4<br />
5-7-4<br />
87 Schutz.<br />
44 Schutz.<br />
98 L.Schutz.<br />
88 L.Schutz.<br />
21 INF.<br />
20 INF.<br />
59 INF.<br />
3<br />
Art.<br />
x<br />
x<br />
x<br />
x<br />
GT 10<br />
x<br />
GT 10<br />
x<br />
x<br />
x<br />
GT 4<br />
4<br />
GT 4<br />
4<br />
GT 4<br />
4<br />
GT 4<br />
4<br />
4<br />
4<br />
GT 8<br />
4<br />
2204<br />
4<br />
5-7-4<br />
4-6-4<br />
6-7-5<br />
6-7-5<br />
5-8-4<br />
5-7-4<br />
4-6-4<br />
\-\-2<br />
68 INF.<br />
67 INF.<br />
86 Schutz.<br />
Serrada<br />
Cherle<br />
x<br />
x<br />
x<br />
GT 7<br />
4<br />
GT 7<br />
4<br />
GT 8<br />
4<br />
1706<br />
c<br />
2005<br />
c<br />
4-5-4<br />
5-7-4<br />
4-6-4<br />
c<br />
3<br />
\-2-\<br />
c<br />
2<br />
\-3-\<br />
c c<br />
c c<br />
Ratti<br />
Corbin<br />
Enna<br />
2708<br />
c<br />
2810<br />
c<br />
2415<br />
c<br />
c<br />
1<br />
c<br />
1<br />
\-1-\<br />
c<br />
1<br />
\-2-\<br />
c c<br />
\-1-\<br />
c c<br />
c c<br />
c c<br />
Gran. Sard.<br />
Alessandria<br />
Etna<br />
Ragg. Bers. C.<br />
Gr.Alp. Foza<br />
Pescara<br />
Trapani<br />
Modena<br />
Udine<br />
Liguria<br />
Liguria<br />
x<br />
x<br />
x<br />
x<br />
x<br />
x<br />
x<br />
x<br />
x<br />
x<br />
2<br />
1<br />
1<br />
III<br />
1<br />
1<br />
1<br />
2<br />
1<br />
2<br />
GT 9<br />
4<br />
3-4-4<br />
1-3-4<br />
1-3-4<br />
1-2-6<br />
3-4-5<br />
1-3-4<br />
1-3-4<br />
2-3-4<br />
1-3-4<br />
3-4-4<br />
5-7-4<br />
Sassari<br />
Piacenza<br />
Bari<br />
Barletta<br />
Forlì<br />
Piemonte<br />
x<br />
x<br />
x<br />
x<br />
x<br />
x<br />
2<br />
2<br />
1<br />
1<br />
1<br />
2<br />
Italian<br />
Player Turn<br />
Austro-<br />
Hungarian<br />
Player Turn<br />
3-4-4<br />
2-3-4<br />
1-3-4<br />
1-3-4<br />
1-3-4<br />
3-4-4<br />
5 INF. 20<br />
15 INF. 20<br />
58 K.J. 20<br />
180 K.J. 20<br />
6 Gebirg. 8<br />
9 Gebirg 8<br />
10 Gebirg. 8<br />
18 Gebirg. 8<br />
x<br />
x<br />
x<br />
x<br />
Moved Moved<br />
x<br />
x<br />
x<br />
x<br />
2<br />
2<br />
2<br />
2<br />
2<br />
2<br />
2<br />
2<br />
3-3-4<br />
3-3-4<br />
3-4-5<br />
3-4-5<br />
2-3-5<br />
2-3-5<br />
2-3-5<br />
2-3-5<br />
55a INF. 3<br />
56 INF. 3<br />
18 INF. 3<br />
43 Sch. 3<br />
11 INF. 3<br />
12 INF. 3<br />
11 Gebirg. 8<br />
12 Gebirg. 8<br />
x<br />
x<br />
x<br />
x<br />
x<br />
x<br />
Moved<br />
Moved<br />
x<br />
x<br />
2<br />
2<br />
2<br />
2<br />
2<br />
2<br />
2<br />
2<br />
3-4-4<br />
2-3-4<br />
3-4-4<br />
2-3-4<br />
2-3-4<br />
2-3-4<br />
3-3-5<br />
2-3-5<br />
Moved Moved Moved<br />
59 INF.<br />
20 INF.<br />
21 INF.<br />
88 L.Schutz.<br />
98 L.Schutz.<br />
44 Schutz.<br />
87 Schutz.<br />
3<br />
Art.<br />
3<br />
Art.<br />
x<br />
x<br />
x<br />
x<br />
x<br />
x<br />
x<br />
2<br />
2<br />
2<br />
2<br />
2<br />
2<br />
2<br />
x<br />
x<br />
2405<br />
4<br />
2304<br />
4<br />
2-3-4<br />
3-4-4<br />
3-4-4<br />
3-4-5<br />
3-4-5<br />
2-3-4<br />
3-4-4<br />
\-\-2<br />
\-\-2<br />
86 Schutz.<br />
67 INF.<br />
68 INF.<br />
Spitz Vezzena<br />
Doss Sommo<br />
Verle<br />
Lusern<br />
Geschwert<br />
x<br />
x<br />
x<br />
2<br />
2<br />
2<br />
2702<br />
c<br />
1906<br />
c<br />
2603<br />
c<br />
2605<br />
c<br />
2405<br />
c<br />
c<br />
1<br />
c<br />
2<br />
c<br />
3<br />
c<br />
2<br />
\-3-\<br />
c<br />
3<br />
2-3-4<br />
3-4-4<br />
2-3-4<br />
\-3-\<br />
c c<br />
\-2-\<br />
c c<br />
\-2-\<br />
c c<br />
\-2-\<br />
c c<br />
c c<br />
COMBAT<br />
EFFECT.<br />
COMBAT<br />
EFFECT.<br />
COMBAT<br />
EFFECT.<br />
COMBAT<br />
EFFECT.<br />
COMBAT<br />
EFFECT.<br />
COMBAT<br />
EFFECT.<br />
COMBAT<br />
EFFECT.<br />
COMBAT<br />
EFFECT.<br />
COMBAT<br />
EFFECT.<br />
COMBAT<br />
EFFECT.<br />
COMBAT<br />
EFFECT.<br />
COMBAT<br />
EFFECT.<br />
Campomolon<br />
2408<br />
c<br />
\-2-\<br />
c<br />
3<br />
-2<br />
-2<br />
-2<br />
-2<br />
-2<br />
-2<br />
-1<br />
-1<br />
-1<br />
-1<br />
-1<br />
-1<br />
c c<br />
Counters Sheet<br />
COMBAT<br />
EFFECT.<br />
COMBAT<br />
EFFECT.<br />
COMBAT<br />
EFFECT.<br />
COMBAT<br />
EFFECT.<br />
COMBAT<br />
EFFECT.<br />
COMBAT<br />
EFFECT.<br />
COMBAT<br />
EFFECT.<br />
COMBAT<br />
EFFECT.<br />
COMBAT<br />
EFFECT.<br />
COMBAT<br />
EFFECT.<br />
COMBAT<br />
EFFECT.<br />
COMBAT<br />
EFFECT.<br />
COMBAT<br />
EFFECT.<br />
COMBAT<br />
EFFECT.<br />
COMBAT<br />
EFFECT.<br />
COMBAT<br />
EFFECT.<br />
COMBAT<br />
EFFECT.<br />
COMBAT<br />
EFFECT.<br />
COMBAT<br />
EFFECT.<br />
COMBAT<br />
EFFECT.<br />
-2<br />
-2<br />
-2<br />
-2<br />
-2<br />
-2<br />
-2<br />
-2<br />
-2<br />
-2<br />
-1<br />
-1<br />
-1<br />
-1<br />
-1<br />
-1<br />
-1<br />
-1<br />
-1<br />
-1<br />
COMBAT<br />
EFFECT.<br />
COMBAT<br />
EFFECT.<br />
COMBAT<br />
EFFECT.<br />
COMBAT<br />
EFFECT.<br />
COMBAT<br />
EFFECT.<br />
COMBAT<br />
EFFECT.<br />
COMBAT<br />
EFFECT.<br />
COMBAT<br />
EFFECT.<br />
COMBAT<br />
EFFECT.<br />
COMBAT<br />
EFFECT.<br />
COMBAT<br />
EFFECT.<br />
COMBAT<br />
EFFECT.<br />
COMBAT<br />
EFFECT.<br />
COMBAT<br />
EFFECT.<br />
COMBAT<br />
EFFECT.<br />
COMBAT<br />
EFFECT.<br />
COMBAT<br />
EFFECT.<br />
COMBAT<br />
EFFECT.<br />
COMBAT<br />
EFFECT.<br />
COMBAT<br />
EFFECT.<br />
-2<br />
-2<br />
-2<br />
-2<br />
-2<br />
-2<br />
-2<br />
-2<br />
-2<br />
-2<br />
-1<br />
-1<br />
-1<br />
-1<br />
-1<br />
-1<br />
-1<br />
-1<br />
-1<br />
-1<br />
OUT OF<br />
SUPPLY<br />
AV=0<br />
OUT OF<br />
SUPPLY<br />
AV=0<br />
OUT OF<br />
SUPPLY<br />
AV=0<br />
OUT OF<br />
SUPPLY<br />
AV=0<br />
OUT OF<br />
SUPPLY<br />
AV=0<br />
OUT OF<br />
SUPPLY<br />
AV=0<br />
OUT OF<br />
SUPPLY<br />
AV=0<br />
OUT OF<br />
SUPPLY<br />
AV=0<br />
COMBAT<br />
EFFECT.<br />
COMBAT<br />
EFFECT.<br />
COMBAT<br />
EFFECT.<br />
COMBAT<br />
EFFECT.<br />
LOW<br />
SUPPLY<br />
LOW<br />
SUPPLY<br />
LOW<br />
SUPPLY<br />
LOW<br />
SUPPLY<br />
LOW<br />
SUPPLY<br />
LOW<br />
SUPPLY<br />
LOW<br />
SUPPLY<br />
LOW<br />
SUPPLY<br />
-2<br />
-2<br />
-2<br />
-2<br />
-2<br />
-2<br />
-2<br />
-2<br />
-2<br />
-2<br />
-1<br />
-1<br />
-1<br />
-1<br />
-1<br />
-1<br />
-1<br />
-1<br />
-1<br />
-1