Pre-Installation Mold Checklist and Maintenance Date
Pre-Installation Mold Checklist and Maintenance Date
Pre-Installation Mold Checklist and Maintenance Date

Create successful ePaper yourself
Turn your PDF publications into a flip-book with our unique Google optimized e-Paper software.
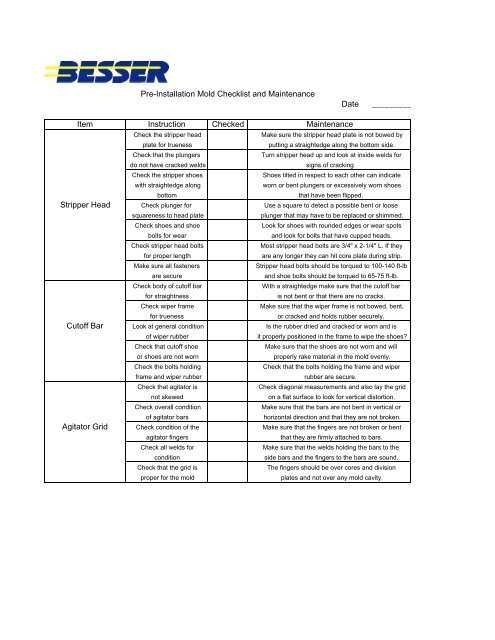
<strong>Pre</strong>-<strong>Installation</strong> <strong>Mold</strong> <strong>Checklist</strong> <strong>and</strong> <strong>Maintenance</strong><br />
Item Instruction Checked<br />
<strong>Maintenance</strong><br />
Stripper Head<br />
Cutoff Bar<br />
<strong>Date</strong> _________<br />
Check the stripper head Make sure the stripper head plate is not bowed by<br />
plate for trueness putting a straightedge along the bottom side.<br />
Check that the plungers<br />
Turn stripper head up <strong>and</strong> look at inside welds for<br />
do not have cracked welds<br />
signs of cracking<br />
Check the stripper shoes<br />
Shoes tilted in respect to each other can indicate<br />
with straightedge along<br />
worn or bent plungers or excessively worn shoes<br />
bottom<br />
that have been flipped.<br />
Check plunger for<br />
Use a square to detect a possible bent or loose<br />
squareness to head plate<br />
plunger that may have to be replaced or shimmed.<br />
Check shoes <strong>and</strong> shoe<br />
Look for shoes with rounded edges or wear spots<br />
bolts for wear<br />
<strong>and</strong> look for bolts that have cupped heads.<br />
Check stripper head bolts<br />
Most stripper head bolts are 3/4" x 2-1/4" L. If they<br />
for proper length<br />
are any longer they can hit core plate during strip.<br />
Make sure all fasteners<br />
Stripper head bolts should be torqued to 100-140 ft-lb<br />
are secure<br />
<strong>and</strong> shoe bolts should be torqued to 65-75 ft-lb.<br />
Check body of cutoff bar<br />
With a straightedge make sure that the cutoff bar<br />
for straightness<br />
is not bent or that there are no cracks.<br />
Check wiper frame<br />
Make sure that the wiper frame is not bowed, bent,<br />
for trueness<br />
or cracked <strong>and</strong> holds rubber securely.<br />
Look at general condition<br />
Is the rubber dried <strong>and</strong> cracked or worn <strong>and</strong> is<br />
of wiper rubber<br />
it properly positioned in the frame to wipe the shoes?<br />
Check that cutoff shoe<br />
Make sure that the shoes are not worn <strong>and</strong> will<br />
or shoes are not worn<br />
properly rake material in the mold evenly.<br />
Check the bolts holding<br />
Check that the bolts holding the frame <strong>and</strong> wiper<br />
frame <strong>and</strong> wiper rubber<br />
rubber are secure.<br />
Check that agitator is<br />
Check diagonal measurements <strong>and</strong> also lay the grid<br />
not skewed<br />
on a flat surface to look for vertical distortion.<br />
Check overall condition<br />
Make sure that the bars are not bent in vertical or<br />
of agitator bars<br />
horizontal direction <strong>and</strong> that they are not broken.<br />
Agitator Grid Check condition of the<br />
agitator fingers<br />
Check all welds for<br />
condition<br />
Check that the grid is<br />
proper for the mold<br />
Make sure that the fingers are not broken or bent<br />
that they are firmly attached to bars.<br />
Make sure that the welds holding the bars to the<br />
side bars <strong>and</strong> the fingers to the bars are sound.<br />
The fingers should be over cores <strong>and</strong> division<br />
plates <strong>and</strong> not over any mold cavity.
<strong>Mold</strong> Frame<br />
Unit Components<br />
<strong>Pre</strong>-<strong>Installation</strong> <strong>Mold</strong> <strong>Checklist</strong> <strong>and</strong> <strong>Maintenance</strong><br />
<strong>Date</strong> _________<br />
Look at general condition<br />
Check wear on side bars at mold lock liners <strong>and</strong><br />
of mold side bars<br />
see how distorted extended angle is.<br />
Check the outside division<br />
These can be checked visually or with the fingers<br />
plates or mold end bars<br />
to detect any signs of excessive wear that could<br />
for wear<br />
cause tearing or "troweling" on the face shells.<br />
Check the mold top plate<br />
Make sure the top plate is not excessively worn<br />
for wear <strong>and</strong> weld cracks where cores seat<br />
Check the condition of<br />
See if the fence <strong>and</strong> its welds are cracked <strong>and</strong><br />
the mold fence<br />
make sure it is not bent up excessively.<br />
Look at the top plate<br />
Check the welds on the wear strip <strong>and</strong> check the<br />
wear strip<br />
important 5-1/2" dimension from the center of the<br />
back vibrator bolt hole to the edge of the strip.<br />
Look at the condition of<br />
The hold downs should not be pulled down against<br />
the hold downs <strong>and</strong> rivets<br />
the extended angle <strong>and</strong> the rivets should be seated<br />
correctly in the hold down.<br />
Check the bolts, nuts,<br />
Make sure that all bolts <strong>and</strong> nuts are present<br />
<strong>and</strong> lock washers<br />
<strong>and</strong> that lock washers are properly compressed.<br />
Outside plates should be torqued to 625-675 ft-lbs.<br />
Outside plates with face liners to 175-195 ft-lbs.<br />
Check squareness of the<br />
With a tape measure, measure the diagonals of the<br />
mold frame<br />
mold to see if they are the same.<br />
Check inside division<br />
Check the wear on the division plate <strong>and</strong> see<br />
plate condition<br />
that the plate is not broken <strong>and</strong> loose<br />
Check the end liners<br />
Look at <strong>and</strong> feel the end liners for signs of<br />
for excessive wear<br />
excessive wear that can cause unit deformation.<br />
Check the valve springs<br />
Check that the assemblies are not broken <strong>and</strong> that<br />
in the core assemblies<br />
they work freely to prevent suction.<br />
Check the core assemblies<br />
Make sure the cores are not twisted <strong>and</strong> that they<br />
for proper positioning<br />
are centered in the compartment.<br />
Look at the wear on the<br />
Check that core plates are not over-worn or cracked<br />
core assemblies<br />
<strong>and</strong> that bells are not worn or have holes.<br />
Look at component<br />
Make sure that all components are not loose <strong>and</strong><br />
security<br />
end liners are torqued to 100-140 ft-lbs. <strong>and</strong><br />
core assemblies are torqued to 70-90 ft-lbs.
Vibrator Shafts<br />
Pallet Guides<br />
<strong>Pre</strong>-<strong>Installation</strong> <strong>Mold</strong> <strong>Checklist</strong> <strong>and</strong> <strong>Maintenance</strong><br />
Check sheaves on<br />
vibrators for wear<br />
Check sheave alignment<br />
with motor sheaves<br />
Look at vibrator weights<br />
for size <strong>and</strong> positioning<br />
Check the ease of rotation<br />
of shafts<br />
Look at seating of shaft<br />
in mold side bar cutout<br />
Check end play in the<br />
vibrator shaft<br />
Check the condition of<br />
the neoprene seals<br />
Check the condition of<br />
the grease fittings<br />
Check pallet guides<br />
for positioning<br />
Check the condition of<br />
the pallet guides<br />
Check the condition of<br />
the vibrator bolts<br />
<strong>Date</strong> _________<br />
Make sure that the sidewalls are not worn <strong>and</strong> that<br />
groove bottoms are not shiny <strong>and</strong> they are not broken<br />
See that the vibrator <strong>and</strong> motor sheaves are in a<br />
straight line when mold is installed in machine.<br />
Make sure that each shaft has the same weight on<br />
it <strong>and</strong> they are positioned properly with nuts out.<br />
Make sure the weights return to bottom dead center<br />
when they are turned either CW or CCW <strong>and</strong> released<br />
Make sure there is an gap between bearing housing<br />
<strong>and</strong> side bar when shaft is seated.<br />
Push <strong>and</strong> pull on the vibrator sheave <strong>and</strong> make<br />
sure that there is no movement <strong>and</strong> those directions.<br />
Make sure that the neoprene seals are properly<br />
seated <strong>and</strong> that they are not broken.<br />
Check for signs of recent greasing <strong>and</strong> see that<br />
the fitting will accept a grease gun.<br />
Check that the pallet guides do not come in<br />
contact with the outside division plates<br />
Check that the pallet guides are not broken or bent<br />
<strong>and</strong> they don't have areas where the pallet can<br />
catch during the strip <strong>and</strong> cause pallet bounce.<br />
Make sure bolts are secure <strong>and</strong> sound <strong>and</strong> that<br />
there are no broken lock washers.<br />
Vibrator bolts are torqued to factory specs.