Unicorn Mk II User Manual - German Physiks
Unicorn Mk II User Manual - German Physiks
Unicorn Mk II User Manual - German Physiks

You also want an ePaper? Increase the reach of your titles
YUMPU automatically turns print PDFs into web optimized ePapers that Google loves.
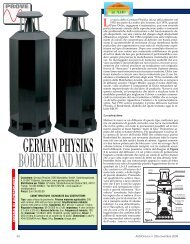
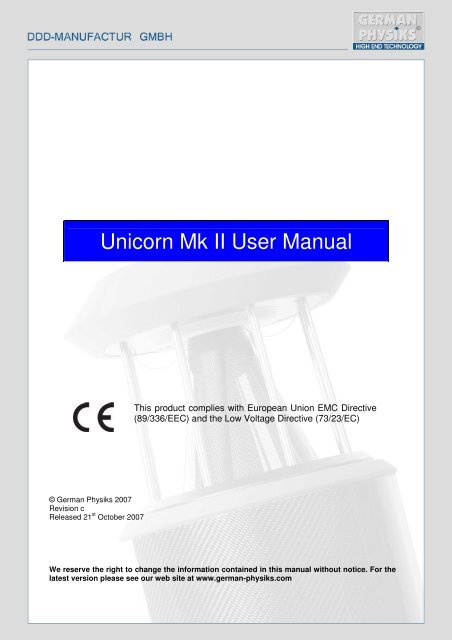
<strong>Unicorn</strong> <strong>Mk</strong> <strong>II</strong> <strong>User</strong> <strong>Manual</strong><br />
This product complies with European Union EMC Directive<br />
(89/336/EEC) and the Low Voltage Directive (73/23/EC)<br />
© <strong>German</strong> <strong>Physiks</strong> 2007<br />
Revision c<br />
Released 21 st October 2007<br />
We reserve the right to change the information contained in this manual without notice. For the<br />
latest version please see our web site at www.german-physiks.com
TABLE OF CONTENTS<br />
1. INTRODUCTION..................................................................................................................................3<br />
2. UNPACKING YOUR LOUDSPEAKERS ..............................................................................................3<br />
3. PRINCIPLE FEATURES OF THE UNICORN <strong>Mk</strong> <strong>II</strong> .............................................................................5<br />
4. LOUDSPEAKER PLACEMENT AND SET-UP ....................................................................................5<br />
Adjusting the Spikes.........................................................................................................................5<br />
Listening Room Layout ....................................................................................................................7<br />
Loudspeaker Placement ..................................................................................................................7<br />
Distance from front wall ..............................................................................................................7<br />
Distance from side wall...............................................................................................................7<br />
5. CONNECTING YOUR LOUDSPEAKERS ...........................................................................................9<br />
High Frequency Level Control ....................................................................................................9<br />
Low Frequency Level Control .....................................................................................................9<br />
Input Terminal Connections .............................................................................................................10<br />
6. REMOVING THE DDD SHIPPING COVERS ......................................................................................10<br />
7. LOUDSPEAKER BREAK IN.................................................................................................................10<br />
8. CARE OF YOUR LOUDSPEAKERS....................................................................................................11<br />
9. WARRANTY .........................................................................................................................................11<br />
10. SERVICE AND SUPPORT..................................................................................................................11<br />
11. HOW TO CONTACT US .....................................................................................................................12<br />
12. UNICORN MK <strong>II</strong> SPECIFICATIONS ...................................................................................................13<br />
13. WARRANTY REGISTRATION............................................................................................................14<br />
2
1. INTRODUCTION<br />
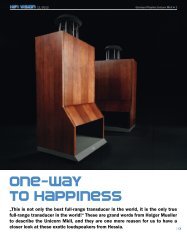
Thank you for selecting the <strong>German</strong> <strong>Physiks</strong> <strong>Unicorn</strong> <strong>Mk</strong> <strong>II</strong> loudspeakers. The <strong>Unicorn</strong> <strong>Mk</strong> <strong>II</strong> is a full<br />
range loudspeaker using a single DDD driver operated in both its bending wave and piston modes. In<br />
the bending wave mode it radiates sound directly and in the piston mode it radiates via a horn. The<br />
<strong>Unicorn</strong> <strong>Mk</strong> <strong>II</strong> is entirely handmade and is built and tested by highly skilled technicians at our factory in<br />
Maintal in <strong>German</strong>y.<br />
Every step in the design and manufacture of this product has been dedicated to producing a loudspeaker<br />
that will provide a lifetime of musical enjoyment.<br />
We strongly recommend that you read this manual before attempting to use the loudspeakers as it will<br />
enable you obtain the best performance from them.<br />
2. UNPACKING YOUR LOUDSPEAKERS<br />
NOTE:<br />
To allow the packing to be lifted off the loudspeakers, ensure that<br />
the room where the loudspeakers are to be unpacked has at least<br />
135cm of clearance between the top of the carton and the ceiling.<br />
When lifting the loudspeakers out of the packing hold them<br />
around the cabinet. Do not lift them by the DDD driver support<br />
pillars (figure 3) as this may damage the DDD driver.<br />
The DDD drivers may be protected with clear film or cardboard<br />
covers. We recommend that these be left in place until the<br />
loudspeakers have been placed in their final location so as to<br />
guard against accidental damage during handling.<br />
The <strong>Unicorn</strong> <strong>Mk</strong> <strong>II</strong> weighs approximately 56kg (123lbs) and should<br />
not be lifted be one person alone. Always have help.<br />
Each <strong>Unicorn</strong> <strong>Mk</strong> <strong>II</strong> is supplied in an individual shipping carton. Both external networks are packed<br />
together in a third carton. The <strong>Unicorn</strong> <strong>Mk</strong> <strong>II</strong> cartons must be kept upright as shown in figure 1. Before<br />
opening the cartons, please inspect them for damage. If you see any damage, please contact the<br />
supplying audio dealer immediately and provide them with a full description of the damage. Do not<br />
attempt to unpack the cartons until you have spoken with the dealer and have been advised how to<br />
proceed.<br />
A<br />
B<br />
Figure 1. <strong>Unicorn</strong> <strong>Mk</strong> <strong>II</strong> Shipping Carton<br />
3
To unpack the loudspeakers please follow the instructions below:<br />
1. Remove the top of the carton – item A in figure 1.<br />
2. Remove the foam packing piece from the top of the main body of the carton - item B in figure 1.<br />
3. Lift off the main body of the carton – item B in figure 1. Make sure that you have sufficient clearance<br />
between the top of the carton and the ceiling above.<br />
4. Lift the loudspeaker off the lower packing tray by holding it around the cabinet. Do not lift the<br />
loudspeaker by the DDD driver support pillars – figure 3.<br />
5. Remove the clear film from around the loudspeaker taking care not to scratch the finish. Do not use<br />
a knife.<br />
6. Remove the foam protective strip from the top and bottom of the loudspeaker cabinet.<br />
Please confirm that the cartons contain the following items:<br />
Item Quantity Description<br />
1 2 <strong>Unicorn</strong> <strong>Mk</strong> <strong>II</strong> Loudspeakers<br />
2 2 <strong>Unicorn</strong> <strong>Mk</strong> <strong>II</strong> Networks<br />
3 2 Network Cables<br />
4 1 <strong>Unicorn</strong> <strong>Mk</strong> <strong>II</strong> <strong>User</strong> <strong>Manual</strong><br />
5 2 Cleaning Cloths<br />
If any items are missing or shows signs of damage, please contact the supplying dealer immediately.<br />
Please retain all of the packing as you will need this should it be necessary in the future to ship the<br />
loudspeakers. Should you need to return the loudspeakers to the factory, you must use the original<br />
packing. The use of any other packing may result in the loudspeakers sustaining damage in transit.<br />
Such damage is not covered by the warranty. Should you require replacement packing, please contact<br />
your <strong>German</strong> <strong>Physiks</strong> dealer, the national distributor or the factory directly.<br />
<strong>Unicorn</strong> <strong>Mk</strong> <strong>II</strong> loudspeaker <strong>Unicorn</strong> <strong>Mk</strong> <strong>II</strong> network Network cable<br />
Figure 2. <strong>Unicorn</strong> <strong>Mk</strong> <strong>II</strong> Major Components<br />
4
3. PRINCIPLE FEATURES OF THE UNICORN <strong>Mk</strong> <strong>II</strong><br />
DDD driver<br />
DDD support<br />
pillars<br />
Input<br />
terminals<br />
Horn<br />
mouth<br />
Figure 3. Principle Features of the <strong>Unicorn</strong> <strong>Mk</strong> <strong>II</strong><br />
4. LOUDSPEAKER PLACEMENT AND SET-UP<br />
NOTE:<br />
DO NOT place the loudspeakers close to cathode ray type<br />
monitors or projectors, as the very powerful magnets used<br />
in the drivers may affect the picture. We recommend a<br />
minimum separation of 2m.<br />
Adjusting the Spikes<br />
NOTE:<br />
We strongly recommend having an assistant help to hold<br />
the loudspeakers while the spikes are being adjusted.<br />
The base of the <strong>Unicorn</strong> <strong>Mk</strong> <strong>II</strong> is fitted with four spikes. These are double ended as shown in figure 4<br />
and are locked in position with a nut. You will need an open ended 10mm spanner to adjust them -<br />
figure 5.<br />
Figure 4. Double Ended Spike and Nut<br />
5
The round ends of the spikes should be used when the loudspeakers are to be placed on a hard floor<br />
such as tile or wood and the pointed ends should be used when the loudspeakers are to be placed on<br />
a carpeted floor. The loudspeakers are shipped with the round end of the spikes facing out.<br />
When placing the loudspeakers on a carpeted floor, ensure that the spikes are set to protrude<br />
sufficiently from the base to pass through the carpet and make firm contact with the underlying floor.<br />
The easiest way to adjust the spikes is to lay the loudspeaker on its side. To protect the finish, we<br />
suggest that you use a clean soft blanket to lay the speaker on. Set the two spikes at the back and<br />
the left hand front spike to protrude approximately the same amount - within 1 or 2mm – and then<br />
tighten the locking nut. Set the right hand front spike to protrude the same amount, but do not tighten<br />
the locking nut.<br />
Stand the loudspeaker up and place it in its initial position. Please refer to figure 6 for guidance on<br />
positioning.<br />
If the <strong>Unicorn</strong> <strong>Mk</strong> <strong>II</strong> is placed on a carpet, push downwards on the top of the cabinet and ensure that<br />
the spikes are in contact with the underlying floor. Do not push on the top of the DDD driver.<br />
To check that the loudspeaker is sitting squarely on the spikes:<br />
1. If the loudspeaker can be rocked in the 10 o’clock to 4 o’clock direction, lean the<br />
loudspeaker to the left and screw out the right hand front spike by the amount of<br />
movement you saw at the base of the cabinet. It is best to have an assistant to help you<br />
hold the loudspeaker. Stand the loudspeaker back up and repeat the process until the<br />
loudspeaker is sitting squarely on its spikes. Lean the loudspeaker to the left again and<br />
tighten the nut on the right front spike (figure 5), taking care not to change the spike’s<br />
setting.<br />
2. If the loudspeaker can be rocked in the 2 o’clock to 8 o’clock direction, lean the<br />
loudspeaker to the left and screw in the right hand front spike by the amount of<br />
movement you saw at the base of the cabinet. It is best to have an assistant to help<br />
you hold the loudspeaker. Stand the loudspeaker back up and repeat the process until<br />
the loudspeaker is sitting squarely on its spikes. Lean the loudspeaker to the left again<br />
and tighten the nut on the right front spike (figure 5), taking care not to change the<br />
spike’s setting.<br />
Loosen<br />
Lock<br />
Figure 5. Adjusting a Spike Nut<br />
6
Listening Room Layout<br />
The following points will help you optimise your listening room layout.<br />
1. The left and right sides of the room should be symmetrical. If the room is asymmetrical, this will<br />
degrade the quality of the stereo image. This is because most of the sound energy that you hear is<br />
reflected before it reaches your ears.<br />
2. Place the loudspeakers symmetrically in the room, i.e. the same distance from the centre line of the<br />
room and the same distance from the front wall.<br />
3. Avoid placing the speakers similar distances from the side and front walls, as this may lead to an<br />
uneven bass response<br />
4. Avoid having any hard surfaces between your listening position and the loudspeakers. This will<br />
generate additional reflections that may degrade the stereo image. For this reason, where ever<br />
possible equipment should be located at the side of the room. If you have a hard floor (tile or wood), it<br />
may be advantageous to place a carpet on the floor covering the area between the loudspeakers and<br />
the listening position, as this will reduce unwanted early reflections.<br />
5. Avoid having the listening position closer than 1.2m from the rear wall as early reflections from the<br />
wall will degrade the stereo image.<br />
Loudspeaker Placement<br />
Distance from front wall<br />
We recommend that you start with the <strong>Unicorn</strong> <strong>Mk</strong> <strong>II</strong> positioned 1.0m from the front wall and set facing<br />
directly down the room as shown in figure 6. As you move the speaker closer to the wall the level of<br />
the bass response will increase. The converse will be true as you move the speaker away from the<br />
front wall. The <strong>Unicorn</strong> <strong>Mk</strong> <strong>II</strong> should not be placed closer than 20cm from the front wall and no further<br />
away than 4 metres. If the loudspeaker is placed too close to the wall, the amount of bass will be high,<br />
but it will not be well controlled and the stereo imaging will be degraded due to an increase in early<br />
reflections. Aim to find a position that provides an even bass response so that all the bass notes in the<br />
music are reproduced at an equal level, combined with well focussed stereo images. Be sure that the<br />
recording you use to check this has an even bass response.<br />
In some rooms it may be beneficial to toe the loudspeaker in towards the listening position. This will<br />
have the effect of reducing the amount of bass whilst improving bass control.<br />
Distance from side wall<br />
We recommend that the distance between the centres of the loudspeakers be 2/3 of the distance of the<br />
loudspeakers from the listening position. Moving the speakers further apart will degrade the stereo<br />
image.<br />
We do not recommend placing the loudspeakers closer than 20 cm from the side walls, as the early<br />
reflections will degrade the stereo image.<br />
Positioning the loudspeakers too close to the side walls will also lead to an uneven bass response.<br />
Aim to find the position that provides the best defined and most realistic stereo image combined with<br />
an even bass when you are seated at the listening position.<br />
Figure 6 gives a general guide to speaker positioning and the location of the listening position. Note<br />
how the recommended listening position varies with the separation between the loudspeakers.<br />
7
Minimum<br />
20cm/ 8 inches<br />
Minimum<br />
20cm/ 8 inches<br />
Distance = “d”<br />
Listening<br />
Position<br />
Do not have the listening<br />
position closer than 1.2<br />
from the rear wall<br />
Figure 6. Listening Room Arrangement<br />
8
5. CONNECTING YOUR LOUDSPEAKERS<br />
NOTE:<br />
The <strong>Unicorn</strong> <strong>Mk</strong> <strong>II</strong> must be used with the external network<br />
supplied. Do not connect it directly to the power amplifier.<br />
An amplifier capable of delivering at least 60W rms into 4<br />
ohms per channel should be used for each loudspeaker.<br />
The external network supplied with the <strong>Unicorn</strong> <strong>Mk</strong> <strong>II</strong> has both high and low frequency level controls.<br />
The high frequency control allows the user to compensate for variations in the listening room high<br />
frequency absorption characteristic. The low frequency control allows the used to adjust for the best<br />
bass performance in their room. These controls and the input terminals are located on the external<br />
network’s top panel – figure 7.<br />
High Frequency<br />
Level Control<br />
Input Terminals<br />
Connect to amplifier<br />
Low Frequency<br />
Level Control<br />
Figure 7. Input Terminals and Level Adjustments for the <strong>Unicorn</strong> <strong>Mk</strong> <strong>II</strong><br />
High Frequency Level Control<br />
4 settings are provided: -2dB, Flat, +2dB and +4dB and the centre frequency is 8,000Hz. To adjust the<br />
control, pull the jumper out and then push it back into the appropriate pair of sockets. Initially this control<br />
should be set to the flat position. Make any final adjustment after the break in period.<br />
Low Frequency Level Control<br />
This is a low frequency shelf control and takes effect at 60Hz. Initially this control should be set to the flat<br />
position. Make any final adjustment after the break in period. To adjust the control set the jumpers as<br />
shown below:<br />
Jumper Setting Titanium DDD Driver Carbon DDD Driver<br />
No jumpers fitted Flat Flat<br />
Black jumper only +1.0dB +1.0dB<br />
Red jumper only +2.0dB +2.0dB<br />
Black and red jumpers +3.0dB +3.5dB<br />
9
Input Terminal Connections<br />
NOTE:<br />
The loudspeaker input terminals should be tightened as<br />
firmly as possible by hand. Do not use pliers or any other<br />
tools as this may damage the terminals.<br />
Use the cable supplied to connect the input sockets on the back of the loudspeaker (figure 3) to the<br />
output sockets on the side of the external network. Ensure that the two red sockets are connected<br />
together and that the two black sockets are connected together. Connect the amplifier to the input<br />
terminals on the top of the external network. Do not connect the amplifier directly to the <strong>Unicorn</strong> <strong>Mk</strong> <strong>II</strong> as<br />
this may result in damage to the DDD driver which will not be covered under the warranty.<br />
We recommend that you use loudspeaker cables terminated with high quality spade lugs, as these<br />
provide the best electrical connection. The lugs should be either soldered or crimped to the cable – the<br />
latter is preferred. We do not recommend the use of bare wire to connect to the loudspeaker terminals.<br />
This produces an inferior connection that will degrade as the bare conductors become tarnished.<br />
NOTE:<br />
Do not switch the amplifier on until the DDD covers have<br />
been removed as shown in section 6.<br />
6. REMOVING THE DDD SHIPPING COVERS<br />
If your loudspeakers are fitted with titanium DDD drivers these will be covered with either a layer of clear<br />
film or cardboard to protect them whilst in transit. This should now be removed. The film should be<br />
peeled off by hand. Do not use a knife.<br />
To remove the cardboard protector, slit the adhesive tape securing it by sliding a short bladed knife<br />
between the two layers of cardboard whilst holding the knife as shown in figure 8. Do not cut in the way<br />
shown in figure 9, as there is a danger that you will cut the DDD driver diaphragm.<br />
Figure 8. The Correct Way to<br />
Remove the DDD Driver Cover<br />
Figure 9. The Wrong Way to<br />
Remove the DDD Driver Cover<br />
7. LOUDSPEAKER BREAK IN<br />
Like all audiophile equipment, <strong>German</strong> <strong>Physiks</strong> loudspeakers require a break in period from new<br />
before they reach their optimum level of performance. The music used for the break in should be<br />
dynamic in order to properly exercise all the components of the loudspeaker.<br />
For the first 10 hours play the loudspeaker at low level only. This is a level where you would easily be<br />
able to carry out a conversation without needing to raise your voice.<br />
10
After this, the speaker may be played at normal listening levels. The break in process will be complete<br />
after 200 to 300 hours.<br />
8. CARE OF YOUR LOUDSPEAKERS<br />
NOTE:<br />
NEVER attempt to open the cabinets. There are no user<br />
serviceable parts inside the loudspeakers.<br />
NEVER touch the diaphragm on the DDD driver, or allow<br />
any object to come into contact with the diaphragm.<br />
NEVER attempt to clean the dust off the diaphragm. Dust<br />
has no affect on its performance and may be safely<br />
ignored.<br />
NEVER attempt to clean the speakers with any abrasive<br />
materials or any cleaners containing ammonia, alcohol or<br />
other solvents, as these may damage the finish.<br />
The only maintenance the speakers will require is periodic dusting to remove dust and any finger prints<br />
from the cabinets. Please use the cleaning cloths supplied with the loudspeakers. These cloths<br />
should be used dry. Do not use any form of liquid with them. Additional cloths may be obtained via<br />
local your <strong>German</strong> <strong>Physiks</strong> dealer, national distributor or direct from <strong>German</strong> <strong>Physiks</strong>.<br />
9. WARRANTY<br />
Your <strong>German</strong> <strong>Physiks</strong> loudspeakers are warranted to be free from defects if used under normal<br />
conditions for a period of 5 years from the date of purchase, provided that the customer registers their<br />
purchase by completing and returning the registration form at the end of this manual within 7 days of<br />
purchase. They must also return a copy of the receipt issued at the time of purchase. If this is not<br />
done the warranty period will be 5 years from the date of shipment from the factory. This warranty is<br />
transferable to subsequent owners, who must register their purchase with us.<br />
Modifications or repairs performed by the factory, or by an authorised repair agent, shall be guaranteed<br />
for the remaining period of the warranty, or for 1 year, which ever is greater.<br />
Any unauthorised modifications or repairs will invalidate the warranty. The warranty will also be<br />
invalidated if <strong>German</strong> <strong>Physiks</strong> determines that the unit has been subject to misuse including, but not<br />
limited to, burnt out voice coils and dents or scratches on driver diaphragms or cabinets.<br />
There is no other express warranty on <strong>German</strong> <strong>Physiks</strong> products. This warranty shall not extend<br />
beyond the stated warranty period. No responsibility is assumed for incidental or consequential<br />
damage.<br />
10. SERVICE AND SUPPORT<br />
In the first instance please contact your local <strong>German</strong> <strong>Physiks</strong> dealer or distributor. They will diagnose<br />
the fault and liaise with <strong>German</strong> <strong>Physiks</strong> to decide the best way to affect a repair. If they unable to<br />
assist you, please contact <strong>German</strong> <strong>Physiks</strong> by phone on + 49 61 09 50 29 823, by fax on + 49 61 09<br />
50 29 826, or by email at service@german-physiks.com. You can also contact us via our web site at<br />
www.german-physiks.com. Please take into account time differences between <strong>German</strong>y and where<br />
11
you are calling from should you need to phone us. Email is our preferred method of initial contact.<br />
Please supply the model name and serial numbers of your loudspeakers and as much detail of your<br />
problem as possible. The serial number is printed on a label attached to the underside of the<br />
loudspeaker’s base plate.<br />
In most cases, the repair will be dealt with by sending spare parts from the factory. If it becomes<br />
necessary to return your loudspeakers or any part of them to the factory, you will be given a Return<br />
Authorization (RA) number. This number must be clearly marked on the outside of the packing.<br />
Returns made without a RA number will not be accepted. Any returned items must be shipped in the<br />
original packing. <strong>German</strong> <strong>Physiks</strong> will not be responsible for any damage that occurs as a result of the<br />
use of non-standard packing. Returns received in non-standard packing will be replaced with new<br />
packing at the owner's expense. If you need new packing, please contact your <strong>German</strong> <strong>Physiks</strong> dealer<br />
or the factory.<br />
For items returned to the factory under warranty during the first year, <strong>German</strong> <strong>Physiks</strong> will pay for the<br />
shipping charges both ways. A shipping company approved by <strong>German</strong> <strong>Physiks</strong> must be used and the<br />
items will be returned to the customer using the same carrier, or an equivalent service.<br />
For loudspeakers returned to the factory under warranty after the first year, the customer is responsible<br />
for paying all shipping and related charges back to the factory. A shipping company approved by<br />
<strong>German</strong> <strong>Physiks</strong> must be used. Providing this condition is met, <strong>German</strong> <strong>Physiks</strong> will pay the cost of<br />
shipping the loudspeakers back to the customer.<br />
<strong>German</strong> <strong>Physiks</strong> will not pay any shipping costs if:<br />
a. Loudspeakers or parts are returned without a RA number<br />
b. No fault is found<br />
c. If the fault is judged to be due to misuse such as, but not limited to, burnt out voice<br />
coils and dents or scratches on driver diaphragms or cabinets.<br />
Customers are responsible for all freight, duties and related shipping charges for loudspeakers<br />
returned for non-warranty repairs.<br />
11. HOW TO CONTACT US<br />
If you wish to get in touch with us please use the contact information shown below. Please note that<br />
our office hours are from 9.30 a.m. to 5.00 p.m. Monday to Thursday, excluding public holidays and<br />
that we cannot respond to enquiries outside of these hours. Where ever possible you contact us by<br />
email. This will allow us to give your enquiry more consideration and so provide a more detailed reply.<br />
Address<br />
DDD-Manufactur GmbH<br />
Gutenbergstraße 4<br />
D-63477 Maintal<br />
GERMANY<br />
Telephone + 49 61 09 50 29 823<br />
Fax + 49 61 09 50 29 826<br />
Email<br />
Web<br />
service@german-physiks.com<br />
www.german-physiks.com<br />
12
12. UNICORN MK <strong>II</strong> SPECIFICATIONS<br />
Version With Titanium DDD Driver With Carbon DDD Driver<br />
Impedance 4 ohms 4 ohms<br />
Frequency Response 55 - 21,500Hz 40 - 24,000Hz<br />
Power Handling<br />
Nominal 80W 100W<br />
Short term 100W 140W<br />
Amplification required<br />
High frequency adjustment<br />
Minimum 60W/ 4 ohms<br />
-2dB, flat, +2dB and 4dB centred at 8,000Hz<br />
Low frequency adjustment<br />
Flat, +1.0dB, +2.0db and<br />
+3.0dB starting from 60Hz<br />
Flat, +1.0dB, +2.0db and<br />
+3.5dB starting from 60Hz<br />
Sensitivity 87.7dB for 1W at 1m 88.0dB for 1W at 1m<br />
Operating principle<br />
Input connectors<br />
1 way full range loudspeaker with 360° surround radiation using<br />
the DDD Bending Wave Converter<br />
1 set of binding posts<br />
Driver 1 x Titanium DDD driver 1 x Carbon DDD driver<br />
Dimensions<br />
Speaker<br />
Crossover<br />
Weight<br />
Speaker<br />
Crossover<br />
Warranty<br />
550mm W x 1,241mm H x 460mm D<br />
21.7" W x 48.9" H x 18.1" D<br />
270mm W x 173mm H x 230mm D<br />
10.6" W x 6.8" H x 9.1" D<br />
Approx 56.0kg<br />
Approx 123.2lbs<br />
4.4kg<br />
9.7lbs<br />
5 years<br />
As part of our process of continually improving our products, we reserve the right to change specifications without notice<br />
13
13. WARRANTY REGISTRATION<br />
In order to register your purchase and obtain the full 5 year warranty, Please complete the form below<br />
within 7 days of purchase and return it by post together with a copy of the receipt of purchase to:<br />
DDD-Manufactur GmbH<br />
Gutenbergstraße 4<br />
D-63477 Maintal<br />
GERMANY<br />
Name<br />
Address<br />
Country<br />
Zip/Post Code<br />
Speaker Model<br />
DDD Type<br />
Delete as necessary<br />
Serial Number<br />
See label under speaker<br />
Finish<br />
Date of<br />
Purchase<br />
<strong>Unicorn</strong> <strong>Mk</strong> <strong>II</strong><br />
Titanium / Carbon.<br />
Where<br />
Purchased<br />
Address<br />
Country<br />
Zip/Post Code<br />
14