
You also want an ePaper? Increase the reach of your titles
YUMPU automatically turns print PDFs into web optimized ePapers that Google loves.
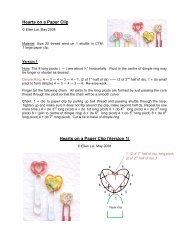
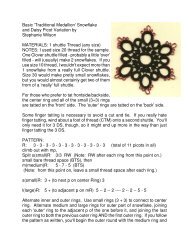
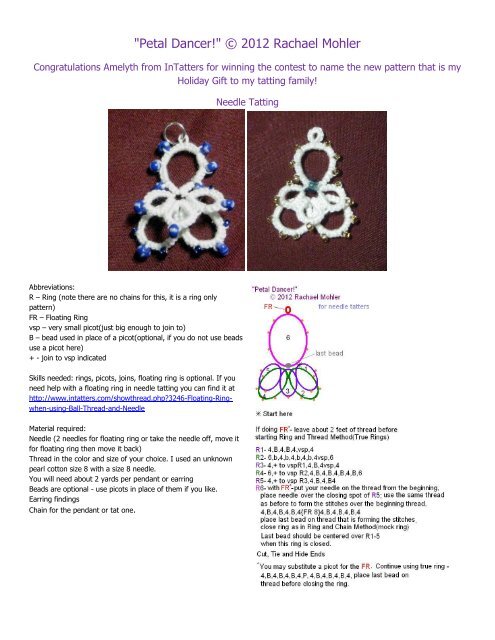
"<strong>Petal</strong> <strong>Dancer</strong>!" © 2012 Rachael Mohler<br />
Congratulations Amelyth from InTatters for winning the contest to name the new pattern that is my<br />
Holiday Gift to my tatting family!<br />
Needle Tatting<br />
Abbreviations:<br />
R – Ring (note there are no chains for this, it is a ring only<br />
pattern)<br />
FR – Floating Ring<br />
vsp – very small picot(just big enough to join to)<br />
B – bead used in place of a picot(optional, if you do not use beads<br />
use a picot here)<br />
+ - join to vsp indicated<br />
Skills needed: rings, picots, joins, floating ring is optional. If you<br />
need help with a floating ring in needle tatting you can find it at<br />
http://www.intatters.com/showthread.php?3246-Floating-Ringwhen-using-Ball-Thread-and-Needle<br />
Material required:<br />
Needle (2 needles for floating ring or take the needle off, move it<br />
for floating ring then move it back)<br />
Thread in the color and size of your choice. I used an unknown<br />
pearl cotton size 8 with a size 8 needle.<br />
You will need about 2 yards per pendant or earring<br />
Beads are optional - use picots in place of them if you like.<br />
Earring findings<br />
Chain for the pendant or tat one.
This picture shows the join of R3 to R1.<br />
Another angle showing the same join of R3 to R1.<br />
This picture shows how R1,R3 and R5 are joined as well as R2 and R5 before R5 is closed.<br />
R5 is closed. In preparation for R6 place 3 beads on the thread we have been using up to this point. If<br />
using only one needle, take it off this thread and put it on the thread saved at the beginning. If you have 2 needles put the second<br />
needle on the beginning thread and put 1 bead on this thread (I used a special bead for this one because it ends up in the middle).<br />
Place the Needle that is on the beginning thread at the base of R5. Complete the stitches up to the<br />
point of the FR using the same thread used for R1-5.
Place the first needle at the point of the last stitch on the second needle. If you only have one needle<br />
take the stitches off the needle and pull through leaving a loop (don’t pull all the way through), then thread it onto the other thread.<br />
Form the FR of 8 stitches as a true with the same thread.<br />
Close the FR as a true ring. Place three beads onto this thread.<br />
You can remove the needle from this thread at this time. If you only have one needle rethread<br />
it onto the other thread again. Finish the stitches of R6.
to front.<br />
Take the stitches off the needle and start to close. Put the needle through the loop from back<br />
an ornament hanger on it later.<br />
Finish closing R6. Cut, tie and hide the ends. I will be using this as an ornament so I will put<br />
For this ornament I used a true ring instead of a mock ring. Put one bead on the<br />
thread before starting. The Stitch count is 4-4-4-8, put needle through jump ring on the tiny snowflake, picot, 8-4-4-4.<br />
Close the ring so that the bead is centered over the first 5 rings. Cut, tie and Hide.