SCREAMIN' EAGLE TWIN CAM 110 (1800 CC ... - Harley-Davidson
SCREAMIN' EAGLE TWIN CAM 110 (1800 CC ... - Harley-Davidson
SCREAMIN' EAGLE TWIN CAM 110 (1800 CC ... - Harley-Davidson

Create successful ePaper yourself
Turn your PDF publications into a flip-book with our unique Google optimized e-Paper software.
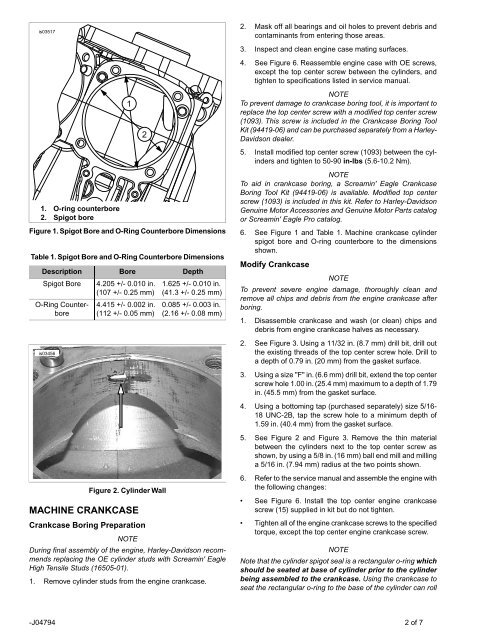
is03517<br />
2. Mask off all bearings and oil holes to prevent debris and<br />
contaminants from entering those areas.<br />
1<br />
2<br />
3. Inspect and clean engine case mating surfaces.<br />
4. See Figure 6. Reassemble engine case with OE screws,<br />
except the top center screw between the cylinders, and<br />
tighten to specifications listed in service manual.<br />
NOTE<br />
To prevent damage to crankcase boring tool, it is important to<br />
replace the top center screw with a modified top center screw<br />
(1093). This screw is included in the Crankcase Boring Tool<br />
Kit (94419-06) and can be purchased separately from a <strong>Harley</strong>-<br />
<strong>Davidson</strong> dealer.<br />
5. Install modified top center screw (1093) between the cylinders<br />
and tighten to 50-90 in-lbs (5.6-10.2 Nm).<br />
1. O-ring counterbore<br />
2. Spigot bore<br />
Figure 1. Spigot Bore and O-Ring Counterbore Dimensions<br />
Table 1. Spigot Bore and O-Ring Counterbore Dimensions<br />
Description<br />
Spigot Bore<br />
O-Ring Counterbore<br />
is03456<br />
Bore<br />
4.205 +/- 0.010 in.<br />
(107 +/- 0.25 mm)<br />
4.415 +/- 0.002 in.<br />
(112 +/- 0.05 mm)<br />
Figure 2. Cylinder Wall<br />
MACHINE CRANKCASE<br />
Crankcase Boring Preparation<br />
NOTE<br />
Depth<br />
1.625 +/- 0.010 in.<br />
(41.3 +/- 0.25 mm)<br />
0.085 +/- 0.003 in.<br />
(2.16 +/- 0.08 mm)<br />
During final assembly of the engine, <strong>Harley</strong>-<strong>Davidson</strong> recommends<br />
replacing the OE cylinder studs with Screamin' Eagle<br />
High Tensile Studs (16505-01).<br />
1. Remove cylinder studs from the engine crankcase.<br />
NOTE<br />
To aid in crankcase boring, a Screamin' Eagle Crankcase<br />
Boring Tool Kit (94419-06) is available. Modified top center<br />
screw (1093) is included in this kit. Refer to <strong>Harley</strong>-<strong>Davidson</strong><br />
Genuine Motor Accessories and Genuine Motor Parts catalog<br />
or Screamin' Eagle Pro catalog.<br />
6. See Figure 1 and Table 1. Machine crankcase cylinder<br />
spigot bore and O-ring counterbore to the dimensions<br />
shown.<br />
Modify Crankcase<br />
NOTE<br />
To prevent severe engine damage, thoroughly clean and<br />
remove all chips and debris from the engine crankcase after<br />
boring.<br />
1. Disassemble crankcase and wash (or clean) chips and<br />
debris from engine crankcase halves as necessary.<br />
2. See Figure 3. Using a 11/32 in. (8.7 mm) drill bit, drill out<br />
the existing threads of the top center screw hole. Drill to<br />
a depth of 0.79 in. (20 mm) from the gasket surface.<br />
3. Using a size "F" in. (6.6 mm) drill bit, extend the top center<br />
screw hole 1.00 in. (25.4 mm) maximum to a depth of 1.79<br />
in. (45.5 mm) from the gasket surface.<br />
4. Using a bottoming tap (purchased separately) size 5/16-<br />
18 UNC-2B, tap the screw hole to a minimum depth of<br />
1.59 in. (40.4 mm) from the gasket surface.<br />
5. See Figure 2 and Figure 3. Remove the thin material<br />
between the cylinders next to the top center screw as<br />
shown, by using a 5/8 in. (16 mm) ball end mill and milling<br />
a 5/16 in. (7.94 mm) radius at the two points shown.<br />
6. Refer to the service manual and assemble the engine with<br />
the following changes:<br />
• See Figure 6. Install the top center engine crankcase<br />
screw (15) supplied in kit but do not tighten.<br />
• Tighten all of the engine crankcase screws to the specified<br />
torque, except the top center engine crankcase screw.<br />
NOTE<br />
Note that the cylinder spigot seal is a rectangular o-ring which<br />
should be seated at base of cylinder prior to the cylinder<br />
being assembled to the crankcase. Using the crankcase to<br />
seat the rectangular o-ring to the base of the cylinder can roll<br />
-J04794 2 of 7