You also want an ePaper? Increase the reach of your titles
YUMPU automatically turns print PDFs into web optimized ePapers that Google loves.
Congratulations, you are the proud owner of<br />
the finest Production crossbow in the world!<br />
Please follow all safety, assembly and trouble shooting<br />
instructions contained in the manual. It is extremely important<br />
to read and follow the instructions before attempting to use<br />
your crossbow. Serious injuries to yourself or others, damage to<br />
your crossbow or poor performance from your crossbow could<br />
result from failure to thoroughly read and un<strong>de</strong>rstand these<br />
instructions. If any part of this manual is unclear to you contact<br />
the service <strong>de</strong>partment at 800-237-4507. After assembly of<br />
your crossbow, please keep manual for future reference.<br />
As with any other high performance equipment, meticulous<br />
care and a regular maintenance schedule must be maintained.<br />
Manual Contents<br />
2<br />
Specifications 3<br />
Parts Checklist 3<br />
Safety Gui<strong>de</strong>lines 4<br />
<strong>Crossbow</strong> <strong>Breakdown</strong> 5<br />
Parts Picture 5<br />
Assembly<br />
Custom Fitting 6-8<br />
<strong>Crossbow</strong> Operation 8-11<br />
Troubleshooting 12-13<br />
Care and Maintenance 14<br />
Warranty 15<br />
Warranty Registration<br />
Back Cover
Specifications<br />
Feet per Second 345<br />
Power Stroke 15.5”<br />
Draw Weight<br />
150 lbs<br />
Physical Weight<br />
7.7 lbs<br />
Width 27”<br />
Length 37.5”<br />
String Length 39 5/8”<br />
Number of Strands 24<br />
String Stock Number 16200<br />
Parts List<br />
Before beginning to assemble your crossbow, take a moment to<br />
organize these parts and ensure you have everything you need.<br />
If you are missing any of the below parts, contact the Barnett<br />
Sales Department at 1-800-237-4507.<br />
1* Front Sight Bracket<br />
2* Brass Sight Pints w/ Nut, Washer &Barrel<br />
2* Front Sight Bracket Screws<br />
1* Rear Peep Sight<br />
1 Hex Keys 5/32, 3/16, 3/32<br />
1 Lubewax<br />
* ITEMS ARE NOT INCLUDED WHEN BOW IS<br />
PURCHASED AS A PACKAGE WITH SCOPE.<br />
3
Safety Gui<strong>de</strong>lines<br />
The Revolution AVi is equipped with an automatic,<br />
ambi<strong>de</strong>xtrous safety, which engages every time the crossbow<br />
is cocked. The safety must be released before each shot. This,<br />
as with any other mechanical <strong>de</strong>vice, does not guarantee total<br />
safety, as no safety <strong>de</strong>vice is a substitute for common sense and<br />
safe handling. The crossbow trigger is only to be pulled when<br />
the safety is in “fire” position and NEVER when it is in the “safe”<br />
position or anywhere between “safe” and “fire.” Do not attempt to<br />
alter or modify the safety or the trigger mechanism.<br />
The following rules should be followed at all times:<br />
EXTREME CAUTION SHOULD BE USED AT ALL TIMES WHEN<br />
HANDLING A CROSSBOW. FAILURE TO FOLLOW THESE RULES<br />
COULD RESULT IN SERIOUS INJURY OR DEATH.<br />
• Always keep your fingers below the flight track and out of<br />
the path of cables and strings when firing the crossbow. The<br />
velocity of the string striking your fingers as the string travels<br />
forward could cause severe personal injury.<br />
• Never dry-fire the crossbow (shooting without an arrow or too<br />
light of an arrow). Dry firing will void the warranty and can<br />
result in damage to the limb assembly and possibly cause<br />
personal injury.<br />
• Never fire the crossbow until you are sure of your target.<br />
• Always use an a<strong>de</strong>quate target and backstop when target<br />
shooting.<br />
• Always use suitable crossbow arrows, such as Barnett’s 22”<br />
Carbon Arrows with half moon nocks ma<strong>de</strong> by BARNETT for the<br />
Revolution AVi. Arrows of improper stiffness or mass weight<br />
may damage the limb and cable assembly, voiding the warranty<br />
and possibly cause personal injury.<br />
• Always inspect the crossbow and arrows before firing. Bent or<br />
damaged arrows are not safe to fire and should be discar<strong>de</strong>d<br />
or repaired.<br />
4
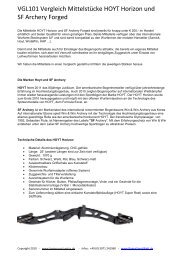
<strong>Crossbow</strong> <strong>Breakdown</strong><br />
4<br />
3<br />
1<br />
2<br />
7<br />
6<br />
9<br />
5<br />
8<br />
10<br />
1. Adjustable Cheek Piece<br />
2. Adjustable Rear Stock<br />
3. Scope Mount<br />
4. String<br />
5. Cams<br />
6. Cables<br />
7. AVi Limbs<br />
8. Foot Stirrup<br />
9. AVi Limb Retainer, Bezel, and Limb Bolt<br />
10. Limb Button<br />
11. Front Sight Bracket with hardware (Not Shown. Not inclu<strong>de</strong>d<br />
if package with scope is purchased.)<br />
12. Peep Sight (Not Shown. Not inclu<strong>de</strong>d if package with scope is<br />
purchased.)<br />
5
Assembly Gui<strong>de</strong><br />
Attaching Prod Housing to Stock<br />
• Place bowstring on top of the flight track . Place cables un<strong>de</strong>r<br />
front edge of flight track and push prod until it seats securely<br />
over pins. See Figure 1 (See warnig below)<br />
• Turn bow over and engage prod, locking hooks over locking pin<br />
on the si<strong>de</strong> of the flight track.<br />
• The latch unlock switch will click into place over the foot stirrup<br />
crossbar and prevent the foot stirrup from unlatching. See<br />
Figure 2<br />
Fig 1 Fig 2<br />
NOTE: This procedure should require some strength to ensure<br />
the prod housing locks onto the flight track firmly. If the latch<br />
mechanism feels loose or too easy to latch STOP and call the<br />
service <strong>de</strong>partment immediately. 800-237-4507.<br />
• Double check to see that the prod housing is securely seated on<br />
flight track and the foot stirrup is securely locked down by the<br />
latch unlock switch.<br />
WARNING:<br />
• When installing the Revolution AVi prod housing onto the<br />
gun body, the prod housing will angle upward as shown in<br />
Figure 3. You must push the prod housing downward so it sits<br />
flat on the nose of the gun body as shown in Figure 4.<br />
• Do not engage the foot claw when the prod housing is at the<br />
6
Fig 3<br />
angle in Figure 3, as this<br />
will cause damage to the<br />
gun body and the prod<br />
housing assembly.<br />
• Please contact the service<br />
<strong>de</strong>partment at<br />
1-800-237-4507 with any<br />
questions or concerns.<br />
To <strong>de</strong>tach prod housing<br />
from stock, reverse the<br />
assembly procedure. It will be<br />
necessary to pull down the<br />
latch unlock switch before<br />
disengaging the foot stirrup<br />
and unlatching prod locking<br />
hooks.<br />
Fig 4<br />
Mounting the Front Sight<br />
• Align the holes of the front sight<br />
bracket with the holes on the prod<br />
housing and attach firmly using the<br />
screws and washers given in the<br />
hardware kit. See Figure 5<br />
• Insert the first sight pin through<br />
the bracket with the slotted screw<br />
flush insi<strong>de</strong> the bracket and tighten<br />
down the barrel and washer on the<br />
outsi<strong>de</strong> of the bracket. Install the<br />
second pin in the same manner<br />
facing first pin. See Figure 6.<br />
Fig 5<br />
Fig 6<br />
7
Mounting the Rear Peep Sight<br />
• Sli<strong>de</strong> onto the attached dovetail<br />
with the bell portion facing<br />
towards you and tighten. See<br />
Figure 7<br />
Installing an Optional Scope<br />
The recommen<strong>de</strong>d crossbow<br />
scope is a Barnett 4x32 mm fivereticle<br />
scope.<br />
• Remove peep sight from the<br />
scope rail.<br />
• Position your scope by moving it forward or backward until the<br />
proper eye relief is found. This is typically three to four inches<br />
from your eye to the eyepiece when you are holding the<br />
crossbow in a shooting position.<br />
• Tighten the scope mounting rings with caution.<br />
Important: Be sure to tighten windage, elevation caps and<br />
scope mount rings before shooting crossbow.<br />
Attaching Optional Quiver<br />
Fig 7<br />
• With crossbow upsi<strong>de</strong> down, line up mounting bracket with<br />
pre-drilled hole on un<strong>de</strong>rsi<strong>de</strong> of stock body, install and tighten<br />
screw.<br />
• Line up quick <strong>de</strong>tach quiver bracket with holes on mounting<br />
bracket (make sure solid si<strong>de</strong> is up), install and tighten the two<br />
<strong>de</strong>tach bracket screws.<br />
• Attach quiver by placing it on the quick <strong>de</strong>tach bracket with<br />
plastic studs facing the mounting plate at a slight angle and<br />
twist to secure.<br />
8
Custom Fitting<br />
For a full custom fit, Barnett has <strong>de</strong>veloped the Adjustable Cheek<br />
Piece and Adjustable Rear Stock. The following procedures<br />
will aid you in setting up your Revolution AVi for comfort and<br />
accuracy. Once you have customized your adjustments you will<br />
shoul<strong>de</strong>r your Revolution AVi in your natural shooting position.<br />
Adjustable Rear Stock<br />
Scopes require a minimum distance of 3” eye relief. Eye relief<br />
is the distance your eye requires from the rear of the scope to<br />
attain a clear field of view.<br />
When making adjustment<br />
for use with rear peep these<br />
adjustments are based on<br />
personal comfort and eye<br />
characteristics, as eye relief is<br />
not a factor with a peep.<br />
• Loosen set screws on right<br />
si<strong>de</strong> of stock, located above<br />
and below the adjustment<br />
dial, enough to turn dial<br />
freely. See Figure 8<br />
• Turn adjustment dial<br />
(clockwise extends, counter<br />
clockwise to retract) to make<br />
adjustments for proper eye<br />
relief or comfort level. See<br />
Figure 9<br />
• Re-tighten set screws<br />
without over tightening to<br />
lock in your adjustment.<br />
Fig 8<br />
Fig 9<br />
9
Adjustable Cheek Piece<br />
• Loosen both retaining screws from one si<strong>de</strong> of cheek piece one<br />
– two full turns. See Figure 9<br />
• Adjust the angle and or height so your eye aligns naturally and<br />
comfortably with your peep sight or scope. See Figure 10<br />
• Re-tighten retaining screws to lock in your adjustment.<br />
Fig 9 Fig 10<br />
10<br />
Cocking your <strong>Crossbow</strong><br />
Be sure to apply Barnett<br />
lubewax to the flight track<br />
before cocking.<br />
• Place the cocking stirrup (foot<br />
claw) on the ground with one<br />
foot in the stirrup and the<br />
stock end resting against your<br />
thigh. See Figure 11<br />
Operation<br />
• Place both hands on the string<br />
no more than ½” on each si<strong>de</strong><br />
Fig 11<br />
of the crossbow body. With<br />
even pressure on each si<strong>de</strong>, pull the string back until it locks<br />
into the trigger mechanism with an audible “click”. Be sure to<br />
apply downward pressure against flight track.
• Slowly release hand pressure on the string until you are sure it<br />
is locked securely into the trigger mechanism. The crossbow<br />
is now cocked with the safety on. Make sure that the string is<br />
seated at the bottom of the tumbler. The tumbler is the part<br />
of the trigger that the string is resting on when cocked. If it is<br />
resting at the top of the tumbler, use both thumbs and gently<br />
push string down until it is seated at the bottom of the tumbler<br />
to ensure proper arrow flight.<br />
Note: The serving on the string has had a line on each si<strong>de</strong> of the<br />
flight surface marked at the factory. After cocking the crossbow<br />
make sure that the marks on the string are showing equally on<br />
each si<strong>de</strong> of the trigger mechanism. Unevenly cocked crossbows<br />
will have erratic arrow flight. When restringing your crossbow<br />
mark the serving of the string, on each si<strong>de</strong> of the flight track<br />
at rest. Apply Barnett Lubewax to the string serving and track<br />
surface.<br />
Loading your <strong>Crossbow</strong><br />
• Place the arrow forward un<strong>de</strong>r the front sight bracket and lay<br />
the arrow on the flight surface. When using arrows with moon<br />
nocks, be sure that the odd colored fletch is placed in the flight<br />
groove and that the concaved nock is parallel to the string.<br />
• Sli<strong>de</strong> the arrow back un<strong>de</strong>r the arrow retaining spring and fully<br />
into the trigger mechanism. Note: The arrow retaining spring<br />
should only exert enough pressure to hold the arrow in place<br />
without lifting it from its position on the flight surface.<br />
If arrows with moon nocks are used, be sure that the odd<br />
colored fletch is placed in the flight groove and that the<br />
concaved nock is parallel to the string.<br />
11
Firing your <strong>Crossbow</strong><br />
To fire the arrow from your crossbow:<br />
• Point the crossbow in a safe direction.<br />
• Push the safety forward to the off position. The crossbow<br />
will now fire when the trigger is pulled. The safety MUST be<br />
disengaged in this manner prior to every shot.<br />
BE SURE TO KEEP YOUR FINGERS BELOW THE STOCK FORE<br />
END (FLIGHT TRACK) WHILE SHOOTING. Note photos below.<br />
This will prevent your hands from being struck by the string<br />
as it travels forward. The velocity of the string hitting your<br />
fingers will cause severe injury.<br />
Unloading your <strong>Crossbow</strong><br />
By far, the easiest way to un-cock a cocked crossbow is to fire an<br />
arrow into a target or into the ground away from <strong>de</strong>bris, loose<br />
rocks or other people.<br />
12
Sighting-In the <strong>Crossbow</strong><br />
Using the rear peep sight and front sight pins:<br />
• Place the first sight pin near the top of the front sight bracket.<br />
• Shooting at a target from 10 yards, aim for the bulls eye. If the<br />
first shot is above the bulls eye, move the pin up (or down if<br />
the shot is below the bulls eye).<br />
• If the first shot is to the left of the bulls eye, screw the pin to the<br />
left (or right if the shot is to the right).<br />
TIP: Move the pin in the direction of the error, follow the arrow.<br />
Continue in this manner until you have three consecutive<br />
shots into the bulls eye. Repeat this procedure with the<br />
other pin,starting near the bottom of the sight bracket. It is<br />
recommen<strong>de</strong>d that the bottom pin be sighted in to the 35 to 40<br />
yard range.<br />
Arrow Retainer<br />
When loa<strong>de</strong>d, the arrow should lie “flat” in the flight groove. The<br />
arrow retaining spring should not be twisted to the left or right<br />
and should exert only enough pressure on the rear of the arrow<br />
to hold it in place. It should not lift the front of the arrow off the<br />
flight groove. At this point, the arrow should be lying directly<br />
parallel with the flight groove. We recommend the use of Barnett<br />
arrows manufactured specifically for your Barnett crossbow.<br />
Arrow Selection and Proper Flight<br />
Due to the unique <strong>de</strong>sign of your Barnett crossbow, it is<br />
imperative that only specified arrows are used. These arrows are<br />
correctly weighted to absorb the high energy generated by the<br />
compound <strong>de</strong>sign. Lighter arrows simulate a “dryfire” condition<br />
and will result in damage to the crossbow VOIDING the warranty.<br />
Barnett’s 22” Carbon arrows are correctly “spined”.<br />
DRY FIRING WILL VOID THE WARRANTY.<br />
• Use Barnett’s 22” Carbon arrows with straight, offset or helical<br />
13
fletches with Half Moon Nock.<br />
• Recommen<strong>de</strong>d fixed bla<strong>de</strong> broadheads can be any three bla<strong>de</strong><br />
low profile broadhead with a cutting diameter no larger than<br />
1-3/16”.<br />
• When using fixed bla<strong>de</strong> broadheads, the bla<strong>de</strong>s must be<br />
aligned with the fletches of the arrow. This can be done by<br />
placing a rubber o-ring between the broadhead and the arrow<br />
front insert.<br />
• Mechanical broadheads that simulate the flight of a field point<br />
may be used where legal.<br />
IMPORTANT DISCLAIMER<br />
Because of the power of the Revolution AVi and the inconsistent<br />
properties of woo<strong>de</strong>n shafts, which have a ten<strong>de</strong>ncy to warp,<br />
vary in spine stiffness, <strong>de</strong>nsity, moisture absorption, all of which<br />
result in inaccuracy. Barnett Outdoors does not recommend<br />
their use un<strong>de</strong>r any circumstance. Possible injury could result<br />
from shaft breakage, etc., we accept no responsibility or liability<br />
arising from the use of woo<strong>de</strong>d shaft arrows.<br />
14<br />
Troubleshooting<br />
Arrow Flight-Possibly the greatest variable in accuracy are the<br />
arrows. These differ greatly and have totally different flight<br />
characteristics. Generally speaking, target arrows are more<br />
accurate than hunting arrows. Because of the surface area of the<br />
fixed bla<strong>de</strong>d broadheads used in hunting there is a ten<strong>de</strong>ncy<br />
for the arrow to “plane”. To help overcome this we suggest that<br />
practice be ma<strong>de</strong> well in advance of the hunting season with the<br />
type of arrows you will be using to achieve consistent groupings.<br />
Consi<strong>de</strong>r the following when selecting arrows; heavy, stiff spined<br />
arrows with fletching hold more energy for humane harvesting a<br />
reasonable ranges (15-35 yards). Lighter arrows are much faster<br />
however hold less energy.<br />
• If the string has been changed was it a Barnett string?
• Are the arrows straight and fletches (vanes) in good condition?<br />
• Does the arrow lie flat (true) on the flight groove? Is the arrow<br />
retainer to tight or twisted? (Adjust arrow retainer with a pair<br />
of needle nose pliers – USE CAUTION)<br />
• Does the arrow sli<strong>de</strong> smoothly and evenly into the trigger<br />
mechanism?<br />
• When cocking your crossbow, are you pulling equally on each<br />
si<strong>de</strong> on each si<strong>de</strong> of the string? (Mark your new strings on<br />
each si<strong>de</strong> of the flight track as stated earlier) After cocking the<br />
crossbow, make sure the marks are showing evenly on each<br />
si<strong>de</strong> of the trigger mechanism.<br />
• When cocking your crossbow make a conscious effort to<br />
hold the string on the flight track so as not to lift over the<br />
arrowretainer.<br />
• Are you putting one fletching down in the flight groove?<br />
• When using broadheads,<br />
line up the bla<strong>de</strong>s with the<br />
fletches on the arrow (using<br />
o-ring).<br />
• Have you checked the tiller<br />
to see if any adjustments<br />
should be ma<strong>de</strong>? Tiller is<br />
the measurement between<br />
the base of the limb and<br />
Fig 12<br />
the bowstring. The tiller<br />
measurement tells you if both limbs are equally<br />
stressed. Your bow is in proper tiller when this measurement<br />
is the same for both limbs. Uneven tiller will cause erratic<br />
arrow flight. All crossbows are accurately tillered at the factory<br />
prior to shipping. To adjust the tiller, use an allen wrench and<br />
measuring tape as shown in the illustration. See Figure 12.<br />
15
String Fraying<br />
• Are you using Barnett lubewax on the center string serving and<br />
flight track every 5-10 shots and on the cables when nee<strong>de</strong>d?<br />
• Keep the trigger mechanism and flight surface free of<br />
obstruction.<br />
• Check for metal burrs on the flight track and arrow end caps.<br />
Limbs Weak or Losing Power<br />
• Has the crossbow been dry fired? (could cause limb to crack).<br />
• Inspect the limbs for splits or cracks.<br />
• Are you using Barnett string (the proper length)?<br />
Care of String<br />
Care and Maintenance<br />
The owners kit contains a tube of lube wax that should be<br />
applied to the center serving and flight track every 5 – 10 shots.<br />
Lube wax should also be applied anywhere the cables make<br />
contact with the Teflon tape or flight track every 20 – 30 shots. To<br />
extend the life of your cables it is important to apply ARCHERY<br />
STRING WAX to all areas of the cables and string every 30 - 50<br />
shots or when white fuzz begins to appear. If the crossbow has<br />
been exposed to excessive moisture you may need to apply wax<br />
sooner.<br />
Care of AVi Limbs<br />
AVi is an Anti Vibration Isolation process that encapsulates<br />
standard bow limbs. If scratches or minor cuts appear in the limb<br />
caused by contact from outsi<strong>de</strong> objects, the bow limb is not<br />
affected and should not be returned for warranty. Use caution<br />
when placing in a bow press or when around sharp objects to<br />
avoid damage to the covering itself. Note: It is normal for AVi<br />
limb material to displace around the Limb/Prod Area.<br />
16
PRIOR TO EVERY SHOOTING SESSION, IT IS RECOMMENDED<br />
THAT A COMPLETE CHECK OF CABLES, WHEELS, SCREWS<br />
AND ARROWS BE MADE.<br />
• Always store your crossbow in a safe, dry place.<br />
• Do not expose your crossbow to extreme heat, such as closed,<br />
hot vehicles or near heat sources.<br />
• Inspect cables and strings for signs of wear. An authorized<br />
service center or the factory should replace Cables showing<br />
wear immediately.<br />
• Periodically put a few drops of quality lightweight machine oil<br />
in the trigger mechanism.<br />
• Periodically lubricate the eccentric wheel axels with lightweight<br />
machine oil.<br />
• Keep the flight track and the string serving waxed, reducing<br />
friction.<br />
• Your prod can be left strung in<strong>de</strong>finitely although we do not<br />
recommend that the bow be left in the cocked position for<br />
periods longer than four hours.<br />
With reasonable care of your equipment and diligent practice, your<br />
crossbow will remain an accurate, highly efficient hunting weapon.<br />
17
Warranty Information<br />
The stock, trigger mechanism and limbs are covered un<strong>de</strong>r a<br />
limited one-year warranty. The AVi limbs are not covered for<br />
cosmetic wear and tear. Our liability extends to parts and labor.<br />
Not covered are: strings, cables, arrows, transportation of<br />
product to our Service Center; damage caused by abuse,<br />
modification or failure to perform normal maintenance; or any<br />
other expense, consequential damages, coinci<strong>de</strong>ntal damages,<br />
or inci<strong>de</strong>ntal expenses including damage to property or person.<br />
There are no other warranties expressed or implied. This<br />
warranty gives you specific legal rights and you may also have<br />
other rights that vary from state to state.<br />
Warranty Registration Card must be mailed within 10 days of<br />
purchase to validate the warranty.<br />
TO OBTAIN SERVICE: Please call for a return authorization<br />
number prior to sending the unit and write the RA# on the<br />
outsi<strong>de</strong> of the package. Return the unit to an authorized Service<br />
Center or directly to the factory. For a listing of authorized<br />
service centers please call the factory at the toll free number<br />
listed below. Attach to the product your name, address,<br />
telephone number and a letter <strong>de</strong>scribing the problem. Carefully<br />
package and return product prepaid.<br />
For further inquiries contact the Sales Dept through the toll<br />
free number: 1-800-237-4507.<br />
How to reach us:<br />
Barnett Outdoors, L.L.C., PO Box 934, O<strong>de</strong>ssa, FL, 33556<br />
Phone 813-920-2241 - Fax 813-920-5400<br />
E-mail service@barnettcrossbows.com<br />
18
Cut out and mail immediately to:<br />
Barnett Outdoors, L.L.C.<br />
P.O. Box 934<br />
O<strong>de</strong>ssa, FL 33556<br />
––––––––––––––––––––––––––––––––––––––––––––––––––––––<br />
WARRANTY CARD<br />
Name______________________________ Age______<br />
Address______________________________________<br />
City____________________ State______ Zip_______<br />
Date of Purchase__________ Phone # _____________<br />
Place of Purchase________________ Price Paid______<br />
Purchase Address______________________________