Read the whole article from the May 2010 issue. - Good Old Boat ...
Read the whole article from the May 2010 issue. - Good Old Boat ...
Read the whole article from the May 2010 issue. - Good Old Boat ...

Create successful ePaper yourself
Turn your PDF publications into a flip-book with our unique Google optimized e-Paper software.
TM<br />
www.goodoldboat.com Issue 72 <strong>May</strong>/June <strong>2010</strong><br />
$8 00 (Canada $8 00 CDN)<br />
06<br />
0 62825 97035 7
Rigging matters<br />
Replacing<br />
a backstay<br />
Here’s a rigging project<br />
you can do yourself<br />
by Andy Schell<br />
My best friend Adam’s newto-him<br />
Tartan 37, Audentia,<br />
had never left <strong>the</strong> dock with<br />
him at <strong>the</strong> helm. He’d purchased her<br />
in February, and <strong>the</strong>re is ice on <strong>the</strong><br />
Chesapeake in February. She was<br />
ber<strong>the</strong>d at a private dock in Whitehall<br />
Bay, just north of Annapolis, when<br />
Adam bought her. I had seen <strong>the</strong> boat<br />
before he did — Adam is a pilot with<br />
<strong>the</strong> Air National Guard stationed in<br />
Mississippi, so I became his ad hoc<br />
broker in Annapolis. I scoured <strong>the</strong> listings,<br />
talking to real brokers and diving<br />
into leads with <strong>the</strong> excited enthusiasm<br />
that accompanies any boat search,<br />
bolstered by <strong>the</strong> fact that I would not be<br />
writing any checks.<br />
As a professional captain, and having<br />
just completed two boat searches in<br />
<strong>the</strong> past three years (for my fa<strong>the</strong>r’s<br />
Wauquiez Hood 38 and for my Allied<br />
Seabreeze yawl), I had <strong>the</strong> experience<br />
and confidence to fulfill my responsibility<br />
and find Adam <strong>the</strong> right boat.<br />
There are a lot of Tartan 37s out <strong>the</strong>re,<br />
so <strong>the</strong> search was extensive.<br />
Adam wound up buying his boat<br />
on my advice, after flying home to see<br />
her for himself. Unfortunately, on <strong>the</strong><br />
day of <strong>the</strong> sea trial, she was iced-in, so<br />
her maiden voyage would have to wait.<br />
By <strong>the</strong> time <strong>the</strong> creek had thawed,<br />
Adam’s dock lease was up and he<br />
planned to move her across Chesapeake<br />
Bay to <strong>the</strong> Eastern Shore. His insurance<br />
required a rigging survey, which revealed<br />
cracked swaged fittings on <strong>the</strong> backstay.<br />
He asked me to replace <strong>the</strong> backstay for<br />
him before we moved <strong>the</strong> boat.<br />
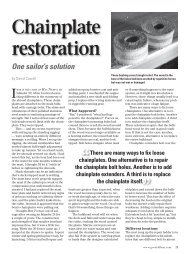
A suspect swaged<br />
fitting, at right, led<br />
Andy to replace <strong>the</strong><br />
<strong>whole</strong> backstay on a<br />
Tartan 37. He chose<br />
to use Hi-MOD<br />
mechanical fittings,<br />
center. Adam, <strong>the</strong><br />
boat’s owner, was<br />
away on business,<br />
bottom, leaving Andy<br />
in charge.<br />
The backstay<br />
I’m a firm believer in using mechanical,<br />
ra<strong>the</strong>r than swaged, fittings for all of<br />
a boat’s rigging, and talked Adam into<br />
going with <strong>the</strong> relatively new Hi-MOD<br />
fittings made by Petersen Stainless<br />
Rigging in <strong>the</strong> U.K. (and distributed by<br />
Hayn Marine in <strong>the</strong> U.S.A.) for his new<br />
backstay. The Hi-MOD fittings work on<br />
<strong>the</strong> same principle as <strong>the</strong> ubiquitous<br />
Sta-Lok and Norseman fittings, that of<br />
using mechanical compression to keep<br />
<strong>the</strong> wire in <strong>the</strong> fitting. They have a clever<br />
addition to <strong>the</strong> inner cone, a crown ring,<br />
which keeps <strong>the</strong> unlayed wire strands<br />
perfectly spaced inside <strong>the</strong> fitting.<br />
We ordered <strong>the</strong> wire and <strong>the</strong> fittings<br />
<strong>from</strong> Rigging Only (). Once we had <strong>the</strong> wire and pin<br />
measurements, which required <strong>the</strong> first<br />
of many trips to <strong>the</strong> mas<strong>the</strong>ad, <strong>the</strong> guys<br />
at Rigging Only were very helpful in<br />
determining pin sizes and turnbuckle<br />
sizes for <strong>the</strong> new stay.<br />
Measuring<br />
The first step was to measure <strong>the</strong> old<br />
stay and determine what, exactly, we<br />
actually needed to replace. The rigging<br />
survey required <strong>the</strong> replacement of just<br />
www.goodoldboat.com 23
Rigging matters<br />
<strong>the</strong> swaged fittings, not <strong>the</strong> wire, but<br />
Adam decided to scrap <strong>the</strong> <strong>whole</strong> lot<br />
and replace <strong>the</strong> stay entirely, including<br />
<strong>the</strong> turnbuckle. We weren’t sure when<br />
<strong>the</strong> rig had been replaced last, and<br />
this Tartan had recently completed a<br />
circumnavigation with <strong>the</strong> previous<br />
owner. Better safe than sorry.<br />
We used a simple wire gauge to<br />
measure <strong>the</strong> wire thickness (to <strong>the</strong><br />
nearest 1 ⁄32 inch), <strong>the</strong> pin diameter on<br />
<strong>the</strong> chainplate, and <strong>the</strong> pin diameter<br />
at <strong>the</strong> mas<strong>the</strong>ad. With <strong>the</strong>se measurements,<br />
<strong>the</strong> guys at Rigging Only advised<br />
us on what size Hi-MOD fittings and<br />
is to measure it against <strong>the</strong> old one.<br />
We stretched <strong>the</strong> old stay out on <strong>the</strong><br />
dock, unscrewing <strong>the</strong> turnbuckle to its<br />
maximum length.<br />
The next step was to assemble <strong>the</strong><br />
Hi-MOD fitting to one end of <strong>the</strong> new<br />
stay. We chose to do <strong>the</strong> lower part,<br />
including <strong>the</strong> turnbuckle, in order to<br />
have something with which to compare.<br />
Assembly is surprisingly easy and<br />
intuitive. First, slip <strong>the</strong> body of <strong>the</strong><br />
fitting onto <strong>the</strong> wire, <strong>the</strong>n unlay <strong>the</strong> end<br />
of <strong>the</strong> wire. This is amazingly easy: with<br />
your fingers, simply twist <strong>the</strong> wire in<br />
<strong>the</strong> opposite direction to <strong>the</strong> lay and it<br />
1<br />
2<br />
I slowly lowered <strong>the</strong> backstay<br />
with <strong>the</strong> lashing line while a helper below<br />
slowly pulled it onto <strong>the</strong> dock.<br />
3<br />
turnbuckle to order. We ordered <strong>the</strong><br />
wire about 3 feet too long to give<br />
us room to botch <strong>the</strong> age-old rule<br />
of “measure twice, cut once.” Once<br />
<strong>the</strong> shipment arrived, complete with<br />
detailed instructions for assembling <strong>the</strong><br />
Hi-MODs, we set to work.<br />
Removing <strong>the</strong> old stay<br />
The key when replacing any piece of<br />
rigging on a sailboat is first, before<br />
actually disconnecting it, to properly<br />
support <strong>the</strong> mast wherever <strong>the</strong> wire is<br />
to be removed. To create a temporary<br />
backstay, I positioned one of <strong>the</strong> genoa<br />
sheet blocks as far aft on <strong>the</strong> track as<br />
possible, rove <strong>the</strong> main halyard through<br />
it, and cranked down hard with <strong>the</strong><br />
genoa winch.<br />
Up to <strong>the</strong> mas<strong>the</strong>ad I went to remove<br />
<strong>the</strong> fitting and lower <strong>the</strong> stay. Before<br />
removing <strong>the</strong> pin, it’s imperative to tie a<br />
long, small line on <strong>the</strong> stay with a rolling<br />
hitch and lash it firmly to something<br />
solid at <strong>the</strong> mas<strong>the</strong>ad — <strong>the</strong> full weight<br />
of <strong>the</strong> backstay will at once be in your<br />
hand when that pin comes out, and<br />
dropping it on deck accidentally is not<br />
an option. I slowly lowered <strong>the</strong> backstay<br />
with <strong>the</strong> lashing line while a helper<br />
below slowly pulled it onto <strong>the</strong> dock,<br />
preventing it <strong>from</strong> touching <strong>the</strong> deck at<br />
all. With <strong>the</strong> old stay removed, it was<br />
time to build <strong>the</strong> new one.<br />
Cutting and fitting<br />
The easiest and most precise way to<br />
get <strong>the</strong> stay length correct in one go<br />
should come right apart. Slide <strong>the</strong> cone<br />
onto <strong>the</strong> core of <strong>the</strong> wire and add <strong>the</strong><br />
slotted crown ring unique to Hi-MOD on<br />
top of this. Now carefully twist <strong>the</strong> wire,<br />
this time in <strong>the</strong> direction of <strong>the</strong> lay, to<br />
bring <strong>the</strong> strands back toge<strong>the</strong>r around<br />
<strong>the</strong> cone and <strong>the</strong> slotted ring. This is<br />
a bit tricky <strong>the</strong> first time, but once <strong>the</strong><br />
strands are in place, <strong>the</strong> slotted ring<br />
keeps <strong>the</strong>m <strong>the</strong>re. Be sure to screw <strong>the</strong><br />
<strong>whole</strong> lot toge<strong>the</strong>r in a trial run, <strong>the</strong>n<br />
disassemble it and re-assemble it using<br />
permanent thread locker (<strong>the</strong> red tube)<br />
on <strong>the</strong> outer fitting. This <strong>whole</strong> process<br />
takes mere minutes.<br />
We aligned <strong>the</strong> new turnbuckle with<br />
<strong>the</strong> old one and stretched both wires out<br />
along <strong>the</strong> dock. The trickiest part was to<br />
measure <strong>the</strong> o<strong>the</strong>r end correctly — you<br />
must account for <strong>the</strong> length of <strong>the</strong> new<br />
eye fitting for <strong>the</strong> mas<strong>the</strong>ad before you<br />
cut <strong>the</strong> wire. I was surprised to find<br />
that a 32-tooth hacksaw cuts through<br />
<strong>the</strong> stainless-steel wire with moderate<br />
effort. It’s essential to smooth <strong>the</strong> newly<br />
cut wire end with a file before assembling<br />
<strong>the</strong> Hi-MOD fitting. Follow <strong>the</strong><br />
same process as with <strong>the</strong> bottom fitting<br />
and you have a brand-new backstay.<br />
Installing <strong>the</strong> new stay<br />
Adam chose to forgo, for <strong>the</strong> time<br />
being, both a backstay adjuster and<br />
SSB-antenna insulators on <strong>the</strong> new stay,<br />
for budget considerations. As he’s not<br />
a racer, once we conservatively tuned<br />
<strong>the</strong> new rig, <strong>the</strong> odds of his adjusting<br />
it were slim even if he had an adjuster.<br />
4<br />
5<br />
To install a hi-MOD fitting, start by sliding<br />
<strong>the</strong> body over <strong>the</strong> wire (1). unlay <strong>the</strong> wire<br />
for a short distance by twisting it against<br />
<strong>the</strong> lay (2). Slip <strong>the</strong> cone over <strong>the</strong> wire’s<br />
core (3). Slip <strong>the</strong> slotted crown ring over <strong>the</strong><br />
core behind <strong>the</strong> cone (4). Push <strong>the</strong> ring and<br />
cone along <strong>the</strong> core using <strong>the</strong> end of <strong>the</strong><br />
terminal (5). an indent in <strong>the</strong> terminal’s end<br />
sets <strong>the</strong> ring at <strong>the</strong> correct distance.<br />
pHotos supplieD by Hayn enterprises llC<br />
24 <strong>Good</strong> <strong>Old</strong> <strong>Boat</strong> <strong>May</strong>/June <strong>2010</strong>
6<br />
7<br />
8<br />
9<br />
10<br />
He’ll add insulators before he goes<br />
cruising, but that’s still years away.<br />
To install <strong>the</strong> stay, I followed <strong>the</strong><br />
same process as when removing <strong>the</strong> old<br />
one, this time in reverse. We attached <strong>the</strong><br />
turnbuckle to <strong>the</strong> backstay chainplate,<br />
leaving it unscrewed to give me plenty<br />
of slack. I went up <strong>the</strong> mast a third time,<br />
but without <strong>the</strong> stay. Once at <strong>the</strong> mas<strong>the</strong>ad,<br />
I hoisted <strong>the</strong> stay with <strong>the</strong> same<br />
line we used before, making sure to lash<br />
it down to something before trying to<br />
fit it. It’s amazing how heavy that wire<br />
is when you try to hold it with one hand<br />
and fit <strong>the</strong> pin through <strong>the</strong> mas<strong>the</strong>ad.<br />
We got <strong>the</strong> measurement correct, thankfully,<br />
and <strong>the</strong> stay went back toge<strong>the</strong>r<br />
with no problem. Once I was back on<br />
deck, I tightened <strong>the</strong> turnbuckle.<br />
Helpful hints<br />
We tuned <strong>the</strong> rig at <strong>the</strong> dock, but I left<br />
<strong>the</strong> cotter pins out. I wanted to get <strong>the</strong><br />
boat sailing and re-tune <strong>the</strong> rig if needed<br />
before locking everything down. Once<br />
we’d done this, I replaced <strong>the</strong> cotter<br />
pins with new stainless-steel ones.<br />
I almost always replace old cotter pins<br />
when I’m working with rigging.<br />
The rig will need to be checked<br />
every few weeks, as <strong>the</strong> new stay will<br />
undoubtedly stretch under load when<br />
<strong>the</strong> boat is sailed hard a few times. In<br />
a worst-case scenario, <strong>the</strong> stay would<br />
have to be removed and shortened with<br />
<strong>the</strong> saw, but with <strong>the</strong> Hi-MOD fittings,<br />
this could be done quite easily without<br />
having to purchase any new parts.<br />
Ideally, Adam would have replaced<br />
all <strong>the</strong> rigging at once, <strong>the</strong>reby getting<br />
a better price for buying more material<br />
and also having <strong>the</strong> peace of mind of a<br />
brand-new rig. However, considering<br />
both <strong>the</strong> rigging survey and our own<br />
surveys turned up only <strong>the</strong> questionable<br />
backstay, we felt comfortable leaving<br />
<strong>the</strong> old rig intact for Chesapeake Bay<br />
sailing. He intends to replace <strong>the</strong> rest of<br />
<strong>the</strong> wire before heading offshore.<br />
Many world-cruisers recommend<br />
using <strong>the</strong> same diameter wire for all of a<br />
boat’s rigging. I agree with this and intend<br />
to re-rig Arcturus, my Seabreeze, using<br />
this philosophy. By using <strong>the</strong> biggest wire<br />
size required by <strong>the</strong> rig for every shroud<br />
and stay, I will beef up <strong>the</strong> rig and need<br />
to carry fewer spares when far <strong>from</strong> port.<br />
One length of wire and a few Hi-MOD<br />
fittings will be usable for any part of <strong>the</strong><br />
rig that may need to be repaired, even<br />
under way. The only headache with<br />
this <strong>the</strong>ory is <strong>the</strong> need to upgrade <strong>the</strong><br />
chainplates in many cases. A rig is only<br />
as strong as its weakest link, and often<br />
<strong>the</strong> wire is stronger than <strong>the</strong> chainplates.<br />
We both learned, quite painlessly,<br />
that DIY rigging solutions on old boats<br />
are quite feasible and can be quite<br />
enjoyable as well.<br />
Andy Schell is a professional captain,<br />
rigger, and freelance writer. He lives<br />
aboard his yawl, Arcturus, and runs<br />
sail training and navigation workshops<br />
with his fa<strong>the</strong>r, also a captain. Andy<br />
and his fiancée, Mia, are currently<br />
in Florida, fitting out for <strong>the</strong>ir spring<br />
transatlantic to Sweden, Mia’s home<br />
country. Contact Andy at .<br />
With <strong>the</strong> cone and crown ring in place, gently<br />
twist <strong>the</strong> wire strands with <strong>the</strong> lay and set<br />
<strong>the</strong>m in <strong>the</strong> slots in <strong>the</strong> crown ring (6). Pull<br />
<strong>the</strong> body up over <strong>the</strong> core and crown ring<br />
(7). Check that <strong>the</strong> wire strands are in order<br />
(8). Screw <strong>the</strong> stud into <strong>the</strong> body (9). <strong>the</strong><br />
assembled fitting is neat and secure (10).<br />
Audentia awaits her new owner, and her new<br />
name, at right.<br />
www.goodoldboat.com 25