GReddy Intercooler Kit
GReddy Intercooler Kit
GReddy Intercooler Kit

Create successful ePaper yourself
Turn your PDF publications into a flip-book with our unique Google optimized e-Paper software.
<strong>GReddy</strong> <strong>Intercooler</strong> <strong>Kit</strong><br />
2003 Nissan 350Z (VQ35DE) Front mount Type 23
2003 Nissan 350Z (VQ35DE) Front Mount Type 23<br />
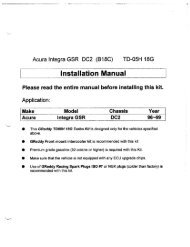
Installation Manual<br />
Please read the entire manual before installing this<br />
kit.<br />
Application:<br />
Make Model Chassis Year<br />
Nissan 350Z Z33 2003<br />
• This <strong>GReddy</strong> <strong>Intercooler</strong> <strong>Kit</strong> is designed only for the vehicles specified<br />
above, with <strong>GReddy</strong> Turbo <strong>Kit</strong> (part # 11520093) installed.<br />
• Premium grade gasoline (91 octane or higher) is required with this <strong>Kit</strong>.<br />
• Make sure that the vehicle is not equipped with any ECU upgrade chips.<br />
• Use of <strong>GReddy</strong> Racing Spark Plugs ISO #7 LONG or NGK plugs (colder<br />
than factory) is recommended with this kit.<br />
Important<br />
1. This installation should only be performed by a trained specialist who is very<br />
familiar with the automobile’s mechanical, and electrical system.<br />
2. If installed by an untrained person, it may cause damage to the kit as well as<br />
the vehicle.<br />
3. <strong>GReddy</strong> Performance Products Inc. is not responsible for any damage to<br />
the vehicle’s electrical system caused by improper installation.<br />
4. Call your <strong>GReddy</strong> Authorized dealer or <strong>GReddy</strong> Performance Products if<br />
there are any problems or questions regarding this product.<br />
5. Installation of this kit will require the removal of the front bumper<br />
support beam. If you are uncomfortable with the removal, please stop<br />
the installation.
1. Parts List<br />
1. <strong>Intercooler</strong> Type23 1<br />
2. Intake Pipe I-1 (aluminum 50∅) (Right Side) 1<br />
3. " I-2 (aluminum 50∅) (Right Side) 1<br />
4. " I-3 (aluminum 50∅) (Left Side) 1<br />
5. " I-4 (aluminum 50∅) (Left Side) 1<br />
6. " I-5 (aluminum elbow 70∅ no.9) 1<br />
7. " I-6 (aluminum 70∅) 1<br />
8. Rubber Hose 10∅ 550mm 1<br />
9. Silicone Hose 70∅ Straight 2<br />
10. " 50∅-60∅ Reducer 2<br />
11. Hose Band 10∅ Tridon #5 6<br />
12. " 50∅ Tridon #32 2<br />
13. " 60∅ Tridon #36 2<br />
14. " 70∅ Tridon #44 4<br />
15. Straight Tube 5∅ 2<br />
16. " 10∅ 2<br />
17. Power Steering Cooler 1<br />
18. Power Steering Cooler Bracket 1 Set<br />
19. Washer Tank 1<br />
20. Washer Tank Relocation Bracket 1 Set<br />
21. Washer Tank Extension Hose (5∅ 1500mm) 2<br />
22. Washer Tank Exhtension Harness 1 Set<br />
23. Aluminum Spacer 1<br />
24. M6 x 15mm Stainless P=1.00 B S/W F/W N 2<br />
25. M6 x 25mm Stainless P=1.00 B S/W F/W - 1<br />
26. M8 x 15mm Stainless P=1.25 B S/W F/W - 1
1. Parts List<br />
1 2 3 4<br />
5 6 7 8<br />
9, 10 11 - 14 15, 16 17<br />
18 19 20 21<br />
22 23 24 - 26
2. Stock Parts Removal<br />
Please refer to the factory service manual for the proper<br />
stock parts removal.<br />
2-1 Disconnect the negative terminal of the battery.<br />
2-2 Remove the under engine cover.<br />
2-3 Remove the front bumper.<br />
2-4 Remove the bumper reinforcement.<br />
2-5 Remove the left and the right side horn.<br />
2-6 Remove the Power steering fluid cooler.<br />
2-6 Remove the charge pipe C-2, C-3, and C-5 from the turbo kit.<br />
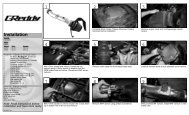
3. <strong>Kit</strong> Installation<br />
1. Core Installation<br />
Mount the intercooler core as shown. Secure the top bracket to the hood latch<br />
assembly and the bottom bracket to the sub-frame.<br />
(Parts Used #1, 24, 26)
2. Intake Pipe Installation<br />
1) Install the Intake pipe I-1 and I-2 from C-1 pipe from the turbo kit to the<br />
top intercooler in-let as shown.<br />
2) Install the Intake pipe I-3 and I-4 from C-4 pipe from the turbo kit to the<br />
bottom intercooler in-let as shown.<br />
3) Install the Intake pipe I-5 and I-6 from intercooler outlet to the airflow meter as<br />
shown.<br />
(Parts Used #2, 3, 4, 5, 6, 7, 9, 10, 12, 13, 14)<br />
Right side turbo (C-1) to the <strong>Intercooler</strong><br />
Left side turbo (C-4) to the intercooler<br />
Right side turbo I-2 to the intercooler <strong>Intercooler</strong> to the airflow meter
3. Power Steering Fluid Cooler Installation<br />
Install the power steering fluid cooler as<br />
shown.<br />
(Parts Used #8, 11, 16, 17, 18)<br />
3. Horn and Air Bag sensor relocation<br />
Relocate the horn and the sir bag sensor using the provided brackets as shown.<br />
(Parts Used #22, 23, 25)<br />
4. Washer tank Installation<br />
1) Remove the washer pump from the factory washer tank and reinstall them to<br />
the provided tank.<br />
2) Mount the washer tank using provided brackets as shown.<br />
3) Connect the hoses and the wires using the provided extension harness and<br />
hoses.<br />
(Parts Used #15, 19, 20, 21, 22)
5. Front Bumper Modification<br />
Trim the grill off and all the area that would contact the intercooler core.<br />
6. Starting the Engine<br />
(1) Refill the coolant and the power steering fluid to factory spec.<br />
(2) Check all the hoses and wires connection, then reconnect the negative side<br />
of the battery.<br />
(3) Start the engine.<br />
(4) Turn the steering wheel all the way left and all the way right. Fill the power<br />
steering fluid if necessary.<br />
(5) While idling, check for any oil, coolant, or air leeks.<br />
(6) After inspection, reinstall the under cover and other stock parts that was<br />
removed.<br />
(7) After inspection, reinstall the under cover and other stock parts that was<br />
removed.<br />
(8) On the initial run, be sure to have a boost gauge to check the turbo-actuator<br />
setting. This turbo kit is preset to boost between 0.6kg/cm 2 to 0.5kg/cm 2 .<br />
It is very important that you monitor the boost pressure, and make sure not to<br />
over boost. Over boosting can cause engine damage.<br />
This completes the <strong>Intercooler</strong> <strong>Kit</strong> installation.