2CRBR000 - INSTALLATION
2CRBR000 - INSTALLATION
2CRBR000 - INSTALLATION

Create successful ePaper yourself
Turn your PDF publications into a flip-book with our unique Google optimized e-Paper software.
<strong>2CRBR000</strong><br />
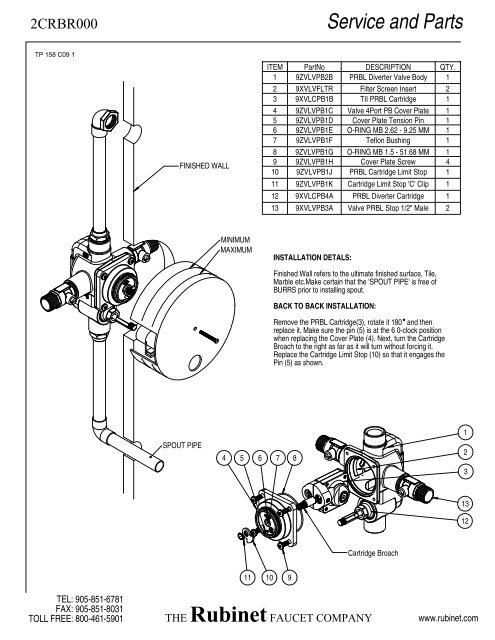
Service and Parts<br />
TP 158 C09 1<br />
FINISHED WALL<br />
ITEM PartNo DESCRIPTION QTY.<br />
1 9ZVLVPB2B PRBL Diverter Valve Body 1<br />
2 9XVLVFLTR Filter Screen Insert 2<br />
3 9XVLCPB1B TII PRBL Cartridge 1<br />
4 9ZVLVPB1C Valve 4Port PB Cover Plate 1<br />
5 9ZVLVPB1D Cover Plate Tension Pin 1<br />
6 9ZVLVPB1E O-RING MB 2.62 - 9.25 MM 1<br />
7 9ZVLVPB1F Teflon Bushing 1<br />
8 9ZVLVPB1G O-RING MB 1.5 - 51.68 MM 1<br />
9 9ZVLVPB1H Cover Plate Screw 4<br />
10 9ZVLVPB1J PRBL Cartridge Limit Stop 1<br />
11 9ZVLVPB1K Cartridge Limit Stop 'C' Clip 1<br />
12 9XVLCPB4A PRBL Diverter Cartridge 1<br />
13 9XVLVPB3A Valve PRBL Stop 1/2" Male 2<br />
MINIMUM<br />
MAXIMUM<br />
<strong>INSTALLATION</strong> DETALS:<br />
Finished Wall refers to the ultimate finished surface, Tile,<br />
Marble etc.Make certain that the 'SPOUT PIPE' is free of<br />
BURRS prior to installing spout.<br />
BACK TO BACK <strong>INSTALLATION</strong>:<br />
Remove the PRBL Cartridge(3), rotate it 180 and then<br />
replace it. Make sure the pin (5) is at the 6 0-clock position<br />
when replacing the Cover Plate (4). Next, turn the Cartridge<br />
Broach to the right as far as it will turn without forcing it.<br />
Replace the Cartridge Limit Stop (10) so that it engages the<br />
Pin (5) as shown.<br />
1<br />
SPOUT PIPE<br />
4<br />
5 6 7<br />
8<br />
2<br />
3<br />
13<br />
12<br />
Cartridge Broach<br />
11<br />
10<br />
9<br />
TEL: 905-851-6781<br />
FAX: 905-851-8031<br />
TOLL FREE: 800-461-5901<br />
THE Rubinet<br />
FAUCET COMPANY<br />
www.rubinet.com
Filter Screen Removal and Cleaning<br />
PLEASE NOTE: SHUT OFF BOTH HOT AND COLD WATER SUPPLIES BEFORE SERVICING THE VALVE.<br />
The Pressure Balance valve contained in this kit has filter screens that prevent debris from obstructing the pressure balancing cartridge. If excessive in-line debris accumulates in the filter<br />
screen you will notice a decrease in flow from the valve.<br />
1<br />
The filter screens are attached to an insert<br />
that is fitted into the valve body inlets. With the<br />
cartridge removed the 2 inserts and filter<br />
screens can be easily removed from the valve<br />
body.<br />
3<br />
There is a place on either side of the filter insert<br />
where you can get your finger nail underneath<br />
the filter screen. By pulling the filter screen away<br />
from the insert it will “pop” out.<br />
All debris can now be easily removed from the<br />
filter screen. Replace the filter screen into the<br />
insert and push together gently until it clicks into<br />
place.<br />
2<br />
Remove the insert by pressing the top corner.<br />
This will rotate the insert allowing easy<br />
removal from the valve body.<br />
4<br />
Place the insert back into the valve body, making<br />
sure the angled edge of the insert faces out. Be<br />
careful that the O-Ring stays in place, applying a<br />
little grease (vaseline) will help. The insert<br />
should sit flush against the wall of the valve body<br />
when properly installed.<br />
TEL: 905-851-6781<br />
FAX: 905-851-8031<br />
TOLL FREE:800-461-5901 THE Rubinet FAUCET COMPANY www.rubinet.com<br />
TP 158 C09 1