77120_Product_Information - Gunson
77120_Product_Information - Gunson
77120_Product_Information - Gunson

You also want an ePaper? Increase the reach of your titles
YUMPU automatically turns print PDFs into web optimized ePapers that Google loves.
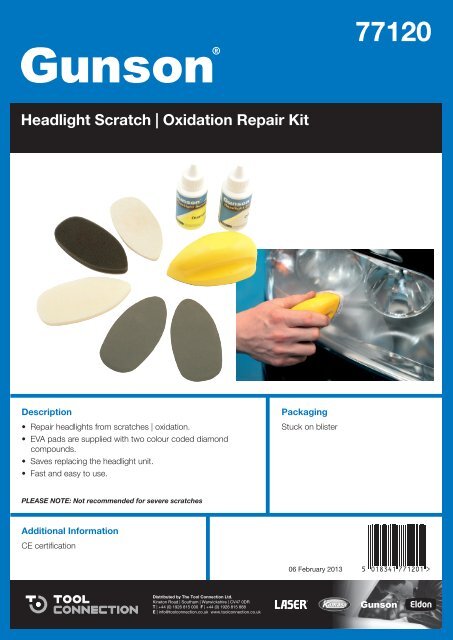
<strong>77120</strong><br />
Headlight Scratch | Oxidation Repair Kit<br />
Description<br />
• Repair headlights from scratches | oxidation.<br />
• EVA pads are supplied with two colour coded diamond<br />
compounds.<br />
• Saves replacing the headlight unit.<br />
• Fast and easy to use.<br />
Packaging<br />
Stuck on blister<br />
PLEASE NOTE: Not recommended for severe scratches<br />
Additional <strong>Information</strong><br />
CE certification<br />
06 February 2013<br />
Distributed by The Tool Connection Ltd.<br />
Kineton Road | Southam | Warwickshire | CV47 0DR<br />
T | +44 (0) 1926 815 000 F | +44 (0) 1926 815 888<br />
E | info@toolconnection.co.uk www.toolconnection.co.uk
INSTRUCTIONS<br />
Fast and easy repair of scratches and scuffing on modern plastic headlight units. Also cleans headlights which<br />
have become extremely clouded and dull over time from a combination of fine scratches and the effects of UV<br />
on the clear plastic.<br />
The kit is supplied with an applicator, 1 x white foam applicator base, 1 x wool polishing pad, 1 x foam<br />
polishing pad, 2 x P1200 grade wet-or-dry abrasive pads.<br />
Part 1:<br />
• Clean the headlight to be repaired with clean,<br />
soapy water, then dry off. Make sure there is no<br />
dirt or grit left on the headlight.<br />
• The P1200 abrasive pad can be mounted directly<br />
onto the applicator for flat surfaces. For curved<br />
surfaces the white foam applicator base is attached<br />
to the applicator first and then the P1200 abrasive<br />
pad is mounted onto the foam applicator base.<br />
• Using the abrasive pad ‘wet’ using clean water,<br />
steadily rub over the area to be repaired in a<br />
straight-line motion, then again at a 90º angle. For<br />
a scratch, keep rubbing until the scratch has been<br />
removed; for scuffing and cloudiness, rub steadily<br />
across the affected area. Keep wiping off the<br />
residue and keep the abrasive pad wet at all times.<br />
• Clean off with a soft cloth or microfiber cloth.<br />
• Fit the wool polishing pad onto the applicator.<br />
Squeeze a small amount of the Part 1 Grey<br />
Diamond Compound onto the polishing pad.<br />
• Polish vigorously over the affected area, adding<br />
more Diamond Compound if necessary. Continue<br />
polishing until the affected area is bright and<br />
transparent again.<br />
• Clean off with a soft cloth or microfiber cloth.<br />
Precautions:<br />
• Always wear eye protection.<br />
• Responsibility for damage or injury lies with the user.<br />
• Clean components after use and ensure that caps are tight on bottles.<br />
Part 2:<br />
• Ensure that all of the residue of the Part 1 Grey<br />
Diamond Compound has been removed from the<br />
surface of the headlight.<br />
• Fit the foam polishing pad onto the applicator.<br />
Squeeze a small amount of the Part 2 Yellow<br />
Diamond Compound onto the foam polishing pad.<br />
• Polish vigorously over the affected area, adding<br />
more Part 2 Yellow Diamond Compound if<br />
necessary. Continue polishing until the affected<br />
area is bright and transparent again. This stage<br />
will restore the optical clarity so keep polishing<br />
until there is no remaining scratches or cloudiness.<br />
• Clean off with a soft cloth or microfiber cloth,<br />
polishing briskly to leave a bright and shiny<br />
finish. If any cloudiness remains, reapply Part 2 to<br />
remove.<br />
When finished, clean off the pads and applicator and<br />
keep clean and dry so that the kit can be used again.