Pressure Washer Owner's Manual - Home Depot
Pressure Washer Owner's Manual - Home Depot
Pressure Washer Owner's Manual - Home Depot

You also want an ePaper? Increase the reach of your titles
YUMPU automatically turns print PDFs into web optimized ePapers that Google loves.
<strong>Pressure</strong> <strong>Washer</strong> Owner’s <strong>Manual</strong><br />
This <strong>Manual</strong> Contains Important Safety Instructions and Operating Instructions<br />
Models: P1450S, P1750S, P1450S-CAN, P1750S-CAN<br />
P1600S, P1800S, P1600S-BB, P1800S-BB, P1600S-CAN, P1800S-CAN<br />
Contents:<br />
Page 2 Factory Original Parts<br />
Page 3 Package Contents/Component Identification<br />
Page 5 Missing Parts Request Form<br />
Page 6 Warnings<br />
Page 8 Preparation & Assembly - Model 1450S, 1450S-CAN,<br />
P1600S, P1600S-BB, P1600S-CAN<br />
Page 9 Preparation & Assembly - Model 1750S, 1750S-CAN<br />
P1800S, P1800S-BB, P1800S-CAN<br />
Page 10 Operation<br />
Page 14 Maintenance<br />
Page 15 Tips for Cleaning<br />
Page 16 Troubleshooting<br />
Page 17 Warranty<br />
Page 18 Extended Warranty & Product Registration Card<br />
IMPORTANT SAFETY INSTRUCTIONS:<br />
READ SAFETY WARNINGS AND OPERATING INSTRUCTIONS CAREFULLY<br />
SAVE THESE INSTRUCTIONS<br />
DO NOT RETURN THIS<br />
PRESSURE WASHER TO<br />
THE STORE!<br />
QUESTIONS OR NEED HELP?<br />
Call: 919-550-3259<br />
www.<strong>Pressure</strong><strong>Washer</strong>911.com<br />
Have the following information ready when you call us:<br />
Date of Purchase: _____________________________<br />
Location of Purchase: __________________________<br />
Serial #: ____________________________________<br />
Is a registered trademark of The Stanley Works or its affiliates and<br />
is used under license by GXi Outdoor Power, LLC, 7868 Highway 70<br />
Business, Clayton, NC 27520
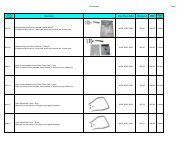
FACTORY ORIGINAL STANLEY PARTS<br />
Stanley is the Official Sponsor of NASCAR Racing<br />
ORDER ONLINE NOW AND SAVE!<br />
www.<strong>Pressure</strong><strong>Washer</strong>911.com<br />
Phone orders, call [1] 919-550-3259<br />
Please have the part number and credit card ready when calling.<br />
Replacement Gun<br />
Part Number: SP01009<br />
Phone Price: $30.00<br />
Web Price: $27.90<br />
Replacement Adjustable Wand<br />
Part Number: SP00209 (Model P1450S, 1450S-CAN,<br />
P1600S, P1600S-BB, P1600S-CAN)<br />
Part Number: SP00309 (Model P1750S, 1750S-CAN,<br />
P1800S, P1800S-BB, P1800S-CAN)<br />
Phone Price: $30.00<br />
Web Price: $27.90<br />
Replacement Turbo Wand<br />
Part Number: SP00409<br />
Phone Price: $30.00<br />
Web Price: $27.90<br />
Replacement High <strong>Pressure</strong> Hose<br />
Part Number: SP00509 (Model P1450S, 1750S, P1450S-<br />
CAN, 1750S-CAN, P1600S, P1600S-BB,<br />
P1600S-CAN, P1800S, P1800S-BB,<br />
P1800S-CAN)<br />
Phone Price: $30.00<br />
Web Price: $27.90<br />
Rotary Brush<br />
Straight Brush<br />
Replacement Rotary and Straight Brush<br />
Part Number: SP00709 (Rotary Brush)<br />
Part Number: SP00809 (Straight Brush)<br />
Phone Price: $30.00 Each<br />
Web Price: $27.90 Each<br />
For replacement parts not listed here,<br />
see pages 3-4.
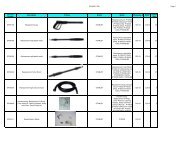
PACKAGE CONTENTS (P1450S, P1450S-CAN, P1600S, P1600S-BB, P1600S-CAN)<br />
A<br />
I<br />
B<br />
C<br />
D<br />
Optional feature that is<br />
sold separately<br />
J<br />
E<br />
K<br />
F<br />
G<br />
H<br />
L M N O P<br />
Rev: Feb2011<br />
PARTS LIST for Model P1450S, P1450S-CAN, P1600S, P1600S-BB, P1600S-CAN<br />
Part Letter Part Name Number of Pieces Replacement Part Number<br />
A Gun Assembly 1 SP00109<br />
B Adjustable wand 1 SP00209<br />
C Turbo wand 1 SP00409<br />
D<br />
Rotary Brush (optional—comes with only certain models such as the P1450S<br />
and P1750S and can be purchased separately) 1 SP00709<br />
E<br />
Straight Brush Brush (optional—comes with only certain models such as the<br />
P1450S and P1750S and can be purchased separately) 1 SP00809<br />
F Soap Injector and Bottle 2 SP00909<br />
G Gun Holder/Wand Holder (P1450S, P1450S-CAN, P1600S, P1600S-BB, P1600S-CAN) 1 SP01009<br />
H Owner’s <strong>Manual</strong> (in hardware bag) 1 SP00609<br />
I Tool Belt 1 SP01109<br />
J High-pressure hose strap 1 SP01209<br />
K High <strong>Pressure</strong> Hose (P1450S, P1450S-CAN, P1600S, P1600S-BB, P1600S-CAN) 1 SP00509<br />
L 17mm Wrench (in hardware bag) 1 SP00609<br />
M Cleaning Needle (in hardware bag) 1 SP00609<br />
Brass Quick-connect coupling & Inlet Adapter (optional—comes with only certain<br />
N models such as the P1450S and P1750S and can be purchased separately) 2 SP01309<br />
O Water Inlet Filter (in hardware bag) 1 SP00609<br />
P O-Rings (in hardware bag) 5 SP00609<br />
Order replacement parts online: www.<strong>Pressure</strong><strong>Washer</strong>911.com<br />
Phone orders, call [1] 919-550-3259. Please have the part number and a credit card ready when calling.<br />
®<br />
STANLEY Electric <strong>Pressure</strong> <strong>Washer</strong>s<br />
3 of 18
PACKAGE CONTENTS (P1750S, P1750S-CAN, P1800S, P1800S-BB, P1800S-CAN)<br />
A<br />
Hose Reel<br />
I<br />
B<br />
C<br />
Hose Reel Handle<br />
J<br />
D<br />
Optional feature that is<br />
sold separately<br />
K<br />
E<br />
F<br />
G<br />
L<br />
H<br />
N O P Q R<br />
M<br />
PARTS LIST for Model P1750S, P1750S-CAN, P1800S, P1800S-BB, P1800S-CAN<br />
Part Letter Part Name Number of Pieces Replacement Part Number<br />
A Gun Assembly 1 SP00109<br />
B Adjustable wand 1 SP00309<br />
C Turbo wand 1 SP00409<br />
D<br />
Rotary Brush (optional—comes with only certain models such as the P1450S<br />
and P1750S and can be purchased separately) 1 SP00709<br />
E Straight Brush 1 SP00809<br />
F Gun/wand Holder (P1750S, P1750S-CAN, P1800S, P1800S-BB, P1800S-CAN) 1 SP01409<br />
G Extension Hose 1 SP01509<br />
H Owner’s <strong>Manual</strong> (in hardware bag) 1 SP00609<br />
I Hose Reel 1 SP01609<br />
J Hose Reel Handle 1 SP01709<br />
K High <strong>Pressure</strong> Hose (P1750S, P1750S-CAN, P1800S, P1800S-BB, P1800S-CAN) 1 SP02409<br />
L Soap Bottle and Bracket 2 SP01809<br />
M Foot Rest 1 SP01909<br />
N 17mm Wrench (in hardware bag) 1 SP00609<br />
O Cleaning Needle (in hardware bag) 1 SP00609<br />
P<br />
Brass Quick-connect coupling & Inlet Adapter optional—comes with only certain<br />
models such as the P1450S and P1750S and can be purchased separately) 2 SP01309<br />
Q Water Inlet Filter (in hardware bag) 1 SP00609<br />
R O-Rings (in hardware bag) 5 SP00609<br />
Order replacement parts online: www.<strong>Pressure</strong><strong>Washer</strong>911.com<br />
Phone orders, call [1] 919-550-3259. Please have the part number and a credit card ready when calling.<br />
®<br />
4 of 18<br />
STANLEY Electric <strong>Pressure</strong> <strong>Washer</strong>s<br />
Rev: Feb2011
Missing Parts Request Form<br />
Please indicate the part that you are missing:<br />
Hardware bag<br />
Other<br />
Name<br />
Address<br />
Date of purchase<br />
Model #:<br />
Phone<br />
Email<br />
Serial #:<br />
Comments:<br />
IMPORTANT: Please include your receipt. Without a receipt, your<br />
order will be delayed. You may also email us at:<br />
customerservice@gxioutdoorpower.com<br />
Fax: 1-919-550-3277<br />
If emailing, please scan in your proof of purchase.<br />
Other fine products offered by<br />
Electric <strong>Pressure</strong> <strong>Washer</strong><br />
Generators<br />
Commercial Mowers<br />
Rev: Feb2011<br />
®<br />
STANLEY Electric <strong>Pressure</strong> <strong>Washer</strong>s<br />
5 of 18
This owner’s manual is considered a permanent part of the pressure<br />
washer and should remain with the pressure washer if resold. The<br />
information and specifications included in this publication were in<br />
effect at the time of approval for printing.<br />
GXi Outdoor Power, LLC reserves the right to discontinue or change<br />
specifications or design at any time without notice and without<br />
incurring any obligation whatever. No part of this publication may be<br />
reproduced without written permission.<br />
SAFETY LABEL LOCATIONS<br />
These labels warn you of potential hazards that can cause serious<br />
injury. Read them carefully. If a label comes off or becomes hard to<br />
read, contact Customer Care for a replacement.<br />
SAFETY INFORMATION<br />
STANLEY pressure washers are designed to give safe and dependable<br />
service if operated according to instructions. Read and understand this<br />
owner’s manual before operating your pressure washer.<br />
OPERATOR RESPONSIBILITY<br />
Know how to stop the pressure washer quickly in case of emergency.<br />
Understand the use of all product controls, output receptacles, and<br />
connections. Be sure that anyone who operates the pressure washer<br />
receives proper instruction. Do not let children operate the pressure<br />
washer.<br />
WARNING<br />
Use of pressure washer can create puddles and slippery<br />
surfaces.<br />
<br />
The cleaning area should have adequate slopes and drainage to<br />
reduce the possibility of a fall due to slippery surfaces.<br />
High pressure spray could cause you to fall if you are too close<br />
to the cleaning surface.<br />
Keep spray nozzle between 8 to 24 inches away from cleaning<br />
surface.<br />
<br />
<br />
Operate this unit on a stable surface.<br />
Be extremely careful if you must use the pressure washer from a<br />
ladder, scaffolding or any other relatively unstable location. Firmly<br />
grasp spray gun with both hands when using high pressure spray to<br />
avoid injury if gun kicks back.<br />
WARNINGS<br />
<br />
<br />
<br />
<br />
To minimize the amount of water getting into the pressure washer,<br />
the unit should be placed as far as possible from the cleaning site<br />
during operation.<br />
Never carry your pressure washer by the cord. Do not pull on the<br />
cord to disconnect from the outlet.<br />
To allow free air circulation, the pressure washer should not be<br />
covered during operation.<br />
California Proposition 65: This product or its power cord contains<br />
lead, a chemical known to the State of California to cause cancer,<br />
birth defects or other reproductive harm. Wash hands after use.<br />
WARNING<br />
SAVE THESE INSTRUCTIONS<br />
Servicing of a double-insulation product:<br />
In a double-insulation product, two systems of insulation are provided<br />
instead of grounding. No grounding means is provided on a double<br />
insulated. product, nor should a means for grounding be added to the<br />
product. Servicing a double-insulated product requires extreme care and<br />
knowledge of the system, and should be done only by qualified service<br />
personnel. Replacement parts of a double-insulated product must be<br />
identical to the parts they replace. A double-insulated product is marked<br />
with the words “DOUBLE INSULATION” or “DOUBLE INSULATED”.<br />
The symbol may also be marked on the product.<br />
WARNING<br />
SAFETY FEATURES AND ELECTRICAL POWER<br />
INFORMATION<br />
The pressure washer is equipped with a stop device that will sense<br />
when the trigger on the gun is released. It will open the power circuit to<br />
the motor and cause the pressure washer motor to stop. Motor will<br />
resume again when trigger is pulled.<br />
The pressure washer is also equipped with a main power “ON/<br />
OFF” switch located on the unit. It should always be moved to<br />
the “OFF” position when the pressure washer is not being used<br />
to prevent possible injury or damage.<br />
Ground Fault Circuit Interrupter:<br />
This pressure washer has a ground-fault circuit-interrupter (GFCI) built<br />
into the plug of the power supply cord. This device provides additional<br />
Some chemicals or detergents may be harmful if inhaled or<br />
protection from the risk of shock. Should replacement of the plug or cord<br />
ingested, causing severe nausea, fainting or poisoning.<br />
become necessary, use only identical replacement parts that include<br />
GFCI protection.<br />
Use a respirator or mask whenever there is a chance that vapors<br />
may be inhaled.<br />
Extension cords are not recommended unless they are plugged<br />
Read all instructions with mask so you are certain the mask will into a ground fault circuit-interrupter found in circuit boxes or<br />
protected receptacles.<br />
WHEN OPERATING EQUIPMENT<br />
Avoid accidental starts. Shut power “OFF” before connecting or<br />
disconnecting cord to electrical outlets.<br />
DO NOT spray flammable liquids.<br />
Do not use acids and solvents in this product. These products can<br />
cause physical injuries to the operator and irreversible damage to<br />
the machine.<br />
Do not use with flammable liquids and toxic chemicals.<br />
®<br />
6 of 18<br />
STANLEY Electric <strong>Pressure</strong> <strong>Washer</strong>s<br />
Rev: Feb2011
WARNINGS<br />
Extension Cords<br />
If possible, do not use extension cords with this<br />
product. However, if you must use one, observe all<br />
the warnings and instructions listed below: Use a sufficient gauge:<br />
Maximum cable length: 50 ft = 14 AWG<br />
Use only extension cords that are intended for outdoor use. These<br />
extension cords are identified by a marking “Acceptable for use<br />
with outdoor appliances; store indoors while not in use.”<br />
Use only extension cords having an electrical rating not less than<br />
the rating of the product.<br />
Do not use damaged extension cords. Examine extension cord<br />
before using and replace if damaged.<br />
Do not abuse extension cord and do not yank on any cord to<br />
disconnect.<br />
Keep cord away from heat and sharp edges.<br />
Always disconnect the extension cord from the receptacle before<br />
disconnecting the product from the extension cord.<br />
To reduce the risk of electrocution, keep all connections dry and off<br />
the ground. Do not touch plug with wet hands.<br />
WARNING<br />
The pressure washer is also equipped with a main power “ON/OFF”<br />
switch located on the unit. It should always be moved to the “OFF”<br />
position when the pressure washer is not being used to prevent possible<br />
injury or damage.<br />
CAUTION<br />
A pressure washer produces a high pressure spray which<br />
increases risk of injury and damage to unit.<br />
<br />
<br />
<br />
<br />
<br />
<br />
High pressure spray can cause paint chips or other particles to<br />
become airborne.<br />
<br />
Gun Kicks Back - Hold with both hands!<br />
The trigger gun safety lock prevents the trigger from accidentally<br />
being engaged. The safety feature DOES NOT lock trigger in the ON<br />
position.<br />
DO NOT secure spray gun in open position.<br />
DO NOT leave spray gun unattended while machine is running.<br />
NEVER use a spray gun which does not have a trigger lock or<br />
trigger guard in place and in working order.<br />
Always be certain spray gun, nozzles and accessories are correctly<br />
attached.<br />
High pressure spray may damage fragile items including glass.<br />
<br />
<br />
CAUTION<br />
DO NOT point spray gun at glass when in jet spray mode.<br />
NEVER aim spray gun at plants.<br />
WARNING<br />
Always wear eye protection when using this equipment or in<br />
vicinity of where equipment is in use.<br />
The high pressure stream of water that this equipment produces<br />
can pierce skin and its underlying tissues, leading to serious<br />
injury and possible amputation.<br />
Spray gun traps high water pressure, even when pump is not<br />
running and water is disconnected, which can cause injury.<br />
<br />
<br />
<br />
<br />
<br />
<br />
<br />
CAUTION<br />
Improper treatment of the pressure washer can damage it and<br />
shorten its life.<br />
If you have questions about intended use, ask dealer or contact<br />
Customer Service at [1] 919-550-3259.<br />
NEVER operate units with broken or missing parts, or without<br />
protective housing or covers.<br />
DO NOT bypass any safety device on this machine.<br />
Before starting pressure washer in cold weather, check all parts of<br />
the equipment to be sure ice has not formed there.<br />
NEVER move machine by pulling on high pressure hose. Use handle<br />
provided on unit.<br />
This equipment is designed to be used with STANLEY authorized<br />
parts ONLY. If equipment is used with parts that DO NOT comply<br />
with minimum specifications, user assumes all risks and liabilities.<br />
WARNING<br />
NEVER aim spray gun at people, animals, plants, electrical devices,<br />
or the unit itself.<br />
DO NOT allow CHILDREN to operate pressure washer.<br />
To reduce the risk of injury, do not operate the machine near<br />
children<br />
NEVER repair high pressure hose. Replace it.<br />
NEVER repair leaking connections with sealant of any kind.<br />
Replace o-ring or seal.<br />
Keep high pressure hose connected to pump and spray gun while<br />
system is pressurized.<br />
ALWAYS point gun in safe direction and squeeze spray gun trigger,<br />
to release high pressure, every time you stop engine. Engage<br />
trigger lock when not in use.<br />
Risk of Electrocution<br />
Inspect cord before using - Do not use if cord is damaged.<br />
Keep all connections dry and off the ground.<br />
Do not touch plug with wet hands.<br />
Do not use extension cords with the product.<br />
Water spray must never be directed towards any electric wiring,<br />
devices or directly towards itself.<br />
Risk of Explosion<br />
Do not spray flammable liquids<br />
Do no use acids and solvents in this product. These products can<br />
cause physical injuries to the operator and irreversible damage to<br />
the machine.<br />
Rev: Feb2011<br />
®<br />
STANLEY Electric <strong>Pressure</strong> <strong>Washer</strong>s<br />
7 of 18
PREPARATION & ASSEMBLY - Model P1450S, P1450S-CAN, P1600S, P1600S-BB, P1600S-CAN<br />
Assembly Time: 5 minutes<br />
Tools Required: 17mm or Adjustable Wrench<br />
Surface Preparation<br />
<br />
<br />
<br />
Before starting any cleaning task, it is important to inspect the area<br />
for objects which could create a hazard.<br />
Remove any objects from the work area which could be tripped<br />
over, such as toys or outdoor furniture.<br />
Ensure that all doors and windows are closed tightly.<br />
Step 1<br />
<br />
Remove or peel off blue protective film on the front of the pressure<br />
washer and on the wands (if applicable). Also, remove any bubble<br />
wrap. Discard blue protective film and bubble wrap.<br />
Step 2<br />
<br />
Attach the Quick Connect Inlet coupling to water supply inlet on<br />
pressure washer, as shown in Figure below.<br />
Step 5<br />
<br />
Attach other end of High <strong>Pressure</strong> Hose to Gun as shown in Figure<br />
below. Fasten tightly with 17mm wrench to avoid leakage.<br />
Step 6<br />
<br />
Attach Shoulder Strap to the Strap Bracket as shown in Figure<br />
below.<br />
Step 3<br />
Attach Wand Bracket to the unit as shown in Figure below.<br />
Step 7<br />
<br />
Attach the hose holder strap to the side of the unit as shown in<br />
Figure below.<br />
Step 4<br />
Attach High <strong>Pressure</strong> Hose to Main Unit as shown in Figure below.<br />
For Operating Instructions, proceed to page 9.<br />
8 of 18<br />
®<br />
STANLEY Electric <strong>Pressure</strong> <strong>Washer</strong>s<br />
Rev: Feb2011
PREPARATION & ASSEMBLY - Model P1750S, P1750S-CAN, P1800S, P1800S-BB, P1800S-CAN<br />
Assembly Time: 5 minutes<br />
Tools Required: 17mm or Adjustable Wrench<br />
Surface Preparation<br />
<br />
<br />
<br />
Step 2<br />
<br />
Before starting any cleaning task, it is important to inspect the area<br />
for objects which could create a hazard.<br />
Remove any objects from the work area which could be tripped<br />
over, such as toys or outdoor furniture.<br />
Ensure that all doors and windows are closed tightly.<br />
Step 1<br />
<br />
Remove or peel off blue protective film on the front of the pressure<br />
washer and on the wands (if applicable). Also, remove any bubble<br />
wrap. Discard blue protective film and bubble wrap.<br />
Attach the Quick Connect Inlet coupling to water supply inlet on<br />
pressure washer as shown in Figure below.<br />
Step 5<br />
<br />
Step 6<br />
<br />
Attach the L-shape coupler end of the extension hose (F) into the<br />
water outlet as shown in Figure below. Fasten tightly to avoid<br />
leakage.<br />
Attach the straight coupler end of the extension hose into the hose<br />
reel inlet as shown in Figure below. Fasten tightly to avoid<br />
leakage.<br />
Step 3<br />
Attach the gun/wand holder as shown in Figure below.<br />
Step 7<br />
<br />
Attach High <strong>Pressure</strong> Hose to Gun as shown in Figure below.<br />
Fasten tightly with 17mm wrench to avoid leakage.<br />
Step 4<br />
<br />
Attach the soap/detergent bracket, bottle, siphon hose, as shown<br />
in Figure below.<br />
Step 8<br />
Attach foot bracket as shown in Figure below.<br />
For Operating Instructions, proceed to page 9.<br />
Rev: Feb2011<br />
®<br />
STANLEY Electric <strong>Pressure</strong> <strong>Washer</strong>s<br />
9 of 18
OPERATION<br />
HOW TO USE THE PRESSURE WASHER<br />
If you have any problems operating your pressure washer,<br />
please call the pressure washer help-line at [1] 919-550-3259.<br />
WARNING<br />
<strong>Pressure</strong> <strong>Washer</strong> Clearance<br />
Prevailing winds and air currents should be taken into consideration<br />
when positioning pressure washer.<br />
Keep spray nozzle between 8 to 24 inches away from cleaning<br />
surface.<br />
Operate this unit on a stable surface.<br />
Be extremely careful if you must use the pressure washer from a<br />
ladder, scaffolding or any other relatively unstable location.<br />
Firmly grasp spray gun with both hands when using high pressure<br />
spray to avoid injury if gun kicks back.<br />
High pressure spray could cause you to fall if you are too<br />
close to the cleaning surface.<br />
CAUTION:<br />
<br />
<br />
<br />
<br />
<br />
Water Supply (Cold Water Only):<br />
Do not draw non-water liquids through the unit. For use with cold<br />
water supply only.<br />
Water hose must be at least a 1/2 inch diameter.<br />
Flow rate of water supply must not fall below 2GPM (gallons per<br />
minute).<br />
Flow rate can be determined by running the water for one minute<br />
into an empty 5-gallon container.<br />
The water supply temperature must not exceed 104°F<br />
(40°C).<br />
CAUTION:<br />
<br />
Never use the pressure washer to draw in water<br />
contaminated with solvents (e.g. paint thinners, gasoline,<br />
oil, etc.).<br />
Dirt in the feed water will damage the unit.<br />
To avoid this risk, we recommend checking<br />
the water filter (located inside the water inlet; to clean it<br />
out see Maintenance section on page 13).<br />
Always prevent debris from being drawn into the unit by<br />
using a clean water source and an accessory water filter if<br />
required.<br />
To prolong the life of the unit, it is recommended to rest the unit<br />
5 minutes after every 30 minutes of use.<br />
The high pressure stream of water that this equipment produces<br />
can pierce skin and its underlying tissues, leading to serious<br />
injury and possible amputation.<br />
Spray gun traps high water pressure, even when motor is<br />
stopped and water is disconnected, which can cause injury.<br />
<br />
<br />
Step 1:<br />
Make sure that the ON/OFF switch is in the “OFF” position.<br />
Step 2:<br />
<br />
Fasten the quick-connect coupling onto the garden hose and then<br />
attach the quick-connecting coupling to the inlet adaptor, as shown<br />
in the Figure below.<br />
Step 3:<br />
<br />
WARNING<br />
Keep high pressure hose connected to pump and spray gun while<br />
system is pressurized.<br />
ALWAYS point gun in safe direction and squeeze spray gun trigger,<br />
to release high pressure, every time you stop engine. Engage<br />
trigger lock when not in use.<br />
Insert the desired wand into spray gun, and twist 1/4 turn until<br />
rectangular tab appears.<br />
A pressure washer produces a high pressure spray which<br />
increases risk of injury and damage to unit.<br />
<br />
<br />
Always wear eye protection when using this equipment or in<br />
vicinity of where equipment is in use.<br />
Before starting the pressure washer, be sure you are wearing<br />
adequate eye protection.<br />
Step 4:<br />
<br />
To use another wand, reverse Step 3 and insert desired wand by<br />
repeating Step 3.<br />
10 of 18<br />
®<br />
STANLEY Electric <strong>Pressure</strong> <strong>Washer</strong>s<br />
Rev: Feb2011
OPERATION<br />
CAUTION<br />
A pressure washer produces a high pressure spray which<br />
increases risk of injury and damage to unit.<br />
<br />
<br />
<br />
<br />
<br />
<br />
Gun Kicks Back - Hold with both hands!<br />
The trigger gun safety lock prevents the trigger from accidentally<br />
being engaged. The safety feature DOES NOT lock trigger in the ON<br />
position.<br />
DO NOT secure spray gun in open position.<br />
DO NOT leave spray gun unattended while machine is running.<br />
NEVER use a spray gun which does not have a trigger lock or<br />
trigger guard in place and in working order.<br />
Always be certain spray gun, nozzles and accessories are correctly<br />
attached.<br />
Step 7<br />
<br />
Before turning the unit “ON”, depress the trigger to bleed any<br />
trapped air out of the pump and hose.<br />
Step 8<br />
<br />
Release trigger and start the pressure washer by turning ON/OFF<br />
switch to ON.<br />
Step 5:<br />
Attach garden hose to water supply and turn water on.<br />
Step 6:<br />
<br />
Plug the unit into an outlet. Make sure that the pressure<br />
washer is the only device plugged into the outlet. If plugging<br />
into a garage outlet, make sure there are no other devices plugged<br />
into any other outlets in the garage.. Press “TEST”. Then press<br />
“RESET” to assure proper connection to power.<br />
Step 9<br />
Adjusting the spray<br />
Turning the nozzle allows the use of several different spray tips.<br />
Each spray tip provides a different spray pattern as shown in Figure<br />
below.<br />
CAUTION:<br />
<br />
Jet spray adjustment is very aggressive. Do not adjust while<br />
spraying. We recommend that for most cleaning applications, a 20<br />
degree spray angle should be used to avoid damage to the surface<br />
being sprayed.<br />
Rev: Feb2011<br />
®<br />
STANLEY Electric <strong>Pressure</strong> <strong>Washer</strong>s<br />
To prolong the life of the unit, it is<br />
recommended to rest the unit 5 minutes after<br />
every 30 minutes of use.<br />
11 of 18
OPERATION<br />
WORKING WITH DETERGENTS<br />
Working with detergent ensures a quick soaking of the dirt, and allows<br />
the high-pressure water to penetrate and remove the dirt more<br />
effectively. Always spray detergent on a dry surface. Do not pre-soak<br />
area with plain water. Wetting the surface first dilutes the detergent<br />
and reduces its cleaning ability.<br />
To siphon and apply detergent, you must operate the pressure washer<br />
on low pressure—slide the wand away from you as shown in Step 1.<br />
This provides a gentle application of detergent, with the pressure<br />
equivalent to a low-set garden hose. The high-pressure setting is used<br />
for cleaning; you cannot apply detergents when working at highpressure.<br />
Always test detergent in an inconspicuous area before use.<br />
Step 1<br />
P1450S, P1600S: Insert yellow detergent attachment as shown in<br />
Figure below.<br />
P1750S, P1800S: Install the adjustable wand into spray gun and pull<br />
towards the gun.<br />
Diagram for P1750S and P1800S ONLY:<br />
Step 3<br />
<br />
<br />
Gently remove detergent container and fill with detergent.<br />
Re-attach containers back into position.<br />
Step 4<br />
Turn on the pressure washer. Pull trigger to operate unit. The liquid<br />
detergent will automatically mix with water and be discharged through<br />
nozzle. Apply detergent to a DRY work surface, from bottom to top.<br />
Step 5<br />
Allow detergent to remain on the surface for a short time before rinsing.<br />
Do not allow detergent to dry on surface.<br />
Step 6<br />
Rinse with clean water under high-pressure. On a vertical surface, rinse<br />
from the bottom up, then rinse from the top down to avoid streaking.<br />
Hold nozzle 6-8 inch from the work surface at a° 45 angle.<br />
Step 7 (End of detergent application)<br />
When you have finished using the detergent injection system, remove<br />
detergent suction tube from bottle and insert into 1 gallon (5L) of fresh<br />
water. Siphon water at low-pressure for one to two minute so that all<br />
detergent is flushed through system. Remove detergent bottle and rinse<br />
it until it is thoroughly cleaned.<br />
To siphon detergent, adjust the nozzle to the low pressure setting by<br />
sliding the wand away from you.<br />
Step 2<br />
P1750S and P1800S ONLY: Set the adjustable nozzle to the low<br />
-pressure setting. The nozzle must be set in the low-pressure<br />
position to apply detergent. Apply high pressure spray to small<br />
area and then check surface for damage. If no damage is found,<br />
you can assume it is okay to continue cleaning. Start at top of<br />
area to be rinsed, working down with same overlapping strokes<br />
as used for cleaning.<br />
12 of 18<br />
®<br />
STANLEY Electric <strong>Pressure</strong> <strong>Washer</strong>s<br />
CAUTION<br />
Damage may occur to painted surface if chemical is<br />
allowed to dry on surface. Wash and rinse a small section<br />
at a time. Avoid working on hot surfaces or in direct<br />
sunlight<br />
Failure to clean properly will cause the injection system to<br />
become clogged and inoperable.<br />
Never use:<br />
Bleach, chlorine products and other corrosive<br />
chemicals<br />
Liquids containing solvents (i.e., paint thinners,<br />
gasoline, oils)<br />
Tri-sodium phosphate products<br />
Ammonia products<br />
Acid-based products<br />
These chemicals will harm the unit and will damage the<br />
surface being cleaned..<br />
Rev: Feb2011
OPERATION<br />
Shutting Down and Cleaning Up<br />
Step 1<br />
Turn the switch to “OFF” (0) position and unplug cord from outlet.<br />
Step 2<br />
Turn off the water supply.<br />
Step 3<br />
Press trigger to release water pressure for 20~30 seconds.<br />
Winterizing and Long Term Storage<br />
STORING<br />
Before storing the unit for an extended period. be sure the storage area<br />
is free of excessive humidity and dust.<br />
Storage Preparation for <strong>Pressure</strong> Pump<br />
Water should not remain in the unit for long periods of time. Sediments or<br />
minerals can deposit on pump parts and “freeze” pump action. If you do not plan<br />
to use the pressure washer for more than 30 days, follow this procedure:<br />
1. Flush chemical injection hose by placing filter into a pail of clean water<br />
while running pressure washer in low pressure mode. Flush for one to two<br />
minutes.<br />
2. Shut off pressure washer and let it cool, then remove high pressure and<br />
garden hoses.<br />
3. Empty pump of liquids by pulling engine recoil handle about 6 times. This<br />
should remove most liquid from pump.<br />
4. Ensure pump is clean and empty to prevent corrosion build up and freezing<br />
of pump components.<br />
5. Store unit in a clean, dry area.<br />
We recommend storing indoors where unit will not be exposed<br />
to freezing temperatures.<br />
WARNING<br />
Turn off water supply and squeeze trigger to depressurize<br />
the unit. Failure to do so could result in personal injury due<br />
to discharge of high-pressure water.<br />
Step 4<br />
Disconnect the garden hose from the water inlet on the unit.<br />
Step 5<br />
Disconnect the high-pressure hose from the high pressure outlet<br />
and engage the gun safety lock.<br />
STEPPING AWAY OR TAKING A BREAK<br />
If taking a break of five minutes or more:<br />
1. Engage gun safety lock.<br />
2. Turn pressure washer to “OFF” (O) position.<br />
3. Unplug the power cord from the outlet.<br />
CAUTION<br />
You must protect your unit from freezing temperatures.<br />
Failure to do so will permanently damage your pump and render<br />
your unit inoperable.<br />
Freeze damage is not covered under warranty.<br />
Alternative Procedure<br />
If you cannot perform the Optimum Winterizing procedure,<br />
you can still protect your pressure washer from winter-damage:<br />
1. Disconnect all water connections.<br />
2. Turn on the machine for a few seconds. Press trigger to bleed any<br />
remaining water in the pump. Turn off immediately.<br />
3. Remove the gun and hose from the pressure washer. Drain any<br />
excess water. Roll hose carefully and do not allow hose to be kinked.<br />
4. Store the machine and accessories in a room that does not reach<br />
freezing temperatures. Do not store near furnace or other hot areas as<br />
it may dry out o-rings and pump seals.<br />
CAUTION<br />
Failure to follow the above directions will result in damage to the pump assembly<br />
and accessories and will void the warranty. We recommend the use of antifreeze<br />
(Pump Saver) to prevent cold weather damage during storage in the winter months.<br />
Rev: Feb2011<br />
®<br />
STANLEY Electric <strong>Pressure</strong> <strong>Washer</strong>s<br />
13 of 18
MAINTENANCE<br />
Connections<br />
Connections on pressure washer hoses, gun and spray wand should be<br />
cleaned regularly and lubricated with non-water soluble grease.<br />
Adjustable Nozzle Maintenance<br />
Surging, or pulsing sensation, felt while squeezing the spray gun<br />
trigger may be caused by excessive pump pressure. The principal<br />
cause of excessive pump pressure is a nozzle clogged or restricted<br />
with foreign materials, such as dirt, etc. To correct the problem,<br />
immediately clean the nozzle using the tools included with your<br />
pressure washer and follow these instructions:<br />
1. Shut off pressure washer and turn off water supply.<br />
2. Depressurize unit by squeezing trigger with wand away from<br />
face.<br />
3. Remove wand from gun<br />
4. Use needle included in kit to free any foreign material clogging or<br />
restricting spray tip, see Figure below.<br />
Adjustable Nozzle<br />
For the adjustable nozzle, you can also lubricate the nozzle collar (highpressure<br />
low-pressure) by using non-water soluble grease regularly.<br />
Water Filter Screen<br />
The pressure washer is equipped with a water inlet filter that prevents<br />
debris going into the pump. If the filter is not kept clean, the flow of<br />
water to the pressure washer will be restricted and the pump may be<br />
damaged.<br />
1. To clean the screen, remove quick connector and remove the filter<br />
screen from the pump inlet.<br />
2. Rinse filter screen with warm water until it is free of debris and<br />
blockage. Check for any damage, replace if damaged.<br />
3. Reinstall screen and quick-connector immediately.<br />
Air Vents<br />
The air vents located on the front and back of the pressure washer must<br />
be kept clean and free of any obstructions to ensure proper air-cooling<br />
of the motor during operation.<br />
O–Ring Maintenance<br />
Through the normal operation of your pressure washer, o–rings, which<br />
keep the connections of the hoses and spray gun tight and leak–free,<br />
may become worn or damaged. They should be lubricated with nonwater<br />
soluble grease.<br />
GENERAL MAINTENANCE RECOMMENDATIONS<br />
The pressure washer warranty does not cover items that have been<br />
subjected to operator abuse or negligence. To receive full value from the<br />
warranty, the operator must maintain the pressure washer as instructed<br />
in this manual.<br />
NOTE: Should you have questions about replacing components on your<br />
pressure washer, please call [1] 919-550-3259 for assistance.<br />
All maintenance in this manual should be made at least once each<br />
season.<br />
Before Each Use<br />
1. Check water inlet screen for damage.<br />
2. Check high pressure hose for leaks.<br />
3. Check detergent siphoning tube and filter for damage.<br />
4. Check spray gun, nozzle extension, and nozzles for leaks.<br />
5. Rinse out garden hose to flush out debris.<br />
Check High <strong>Pressure</strong> Hose<br />
The high pressure hose can develop leaks from wear, kinking, or abuse.<br />
Inspect the hose each time before using it. Check for cuts, leaks,<br />
abrasions or bulging of cover, damage or movement of couplings. If any<br />
of these conditions exist, replace the hose immediately.<br />
The high pressure stream of water that this equipment produces<br />
can pierce skin and its underlying tissues, leading to serious<br />
injury and possible amputation.<br />
<br />
<br />
WARNING<br />
The high pressure stream of water that this equipment produces<br />
can pierce skin and its underlying tissues, leading to serious<br />
injury and possible amputation.<br />
NEVER repair leaking connections with sealant of any kind. Replace<br />
o-ring or seal.<br />
WARNING<br />
NEVER repair high pressure hose. Replace it.<br />
Replacement hose rating MUST exceed maximum pressure rating<br />
of unit.<br />
Check Detergent Siphoning Tube<br />
Examine the filter on the detergent tube and clean if clogged. The tube<br />
should fit tightly on the barbed fitting. Examine the tube for leaks or<br />
tears. Replace the filter or tube if either is damaged.<br />
Check Gun and Nozzle Extension<br />
Examine the hose connection to the spray gun and make sure it is<br />
secure. Test the trigger by pressing it and making sure it springs back<br />
into place when you release it. Put the trigger lock in the on position and<br />
test the trigger. You should not be able to press the trigger.<br />
14 of 18<br />
®<br />
STANLEY Electric <strong>Pressure</strong> <strong>Washer</strong>s<br />
Rev: Feb2011
Tips for Cleaning<br />
CAUTION<br />
Before cleaning any surface an inconspicuous area should be cleaned to test spray pattern and distance for maximum cleaning results.<br />
If painted surfaces are peeling or chipping, use extreme caution as pressure washer may remove the loose paint from the surface.<br />
When using on surfaces which might come in contact with food, flush surfaces with plenty of drinking water.<br />
Automobiles, RV’s, Boats, Motorcycles, ATV’s<br />
Pre-rinse vehicle with fresh water. If using detergent, apply to surface at<br />
low pressure. For best results, clean one side of vehicle at a time and<br />
always apply detergent from bottom to top, do not allow detergent to<br />
dry on surface. If needed, use special wash brush attachment (not<br />
included) to remove stubborn dirt. Rinse at high pressure in a sweeping<br />
motion keeping the spray nozzle approximately 6-8 inches from the<br />
cleaning surface (distance should increase when rinsing pin-striping or<br />
other sensitive surfaces). Always clean from top to bottom and from left<br />
to right. For best results, wipe surface dry with a chamois or soft dry<br />
cloth.<br />
BBQ Grills, Gardening Tools, Mowers/Trimmers<br />
Pre-rinse cleaning surface with fresh water. If using detergent or<br />
Degreaser, apply detergent at low pressure. Allow detergent to remain<br />
on surface 1-3 minutes. Do not allow detergent to dry on surface. Rinse<br />
at high pressure keeping the spray nozzle approximately 3-6 inches from<br />
the cleaning surface. For removing extremely stubborn dirt, it may be<br />
necessary to move the spray nozzle even closer to the surface for<br />
greater dirt cutting action.<br />
Driveway, Sidewalks, Patios, Brick<br />
Pre-rinse cleaning surface with fresh water. If using detergent or<br />
Degreaser, apply to surface at low pressure. For best results, limit your<br />
work area to smaller sections of approximately 25 square feet. Allow<br />
detergent or Degreaser to remain on surface 1-3 minutes. Do not allow<br />
detergent to dry on surface. Rinse at high pressure in a sweeping<br />
motion keeping the spray nozzle approximately 3-6 inches from the<br />
cleaning surface. Always clean from top to bottom and from left to<br />
right. For removing extremely stubborn stains, use the Turbo Nozzle.<br />
Decks<br />
Pre-rinse deck and surrounding area with fresh water. If using<br />
detergent, apply to surface at low pressure. For best results, limit your<br />
work area to smaller sections of approximately 25 square feet. Allow<br />
detergent to remain on surface 1-3 minutes. Do not allow detergent to<br />
dry on surface. Rinse at high pressure in a long sweeping motion<br />
keeping the spray nozzle approximately 3-6 inches from the cleaning<br />
surface. Always clean from top to bottom and from left to right. When<br />
moving on to a new section of the cleaning surface, be sure to overlap<br />
the previous section to eliminate stop marks and ensure a more even<br />
cleaning result.<br />
House Siding<br />
(Pre-rinse cleaning surface with fresh water. If using detergent, apply to<br />
surface at low pressure (for best results, limit your work area to<br />
sections of approximately 6 feet and always apply detergent from<br />
bottom to top). Allow detergent to remain on surface 1-3 minutes. Do<br />
not allow detergent to dry on surface, if surface appears to be drying,<br />
simply wet down surface with fresh water. If needed, use special wash<br />
brush attachment (not included) to remove stubborn dirt. Rinse at high<br />
pressure from top to bottom in an even sweeping motion keeping the<br />
spray nozzle approximately 6 inches from the cleaning surface.<br />
Patio and Lawn Furniture<br />
Pre-rinse furniture and surrounding area with fresh water. If using<br />
detergent, apply to surface at low pressure. Allow detergent to remain<br />
on surface 1-3 minutes. Do not allow detergent to dry on surface. If<br />
needed use special Wash Brush attachment (not included) to remove<br />
stubborn dirt. Rinse at high pressure in a sweeping motion keeping the<br />
spray nozzle approximately 3-6 inches from the cleaning surface. For<br />
best results, clean from top to bottom and from left to right.<br />
TROUBLESHOOTING<br />
Symptom Cause Solution<br />
Motor will not start On/Off switch is in the “OFF” (0) position. Turn switch to the “ON” (I) position<br />
Power cord is not plugged in.<br />
Electrical outlet does not supply adequate power.<br />
Tripped GFCI plug.<br />
Tripped circuit breaker.<br />
Plugged Wand<br />
Plug in power cord.<br />
Try a different outlet.<br />
Press “RESET” button on GFCI plug.<br />
Switch off pressure washer. The reset comes automatically once the<br />
temperature of the unit drops.<br />
Turn unit off. If wand is plugged, then the water will be at full<br />
pressure making disconnecting wand difficult. Carefully disconnect<br />
wand and/or gun, clean wand.<br />
Unit does not reach high pressure. Diameter of garden hose is too small. Replace with a 5/8 inch or larger garden hose.<br />
Water supply is restricted.<br />
Not enough inlet water supply.<br />
Water inlet filter is clogged.<br />
Check garden hose for kinks, leaks and blockage.<br />
Open water source full force.<br />
Remove filter and rinse out in warm water.<br />
Spray wand is on low pressure position<br />
Turn spray wand to high pressure position (See p.10)<br />
Troubleshooting continued on next page...<br />
Rev: Feb2011<br />
®<br />
STANLEY Electric <strong>Pressure</strong> <strong>Washer</strong>s<br />
15 of 18
TROUBLESHOOTING (continued)<br />
Symptom Cause Solution<br />
Output pressure varies high and low. Not enough inlet water supply. Turn water on full force. Check garden hose for kinks,<br />
leaks or blockage.<br />
No detergent.<br />
Pump is sucking air.<br />
Water inlet filter is clogged.<br />
Discharge nozzle is obstructed.<br />
Check that hoses and fittings are air tight. Turn off machine.<br />
Purge pump by squeezing trigger gun until a<br />
steady flow of water emerges through the nozzle.<br />
Remove filter and rinse out in warm water.<br />
Blow out or remove debris with a fine needle.<br />
Calcified gun, hose or spray wand.<br />
Run distilled vinegar through detergent suction tube.<br />
Detergent suction tube not properly connected to Check connection.<br />
the machine.<br />
Detergent is too thick.<br />
Filter on detergent suction tube is clogged.<br />
Damaged or clogged detergent suction tube.<br />
Spray wand is in high pressure position.<br />
Discharge nozzle is obstructed.<br />
Blow out or remove<br />
Garden hose connection leaks. Loose fittings. Tighten fittings.<br />
Dilute detergent, for best results use recommended<br />
detergent.<br />
Run warm water through filter to remove debris.<br />
Remove obstruction or replace detergent suction tube.<br />
Turn spray wand tip to low pressure position.<br />
Missing/worn rubber washer.<br />
Insert new washer.<br />
Spray wand, or extension, or nozzle leaks. Spray nozzle not properly attached. Insert the spray nozzle into the trigger Carefully press in<br />
against the spring tension and twist into the locked<br />
position.<br />
Broken o-ring or plastic insert.<br />
Call Customer Support<br />
Pump is noisy. Pump is sucking air. Check that hoses and fittings are air tight. Turn off<br />
machine and purge pump by squeezing trigger gun until a<br />
steady flow of water emerges through the nozzle.<br />
Water leaks from pump (up to 10 drops per Loose fittings.<br />
Check that all fittings are tight.<br />
minute is permissible).<br />
Water seals are damaged or worn.<br />
Call Customer Support<br />
Oil Drips. Oil seals are damaged or worn. Call Customer Support<br />
Motor buzzes but fails to run. Supply voltage below minimum. Verify that only the pressure washer is running on this<br />
circuit.<br />
System has residual pressure.<br />
Turn unit “OFF”, squeeze trigger on spray want to release<br />
pressure, then turn unit “ON”.<br />
Voltage loss due to extension cord.<br />
<strong>Pressure</strong> washer not used for long periods<br />
Do not use extension cord with this unit—plug directly<br />
into power outlet.<br />
Call Customer Service.<br />
IF YOU ENCOUNTER ANY ADDITIONAL DIFFICULTIES NOT LISTED, CALL CUSTOMER SERVICE AT<br />
[1] 919-550-3259 FOR ASSISTANCE.<br />
16 of 18<br />
®<br />
STANLEY Electric <strong>Pressure</strong> <strong>Washer</strong>s<br />
Rev: Feb2011
Limited Warranty & Service<br />
LIMITED 1 YEAR WARRANTY<br />
TERM OF THIS WARRANTY:<br />
This pressure washer is warranted to be free of defects in materials and workmanship under normal residential use for a period of 1 year. This warranty applies to the<br />
electric motor and the pump for 1 year. (Normal wear and maintenance items such as the cord, GFCI breaker, wand, hose, tips, seals, and other attachments are<br />
warranted for 90 days.) Warranty repairs will be made without charge for parts and labor for the first 90 days from the date of purchase. After the first 90 days, this<br />
limited warranty covers the costs of replacement parts on the pressure washer unit only. Any commercial, industrial or rental use of the product will reduce the term of<br />
this warranty to 30 days for all components.<br />
TO QUALIFY FOR THIS WARRANTY:<br />
The product must be purchased in the United States, Canada or Mexico from a retail store authorized by GXi Outdoor Power Equipment LLC to sell the product. This<br />
warranty applies to first retail purchaser / owner during the applicable warranty time period. A proof of purchase receipt showing date of purchase and authorized retail<br />
store and a valid product serial number are required to demonstrate warranty eligibility.<br />
WHAT GXI PARTS AND SERVICE LLC WILL REPAIR OR REPLACE UNDER WARRANTY:<br />
GXI PARTS AND SERVICE LLC will repair or replace, at its option, any part that is proven to be defective in material or workmanship under normal use during the<br />
applicable warranty time period subject to the exclusions stated herein. This warranty is void if the owner fails to follow the prescribed maintenance and operating<br />
procedures described in this manual. Only failures where an identifiable manufacturing defect can be identified will be covered under the terms of this warranty.<br />
GXI PARTS AND SERVICE LLC has the right to recover warranty administration costs from the owner if the root cause of the malfunction was found to be other than<br />
defective material or workmanship. Anything replaced under warranty becomes the property of GXI PARTS AND SERVICE LLC. Parts replaced under warranty will be<br />
considered as part of the original product and any warranty on those parts will expire coincident with the original product warranty.<br />
TO OBTAIN WARRANTY SERVICE:<br />
Contact GXI PARTS AND SERVICE LLC to obtain warranty return authorization and directions as to where to send your product for evaluation. Have your proof of<br />
purchase and the product serial number available when you call. Two options for warranty service are available:<br />
Easy Return Service – Contact GXI PARTS AND SERVICE LLC for a pre-paid return shipping label and instructions to ship the product to our repair facility. If<br />
there is a manufacturing defect identified, the product will be repaired and returned to the customer free of all charges. In the event there is a non-warranted<br />
repair required, GXI PARTS AND SERVICE LLC will notify the customer of the repair and return shipping costs prior to proceeding with repairs. If payment is<br />
not received within 60 days the product will be disposed of.<br />
Advance Exchange Service - Contact GXI PARTS AND SERVICE LLC and provide a valid credit card, a $75 pre-authorization will be made against your<br />
card. GXI PARTS AND SERVICE LLC will ship a replacement unit complete with accessories to you with a pre-paid return shipping label and instructions to<br />
ship the faulty product and complete set of accessories to our repair facility. If there is a manufacturing defect, the pre-authorized charges will be cancelled.<br />
In the event there is a non warranted repair required or accessories are missing, GXI PARTS AND SERVICE LLC will charge the customer’s card for the repairs<br />
and the missing accessories.<br />
If you are not satisfied with warranty service, contact GXi PARTS AND SERVICE LLC. If you are unable to resolve problems and require further assistance, write to GXI<br />
PARTS AND SERVICE LLC Customer Service.<br />
EXCLUSIONS:<br />
THIS WARRANTY DOES NOT EXTEND TO PARTS AFFECTED OR DAMAGED BY ACCIDENT AND/OR COLLISION, NORMAL WEAR, CONTAMINATION, USE IN AN<br />
APPLICATION FOR WHICH THE PRODUCT WAS NOT DESIGNED OR ANY OTHER MISUSE, NEGLECT, INCORPORATION OR USE OF UNSUITABLE ATTACHMENTS OR<br />
PARTS, UNAUTHORIZED ALTERATION, OR ANY CAUSES OTHER THAN DEFECTS IN MATERIAL OR WORKMANSHIP OF THE PRODUCT. IN PARTICULAR, THIS<br />
WARRANTY DOES NOT COVER DAMAGE CAUSED BY FAILURE TO FOLLOW PRESCRIBED WARNINGS AND OPERATING PRACTICES; FAILURE TO FOLLOW PROPER<br />
MAINTENANCE AND STORAGE PROCEDURES; AND PHYSICAL DAMAGE DUE TO SHIPPING, HANDLING OR STORAGE.<br />
DISCLAIMER OF CONSEQUENTIAL DAMAGE AND LIMITATION OF IMPLIED WARRANTIES:<br />
GXI PARTS AND SERVICE LLC DISCLAIMS ANY RESPONSIBILITY FOR LOSS OF TIME OR USE OF THE PRODUCT, TRANSPORTATION, COMMERCIAL LOSS, OR ANY<br />
OTHER INCIDENTAL OR CONSEQUENTIAL DAMAGE. ANY IMPLIED WARRANTIES ARE LIMITED TO THE DURATION OF THIS WRITTEN LIMITED WARRANTY.<br />
Commercial Lawn Mowers Heavy Duty <strong>Pressure</strong> <strong>Washer</strong>s Chipper Shredders Generator Accessories
Extended Protection Plan<br />
TERM OF THIS AGREEMENT:<br />
GXI PARTS AND SERVICE LLC will repair or replace the pressure washer should the pump, motor, or frame components fail under normal residential usage within the Five Year Coverage<br />
Period (from the original date of purchase). Up to two replacements will be provided during the life of the agreement.<br />
The cord, GFCI breaker, wand, hose, trigger assembly and other attachments are warranted under the terms of the standard warranty for 90 days. Any commercial, industrial or rental use of<br />
the product will void this agreement.<br />
TO QUALIFY FOR REPAIRS UNDER THIS AGREEMENT:<br />
The Product Protection Plan must be purchased and paid in full a residential customer. Product must be purchased in the United States, Mexico or Canada from a dealer authorized by GXi<br />
Outdoor Power Equipment LLC to sell those products. This warranty applies to first retail purchaser / owner and is non-transferable. A serial number and proof of purchase receipt showing<br />
date of purchase and authorized dealer is required to demonstrate warranty purchase eligibility.<br />
WHAT GXI PARTS AND SERVICE LLC WILL REPAIR OR REPLACE UNDER AGREEMENT:<br />
GXI PARTS AND SERVICE LLC will repair or replace with a new or reconditioned product, at its option, any part that fails under normal use during the applicable warranty time period subject<br />
to the exclusions stated herein. This agreement is void if the owner fails to follow the prescribed maintenance and operating procedures described in the product manual.<br />
GXI PARTS AND SERVICE LLC has the right to recover administration costs from the owner if the root cause of the failure is found to be other than conditions covered by this<br />
agreement. Anything replaced under this agreement becomes the property of GXI PARTS AND SERVICE LLC. Parts replaced under this agreement will only be covered for the term of the<br />
agreement. No warranty of any kind beyond the term of this agreement is implied.<br />
TO OBTAIN SERVICE:<br />
Contact GXI PARTS AND SERVICE LLC to obtain return authorization and directions as to where to send your product for evaluation. Have your Product Protection Plan receipt and the<br />
product serial number available when you call.<br />
Easy Return Service – Contact GXI PARTS AND SERVICE LLC for a pre-paid return shipping label and instructions to ship the product to our repair facility. If there is a failure<br />
covered under the terms of this agreement, the product will be repaired and returned to the customer free of all charges. In the event there is a repair required that is not<br />
covered under the terms of this agreement, GXI PARTS AND SERVICE LLC will notify the customer of the repair and return shipping costs prior to proceeding with repairs. If<br />
payment is not received within 60 days the product will be disposed of.<br />
Advance Exchange Service - Contact GXI PARTS AND SERVICE LLC and provide a valid credit card, a $75 pre-authorization will be made against your card. GXI PARTS AND<br />
SERVICE LLC will ship a replacement unit to you with a pre-paid return shipping label and instructions to ship the faulty product to our repair facility. If there is a failure that is<br />
covered under the terms of this agreement, the pre-authorized charges will be cancelled. In the event there is a non-covered repair required or accessories are missing, GXI<br />
PARTS AND SERVICE LLC will charge the customer’s card for the repairs and the missing accessories (one way freight?) The other guy pays for this.<br />
If you are not satisfied with service under this agreement, contact GXI PARTS AND SERVICE LLC. However, if you should require further assistance, write to GXI PARTS AND SERVICE LLC,<br />
attention customer Service.<br />
EXCLUSIONS:<br />
THIS AGREEMENT DOES NOT EXTEND TO PARTS AFFECTED OR DAMAGED BY ACCIDENT AND/OR COLLISION, CONTAMINATION, USE IN AN APPLICATION FOR WHICH THE PRODUCT<br />
WAS NOT DESIGNED OR ANY OTHER MISUSE, NEGLECT, INCORPORATION OR USE OF UNSUITABLE ATTACHMENTS OR PARTS, UNAUTHORIZED ALTERATION, OR ANY CAUSES OTHER<br />
THAN NORMAL USE OF THE PRODUCT. IN PARTICULAR, THIS WARRANTY DOES NOT COVER DAMAGE CAUSED BY FAILURE TO FOLLOW PRESCRIBED WARNINGS AND OPERATING<br />
PRACTICES; FAILURE TO FOLLOW PROPER MAINTENANCE AND STORAGE PROCEDURES; AND PHYSICAL DAMAGE DUE TO SHIPPING, HANDLING OR STORAGE.<br />
DISCLAIMER OF CONSEQUENTIAL DAMAGE AND LIMITATION OBLGATIONS UNDER THIS AGREEMENT:<br />
GXI PARTS AND SERVICE LLC DISCLAIMS ANY RESPONSIBILITY FOR LOSS OF TIME OR USE OF THE PRODUCT, TRANSPORTATION, COMMERCIAL LOSS, OR ANY OTHER INCIDENTAL OR<br />
CONSEQUENTIAL DAMAGE.<br />
THIS AGREEMENT IS VOID IF THE MANUFACTURING DATE AND THE SERIAL NUMBER ON THE EQUIPMENT HAS BEEN REMOVED OR THE EQUIPMENT HAS BEEN MODIFIED. THE<br />
AGREEMENT IS NOT TRANSFERABLE, NON-REFUNDABLE AND HAS NO CASH VALUE.<br />
Product Protection Plan features, pricing and specifications are subject to change without notice. Please contact GXI PARTS AND SERVICE LLC at [1] 919-550-3259 or visit<br />
www.pressurewasher911.com to verify pricing and availability.<br />
Name: _________________________________________<br />
Address: ________________________________________<br />
City, State, Zip Code: _______________________________<br />
Phone Number: ___________________________________<br />
Fax Number: _____________________________________<br />
E-mail: _________________________________________<br />
<strong>Pressure</strong> <strong>Washer</strong> Model:<br />
P1450S P1450S-CAN P1600S P1600S-BB P1600S-CAN<br />
P1750S P1750S-CAN P1800S P1800S-BB P1800S-CAN<br />
Serial Number: __________________________________<br />
Store of Purchase: _______________________________<br />
Date of Purchase: ________________________________<br />
Please attach a copy of your sales receipt.<br />
Product Registration Card<br />
I would like to purchase the Extended Protection Plan:<br />
Within 30 days from date of purchase: $89.99<br />
Within 12 months from date of purchase: $109.99<br />
Within 18 months from date of purchase: $129.99<br />
No, thank you. No product protection plan selected.<br />
Form of Payment:<br />
Payment enclosed. Please make payable to: GXi Parts and Service<br />
Charge My Credit Card: VISA MASTERCARD<br />
Credit Card Number: _______________________________<br />
Expiration Date: __________________________________<br />
Mail To: GXi Parts and Service<br />
or Fax To:<br />
7868 US Highway 70, Suite C [1] 919-550-3277<br />
Clayton, NC 27520