Kogeplade PVL6HT46 - Harald Nyborg
Kogeplade PVL6HT46 - Harald Nyborg
Kogeplade PVL6HT46 - Harald Nyborg

Create successful ePaper yourself
Turn your PDF publications into a flip-book with our unique Google optimized e-Paper software.
DK<br />
GB<br />
IE<br />
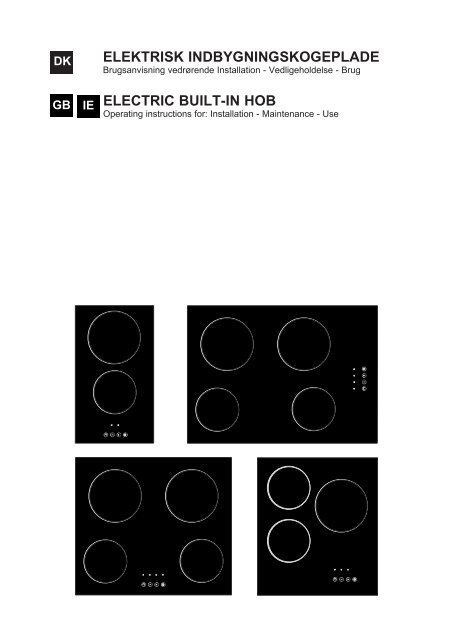
ELEKTRISK INDBYGNINGSKOGEPLADE<br />
Brugsanvisning vedrørende Installation - Vedligeholdelse - Brug<br />
ELECTRIC BUILT-IN HOB<br />
Operating instructions for: Installation - Maintenance - Use
DANSK<br />
DK<br />
Dette apparat er blevet testet og indstillet af kvalificeret og specialuddannet<br />
personale inden afsendelse fra fabrikken. Herved optimeres<br />
funktionsresultaterne. Alle senere reparationer eller indstillinger skal udføres<br />
nøje og præcist. Derfor anbefales det altid at kontakte forhandleren eller det<br />
nærmeste servicecenter. Oplys om funktionsforstyrrelsen og apparatets<br />
model. Originale reservedele kan kun købes ved servicecentrene. Af hensyn<br />
til miljøet og børnenes sikkerhed må emballagen ikke efterlades i miljøet.<br />
Indlevér den til en genbrugsstation.<br />
Symbolet på apparatet eller emballagen betyder, at apparatet ikke<br />
skal opfattes som almindeligt husholdningsaffald. Apparatet skal indleveres til<br />
et affaldsbehandlingsselskab med henblik på genbrug af elektrisk og<br />
elektronisk udstyr. Korrekt bortskaffelse af apparatet reducerer de potentielle<br />
negative miljø- og sundhedsmæssige konsekvenser. Kontakt kommunen, de<br />
lokale affaldsmyndigheder eller forhandleren vedrørende yderligere<br />
oplysninger om genbrug af dette apparat.<br />
INDHOLDSFORTEGNELSE<br />
Generelle forskrifter s. 2-3<br />
Instruktioner vedrørende brug s. 4-5<br />
Vedligeholdelse og rengøring s. 6<br />
Instruktioner vedrørende installation s. 7-9<br />
1 - DANSK
Generelle forskrifter<br />
DK<br />
Kære kunde.<br />
Tak for valget af vores apparat. Det er nemt at bruge dette apparat. Det<br />
er dog nødvendigt at læse denne brugsanvisning omhyggeligt inden<br />
installation og brug af apparatet. Brugsanvisningen indeholder de<br />
korrekte oplysninger vedrørende optimal installation, brug og<br />
vedligeholdelse af apparatet.<br />
• Dette produkt er til madlavning og opvarmning af fødevarer.<br />
Må ikke anvende dem til andre formål.<br />
• Det er meget vigtigt at aflevere brugsanvisningen sammen med<br />
apparatet i tilfælde af overdragelse.<br />
• Dette apparat er udviklet til brug i private hjem. Det skal betjenes af<br />
voksne, og børn må ikke benytte apparatet som legetøj. De<br />
tilgængelige dele kan blive meget varme i forbindelse med brug af<br />
apparatet.<br />
• Hold øje med børn og uansvarlige personer således, at de ikke kan<br />
berøre de varme overflader og ikke opholder sig i nærheden af<br />
apparatet, når det er i brug.<br />
• Installationen af apparatet skal udføres af autoriserede og kvalificerede<br />
installatører med kendskab til de gældende installationsstandarder.<br />
• Frakobl strømmen, og lad apparatet afkøle inden vedligeholdelse eller<br />
rengøring.<br />
• Det anbefales at slukke den respektive kogeplade inden fjernelse af<br />
gryden/panden.<br />
• Brugeren må ikke selv udskifte apparatets forsyningskabel. Udskiftningen<br />
må kun udføres af kvalificeret personale.<br />
• Frakobl straks strømmen i tilfælde af sprækker i den glaskeramiske<br />
kogeplade - dette gælder også i tilfælde af minimale sprækker.<br />
• Det frarådes at anbringe stanniol, plastbeholdere eller andet varmefølsomt<br />
materiale på de varme overflader. Brug ikke den glaskeramiske kogeplade<br />
som frasætningsplade til eventuelle genstande.<br />
• Undgå rengøring med damprenser.<br />
2 - DANSK
Generelle forskrifter<br />
DK<br />
• Kontakt altid et autoriseret servicecenter i tilfælde af eventuelle<br />
reparationer. Sørg for, at der benyttes originale reservedele.<br />
Uautoriserede reparationer indebærer risiko for skader.<br />
• Det er også muligt at benytte gryder/pander af glas, porcelæn og stål,<br />
forudsat at grydernes/pandernes bund er fuldstændigt plan. Det anbefales<br />
at benytte gryder/pander med en passende diameter i forhold til den<br />
pågældende kogezone. Brug ikke gryder/pander med en mindre diameter<br />
end den pågældende kogezone. Tænd ikke kogezonen, hvis der ikke er<br />
anbragt en gryde/pande.<br />
• Anbring ikke gryder/pander med skæv eller deform bund på kogezonerne.<br />
Herved undgås at gryden/panden vælter, eller at væsken koger over.<br />
Tænd kun kogezonerne, hvis der er anbragt gryder/pander.<br />
Apparatet opfylder kravene i følgende direktiver:<br />
- 2006/95/EF (lavspænding)<br />
- 2004/108/EF (elektromagnetisk kompatibilitet)<br />
- 89/109/EF (materialer og genstande, bestemt til at komme i<br />
berøring med levnedsmidler)<br />
- 2002/96/EF (WEEE)<br />
- 2005/32/EF (EuP)<br />
3 - DANSK
Instruktioner vedrørende brug<br />
DK<br />
<strong>Kogeplade</strong>ns kontrolområde er udstyret med kontrollerne til styring af<br />
funktionen i de enkelte kogezoner.<br />
Kontrollér, at kontrolområdet er ryddet og rengjort, inden der sluttes strøm til<br />
kogepladen. Efter tilslutningen viser kontrollernes display tegnet “-”.<br />
• Tænding af kogezoner:<br />
Inden tænding af kogezonerne er det nødvendigt at tænde kogepladen<br />
ved at berøre symbolet (ON-OFF). Det første display viser “0”.<br />
<strong>Kogeplade</strong>n forbliver aktiveret i ca. 10 sekunder, og inden udløbet af dette<br />
tidsrum er det muligt at vælge kogezonerne ved hjælp af symbolet og<br />
tænde de pågældende kogezoner ved at benytte en af disse to<br />
fremgangsmåder:<br />
1 - Ved at berøre symbolet “-”<br />
Displayet viser effekten “4” som default. Det er herefter muligt at øge eller<br />
reducere effekten mellem min. “1” og maks. “9” (kogezonen slukkes, når<br />
effekten “0” indstilles).<br />
2 - Ved at berøre symbolet “+”<br />
Displayet viser effekten “9” skiftevist med bogstavet “A” som default. Hvis<br />
effekten inden udløbet af 10 sekunder ændres fra “8” til “1”, aktiveres<br />
“Boost” funktionen (bogstavet “A” vises skiftevist med den valgte effekt). I<br />
modsat fald fungerer kogezonen som normalt (bogstavet “A” vises ikke).<br />
I “Boost” funktionen indstilles kogezonen til maks. effekt i et givent<br />
tidsrum, som afhænger af den konkrete indstilling. Herefter skifter<br />
kogezonen automatisk til den normale funktion (se tabellen).<br />
Når bogstavet “A” vises i denne funktion, er det muligt at kontrollere den<br />
valgte effekt ved at berøre symbolet “+” eller “-“.<br />
Udvidet kogezone (hvis den findes):<br />
Den udvidede kogezone aktiveres ved hjælp af symbolerne “+” og “-“.<br />
Funktionen kan kun benyttes, hvis den pågældende kogezone allerede er<br />
tændt. Der tændes en prik ved siden af tallet.<br />
Sluk den udvidede kogezone ved at slukke den pågældende kogezone.<br />
Bemærk:<br />
Symbolet “H” angiver, at den pågældende kogezone stadig er varm.<br />
Symbolet “H” slukkes i tilfælde af strømsvigt og vises ikke igen, når<br />
4 - DANSK
Instruktioner vedrørende brug<br />
DK<br />
strømforsyningen genetableres. Vær meget forsigtig i sådanne situationer.<br />
Det er altid muligt at tænde kogezonen på ny, når symbolet “H” er tændt.<br />
• Slukning af kogezoner:<br />
- Sluk de enkelte kogezoner ved at vælge den pågældende kogezone ved<br />
hjælp af symbolet , og benyt symbolerne “-” og “+”.<br />
- Sluk alle kogezoner ved at berøre symbolet (ON-OFF).<br />
- Afhængigt af effekten kan kogezonerne være tændt i et maks. (uafbrudt)<br />
tidsrum. Herefter slukkes kogezonerne automatisk (se tabellen), og<br />
bogstavet “H” vises.<br />
• Børnesikring:<br />
Børnesikringen kan kun aktiveres, når kogezonerne er slukket. Aktivér den<br />
ved at berøre symbolet og dernæst symbolerne og “-” samtidigt.<br />
Herefter høres lydalarmen. Berør til slut symbolet “+”. En række symboler<br />
“L” tændes i et par sekunder. Børnesikringen er aktiveret, og kontrollerne<br />
kan ikke benyttes.<br />
Frakobl børnesikringen ved at berøre symbolet og dernæst<br />
symbolerne og “-” samtidigt. Herefter høres lydalarmen. Berør til slut<br />
symbolet “-”.<br />
• Forskrift:<br />
Hvis en eller flere kontroller betjenes i forkert rækkefølge i mere end 10<br />
sekunder, overgår kogepladen til fejlstatus. Kogezonerne slukkes<br />
automatisk, og symbolet “F” blinker. Efter afhjælpning af fejlen<br />
(eksempelvis snavs eller en genstand i kontrolområdet), slukkes symbolet,<br />
og kogepladen kan igen benyttes.<br />
Effektniveau<br />
Funktionsintervaller<br />
(sekunder) Boost tidsrum<br />
Maks. tidsrum<br />
for uafbrudt<br />
Tændt Slukket<br />
brug (timer)<br />
1 1 46 1 min. 22 sek. 10<br />
2 4 44 2 min. 44 sek. 5<br />
3 6 41 4 min. 6 sek. 5<br />
4 9 38 5 min. 28 sek. 4<br />
5 11 36 6 min. 50 sek. 3<br />
6 14 33 1 min. 22 sek. 2<br />
7 21 26 2 min. 44 sek. 2<br />
8 28 19 2 min. 44 sek. 2<br />
9 Tændt uafbrudt - 1<br />
5 - DANSK
Vedligeholdelse og rengøring<br />
DK<br />
Vedligeholdelse og rengøring<br />
Kobl strømmen fra apparatet hver gang inden vedligeholdelse eller rengøring.<br />
Rengør kogepladen hver gang efter brug, når den er afkølet. Fjern eventuelle<br />
madrester. Hvis de ikke fjernes, inden kogepladen atter tændes, kan de<br />
sætte sig fast permanent.<br />
Benyt kun egnede produkter. Undgå brug af ståluld, skuresvampe og<br />
skurepulver, idet de kan ridse glassets overflade.<br />
Brug ikke spray med ovnrens, idet dette produkt er aggressivt og ødelægger<br />
glassets overflade.<br />
Mindre rester kan fjernes med en fugtig klud eller med varmt sæbevand.<br />
Hvide ringe som følge af sæberester skal fjernes med vand. Tør efter med<br />
en blød klud.<br />
Kalkpletter fra væske, der er kogt over, skal fjernes med eddike, citronsaft<br />
eller kalkfjerner.<br />
Fjern eventuelle rester af rengøringsmidler, idet de kan ødelægge glasset,<br />
når kogepladen atter tændes.<br />
Hårde og fastbrændte aflejringer<br />
bør fjernes ved hjælp af en almindelig<br />
glasskraber med metalblad (se<br />
figuren).<br />
Undgå rengøring med damprenser.<br />
Kontakt kvalificeret personale vedrørende afhjælpning af eventuelle<br />
funktionsforstyrrelser.<br />
6 - DANSK
Instruktioner vedrørende installation<br />
DK<br />
Tilslutning af strøm<br />
Tilslutningen af strøm må kun udføres af kvalificeret personale med kendskab<br />
til de gældende installationsstandarder.<br />
Apparatet er indstillet til vekselstrøm med den spænding som fremgår af<br />
mærkeskiltet (gengivet i slutningen af brugsanvisningen og på apparatet (se<br />
også det eventuelle el-skema på apparatet).<br />
I tilfælde af permanent installation er det nødvendigt at installere en alpolet<br />
afbryder med en indbyrdes kontaktafstand på min. 3 mm mellem apparatet<br />
og strømforsyningen. Afbryderen skal være egnet til den konkrete belastning<br />
og skal opfylde kravene i de gældende standarder. Den gul/grønne jordleder<br />
må ikke være berørt af denne afbryder.<br />
Forsyningskablet skal være af typen H05RR-F og skal anbringes således, at<br />
ingen dele af kablet kan opnå temperaturer, der er højere end<br />
omgivelsestemperaturen + 50 °C.<br />
Kontrollér inden tilslutningen, at strømforsyningen er udstyret med effektiv<br />
jordforbindelse. Strømforsyningen skal opfylde de gældende standarder, og<br />
der skal være nem adgang til stikkontakten eller den alpolede afbryder efter<br />
installation af apparatet.<br />
Producenten kan ikke gøres ansvarlig i tilfælde af manglende<br />
overholdelse af de gældende standarder.<br />
7 - DANSK
Instruktioner vedrørende installation<br />
DK<br />
Instruktioner vedrørende indbygning i bordplade<br />
<strong>Kogeplade</strong>r 30 cm<br />
<strong>Kogeplade</strong>r 45 cm<br />
4÷8<br />
510<br />
290<br />
4÷8<br />
510<br />
450<br />
60 min<br />
190 min<br />
63<br />
60 min<br />
190 min<br />
63<br />
480<br />
480<br />
260<br />
415<br />
<strong>Kogeplade</strong>r 60 cm<br />
<strong>Kogeplade</strong>r 70 cm<br />
4÷8<br />
510<br />
580<br />
4÷8<br />
510<br />
770<br />
60 min<br />
190 min<br />
63<br />
60 min<br />
190 min<br />
50<br />
480<br />
480<br />
550<br />
740<br />
<strong>Kogeplade</strong>r 90 cm<br />
900<br />
510<br />
4÷8 4÷8<br />
350<br />
900<br />
60 min<br />
190 min<br />
63<br />
60 min<br />
190 min<br />
63<br />
480<br />
330<br />
870<br />
880<br />
Apparatet kan indbygges i alle former for bordplader, forudsat at<br />
køkkenelementernes vægge tåler en temperatur svarende min. til<br />
omgivelsestemperaturen + 65 °C (EN 60335-2-6). Installér ikke apparatet for<br />
tæt på brandfarlige materialer (gardiner, viskestykker, osv.<br />
8 - DANSK
50mm<br />
Instruktioner vedrørende installation<br />
DK<br />
Anbring tætningslisten (medfølger) omkring kogepladens omkreds. Sørg for,<br />
at enderne når hinanden uden at overlappe.<br />
Læg kogepladen ned i åbningen i bordpladen, og sørg for, at den er<br />
centreret.<br />
Fastgør kogepladen til bordpladen ved hjælp af låsekonsollerne.<br />
30mm<br />
Forskrifter<br />
Der skal være min. 600 mm mellem kogepladen og eventuelle overskabe<br />
monteret over kogepladen. For at undgå kraftig overophedning er det<br />
nødvendigt at montere en skilleplade (skillepladen skal min. have samme<br />
størrelse som indbygningshullet). Dette gælder, uanset om der er monteret<br />
en ovn under kogepladen eller ej.<br />
85 mm<br />
Skilleplade<br />
9 - DANSK
ENGLISH<br />
GB<br />
Before leaving the factory, this appliance has been inspected and adjusted by<br />
expert and qualified personnel so that it gives the best operating results. Any<br />
repair or adjustment that may subsequently be necessary must be done with<br />
the greatest care and attention. For this reason, we recommend you always<br />
contact the Dealer who sold the appliance or our nearest Service Centre,<br />
specifying the type of problem and the model of appliance in your<br />
possession. Please also remember that the original spare parts are available<br />
only at our Technical Service Centres. Do not leave the waste from the<br />
packaging unguarded but, both for the safety of children and for the<br />
protection of the environment, dispose of it at a centre for differentiated<br />
waste collection.<br />
The symbol on the product or on the packaging indicates that the<br />
product must not be considered normal household waste, but must be taken<br />
to the appropriate point of collection for recycling electrical and electronic<br />
appliances. The correct disposal of this product contributes to avoiding<br />
potential negative consequences for the environment and for health. For<br />
more detailed information on the recycling of this product, please contact your<br />
municipal offices, the local waste disposal service or the store where you<br />
bought the product.<br />
CONTENTS<br />
General warnings page 2-3<br />
Instructions for use page 4-5<br />
Maintenance and cleaning page 6<br />
Instructions for installation page 7-9<br />
1 - ENGLISH
General warnings<br />
GB<br />
Dear Customer,<br />
Thank you for your preference for our product. This appliance is easy to<br />
use. Before installing and using it, however, please read this booklet<br />
carefully. It contains the correct indications for optimal installation, use<br />
and maintenance of the product.<br />
• This product is for cooking and heating food. Do not use it for other<br />
purposes.<br />
• It is very important to keep this instruction booklet together with the<br />
appliance in the event that it is transferred to another person.<br />
• This appliance has been designed for non-professional use by<br />
private individuals in homes. It must therefore be used by adults<br />
aware of potential dangers and children should not be allowed to<br />
approach it with the intention of playing. During use, the appliance<br />
may be subject to significant heating of the accessible front parts.<br />
• Watch over children and people who are not auto-sufficient for all the<br />
time the hob is on so that they do not touch the hot surface and are<br />
not near the appliance when it is on.<br />
• The product must be installed by competent and qualified fitters aware of<br />
the regulations on installation currently in force.<br />
• Before maintenance or cleaning, disconnect the appliance electrically and<br />
wait for it to cool down.<br />
• Before removing pans, the relative heating element should be switched off.<br />
• The power cable of the appliance must not be replaced by the user. For<br />
replacement, contact qualified personnel only.<br />
• If even only a minimum crack appears on the surface of the glass ceramic<br />
hob, immediately disconnect the electricity.<br />
• Do not place aluminium foil, plastic containers or any material that<br />
perishes with hear on the hot surfaces. Do not use the glass ceramic as a<br />
base to support other objects.<br />
• Do not use jets of vapour for cleaning.<br />
2 - ENGLISH
General warnings<br />
GB<br />
• For any repairs, always contact an authorized Service Centre and ask for<br />
original spare parts only. Repairs by non-competent personnel may cause<br />
damage.<br />
• Glass, porcelain and steel containers can also be used on condition that<br />
they have a very flat base. Containers with a suitable diameter for that of<br />
the cooking areas should be used. Do not use containers with a smaller<br />
diameter than that of the cooking area and do not switch on the cooking<br />
areas without containers.<br />
• The appliance is not intended to be operated by means of an external timer<br />
or separate remote-control system.<br />
• Take care not to place pans with an unstable or deformed bottom on the<br />
heating surfaces in order to avoid accidences by spillage or overflowing of<br />
fluids. Do not switch on the cooking areas without containers.<br />
This appliance is compliant with the Directives:<br />
- 2006/95/EC (low voltage appliances)<br />
- 2004/108/EC (electromagnetic compatibility)<br />
- 89/109/EC (parts in contact with food)<br />
- 2002/96/EC (WEEE)<br />
- 2005/32/EC (EuP)<br />
3 - ENGLISH
Instructions for use<br />
GB<br />
The control area of the hob has the devices for the individual heating<br />
elements to work.<br />
Before connecting the hob to the electric mains, make sure that the control<br />
area is clear and clean. After connection, the displays in the control area<br />
show “-”.<br />
• Switching on the cooking areas:<br />
Before being able to switch on the cooking areas, the hob must be<br />
activated by touching the symbol (ON-OFF) and the first display<br />
shows “0”. The hob remains active for about 10 seconds: in this period,<br />
after having selected the symbol , the cooking areas can be switched<br />
on in the following two ways:<br />
1 – by touching the symbol “-”<br />
the display shows the regulation “4”, at this stage the regulation can be<br />
increased or decreased from a minimum of “1” to a maximum of “9”<br />
(regulation on “0” switches off the cooking area).<br />
2 – by touching the symbol “+”<br />
the display shows “9” alternating with “A”. If within 10 seconds, it is varied<br />
from “8” to “1”, the “Boost” function (shown by the letter “A” which<br />
alternates with the regulation selected) is activated, otherwise the cooking<br />
area will operate normally (the letter “A” does not appear).<br />
With the “Boost” function, the cooking area is raised to its maximum<br />
power for a specific period of time, which varies according to the regulation<br />
selected, and then automatically passes to normal functioning (see table).<br />
When it is functioning with the letter “A” displayed, the regulation selected<br />
can be checked by touching the symbol “+” or “-“.<br />
Extended area (if present):<br />
The extended area is activated by pressing the symbols “+” and “-“ at the<br />
same time only if the cooking area with this function is already on. A dot<br />
next to the number goes on. To switch off the extended area, switch off<br />
the relative cooking area.<br />
4 - ENGLISH
Instructions for use<br />
GB<br />
Notes:<br />
The symbol “H” indicates that the corresponding cooking area is still hot. If<br />
there is a power cut, the symbol “H” goes off and will not appear when the<br />
electricity returns: in this case, be extremely careful. When the symbol “H”<br />
is on, it is always possible to switch the cooking area on again.<br />
• Switching off the cooking area:<br />
- To switch off the individual cooking areas, select them through the<br />
symbol and press the symbols “-” and “+” at the same time.<br />
- To switch off all the cooking areas, touch the symbol (ON-OFF).<br />
- The cooking areas, according to the regulation, have a maximum time of<br />
use after which they automatically switch off (see table) and the symbol<br />
“H” is displayed.<br />
• Child lock:<br />
The lock can only be activated when the cooking areas are switched off.<br />
To insert it, touch the symbol then the and “-” symbols<br />
simultaneously and, after the beep, the “+” symbol. A series of “L” light up for<br />
a few seconds, the lock is activated and the controls are blocked.<br />
To disable the lock, touch the symbol then the and “-” symbols<br />
simultaneously and then, after the beep, the “-” symbol.<br />
• Warning:<br />
If one or more controls are pressed in an incorrect sequence for more than<br />
ten seconds, the hob enters the error mode, the cooking areas are<br />
automatically switched off and the symbol “F” is shown, flashing. After<br />
removing the cause of the error (for example dirt or an object placed on<br />
the control area) the visual display is deactivated and the hob can be used<br />
once again.<br />
Intervals of functioning<br />
(seconds)<br />
Time of<br />
Boost<br />
ON OFF activation<br />
1 1 46 1min 22sec 10<br />
2 4 44 2min 44sec 5<br />
3 6 41 4min 06sec 5<br />
4 9 38 5min 28sec 4<br />
5 11 36 6min 50sec 3<br />
6 14 33 1min 22sec 2<br />
7 21 26 2min 44sec 2<br />
8 28 19 2min 44sec 2<br />
9 Always - 1<br />
Level of<br />
regulation<br />
5 - ENGLISH<br />
Time of maximum<br />
continuous use<br />
(hours)
Maintenance and cleaning<br />
GB<br />
Maintenance and cleaning<br />
Before each operation, disconnect the appliance from the mains.<br />
After each use, when cool, clean the hob eliminating even the small residues<br />
which, when the hob is switched on again, can become impossible to remove.<br />
Only use suitable products, avoiding steel wool pads, abrasive sponges and<br />
powder detergents as these products can scratch the surface of the glass.<br />
Sprays to clean ovens are not suitable as they are aggressive and damaging<br />
for the surface of the glass.<br />
Slight residue can be removed with a damp cloth or with hot soapy water.<br />
Ring marks from soap can be removed with water which must be dried using<br />
a soft cloth.<br />
Marks of scale, caused by boiling liquids overflowing from the containers,<br />
are removed with vinegar, lemon or an anti-scale product.<br />
Eliminate residues of detergent as, the next time they heat up, they could<br />
become aggressive for the glass.<br />
For resistant and hardened<br />
incrustations we recommend using<br />
a scrape for windows with a metallic<br />
blade which can easily be found on<br />
the market (see figure).<br />
Do not use jets of steam for cleaning.<br />
To remedy any anomalies of functioning, please contact qualified personnel.<br />
6 - ENGLISH
Instructions for installation<br />
GB<br />
Electric connection<br />
The appliance must be connected electrically only by qualified personnel<br />
aware of the current regulations on installation in force.<br />
The appliance is ready for operating in alternating current, at the voltage<br />
shown on the “characteristic data” plate shown at the end of the booklet and<br />
on the product (also see any connection diagram on the product).<br />
In the case of connection directly to the mains, an omnipolar switch must be<br />
placed between the appliance and the mains with a minimum opening<br />
between the contacts of at least 3 mm dimensioned to the load and in the<br />
respect of the regulations currently in force. The yellow/green earth wire must<br />
not be interrupted by this switch.<br />
The power supply cable must be H05RR-F and must be positioned in such a<br />
way that at no point can a temperature 50°C above ambient temperature be<br />
reached.<br />
Before making the connection, check that the power circuit has an effective<br />
earthing that meets regulations in force and that the socket or the omnipolar<br />
switch is easily reached when the appliance is installed.<br />
The earth cable (yellow/green) connected to the product’s terminal must<br />
be longer than the others.<br />
The manufacturer declines all liability in the event that the regulations in<br />
force are not respected.<br />
7 - ENGLISH
Instructions for installation<br />
GB<br />
Instructions for fitting into kitchen units<br />
hobs series 30 cm<br />
hobs series 45 cm<br />
4÷8<br />
510<br />
290<br />
4÷8<br />
510<br />
450<br />
190 min<br />
60 min<br />
63<br />
60 min<br />
190 min<br />
63<br />
480<br />
480<br />
260<br />
415<br />
hobs series 60 cm<br />
hobs series 70 cm<br />
4÷8<br />
510<br />
580<br />
4÷8<br />
510<br />
770<br />
60 min<br />
190 min<br />
63<br />
60 min<br />
190 min<br />
50<br />
480<br />
480<br />
550<br />
740<br />
hobs series 90 cm<br />
510<br />
4÷8 4÷8<br />
900<br />
350<br />
900<br />
60 min<br />
190 min<br />
63<br />
60 min<br />
190 min<br />
63<br />
480<br />
330<br />
870<br />
880<br />
The appliance can be fitted into all types of units the walls of which resist an<br />
extra temperature of at least 65° C above the ambient temperature (EN<br />
60335 - 2 - 6). Avoid installing it near inflammable materials, for example<br />
curtains, cloths etc.<br />
8 - ENGLISH
Instructions for installation<br />
GB<br />
Position the special sealing trim (supplied) on the perimeter of the hob, taking<br />
care that the ends meet without overlapping.<br />
Introduce the hob into the opening of the unit, taking care to centre it.<br />
Fix the hob to the unit with the special fixing brackets.<br />
Warnings<br />
Any presence of a cupboard above the hob must have a minimum distance<br />
from the top of 600 mm. In order to avoid excessive overheating, even in the<br />
absence of an oven underneath, a sector of separation is necessary to avoid<br />
excessive overheating, at least of the dimension of the fitting bolts.<br />
85 mm<br />
Sector of separation<br />
9 - ENGLISH
Dis. S506_989 -I-<br />
Cod. 099230009850<br />
Rev. 0 del 03/10<br />
Apparatets mærkeskilt<br />
Rating plate of the product