RP-1 ver 1.79.indd - Hifi Gear
RP-1 ver 1.79.indd - Hifi Gear
RP-1 ver 1.79.indd - Hifi Gear

You also want an ePaper? Increase the reach of your titles
YUMPU automatically turns print PDFs into web optimized ePapers that Google loves.
Owner´s manual<br />
<strong>RP</strong>-1<br />
RoomPerfect<br />
MENU<br />
<strong>RP</strong>-1 Room Processor<br />
ENTER
Table of Contents<br />
Operating Voltage 4<br />
Unpacking the <strong>RP</strong>-1 4<br />
Serial Number Registration 4<br />
Introduction 5<br />
Accessories 6<br />
Front Panel 7<br />
Display Indicators 8<br />
Rear Panel 8<br />
Remote Control 10<br />
Connecting the <strong>RP</strong>-1 12<br />
- Connecting to sources and amplifiers 12<br />
- Setup options of Main and Line outputs 14<br />
Menu System 15<br />
- Navigating the Menu System 15<br />
Menu Tree 16<br />
Introduction to RoomPerfect 17<br />
- Global Listening 17<br />
- Focus Listening 17<br />
- Voicing 17<br />
RoomPerfect 18<br />
- Guided Setup 18<br />
- Setting the Measurement Volume Level 19<br />
- Focus Measurement 20<br />
- Room Measurements 20<br />
- Adding more Room Measurements 21<br />
- Calculation of Focus and Global Filters 22<br />
- Advanced Options 23<br />
- Change Focus Pos. 23<br />
- Measure Room Pos. 23<br />
- RoomKnowledge 24<br />
- RoomCorrection 24<br />
Display 25<br />
Display Timeout 25<br />
Display Brightness 25<br />
Input Connection 25<br />
Input Sensitivity 26<br />
Advanced Setup 26<br />
- Communication 26<br />
- Comm Address 26<br />
- Comm Speed 26<br />
- Line Out Level 27<br />
- Routing 27<br />
- Crosso<strong>ver</strong> Frequency 28<br />
- Filter Type 28<br />
- Delay 29<br />
- Remote Control 29<br />
- Firmware Versions 30<br />
- Factory Reset 30<br />
Troubleshooting 31<br />
- RoomPerfect 31<br />
- <strong>RP</strong>-1 32<br />
Firmware Upgrading 33<br />
Connectors 34<br />
- Mains Connector 34<br />
- Balanced Inputs 34<br />
- Unbalanced Inputs 34<br />
Cleaning and Maintenance 34<br />
Technical Specifications 35<br />
- Audio 35<br />
- Protection 35<br />
- Mains 35<br />
- Mechanical 35<br />
Technical Assistance 36<br />
Appendix 37<br />
- Voicing Curves 37<br />
Manual <strong>ver</strong>sion 01-08-09<br />
3
Operating Voltage<br />
The <strong>RP</strong>-1 can be switched between 115V and 230V mains voltage.<br />
In 115V mode the <strong>RP</strong>-1 requires a mains voltage of 100V-120V at 50-60Hz.<br />
In 230V mode the <strong>RP</strong>-1 requires a mains voltage of 220V-240V at 50-60Hz.<br />
The mains voltage setting for your <strong>RP</strong>-1 can be changed on the rear selector.<br />
Make sure the rear selector is in the correct position and connect the power input<br />
only to the appropiate AC source. The warranty will not co<strong>ver</strong> any damage caused<br />
by connecting to the wrong type of AC mains.<br />
The <strong>RP</strong>-1 has three power modes:<br />
1. OFF<br />
No circuitry is powered. Please note that some parts of the mains entry section still carry live mains.<br />
2. STANDBY<br />
The microprocessor is active..<br />
3. ON<br />
All circuits active.<br />
Unpacking the <strong>RP</strong>-1<br />
Carefully remove the unit and accessory kit from the carton, visually check for shipping damage.<br />
Contact both the shipper and your Lyngdorf Audio representative immediately if the unit bears any sign<br />
of damage from mishandeling. All Lyngdorf Audio equipment is carefully inspected before leaving our<br />
factory.<br />
Keep shipping carton and packing material for future use or in the unlikely event that<br />
the unit needs servicing. If this unit is shipped without the original packaging, damage<br />
could occur and void the warranty.<br />
Serial Number Registration<br />
Please record the serial number of your <strong>RP</strong>-1 here for future reference. The serial number is printed on<br />
the label on the rear panel. You will need this serial number, should you e<strong>ver</strong> require service for your<br />
<strong>RP</strong>-1.<br />
<strong>RP</strong>-1 serial number: _____________________<br />
4
Introduction<br />
Congratulations on the purchase of your Lyngdorf Audio <strong>RP</strong>-1 with RoomPerfect.<br />
This ‘Black Box’ expands your existing music system with the most advanced room correction system<br />
on the market. It is implemented in such a way that you will always achieve the perfect result. No computer<br />
needed, no acoustic knowledge needed, no user input needed. We leave nothing to chance in the<br />
fully automated calibration process.<br />
Howe<strong>ver</strong>, for the advanced user there are plenty of challenges since the <strong>RP</strong>-1 is also a complete ‘Control<br />
Centre’ that allows you to build advanced multi-way passive or active speaker systems. This is possible<br />
due to the <strong>ver</strong>y powerful built-in DSP ‘engine’ which facilitates signal routing, creation of active crosso<strong>ver</strong>s,<br />
delay settings etc.<br />
In fact we believe the <strong>RP</strong>-1 to be a true ‘Black Box’ in the way that it sets new standards for what’s possible<br />
to improve sonically in a music system.<br />
5
1 2 3<br />
4 5 6<br />
7 8 9<br />
digital 0<br />
info<br />
analog<br />
menu<br />
RCS<br />
AMP<br />
channel<br />
ENTER<br />
A/B<br />
random repeat<br />
CD<br />
TUNER<br />
volume<br />
Accessories<br />
You should find the following accessories included:<br />
Mains cord<br />
8 m (26.25 feet)<br />
XLR – XLR cable<br />
Microphone<br />
Programming cable<br />
Remote control<br />
Microphone stand with Mic clamp<br />
(deli<strong>ver</strong>ed in a separate carton)<br />
6
Front Panel<br />
MENU<br />
<strong>RP</strong>-1 Room Processor<br />
ENTER<br />
1 2 3 4<br />
Controls<br />
The buttons/controls on the front panel of the <strong>RP</strong>-1 can all be operated with a direct press.<br />
1. Mains Switch<br />
Powers the <strong>RP</strong>-1 on/off.<br />
2. Display<br />
Display with all information on menu system and status.<br />
3. Navigation Keys<br />
Pressing the Enter button for 3 seconds will set the <strong>RP</strong>-1 in stand-by mode and turns On the <strong>RP</strong>-1 from<br />
stand-by mode with a short press.<br />
In normal operation mode the Up/Down toggles between the avaliable Focus and Global filters and Bypass<br />
whereas the Left/Right toggles between neutral and the available voicings.<br />
In menu mode used for navigation in the menu system: Up/Down, Left/Right & Enter. Pressing and holding<br />
down the Up/Down, Right/Left keys, changes some selected values fast.<br />
4. Menu Button<br />
Toggles Menu mode on/off and navigates one level back when in menu mode.<br />
7
Display Indicators<br />
1 2 3<br />
1. Menu<br />
Alphanumeric Display (2*20 Characters).<br />
2. Standby Indicator<br />
Power On is indicated with display showing all information on status. Standby mode is indicated with the<br />
Standby Indicator being lit only.<br />
3. RoomPerfect Logo<br />
Is illuminated whena RoomPerfect filter is engaged.<br />
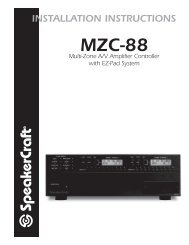
Rear Panel<br />
1<br />
2<br />
3<br />
4 5<br />
6<br />
7<br />
8<br />
1. Analog Output<br />
Double pairs of balanced/XLR Left/Right analog outputs (Main and Line out).<br />
The best performance is obtained by using the balanced output. Also, it is possible to mix balanced and<br />
unbalanced connections - i.e. to connect e.g. the main channel via the balanced output and the line channel<br />
via the unbalanced output.<br />
Ne<strong>ver</strong> connect balanced and unbalanced Line or Main out at the same time.<br />
Only connect either balanced or unbalanced for each Main out, Line out.<br />
2. 115V and 230V mains voltage switch.<br />
Switches between 115V and 230V mains input voltage.<br />
Make sure the rear selector is in the correct setting and connect the power input<br />
only to an appropiate AC source. The warranty will not co<strong>ver</strong> any damage caused by<br />
connecting to a wrong type of AC mains.<br />
8
3. Analog Input<br />
Balanced/XLR Left/Right Analog input.<br />
Ne<strong>ver</strong> connect balanced and unbalanced Input at the same time.<br />
4. Analog Input<br />
Unbalanced/RCA Left/Right Analog input.<br />
The default Input setting is “Balanced / XLR”. This can be changed to “Unbalanced<br />
/ RCA” from the “Input Connection” menu.<br />
If the setting is not set correctly you may experience humming.<br />
5. Analog Output<br />
Double pairs of unbalanced/RCA Left/Right analog outputs (Main and Line out).<br />
Ne<strong>ver</strong> connect balanced and unbalanced Output at the same time.<br />
6. Mic. In<br />
Mic. in for connection of RoomPerfect microphone.<br />
7. RS232 Input/Aux<br />
RS232 communication connectors for communication with a PC for firmware update, remote control<br />
from other Lyngdorf equipment with broadcast commands or linked control between se<strong>ver</strong>al other amplifiers<br />
or other suitable equipment with a remote start.<br />
• The ‘INPUT’ is used for connection to a PC, or as a control input from a Lyngdorf master amplifier.<br />
• The ‘AUX’ connection bypasses input from other master amplifiers to the next amplifier.<br />
8. Mains Input<br />
9
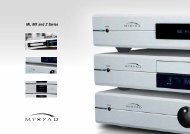
Remote Control<br />
The remote control is used to access the menu system as well as the buttons directly accessible on the<br />
front panel. To control the <strong>RP</strong>-1 the RCS (Room Correction System) key must be pressed.<br />
The functionality of the buttons when RCS is pressed are as follows:<br />
1. Standby<br />
The standby button puts the <strong>RP</strong>-1 in stand-by mode.<br />
1<br />
2<br />
1 2 3<br />
2. Numerical Buttons 1-8<br />
Selects Focus listening mode (up to 8 different listening positions can<br />
be stored in RoomPerfect).<br />
3<br />
5<br />
6<br />
4 5 6<br />
7<br />
digital<br />
8<br />
0<br />
9<br />
info<br />
4<br />
7<br />
3. Numerical Button 9<br />
Selects global listening mode.<br />
8<br />
9<br />
11<br />
12<br />
analog<br />
AMP<br />
RCS<br />
CD<br />
menu<br />
TUNER<br />
10<br />
13<br />
14<br />
4. Digital<br />
No function<br />
15<br />
17<br />
channel<br />
volume<br />
16<br />
5. Numerical Button 0<br />
Selects bypass listening mode (no room correction filter selected).<br />
18<br />
19<br />
ENTER<br />
6. Info<br />
To select a specific Voicing filter, press the ‘Info’ followed by numerical<br />
button 0-6 within 2 seconds.<br />
A/B<br />
random<br />
repeat<br />
7. Analog<br />
No function<br />
8. Mute<br />
No function.<br />
9. Menu<br />
Activates or de-activates the Menu system on the Main display.<br />
10. AMP<br />
Selects the remote for operation with a Lyngdorf Amplifier/Pre-amp.<br />
11. RCS<br />
Selects the remote for operation with a Lyngdorf Room Processor.<br />
12. CD<br />
Selects the remote for operation with a Lyngdorf CD Player.<br />
13. Tuner<br />
No function.<br />
14. Channel -/+<br />
No function.<br />
15. Volume Up/down<br />
No function.<br />
10
16. Up / Down / Left / Right<br />
In normal operation mode the Up/Down toggles between Bypass, Focus and Global filter and the Left/<br />
Right toggles between Neutral and the available voicings.<br />
In menu mode they are used for navigation in the menu system. Pressing and holding down the Up/<br />
Down, Right/Left keys, changes some selected values fast.<br />
17. Enter<br />
Turns the <strong>RP</strong>-1 On from stand-by mode and works as Enter in menu system.<br />
18. No Function.<br />
11
DPA-1 Digital Pre-Amplifier<br />
DPA-1 Digital Pre-Amplifier<br />
Connecting the <strong>RP</strong>-1<br />
The photos used are only meant as visual aids to show the <strong>ver</strong>satility of the <strong>RP</strong>-1,<br />
Lyngdorf Audio doesn’t necessarily carry all other products with the described specifications<br />
in the product assortment.<br />
Connecting to sources and amplifiers<br />
The <strong>RP</strong>-1 is <strong>ver</strong>y simple to hook up. There are three basic ways to connect the <strong>RP</strong>-1 to your system.<br />
1. Connect all sources to your preamplifier and connect it to the <strong>RP</strong>-1 input.<br />
Then connect the <strong>RP</strong>-1 output signal to a poweramplifier.<br />
Source(s)<br />
Preamp<br />
<strong>RP</strong>-1<br />
Poweramp<br />
2. Connect a single audio source to the <strong>RP</strong>-1 input.<br />
Then connect the <strong>RP</strong>-1 output signal to your integrated- or preamplifier.<br />
Source<br />
<strong>RP</strong>-1<br />
Integrated amplifier / Preamp<br />
12
DPA-1 Digital Pre-Amplifier<br />
3. If your integrated amplifier or preamp has a ‘tape 2’ loop (sometimes called recording loop) or ‘Pre<br />
in/out’:<br />
• Connect the output of the ‘tape 2’ loop / ‘Pre out’ to the input of the <strong>RP</strong>-1.<br />
• Then connect the output of the <strong>RP</strong>-1 to the input of the ‘tape 2’ loop / ‘Pre in’.<br />
Using this configuration enables you to use multiple audio sources without switching source and/or<br />
cables, since the ‘tape 2’ loop ‘Pre in/out’ is always active and not depending on other used inputs<br />
and outputs.<br />
Source(s)<br />
Integrated amp / Preamp-poweramp<br />
<strong>RP</strong>-1<br />
When using Option 2 or a ‘tape 2’ loop as described in Option 3, be aware that your<br />
amplifiers volume control is set at an appropriate level when making the RoomPerfect<br />
calibration.<br />
Please refer to the chapter “Setting the Measurement Volume Level” for further<br />
information.<br />
13
Setup options of Main and Line outputs<br />
As described in “Routing” and “Crosso<strong>ver</strong> Frequency” there are many ways to utilize the Main and Line outputs.<br />
Here we have described the three most common set-up´s. Please note the products, outputs and crosso<strong>ver</strong><br />
frequencies are chosen randomly in these descriptions. Combine them as you see fit.<br />
1. Single-amp set-up with full range main speakers (no subwoofer).<br />
A poweramp is connected to Main Outputs Left and Right. No crosso<strong>ver</strong> is selected.<br />
Main Output Left<br />
No filter<br />
<strong>RP</strong>-1<br />
Main Output Right<br />
No filter<br />
Speaker Poweramp Speaker<br />
2. Poweramplifier and subwoofer set-up.<br />
A poweramp is connected to the Main Outputs Left and Right and the highpass crosso<strong>ver</strong> is set at 80Hz.<br />
The Subwoofer is connected to the Line Output and the lowpass crosso<strong>ver</strong> is set at 80Hz. Remember to<br />
bypass or set the subwoofer cut-off frequency to maximum.<br />
Main Output Left + Right<br />
Highpass filter set at 80Hz<br />
<strong>RP</strong>-1<br />
Line Output Right<br />
Mono lowpass filter set at 80Hz<br />
Speakers<br />
Poweramp<br />
Active subwoofer<br />
3. Lyngdorf 2+2 setup.<br />
A poweramp is connected to Line Outputs Left and Right and the highpass crosso<strong>ver</strong> is set at 400Hz.<br />
Lyngdorf boundary woofers are connected to Main Outputs Left and Right, through a poweramp, and<br />
the lowpass crosso<strong>ver</strong> set at 400Hz.<br />
Line Output Left + Right<br />
Highpass filter set at 400Hz<br />
<strong>RP</strong>-1<br />
Main Output Left + Right<br />
Lowpass filter set at 400Hz<br />
Speakers Poweramp<br />
Poweramp Boundary woofers<br />
14
Menu System<br />
The Main Display on the front panel of the <strong>RP</strong>-1 shows all functionality and current status of the <strong>RP</strong>-1. An<br />
o<strong>ver</strong>view of the menu tree can be seen in the ‘Menu Tree’ chapter.<br />
Navigating the Menu System<br />
Pressing the Menu button on the front panel or the remote enters the menu or steps back one level in<br />
the menu system.<br />
Use the left/right arrows keys to navigate the Menu system. To access a sub menu setting press the<br />
Enter button. To change a setting, use the Up/Down and/or Left/Right arrows and press Enter to accept<br />
the change, or Menu to exit without applying any changes.<br />
Pressing and holding down the Up/Down, Right/Left keys, changes some selected values fast.<br />
15
Menu Tree<br />
This is an o<strong>ver</strong>view of the entire <strong>RP</strong>-1 menu structure.<br />
<strong>RP</strong>-1 Main Menu<br />
RoomPerfect<br />
Advanced setup<br />
Guided setup<br />
Communication<br />
Advanced options<br />
Comm Address<br />
Measure Focus Pos<br />
Comm Speed<br />
Measure Room Pos<br />
Line Out Level<br />
RoomKnowledge<br />
Routing<br />
RoomCorrection<br />
Crosso<strong>ver</strong> freq<br />
Display<br />
Filter Type<br />
Display Timeout<br />
Delay<br />
Disp . Brightness<br />
Remote Control<br />
Input Connection<br />
Firmware Versions<br />
Input Sensitivity<br />
Factory Reset<br />
16
Introduction to RoomPerfect<br />
Once the guided set-up has been successfully completed you have the option to listen to music through<br />
two listening settings; Focus 1 and Global room correction fi lters. The RoomPerfect fi lters are stored<br />
on the numerical buttons from 1 to 9 on the remote control. To change from one fi lter to the other you<br />
simply press the numerical button corresponding to the desired fi lter, or toggle between them by pressing<br />
the Up/Down buttons on the remote or front panel.<br />
Global is stored on numerical button 9 and the Focus 1 is stored on numerical button 1. Furthermore you<br />
can add 7 more Focus/listening position (8 in all). The additional focus/listening positions can be stored on<br />
numerical buttons from 2 to 8. To bypass the room correction fi lters, press numerical button 0.<br />
Global Listening<br />
The Global filter improves the sound quality across the whole room. When you are listening to music in<br />
a room but are not sat in any particular listening position, the global filter gives the best result.<br />
Focus Listening<br />
The Focus filter improves the sound quality at a listening position by exploiting the 3-dimensional acoustic<br />
properties gained through the room measurements. This makes the Focus filter the best solution for<br />
optimal sound quality at a specific listening position.<br />
Voicing<br />
When using RoomPerfect you will experience a much more precise and detailed sound reproduction<br />
– which could also be described as more analytical.<br />
The Voicing setting is an EQ filter that can be used to gently amplify or attenuate certain frequencies according<br />
to your personal preferences and/or to compensate if a given recording sounds too ‘bright’ or too<br />
‘dark’. The standard voicing settings, and their numerical value on the remote control, are:<br />
• Neutral (0), Music 1 (1), Music 2 (2), Relaxed (3), Open (4), Open Air (5), Soft (6).<br />
The frequency curves of the different voicing settings can be viewed in the appendix. Neutral is a bypass<br />
setting.<br />
You can toggle between neutral and the available voicings by pressing the Left/Right buttons on the remote<br />
or front panel. The can also be selected directly by pressing “info” followed by the voicing number<br />
on the remote control.<br />
17
RoomPerfect<br />
The sub menus accessible in the RoomPerfect menu are:<br />
RoomPerfect<br />
Guided setup<br />
Advanced options<br />
Advanced options is only available when Guided set-up has been performed.<br />
Guided Setup<br />
When you enter the RoomPerfect Main Menu for the first time, only the Guided setup is available.<br />
Press Enter to initiate the guided set-up.<br />
The main steps in the guided set-up procedure are:<br />
• Setting the measurement volume level<br />
• Taking one Focus (listening position) measurement<br />
• Taking at least three room position measurements<br />
• Finally, automatic calculation of Focus and Global filters<br />
If you wish to leave the guided set-up at any time during the set-up, simply press the ‘Menu’ button and<br />
the following message appears, ‘Exit without saving? No/Yes’.<br />
• Choose Yes to exit the guided set-up without saving any data or,<br />
• Choose No to cancel and continue with the guided set-up.<br />
18
Setting the Measurement Volume Level<br />
When setting the measurement volume level, it is important that you always judge whether the calibration<br />
volume is too loud. The calibration volume should not be so loud that it causes:<br />
• uncomfortably loud sounds that are inconvenient to you or your environment, or<br />
• damage to your loudspeakers.<br />
When the message ‘Connect and place mic. in focus pos.’ appears, connect the microphone to the microphone<br />
input found on the back panel. Thereafter, place the microphone, using the microphone stand,<br />
in an appropriate focus/listening position. This location should be at your main listening position, typically<br />
more or less centered between the loudspeakers.<br />
Make sure that the height and the orientation of the microphone corresponds to your typical listening<br />
height and direction as illustrated and do not block the line of sight between the microphone and the<br />
loudspeakers.<br />
When the microphone has been correctly connected and placed in the focus position, you are ready to<br />
set the calibration volume. The calibration signal is a combination of the high and low frequency measuring<br />
signals and is only presented in your left loudspeaker. The measuring signals sound <strong>ver</strong>y artificial and<br />
disharmonic due to the fact that they are composed of pure tones at different frequencies.<br />
Press Enter to confirm and to commence the calibration process.<br />
If the <strong>RP</strong>-1 is connected before the volume control of your amplifier e.g. when using<br />
Option 2 or a ‘tape 2’ loop as described in Option 3 in the “Connecting the <strong>RP</strong>-1”<br />
chapter, be aware that the volume control of your amplifier is set at an appropriate<br />
level when making the RoomPerfect calibration.<br />
The volume control should be set at 0dB, which typically is in the “12 o´ clock” position.<br />
This setting must be used again if you wish to add additional RoomPerfect<br />
measurements later.<br />
The test signal will start and shortly thereafter the <strong>RP</strong>-1 will suggest an initial estimate of the desired<br />
maximum calibration volume, displayed as ‘Adjust level: XX up/down - Retry/Save Current’<br />
Please raise or lower the volume by pressing the Up/Down buttons on the <strong>RP</strong>-1 front panel or remote<br />
control towards the desired number of steps shown on the display but ensure you avoid clipping, uncomfortably<br />
loud levels and damage to the loudspeakers. Continue choosing Retry for a re-estimation of the<br />
desired maximum calibration volume, until an appropriate calibration volume is reached. If you find the<br />
suggested calibration volume too loud simply turn down the volume to an appropriate level and choose<br />
Save current.<br />
19
When the message ‘Calibration ok. Press Enter to continue’ is displayed, the calibration volume has successfully<br />
been set and saved.<br />
Focus Measurement<br />
When the calibration is OK, press Enter to start the measuring process and ‘Measuring Focus position<br />
…’ will be displayed. Each measurement comprises four steps:<br />
• A low and a high frequency measuring signal first in the left and then in the right channel.<br />
The length of each measurement depends on a combination of the measurement volume, set in the<br />
calibration process, and the background noise in your local environment. Typical measuring times for the<br />
low and high frequency measuring signals are 25 and 5 seconds, respectively.<br />
You can exit a commenced measurement by clapping close to the microphone.<br />
Do not sit in the listening position during focus measurements.<br />
The measurement will stop prematurely if an error occurs during the measuring process. In this case,<br />
an error message is displayed. Press Enter to continue and ‘Retry focus measurement – press Enter’ is<br />
displayed.<br />
If the error needs correcting this should be done at this point (see RoomPerfect troubleshooting),<br />
thereafter press Enter to retry the measurement. The measurement procedure will start again.<br />
A measurement has ended successfully when the last measuring signal stops and the display shows a<br />
RoomKnowledge rating, as ‘RoomKnowledge XX% - Measurement ok’. Press Enter to continue.<br />
Room Measurements<br />
The number of room positions needed depends on the value of RoomKnowledge, if it is below 90% after<br />
the third measurement the guide automatically includes extra room measurements until a RoomKnowledge<br />
of 90% or more has been achieved.<br />
The remaining measurements are to be placed in random positions in the room with random orientations<br />
of the microphone. Choosing these random or arbitrary positions and orientations is easy. All you<br />
have to do is place the microphone at different positions in the room and with different orientations. It is<br />
important to perform well spaced measurements to get a co<strong>ver</strong>ing image of the acoustical properties in<br />
the room, i.e. varying positions, heights and orientations of the microphone.<br />
20
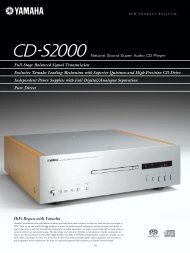
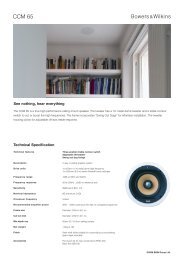
For an optimal room correction it is <strong>ver</strong>y important that the measurements are:<br />
1. performed more than 1 meter (approx. 3 feet) away from the loudspeakers,<br />
2. not performed behind the loudspeaker, and<br />
3. that there is at least 50 cm/1.5 ft between each measurement.<br />
3.<br />
50<br />
cm<br />
1.<br />
1m<br />
2.<br />
Not behind<br />
loudspeaker<br />
When a random measuring position and microphone orientation has been chosen press Enter. The measuring<br />
process will start and the display will show ‘Measuring room position 1’.<br />
The measurement will stop prematurely if an error occurs during the measuring process. In this case, the<br />
error message ‘Retry room measurement – press Enter’ is displayed. Press Enter to continue.<br />
If it is an error that needs correcting, then correct the error (see RoomPerfect trouble-shooting) and proceed<br />
with the room position measurement by pressing Enter. The measurement has ended successfully<br />
when the last measuring signal stops and the display shows ‘RoomKnowledge XX% - Measurement ok’.<br />
This process is repeated at least three times and until the RoomKnowledge reaches 90%.<br />
Adding more Room Measurements<br />
If you have performed successful measurements and RoomKnowledge has reached 90%, the message<br />
‘Add more room meas.? Yes/No’ is displayed.<br />
At this point, or any time later, you can decide whether the acquired room measurements are sufficient or<br />
you wish to add further room measurements to learn more about the room’s acoustical information. Adding<br />
more room measurements results in a higher RoomKnowledge, this in turn improves the room correction<br />
filters.<br />
• Choose Yes to add more room measurements. The room measuring process is now continued as<br />
described in the previous section.<br />
• Choose No when no additional measurements are required. The <strong>RP</strong>-1 will return to full scale output.<br />
The message ‘Save guided measurement - Yes/No’ will be displayed when exiting a successfully completed<br />
guided set-up.<br />
• Choose Yes to save the results of the guided set-up and calculate the focus and the global room<br />
correction filters.<br />
• Choose No if you wish to exit the guided set-up without calculating any room correction filters, without<br />
saving the performed measurement.<br />
21
Calculation of Focus and Global Filters<br />
When RoomPerfect calculates the fi lters the display shows the following, ‘Calculating fi lters - Please<br />
wait’.<br />
The fi lter calculation process can be expected to take anywhere between 5 seconds and a minute depending<br />
on the specifi c task.<br />
When RoomPerfect has calculated the room correction fi lters, they are automatically saved. The Focus<br />
fi lter is saved as setting 1 and Global is saved as setting 9 out of the possible 9 fi lter settings.<br />
You have now successfully completed a guided set-up and the RoomPerfect Advanced Menu is now<br />
available.<br />
22
Advanced Options<br />
This section describes the options in the advanced menu, which is available after Guided Setup has been<br />
completed. Here you can change the listening position and add more room measurements, check the<br />
RoomKnowledge of your current set-up, and check the RoomCorrection for the different filters.<br />
Advanced options<br />
Measure Focus Pos Measure Room Pos<br />
RoomKnowledge RoomCorrection<br />
If the <strong>RP</strong>-1 is connected before the volume control of your amplifier e.g. when using<br />
Option 2 or a ‘tape 2’ loop as described in Option 3 in the “Connecting the <strong>RP</strong>-1”<br />
chapter, be aware that the volume control of your amplifier is set at the same level<br />
as when making the initial RoomPerfect calibration.<br />
If you do not remember this setting, you will need to perform a new guided setup.<br />
Change Focus Position.<br />
As mentioned, it is possible to add 7 different listening/focus positions.<br />
Place the microphone correctly in the new listening position and the measurement process can commence.<br />
The saved calibration volume from the guided set-up is used as a default when adding extra focus/listening<br />
and room positions though, as mentioned, the volume can be changed at any time between measurements<br />
to suit a particular situation.<br />
After a successful measurement the message ‘RoomKnowledge XX% - Measurement ok’ is displayed.<br />
Press Enter to continue.<br />
The message ‘Save Focus measurement(s) – Yes/No’ will appear.<br />
• choose Yes to save the measurement or,<br />
• choose No to exit without saving the current measurement.<br />
Choose between focus/listening position 2 - 8 and press Enter. If you wish to o<strong>ver</strong>write an existing Focus<br />
fi lter (2 to 8 can be o<strong>ver</strong>written) or you are trying to save a new fi lter on an existing preset then ‘Focus<br />
no.X exists! O<strong>ver</strong>write? Yes/No’ will be displayed.<br />
When the Focus number has been chosen, the volume turns down to default or lower and the new Focus fi lter<br />
is calculated and saved.<br />
Measure Room Pos.<br />
It is always possible to add more room measurements, which can increase RoomKnowledge and thereby<br />
fine tune both room correction filters (Focus and Global).<br />
Press Enter to start a new room measurement.<br />
First the volume must be calibrated, as described in the ‘Guided Setup’ chapter. Then place the microphone<br />
in a random room position and the measurement can commence.<br />
The volume can be changed at any time between measurements to suit a particular measurement situation.<br />
23
‘Add more room meas.? Yes/No’ will show in the display:<br />
• choose Yes to add another room measurement or,<br />
• choose No to stop adding more room measurements. If No is chosen the <strong>RP</strong>-1 is will return to full<br />
scale output.<br />
‘Save room measurement(s)? Yes/No’ will hereafter be shown.<br />
• choose Yes to save the performed room measurement,<br />
• and No to exit without saving any of the performed measurements.<br />
Adding one or more room measurements leads to a re-calculation of both filters (i.e. Global and Focus<br />
filters) due to the fact that more of room’s acoustic properties have been learned, something that affects<br />
these filters.<br />
When adding focus measurements, make sure the system volume is the same for all measurements.<br />
Whether adding more room measurements now or later.<br />
If you can´t remember the volume setting, we recommend to delete the filter and<br />
start o<strong>ver</strong>.<br />
RoomKnowledge<br />
The RoomKnowledge index is a parameter that tells how much of the room’s acoustical properties have<br />
been learned. A high RoomKnowledge ( 90%) means that most of the room’s acoustical properties have<br />
been learned. The more room measurements you add, the higher the RoomKnowledge will become.<br />
The more that the acoustical properties of the room are learned, the greater the accuracy of the room<br />
correction.<br />
RoomCorrection<br />
The RoomCorrection index is a measure of how much processing is being employed in the room correction<br />
filter. To some extent the RoomCorrection index reflects how audible the correction is. Howe<strong>ver</strong>, the<br />
same amount of processing can sound <strong>ver</strong>y different due to placement in frequency of the processing.<br />
For low values (below 10%) of the room correction index, only subtle correction is needed to the original<br />
sound in the room. With high room correction index values more extensive processing is employed.<br />
24
Display<br />
The sub menus accessible in the Display menu are:<br />
Display<br />
Display Timeout<br />
Disp. Brightness<br />
Display Timeout<br />
Display Timeout<br />
Display Timeout<br />
Display Timeout set-up is used for enabling/disabling the 10 sec. display ’switch’off’ feature. If enabled<br />
the Main Display reading will switch off after 10 sec of inactivity from the front panel buttons or remote.<br />
Display Brightness<br />
Display Brightness<br />
Disp. Brightness<br />
Display Brightness is used to control the brightness of the display. The brightness can be set to 25%,<br />
50%, 75% or 100%.<br />
Input Connection<br />
Input Connection<br />
The Input Connection can be set to:<br />
• Balanced / XLR or,<br />
• Unbalanced / RCA<br />
The default setting is Balanced / XLR.<br />
Remember to select the same input as physically connected.<br />
If the setting is not correct you may experience humming.<br />
25
Input Sensitivity<br />
Input Sensitivity<br />
The Input Sensitivity setting enables you to match the line level output of your pre-amplifier to the input<br />
sensitivity of the Lyngdorf Audio <strong>RP</strong>-1. The normal settings are:<br />
• Select ‘High’ for input levels 2.2V RMS.<br />
• Select ‘High + Gain’ for input levels
Line Out Level<br />
Line Out Level<br />
This adjusts the o<strong>ver</strong>all output level in steps of -0.1 db, it can be attenuated to –40 dB in total.<br />
Routing<br />
Routing<br />
In Routing it is possible to apply different settings to the Main and Line outputs:<br />
Symbol Name Main output Line Output<br />
R<br />
L<br />
R<br />
L<br />
R<br />
L<br />
L<br />
R<br />
Highpass filter X X<br />
Lowpass filter X X<br />
Left and Right channel switching X -<br />
M Mono - X<br />
M Mono lowpass filter - X<br />
A highpass and a lowpass filter can be applied to the Main and Line outputs when you want to connect<br />
an additional amplifier or subwoofer along with your main amplifier.<br />
A Mono setting is also available for the Line output, this is used when connecting a single subwoofer to<br />
the Line output.<br />
If no filter is selected the full frequency range will be directed to the Main and Line Out terminals. If a<br />
filter is selected the frequencies above or below the selected crosso<strong>ver</strong> frequency will be directed to the<br />
analog Main or Line Out terminals.<br />
When a highpass or lowpass filter has been chosen, the Crosso<strong>ver</strong> Frequency and Filter Type menus are<br />
enabled.<br />
27
Crosso<strong>ver</strong> Frequency<br />
Crosso<strong>ver</strong> freq.<br />
Crosso<strong>ver</strong> Frequency is only available when Routing has been setup.<br />
The Crosso<strong>ver</strong> Frequency can be selected anywhere between 40 – 9999Hz.<br />
It is <strong>ver</strong>y difficult to give exact guidelines to setting a suitable crosso<strong>ver</strong> frequency, filter type and order<br />
since this depends on the exact dri<strong>ver</strong>s and configurations. Therefore, the following recommendations<br />
should be seen as a good starting point only.<br />
In general, the recommended crosso<strong>ver</strong> frequency between (sub)woofers and main speakers is between<br />
200 - 400 Hz.<br />
By using a high crosso<strong>ver</strong> frequency, the rear wall quarter wavelength reflection is removed from the<br />
main speakers.<br />
If a Lyngdorf Audio boundary woofer is used in a 2+2 set-up, a crosso<strong>ver</strong> frequency of 400 is recommended<br />
due to the high bandwidth of the boundary woofer.<br />
For conventional active subwoofers with built in low pass filter the recommended crosso<strong>ver</strong> frequency<br />
is the upper low-pass frequency of the subwoofer.<br />
If at all possible, the low pass filter in the subwoofer should be bypassed. Due to the quarter wave<br />
reflection from the rear wall corresponding to the depth of the subwoofer cabinet we recommend an<br />
crosso<strong>ver</strong> point at approximately 200 Hz. You might experiment with turning the subwoofer so the dri<strong>ver</strong><br />
faces the wall in a distance of 5 to 10 cm. This will increase the bandwidth of the subwoofer.<br />
Howe<strong>ver</strong>, due to the limited bandwidth (frequency response) of most conventional subwoofers you<br />
might find it necessary to choose a lower crosso<strong>ver</strong> frequency.<br />
When ‘building’ active speaker systems it is recommended to use the original crosso<strong>ver</strong> point(s) used<br />
by the manufacturer. Due to the short wavelengths of the mid/high frequencies it is essential that both<br />
crosso<strong>ver</strong> frequency, filter type and order as well as delay is set correctly. Therefore, creating filters for<br />
active speakers is an iterative process that requires se<strong>ver</strong>al critical listening sessions in order to achieve<br />
seamless integration of the different speaker dri<strong>ver</strong>s.<br />
Filter Type<br />
Filter Type<br />
Filter Type is only available when Routing has been setup.<br />
It is possible to choose from two different Filter Types in this menu.<br />
LiRi: (Linkwitz Riley) 2, 4 or 8 order.<br />
Butw: (Butterworth) 1, 2 or 4 order.<br />
In a 2+2 set-up (main speakers + Lyngdorf Audio boundary woofers) we recommend using a fourth order<br />
Linkwitz Riley filter.<br />
In set-ups using conventional active subwoofers – again due to limited bandwidth – we recommend using<br />
a second order butterworth filter.<br />
In active speaker systems it is recommended starting with a fourth order Linkwitz Riley filter.<br />
28
Delay<br />
Delay<br />
If you are using a set-up with two main loudspeakers located at an identical distance to the listening<br />
position you don’t need to set a delay. Howe<strong>ver</strong>, if the distance isn’t identical and/or you are using a subwoofer,<br />
or a Lyngdorf Audio 2+2 system, you need to set a delay in order to ensure that the sound from<br />
each loudspeaker reaches the listening position simultaneously. This must be done for main left (ML) and<br />
right (MR) and as well as line left (LL) and right (LR).<br />
To set the delay all you need do is to measure the distance from each loudspeaker to the listening position<br />
and enter these values in the menu. The necessary delays are then automatically calculated and<br />
applied to each channel.<br />
1 centimeter = 0.3937 in<br />
The fault message ‘Values for delay exceed limits’ is displayed when the difference<br />
between the distance from the speakers closest to, and the speakers furthest from,<br />
the listening position is too big. The biggest difference allowed is 340 cm / 134 in.<br />
If the fault message appears, you can use the following solutions:<br />
(Can be used individually or together to achieve a valid set-up with respect to the delay lengths):<br />
• Shorten the distances between your Main and Line channel loudspeakers resulting in a more<br />
compact loudspeaker set-up.<br />
• Arrange your loudspeaker set-up and/or your listening position in a more symmetrical set-up.<br />
Remote Control<br />
Remote Control<br />
Remote Control set-up makes it possible to activate or de-activate the remote control.<br />
29
Firmware Versions<br />
Firmware <strong>ver</strong>sions<br />
The Firmware Versions menu is used to check the current firmware <strong>ver</strong>sion of your <strong>RP</strong>-1 and the Room-<br />
Perfect module as well as the RoomPerfect serial number.<br />
Factory Reset<br />
Factory Reset<br />
The Factory Reset setting is used to restore all settings, including RoomPerfect, in the <strong>RP</strong>-1 to the factory<br />
settings.<br />
If you return to the factory settings all your personal settings will be erased.<br />
30
Troubleshooting<br />
RoomPerfect<br />
No microphone connected<br />
The error message ‘No microphone connected’ is displayed when no microphone is connected to the<br />
<strong>RP</strong>-1.<br />
Solution:<br />
• Connect the microphone on the back panel.<br />
No signal<br />
1. The error message ‘Fault – No signal’ is displayed when the incoming signal is classified as<br />
pure noise. This happens when the <strong>RP</strong>-1´s measuring signal is too low compared with the noise<br />
from the local environment.<br />
2. The volume setting of your amplifier and/or <strong>RP</strong>-1 measuring volume is to low.<br />
3. The above error message is also displayed when the loudspeakers are not connected.<br />
Solution:<br />
• Reduce the noise in your measuring environment.<br />
• Raise the volume setting of your amplifier and/or <strong>RP</strong>-1 measuring volume before continuing with the<br />
measurement.<br />
• Connect your loudspeakers.<br />
Low signal<br />
The error message ‘Fault – Low signal’ is displayed when the measurement has taken more than 5<br />
minutes for the low frequency signal or 2 minutes for the high frequency signal. This happens when<br />
the system calibration volume is low compared to the background noise of your environment, something<br />
that results in prolonged measuring times.<br />
Solution:<br />
• Raise the <strong>RP</strong>-1´s measuring volume or the volume setting of your amplifier before continuing with<br />
the measurement, or reduce the noisy elements in your environment.<br />
Signal clipping<br />
1. The error message ‘Fault – Signal clipping’ is displayed when the incoming signal is<br />
classified as too loud resulting in clipping (distortion).<br />
2. A loud noise from the local environment that has corrupted the measurement results in this<br />
error message.<br />
Solution:<br />
• Lower the measuring signal volume before continuing with the measurement.<br />
• Repeat the measurement with no changes; howe<strong>ver</strong> refrain from making excessive noise<br />
when measuring.<br />
31
Troubleshooting<br />
<strong>RP</strong>-1<br />
Speakers are humming when the <strong>RP</strong>-1 is turned on<br />
Balanced and unbalanced for Main out connections are used at the same time.<br />
Solution:<br />
• Disconnect the interfering connection.<br />
Speakers are humming when the <strong>RP</strong>-1 is turned on<br />
Balanced and unbalanced for Line out connections are used at the same time.<br />
Solution:<br />
• Disconnect the interfering connection.<br />
Speakers are humming when the <strong>RP</strong>-1 is turned on<br />
Balanced and unbalanced for Input connections are used at the same time.<br />
Solution:<br />
• Disconnect the interfering connection, and remember select the correct setting in the ‘input<br />
connection’ menu.<br />
32
Firmware Upgrading<br />
The <strong>RP</strong>-1 firmware can be upgraded using the ‘Lyngdorf Audio – Serial Load’ software. This is in the PC<br />
package available from www.Lyngdorf.com.<br />
Press the Enter button while powering On to bring the product into upgrade mode.<br />
33
Connectors<br />
Mains Connector<br />
Mains voltage to the <strong>RP</strong>-1 is applied via an IEC320 type connector. The supplied cable with safety ground<br />
should be used to connect the <strong>RP</strong>-1 to a mains outlet.<br />
Make sure the rear selector is in the correct setting and connect the power input<br />
only to an appropiate AC source. The warranty will not co<strong>ver</strong> any damage caused by<br />
connecting to the wrong type of AC mains.<br />
Always disconnect the <strong>RP</strong>-1 from the mains before changing any connections to its<br />
inputs or outputs.<br />
Balanced Inputs<br />
The balanced XLR inputs are wired in accordance with IEC268:<br />
Pin 1: Chassis and ground.<br />
Pin 2: Hot (+).<br />
Pin 3: Cold (-).<br />
Shell: Chassis and ground.<br />
Unbalanced Inputs<br />
The unbalanced RCA inputs are wired in accordance with normal practice:<br />
Shell: Chassis and ground.<br />
Pin: Hot (+).<br />
Cleaning and Maintenance<br />
This unit does not require any regular maintenance except to keep its exterior clean. Simply wipe its exterior<br />
with a clean soft cloth. A small amount of non-abrasive cleaner may be used on the cloth to remove<br />
any excessive dirt or fingerprints. Do not use abrasive cleaners or cleaners containing liquid solvents.<br />
34
Technical Specifications<br />
Audio<br />
Parameter Value Note<br />
Balanced input connectors 3 pin XLR, gold-plated. Case=Gnd, Pin1=Gnd,<br />
Pin2=Hot(+), Pin3=Cold(-)<br />
Balanced input impedance 10KOhm AC-coupled.<br />
Unbalanced input connectors RCA (phono) jack, gold-plated. Case=Gnd, Tip=Hot(+)<br />
Unbalanced input impedance 10KOhm AC-coupled<br />
Input sensitivity<br />
4.4V (2.2V with high sens.)<br />
DAC Out impedance<br />
50Ohm<br />
Unbalanced output Unity 0dB according to input level<br />
Balanced output Unity 0dB according to input level<br />
Frequency Response 20 - 20KHz +/-0.1dB RoomPerfect Highpass Filter<br />
-3dB at 18Hz<br />
THD+N A-wgt<br />
-103dB Neutral voicing - ref 4.4V<br />
Analog to Analog<br />
S/N Ratio<br />
113dB Neutral voicing - ref 4.4V<br />
Analog to Analog<br />
Dynamic Range<br />
113dB Neutral voicing - ref 4.4V<br />
Analog to Analog<br />
Channel Separation 114dB AC Sweep from 125 - 16KHz<br />
All audio measurements, except frequency response, are measured with a 20KHz low-pass filter in accordance<br />
with AES-17.<br />
Protection<br />
Parameter Value Value<br />
Grounding<br />
Mains earth, chassis and audio<br />
ground are connected internally.<br />
O<strong>ver</strong> temperature Mains-transformer. Auto resetting thermal fuse in<br />
mains transformer.<br />
Mains<br />
Parameter Value Note<br />
Mains input connector IEC 320 cold type Mains lead supplied.<br />
Mains voltage range<br />
100-240V AC, 50–60Hz<br />
Power consumption 4 W STANDBY mode. 230V AC.<br />
Power consumption 23 W OPERATE mode. 230V AC.<br />
Mechanical<br />
Parameter Value Note<br />
Width 450mm (17.72”)<br />
Depth 355mm (13.98”)<br />
Height 100mm (3.94”) Including feet.<br />
Net weight<br />
6.6 Kg (14.6 lb.)<br />
Shipping weight 9.9 Kg (21.8 lb.) 2 shipping boxes<br />
35
Technical Assistance<br />
For latest <strong>ver</strong>sion of the firmware, the newest <strong>ver</strong>sion of this document and ‘Questions and Answers’,<br />
please check the ‘Support’ section on the Lyngdorf Audio website.<br />
If you have any problems with or questions regarding your Lyngdorf Audio product, please contact<br />
your nearest Lyngdorf Audio representative or:<br />
Lyngdorf Audio ApS<br />
Denmark<br />
E-mail: info@lyngdorf.com<br />
Web: http://www.lyngdorf.com<br />
36
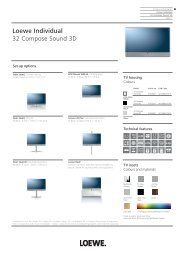
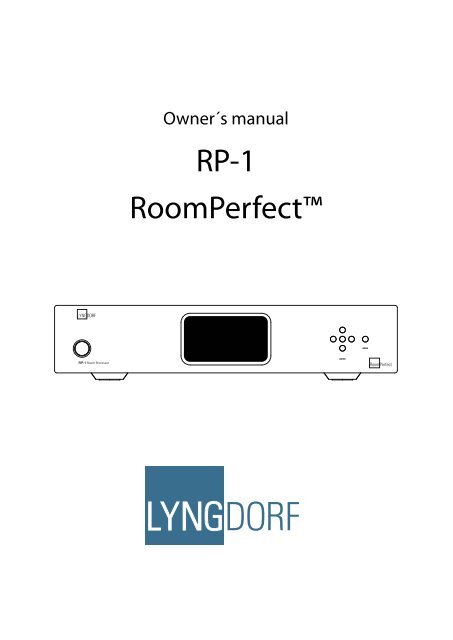
Appendix<br />
Voicing Curves<br />
For further information on the Voicing setting, please refer to the “Voicing” chapter.<br />
Music 1 Music 2<br />
6<br />
Magnitude Response: Music 1<br />
6<br />
Magnitude Response: Music 2<br />
4<br />
4<br />
Magnitude (dB )<br />
2<br />
0<br />
-2<br />
Magnitude (dB )<br />
2<br />
0<br />
-2<br />
-4<br />
-4<br />
-6<br />
10 Hz 100 Hz 1kHz 10kHz<br />
Frequency (Hz)<br />
-6<br />
10 Hz 100 Hz 1kHz 10kHz<br />
Frequency (Hz)<br />
Relaxed<br />
Open<br />
6<br />
Magnitude Response: Relaxed<br />
6<br />
Magnitude Response: Open<br />
4<br />
4<br />
Magnitude (dB)<br />
2<br />
0<br />
-2<br />
Magnitude (dB)<br />
2<br />
0<br />
-2<br />
-4<br />
-4<br />
-6<br />
10 Hz 100 Hz 1kHz 10kHz<br />
Frequency (Hz)<br />
-6<br />
10 Hz 100 Hz 1kHz 10kHz<br />
Frequency (Hz)<br />
Open Air<br />
Soft<br />
6<br />
Magnitude Response: Open Air<br />
6<br />
Magnitude Response: S oft<br />
4<br />
4<br />
Magnitude (dB )<br />
2<br />
0<br />
-2<br />
Magnitude (dB )<br />
2<br />
0<br />
-2<br />
-4<br />
-4<br />
-6<br />
10 Hz 100 Hz 1kHz 10kHz<br />
Frequency (Hz)<br />
-6<br />
10 Hz 100 Hz 1kHz 10kHz<br />
Frequency (Hz)<br />
37
40<br />
www.lyngdorf.com