Installation Instructions - H&S Performance
Installation Instructions - H&S Performance
Installation Instructions - H&S Performance

Create successful ePaper yourself
Turn your PDF publications into a flip-book with our unique Google optimized e-Paper software.
Warning!<br />
This high performance product is intended for off-road, closed-course racing use ONLY. This<br />
product may never be installed on a vehicle registered for highway use. By installing the<br />
EGR or EGR Cooler Delete Kit onto your vehicle, you assume all risk and liability associated<br />
with its use. It is your responsibility to ensure that your vehicle complies with all national,<br />
state, and local emissions laws. Due to its high performance nature, the EGR or EGR Cooler<br />
Delete Kit may void vehicle manufacturer’s warranty. H&S <strong>Performance</strong>, LLC assumes<br />
no liability for misuse of its products. By installing the EGR or EGR Cooler Delete Kit, you<br />
release H&S <strong>Performance</strong>, LLC of any and all liability associated with its use. Any and all<br />
civil penalties for removing your vehicles emissions equipment are the sole responsibility<br />
of the end user. Check your laws before installing!<br />
H&S <strong>Performance</strong> EGR delete kits are designed to be used in conjunction with an H&S Tuner.<br />
If you are installing this EGR delete kit without an H&S tuner, you will almost certainly<br />
get a Check Engine Light(CEL), as well as possible undesirable performance. If using<br />
ANY other brand tuner besides H&S, please contact your particular tuner manufacturer to<br />
determine if their tuning is designed to work in conjunction with an EGR delete kit.<br />
TROUBLESHOOTING:<br />
Please read and understand all installation instructions before proceeding with the<br />
installation.<br />
If you have questions during the installation of this product, please call H&S <strong>Performance</strong><br />
support at 1-888-628-1730<br />
2 Ford 6.0L Powerstroke EGR/EGR Cooler Delete Kit <strong>Installation</strong> Manual
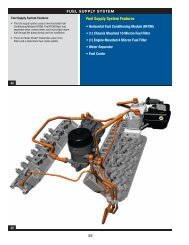
Included parts:<br />
1- Aluminum EGR Valve Plate with O-Ring<br />
1- Aluminum EGR Cooler Plate with O-Rings<br />
1- 180 Degree Stainless Steel Coolant Tube<br />
1- Stainless Steel Up Pipe<br />
1- Up pipe gasket<br />
1- 3/4” Silicone Hose<br />
2- 3/4” Hose Clamps<br />
2- 5/16 X 1.25” Bolts<br />
2- 5/16 X 2.5” Bolts<br />
4- 5/16 Nuts<br />
STEP 1<br />
Un-hook battery terminals, drain the engine coolant and remove clips from the plastic wire<br />
way just above the turbo, fold to windshield of truck.<br />
Plastic Wireway<br />
STEP 2<br />
Remove the radiator over flow reservoir by removing 3 hose clamps (the third hose clamp is<br />
on the bottom side of the reservoir), and 2 bolts.<br />
Clamps<br />
Bolts<br />
1-888-628-1730 • www.hsperformance.com 3
STEP 3<br />
Remove the intake tube assembly by loosening the hose clamp, un-clipping the MAP sensor<br />
harness and removing 2 bolts.<br />
Clamp<br />
Bolts<br />
STEP 4<br />
Remove upper fan shroud by prying away from radiator through slots.<br />
STEP 5<br />
Remove charge pipe by loosening two hose clamps (one on bottom and top of the tube).<br />
Charge Pipe<br />
4 Ford 6.0L Powerstroke EGR/EGR Cooler Delete Kit <strong>Installation</strong> Manual
STEP 6<br />
Remove Alternator. Disconnect both wire harnesses and remove 3 bolts.<br />
STEP 7<br />
Disconnect down pipe by removing v band clamp from back of turbo.<br />
1-888-628-1730 • www.hsperformance.com 5
STEP 8<br />
Remove turbo charger. This is done by removing the VGT actuator wire, two oil feed line<br />
bolts, up-pipe v band clamp, and the three turbo mounting bolts. It is strongly recommended<br />
to use penetrating oil on all turbo bolts, exhaust up pipe bolts, and pedestal bolts.<br />
Once these parts are removed the turbo will roll toward the passenger side of the truck and<br />
out of the pedestal.<br />
STEP 9<br />
Remove intake horn by loosening clamp, and removing 4 bolts.<br />
6 Ford 6.0L Powerstroke EGR/EGR Cooler Delete Kit <strong>Installation</strong> Manual
STEP 10<br />
Remove 4 Fuel lines and disconnect 3 wire harnesses. (two of the wire harnesses are located<br />
on the backside of the oil filter housing not shown in picture)<br />
STEP 11<br />
Remove the Oil and Fuel filter housing by removing 4 Hex bolts.<br />
STEP 12<br />
Remove two bolts from coolant line.<br />
1-888-628-1730 • www.hsperformance.com 7
STEP 13<br />
Remove two bolts that secure the fan shroud to the front of the intake manifold. Remove 1<br />
bolt from the fuel line bracket.<br />
STEP 14<br />
Remove 3 wire harnesses and remove 4 injector harnesses (use a flat head screwdriver to<br />
pry the metal harness clips away for removal).<br />
STEP 15<br />
Remove the boost line to MAP Sensor.<br />
8 Ford 6.0L Powerstroke EGR/EGR Cooler Delete Kit <strong>Installation</strong> Manual
STEP 16<br />
Remove the IPR harness (Injection Pressure Regulator)<br />
STEP 17<br />
Loosen 18 bolts using a 10 mm on the top of the intake manifold. Remove the manifold by<br />
lifting up and forward motion.<br />
STEP 18<br />
Loosen and remove the v band clamp from the up pipe to the EGR Cooler.<br />
1-888-628-1730 • www.hsperformance.com 9
STEP 19<br />
Remove EGR Cooler and coolant hose.<br />
STEP 20<br />
Remove 2 bolts on the bottom and 2 bolts on top of the up pipe. Remove up pipe.<br />
STEP 21<br />
Install the new up pipe using the supplied 5/16” nuts, bolts,and gasket. (The supplied<br />
gasket is to be used on the top side of the up pipe along with the 5/16 x 1.25” bolts)<br />
10 Ford 6.0L Powerstroke EGR/EGR Cooler Delete Kit <strong>Installation</strong> Manual
STEP 22<br />
Install the 180 degree stainless tube in the bottom of the intake manifold with the new<br />
bracket block off plate combo.<br />
STEP 23<br />
Reinstall intake manifold, replace and torque bolts to 120 in lbs. Remove the EGR Valve and<br />
replace with provided block off plate and O-ring.<br />
STEP 25<br />
Reinstall turbo, all intake and exhaust tubes including down pipe, alternator, shroud, wires<br />
etc. in reverse order. Refill with new coolant and start engine, check for any leaks and top off<br />
fluids as needed.<br />
1-888-628-1730 • www.hsperformance.com 11