Coestherm® Coesklima Superk®
Coestherm® Coesklima Superk®
Coestherm® Coesklima Superk®

Create successful ePaper yourself
Turn your PDF publications into a flip-book with our unique Google optimized e-Paper software.
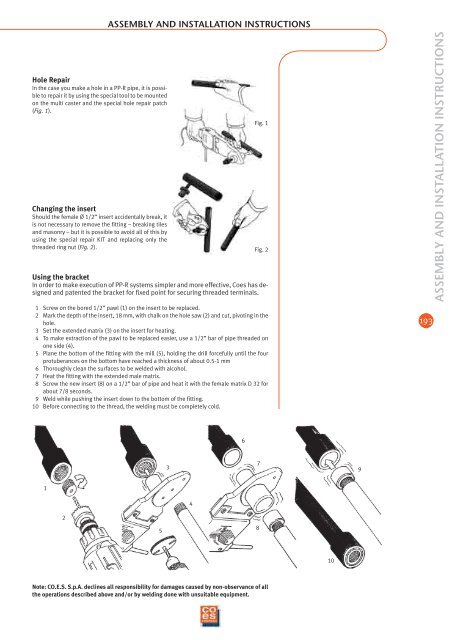
ASSEMBLY AND INSTALLATION INSTRUCTIONS<br />
Hole Repair<br />
In the case you make a hole in a PP-R pipe, it is possible<br />
to repair it by using the special tool to be mounted<br />
on the multi caster and the special hole repair patch<br />
(Fig. 1).<br />
Fig. 1<br />
Changing the insert<br />
Should the female Ø 1/2” insert accidentally break, it<br />
is not necessary to remove the fitting – breaking tiles<br />
and masonry – but it is possible to avoid all of this by<br />
using the special repair KIT and replacing only the<br />
threaded ring nut (Fig. 2). Fig. 2<br />
Using the bracket<br />
In order to make execution of PP-R systems simpler and more effective, Coes has designed<br />
and patented the bracket for fixed point for securing threaded terminals.<br />
1 Screw on the bored 1/2” pawl (1) on the insert to be replaced.<br />
2 Mark the depth of the insert, 18 mm, with chalk on the hole saw (2) and cut, pivoting in the<br />
hole.<br />
3 Set the extended matrix (3) on the insert for heating.<br />
4 To make extraction of the pawl to be replaced easier, use a 1/2” bar of pipe threaded on<br />
one side (4).<br />
5 Plane the bottom of the fitting with the mill (5), holding the drill forcefully until the four<br />
protuberances on the bottom have reached a thickness of about 0.5-1 mm<br />
6 Thoroughly clean the surfaces to be welded with alcohol.<br />
7 Heat the fitting with the extended male matrix.<br />
8 Screw the new insert (8) on a 1/2” bar of pipe and heat it with the female matrix D 32 for<br />
about 7/8 seconds.<br />
9 Weld while pushing the insert down to the bottom of the fitting.<br />
10 Before connecting to the thread, the welding must be completely cold.<br />
193<br />
ASSEMBLY AND INSTALLATION INSTRUCTIONS<br />
6<br />
3<br />
7<br />
9<br />
1<br />
4<br />
2<br />
5<br />
8<br />
10<br />
Note: CO.E.S. S.p.A. declines all responsibility for damages caused by non-observance of all<br />
the operations described above and/or by welding done with unsuitable equipment.