LCD B2K - Paintball Gun Manuals
LCD B2K - Paintball Gun Manuals
LCD B2K - Paintball Gun Manuals

Create successful ePaper yourself
Turn your PDF publications into a flip-book with our unique Google optimized e-Paper software.
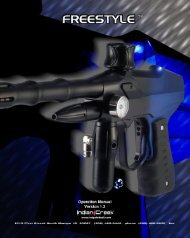
INSTRUCTION MANUAL<br />
Version 1.6<br />
Indian Creek Design BushMaster series<br />
Model <strong>B2K</strong>2<br />
Copyright 1993…. 2001<br />
All Rights Reserved<br />
No part of this document may be copied or reproduced in any form or by<br />
any means without the prior written consent of Indian Creek Design, Inc.<br />
Trademark Notices:<br />
* Panther VTS is a registered trademark of Indian Creek Design, Inc.<br />
* Panther II VTS is a trademark of Indian Creek Design, Inc.<br />
* Puma is a trademark of Indian Creek Design, Inc.<br />
* Bobcat is a trademark of Indian Creek Design, Inc.<br />
* Thunder CAT is a trademark of Indian Creek Design, Inc.<br />
* Desert FOX is a trademark of Indian Creek Design, Inc.<br />
* 45/68 Magnum VTS is a trademark of Indian Creek Design, Inc.<br />
* BushMaster 2000 is a trademark of Indian Creek Design, Inc.<br />
* <strong>B2K</strong> is a trademark of Indian Creek Design, Inc.<br />
* <strong>B2K</strong>2 is a trademark of Indian Creek Design, Inc.<br />
Notice is hereby given that this manual is part of the article owned in<br />
whole by Indian Creek Design, Inc., known as indicated in this manual<br />
and drawings. All rights of manufacture and reproduction of such<br />
articles or any part thereof are reserved by Indian Creek Design, Inc.<br />
Neither said article nor any part thereof may be manufactured or<br />
reproduced except by written authorization from Indian Creek Design,<br />
Inc. All proprietary rights and information are the sole property of<br />
Indian Creek Design, Inc.<br />
1
STATEMENT OF LIABILITY<br />
Indian Creek Design, Inc., delivers this air gun with the<br />
understanding that Indian Creek Design, Inc., assumes no<br />
responsibility for its resale or safe handling. It can be considered a<br />
dangerous weapon if mishandled, abused, or the safety instructions<br />
are ignored. Indian Creek Design, Inc., assumes no responsibility<br />
for physical injury or property damage resulting from its use.<br />
Indian Creek Design, Inc., makes no warranties with respect to this<br />
documentation and disclaims any implied warranties of<br />
merchantability or fitness for a particular purpose. The information<br />
in this document is subject to change without notice. Indian Creek<br />
Design, Inc., assumes no responsibility for any errors that may<br />
appear in this document.<br />
WARNING:<br />
This is not a toy. Misuse may cause serious injury or<br />
death. Eye protection designed for paintball use must<br />
be worn by the user and any person within range. It is<br />
to be used by adults only. It is to be used on safety<br />
certified fields only. Obey all local, state and federal<br />
laws. Follow the rules of safe paintball gun handling.<br />
Read all instructions before use.<br />
2
<strong>B2K</strong>2 OVERVIEW<br />
The <strong>B2K</strong>2 is a quality marking instrument specially designed to meet the needs of<br />
the professional style tournament player. The <strong>B2K</strong>2 is an electronic solenoid<br />
actuated computer controlled marking device. The major components of the <strong>B2K</strong>2<br />
are machined from solid, aircraft-grade aluminum, and then hard anodized per<br />
military specifications. No castings are used in the construction of the <strong>B2K</strong>2,<br />
thereby providing the end user with a high-quality, precision-engineered marking<br />
instrument.<br />
<strong>Paintball</strong> markers get a lot of abuse. Indian Creek Design, Inc., has built the <strong>B2K</strong>2<br />
with this in mind. All internal parts, wear and contact surfaces have been heat<br />
treated or hard anodized. The toughest and most resilient materials and components<br />
have been used in the design of this instrument.<br />
The <strong>B2K</strong>2 uses a single standard 9-volt battery for operation. The circuitry is a<br />
microprocessor based digital controller.<br />
The <strong>B2K</strong>2 does not need tools in order to be field-stripped. Removing the fieldstrip<br />
link-pin of the bolt enables the removal of the entire bolt assembly.<br />
The <strong>B2K</strong>2 offers Αlow-pressure≅ operation. The main operating pressure is 225-<br />
300 PSI nominally adjusted to visually via the gauge on the primary (input)<br />
regulator. The secondary pressure is factory pre-set and regulated to 85-95 PSI.<br />
Gas usage is controlled through these 2 internal regulators. The unique feature of<br />
this gun is the regulator adjustment. This allows precise adjustment for the velocity<br />
control of the gun and for gas efficiency.<br />
The <strong>B2K</strong>2 comes with a removable barrel system. This feature allows the user to<br />
select a barrel that is most suitable for the playing conditions. All barrels are<br />
mirror-honed with a muzzle break, step-bore and spiral porting and stock length is<br />
12".<br />
3
OPERATION<br />
Read the entire manual before you prepare your <strong>B2K</strong>2 for firing. Safety and safe<br />
gun handling are the most important aspects of paintball sports. Please practice<br />
each of the following steps with an unloaded gun before attempting to charge your<br />
gun with compressed air and paint pellets. Do not load compressed air and paint<br />
pellets into your <strong>B2K</strong>2 until you feel completely confident with your ability to<br />
handle your <strong>B2K</strong>2 safely.<br />
Keep your finger out of the trigger guard and away from the trigger; point the<br />
muzzle of the gun in a safe direction at all times. Keep the gun turned off until<br />
ready to operate. The <strong>B2K</strong>2 does not have a mechanical safety, only an on-off<br />
switch! Always keep your <strong>B2K</strong>2 pointed in a safe direction. Always use a barrel<br />
plug.<br />
Installing the 9 volt Power Source<br />
The <strong>B2K</strong>2 requires a single 9-volt battery as the electronic power source. The use<br />
of long life batteries is recommended.<br />
The 9-volt battery is located in the frame (or Αtray≅) above the trigger and on-off<br />
switch. The battery is accessed through a battery cover located on the right side of<br />
the gun.<br />
Remove the 2 screws that hold the battery cover in place. Connect the battery to<br />
the terminal and place the battery inside the frame (or tray) carefully being sure that<br />
the black and red wires to the terminal are forward and are toward the bottom.<br />
Make sure that there are no abrupt kinks and the wires are comfortably placed, do<br />
not force them into place. Replace the cover and 2 screws.<br />
If you need to remove the complete battery frame and grip follow these<br />
4
instructions. Before removing the tray, remove the grip frame side panel on the left<br />
side, exposing the CPU and switches. Note the blue wires looped down into the<br />
PCB cavity. This loop is to allow the necessary distance between the tray and<br />
upper body to change the battery or maintain the solenoid. This loop must be<br />
maintained when re-assembly is completed. To remove the tray, use a 7/64 allen<br />
wrench and remove the four 6-32X1" screws around the bottom of the Αtray≅.<br />
Gently separate the upper section from the lower section, being careful not to put<br />
stress on the wiring harness (blue looped wires) connected to the solenoid valve on<br />
the upper section. Place the tray and upper body together being careful not to<br />
pinch any wires in the body, bring the blue wire loop back to its original position.<br />
Turn the main on-off switch to the on position and be sure the LED lights up, then<br />
turn off. Replace the four 6-32X1" screws and the grip panel.<br />
The <strong>LCD</strong> readout screen located on the back of the marker.<br />
That’s right. It’s In Your Face. No scrambling during a game to look at<br />
something on the side of your marker or in your hand. Keep your profile tight,<br />
your aim secured, and ready to fire as you glance briefly at the <strong>LCD</strong> timer and<br />
shot counter. Information comes to you quickly and easily.<br />
5
Software and an on-board connector for the infrared sensors (anti-chop eye) are<br />
already built into the board so that upgrades will be easier in the future. The<br />
<strong>LCD</strong>, when turned on, first shows the mode, then the rate of fire, and then<br />
defaults to the game timer and shot counter that run during the game. The <strong>LCD</strong><br />
is simple to use. It=s practical. It=s made for <strong>Paintball</strong>. It=s not Playstation,<br />
Nintendo, Windows or Mac compatible. To bypass the mode and BPS display,<br />
you can pull the trigger and then turn the main switch to the on position, that<br />
activates the timer immediately and allows the gun to fire on the very next<br />
trigger pull.<br />
CO2, Nitrogen or Compressed Air Usage<br />
The <strong>B2K</strong>2 comes with a male quick-disconnect adapter on the input side of the<br />
regulator. The <strong>B2K</strong>2 can be set up to use a nitrogen or compressed air system.<br />
Although it may be used, CO2 is not recommended for use as the propellant.<br />
Generally the CO2 that we use as an industry is industrial grade CO2. It is dirty,<br />
pumped from large tanks full of contaminates including rust and metal flakes. CO2<br />
can be used successfully if used with anti-siphon systems and filters. Be aware that<br />
under the conditions of CO2 the results may not be as expected. Consult the place<br />
6
where you purchased your <strong>B2K</strong>2, or a recognized and competent airsmith, for<br />
instruction in the safe handling of compressed-air cylinders before purchasing or<br />
connecting one to your <strong>B2K</strong>2.<br />
Adjustable regulator compressed air systems:<br />
The input pressure from your compressed air system should be regulated down to<br />
350-500 PSI output pressure. Note: on MOST systems, there is a large difference<br />
between the setting pressure and the actual output operating pressure. If your<br />
compressed air system does not have an output pressure gauge on its regulator we<br />
do not recommend its use.<br />
Fixed output regulated compressed air systems:<br />
VERIFY the output pressure from the regulator. If your compressed air system<br />
does not have an output pressure gauge on its regulator we do not recommend its<br />
use.<br />
CO2 usage:<br />
Although it may be used, CO2 is not recommended for use as the propellant.<br />
Generally the CO2 that we use as an industry is industrial grade CO2. It is dirty,<br />
pumped from large tanks full of contaminates including rust and metal flakes. CO2<br />
can be used successfully if used with anti-siphon systems and filters. Be aware that<br />
under the conditions of CO2 the results may not be as expected.<br />
REMEMBER: CO2, compressed air or nitrogen systems can be extremely<br />
dangerous if misused or improperly handled. Use only D.O.T. certified tanks.<br />
Before pressurizing your <strong>B2K</strong>2, check to make sure that you have a barrel plug in<br />
place and there is no paint in the gun. The on-off switch should be OFF. Air can<br />
now be applied, the gun will become pressurized and the bolt will move backwards.<br />
<strong>Paintball</strong> and Loader Usage<br />
The <strong>B2K</strong>2 comes equipped to accept 1.03" OD standard-gravity feed loaders. Fit<br />
the loader directly into the vertical feed tube. Always twist it down in a<br />
CLOCKWISE direction. Always twist it off in a CLOCKWISE direction as well.<br />
The <strong>B2K</strong>2 uses .68 caliber, water-soluble paint pellets. The pellets are gravity fed<br />
from the loader through the direct vertical feed nipple and into the breech of the<br />
gun.<br />
DIP Switch settings - Modes - Rate of Fire -<br />
7
The <strong>B2K</strong>2 features 8 different modes of fire.<br />
Mode selection is dependant on the switch settings of the DIP switches on the<br />
Printed Circuit Board.<br />
Modes are:<br />
1. Semi-auto (one single shot per trigger pull),<br />
2. 2 shot (2 shots if the trigger is pulled and not released, with single shot<br />
capabilities)<br />
3. 3 shot burst (3 shots if the trigger is pulled and not released, with single<br />
shot capabilities)<br />
4. 6 shot burst (6 shots if the trigger is pulled and not released, with single<br />
shot or any amount between capabilities).<br />
5. Auto Response mode fires once the trigger is pulled and once when it is<br />
released.<br />
6. Turbo mode (emulated trigger reaction). To engage this mode you must<br />
maintain a sequence of cycles within a pre-determined timing<br />
rate, and as long as this repetition is maintained, the mode will<br />
remain engaged.<br />
7. Zip mode (a ramping cycle) starts at 8 BPS and increases to 12 BPS<br />
within a 6 shot burst if the trigger is pulled and not released, with<br />
single shot or any amount between capabilities.<br />
8. Full auto (as long as the trigger is pulled it will cycle).<br />
8
Mode selection is accomplished using switches 1 thru 3. The following<br />
configurations will give you the desired modes.<br />
Switch numbers<br />
Modes #1 #2 #3<br />
Semi-Auto off off off<br />
2 shot Burst on off off<br />
3 shot Burst off on off<br />
6 shot Burst on on off<br />
Auto-Response off off on<br />
Turbo Mode on off on<br />
Zip (ramp) off on on<br />
Full Auto on on on<br />
9
Rate of Fire and timing is as follows:<br />
Dip switch #4 and #5 (registers Solenoid on times in milliseconds)<br />
#4 #5<br />
off off = 06 ms (.006 seconds)<br />
on off = 08 ms (.008 seconds)<br />
off on = 10 ms (.010 seconds)<br />
on on = 12 ms (.012 seconds)<br />
Dip switch #6, #7 and #8 (registers Solenoid off (delay before re-cycle) times in<br />
milliseconds)<br />
#6 #7 #8<br />
off off off = 70 ms (.070 seconds)<br />
on off off = 80 ms (.080 seconds)<br />
off on off = 90 ms (.090 seconds)<br />
on on off = 100 ms (.100 seconds)<br />
off off on = 110 ms (.110 seconds)<br />
on off on = 120 ms (.120 seconds)<br />
off on on = 130 ms (.130 seconds)<br />
on on on = 140 ms (.140 seconds)<br />
Calculating the cycles per second is easy and precise. For instance, if, S4 is off &<br />
S5 is on, S6 & S7 are off and S8 is on the rate is calculated as .010 + .110 = .120.<br />
The total cycle times for .120 = 8.33 cycles per second (1 divided by .120).<br />
This is the calculation for Balls Per Second.<br />
Firing the <strong>B2K</strong>2<br />
Keep your finger out of the trigger guard and away from the trigger; point the<br />
muzzle of your gun in a safe direction at all times during this process. Be sure your<br />
goggles are securely in place. Push the on-off switch into the off position.<br />
Always keep your <strong>B2K</strong>2 pointed in a safe direction!<br />
1. Place the empty loader onto the gun. Be sure that it is securely mounted in<br />
place.<br />
2. Apply the compressed gas, pressurizing the gun.<br />
10
3. Put the paintballs into the loader.<br />
4. Remove the barrel plug.<br />
5. Aim the gun at the target.<br />
6. Push the on-off switch to the ON position, the LED will light up.<br />
7. Place your finger on the trigger.<br />
8. Pull the trigger with a smooth squeezing motion. BANG. . . .<br />
UNLOADING THE <strong>B2K</strong>2<br />
Keep your finger out of the trigger guard and away from the trigger; point the<br />
muzzle of your gun in a safe direction during this entire process. Always keep your<br />
<strong>B2K</strong>2 pointed in a safe direction!<br />
1. Push the on-off switch to the off position. The LED will be off.<br />
2. Place the barrel plug into the end of the barrel.<br />
3. Remove the pressurized gas from the marker carefully.<br />
4. Tilt the marker so that the loader is lower than the body of the gun.<br />
5. Remove the paintball loader from the direct vertical-feed tube, turning the<br />
loader in a clockwise direction.<br />
6. Inspect the inside of the direct vertical-feed tube to be sure that a ball does not<br />
remain inside the breech.<br />
MAINTENANCE<br />
CAUTION: Before attempting to perform any maintenance operations or any gun<br />
disassembly, make sure that all paint pellets and sources of propellants have been<br />
removed from the gun. Insert a barrel plug, push the on-off switch to the OFF<br />
position and keep the gun in its "SAFE" mode.<br />
Simple Maintenance<br />
Keep your <strong>B2K</strong>2 clean and lubricated to eliminate the friction that would prevent<br />
reliable operation. Clean and lube the gun before each use, and do not put it away<br />
dirty. USE NO OILS! Do not use petroleum-based lubricants in the lubrication of<br />
this gun. Teflon or silicon spray lubricants are the recommended types of<br />
lubrication for the bolt area of the main housing. Lithium grease is recommended<br />
for lubricating the regulator pistons, and the cylinder assembly. Be sure it is<br />
Lithium Grease and not axel grease.<br />
Cleaning Paint from the Barrel<br />
11
Unscrew the barrel with approximately one and one half (1-1/2) revolutions to<br />
remove the barrel for swabbing/cleaning. Keep the barrel clean to insure the<br />
continued accuracy of the <strong>B2K</strong>2. Gelatin from the paintballs has a tendency to<br />
build up in the barrel. As part of your cleaning ritual, wash out the barrel with hot<br />
soapy water and rinse it well.<br />
Removing the Bolt Assembly (Field Stripping)<br />
Remove the paint and pressurized gas from the gun. The gun can be field stripped<br />
while it is pressurized.<br />
1. Remove (pull) the knurled pin from the top of the marker. Pull the bolt body<br />
out the back of the main body.<br />
Once the bolt assembly is removed, it is possible to clean the entire upper receiver<br />
of the gun, including the breech and feed tube area. You may slightly lubricate the<br />
rear section of the bolt and bolt chamber with a light synthetic spray lubricant<br />
before re-installing the bolt. Do not use petroleum/oil-based lubricants; do use<br />
Teflon or silicon-based lubricants. The Αbolt≅ is NOT a simple plastic; it is a<br />
natural Delrin acetate material, which is a Dupont 3M material, developed<br />
specifically for this type of application. The use of a metal type of bolt will void all<br />
warranties.<br />
1. Point the barrel downward and slide the bolt in until the link pin hole lines up<br />
with the slot in the hammer and carefully install the link pin. Note: You must be<br />
sure that the link pin is engaged PROPERLY with the hammer, if the link pin IS<br />
NOT PROPERLY replaced, you may damage the hammer/cylinder assembly.<br />
12
Remember…operator error is not covered by<br />
warranty!<br />
13
STORAGE AND TRANSPORTATION<br />
- Your <strong>B2K</strong>2 must be clear of all paint and propellant when not being used.<br />
- Be sure the on-off switch is off and the LED is not lighted.<br />
- Put the barrel plug in place.<br />
- Make sure the gun is clean.<br />
- Store your <strong>B2K</strong>2 in a clean, cool, dry place.<br />
- Keep your <strong>B2K</strong>2 away from children.<br />
This air gun is not a toy! To be used by adults only!<br />
Your <strong>B2K</strong>2 must be clear of all paint and any source of propellant during<br />
transportation to and from the playing field. Keep your barrel plug in place. Keep<br />
the on-off switch in the off position. Protect your <strong>B2K</strong>2 from excessive heat during<br />
transportation. Observe and obey all local, state and federal laws concerning the<br />
transportation of paintball guns. For information concerning any of the laws in your<br />
area, contact your nearby friendly law enforcement agency.<br />
IMPORTANT: Never carry your <strong>B2K</strong>2 uncased when not on a playing field. The<br />
non-playing public and law enforcement personnel may not be able to distinguish<br />
between a paint marking device and firearm. For your own safety and to protect the<br />
image of the sport, always carry your <strong>B2K</strong>2 in a suitable gun case or in the box in<br />
which it was shipped.<br />
If you must ship your <strong>B2K</strong>2 for any reason, the box in which you purchased the gun<br />
is acceptable to all major carriers. Never ship charged CO2 or pressurized gas<br />
containers.<br />
14
ADJUSTING THE TRIGGER PULL<br />
You will notice two screws in your trigger. These screws adjust the length of<br />
pull and actuation point of the trigger. The bottom screw adjusts your trigger<br />
stop point (length of pull). The top screw is the contact point for your micro<br />
switch.<br />
1. Use blue loctite while adjusting the screws. Normal activity can cause<br />
the screws to back out of adjustment. DO NOT glob the loctite on, it<br />
can cause damage to the micro switch if you use too much.<br />
2. Begin by adjusting the bottom screw to your desired pull. Screw it in to<br />
lessen the distance the trigger must travel.<br />
3. Very Carefully screw in the top screw. Making large adjustments can<br />
force the screw into the micro switch and damage it. You will want to<br />
screw it in to the point where it makes contact with the micro switch but<br />
does not permanently rest on it. Continually check to verify that the<br />
LED flashes off and then back on when you pull the trigger. If you pull<br />
the trigger and the LED goes off and stays off, you have adjusted the<br />
screw in too far. Back it out.<br />
4. Clean up any excess loctite and let it dry for at least an hour before<br />
using your <strong>B2K</strong>2. This ensures the screws will remain in place.<br />
<strong>B2K</strong>2 TUNING GUIDE<br />
High pressure regulator adjustment:<br />
The <strong>B2K</strong>2 has a totally new and innovative system. The pressurized gas is<br />
regulated internally. The pressure regulator is externally adjustable via the screw<br />
with the slot in the bottom of the high-pressure regulator. A cap for this screw has<br />
been provided to keep access to this screw restricted. To increase the pressure, thus<br />
increasing the velocity of your projectile, remove the cap. Using a wide<br />
screwdriver, or even a Quarter insert into the slot and turn clockwise.<br />
NOTE: Only slight turns are needed to accomplish changes in the pressure used to<br />
shoot the paintball, thus changes in the velocity at which it is propelled.<br />
To decrease the velocity of your shots, turn the screw counter-clockwise. You must<br />
15
take a Αclearing≅ shot before the change in the decreasing direction can be<br />
registered.<br />
A pressure gauge has been installed into the regulator body to indicate the exact<br />
operating pressure of the marker. This gauge is extremely useful. At the factory we<br />
set the regulator gauge to 225-300 PSI with an input pressure of 400 PSI using<br />
Compressed air as the base propellant. Under normal circumstances these settings<br />
will produce paintball velocities at approximately 280-300 fps. The input pressure<br />
from your tank should be set at 350-500 PSI. Higher input pressures will not<br />
provide increased performance. There is a specific input side and output side of the<br />
main input regulator. If the gauge and input sides are switched, the outcome will be<br />
total bypassing of the main input regulator.<br />
Low pressure regulator adjustment:<br />
The low pressure regulator is externally adjustable via the adjustment screw with<br />
the slot for a wide screwdriver or even a quarter in the front of the low-pressure<br />
regulator. The low pressure regulator is pre-set at the factory to 85-95 PSI to<br />
operate the 4-way solenoid actuated valve. It may be necessary to re-adjust the low<br />
pressure regulator from time to time. Bench adjusting the regulator can be done by<br />
pressurizing the gun, be sure the input regulator is set properly, and then turning the<br />
adjustment screw inward (clock-wise) until you hear a leak coming from the 4-way<br />
valve in the grip area. The 4-way valve has an over-pressurization relief valve that<br />
will start to bleed off at approximately 125 PSI, once you hear the leak start then<br />
back off the adjustment screw 2 turn and the leak will stop. That will approximate<br />
the pressure to about 90 PSI. The low pressure regulator is designed to shut down<br />
and preserve the integrity of the low pressure system if it sees an input pressure<br />
over approximately 400 PSI coming from the main input regulator.<br />
This gun was designed with safety and safety standards in mind. If you attempt to<br />
shoot paintballs higher than established safety standards, the gun will not function<br />
properly.<br />
NOTE 1. You may notice that if you attempt to operate the gun at<br />
extremely high velocities, the internals will not function properly!<br />
NOTE 2. This gun is not designed to shoot above the safety limits<br />
established by industry standards.<br />
16
Leak Related Problems<br />
1. The <strong>B2K</strong>2 has a leak down the barrel. Reason: gas is leaking through or<br />
around the valve pin seal or O>ring area.<br />
a. Can you hear the leak when the gas is removed? Yes? There is no<br />
leak. You hear the ocean.<br />
b. The valve seal is marred/scratched or worn out or dirt has<br />
gotten to it. Replace it.<br />
2. The <strong>B2K</strong>2 has a leak around the high pressure regulator seam.<br />
Reason: the seal between the regulator body and the main<br />
body is bad.<br />
a. Tighten the regulator to the body.<br />
b. Check and/or replace the O’ring.<br />
3. The <strong>B2K</strong>2 has a leak around the low pressure regulator seam. Reason: the<br />
seal between the regulator body and main body is bad or the regulator has<br />
loosened up.<br />
a. Tighten the regulator into the body.<br />
b. Check and/or replace the O=ring gasket. Sized -019.<br />
4. The <strong>B2K</strong>2 has a leak inside the grip/battery area.<br />
Reason: the 4-way valve is leaking.<br />
a. Tighten the 4-way valve to the manifold. Take care not to over-tighten.<br />
b. Check for over-pressurization from the low pressure regulator. Re-adjust<br />
the low pressure regulator.<br />
c. Replace the O=rings on the cylinder assembly. Sized -015.<br />
d. Replace the piston O=ring. Sized -011<br />
e. Replace the solenoid/valve assembly.<br />
Ball Breakage Problems<br />
1. The ball breaks in the breech.<br />
a. The balls in your loader can bind, messing up your trigger timing.<br />
Note the ball drop and use an agitated loader.<br />
17
. As you run and shoot, you actually unweigh the gravity-fed balls in<br />
your loader. This can cause a ball to hesitate in its drop. This affects<br />
your trigger timing.<br />
c. If the ball retention ball does not move freely, the paintballs will<br />
crush against it or it may have stuck in the depressed position allowing<br />
double feeding. Check its tension regularly and keep this area as clean as<br />
possible.<br />
d. If the ball retention ball is too sloppy, the ball will not be held in the<br />
proper position. This may allow the next ball to enter the path of the<br />
bolt, subjecting it to impact cracking or shearing. Verify the tension.<br />
e. Increasing the timing of the solenoid on time will decrease the possible<br />
blow- back that is created when the ball is expelled, or increasing the<br />
solenoid off time to increase the time that the bolt stays back to let another ball<br />
drop into the breech.<br />
Regulator Related Problems<br />
1. The gauge reads correctly when charged, but climbs in pressure after a<br />
few moments.<br />
a. The regulator seal has been contaminated. Disassemble the regulator, and<br />
clean the seal with a ΑQ-tip≅ and alcohol. If you need assistance in the<br />
Disassembly of the regulator, please call (208) 468-0446.<br />
2. The gauge reads correctly when charged, but drops in pressure after a few<br />
shots.<br />
a. The regulator may not be adjusted correctly. Remove all pressurized gas,<br />
and back off the regulator adjustment screw 3 turns. Pressurize the system and<br />
adjust the pressure back up to the desired pressure.<br />
3. The gauge reads correctly when charged, but drops in pressure after a few<br />
shots, and is slow to climb back to normal pressure.<br />
a. The recovery side of the regulator is sluggish and may need cleaning and<br />
lubrication. If you need assistance in the disassembly of the regulator, please<br />
call (208) 468-0446.<br />
b. The regulator seal needs to be replaced if it has a deep groove in it from the<br />
regulator cup.<br />
18
Replacing or removing the original regulators voids all<br />
warranties.<br />
Battery Related Problems<br />
1. LED functions but the marker does not fire.<br />
2. Alternately missed shots.<br />
3. Velocity drops while firing several shots.<br />
4. Erratic Velocities. Jumps of 20 fps or more.<br />
5. Unexplainable paint breakage.<br />
6. Slight leak from the solenoid in the back of the grip.<br />
a. Change the battery. The LED only requires 1½ volts to function. The<br />
solenoid requires a minimum of 5 volts to operate. This means the marker<br />
may appear to be getting enough power when it is not. All batteries are<br />
NOT created equal. Performance will vary. Therefore, if you experience<br />
any erratic behavior, always change the battery first.<br />
19