Cooker with electric ventilated oven and ceramic hob - Indesit
Cooker with electric ventilated oven and ceramic hob - Indesit
Cooker with electric ventilated oven and ceramic hob - Indesit

You also want an ePaper? Increase the reach of your titles
YUMPU automatically turns print PDFs into web optimized ePapers that Google loves.
<strong>Cooker</strong> <strong>with</strong> <strong>electric</strong><br />
<strong>ventilated</strong> <strong>oven</strong> <strong>and</strong><br />
<strong>ceramic</strong> <strong>hob</strong><br />
Instructions for installation <strong>and</strong> use<br />
K 3C8 V.B/G<br />
K 3C8 V.B A/G
<strong>Cooker</strong> <strong>with</strong> <strong>electric</strong> <strong>ventilated</strong> <strong>oven</strong> <strong>and</strong> <strong>ceramic</strong><br />
<strong>hob</strong><br />
Instructions for installation <strong>and</strong> use
Important safety warnings<br />
To maintain the EFFICIENCY <strong>and</strong> SAFETY of this appliance, we recommend:<br />
• call only the Service Centers authorized by the manufacturer<br />
• always use original Spare Parts<br />
1 This appliance is intended for nonprofessional use<br />
<strong>with</strong>in the home.<br />
2 These instructions are only for those countries whose<br />
symbols appear in the booklet <strong>and</strong> on the serial no.<br />
plate of the appliance.<br />
3 This owner’s manual is for a class 1 appliance (insulated)<br />
or class 2, subclass 1 appliances (installed<br />
between two cabinets.<br />
4 Before using your appliance, read the instructions in<br />
this owner’s manual carefully since it provides all the<br />
information you need to ensure safe installation, use<br />
<strong>and</strong> maintenance. Always keep this owner’s manual<br />
close to h<strong>and</strong> since you may need to refer to it in the<br />
future.<br />
5 When you have removed the packing, check that the<br />
appliance is not damaged. If you have any doubts, do<br />
not use the appliance <strong>and</strong> contact your nearest Ariston<br />
Service Centre. Never leave the packing components<br />
(plastic bags, polystyrene foam, nails, etc.) <strong>with</strong>in the<br />
reach of children since they are a source of potential<br />
danger.<br />
6 The appliance must be installed only by a qualified technician<br />
in compliance <strong>with</strong> the instructions provided. The<br />
manufacturer declines all liability for improper installation,<br />
which may result in personal injury <strong>and</strong> damage<br />
to property.<br />
7 The <strong>electric</strong>al safety of this appliance can only be guaranteed<br />
if it is correctly <strong>and</strong> efficiently earthed, in compliance<br />
<strong>with</strong> regulations on <strong>electric</strong>al safety. Always<br />
ensure that the earthing is efficient. If you have any<br />
doubts, contact a qualified technician to check the system.<br />
The manufacturer declines all liability for damage<br />
resulting from a system which has not been earthed.<br />
8 Before plugging the appliance into the mains, check<br />
that the specifications indicated on the date plate (on<br />
the appliance <strong>and</strong>/or packaging) correspond <strong>with</strong> those<br />
of the <strong>electric</strong>al <strong>and</strong> gas systems in your home.<br />
9 Check that the <strong>electric</strong>al capacity of the system <strong>and</strong><br />
sockets will support the maximum power of the appliance,<br />
as indicated on the data plate. If you have any<br />
doubts, contact a qualified technician.<br />
10 An omnipolar switch <strong>with</strong> a contact opening of at least<br />
3 mm or more is required for installation.<br />
11 If the socket <strong>and</strong> appliance plug are not compatible,<br />
have the socket replaced <strong>with</strong> a suitable model by a<br />
qualified technician, who should also check that the<br />
cross-section of the socket cable is sufficient for the<br />
power absorbed by the appliance. The use of adaptors,<br />
multiple sockets <strong>and</strong>/or extensions, is not recommended.<br />
If their use cannot be avoided, remember to<br />
use only single or multiple adapters <strong>and</strong> extensions<br />
which comply <strong>with</strong> current safety regulations. In these<br />
cases, never exceed the maximum current capacity<br />
indicated on the individual adaptor or extension <strong>and</strong><br />
the maximum power indicated on the multiple adapter.<br />
12 Do not leave the appliance plugged in if it is not in use.<br />
Switch off the main switch <strong>and</strong> gas supply when you<br />
are not using the appliance.<br />
13 The openings <strong>and</strong> slots used for ventilation <strong>and</strong> heat<br />
dispersion must never be covered.<br />
14 The user must not replace the supply cable of this appliance.<br />
Always contact an after-sales service centre<br />
which has been authorised by the manufacturer if the<br />
cable has been damaged or needs replacement.<br />
15 This appliance must be used for the purpose for which<br />
it was expressly designed. Any other use (e.g. heating<br />
rooms) is considered to be improper <strong>and</strong> consequently<br />
dangerous. The manufacturer declines all liability for<br />
damage resulting from improper <strong>and</strong> irresponsible use.<br />
16 A number of fundamental rules must be followed when<br />
using <strong>electric</strong>al appliances. The following are of particular<br />
importance:<br />
• Do not touch the appliance when your h<strong>and</strong>s or feet<br />
are wet.<br />
• Do not use the appliance barefooted.<br />
• Do not use extensions, but if they are necessary,<br />
caution must be exercised.<br />
• Never pull the power supply cable or the appliance<br />
to unplug the appliance plug from the mains.<br />
• Never leave the appliance exposed to atmospheric<br />
agents (rain, sun etc.)<br />
• Do not allow children or persons who are not familiar<br />
<strong>with</strong> the appliance to use it, <strong>with</strong>out supervision.<br />
17 Always unplug the appliance from the mains or switch<br />
off the main switch before cleaning or carrying out maintenance.<br />
18 If you are no longer using an appliance of this type,<br />
remember to make it unserviceable by unplugging the<br />
appliance from the mains <strong>and</strong> cutting the supply cable.<br />
Also make all potentially dangerous parts of the appliance<br />
safe, above all for children who could play <strong>with</strong><br />
the appliance.<br />
19 To avoid accidental spillage do not use cookware <strong>with</strong><br />
uneven or deformed bottoms on the <strong>electric</strong> plates. Turn<br />
the h<strong>and</strong>les of pots <strong>and</strong> pans inwards to avoid knocking<br />
them over accidentally.<br />
20 Never use flammable liquids such as alcohol or gasoline,<br />
etc. near the appliance when it is in use.<br />
21 When using small <strong>electric</strong> appliances near the <strong>hob</strong>,<br />
keep the supply cord away from the hot parts.<br />
22 Make sure the knobs are in the “•”/”¡” position when<br />
the appliance is not in use.<br />
23 When the appliance is in use, the heating elements<br />
<strong>and</strong> some parts of the <strong>oven</strong> door become extremely<br />
hot. Make sure you don’t touch them <strong>and</strong> keep children<br />
well away.<br />
24 If the cooker is placed on a pedestal, take the<br />
necessary precautions to prevent the same from sliding<br />
off the pedestal itself.<br />
3
Installation<br />
The following instructions should be read by a qualified technician<br />
to ensure that the appliance is installed, regulated <strong>and</strong> technically<br />
serviced correctly in compliance <strong>with</strong> current regulations.<br />
Important: disconnect the cooker from the <strong>electric</strong>ity when<br />
making any adjustement, maintenance operation, etc.<br />
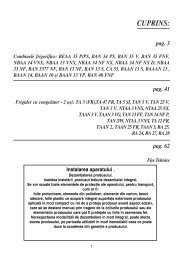
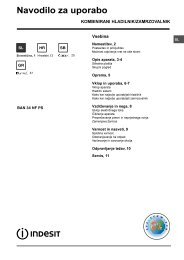
Positioning<br />
The appliance can be installed next to furniture units which are<br />
no taller than the top of the cooker <strong>hob</strong>. For proper installation of<br />
the cooker, the following precautions must be taken:<br />
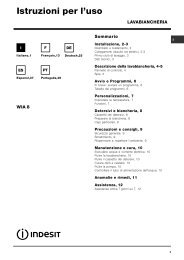
a) Kitchen cabinets installed next to the cooker that are taller<br />
than the top of the <strong>hob</strong> must be situated at least 200 mm<br />
from the edge of the <strong>hob</strong>.<br />
b) Hoods must be installed according to the requirements in<br />
the installation manual for the hoods themselves <strong>and</strong> in any<br />
case at a minimum distance of 650 mm.<br />
c) Place the wall cabinets adjacent to the hood at a minimum<br />
height of 420 mm from the <strong>hob</strong> (see figure).<br />
d) Should the cooker be installed beneath a wall cabinet, the<br />
latter should be situated at least 700 mm (millimetres) away<br />
from the <strong>hob</strong>, as shown in the figure.<br />
e) the cut-out for the cooker cabinet should have the dimensions<br />
indicated in the figure.<br />
mm.<br />
420<br />
Min.<br />
HOOD<br />
Min. 600 mm.<br />
Min. 420 mm.<br />
min. 650 mm. <strong>with</strong> hood<br />
min. 700 mm. <strong>with</strong>out hood<br />
N.B.: the following installation procedure must be carried out by<br />
a qualified <strong>electric</strong>ian. The <strong>electric</strong>al installation must comply <strong>with</strong><br />
the IEE Regulations, Building & local By-Lays.<br />
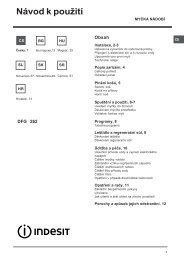
For the installation of the feeding cable carry out the following<br />
operations:<br />
l Unscrew screw “V” (see fig. A)<br />
l Pull <strong>and</strong> open the junction blok lid<br />
Important: the wires in the mains lead are coloured in<br />
accordance <strong>with</strong> the following code:<br />
Green & Yellow<br />
Earth<br />
Blue<br />
Neutral<br />
Brown<br />
Live<br />
As the colours of the wires in the mains lead may not correspond<br />
<strong>with</strong> the coloured markings identifying the terminals in your plug,<br />
proceed as follows:<br />
Green & Yellow wire to terminal marked “E” or 6 or coloured<br />
Green or Green & Yellow.<br />
Brown wire to terminal marked “L” or coloured Red.<br />
Blue wire to terminal marked “N” or coloured Black (see fig. B).<br />
l fix the feeding cable in the special cable stop <strong>and</strong> close the<br />
cover.<br />
N.B.: the power supply cable must have these minimum<br />
requirements:<br />
Type: H05RR-F<br />
Section: 3x4 mm 2<br />
V<br />
Levelling your appliance (only on a few models)<br />
Your cooker is supplied <strong>with</strong> feet for levelling the appliance. If<br />
necessary, these feet can be screwed into the housings in the<br />
corners of the cooker base (Fig. A).<br />
Mounting the legs (only on a few models)<br />
Press-fit legs are supplied which fit under the base of your cooker<br />
(Fig. B).<br />
Fig. A<br />
Fig. B<br />
Connecting the supply cable to the mains<br />
WARNINGS: THIS APPLIANCE MUST BE EARTHED.<br />
Important: The cooker must be connected to the mains by a<br />
switched (double pole) cooker outlet correctly fused <strong>with</strong> a<br />
capacity appropriate to that shown on the cooker Rating Plate.<br />
All <strong>electric</strong>al wiring from the consumer unit to the cooker, via the<br />
switched double pole cooker outlet, must be of an acceptable<br />
type <strong>and</strong> current rating as above.<br />
Note: the supply cable must be positioned so that it never reaches<br />
at any point a temperature 50°C higher than the room temperature.<br />
The cable must be routed away from the rear vents.<br />
Fig. A<br />
Fig. B<br />
Electrical connection<br />
Electric cookers come <strong>with</strong>out a power supply cable. The cooker<br />
is designed to operate on an <strong>electric</strong>ity supply which conforms<br />
to the <strong>electric</strong>al data shown on the Rating Plate. The cooker can<br />
be connected to the mains only after removing the back panel of<br />
the cooker itself <strong>with</strong> a screwdriver.<br />
HOT PARTS<br />
4
Technical Specifications<br />
Oven<br />
Dimensions (WxDxH)<br />
Volume<br />
Ceramic Hob<br />
Front Left<br />
Back Left<br />
Back Right<br />
Front Right<br />
Hob Ceramic absorption Max<br />
39x41x34 cm<br />
54 lt<br />
1200 W<br />
1700 W<br />
1200 W<br />
1700 W<br />
5800 W<br />
ENERGY LABEL<br />
Directive 2002/40/EC on the label of <strong>electric</strong> <strong>oven</strong>s<br />
Norm EN 50304<br />
Declared energy consumption for Forced convection Class<br />
heating mode: b Fan assisted<br />
7This appliance conforms <strong>with</strong> the following<br />
European Economic Community directives:<br />
- 73/23/EEC of 19/02/73 (Low Voltage) <strong>and</strong> subsequent<br />
modifications;<br />
- 89/336/EEC of 03/05/89 (Electromagnetic<br />
Compatibility) <strong>and</strong> subsequent modifications;<br />
- 93/68/EEC of 22/07/93 <strong>and</strong> subsequent<br />
modifications.<br />
Voltage <strong>and</strong> frequency<br />
230/400 V 3N AC 50 Hz<br />
Inner Dimensions of the Food Warmer:<br />
Width: 42 cm<br />
Depth: 44 cm<br />
Height: 23 cm<br />
Mains frequency <strong>and</strong> voltage of the <strong>electric</strong>al<br />
section<br />
Model<br />
Electric section<br />
K 3C8 V.B/G<br />
K 3C8 V.B A/G<br />
Voltage<br />
Power (W)<br />
230-240V~ 50 Hz 7800<br />
104<br />
60 50<br />
85/90<br />
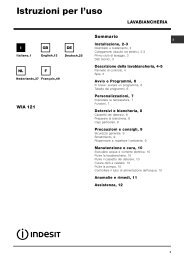
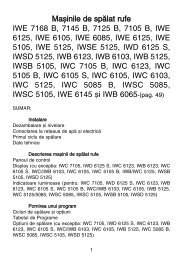
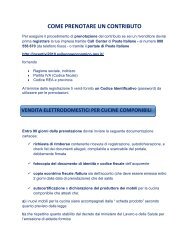
The cooker <strong>with</strong> <strong>electric</strong> <strong>ventilated</strong> <strong>oven</strong> <strong>and</strong> <strong>ceramic</strong> <strong>hob</strong><br />
D. Dripping Pan or Baking Sheet<br />
E. Control Panel<br />
F. Adjustable Feet or Legs<br />
K. Oven Rack<br />
L. Selector Knob<br />
M. Variable grill Knob<br />
N. The control knobs for the <strong>electric</strong> plates<br />
O. Thermostat Light<br />
Q. The green pilot lamp<br />
R. The electronic cooking programmer (only on a few<br />
models)<br />
S. Analogue Programmer for Start/End Cooking Time<br />
(only on a few models)<br />
E<br />
K<br />
D<br />
F<br />
O<br />
Q<br />
O<br />
Q<br />
Grill<br />
Grill<br />
MAX<br />
MAX<br />
12<br />
1/2<br />
9<br />
3<br />
1/2<br />
MIN<br />
6<br />
MIN<br />
R<br />
M<br />
L<br />
N<br />
S<br />
M<br />
L<br />
N<br />
5
How To Use Your Appliance<br />
The various functions included in the cooker are selected by<br />
operating the control devices located on the cooker control<br />
panel.<br />
Notice: The first time you use your appliance, we recommend<br />
that you set the thermostat to the highest setting<br />
<strong>and</strong> leave the <strong>oven</strong> on for about half an hour <strong>with</strong> nothing<br />
in it, <strong>with</strong> the <strong>oven</strong> door shut. Then, open the <strong>oven</strong> door<br />
<strong>and</strong> let the room air. The odour that is often detected during<br />
this initial use is due to the evaporation of substances<br />
used to protect the <strong>oven</strong> during storage <strong>and</strong> until it is installed.<br />
Attention: Only use the bottom shelf of the <strong>oven</strong> when using<br />
the rotisserie to cook (where present). For all other types of<br />
cooking, never use the bottom shelf <strong>and</strong> never place anything<br />
on the bottom of the <strong>oven</strong> when it is in operation because<br />
this could damage the enamel. Always place your cookware<br />
(dishes, aluminium foil, etc. etc.) on the grate provided <strong>with</strong><br />
the appliance inserted especially along the <strong>oven</strong> guides.<br />
N.B.: Should the appliance be equipped <strong>with</strong> an electronic<br />
programmer, to use the <strong>electric</strong> <strong>oven</strong>, just press buttons<br />
V <strong>and</strong> W at the same time (the m symbol will appear<br />
on the display) before selecting the desired cooking<br />
function.<br />
Attention: to use the <strong>oven</strong> in manual mode <strong>with</strong>out the<br />
cooking control timer, match the indicatore on the control<br />
panel <strong>with</strong> the 9 symbol on the timer knob.<br />
Using the <strong>oven</strong><br />
When the <strong>oven</strong> control knob (L) is turned in a clockwise<br />
direction to the symbol X the fan <strong>and</strong> <strong>oven</strong> light will<br />
come on to assist in the defrosting of frozen food. Rotating<br />
further to the complete range of temperatures shown on<br />
the dial you can choose which is most suitable for the food<br />
you are going to cook. The temperature is reached<br />
automatically <strong>and</strong> controlled by the <strong>oven</strong> thermostat (from<br />
50°C to Max).<br />
Note: Whilst using tag <strong>oven</strong> for conventional cooking knob<br />
(M) must be set <strong>with</strong> “MAX” in line <strong>with</strong> the reference mark<br />
on the control panel.<br />
Grill F<br />
The top centre heating element will come on. On this<br />
setting, food is cooked by the thermal radiation given off<br />
in the downward direction by the <strong>electric</strong> heating element.<br />
The very high temperature <strong>and</strong> direct heat of the grill make<br />
it possible to brown meats on the surface while locking in<br />
the juices to keep them tender.<br />
Double Grill d<br />
Both of the top heating elements turn on.<br />
This over-sized grill has a completely new design, which<br />
is the reason why cooking efficiency has increased by<br />
50%. In addition, the double grill eliminates heat gaps in<br />
the corners of the <strong>oven</strong>.<br />
Important: when using the grill, the <strong>oven</strong> door must be<br />
left partly open by positioning the deflector “D” between<br />
door <strong>and</strong> panel to prevent the cooker knobs from<br />
overheating.<br />
Oven Light<br />
The light comes on when the “L” knob is turned to the X<br />
setting. The light illuminates the <strong>oven</strong> <strong>and</strong> remains on when<br />
any of the heating elements is turned on.<br />
Thermostat Light (O)<br />
This light indicates that the <strong>oven</strong> is heating. When it turns off, the<br />
temperature inside the <strong>oven</strong> has reached the setting made <strong>with</strong><br />
the thermostat knob. At this point, the light will turn on <strong>and</strong> off as<br />
the <strong>oven</strong> maintains the temperature at a constant level.<br />
Attention<br />
Avoid the children touch the <strong>oven</strong> door because it is very hot<br />
during the cooking.<br />
Oven door kit<br />
In order to further decrease the temperature of the <strong>oven</strong> door<br />
<strong>and</strong> reduce energy consumption, a supplemental kit has been<br />
made available. This kit should be installed if the <strong>oven</strong> is used in<br />
the presence of small children. To install the protective glass for<br />
the <strong>oven</strong> door (code 076650), contact your nearest Merloni<br />
Eletrodomestici Service Centre indicated on the list provided <strong>with</strong><br />
the appliance.<br />
D<br />
6
Electronic Cooking Programmer<br />
This feature allows you to program the <strong>oven</strong> or the grill as<br />
follows :<br />
• delayed start for a specific length of time;<br />
• immediate start for a specific length of time;<br />
• timer.<br />
Button Functions:<br />
n : timer - hours <strong>and</strong> minutes;<br />
V : cooking time;<br />
W : end cooking time;<br />
s : set cooking time - backward;<br />
: set cooking time - forward.<br />
t<br />
How to reset the digital clock.<br />
After the appliance has been connected to the power supply,<br />
or when the power has gone out, the clock display will<br />
automatically reset to 0:00 <strong>and</strong> begin to blink.<br />
• Press the V <strong>and</strong> W buttons consecutively <strong>and</strong><br />
then reset the time (<strong>with</strong>in 4 seconds) using the s<br />
<strong>and</strong> t buttons.<br />
The t button sets the time forward.<br />
The s button sets the time backward.<br />
Whenever the time must be reset, follow this same procedure.<br />
Manual Operation of the Oven<br />
After resetting the time, the program automatically switches<br />
to the manual mode.<br />
Note: To reset the manual mode after each “automatic”<br />
cooking, press the V <strong>and</strong> W buttons simultaneously.<br />
Start delayed cooking <strong>with</strong> preset duration<br />
The length of the cooking program as well as the time at<br />
which the cooking program ends must be set. If we assume<br />
that the time displayed on the timer is 10:00:<br />
1. Turn the <strong>oven</strong> control knobs to the feature <strong>and</strong> temperature<br />
desired (e.g. conventional <strong>oven</strong>, 200°C);<br />
2. Press the V button <strong>and</strong> then set the cooking time (<strong>with</strong>in<br />
four seconds) using the s <strong>and</strong> t buttons. Let us suppose<br />
that we set the cooking time at 30 minutes. The<br />
display will read as follows:<br />
N<br />
After the button has been released, the current time will<br />
be displayed again after approximately 4 seconds, along<br />
<strong>with</strong> the m symbol <strong>and</strong> the letter “A” (AUTO);<br />
3. Press the W button <strong>and</strong> then use the s <strong>and</strong> t buttons<br />
to set the time for when the cooking program should end.<br />
Let us suppose this time to be 1:00 p.m.<br />
O<br />
4. After the button has been released, the current time will<br />
be displayed after approximately 4 seconds:<br />
P<br />
The letter “A” will light up reminding you that the length<br />
<strong>and</strong> end cooking time were programmed in automatic<br />
mode. At this point, the <strong>oven</strong> will turn on automatically at<br />
12:30 <strong>and</strong> then turn off after 30 minutes. When the <strong>oven</strong> is<br />
turned on, the m symbol will be displayed for the entire<br />
cooking time. At any time during the cooking process, the<br />
length of the cooking time can be displayed by pressing<br />
the V button, <strong>and</strong> the end cooking time by pressing the<br />
W button.<br />
After the cooking time has expired, the timer will ring<br />
for several minutes; to turn it off, simply press any of<br />
the buttons except the s <strong>and</strong> t buttons.<br />
Immediate start <strong>with</strong> preset duration<br />
By programming just the duration (points 1 <strong>and</strong> 2 of the<br />
“Start delayed cooking <strong>with</strong> preset duration” section),<br />
cooking will start up immediately.<br />
To cancel a cooking schedule already programmed<br />
Press the V <strong>and</strong> W buttons simultaneously.<br />
Timer Feature<br />
The timer feature allows you to enter a given amount of time<br />
from which the timer begins to count down. This feature does<br />
not turn the <strong>oven</strong> on or off; it merely sounds when the time<br />
has expired.<br />
When the n button has been pressed, the display will read<br />
as follows:<br />
Q<br />
buttons to set the desired time.<br />
After the button has been released, the timer will start to<br />
count down <strong>and</strong> the current time will be displayed.<br />
R<br />
After the time has expired, an acoustical signal will be emitted,<br />
which can be turned off by pressing any of the buttons (except<br />
Then use the t <strong>and</strong> s<br />
the t <strong>and</strong> s buttons) at this point the n symbol will also<br />
turn off.<br />
Correction/Cancellation of Data<br />
• The data entered can be changed at any time by pressing<br />
the corresponding button <strong>and</strong> the t or s buttons.<br />
• When the data for the length of the cooking time is<br />
cancelled, the data for the end cooking time are also<br />
cancelled automatically, <strong>and</strong> vice versa.<br />
• If the <strong>oven</strong> has been programmed, it will not accept end<br />
cooking times which are before the start of the cooking<br />
process.<br />
Buzzer volume control<br />
Once you have made <strong>and</strong> confirmed the clock settings,<br />
use button s to adjust the volume of the alarm buzzer.<br />
7
ANALOGUE PROGRAMMER FOR START/END COOKING TIME<br />
9<br />
12<br />
6<br />
How to reset the correct time<br />
The <strong>oven</strong> must be plugged in.<br />
Press the knob <strong>and</strong> turn it anticlockwise until you set the<br />
correct time.<br />
NB: The clock is <strong>electric</strong>ally powered, therefore in the event<br />
of a power shortage, it will stop working for the entire duration<br />
of the same. Following this power failure, the correct<br />
time will have to be reset.<br />
Manual operation<br />
NB.: To be used in all cases where programmed<br />
cooking is not necessary.<br />
1 Turn the knob anticlockwise until the symbol 9 appears<br />
in the window.<br />
2 Pull the knob <strong>and</strong> turn it anticlockwise until the knob<br />
marker lines up <strong>with</strong> correct time. A click will indicate the<br />
operation is over.<br />
With the <strong>oven</strong> selector knob, select the desired cooking mode.<br />
To turn the <strong>oven</strong> off, set the same back to the “0” position.<br />
3<br />
Programming cooking <strong>with</strong> immediate start<br />
1 Turn the knob anticlockwise until the desired cooking time<br />
is displayed in the window.<br />
2 Pull the knob <strong>and</strong> turn it anticlockwise until the knob<br />
marker lines up <strong>with</strong> the correct time. A click will indicate<br />
the operation is over.<br />
With the <strong>oven</strong> selector knob, select the desired cooking mode.<br />
The <strong>oven</strong> comes on immediately <strong>and</strong> stays on for the entire<br />
duration of the set cooking time. A buzzer will sound to inform<br />
you the <strong>oven</strong> has come off.<br />
To interrupt it, turn the knob anticlockwise until the symbol<br />
9 appears in the window.<br />
Programming cooking <strong>with</strong> delayed start<br />
1 Cooking time:<br />
Turn the knob anticlockwise until the desired cooking time<br />
is displayed in the window.<br />
2 Cooking start:<br />
Pull the knob <strong>and</strong> turn it anticlockwise until the knob<br />
marker lines up <strong>with</strong> the desired time for cooking to start.<br />
With the <strong>oven</strong> selector knob, select the desired cooking mode.<br />
The <strong>oven</strong> will come on at the desired cooking start time <strong>and</strong><br />
will stay on for the entire duration of the set cooking time. A<br />
buzzer will sound to inform you the <strong>oven</strong> has come off.<br />
To interrupt it, turn the knob anticlockwise until the symbol<br />
9 appears in the window.<br />
8
Cooking advice<br />
The <strong>oven</strong> offers a wide range of alternatives which allow<br />
you to cook any type of food in the best possible way. With<br />
time you will learn to make the best use of this versatile<br />
cooking appliance <strong>and</strong> the following directions are only a<br />
guideline which may be varied according to your own personal<br />
experience.<br />
Using the Grill<br />
Grilling may be carried out <strong>with</strong> a two stage heating<br />
element situated in the top of the <strong>oven</strong> chamber. The<br />
centre, or the complete area of the grill can be selected<br />
by turning the <strong>oven</strong> control knob (L) in a clockwise direction<br />
to align the symbols (F for the centre, d for the complete<br />
area) <strong>with</strong> the mark on the control panel. The variable<br />
temperature control (M) is positioned to right of the <strong>oven</strong><br />
knob. This knob will provide varying grill temperatures<br />
when rotated from “max” to “min” <strong>and</strong> may be adjusted to<br />
vary the level of heat at any time during the grilling<br />
operation.<br />
To operate the grill<br />
1. Turn the <strong>oven</strong> control knob (L) clockwise until the<br />
required grilling symbol is in line <strong>with</strong> the mark on the<br />
control panel. The element is now “on”.<br />
2. The variable grill control (M) can now be operated to<br />
select the required heat.<br />
When using the grill, place the rack at the 4 rack heights<br />
(see cooking table) <strong>and</strong> place the dripping-pan beneath<br />
the <strong>oven</strong> rack to prevent grease from falling onto the bottom<br />
of the <strong>oven</strong>.<br />
Baking Pastries<br />
When baking pastries, always place them in the <strong>oven</strong> after<br />
it has been preheated. Make sure you wait until the<br />
<strong>oven</strong> has been preheated thoroughly (the red “O” light will<br />
turn off). The temperature is normally around 160°C. Do<br />
not open the door while the pastry is cooking in order to<br />
prevent it from dropping. Batters must not be too runny,<br />
as this will result in prolonged cooking times. In general:<br />
Pastry is too dry<br />
Increase the temperature by 10°C <strong>and</strong> reduce the<br />
cooking time.<br />
Pastry dropped<br />
Use less liquid or lower the temperature by 10°C.<br />
Pastry is too dark on top<br />
Place it on a lower rack, lower the temperature, <strong>and</strong><br />
increase the cooking time.<br />
Cooked well on the inside but sticky on the<br />
outside<br />
Use less liquid, lower the temperature, <strong>and</strong> increase<br />
the cooking time.<br />
The pastry sticks to the pan<br />
Grease the pan well <strong>and</strong> sprinkle it <strong>with</strong> a dusting of<br />
flour.<br />
I used more than one level <strong>and</strong> they are not all at<br />
the same cooking point<br />
Use a lower temperature setting. It is not necessary to<br />
remove the food from all the racks at the same time.<br />
Cooking fish <strong>and</strong> meat<br />
When cooking white meat, fowl <strong>and</strong> fish use low<br />
temperatures. (150°C-175°C). When red meat must be<br />
superficially well-cooked but succulent inside, it is<br />
advisable to start <strong>with</strong> a high temperature (200-220°C)<br />
for a short time, <strong>and</strong> then to reduce it at a later point.<br />
Generally speaking, the more meat there is, the lower the<br />
temperature <strong>and</strong> the longer the cooking time should<br />
be.Place the meat in the centre of the grid <strong>and</strong> put a spilltray<br />
underneath to catch grease drips. Insert the grid so<br />
that it is in the middle of the <strong>oven</strong>. If more heat from below<br />
is required, use the 1° bottom shelf.<br />
9
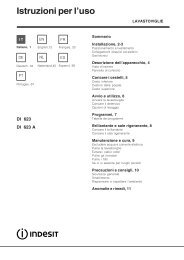
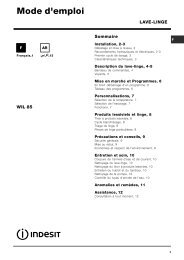
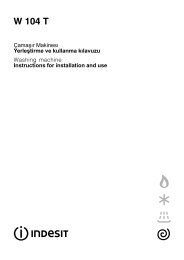
User’s instructions the <strong>ceramic</strong> <strong>hob</strong><br />
Description<br />
The <strong>hob</strong>s have been provided <strong>with</strong> radiant <strong>electric</strong> heaters.<br />
These heaters are incorporated under the surface of the<br />
<strong>hob</strong> as zones which redden while they are in use.<br />
A. Cooking area (A).<br />
B. A lights which indicate whether the corresponding<br />
heaters are at a temperature in excess of 60° C; even<br />
if the <strong>hob</strong>/zone has been switched off.<br />
Instructions for using the pyroceram top<br />
To obtain the best results from your <strong>hob</strong>, there are some<br />
basic rules to follow when cooking or preparing food.<br />
· All types of pots <strong>and</strong> pans may be used on the <strong>ceramic</strong><br />
glass cooktop. However, the bottom surface must be<br />
perfectly flat. Naturally, the thicker the bottom of the<br />
pot or pan, the more uniformly the heat is distributed.<br />
A<br />
A<br />
· Make sure that the base of the pan completely covers<br />
the cooking ring, so as to make full use of the heat<br />
produced<br />
B<br />
Description of the heating elements<br />
The radiant heating elements are composed of circular<br />
heating elements. They only become red after being turned<br />
on for 10-20 seconds.<br />
· Always make sure that the pan base is always dry <strong>and</strong><br />
clean so as to guarantee proper contact as well as<br />
longer-lasting pans <strong>and</strong> the long life-span of the <strong>hob</strong>.<br />
· Do not use the same pans which are used for cooking<br />
on gas burners. The heat strength of gas burners may<br />
deform the pan base <strong>and</strong> will not give the same results<br />
if it is subsequently used on a glazed <strong>ceramic</strong> <strong>hob</strong>.<br />
Pratical advice for using the <strong>electric</strong> plates<br />
The cook-top <strong>electric</strong> plate control knobs (N)<br />
The cookers may be equipped <strong>with</strong> st<strong>and</strong>ard, fast <strong>and</strong><br />
automatic <strong>electric</strong> plates in various combinations (the fast<br />
plates distinguished from the others by a red dot in the<br />
centre, the automatic ones by a round aluminium disk at<br />
the centre.<br />
To avoid heat dispersion <strong>and</strong> damage to the plates,<br />
recommend using cooking vessels <strong>with</strong> flat bottoms in<br />
diameters which are not smaller than the plate diameter.<br />
Table shows the correspondence between the position<br />
indicated on the knobs <strong>and</strong> the use for which the plates<br />
advised.<br />
Setting<br />
0 Off<br />
Normal or Fast Plate<br />
1 Cooking vegetables, fish<br />
2<br />
3<br />
Cooking potatoes (using steam) soups,<br />
chickpeas, beans.<br />
Continuing the cooking of large quantities<br />
of food, minestrone<br />
4 For roasting (average)<br />
5 For roasting (above average)<br />
6<br />
For browning <strong>and</strong> reaching a boil in a<br />
short time.<br />
The green pilot lamp (Q)<br />
This lights up when an <strong>electric</strong> plate is turned on.<br />
10
Cooking advice<br />
Food to be cooked<br />
Wt.<br />
(wt)<br />
Cooking<br />
position of<br />
shelves from<br />
bottom<br />
Temperature<br />
(°C)<br />
Variable<br />
grill<br />
Pre-heating time<br />
(min)<br />
Cooking<br />
time<br />
(min.)<br />
Pasta<br />
Lasagne 2.5 3 210 - 75-80<br />
Cannelloni 2.5 3 210 MAX - 75-80<br />
Oven-baked noodles 2.5 3 210 - 75-80<br />
Meat<br />
Veal 1.7 3 230 - 85-90<br />
Chicken 1.5 3 220 - 110-115<br />
Turkey 3.0 3 MAX MAX - 95-100<br />
Duck 1.8 3 230 - 120/125<br />
Rabbit 2 3 230 - 105/110<br />
Pork 2.1 3 230 - 100/110<br />
Lamb 1.8 3 230 - 90-95<br />
Fish<br />
Mackerel 1.1 3 210-230 - 55-60<br />
Dentex 1.5 3 210-230 MAX - 60-65<br />
Trout baked in paper 1.0 3 210-230 - 40-45<br />
Pizza<br />
Napolitan 1.0 3 MAX MAX 15 30-35<br />
Cake<br />
Biscuits 0.5 3 180 15 30-35<br />
Tarts 1.1 3 180 MAX 15 30-35<br />
Chocolate cake 1 3 200 15 45-50<br />
Raised Cakes 1 3 200 15 50/55<br />
Grill cooking<br />
Toast n.° 4 4 5 5-6<br />
Pork chops 1.5 4 3/4 5 20-30<br />
Mackerel 1.1 4 5 20-30<br />
Note: cooking times are approximate <strong>and</strong> may vary according to personal taste.<br />
11
Routine maintenance <strong>and</strong> cleaning of the <strong>oven</strong><br />
Disconnect the <strong>oven</strong> from the source of <strong>electric</strong>ity<br />
before performing any maintenance or cleaning. To<br />
ensure a long life for your <strong>oven</strong>, clean it frequently <strong>and</strong><br />
carefully, keeping in mind that:<br />
· Do not use steam equipment to clean the appliance.<br />
· the enamelled parts <strong>and</strong> the self-cleaning panels<br />
should be washed <strong>with</strong> warm water <strong>with</strong>out the addition<br />
of abrasive powders or corrosive substances which<br />
could damage the finish;<br />
· The inside of the <strong>oven</strong> should be cleaned fairly often<br />
while it is still warm, using warm water <strong>and</strong> detergent<br />
followed by careful rinsing <strong>and</strong> drying;<br />
· stainless steel may become marked if it comes into<br />
contact <strong>with</strong> very hard water or harsh detergents<br />
(containing phosphorous) for long periods of time. After<br />
cleaning, it is advisable to rinse thoroughly <strong>and</strong> dry. It<br />
is also recommended to dry any water drops;<br />
· avoid dirt <strong>and</strong> grease accumulating on the control panel<br />
by cleaning it frequently. Use non-abrasive sponges or<br />
soft cloths to avoid scratching enamelled or shiny steel<br />
parts.<br />
Cleaning the <strong>hob</strong> surface<br />
Prior to cooking, the <strong>hob</strong> surface should always be cleaned<br />
using a damp cloth to remove any dust or stray food<br />
particles. The <strong>hob</strong> surface should be regularly cleaned<br />
<strong>with</strong> a lukewarm solution of water <strong>and</strong> a mild detergent.<br />
Periodically it may be necessary to use a proprietary<br />
<strong>ceramic</strong> <strong>hob</strong> cleaner. First remove all spilt food <strong>and</strong> fat<br />
<strong>with</strong> a window scrape, preferably the razor blade type<br />
B (not supplied) or, failing that, the fixed blade<br />
razor edge type.<br />
Glass <strong>ceramic</strong> <strong>hob</strong><br />
cleaners<br />
Window scraper Razor blade<br />
scrapers<br />
Replacement blades<br />
COLLO luneta<br />
HOB BRITE<br />
Hob Clean<br />
SWISSCLEANER<br />
Available from<br />
DIY Stores<br />
DIY Stores,<br />
supermarkets,<br />
chemists<br />
Boots, Co-op stores,<br />
department stores, Regional<br />
Electricity Company shops,<br />
supermarkets<br />
Replacing the <strong>oven</strong> light bulb<br />
· Either pull out the plug (if it is accessible) or disconnect<br />
the <strong>oven</strong> from the mains by turning off the multipole<br />
switch used for connecting the <strong>oven</strong> to the <strong>electric</strong>ity<br />
source;<br />
· Remove the glass cover of the lamp holder;<br />
· Unscrew the bulb <strong>and</strong> replace it <strong>with</strong> a high temperature<br />
resistant bulb (300°C) <strong>with</strong> the following<br />
characteristics:<br />
- Voltage 230/240 V<br />
- Wattage 25W<br />
- Type E14<br />
· Replace the glass cover <strong>and</strong> reconnect the power<br />
supply to the <strong>oven</strong>.<br />
Then clean the <strong>hob</strong> while it is still warm to the touch <strong>with</strong><br />
a suitable cleaner <strong>and</strong> paper towel. Then rinse it <strong>and</strong> wipe<br />
it dry <strong>with</strong> a clean cloth .If aluminium foil or plastic items<br />
are accidentally allowed to melt on the <strong>hob</strong> surface they<br />
should be immediately removed from the hot cooking area<br />
<strong>with</strong> a scraper. This will avoid any possible damage to the<br />
surface. This also applies to sugar or any food <strong>with</strong> a high<br />
sugar content. Do not use abrasive sponges or scourers<br />
of any type. Corrosive cleaners such as <strong>oven</strong> sprays <strong>and</strong><br />
stain removers should also not be used.<br />
12
Merloni Elettrodomestici<br />
Viale Aristide Merloni 47<br />
60044 Fabriano<br />
Italy<br />
Tel +39 0732 6611<br />
Fax +39 0732 662501<br />
www.merloni.com<br />
Cucina con forno elettrico ventilato e piano VTC (Spec. GB)<br />
07/04 - 195039130.01