Nortel VPN Gateway Integration Guide - Info-Point-Security
Nortel VPN Gateway Integration Guide - Info-Point-Security
Nortel VPN Gateway Integration Guide - Info-Point-Security

You also want an ePaper? Increase the reach of your titles
YUMPU automatically turns print PDFs into web optimized ePapers that Google loves.
Version 1.0 March 2009<br />
<strong>Nortel</strong> <strong>VPN</strong> <strong>Gateway</strong><br />
<strong>Integration</strong> <strong>Guide</strong><br />
Introduction<br />
This document describes how to integrate PINsafe with the <strong>Nortel</strong> <strong>VPN</strong> <strong>Gateway</strong>. The<br />
integration is based on <strong>Nortel</strong> 3050 Release 7.1.1.0<br />
This guide covers the <strong>Nortel</strong> integration only and does not cover the general steps<br />
required for configuring the <strong>VPN</strong> <strong>Gateway</strong>.<br />
RADIUS <strong>Integration</strong><br />
The main integration required is to get the <strong>Nortel</strong> <strong>VPN</strong> <strong>Gateway</strong> to use RADIUS for<br />
authentication and to use PINsafe as its RADIUS server.<br />
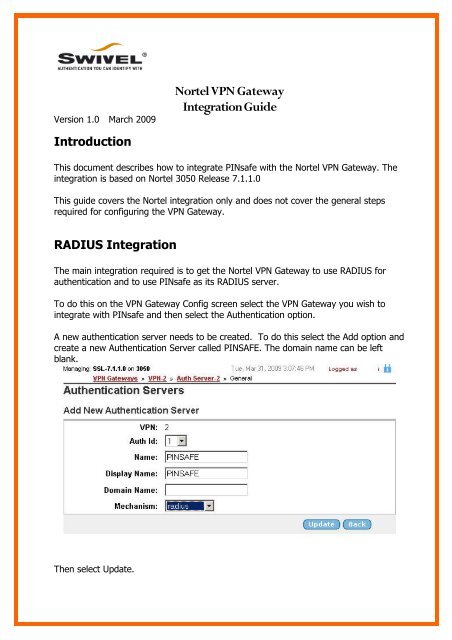
To do this on the <strong>VPN</strong> <strong>Gateway</strong> Config screen select the <strong>VPN</strong> <strong>Gateway</strong> you wish to<br />
integrate with PINsafe and then select the Authentication option.<br />
A new authentication server needs to be created. To do this select the Add option and<br />
create a new Authentication Server called PINSAFE. The domain name can be left<br />
blank.<br />
Then select Update.
Once this stage has been completed the authentication server you have just added will<br />
appear on the Authentication Servers screen. Select the server to configure the<br />
details. The only essential element is on the Servers tag.<br />
Select this tag and enter the details of the PINsafe server on this screen and click<br />
Update.<br />
You must now click Apply on the top right of the screen for these changes to<br />
take effect<br />
The <strong>VPN</strong> is now configured to use PINsafe for authentication. The <strong>Nortel</strong> allows<br />
multiple authentication servers to be defined, if you only wish to use PINsafe then on<br />
the Authentication Order tab ensure that it is the only server defined.<br />
You now need to configure PINsafe to accept authentication requests from the <strong>Nortel</strong><br />
<strong>VPN</strong> gateway<br />
To do this ensure that the RADIUS server is active and running on the same ports as<br />
defined on the <strong>Nortel</strong> <strong>VPN</strong> gateway. A NAS then needs to be added that has entries<br />
for IP address and shared secret that match those of the <strong>Nortel</strong> <strong>VPN</strong> <strong>Gateway</strong>.<br />
The value for IP address that you need to enter may need to match that of the <strong>VPN</strong><br />
host defined on the Config – Hosts screen on the <strong>VPN</strong>.<br />
TURING <strong>Integration</strong><br />
The <strong>Nortel</strong> <strong>VPN</strong> <strong>Gateway</strong> supports login page customization and this allows a TURing<br />
image to be requested and displayed on the logon page to allow seamless integration<br />
between PINsafe and the <strong>Nortel</strong> <strong>VPN</strong> <strong>Gateway</strong>.
This is achieved by going to the <strong>VPN</strong> <strong>Gateway</strong> → Portal page and selecting the Login<br />
tab.<br />
The html code required to include the TURing image can then be inserted. A sample<br />
is shown below.<br />
input type=button name=btnTuring value=Turing onclick=ShowTuring()><br />
<br />
<br />
function ShowTuring() {<br />
ppText = document.getElementById("ptext");<br />
if(ppText != null){<br />
ppText.innerHTML = "One-Time Code:";<br />
}<br />
var img = document.getElementById("turing");<br />
var usr = document.getElementById("user").value;<br />
var imgUrl = "http://pinsafe:8080/pinsafe/SCImage?username=";<br />
if (usr=="") {<br />
alert ("Please enter your username first!");<br />
document.getElementsId("user").focus();<br />
}else{<br />
//Set the image SRC and make it visible<br />
img.src = imgUrl + usr;<br />
img.style.visibility = "visible";<br />
}<br />
}<br />
The url http://pinsafe:8080/pinsafe/SCImage?username= needs to be changed to<br />
match the IP address of the PINsafe server. Note that for an appliance this is likely to<br />
be in the format https://pinsafe:8443/proxy/SCImage?username=<br />
Once these changes have been inserted click UPDATE.<br />
You must now click Apply on the top right of the screen for these changes to<br />
take effect<br />
You can then view the modified page by going to the ip address associated with the<br />
<strong>VPN</strong> on the Config → <strong>VPN</strong> Screen.<br />
Notes<br />
This integration requires the PINsafe server to be available from the internet. An<br />
appliance install can use the proxy to protect the PINsafe server in this respect.<br />
To test the integration ensure that there is a user that exists on both PINsafe and the<br />
<strong>VPN</strong> <strong>Gateway</strong> and check the PINsafe logs to see that it is receiving the authentication<br />
requests.