Installation Instructions - Sonic Electronix
Installation Instructions - Sonic Electronix
Installation Instructions - Sonic Electronix

You also want an ePaper? Increase the reach of your titles
YUMPU automatically turns print PDFs into web optimized ePapers that Google loves.
Why SoundGate Dealers<br />
have the edge...<br />
The technologies used in today’s<br />
vehicles are as sophisticated as any<br />
laptop computer. At SoundGate we<br />
believe these new technologies are<br />
full of opportunities for mobile<br />
electronic dealers across the<br />
nation. We make it a high priority<br />
to not only research these new<br />
systems, but to understand them<br />
and their impact on the aftermarket<br />
car audio industry. Armed with this<br />
knowledge, we are well equipped to<br />
help you integrate new components<br />
into these systems with our<br />
innovative, high-performance<br />
interfaces and unparalleled<br />
technical support.<br />
Simple-fi TM<br />
If you experience any problems, call SoundGate<br />
Technical Support at 800-256-0808, or e-mail us<br />
at sgtech@soundgate.com<br />
www.soundgate.com<br />
AUXMSTRV3<br />
Purpose...<br />
The AUXMSTRV3 is an exciting<br />
multi-use interface that lets you add<br />
two auxiliary inputs to a number of<br />
factory and aftermarket radios.<br />
1. If you have an existing Alpine<br />
M-Bus CD Changer connected to your factory radio, you may<br />
disconnect it, plug in AUXMSTRV3, and turn the connection into an<br />
auxiliary input for up to two devices - iPod, and Satellite radio, for<br />
instance! (note: CD Changer cannot be retained).<br />
2. AUXMSTRV3 can also be connected to many factory radios to add<br />
two auxiliary inputs (see listing below).<br />
3. The AUXMSTRV3 can simply plug into an Alpine M-Bus radio via the<br />
included cable, to provide two auxiliary inputs into the aftermarket<br />
Alpine radio!<br />
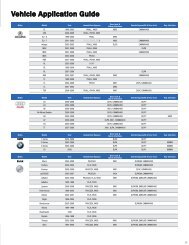
The SoundGate AUXMSTRV3 works in these applications:<br />
Alpine<br />
Jaguar<br />
All Alpine “M-Bus” type radios 1996-97 All<br />
The following part numbers (sold separately) combine AUXMSTRV3 with an<br />
additional factory-match cable, allowing a direct connection to factory<br />
radios (ask your Mobile Electronics Specialist for these part numbers):<br />
AUXMSTCR1 (1996-2001 Chrysler)<br />
AUXMSTHD1 (1998 and newer Honda/Acura)<br />
AUXMSTHD2 (1992-1997 Honda/Acura)<br />
AUXMSTMB1 (1994-98 Mercedes)<br />
AUXMSTVL1 (1996-2002 Volvo) AUXMSTMZ1 (95-96 MAZDA)<br />
Be Sure To Ask Your Autosound<br />
Specialist About These Other<br />
Exciting SoundGate Products...<br />
• Auxiliary Input Interfaces and Docking<br />
Stations which allow you to input the<br />
audio from MP3, DVD/Video, Satellite<br />
Radio, and more to OEM and<br />
aftermarket car audio systems<br />
• High-performance Radio Replacement<br />
Interfaces for seamlessly integrating<br />
new receivers or CD players into OEM<br />
audio systems<br />
• Competition-Grade Interfaces<br />
for adding amplifiers<br />
• Remote Audio Control Interfaces that<br />
let you control aftermarket receivers<br />
and CD players from your factory rear<br />
seat, or steering-wheel-mounted<br />
audio controls.<br />
• And many others!<br />
Simple-fi TM<br />
Copyright © 2004-2007 SoundGate ® . All Rights<br />
Reserved. SoundGate ® is a registered trademark<br />
of Stillwater Designs, Inc. All other trademarks are<br />
the property of their respective owners.<br />
Rev 20070808<br />
Continued on reverse...
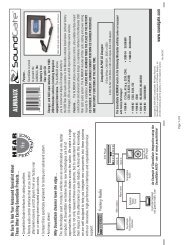
<strong>Installation</strong> <strong>Instructions</strong><br />
Features...<br />
The AUXMSTRV3 utilizes sophisticated microprocessor control,<br />
high-quality components, and advanced software design to<br />
flawlessly adapt the auxiliary input function to each vehicle<br />
or aftermarket radio operating system.<br />
Compatible Radios, systems, interfaces:<br />
- All Alpine “M-Bus” type radios.<br />
- Any system using an Alpine CD Changer Interface (example: Blitzsafe,<br />
PAC, PIE, Peripheral, etc.).<br />
- 1996-97 Jaguars<br />
Preliminary:<br />
A. Turn the ignition key of the car to the “Off” position.<br />
B. Make sure the car’s factory radio is turned to the “Off” position.<br />
Step Gain access to the interfacing location for your AUXMSTRV3.<br />
A. You will be connecting the SoundGate AUXMSTRV3 at the<br />
1<br />
rear of the radio, or at the factory changer cable location.<br />
Consult a factory service manual for exact disassembly instructions if<br />
you are unsure of the procedure. Pay close attention to any warnings<br />
regarding working in or around air bags. Gain access to this location.<br />
Step Mount the AUXMSTRV3 and connect cables.<br />
A. Mount the AUXMSTRV3 at the desired location.<br />
2<br />
B. Securely run the cable supplied with the AUXMSTRV3 from<br />
the AUXMSTRV3 to the rear of the radio, or to the existing CD changer<br />
cable, if plugging in at that location.<br />
C. Plug the auxiliary device(s) into the AUXMSTRV3’s RCA cable inputs.<br />
Operational Notes for listening to your new<br />
Auxiliary device...<br />
IMPORTANT: Driver distraction (paying attention to your driving) is<br />
an important issue. We recommend controlling your auxiliary<br />
device only when the car is stationary and parked.<br />
- Your auxiliary device is controlled from the device itself.<br />
- Enter ‘CD Changer’ mode by pressing the radio’s ‘CD’ button, or<br />
using the ‘Mode’ button to switch to CD Changer mode.<br />
- Pushing the “RANDOM” button switches between Aux Input 1 and<br />
Aux input 2. To operate, push RANDOM once to switch the audio,<br />
then press RANDOM a second time to lock it to that input. (Note:<br />
On Alpine M-Bus radios, press “Function” to access the “Random”<br />
mode.<br />
Note: If your radio does not support this function, alternate switching<br />
modes have been included in AUXMSTRV3:<br />
Alternate mode 1 - Press ‘REPEAT’, then press REPEAT a<br />
second time to lock it to that input<br />
Alternate mode 2 - Press ‘SCAN’, then press SCAN a<br />
second time to lock it to that input<br />
Note: Some radios can access each auxiliary input by<br />
simply using direct disc access - this is typically done by simply<br />
pressing the “Disc 1” or “Disc 2” buttons.<br />
- When in Aux Input mode, the radio display will show “Disc 1” for<br />
auxiliary input #1, and “Disc 2” for auxiliary input 2.<br />
- To exit the Aux mode, simply source to AM/FM, or internal CD.<br />
Step Test the operation of AUXMSTRV3.<br />
Turn the auxiliary device on and place the radio into the “CD<br />
3<br />
Changer” mode. If your auxiliary device is turned on, you<br />
should hear the audio from it at this time.<br />
B. Replace any panels that you removed for access, and your installation<br />
is complete!<br />
Note: If you have a radio that will not support switching between the<br />
two sources via the radio’s buttons, we have included a 2-pin header<br />
connection on the circuit board that a single-pole, single-throw<br />
switch can be wired to, to provide manual switching control - please<br />
contact SoundGate Technical Support at 1-307-674-4707 for details.<br />
If you experience any problems, call SoundGate Technical Support at 800-256-0808 or e-mail us at sgtech@soundgate.com