2007 Fork Service Manual - Manitou
2007 Fork Service Manual - Manitou
2007 Fork Service Manual - Manitou

You also want an ePaper? Increase the reach of your titles
YUMPU automatically turns print PDFs into web optimized ePapers that Google loves.
Installation of Spring Assembly for E2 Air Spring <strong>Fork</strong>s (Cont.)<br />
Fig. 1<br />
8. Push the outer legs past the lower bushing and reinstall the 4mm bolt and<br />
tighten 8mm damper fitting in a counterclockwise direction. Tighten per the<br />
Fastener and Torque Values section.<br />
***Use a shock pump (p/n 85-4069) to fill the air system to the recommended<br />
levels as outlined in Owner’s <strong>Manual</strong>.<br />
R7 Air System <strong>Service</strong> Instructions<br />
WARNING This fork uses compressed air to provide spring resistance and<br />
must be relieved of pressure prior to servicing. Failure to relieve air pressure<br />
could result in injury or possible death.<br />
Fig. 2<br />
Removal of Air Piston and Compression Rod Assembly<br />
There are now two ways to remove the air piston from the inner leg.<br />
A. An Air Piston Removal tool has been developed that will enable you to remove the<br />
piston without having to take the fork apart. (P/N: 85-8062).<br />
Fig. 3<br />
1. Remove air dust cap covering the Schrader Valve.<br />
2. Depress Schrader valve to release air pressure.<br />
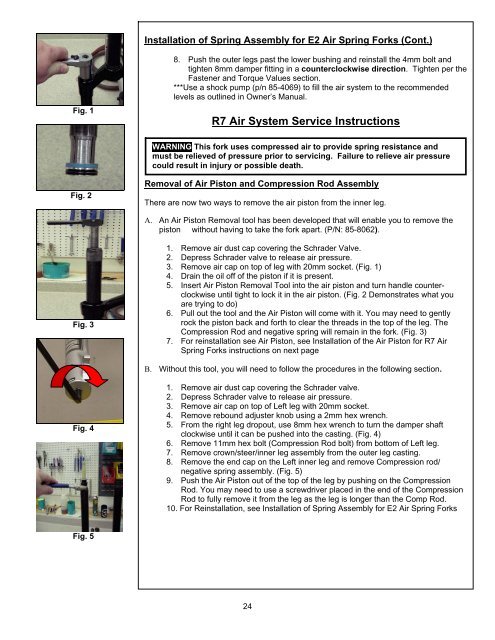
3. Remove air cap on top of leg with 20mm socket. (Fig. 1)<br />
4. Drain the oil off of the piston if it is present.<br />
5. Insert Air Piston Removal Tool into the air piston and turn handle counterclockwise<br />
until tight to lock it in the air piston. (Fig. 2 Demonstrates what you<br />
are trying to do)<br />
6. Pull out the tool and the Air Piston will come with it. You may need to gently<br />
rock the piston back and forth to clear the threads in the top of the leg. The<br />
Compression Rod and negative spring will remain in the fork. (Fig. 3)<br />
7. For reinstallation see Air Piston, see Installation of the Air Piston for R7 Air<br />
Spring <strong>Fork</strong>s instructions on next page<br />
B. Without this tool, you will need to follow the procedures in the following section.<br />
Fig. 4<br />
1. Remove air dust cap covering the Schrader valve.<br />
2. Depress Schrader valve to release air pressure.<br />
3. Remove air cap on top of Left leg with 20mm socket.<br />
4. Remove rebound adjuster knob using a 2mm hex wrench.<br />
5. From the right leg dropout, use 8mm hex wrench to turn the damper shaft<br />
clockwise until it can be pushed into the casting. (Fig. 4)<br />
6. Remove 11mm hex bolt (Compression Rod bolt) from bottom of Left leg.<br />
7. Remove crown/steer/inner leg assembly from the outer leg casting.<br />
8. Remove the end cap on the Left inner leg and remove Compression rod/<br />
negative spring assembly. (Fig. 5)<br />
9. Push the Air Piston out of the top of the leg by pushing on the Compression<br />
Rod. You may need to use a screwdriver placed in the end of the Compression<br />
Rod to fully remove it from the leg as the leg is longer than the Comp Rod.<br />
10. For Reinstallation, see Installation of Spring Assembly for E2 Air Spring <strong>Fork</strong>s<br />
Fig. 5<br />
24