Autosamplers - Chromatography Online
Autosamplers - Chromatography Online
Autosamplers - Chromatography Online

Create successful ePaper yourself
Turn your PDF publications into a flip-book with our unique Google optimized e-Paper software.
1234 LCGC VOLUME 18 NUMBER 12 DECEMBER 2000 www.chromatographyonline.com<br />
GC<br />
Connections<br />
In this month’s “GC<br />
Connections,” John<br />
Hinshaw examines the<br />
role of autosamplers as<br />
the first link in a gas<br />
chromatography<br />
separation. Essentially a<br />
type of robot, modern<br />
autosamplers combine<br />
software, electronic,<br />
mechanical, and<br />
pneumatic components<br />
into a high-precision<br />
device that must deliver<br />
the same sample amount<br />
to a chromatograph while<br />
repeating the identical<br />
autosampler motions,<br />
timing, and speed from<br />
run to run. Such complex<br />
devices depend on the<br />
operator’s selection of<br />
compatible solvents,<br />
sampler motions, and<br />
injection techniques as<br />
well as suitable setup and<br />
maintenance procedures.<br />
John V. Hinshaw<br />
GC Connections Editor<br />
<strong>Autosamplers</strong> —<br />
Symptoms and Solutions<br />
<strong>Autosamplers</strong> perform the first<br />
steps in the chain of events that<br />
conducts solutes from vial to final<br />
chromatographic separation report. Any<br />
errors that arise during autosampling will<br />
propagate through separation, detection,<br />
and quantitation and will affect the final<br />
results. Therefore, proper autosampler<br />
setup, operation, and maintenance are critical<br />
to obtaining the best possible results.<br />
Commercial manufacturers produce devices<br />
suitable for dedicated autosampling of specific<br />
solid, liquid, or gaseous sample types<br />
as well as more universal devices that can<br />
incorporate a number of add-on modules<br />
for sample derivatization, extraction, and<br />
filtration (see Table I). I discussed thermal<br />
desorbers in the September 2000 issue of<br />
LCGC (1), and headspace sampling was<br />
discussed in terms of its use with highspeed<br />
gas chromatography (GC) separations<br />
in the same issue (2). I’ve limited the<br />
discussion in this column to GC liquid<br />
autosamplers, but many of the principles<br />
and ideas presented here are applicable to<br />
other autosampler types as well.<br />
Liquid autosampling in GC comprises<br />
two fundamental steps: First, the syringe<br />
acquires liquid sample for injection. Second,<br />
the syringe injects sample into the<br />
inlet system. Each step requires specific<br />
mechanical motions at well-regulated<br />
speeds. Sample-acquisition choreography<br />
depends upon the autosampler mechanism<br />
and the sample type; sample-injection<br />
choreography depends upon the injection<br />
technique and the sample type. Various<br />
more-sophisticated sample, solvent, and<br />
even reagent sequences are possible; some<br />
autosamplers combine sub- or supernatant<br />
sample extraction, derivatization, or standard<br />
addition into the initial sample acquisition<br />
steps. A more recent addition is the<br />
capability to perform solid-phase microextraction.<br />
Interested readers should contact<br />
the manufacturers listed in Table I for<br />
more detailed information about these<br />
extended capabilities.<br />
Types of Liquid <strong>Autosamplers</strong><br />
Liquid autosamplers can be divided into<br />
two basic categories when considered in<br />
terms of the path the sample takes through<br />
the syringe. Front-loading autosamplers<br />
mimic hand motions that move the syringe<br />
plunger up and down to pull sample up<br />
Table I: GC liquid autosampler manufacturers and currently offered models*<br />
Product Manufacturer† Classification<br />
AOC-17/AOC-1400; AOC-20 Shimadzu Scientific Instruments Front-loading<br />
AS-2000 ThermoQuest/Finnigan Front-loading<br />
AutoSystem XL PerkinElmer Instruments Front-loading<br />
CTC Combi-Pal; CTC A200SE Leap Technologies Front-loading<br />
KMAS5 Konik Front-loading<br />
Model 311-H SRI Instruments Back-loading<br />
Model 4105 OI Corp Front-loading<br />
Model 6850 autosampler; Agilent Technologies Front-loading<br />
model 7683 autosampler<br />
Model 8200 CX; Varian Instruments Hybrid;<br />
model CP 8400/8410<br />
front-loading<br />
* Some models are designed to fit various instruments, and others are specific to the manufacturers’ products.<br />
This table does not include all GC liquid autosampler manufacturers. The information presented<br />
here is based on information from the companies’ web sites and from individuals; neither the author<br />
nor LCGC are responsible for inaccuracies.<br />
† Agilent Technologies (Wilmington, Delaware); Konik (Miami, Florida); Leap Technologies (Carrboro,<br />
North Carolina); OI Corp. (College Station, Texas); PerkinElmer Instruments (Wilton, Connecticut); Shimadzu<br />
Scientific Instruments, Inc. (Columbia, Maryland); SRI Instruments (Torrance, California); Thermo-<br />
Quest/Finnigan (Austin, Texas); Varian Instruments (Walnut Creek, California).
1236 LCGC VOLUME 18 NUMBER 12 DECEMBER 2000 www.chromatographyonline.com<br />
into the barrel and then inject it by<br />
mechanical force. Back-loading autosamplers<br />
use gas pressure to push liquid from the<br />
sample vial or solvent reservoir through<br />
connecting tubing into the syringe barrel<br />
and then out the needle, always moving the<br />
liquid in the same direction. Hybrid<br />
autosamplers combine the sampling method<br />
of a front-loading autosampler with the solvent<br />
rinsing of a back-loading autosampler.<br />
In either case, a clean and relatively<br />
low–viscosity liquid sample will produce<br />
the best results. Dirty or highly viscous<br />
samples are problematic for reasons that I<br />
will discuss below.<br />
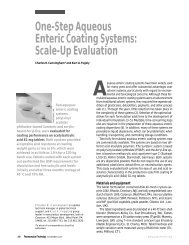
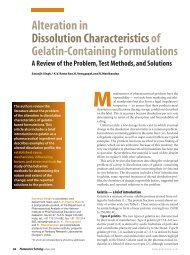
Front-loading autosamplers: In frontloading<br />
autosamplers, the syringe moves<br />
into positions over the sample vial, solvent<br />
reservoirs, the inlet, and waste receptacles,<br />
as Figure 1 shows, and then deposits or<br />
removes liquid as required. The amount of<br />
liquid consumed is small, so these autosamplers<br />
can successfully handle samples of<br />
100 L or less. Only the syringe needle,<br />
barrel, and plunger contact the sample<br />
before injection, and this minimized contact<br />
reduces the amount of solvent needed<br />
to clean the syringes between samples and<br />
the levels of sample-to-sample carryover in<br />
normal operation.<br />
Plunger<br />
motion<br />
Syringe<br />
motion<br />
Inlet<br />
Sample<br />
Solvent<br />
Waste<br />
Figure 1: In a front-loading autosampler<br />
sample, solvent, or waste vials are positioned<br />
beneath the syringe, and the syringe moves<br />
from vial loading to injection positions. The<br />
syringe plunger moves up and down to pump<br />
and eject liquid from the syringe.<br />
Sample acquisition into the syringe barrel<br />
depends upon efficient plunger suction; a<br />
leaking or worn syringe will cause problems<br />
with reproducibility and sample-to-sample<br />
carryover. Sample cleanliness is paramount<br />
because small amounts of particulate matter<br />
will wear out the syringe plunger rapidly,<br />
and nonvolatile residues can cause the<br />
plunger actuation force to increase and<br />
eventually stick the plunger firmly in place.<br />
In front-loading devices, the syringe<br />
plunger goes through many more actuations<br />
per sample injection — approximately<br />
16–20 — than in back-loading devices.<br />
That’s roughly 2000 actuations per full<br />
autosampler tray or 10,000 actuations per<br />
five-day workweek at one tray per day. For<br />
these reasons, most workers prefer polytetrafluoroethylene<br />
(PTFE)–tipped syringe<br />
plungers in front-loading autosamplers.<br />
A too-volatile solvent, such as diethyl<br />
ether or methylene chloride (with atmospheric<br />
pressure boiling points of 34 °C<br />
and 40 °C, respectively) will boil easily<br />
under the reduced pressure conditions<br />
inside the syringe barrel and needle during<br />
plunger motion. The resulting bubbles seriously<br />
detract from accuracy and reproducibility.<br />
Even with autosampler tray cooling<br />
to minimize sample temperatures,<br />
hexane probably is the most volatile solvent<br />
that chromatographers can use successfully<br />
and consistently.<br />
Back-loading autosamplers: In a backloading<br />
autosampler, a second dedicated<br />
sampling needle removes liquid from the<br />
sample vials and solvent reservoirs. Instead<br />
of depending upon syringe plunger suction,<br />
gas pressure positively displaces sample<br />
from the solvent or sample containers<br />
through the second needle and connecting<br />
tubing, into the rear or top of the microsyringe<br />
itself. Liquid flows through the<br />
microsyringe and into waste receptacles<br />
during washing or sample acquisition. The<br />
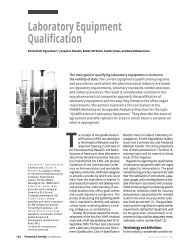
plunger acts as a two-way valve in this case.<br />
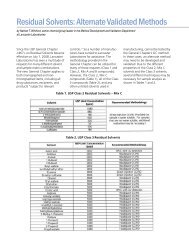
When the plunger is in the up position, as<br />
Figure 2 shows, liquid can travel from the<br />
connecting tubing into the syringe and<br />
downward into a waste receptacle. This<br />
type of arrangement can flush the syringe<br />
very efficiently, but it also consumes more<br />
sample and solvent volume than a frontloading<br />
device. For injection, sample fills<br />
the syringe, the plunger moves into position<br />
at the programmed volume set point,<br />
and the syringe then injects the sample into<br />
the inlet.<br />
A back-loading device also is susceptible<br />
to contaminated samples. Small particles<br />
can clog the interconnecting tubing, and<br />
nonvolatile residue deposits can cause the<br />
plunger actuation force to increase to the<br />
point of stalling as well. However, unlike a<br />
front-loading device, only a few syringe<br />
plunger actuations occur per injection, so<br />
the syringes tend to last longer. Finally,<br />
back-loading devices better tolerate morevolatile<br />
solvents because the system remains<br />
under positive pressure during sample<br />
transport. However, the rapid changes in<br />
internal pressure that occur during sampling<br />
at temperatures close to the liquid’s<br />
boiling point sometimes cause bubble formation<br />
because of the release of entrained<br />
gas from the liquid at nucleation points<br />
along the tubing and connections.<br />
Hybrid autosamplers: Hybrid autosamplers<br />
that mix features of both front- and<br />
back-loading systems also are possible.<br />
These devices load the sample through the<br />
syringe needle, as does a front-loading<br />
system, and rinses the syringe from a larger<br />
solvent reservoir, as does a back-loading<br />
system, as shown in Figure 2. This fusion<br />
of the two operational modes blends the<br />
low carryover and sample consumption<br />
Plunger<br />
motion<br />
Syringe<br />
motion<br />
Inlet<br />
Waste<br />
Load<br />
position<br />
Sample<br />
Solvent or<br />
sample flow<br />
Gas input<br />
Solvent<br />
Figure 2: In a back-loading or hybrid autosampler<br />
the sampling needle (right) enters sample<br />
or solvent vials and gas pressure forces liquid<br />
through the syringe and into a waste vial.<br />
For injection, the plunger moves down to set<br />
the amount of sample and then the syringe<br />
moves over the inlet. In a hybrid autosampler,<br />
the sample vial is positioned under the syringe<br />
needle.
1238 LCGC VOLUME 18 NUMBER 12 DECEMBER 2000 www.chromatographyonline.com<br />
of a front-loading autosampler with the<br />
efficient cleaning obtained with a backloading<br />
autosampler. As Table I illustrates,<br />
however, the overwhelming majority of liquid<br />
autosamplers operate in a full frontloading<br />
mode.<br />
Autosampler Troubleshooting<br />
So, what can go wrong with liquid<br />
autosampling systems? The more complex<br />
the system, the more possibilities for problems.<br />
The electromechanical components<br />
are driven by precision stepper motors,<br />
their positions are ascertained by accurate<br />
sensors, and the interplay between motion<br />
commands and position is monitored<br />
closely by the controlling software and<br />
hardware. Nonetheless, mechanical components<br />
wear out or break from usage or<br />
because of external factors that include<br />
sample problems, installation problems,<br />
and maintenance problems. The remainder<br />
of this “GC Connections” column examines<br />
some of these problems in terms of<br />
their symptoms and presents some solutions<br />
to fix or prevent these difficulties.<br />
The most common problem sources are<br />
dirty or inappropriate samples and poor<br />
maintenance procedures. As I mentioned<br />
above, a dirty sample will quickly plug or<br />
immobilize a syringe. Some autosampler<br />
parts such as septa and syringes require<br />
periodic replacement. The frequency of<br />
replacement depends upon sample characteristics<br />
and on the type of duty cycles that<br />
the sampling technique demands from the<br />
autosampler system.<br />
Syringe Problems<br />
Small or missing peaks: For the syringe,<br />
one of the most common problems manifests<br />
as very small or missing peaks.<br />
Assuming that the inlet system functions<br />
correctly, the column isn’t broken, and the<br />
detector works, this symptom almost<br />
always indicates a blocked syringe needle<br />
or the absence of enough sample volume in<br />
the vials to reach the tip of the sampling<br />
needle. Each autosampler and vial type<br />
requires a minimum liquid amount. Conservatively,<br />
standard 2-mL vials need at<br />
least 0.5 mL, and micro vials or inserts<br />
need 50 L. Smaller sample volumes may<br />
lie under the bottom needle position, so<br />
the syringe draws no sample. On autosamplers<br />
with adjustable needle depths — for<br />
sample-extraction purposes — be sure that<br />
the needle depth is set appropriately.<br />
If the needle dips below the liquid<br />
surface but little or no sample enters the<br />
column, check the syringe for leaks or<br />
blockage. Remove the syringe from the<br />
autosampler and attempt to manually<br />
introduce some pure solvent into it.<br />
Inspect the syringe barrel for the presence<br />
of a bubble-free solvent plug. If necessary,<br />
attempt to unblock the syringe or clean it.<br />
If liquid is drawn, but several bubbles<br />
appear that cannot be expunged by<br />
repeated plunger motions, then the syringe<br />
plunger may be so worn that air can leak<br />
in around it. In this situation a new<br />
syringe is necessary — it is impossible to<br />
repair a syringe that leaks in this manner.<br />
Considering how many plunger cycles a<br />
syringe goes through in the course of a<br />
busy week, sample cleanliness is extremely<br />
important. Because real-world samples are<br />
never pristine, regular syringe replacement<br />
is the best course to avoid syringe problems.<br />
The frequency of replacement will<br />
depend upon the sample, but a weekly new<br />
syringe installation isn’t unusual. The cost<br />
of instrument downtime is very high in<br />
many laboratories, so a small extra supply<br />
cost to properly manage syringe life is<br />
worthwhile.<br />
Finally, never let a syringe dry out with<br />
sample in it during idle periods. Make sure<br />
the autosampler program calls for multiple<br />
solvent rinses after each injection, and consider<br />
manually rinsing out syringes that<br />
won’t be used for a while, even if only for<br />
one day.<br />
Bent needle: Some autosamplers seem<br />
to be prone to bending needles. It is not a<br />
design flaw; it’s a symptom of improper<br />
installation, maintenance, or operating<br />
conditions. The most common cause of<br />
bent needles is misalignment with the inlet<br />
septum nut. Some autosamplers are selfaligning<br />
and include sensors that adjust the<br />
syringe position slightly when the alignment<br />
shifts. Others rely on precisionmolded<br />
parts to bring the parts together in<br />
the right way. However, if the autosampler<br />
tower isn’t installed securely on the instrument,<br />
and if an operator doesn’t check the<br />
needle–inlet alignment upon installation<br />
and upon starting up each day, needles will<br />
bend. Sometimes needles will bend without<br />
the problem being detected by the<br />
autosampler electronics, so it’s very important<br />
to check needles often.<br />
Another source of bent needles is using<br />
the wrong septum. Needles encounter a<br />
fair amount of resistance as they pass<br />
through septa, especially at high injection<br />
speeds. If a septum is too hard, then a needle<br />
may bend. Consider this fact: a highspeed<br />
injection takes roughly 300 ms to<br />
complete. The syringe needle moves down<br />
into the inlet, a distance of about 6 cm, in<br />
less than half of that time. That’s a velocity<br />
of greater than 40 cm/s. <strong>Autosamplers</strong><br />
tend to be easier on the septa themselves,<br />
because the autosampler needle hits the<br />
same spot on the septum with more precision<br />
than manual injections, which tend to<br />
punch out a larger area. So septa will last<br />
longer with an autosampler; a good working<br />
number of autosampler injections<br />
before septum replacement is approximately<br />
100–150 injections or as often as<br />
once a day in high-throughput situations.<br />
Other problems caused by septum<br />
degradation include carrier-gas leaks,<br />
which lead to poor results precision and<br />
retention-time repeatability, and deposition<br />
of septum particles inside the inlet that<br />
cause ghost peaks in the chromatogram<br />
and may also adsorb solutes and produce<br />
peak tailing. In any case, use high-quality<br />
septa and replace them often; in the long<br />
run, it’s worth the small extra cost.<br />
The inlet parts themselves must be correctly<br />
installed and aligned, especially for<br />
on-column injection in which the syringe<br />
needle enters a precolumn that extends<br />
from the column oven into the inlet system.<br />
In this case, high-speed injection is<br />
inappropriate as well, because the needle<br />
often needs to thread its way through a<br />
less-than-perfect alignment of column<br />
entrance, adapter, septum, and nut. For<br />
on-column injection the sample also must<br />
be free of dirt and residue that could build<br />
up in the precolumn during the course of<br />
several injections and then interfere with a<br />
needle’s passage.<br />
Jammed plunger: Syringe plungers are<br />
the most active parts of a liquid autosampler.<br />
An incorrect installation will jam the<br />
plunger on the first motion. As noted<br />
above, as many as 15–20 plunger actuations<br />
may occur per sample. If the sample<br />
isn’t clean, then particles or nonvolatile<br />
residue may build up and eventually jam<br />
the plunger. In the case of non-PTFEtipped<br />
plungers, operation without sufficient<br />
liquid for lubrication will remove<br />
microscopic glass particles that can interfere<br />
with the precision plunger–barrel fit<br />
and jam the plunger just as surely as a dirty<br />
sample. By keeping samples clean and<br />
using sufficient solvent rinses, chromatographers<br />
largely can avoid this particular<br />
problem.<br />
Electrical and<br />
Mechanical Problems<br />
Modern autosampling systems deliver<br />
remarkable long-term performance, considering<br />
the number of motions, speed, and<br />
accuracy that heavy-duty sampling<br />
demands of them. Fifteen years ago, the
www.chromatographyonline.com<br />
previous generation of autosamplers suffered<br />
from balky mechanical designs and a<br />
lack of electrical–mechanical and software<br />
integration, which made them much less<br />
reliable and much less flexible than more<br />
recent designs. Today’s autosamplers,<br />
though, are dedicated robots with even<br />
more complex and precise mechanisms<br />
than earlier designers could access. They<br />
also present more possibilities for failure,<br />
but the chances of any one component<br />
failing are radically less than in earlier<br />
designs. The overall probability of failure is<br />
reduced considerably.<br />
When a modern autosampler does experience<br />
an electrical or mechanical problem,<br />
the autosampler’s software and sensors very<br />
likely will sense the problem, gracefully<br />
pause or halt the analysis sequence, and<br />
alert an operator. A simple example is a<br />
missing solvent vial. In this case, most<br />
autosampling systems will present a message<br />
to that effect and then wait for an<br />
operator to correct the condition and signal<br />
back to the autosampling system that it<br />
should continue. A more extreme example<br />
would involve a broken drive belt, and in<br />
that case the autosampler sensors would<br />
detect the failure of parts to move into<br />
position on command. The controlling<br />
software would then stop attempting to<br />
move the failed component, signal that a<br />
serious failure has occurred, and halt the<br />
analysis sequence until an operator restarts<br />
it. At this point, it’s often a good idea to<br />
run the autosampler diagnostics to try to<br />
pinpoint the problem. Make a written<br />
record of the diagnostic results for future<br />
reference.<br />
Serious failures of this type may require<br />
a trained service person for the repair. In<br />
particular, the installation and alignment of<br />
newly installed components is critical.<br />
Most chromatographers find it fairly easy<br />
to disassemble an autosampler and remove<br />
a broken part, but they usually don’t have<br />
the tools and information required to put<br />
it back together. <strong>Autosamplers</strong>’ high speeds<br />
and precise motions require tight tolerances<br />
and precision alignment. As I have<br />
often said, bringing in a trained professional<br />
who can repair an instrument<br />
quickly and get it running is well worth<br />
the extra outlay in the long run.<br />
Chromatographic Problems<br />
Another class of autosampler problems<br />
arises when the autosampling system<br />
appears to function normally, but the chromatographic<br />
results are not as good as<br />
expected. In these cases, chromatographers<br />
can use a process of elimination to help<br />
isolate the problem at the autosampler, the<br />
inlet, or the column and identify what<br />
remedial action might be appropriate.<br />
The autosampler is the first link in the<br />
separation and detection chain, and poor<br />
injection is reflected all the way to the<br />
data-handling system. The simplest<br />
method for locating a problem that might<br />
be autosampler-related is to remove it as a<br />
potential problem source by making several<br />
manual injections. Those manual injections<br />
will help determine if the autosampler<br />
is at fault. Although manual injections<br />
will not reproduce the exact injection conditions<br />
that an autosampler would deliver,<br />
serious autosampler problems often will<br />
disappear or moderate with manual injection.<br />
In most cases, it is appropriate to<br />
establish a test mixture that includes the<br />
target analytes or their analogues at known<br />
concentrations that lie well within the<br />
capability of the chromatographic system.<br />
If trace analysis is the objective, then use a<br />
standard mix with concentrations that are<br />
20–50 times greater than the method<br />
detection limit for the system in use. With<br />
splitless injection and a flame ionization<br />
detector, this amount might signify concentrations<br />
in the 10–1000 ppb range. For<br />
50–100 L large-volume injections, the<br />
concentrations might be somewhat lower.<br />
Record test chromatograms when the system<br />
is functioning well to establish a<br />
checkpoint for later verification. Verification<br />
may include more system-suitability<br />
tests for separation, resolution, and reproducibility<br />
(see below).<br />
If manual injections produce similar<br />
problems to those of the autosampling<br />
injections, then look at the inlet system<br />
next and check for correct inlet installation,<br />
flow rates, and valve timing. If manual<br />
injection provides better results than<br />
autosampling, then examine the autosampler<br />
and its program settings. For normal<br />
autosampling, try varying autosampler<br />
parameters such as injection speed, injection<br />
volume, and the number of pre- and<br />
postinjection washes to see if these settings<br />
make any difference. Check to be sure that<br />
the selected program parameters are appropriate<br />
for the injection technique. Be alert<br />
for suspicious noises during sampling and<br />
visually check the autosampler, syringe,<br />
vials, robot arm, and any other active components<br />
as they operate.<br />
Determining Repeatability<br />
One reason that analysts use autosamplers<br />
is to obtain better results repeatability than<br />
manual injections will yield. Chromatographers<br />
have certain expectations for repro-<br />
DECEMBER 2000 LCGC VOLUME 18 NUMBER 12 1239<br />
VICI Gig Harbor<br />
1/3 Page Vert Ad<br />
Circle 32
1240 LCGC VOLUME 18 NUMBER 12 DECEMBER 2000 www.chromatographyonline.com<br />
ducibility of results and retention times<br />
that may or may not be met by autosampling.<br />
In general, if an analysis itself — the<br />
injection technique, the separation, or the<br />
detection — is not prone to high reproducibility,<br />
then adding an autosampler will<br />
make little or no difference. For example,<br />
if peaks come out of a column at 1.5 times<br />
the detector noise level, then autosampling<br />
will do little to improve results. Likewise, if<br />
an inlet system is operating far outside its<br />
normal design parameters — such as performing<br />
splitless injections of 10 L of liquid<br />
sample at a 5-mL/min vent flow rate<br />
— then adding an autosampler will<br />
improve nothing.<br />
Chromatographers can easily measure<br />
retention time and area count or amount<br />
reproducibilities. The simplest way is by<br />
using a data system that includes these calculations<br />
in its reporting software. Without<br />
that function, some data systems support<br />
the transfer of results into a spreadsheet,<br />
where the reproducibilities can be computed.<br />
Most scientific calculators support<br />
these calculations as well.<br />
The reproducibility of retention times or<br />
results most often is expressed in terms of<br />
the standard deviation of a series of at least<br />
10 replicate injections. Fewer than 10 data<br />
points may provide values that are not representative<br />
of data in the long run, and<br />
many more than 10 points would be a<br />
waste of time if they were collected just for<br />
the sake of the one measurement. The<br />
standard deviation (s) of a set of n data<br />
points for a set of measured points that is a<br />
representative but relatively small sample of<br />
the entire data population is given by the<br />
following equation:<br />
s 5<br />
n<br />
Σ y i 2 y<br />
i 5 1<br />
n 2 1<br />
[1]<br />
where, y i are the individual data points and<br />
y – is their mean value.<br />
Another useful figure is the relative standard<br />
deviation (RSD) given by this equation:<br />
RSD 5 s y 100<br />
Most instrument manufacturers will<br />
specify the kind of reproducibility that<br />
[2]<br />
their devices can deliver under a set of<br />
clearly defined circumstances, and those<br />
numbers usually represent the best performance<br />
that the instruments can deliver. It<br />
follows that those numbers are seldom<br />
attained in real-world analyses. However, a<br />
well-designed test mixture can come close<br />
to simulating the best possible circumstances<br />
if the methodology itself permits it.<br />
If a test mixture contains only inert analytes<br />
at easily handled concentrations, and<br />
if the methodology uses only standard<br />
injection methods at reasonable volumes,<br />
then it may be possible to get the same<br />
excellent results. Manufacturers often will<br />
specify the exact conditions, column, and<br />
sample they used to get their best results,<br />
so it is possible to reproduce those conditions<br />
in cases that demand this kind of<br />
fundamental crosscheck.<br />
If, however, the real sample yields performance<br />
that is significantly worse than<br />
expected or required, some judicious<br />
checking and measuring can help to determine<br />
whether the autosampler is to blame,<br />
something else in the analytical system is at<br />
fault, or the expectations simply are too<br />
high for the chosen situation.<br />
Mac-Mod Analytical<br />
1/4 Page Ad<br />
DETector Engineering<br />
1/4 Page Ad<br />
Circle 33 Circle 34
www.chromatographyonline.com<br />
First, determine the RSD for a standard<br />
mixture that represents the actual sample.<br />
Make 10–15 replicate autosampler injections<br />
under the same conditions as<br />
intended for the actual analysis. If the area<br />
count RSDs are less than approximately<br />
5%, then be glad the results are that good.<br />
For situations in which the peak area RSD<br />
is more than 2%, it may be advantageous<br />
to use an internal standard and normalize<br />
results to their area counts for each run,<br />
thereby largely eliminating small run-torun<br />
area fluctuations that affect all peaks in<br />
the analysis.<br />
For RSDs greater than 5%, check to see<br />
if the autosampler is causing a problem by<br />
making a second set of 10 manual injections<br />
of the same volume amount of sample.<br />
If the manual injection RSD is<br />
roughly the same or worse than the<br />
autosampler, then the problem, if there is<br />
one, lies elsewhere; for example, in the<br />
inlet or data-handling system. If, however,<br />
manual injections produce a substantial<br />
improvement over autosampler injections,<br />
then it’s time to examine the autosampler<br />
closely and determine what is the exact<br />
fault. Remove the autosampler syringe if<br />
possible and make some additional manual<br />
injections with it to see if the syringe is at<br />
fault. Check the syringe for leaks or blockage,<br />
as described above, and replace it if<br />
necessary. Ensure that each vial contains<br />
sufficient sample and that the solvent wash<br />
supplies are full. Check the waste receptacles<br />
for cleanliness and be sure that they<br />
haven’t filled up.<br />
Conclusion<br />
<strong>Autosamplers</strong> are precision electromechanical<br />
devices that are designed to repeatedly<br />
deliver the same amount of sample at the<br />
same speed and with the same mechanical<br />
motions for extended periods. Combined<br />
with a well-conceived analytical separation,<br />
autosamplers can significantly augment<br />
result repeatability and extend analytical<br />
capabilities with specialized injection techniques.<br />
Modern autosamplers include an array<br />
of sensors and associated software that provide<br />
the required motion precision and<br />
detect when something goes wrong. In<br />
many cases, however, more subtle failures<br />
lead to worse-than-expected results. Chromatographers<br />
can diagnose those occurrences<br />
by isolating an autosampler and its<br />
syringe from the rest of the analytical separation<br />
chain to ascertain the problem<br />
source. GC systems seldom deliver their<br />
DECEMBER 2000 LCGC VOLUME 18 NUMBER 12 1241<br />
best possible performance for real-world<br />
samples, because of externally imposed<br />
effects from polar or labile components,<br />
injection system limitations, or unreasonable<br />
demands on detector sensitivity. In<br />
those cases, a well-constructed test mixture<br />
free of such effects will help determine if<br />
the hardware or the methodology is the<br />
culprit behind worse-than-expected results.<br />
References<br />
(1) J.V. Hinshaw, LCGC 18(9), 940–949 (2000).<br />
(2) M.E. Miller, J.D. Stuart, and S.J. MacDonald,<br />
LCGC 18(9), 968–975 (2000).<br />
John V. Hinshaw<br />
“GC Connections”<br />
editor John V. Hinshaw<br />
is president and<br />
principal consultant<br />
at ChromSource,<br />
Franklin, Tennessee,<br />
and a member of<br />
LCGC’s editorial advisory<br />
board. Direct<br />
correspondence<br />
about this column to “GC Connections,” LCGC,<br />
859 Willamette Street, Eugene, OR 97401,<br />
e-mail lcgcedit@lcgcmag.com.<br />
For an ongoing discussion of GC issues with<br />
John Hinshaw and other chromatographers,<br />
visit the <strong>Chromatography</strong> Forum discussion<br />
group at http://www.chromforum.com.<br />
Metachem<br />
1/2 Page Horiz Page Ad<br />
Circle 35