Instruction Manual - Lenco
Instruction Manual - Lenco
Instruction Manual - Lenco

You also want an ePaper? Increase the reach of your titles
YUMPU automatically turns print PDFs into web optimized ePapers that Google loves.
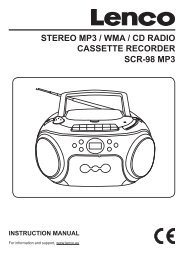
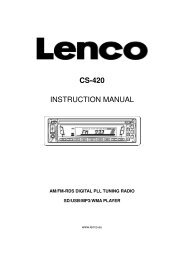
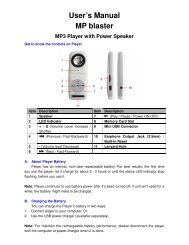
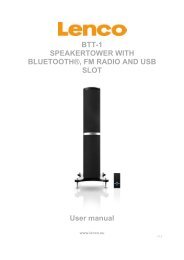
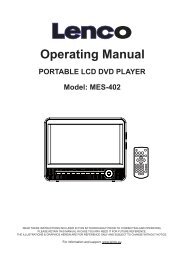
Model No: DVP-733<br />
Portable DVD Player<br />
7″ Widescreen TFT LCD Portable DVD/CD/MP3 Player<br />
<strong>Instruction</strong> <strong>Manual</strong><br />
Please read this manual carefully before operation.<br />
For information and support,<br />
www.lenco.eu
PRECAUTIONS<br />
CAUTION<br />
RISK OF ELECTRIC SHOCK<br />
DO NOT OPEN<br />
For Customer Use:<br />
Enter below the serial number that is located on the<br />
bottom of the unit. Retain this information for future<br />
reference.<br />
CAUTION: TO REDUCE THE RISK OF FIRE AND ELEC-<br />
TRIC SHOCK, DO NOT REMOVE THE COVER (OR BACK)<br />
OF THE UNIT. REFER SERVICING ONLY TO QUALIFIED<br />
SERVICE PERSONNEL.<br />
Model No.<br />
Serial No.<br />
DVP-733<br />
The lightning flash with arrowhead symbol within an equilateral triangle is intended to alert<br />
the user to the presence of uninsulated “dangerous voltage” within the product’s enclosure<br />
that may be of sufficient magnitude to constitute a risk of electric shock.<br />
The exclamation point within an equilateral triangle is intended to alert the user to the presence<br />
of important operation and servicing instructions in the literature accompanying the<br />
appliance.<br />
WARNING:<br />
To prevent fire or shock hazard, do not expose this device to rain or moisture. Dangerous high voltage is present inside the<br />
enclosure. Do not open the cabinet.<br />
Handling the cords on this product will expose you to lead, a chemical known to the State of California to cause cancer, and<br />
birth defects or other reproductive harm. Wash hands after handling.<br />
CAUTION:<br />
This Digital Video Disc player employs a laser system. To prevent direct exposure to the laser beam, do not try to open the<br />
enclosure or defeat the safety interlocks. When open and the interlocks are defeated, visible laser radiation is present.<br />
To prevent electric shock, match wide blade of plug to wide slot of outlet and fully insert.<br />
Use of controls, adjustments, or performance of procedures other than those specified herein may result in hazardous radiation<br />
exposure. DO NOT STARE INTO THE BEAM.<br />
NOTICE:<br />
This product incorporates copyright protection technology that is protected by U.S. patents and other intellectual property<br />
rights. Use of this copyright protection technology must be authorized by Macrovision, and is intended for home and other<br />
limited viewing uses only unless otherwise authorized by Macrovision. Reverse engineering or disassembly is prohibited.<br />
WARNING:<br />
Prolonged exposure to loud sounds from personal music players may lead to temporary or permanent<br />
hearing loss. When participating in the traffic listening to an personal music player can make the<br />
listener less aware of potential dangers such as approaching cars.<br />
2
PRECAUTIONS<br />
Do not make any changes or modifications to the equipment unless otherwise specified in<br />
the manual. If such changes or modifications should be made, you could be required to stop<br />
operation of the equipment.<br />
CPRM<br />
Content Protection for Removable<br />
Media (CPRM) is a hardware-based<br />
technology designed to enforce copy<br />
protection restrictions through builtin<br />
mechanisms in storage media<br />
that would prevent unauthorized file<br />
copying.<br />
3
IMPORTANT SAFETY INSTRUCTIONS<br />
1. Read <strong>Instruction</strong>s: All the safety and operating instructions should be read before the product<br />
is operated.<br />
2. Retain <strong>Instruction</strong>s: The safety and operating instructions should be retained for future reference.<br />
3. Heed Warnings: All warnings on the product and in the operating instructions should be<br />
adhered to.<br />
4. Follow <strong>Instruction</strong>s: All operating and usage instructions should be followed.<br />
5. Cleaning: Unplug this product from the wall outlet before cleaning. Do not use liquid cleaners<br />
or aerosol cleaners. Use a damp cloth for cleaning.<br />
6. Attachments: Use only attachments recommended by the manufacturer. Use of other attachments<br />
may be hazardous.<br />
7. Water and Moisture: Do not use this product near water (e.g., near a bath tub, washbowl,<br />
kitchen sink, laundry tub, in wet basements, or near a swimming pool and the like).<br />
8. Heat: The product should be situated away from heat sources such as radiators, heat regis-<br />
9.<br />
ters, stoves, or other products (including amplifiers) that produce heat.<br />
Accessories: Do not place this product on an unstable cart, stand,<br />
tripod,<br />
10.<br />
bracket, or table. Use only with carts, stands, tripods, brackets,<br />
or tables recommended by the manufacturer or sold with the product.<br />
Any mounting of the product should follow the manufacturer’s<br />
instructions and should use a mounting accessory recommended<br />
by the manufacturer.<br />
A product and cart combination should be moved with care. Quick<br />
11.<br />
stops, excessive force, and uneven surfaces may cause the product<br />
and cart combination to overturn.<br />
Ventilation: Slots and openings in the cabinet are provided for ventila-<br />
t i o n<br />
to ensure reliable operation of the product and to protect it from overheating. These openings<br />
should never be blocked by placing the product on a bed, sofa, rug, or other similar surface.<br />
This product should not be placed in a built-in installation such as a bookcase or rack unless<br />
proper ventilation is provided or the manufacturer instructions have been adhered to.<br />
12. Power Sources: This product should be operated only from the type of power source indicated<br />
on the rating label. If you are not sure of the type of power supply to your home, consult<br />
your product dealer or local power company. For products intended to operate from battery<br />
power or other sources, refer to the operating instructions.<br />
13. Power Sources: Do not connect the power plug to a power outlet other than that which is<br />
indicated here and on the label as this may result in the risk of fire or electric shock. Do not<br />
handle the power plug with wet hands. Doing so may cause electric shock.<br />
14. Power Lines: An outside antenna system should not be located in the vicinity of overhead<br />
power lines or other electric light or power circuits, or where it can fall into such power lines<br />
or circuits. When installing an outside antenna system, extreme care should be taken to keep<br />
from touching such power lines or circuits, as contact with them might be fatal.<br />
15. Battery: Danger of explosion if battery is incorrectly replaced. Replace only with the same or<br />
equivalent type. Battery pack or batteries installed shall not be exposed to excessive heat<br />
such as sunshine, fire or the like.<br />
16. 12V Car Power Adaptor: Disconnect this car power adaptor when not in use. Not for use in<br />
24V vehicles.<br />
17. Using the unit in a Vehicle : On no account should this unit be used by the driver of a moving<br />
4
IMPORTANT SAFETY INSTRUCTIONS<br />
motor vehicle, or left unsecured in the vehicle whilst driving. If this unit is being used by a<br />
passenger in your vehicle, be sure that it is secured or held safely, and does not obstruct any<br />
safety device (i.e. airbag, seat belt etc.) that is fitted. All passengers should wear seat belts<br />
when using this unit in a moving vehicle. If in doubt, please contact your vehicle manufacturer<br />
for further advice. Using other car power adaptors could damage the unit.<br />
18. Using Headphones or Earphones: Hearing experts advise against the constant use of personal<br />
stereos played at high volume. Constant high volume use can lead to hearing loss.<br />
If you experience ringing in the ears or hearing loss, discontinue use and seek medical<br />
advise.<br />
19. Grounding or Polarization: This product may be equipped with a polarized alternating-current<br />
line plug that has one blade wider than the other. This plug will only fit into the power outlet in<br />
one direction. This is a safety feature. If you are unable to insert the plug fully into the outlet,<br />
try reversing the direction of the plug. If the plug should still fail to fit, contact an electrician to<br />
replace the obsolete outlet. Do not defeat the safety purpose of the polarized plug.<br />
20. Power-Cord Protection: Power supply cords should be routed so that they are not likely to<br />
be walked on or pinched by items placed upon or against them, paying particular attention to<br />
cords at plugs, convenience receptacles, and at the point which they exit from the product.<br />
21. Protective Attachment Plug: The product may be equipped with an attachment plug with<br />
overload protection. This is a safety feature. See the operating instructions for replacement<br />
or directions to reset the protective device. If replacement of the plug is required, be sure the<br />
service technician has used a replacement plug that has the same overload protection as the<br />
22. Lightning: For added protection for this product, unplug it from the wall outlet and disconnect<br />
the antenna or cable system during a lightning storm or when it is left unattended and unused<br />
for long periods of time. This will prevent damage to the product due to lightning or power-line<br />
surges.<br />
5
IMPORTANT SAFETY INSTRUCTIONS<br />
23.<br />
24.<br />
25.<br />
26.<br />
27.<br />
28.<br />
Overloading: Do not overload wall outlets, extension cords, or integral convenience<br />
receptacles as this can result in a risk of fire or electric shock.<br />
Object and Liquid Entry: Never push objects of any kind into this product through openings<br />
as they may touch dangerous voltage points or shout-out parts that could result in a fire or<br />
electric shock. Never spill liquid of any kind on the product.<br />
Servicing: Do not attempt to service this product yourself as opening or removing covers may<br />
expose you to dangerous voltage or other hazards. Refer all servicing to qualified service<br />
personnel.<br />
Damage Requiring Service: Unplug this product from the wall outlet and refer servicing to<br />
qualified service personnel under the following conditions: a) when the power-supply or plug<br />
is damaged; b) if liquid has been spilled or if objects have fallen into the product; c) if the<br />
product has been exposed to rain or water; d) if the product does not operate normally by following<br />
the operating instructions. Adjust only those controls that are covered by the operating<br />
instructions as improper adjustment of other controls may result in damage and will often<br />
require extensive work by a qualified technician to restore the product to its normal operation;<br />
e) if the product has been dropped or damaged in any way; f) when the product exhibits a<br />
distinct change in performance—this indicates a need for service.<br />
Replacement Parts: When replacement parts are required, be sure that your service technician<br />
has used replacement parts specified by the manufacturer or have the same characteristics<br />
as the original part. Unauthorized substitutions may result in fire, electric shock, or<br />
other hazards.<br />
Safety Check: Upon completion of any service or repairs to this product, ask the service technician<br />
to perform safety checks to ensure that the product is in proper operating condition.<br />
6
TABLE OF CONTENTS<br />
PRECAUTIONS................................................................................................................................2<br />
IMPORTANT SAFETY INSTRUCTIONS.........................................................................................4<br />
TABLE OF CONTENTS....................................................................................................................7<br />
PACKAGE CONTENTS...................................................................................................................9<br />
ABOUT OPTICAL DISCS..............................................................................................................10<br />
Disc Requirements.................................................................................................................10<br />
Disc Care and Maintenance...................................................................................................10<br />
Handling a Disc..............................................................................................................10<br />
Cleaning a Disc..............................................................................................................10<br />
LOCATION OF CONTROLS..........................................................................................................11<br />
Front View...............................................................................................................................11<br />
Right View..............................................................................................................................12<br />
Left View.................................................................................................................................12<br />
Bottom View...........................................................................................................................12<br />
Remote Control......................................................................................................................13<br />
CONNECTIONS.............................................................................................................................14<br />
Audio & Video Connections...................................................................................................14<br />
USB Connection.....................................................................................................................14<br />
Headphone Connection.........................................................................................................14<br />
Power Connection..................................................................................................................15<br />
Connecting to the wall outlet..........................................................................................15<br />
Using the car plug..........................................................................................................15<br />
Using the Built- in battery.......................................................................................................15<br />
getting started......................................................................................................................16<br />
Using the Remote Control......................................................................................................16<br />
Power Supply..........................................................................................................................16<br />
BASIC OPERATIONS....................................................................................................................17<br />
Basic Playback.......................................................................................................................17<br />
Play/Pause/Stop.....................................................................................................................17<br />
Next /Previous (Skip)..............................................................................................................17<br />
Forward/Reverse (Search).....................................................................................................17<br />
Slow........................................................................................................................................17<br />
Menu Navigation....................................................................................................................17<br />
Numeric Keypad.....................................................................................................................18<br />
Adjusting the Volume..............................................................................................................18<br />
Disc Error Messages..............................................................................................................18<br />
Power Management...............................................................................................................18<br />
FUNCTION BUTTONS...................................................................................................................19<br />
Display / Setup.......................................................................................................................19<br />
Zoom.......................................................................................................................................19<br />
Multi-Subtitle / Audio / Angle..................................................................................................19<br />
Menu / Title.............................................................................................................................19<br />
7
TABLE OF CONTENTS<br />
Repeat A-B Mode...................................................................................................................19<br />
Repeat Playback of a chapter / Title / All of a Disc...............................................................19<br />
LCD Menu...............................................................................................................................20<br />
To acess the USB mode............................................................................................................20<br />
SETUP............................................................................................................................................21<br />
Language................................................................................................................................21<br />
Video.......................................................................................................................................21<br />
Audio.......................................................................................................................................22<br />
Rating.....................................................................................................................................22<br />
Misc........................................................................................................................................22<br />
SPECIFICATIONS..........................................................................................................................23<br />
TROUBLESHOOTING...................................................................................................................24<br />
8
PACKAGE CONTENTS<br />
Please make sure the following items are included in the package. If any items are missing, please<br />
contact your local dealer.<br />
1 2<br />
Menu<br />
Title<br />
DVP-733<br />
Remote Control<br />
3<br />
4<br />
AC Adapter<br />
HEeadphones<br />
5<br />
DC Car Cord<br />
Mounting Bags<br />
9
ABOUT OPTICAL DISCS<br />
Disc Requirements<br />
This DVD player supports playback of the following discs.<br />
Type Disc Mark Content Type Disc Size Max. Playback Time<br />
133 min (SS-SL)<br />
DVD-Video Discs<br />
Audio + Video<br />
(moving picture)<br />
12 cm<br />
242 min (SS-DL)<br />
266 min (DS-SL)<br />
484 min (DS-DL)<br />
Audio Compact Discs (CDs) Audio 12 cm 74 min<br />
JPEG CDs -- Still Picture 12 cm --<br />
This unit can play back CD-R and CD-RW discs that contain JPEG picture files. Discs not listed<br />
above are not supported by this unit (eg, PC CD-ROM, CD-Extra, CD-G, CD-I, etc.)<br />
Disc Care and Maintenance<br />
Optical discs (DVDs, CDs) contain high-density compressed data and need proper handling.<br />
Handling a Disc<br />
• Hold a DVD/CD by its edges. Avoid touching<br />
the recorded side of the disc. To remove<br />
a DVD/CD from its storage case, press down<br />
on the center retention mechanism of the case<br />
and lift the disc out.<br />
• Do not subject discs to prolonged exposure to direct sunlight, high humidity, or high temperatures.<br />
• Do not bend or press discs.<br />
• To reduce the risk of scratches, always put discs back in their case after use. Store discs<br />
vertically in a cabinet.<br />
• Do not place stickers or labels on either side of a disc.<br />
Cleaning a Disc<br />
Use a dry, soft cloth to wipe off any fingerprints and dusts from the playing surface of the disc.<br />
Wipe in a straight line radially from the center to the outside edge of the disc. Small dust particles<br />
and light stains will not affect playback quality.<br />
• Never use chemicals such as record sprays, anti-static sprays, benzene, or thinners to clean<br />
a disc. Doing so will damage the surface of the disc permanently.<br />
10
LOCATION OF CONTROLS<br />
7″ TFT LCD<br />
Speaker<br />
Charge<br />
Mode/USB Button<br />
Play/Pause Button<br />
Setup Button<br />
Stop Button<br />
Direction Buttons<br />
Next (Right) Button<br />
Enter Button<br />
Previous (Left) Button<br />
Open Button<br />
Front View<br />
LCD Mode/USB<br />
• Briefly press this button to display the LCD<br />
menu.<br />
Brightness<br />
Contrast<br />
Color<br />
Mode : 16:9<br />
Reset<br />
1. Press up/down direction button to highlight<br />
item and then make adjustment by left/right<br />
direction button.<br />
2. Press up/down direction button to select Mode<br />
and then press the Enter button to toggle the<br />
screen dimension between 16:9 and 4:3.<br />
3. Select RESET and press ENTER to return the<br />
settings of brightness, contrast and color to<br />
their factory default settings.<br />
• To access the USB mode, insert a USB flash<br />
drive into the USB port. In stop mode or with<br />
no disc loaded, press and hold LCD Mode/<br />
USB button for a short while to display the<br />
Disc/USB menu, you can access a DVD/USB<br />
using this menu.<br />
Play/Pause button<br />
To start/pause playback of a loaded disc.<br />
0<br />
0<br />
0<br />
Setup<br />
To access the setup menu which various features<br />
of the player can be adjusted in.<br />
Stop<br />
Press once to prestop the playback, press twice<br />
to stop completely.<br />
Direction / Enter buttons<br />
Press the direction buttons to select an item and<br />
press the Enter button to confirm.<br />
Fast Forward /Reverse<br />
Press the Next button to skip forward one track.<br />
Press the Previous button to skip back one<br />
track.<br />
Press and hold the NEXT / PREVIOUS button<br />
to fast forward/reverse during video / audio<br />
playback.<br />
11
LOCATION OF CONTROLS<br />
DC 9V in Jack<br />
SD Slot<br />
USB Port<br />
Video Jack<br />
Audio Jack<br />
Headphone Jack<br />
Volume Dial<br />
Ventilation Slots<br />
Battery Compartment<br />
Right View<br />
DC 9V IN Jack<br />
To connect to the AC Adapter / DC 16V Car adapter for power supply.<br />
USB Port<br />
For use with USB flash drives.<br />
Video Jack<br />
To connect to an external TV screen by the AV cable.<br />
Audio Jack<br />
To connect to an external speaker system by the AV cable.<br />
Headphone Jack<br />
Volume Dial<br />
To Adjust the Volume Level.<br />
Bottom View<br />
Ventilation Slots<br />
Battery compartment<br />
Left View<br />
SD Slot<br />
Front View<br />
Power Switch<br />
To turn on/off the unit.<br />
Remote Sensor<br />
Remote Sensor Power Switch<br />
12
LOCATION OF CONTROLS<br />
Remote Control<br />
Display/Setup<br />
Zoom<br />
Power<br />
Direction Buttons<br />
Previous<br />
Enter<br />
Fast Reverse<br />
Subtitle<br />
Next<br />
Repeat A-B<br />
Fast Forward<br />
Repeat All<br />
Play/Pause<br />
Menu<br />
Menu<br />
Audio<br />
Numeric Buttons<br />
Angle<br />
LCD Mode/USB<br />
Title<br />
Title<br />
13
CONNECTIONS<br />
Audio and Video Connections<br />
1. Refer to the owner’s manual of the external device as well.<br />
2. Before connecting the power source, ensure that all the connections are properly done.<br />
USB Connection<br />
The USB memory stick should be plug in the unit directly.<br />
USB extension cable should not be used to avoid failing of data<br />
transferring and interference caused.<br />
1. Insert the USB into the USB port on the left panel of the main unit. With no disc loaded or in stop mode,<br />
press and hold the LCD MODE/USB button to enter source mode. Press the Up/Down direction button to<br />
select USB and then press ENTER to access.<br />
2. It takes a short while for the unit’s reading data. After the device is detected, the screen will display the<br />
working menu, press the direction buttons to select the desired file from the menu and press Play/Pause to<br />
start playback.<br />
Headphone Connection<br />
Be sure that your unit is at low volume level before connecting<br />
the headphones. Increase the volume gradually<br />
for your comfortable listening.<br />
CAUTION:<br />
Hearing experts advise against the constant use of personal<br />
stereos played at high volume. Constant high volume<br />
use can lead to hearing loss. If you experience ringing<br />
in the ears or hearing loss, discontinue use and seek<br />
medical advise.<br />
To Headphone Jack<br />
14
CONNECTIONS<br />
Power Connections<br />
• Connecting to the wall outlet<br />
Caution:<br />
• Do not connect the power plug to a<br />
power outlet other than that which<br />
is indicated here and on the label<br />
as this may result in the risk of fire<br />
or electric shock.<br />
• Do not handle the power plug with<br />
wet hands. Doing so may cause<br />
electric shock.<br />
• Only use AC adapters of the type<br />
specified here. Failure to do so may<br />
case a fire or damage the player.<br />
• Using the car plug<br />
To DC 9V in Jack<br />
AC adapter:<br />
This AC adapter operates on<br />
100-240V~~50/60Hz 0.3A MAX<br />
DC OUT: 9V<br />
DC current: 1.0A MAX<br />
To DC 9V in<br />
To the cigarette<br />
lighter socket.<br />
Disconnect this car power adaptor when not in use. Not for use in 24V vehicles.<br />
Using the Built- in battery<br />
The unit has a built-in rechargeable battery (lithium-polymer). Charge the built-in battery before using it for the<br />
first time. It takes about 4 hours to fully charge the battery.<br />
• Make sure that the power switch is set to the Off position before charging.<br />
• To charge the built-in battery, just connect the AC adapter to the player and a specified wall outlet. See<br />
above. (The Battery Charge indicator will light red while it is charging; it will go off when the battery is<br />
fully charged.)<br />
• The built-in rechargeable battery can be used for approximately 300 charge-cycles without any noticeable<br />
change in performance.<br />
• When the built-in battery power is low, the low battery icon will flash on the upper right corner of the<br />
screen for a while, and then the player will turn itself off automatically.<br />
Note:<br />
•<br />
•<br />
•<br />
•<br />
•<br />
•<br />
Use the specified charger.<br />
Never dispose of in fire or heat up.<br />
Do not use in high temperature or near heat sources.<br />
Do not open the cover.<br />
Refer servicing only to qualified service personnel.<br />
To get the longest service life of the built-in battery, charge at indoor-temperature.<br />
15
GETTING STARTED<br />
Using the Remote Control<br />
To load a battery in the remote:<br />
1. Pull in the direction of the arrow.<br />
2. Slide the compartment out.<br />
3. Place the battery in the compartment with the positive side ( + ) facing up.<br />
4. Push the compartment in to close.<br />
•<br />
•<br />
•<br />
•<br />
•<br />
•<br />
Point the remote at the remote sensor of the photo frame at a distance of no more than 15″<br />
and at an angle no greater than 60 degrees.<br />
Batteries will last for about one year under typical usage.<br />
Replace the batteries if the remote is no longer working.<br />
Do not spill water on the remote control.<br />
Do not use the remote control for other equipment at the same time.<br />
Remove the batteries if the remote control will not be in use for an extended period of time.<br />
. See Power Connections section.<br />
16
BASIC OPERATIONS<br />
1.<br />
2.<br />
3.<br />
Prepare the connections and power supply.<br />
Load a disc.<br />
Press the Open button to open the disc compartment lid. Load a disc with the label-side facing up. Close<br />
the lid manually. If a single-sided disc is loaded upside-down, the player will display “BAD DISC”.<br />
Start playback.<br />
Press Play/Pause button to start playback (some discs may start playing automatically).<br />
Play/Pause/Stop<br />
• Press to play the disc for the first time.<br />
• Press during playback to pause. Press again to resume playback.<br />
• Press during playback to stop the disc (“Pre-Stop”). Press to resume playback.<br />
• Press when the disc is “Pre-Stopped” to stop playback completely. (When is pressed, the<br />
disc will start playing from the beginning.)<br />
Next/Previous (Skip)<br />
• Press to skip forward one track (DVD, CD, MP3, etc).<br />
• Press to skip back one track (DVD, CD, MP3, etc).<br />
Forward/Reverse (Search)<br />
Press / to fast-forward / reverse through the disc.<br />
• Each successive press of / will change the rate of fast-forward / reverse playback.<br />
Slow<br />
To slow-forward/reverse through the disc, press the DOWN/UP direction button.<br />
• Each successive press of DOWN/UP direction button will change the rate of slow-motion<br />
playback.<br />
• Press to resume normal playback.<br />
17
BASIC OPERATIONS<br />
Adjusting the Volume<br />
• Turn the Volume Control dial to adjust the volume level up or down.<br />
Disc Error Messages<br />
The following messages will be displayed on-screen if there is a problem with the format of the loaded disc.<br />
• WRONG REGIONAL DISC. The region code of the disc does not match the player’s region code (Region<br />
1).<br />
• WRONG PASSWORD. The parental rating level of the disc is higher than the parental rating level setting<br />
of the player. The player will not play the disc.<br />
• BAD DISC. The player is equipped with automatic disc quality detection software. If the player detects<br />
a disc that is damaged or has a format problem, it may play the disc at a lower quality or stop play completely,<br />
depending on how damaged the disc is.<br />
Note:<br />
DVD disc production quality may vary; some discs may deviate from the industry standard.<br />
Some incorrectly-formatted discs may still play, however, the playback and operational quality of the disc may<br />
be substandard.<br />
Power Management<br />
If the player will not be in use for a long period of time, set the Power Switch to the OFF position and unplug<br />
the player.<br />
18
FUNCTION BUTTONS<br />
Display/Setup<br />
•<br />
•<br />
Press the DISPLAY button once to show playback information.<br />
Press it twice to enter the player’s setup menu. Enter the Setup menu to adjust the player’s<br />
internal settings, please see the SETUP section for more details.<br />
Zoom<br />
Press ZOOM to change the magnification level of the picture.<br />
• During DVD playback, each successive press of ZOOM will change the level of magnification<br />
to:<br />
Zoom 1x, Zoom 2x, Zoom 3x, Zoom Off.<br />
• In picture mode, each successive press of ZOOM will change the level of magnification to:<br />
Zoom 1x, Zoom 2x, Zoom 3x, Zoom Off.<br />
When the magnification level is greater than Normal/100%, use the direction keys to pan around<br />
the magnified picture.<br />
Note: The picture quality will decrease as the zoom level increases.<br />
Multi-Subtitle / Audio / Angle<br />
•<br />
•<br />
•<br />
During playback of a DVD that has been mastered with subtitles, press SUBTITLE to view the<br />
available subtitle tracks. (A DVD may have up to 32 selectable subtitles.)<br />
During playback of a DVD that has been mastered with alternate language/audio tracks, press<br />
AUDIO to hear the alternate tracks. (A DVD may have up to 8 selectable audio tracks.)<br />
During playback of a DVD that has been mastered with multiple angles, press ANGLE to view<br />
the available alternate camera angles. (A DVD may have up to 9 selectable angles.)<br />
Menu<br />
Title<br />
Menu / Title<br />
Press the MENU button during DVD playback to return to the DVD’s Main menu.<br />
Press the TITLE button during DVD playback to return to the DVD’s Title menu.<br />
Repeat A-B Mode<br />
To repeat playback of a specific section of a disc (loop):<br />
1. Press A-B to set the desired start point (“A”) of the section to be repeated.<br />
2. Press A-B again to set the desired end point (“B” )of the section to be repeated.<br />
3. The section “A-B” will now play repeatedly as a loop. Press A-B again to resume normal<br />
playback.<br />
Repeat Playback of Chapter/Title/ALL of a Disc<br />
Press REPEAT to change the repeat mode of the player. Each successive press of REPEAT will<br />
change the mode as follows:<br />
Repeat Chapter Repeat Title Repeat Disc Repeat Off<br />
19
FUNCTION BUTTONS<br />
LCD Menu<br />
Briefly press this button to display the LCD menu.<br />
Brightness<br />
Contrast<br />
Color<br />
Mode : 16:9<br />
Reset<br />
0<br />
0<br />
0<br />
1. Press up/down direction button to highlight item and then make adjustment by left/right direction<br />
button.<br />
2. Press up/down direction button to select Mode and then press the Enter button to toggle the<br />
screen dimension between 16:9 and 4:3.<br />
3. Select RESET and press ENTER to return the settings of brightness, contrast and color to<br />
their factory default settings.<br />
To access the USB mode: insert a USB flash drive into the USB port. With no disc loaded or in<br />
stop mode, press and hold this button for a short while to display the source mode, you can access<br />
a DVD/USB using this menu. See USB Connection section.<br />
20
SETUP<br />
Various features of the player can be adjusted in the SETUP menu.<br />
1. Press twice to enter the player’s setup menu.<br />
2. Press the direction buttons to select the desired item.<br />
3. Press ENTER to confirm.<br />
English<br />
English<br />
English<br />
English<br />
Language<br />
Video<br />
View Mode Sets the view mode of DVDs. Auto Fit<br />
21
SETUP<br />
Channel Output<br />
Rating<br />
Parental Control<br />
Sets the maturity rating level of the player.<br />
The player will not play any discs rated<br />
higher than this setting.<br />
This setting is password protected (the<br />
default password is: 8888).<br />
Levels 1 to 8.<br />
(8: ADULT is default)<br />
Set Password<br />
Change the Parental Ctrl password. Enter the old password, and<br />
then the new password.<br />
DO NOT FORGET THE PASSWORD; this password cannot<br />
be reset.<br />
Misc<br />
Use Default<br />
Settings<br />
Screen saver<br />
Resets all settings to their factory default<br />
state. This will not reset the Parental Control<br />
password.<br />
The screen saver prevents burn-in damage<br />
to the player’s screen.<br />
Read<br />
On<br />
22
SPECIFICATIONS<br />
6W<br />
1<br />
/PAL<br />
700g<br />
20 x 15.7 x 4.3cm<br />
Specifications and manual are subject to change without prior notice.<br />
23
TROUBLESHOOTING<br />
There is no power to the device.<br />
• Ensure that the Power Switch on the main unit is physically set to the ON position.<br />
• Ensure that the AC adapter cord is securely connected to the player and the proper wall outlet.<br />
The device will not play the disc.<br />
• Ensure that a supported disc is loaded in the player label-side up.<br />
• Ensure that the disc’s rating level does not exceed the player’s parental rating level.<br />
• Ensure that the disc is not damaged or too dirty.<br />
• Clean the disc or try another disc.Moisture may have condensed inside the player. Remove the disc and<br />
leave the player on for 1-2 hours and then try again.<br />
There is no picture.<br />
• Ensure that the TV set has been powered on and is set to the correct AV mode.<br />
• Ensure that the connections between the player and the TV are secure and correct.<br />
• Check if the connection cables are damaged.<br />
The picture is noisy or distorted.<br />
• The disc may be damaged or dirty. Clean the disc or try another one.<br />
• Reset your TV’s color system.<br />
• Ensure that the player is connected directly to the TV (and not through a VCR, cable box, satellite receiver,<br />
etc.)<br />
The picture is not full-screen.<br />
• Change the aspect ratio setting of your player from the Setup menu.<br />
• Select a different aspect ratio option from the DVD disc menu.<br />
There is no sound or distorted sound.<br />
• Ensure that the TV and amplifier have been turned on and properly set up.<br />
• Ensure that the TV and amplifier connections are secure and correct.<br />
• Try a different Audio track of the DVD by pressing AUDIO.<br />
• Ensure that the MUTE function of the TV, Amplifier, or Player is not engaged.<br />
24
TROUBLESHOOTING<br />
The remote control doesn’t work.<br />
• Ensure that the Power Switch has been physically set to the ON position.<br />
• Ensure that there are no obstacles between the remote and the player.<br />
• Point the remote at the remote sensor on the main unit.<br />
• Ensure that the batteries in the remote retain a charge and have been installed correctly.<br />
• Try replacing the remote’s batteries.<br />
Cannot turn the player on using battery power<br />
• To activate the battery power: Turn off the player and then charge the battery by the AC adapter for about<br />
10 seconds.<br />
• See Using the Built- in battery section on Page 15.<br />
25
Mounting Bag<br />
Using the Mounting Bag<br />
1. Insert the unit into bag as shown. 2. Take straps and hook up the neck headrest<br />
of the seat as shown.<br />
3. Adjust the straps tightly so that the unit<br />
is secured.<br />
4. Connect the 12V car plug as shown.<br />
SAFETY WARNING!<br />
• On no account should this unit be used by the driver of a moving motor vehicle, or left unsecured<br />
in the vehicle whilst driving.<br />
• If this unit is being used by a passenger in your vehicle, be sure that it is secured or held safely,<br />
and does not obstruct any safety device (i.e. airbag, seat belt etc.) that is fitted.<br />
• All passengers should wear seat belts when using this unit in a moving vehicle.<br />
• If in doubt, please contact your vehicle manufacturer for further advice.<br />
• Using other car power adaptors could damage the unit.<br />
26
NOTE<br />
If at any time in the future you should need to dispose of this product please<br />
note that: Waste electrical products should not be disposed of with household waste.<br />
Please recycle where facilities exist. Check with your Local Authority or retailer for<br />
recycling advice. (Waste Electrical and Electronic Equipment Directive)<br />
27