Fundo - Installation Manual - Wedi
Fundo - Installation Manual - Wedi
Fundo - Installation Manual - Wedi

Create successful ePaper yourself
Turn your PDF publications into a flip-book with our unique Google optimized e-Paper software.
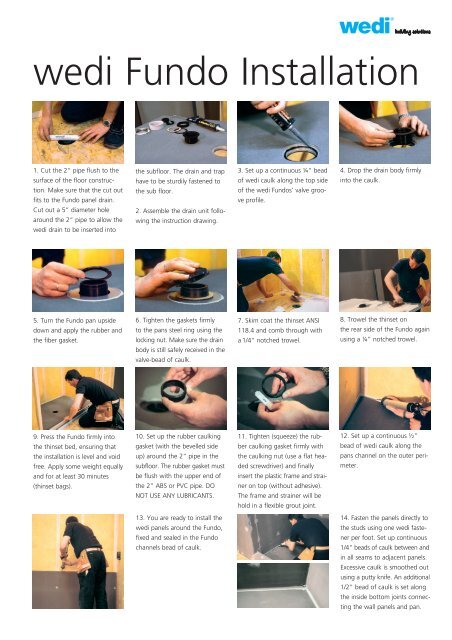
wedi <strong>Fundo</strong> <strong>Installation</strong><br />
1. Cut the 2“ pipe flush to the<br />
surface of the floor construction.<br />
Make sure that the cut out<br />
fits to the <strong>Fundo</strong> panel drain.<br />
Cut out a 5” diameter hole<br />
around the 2” pipe to allow the<br />
wedi drain to be inserted into<br />
the subfloor. The drain and trap<br />
have to be sturdily fastened to<br />
the sub floor.<br />
2. Assemble the drain unit following<br />
the instruction drawing.<br />
3. Set up a continuous ¼” bead<br />
of wedi caulk along the top side<br />
of the wedi <strong>Fundo</strong>s' valve groove<br />
profile.<br />
4. Drop the drain body firmly<br />
into the caulk.<br />
5. Turn the <strong>Fundo</strong> pan upside<br />
down and apply the rubber and<br />
the fiber gasket.<br />
6. Tighten the gaskets firmly<br />
to the pans steel ring using the<br />
locking nut. Make sure the drain<br />
body is still safely received in the<br />
valve-bead of caulk.<br />
7. Skim coat the thinset ANSI<br />
118.4 and comb through with<br />
a 1/4" notched trowel.<br />
8. Trowel the thinset on<br />
the rear side of the <strong>Fundo</strong> again<br />
using a ¼” notched trowel.<br />
9. Press the <strong>Fundo</strong> firmly into<br />
the thinset bed, ensuring that<br />
the installation is level and void<br />
free. Apply some weight equally<br />
and for at least 30 minutes<br />
(thinset bags).<br />
10. Set up the rubber caulking<br />
gasket (with the bevelled side<br />
up) around the 2“ pipe in the<br />
subfloor. The rubber gasket must<br />
be flush with the upper end of<br />
the 2” ABS or PVC pipe. DO<br />
NOT USE ANY LUBRICANTS.<br />
11. Tighten (squeeze) the rubber<br />
caulking gasket firmly with<br />
the caulking nut (use a flat headed<br />
screwdriver) and finally<br />
insert the plastic frame and strainer<br />
on top (without adhesive).<br />
The frame and strainer will be<br />
hold in a flexible grout joint.<br />
12. Set up a continuous ½”<br />
bead of wedi caulk along the<br />
pans channel on the outer perimeter.<br />
13. You are ready to install the<br />
wedi panels around the <strong>Fundo</strong>,<br />
fixed and sealed in the <strong>Fundo</strong><br />
channels bead of caulk.<br />
14. Fasten the panels directly to<br />
the studs using one wedi fastener<br />
per foot. Set up continuous<br />
1/4" beads of caulk between and<br />
in all seams to adjacent panels.<br />
Excessive caulk is smoothed out<br />
using a putty knife. An additional<br />
1/2" bead of caulk is set along<br />
the inside bottom joints connecting<br />
the wall panels and pan.
wedi Tech. Support<br />
wedi Coporation<br />
Tel.: 770.992.5320 · Fax: 770.587.1352 · E-mail: bastian.lohmann@wedicorp.com<br />
D 08/06 K 08/06 A 90157/000