Download - Citrix Knowledge Center
Download - Citrix Knowledge Center
Download - Citrix Knowledge Center

You also want an ePaper? Increase the reach of your titles
YUMPU automatically turns print PDFs into web optimized ePapers that Google loves.
<strong>Citrix</strong> EasyCall Gateway<br />
Telephony System Integrator’s Guide<br />
for Avaya S8300/S87xx-Series<br />
<strong>Citrix</strong> ® EasyCall Gateway 2.2Q
Copyright and Trademark Notice<br />
Use of the product documented in this guide is subject to your prior acceptance of the End User License Agreement. A printable<br />
copy of the End User License Agreement is included on your product media and in the documentation download page of the<br />
administration tool.<br />
Information in this document is subject to change without notice. Companies, names, and data used in examples herein are<br />
fictitious unless otherwise noted. No part of this document may be reproduced or transmitted in any form or by any means,<br />
electronic or mechanical, for any purpose, without the express written permission of <strong>Citrix</strong> Systems, Inc.<br />
© 2006-2009 <strong>Citrix</strong> Systems, Inc. All rights reserved.<br />
Xen®, <strong>Citrix</strong>®, <strong>Citrix</strong> Subscription Advantage, EasyCall, XenServer, Xen<strong>Center</strong> and logos are either registered<br />
trademarks or trademarks of <strong>Citrix</strong> Systems, Inc. in the United States and/or other countries.<br />
RSA Encryption © 1996-1997 RSA Security Inc., All Rights Reserved.<br />
This product includes software developed by The Apache Software Foundation (http://www.apache.org/)<br />
This product includes open source Berkeley DB (BDB) software licensed from Oracle Corporation and PostgresSQL, released<br />
under the BSD license.<br />
Trademark Acknowledgements<br />
Adobe, Acrobat, and PostScript are trademarks or registered trademarks of Adobe Systems Incorporated in the U.S. and/or<br />
other countries.<br />
FreePBX is a registered trademark of Atengo, LLC.<br />
Java, Sun, and SunOS are trademarks or registered trademarks of Sun Microsystems, Inc. in the U.S. and other countries.<br />
Solaris is a registered trademark of Sun Microsystems, Inc. Sun Microsystems, Inc has not tested or approved this product.<br />
Portions of this software are based in part on the work of the Independent JPEG Group.<br />
Microsoft, Windows, Windows Media, Windows Server, Windows NT, Win32, Outlook, ActiveX, Active Directory, and<br />
DirectShow are either registered trademarks or trademarks of Microsoft Corporation in the United States and/or other countries.<br />
UNIX is a registered trademark of The Open Group.<br />
All other trademarks and registered trademarks are the property of their respective owners.<br />
Document Code: January 23, 2009 (KP)
CONTENTS<br />
Contents<br />
Chapter 1<br />
Chapter 2<br />
Integration Overview<br />
Equipment Requirements . . . . . . . . . . . . . . . . . . . . . . . . . . . . . . . . . . . . . . . . . . . . . . 1<br />
Call Detail Records . . . . . . . . . . . . . . . . . . . . . . . . . . . . . . . . . . . . . . . . . . . . . . . . . . . 2<br />
Integrating with Avaya S8300/S87xx-Series through a QSIG Trunk<br />
Prerequisites . . . . . . . . . . . . . . . . . . . . . . . . . . . . . . . . . . . . . . . . . . . . . . . . . . . . . . . . 4<br />
DS1 Circuit Pack Configuration . . . . . . . . . . . . . . . . . . . . . . . . . . . . . . . . . . . . . . . 4<br />
System Parameters . . . . . . . . . . . . . . . . . . . . . . . . . . . . . . . . . . . . . . . . . . . . . . . . 4<br />
Configuring the QSIG Trunk . . . . . . . . . . . . . . . . . . . . . . . . . . . . . . . . . . . . . . . . . . . . 6<br />
Configuring the E1 ISDN-PRI QSIG Trunk . . . . . . . . . . . . . . . . . . . . . . . . . . . . . . 6<br />
Configuring the T1 ISDN-PRI QSIG Trunk . . . . . . . . . . . . . . . . . . . . . . . . . . . . . . 9<br />
Verifying the Integration . . . . . . . . . . . . . . . . . . . . . . . . . . . . . . . . . . . . . . . . . . . . . . 13<br />
Index . . . . . . . . . . . . . . . . . . . . . . . . . . . . . . . . . . . . . . . . . . . . . . . . . . . . . . . . . . . . . 15
iv<br />
Telephony System Integrator’s Guide
CHAPTER 1<br />
Integration Overview<br />
This release of the EasyCall Gateway has been tested for interoperability with Avaya<br />
S8300/S87xx-Series through an E1 and T1 ISDN-PRI QSIG trunk<br />
The configuration can be done in tandem with EasyCall Gateway installation and<br />
configuration, which includes defining the properties of the telephony system trunk and<br />
defining any changes the EasyCall Gateway makes to telephone numbers before<br />
sending them to the telephony system for dialing. For information about EasyCall<br />
Gateway configuration, refer to the EasyCall Gateway Administrator’s Guide.<br />
Those responsible for configuring the telephone system must take the specific<br />
characteristics of a site into consideration to detemine the settings that are appropriate<br />
for the site. Configuration of the Avaya telephone system for integration with the<br />
EasyCall Gateway is similar to integration with a voicemail system.<br />
The following topics describe how to configure trunks for the supported Avaya<br />
systems.<br />
“Equipment Requirements” on page 1<br />
“Call Detail Records” on page 2<br />
“Integrating with Avaya S8300/S87xx-Series through a QSIG Trunk” on page 3<br />
Equipment Requirements<br />
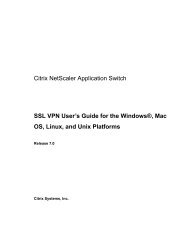
Only the EasyCall Gateway appliance is required to integrate with the Avaya telephony<br />
system. The following diagram shows the integrated components.<br />
Avaya telephony system integrated with the EasyCall Gateway<br />
For information on capacity planning, refer to the EasyCall Gateway Administrator’s<br />
Guide.
2 EasyCall Gateway Telephony System Integrator’s Guide<br />
Call Detail Records<br />
A Call Detail Record (CDR) is a file that contains information about calls placed<br />
through the EasyCall Gateway. Information provided in the CDRs can be used for<br />
billing calls to cost centers and for auditing potential abuse. Each call placed through<br />
EasyCall generates two outbound records.
CHAPTER 2<br />
Integrating with Avaya S8300/S87xx-<br />
Series through a QSIG Trunk<br />
This chapter describes a sample configuration of Avaya S8300/S87xx-Series for<br />
integration with the EasyCall Gateway through an E1 and T1 ISDN-PRI QSIG trunk.<br />
The configuration can be done in tandem with EasyCall Gateway installation and<br />
configuration.<br />
The example configurations are performed through the Avaya Communication<br />
Manager administration software screens, also known as “SAT” (System Access<br />
Terminal) screens. In some instances, the information from the original screen has<br />
been edited for brevity and clarity in presentation.<br />
Those responsible for configuring the telephone system must take the specific<br />
characteristics of a site into consideration to detemine the settings that are appropriate<br />
for the site. Configuration of the Avaya telephone system for integration with the<br />
EasyCall Gateway is similar to integration with a voicemail system.<br />
The following topics describe a sample configuration of Avaya S8300/S87xx-Series:<br />
“Prerequisites” on page 4<br />
“Configuring the QSIG Trunk” on page 6<br />
“Verifying the Integration” on page 13
4 EasyCall Gateway Telephony System Integrator’s Guide<br />
Prerequisites<br />
DS1 Circuit Pack Configuration<br />
The DS1 circuit pack in the Avaya G650 media gateway must be physically configured<br />
for an appropriate mode (T1 or E1). The DS1 board has 24 channels in T1 mode or 32<br />
channels in E1 mode. The default is set to the T1 mode. To modify the DS1 board to<br />
use it in E1 mode, the dipswitch on the DS1 circuit pack must be switched to the 32<br />
channels side.<br />
Note that the DS1 circuit pack in the Avaya G700 media gateway does not required the<br />
above physical change.<br />
System Parameters<br />
It is assumed that the appropriate Avaya license files and authentication files have<br />
been installed, and that login and password credentials are available to those<br />
responsible for configuring the telephone system. To verify that the installed Avaya<br />
Communication Manager license grants permission to use the features illustrated in<br />
this chapter, use the command “display system-parameters customer-options” as<br />
described in the following procedure. If those features are not enabled, obtain licenses<br />
for the required features from an authorized Avaya account representative.<br />
To verify required features are installed<br />
1. Enter display system-parameters customer-options and go to page 3. Verify<br />
that DS1 MSP is set to y to create an E1/T1 interface.<br />
2. Go to page 4. Verify that ISDN-PRI is set to y.
Chapter 2 Integrating with Avaya S8300/S87xx-Series through a QSIG Trunk 5<br />
3. On page 5, verify that Private Networking is set to y.<br />
4. On page 8, verify that Basic Call Setup, Basic Supplementary Services, and<br />
Supplementary Services with Rerouting are set to y.
6 EasyCall Gateway Telephony System Integrator’s Guide<br />
Configuring the QSIG Trunk<br />
The following procedures describe the DS1 board configuration for the physical<br />
interface to the EasyCall Gateway:<br />
“Configuring the E1 ISDN-PRI QSIG Trunk” on page 6<br />
“Configuring the T1 ISDN-PRI QSIG Trunk” on page 9<br />
Configuring the E1 ISDN-PRI QSIG Trunk<br />
This topic is specific to E1 trunks. For information on T1 trunks, see “Configuring the<br />
T1 ISDN-PRI QSIG Trunk” on page 9.<br />
To configure the E1 trunk<br />
1. Enter list configuration all and then note the Board Number for the DS1<br />
circuit pack to be configured.<br />
2. Enter add ds1 x, where x is the Board Number of the DS1 circuit pack obtained<br />
from the previous step. Specify the following:<br />
Name = A descriptive name<br />
Bit Rate = 2.048<br />
Line Coding = hdb3<br />
Signaling Mode = isdn-pri<br />
Connect = pbx<br />
Interface = peer-master<br />
CRC = y<br />
Note Since the Interface field for Avaya Communication Manager is set to peermaster,<br />
the EasyCall Gateway Interface field must be set to CPE (peer-slave).
Chapter 2 Integrating with Avaya S8300/S87xx-Series through a QSIG Trunk 7<br />
3. Enter add signaling-group s, where s is an unused signaling group number.<br />
Specify the following:<br />
Group Type = isdn-pri<br />
Primary D-Channel = 001V216<br />
TSC Supplementary Service Protocol = b<br />
Note The Primary D-Channel is 16 on the DS1 circuit pack for an E1.<br />
4. Enter add trunk-group t, where t is an unused trunk group number. On page 1,<br />
specify the following:<br />
Group Type = isdn<br />
Group Name = a descriptive name<br />
TAC = enter a value that is valid under the provisioned dial plan<br />
Carrier Medium = PRI/BRI<br />
Service Type = tie<br />
5. On page 2, set Supplementary Service Protocol to b to indicate that QSIG<br />
supplementary services will be provided on this trunk.
8 EasyCall Gateway Telephony System Integrator’s Guide<br />
6. On page 3, set Send Name, Send Calling Number, and Send Connected<br />
Number to y.<br />
7. On page 4, specify the following:<br />
Path Replacement = y<br />
Path Replacement Method = always<br />
8. On page 5, add trunk members by entering the following:<br />
Port = xxxxxzz, where xxxxx is the Board Number of the DS1 circuit pack<br />
configured in Step 2 and zz is a channel in the E1 ISDN-PRI.<br />
Sig Grp = the number of the signaling group configured in Step 3.
Chapter 2 Integrating with Avaya S8300/S87xx-Series through a QSIG Trunk 9<br />
Note The following screen sample shows Channels 1 through 10 being added;<br />
channel 16, the signaling channel configured in Step 3, was excluded.<br />
9. Enter change signaling-group s, where s is the number of the signaling group<br />
configured in Step 3. Set Trunk Group for Channel Selection to t, where t is<br />
the value of the trunk group configured in Step 4.<br />
Configuring the T1 ISDN-PRI QSIG Trunk<br />
This topic is specific to T1 trunks. For information on E1 trunks, see “Configuring the<br />
E1 ISDN-PRI QSIG Trunk” on page 6.<br />
To configure the T1 trunk<br />
1. Enter list configuration all and then note the Board Number for the DS1<br />
circuit pack to be configured.
10 EasyCall Gateway Telephony System Integrator’s Guide<br />
2. Enter add ds1 x, where x is the Board Number of the DS1 circuit pack obtained<br />
from the previous step. Specify the following:<br />
Name = A descriptive name<br />
Bit Rate = 1.544<br />
Line Coding = b8zs<br />
Signaling Mode = isdn-pri<br />
Framing Mode = esf<br />
Connect = pbx<br />
Interface = peer-master<br />
Note Since the Interface field for Avaya Communication Manager is set to peermaster,<br />
the EasyCall Gateway Interface field must be set to CPE (peer-slave).<br />
3. Enter add signaling-group s, where s is an unused signaling group number.<br />
Specify the following:<br />
Group Type = isdn-pri<br />
Primary D-Channel = 001V224<br />
TSC Supplementary Service Protocol = b<br />
Note The Primary D-Channel is 24 on the DS1 circuit pack for a T1.<br />
4. Enter add trunk-group t, where t is an unused trunk group number. On page 1,<br />
specify the following:<br />
Group Type = isdn<br />
Group Name = a descriptive name<br />
TAC = enter a value that is valid under the provisioned dial plan<br />
Carrier Medium = PRI/BRI<br />
Service Type = tie
Chapter 2 Integrating with Avaya S8300/S87xx-Series through a QSIG Trunk 11<br />
5. On page 2, set Supplementary Service Protocol to b to indicate that QSIG<br />
supplementary services will be provided on this trunk.<br />
6. On page 3, set Send Name, Send Calling Number, and Send Connected<br />
Number to y.<br />
7. On page 4, specify the following:<br />
Path Replacement = y<br />
Path Replacement Method = always
12 EasyCall Gateway Telephony System Integrator’s Guide<br />
8. On page 5, add trunk members by entering the following:<br />
Port = xxxxxzz, where xxxxx is the Board Number of the DS1 circuit pack<br />
configured in Step 2 and zz is a channel in the T1 ISDN-PRI.<br />
Sig Grp = the number of the signaling group configured in Step 3.<br />
Note The following screen sample shows Channels 1 through 10 being added;<br />
channel 16, the signaling channel configured in Step 3, was excluded.<br />
9. Enter change signaling-group s, where s is the number of the signaling group<br />
configured in Step 3. Set Trunk Group for Channel Selection to t, where t is<br />
the value of the trunk group configured in Step 4.
Chapter 2 Integrating with Avaya S8300/S87xx-Series through a QSIG Trunk 13<br />
Verifying the Integration<br />
To verify path replacement<br />
1. From the Avaya SAT, enter status trunk s, where s is the number of the trunk<br />
group configured in “Configuring the QSIG Trunk” on page 6.<br />
2. Verify that two trunk group members are utilized during the call. Those two trunk<br />
members should be released after a few seconds.<br />
To verify click-to-call<br />
1. Use the Communication Agent to place a call from an application running on the<br />
desktop. After you pick up the call (on the phone profiled to receive click-to-call<br />
calls), the phone being dialed should ring.<br />
2. Enter status trunk s, where s is the number of the trunk group configured in<br />
“Configuring the QSIG Trunk” on page 6.<br />
3. Verify that two trunk group members are utilized. As the phone you dialed goes<br />
off-hook, the two trunk members should be released after a few seconds.
14 EasyCall Gateway Telephony System Integrator’s Guide
INDEX<br />
Index<br />
A<br />
Avaya Communication Manager prerequisites<br />
QSIG 4<br />
C<br />
click-to-call, verification 13<br />
commands for QSIG configuration<br />
add signaling-group (E1) 7<br />
add signaling-group (T1) 10<br />
add trunk-group (E1) 7<br />
add trunk-group (T1) 10<br />
change ds1 (E1) 6<br />
change ds1 (T1) 9<br />
change signaling-group (E1) 9<br />
change signaling-group (T1) 12<br />
display system-parameters customer-options<br />
4<br />
T<br />
trunk group configuration<br />
E1 7<br />
T1 10<br />
D<br />
DS1 board configuration (E1) 6<br />
DS1 board configuration (T1) 9<br />
I<br />
integration prerequisites<br />
QSIG 4<br />
P<br />
path replacement, verification 13<br />
S<br />
signaling group configuration<br />
E1 7, 9<br />
T1 10, 12
16 Telephony System Integrator’s Guide