MMT029 D&D Fast Play - Wizards of the Coast
MMT029 D&D Fast Play - Wizards of the Coast
MMT029 D&D Fast Play - Wizards of the Coast

You also want an ePaper? Increase the reach of your titles
YUMPU automatically turns print PDFs into web optimized ePapers that Google loves.
®<br />
®<br />
ADVENTURE GAME
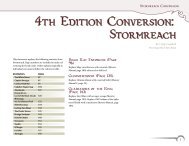
Smoke Dragon's<br />
Lair<br />
The<br />
Lair<br />
2<br />
The Dark River<br />
Cliffside<br />
Key<br />
Zombie<br />
Chamber<br />
Stone Door<br />
Iron Door<br />
Rope Bridge<br />
Altar<br />
Z<br />
Z<br />
S S<br />
Z<br />
Z<br />
Z<br />
Start<br />
Maxie's <br />
Room<br />
0 20 feet<br />
WHAT IS THIS?<br />
This self-contained game gives you and<br />
your friends <strong>the</strong> experience <strong>of</strong> playing <strong>the</strong><br />
Dungeons & Dragons ® game in an easyto-learn<br />
format. In this <strong>Fast</strong>-<strong>Play</strong> Game, you<br />
and your friends take on imaginary roles in<br />
a fantastic tale <strong>of</strong> mighty heroes, mythical<br />
dragons, and powerful magic.<br />
This demo version <strong>of</strong> <strong>the</strong> game is<br />
designed to give you <strong>the</strong> feel <strong>of</strong> playing <strong>the</strong><br />
Dungeons & Dragons game. The full<br />
game contains all sorts <strong>of</strong> options to help<br />
you create your own on-going sword and<br />
sorcery campaign. We’ll tell you more about<br />
that at <strong>the</strong> end <strong>of</strong> this booklet.<br />
CREDITS<br />
Design:<br />
Jeff Grubb<br />
Editing and Creative Direction:<br />
Bill Slavicsek<br />
Cover Illustration:<br />
Tony Sczudlo<br />
Cartography:<br />
Todd Gamble<br />
Typesetting:<br />
Sean Glenn<br />
Graphic Design:<br />
Mark Painter and Sean Glenn<br />
Thanks:<br />
Keith Strohm and Cindi Rice<br />
Based on <strong>the</strong> original Dungeons &<br />
Dragons® game by E. Gary Gygax and<br />
Dave Arneson<br />
DUNGEONS & DRAGONS, D&D, DUNGEON MASTER, and <strong>the</strong> TSR logo are registered trademarks owned by TSR, Inc. All TSR characters, character names, and <strong>the</strong> distinctive<br />
likenesses <strong>the</strong>re<strong>of</strong> are trademarks owned by TSR, Inc. © 1999 TSR, Inc. All rights reserved. TSR, Inc. is a subsidiary <strong>of</strong> <strong>Wizards</strong> <strong>of</strong> <strong>the</strong> <strong>Coast</strong>, Inc.
HOW DO WE PLAY?<br />
The D&D® <strong>Fast</strong>-<strong>Play</strong> Game isn’t like o<strong>the</strong>r<br />
games. There’s no board, no joystick, no<br />
playing pieces. All you need is your<br />
imagination, this booklet, and at least<br />
three six-sided dice.<br />
One <strong>of</strong> <strong>the</strong> players is called <strong>the</strong><br />
Dungeon Master, or DM. The DM’s in<br />
charge <strong>of</strong> running <strong>the</strong> game. The best<br />
storyteller in your group should be <strong>the</strong><br />
DM. Stop reading now and give this<br />
booklet to <strong>the</strong> player who will be <strong>the</strong> DM.<br />
The DM coordinates <strong>the</strong> action, tells <strong>the</strong><br />
o<strong>the</strong>r players what <strong>the</strong>ir characters see and<br />
hear, and resolves battles. You’re two parts<br />
storyteller, one part CPU, with a little bit <strong>of</strong><br />
“banker” and stage manager thrown in.<br />
You run <strong>the</strong> world, and everything in it<br />
does your bidding.<br />
The o<strong>the</strong>r players run <strong>the</strong> heroes, who<br />
influence <strong>the</strong> world with every action <strong>the</strong>y<br />
take. The players tell <strong>the</strong> DM what <strong>the</strong>ir<br />
characters do in situations <strong>the</strong> DM presents.<br />
The heroes—warriors, wizards, priests, and<br />
rogues—slay monsters, rescue villages, and<br />
collect treasure. If <strong>the</strong> heroes survive <strong>the</strong><br />
adventure, <strong>the</strong> players win <strong>the</strong> game.<br />
THE HEROES<br />
There are four character sheets in <strong>the</strong><br />
center <strong>of</strong> this booklet. Each describes one<br />
<strong>of</strong> <strong>the</strong> heroes in this tale that’s set in an<br />
ancient, magical, and dangerous time.<br />
Remove each sheet and give <strong>the</strong>m to <strong>the</strong><br />
players so <strong>the</strong>y can each choose a hero. (You<br />
don’t get one. The DM gets <strong>the</strong> adventure<br />
and all <strong>of</strong> <strong>the</strong> DM characters in it.)<br />
While <strong>the</strong> players take a few moments to<br />
examine <strong>the</strong>ir character sheets, you need to<br />
read “The Game Session,” below.<br />
THE GAME SESSION<br />
How does this work? Well, <strong>the</strong> <strong>Fast</strong>-<strong>Play</strong><br />
Game walks you through a D&D adventure,<br />
presenting <strong>the</strong> game rules when you need<br />
<strong>the</strong>m—you don’t have to memorize<br />
anything to play.<br />
In <strong>the</strong> game, <strong>the</strong> o<strong>the</strong>r players take on<br />
<strong>the</strong> roles <strong>of</strong> brave adventurers. You follow<br />
<strong>the</strong> directions, describing situations,<br />
making embellishments, and reacting to<br />
what <strong>the</strong> players want <strong>the</strong>ir characters to<br />
do. You also get to play <strong>the</strong> roles <strong>of</strong> <strong>the</strong><br />
monsters and o<strong>the</strong>r DM characters in <strong>the</strong><br />
adventure.<br />
Remember, all <strong>of</strong> <strong>the</strong> action takes place<br />
through discussion and dice rolling.<br />
Nobody should run around <strong>the</strong> table or try<br />
any stunts—this is make-believe!<br />
<strong>Play</strong>ers can speak “in character” (“I attack<br />
<strong>the</strong> Zombie”) or refer to <strong>the</strong>ir heroes in <strong>the</strong><br />
third person (“Graywulf attacks <strong>the</strong><br />
Zombie”), depending on whatever way<br />
<strong>the</strong>y are comfortable playing. You can<br />
decide to use different voices and sound<br />
effects when you’re running <strong>the</strong> monsters,<br />
or you can play it straight and describe <strong>the</strong><br />
scenes like a narrator in a movie.<br />
DM AIDS<br />
Throughout this booklet, you’ll find <strong>the</strong><br />
following visual aids to help you run <strong>the</strong><br />
adventure.<br />
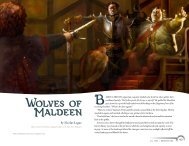
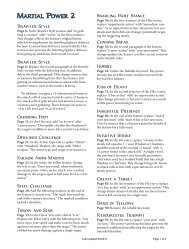
The Map, printed on page 2, is for your<br />
eyes only. Use it to keep track <strong>of</strong> <strong>the</strong> action<br />
and to help describe what <strong>the</strong> heroes see.<br />
Red Text is called a “Read-aloud.” Read<br />
this text out loud to <strong>the</strong> players to<br />
describe what <strong>the</strong>ir heroes see and hear.<br />
Boxed Text contains rules and advice<br />
for running a particular scene in <strong>the</strong><br />
adventure. It provides you with<br />
important directions for playing <strong>the</strong><br />
game. Don’t read boxed text to <strong>the</strong><br />
players, but do follow <strong>the</strong> directions<br />
contained within <strong>the</strong>m.<br />
DM Secrets and Sidebars appear<br />
everywhere else in <strong>the</strong> booklet. Don’t read<br />
this material (or anything that isn’t Red<br />
Text) to <strong>the</strong> players. We tell <strong>the</strong> DM<br />
everything, but <strong>the</strong> players should figure<br />
out <strong>the</strong> adventure’s secrets for <strong>the</strong>mselves.<br />
Note that you can skip <strong>the</strong> Sidebars entirely<br />
if you want. They contain advice and<br />
suggestions, but aren’t crucial to <strong>the</strong><br />
adventure itself.<br />
That’s it! Now we’re ready to start<br />
playing! Let <strong>the</strong> adventure begin …<br />
3
HANDY DM TIP:<br />
CARROTS & STICKS<br />
People play <strong>the</strong> D&D game for many<br />
<strong>of</strong> different reasons. If your group<br />
looks like it might need some<br />
encouragement to get on with <strong>the</strong><br />
mission (find <strong>the</strong> zombies, discover<br />
<strong>the</strong>ir secret, and destroy <strong>the</strong>m), here<br />
are some buttons you can push for<br />
<strong>the</strong> various heroes.<br />
Graywulf is dedicated to <strong>the</strong><br />
destruction <strong>of</strong> evil and this place<br />
reeks <strong>of</strong> it. The hairs on <strong>the</strong> back <strong>of</strong><br />
his neck stand up and he’s sure that<br />
this is <strong>the</strong> lair <strong>of</strong> <strong>the</strong> zombies.<br />
Stardancer is also dedicated to<br />
<strong>the</strong> destruction <strong>of</strong> evil. However, she’s<br />
not above looking for <strong>the</strong> odd spare<br />
coin that <strong>the</strong>se monsters happen to be<br />
carrying. <strong>Play</strong> up <strong>the</strong> fact that where<br />
<strong>the</strong>re’re monsters, <strong>the</strong>re’s treasure.<br />
Delavan has <strong>the</strong> loyalty and<br />
dependability that dwarves are<br />
legendary for. He shouldn’t back down<br />
from a challenge nor desert his allies.<br />
Zanthar Rex seeks knowledge.<br />
Where <strong>the</strong>re are undead, <strong>the</strong>re are<br />
usually lost tomes and magical items.<br />
4<br />
1: WHEN DRAGONS<br />
RULED THE WORLD...<br />
Once <strong>the</strong> players have looked over <strong>the</strong>ir<br />
character sheets, you can start <strong>the</strong><br />
adventure. Remember, only read <strong>the</strong> Red<br />
Text to <strong>the</strong> players. Everything else is for<br />
your information only.<br />
Usually <strong>the</strong> Red Text ends with a<br />
question for <strong>the</strong> players—“What are your<br />
heroes going to do?” At this point you turn<br />
things over to <strong>the</strong> players. They decide if<br />
<strong>the</strong>ir heroes are going to open a door, fight<br />
a monster, run away, or do something else<br />
entirely. It’s <strong>the</strong>ir choice.<br />
The players tell you what <strong>the</strong>ir heroes are<br />
doing (<strong>the</strong>y don’t all have to do <strong>the</strong> same<br />
thing). You <strong>the</strong>n tell <strong>the</strong>m <strong>the</strong> results <strong>of</strong><br />
what <strong>the</strong>y do. This booklet walks you<br />
through <strong>the</strong> hard parts, and tells you how to<br />
handle <strong>the</strong> situations presented. When <strong>the</strong><br />
heroes try something that isn’t covered in<br />
<strong>the</strong> text, just make it up! Even better, make<br />
something up in each scene so that <strong>the</strong><br />
adventure is uniquely your own. That’s <strong>the</strong><br />
fun <strong>of</strong> <strong>the</strong> D&D game.<br />
That simple? That simple. So turn on<br />
your imagination and read this to <strong>the</strong><br />
players:<br />
Each <strong>of</strong> you has a hero—a fighter, rogue,<br />
wizard, or priest. These valiant<br />
adventurers are devoted to ridding <strong>the</strong><br />
world <strong>of</strong> evil. It’s a long time ago, in an<br />
ancient world filled with fantastic<br />
monsters, great treasure, and high<br />
adventure. If your heroes do well, <strong>the</strong>y’ll<br />
win <strong>the</strong> day and survive to gain power<br />
and experience. And toge<strong>the</strong>r, we’ll tell<br />
an exciting story.<br />
I’m going to be <strong>the</strong> Dungeon Master for<br />
this adventure. I’ll describe what your<br />
characters see, and you’ll tell me what<br />
your heroes will do based on those<br />
descriptions. Ready? Let’s begin.<br />
Let <strong>the</strong> players introduce <strong>the</strong>ir<br />
characters to each o<strong>the</strong>r. Then read:<br />
Your heroes are ga<strong>the</strong>red toge<strong>the</strong>r in a<br />
mountain pass, a full moon casts deep<br />
shadows through <strong>the</strong> surrounding pines.<br />
For <strong>the</strong> last few months, zombies—<br />
horrible undead monsters—have assaulted<br />
<strong>the</strong> nearby villages. The villagers have<br />
asked you to discover where <strong>the</strong> zombies<br />
are coming from, and to destroy <strong>the</strong>m.<br />
O<strong>the</strong>rs have sought out <strong>the</strong> secret, but<br />
none have returned.<br />
Now, against <strong>the</strong> side <strong>of</strong> a mountain,<br />
you see a pale bluish light up ahead<br />
through <strong>the</strong> trees. You see a circular<br />
doorway set into <strong>the</strong> cliff side. Strangely<br />
carved runes ring <strong>the</strong> frame <strong>of</strong> <strong>the</strong> door,<br />
and in <strong>the</strong> center is a massive pull-ring.<br />
What are your heroes going to do?<br />
You’ve asked <strong>the</strong> players what <strong>the</strong>y want<br />
<strong>the</strong>ir heroes to do. Now, as <strong>the</strong>ir characters,<br />
<strong>the</strong>y need to tell you what actions <strong>the</strong>y’re<br />
going to perform. Ask each player what his<br />
or her hero is doing.<br />
The heroes have a couple <strong>of</strong> obvious<br />
options. They can leave. They can watch <strong>the</strong><br />
doorway for a while. They can try to read<br />
<strong>the</strong> runes. Or <strong>the</strong>y can open <strong>the</strong> door. Find<br />
<strong>the</strong> action listed below that comes closest<br />
to what <strong>the</strong> heroes are doing and follow <strong>the</strong><br />
directions.<br />
A. Leave<br />
That’s always an option, but it’s not a very<br />
exciting one. After all, <strong>the</strong>se are heroes and<br />
<strong>the</strong>y agreed to help <strong>the</strong> villagers. Encourage<br />
<strong>the</strong> players to press on, o<strong>the</strong>rwise <strong>the</strong> game<br />
is over. See <strong>the</strong> Carrots & Sticks sidebar for<br />
ways to get <strong>the</strong> players on track.<br />
B. Watch <strong>the</strong> Doorway<br />
An hour passes (not in real time, but in <strong>the</strong><br />
imaginary world <strong>of</strong> <strong>the</strong> game). Ano<strong>the</strong>r<br />
hour passes. Nothing happens. Eventually<br />
<strong>the</strong> sky begins to brighten. Ask <strong>the</strong> players<br />
again: What are your heroes doing?<br />
C. Read <strong>the</strong> Runes<br />
The runes, written in an archaic language<br />
and glowing with arcane light, are hard to<br />
decipher. If a hero tries to read <strong>the</strong> runes,<br />
follow <strong>the</strong>se rules:<br />
Each player rolls three dice and tries to<br />
roll less than his or her hero’s<br />
Intelligence score (as recorded on each<br />
player’s character sheet). If <strong>the</strong> total is<br />
less than <strong>the</strong> Intelligence score, <strong>the</strong><br />
hero can read <strong>the</strong> runes. (This is called<br />
an Intelligence check.)
Anybody can attempt to read <strong>the</strong><br />
runes. If anyone who tries makes a<br />
successful Intelligence check, read <strong>the</strong><br />
following to <strong>the</strong>m:<br />
The runes, carved in rough, savage<br />
angles and glowing with a blue light,<br />
read as follows: “Here be <strong>the</strong> crypt <strong>of</strong> <strong>the</strong><br />
smoke dragon, guarded by an army <strong>of</strong> <strong>the</strong><br />
living dead!”<br />
What are your heroes going to do?<br />
D. Examine <strong>the</strong> Door<br />
The door is actually a great stone plug with a<br />
pull-handle in <strong>the</strong> center. If any <strong>of</strong> <strong>the</strong><br />
heroes asks to check out <strong>the</strong> door, have <strong>the</strong>m<br />
make an Intelligence check. (Stardancer can<br />
make a Find Traps check instead.)<br />
To do this, a player rolls three dice and<br />
tries to roll less than his or her hero’s<br />
Intelligence score (or Find Traps score,<br />
in <strong>the</strong> case <strong>of</strong> Stardancer). If <strong>the</strong> total is<br />
less than <strong>the</strong> score, <strong>the</strong> hero discovers<br />
an important detail.<br />
If a hero successfully examines <strong>the</strong> great<br />
stone plug, read:<br />
Crude letters are scrawled on <strong>the</strong> face <strong>of</strong><br />
<strong>the</strong> stone plug. The small, faint letters,<br />
tucked near <strong>the</strong> upper rim, read: “Power<br />
resides in <strong>the</strong> vessel <strong>of</strong> mist. Sunder <strong>the</strong><br />
chalice and rend <strong>the</strong> beast.”<br />
What are your heroes going to do?<br />
E. Open <strong>the</strong> Door<br />
It takes pure muscle to pull <strong>the</strong> large stone<br />
plug out <strong>of</strong> <strong>the</strong> doorway. Each <strong>of</strong> <strong>the</strong> heroes<br />
can try, in turn, to open <strong>the</strong> door. If a hero<br />
tries to open <strong>the</strong> door, follow <strong>the</strong>se rules:<br />
Each player rolls three dice and tries to<br />
roll less than his or her hero’s<br />
Strength score (as recorded on each<br />
player’s character sheet). If <strong>the</strong> total is<br />
less than <strong>the</strong> Strength score, <strong>the</strong> hero<br />
pulls open <strong>the</strong> door. (This is called a<br />
Strength check.)<br />
There’s one o<strong>the</strong>r way to open <strong>the</strong> door.<br />
Zanthar (<strong>the</strong> wizard hero) carries a magical<br />
scroll that contains <strong>the</strong> Knock spell. This<br />
spell automatically opens any door. (The<br />
spell fades after it is used.)<br />
If everyone fails <strong>the</strong>ir Strength checks,<br />
or <strong>the</strong> heroes just decide to let Zanthar do<br />
it in <strong>the</strong> first place, <strong>the</strong> Knock spell opens<br />
<strong>the</strong> door.<br />
Once <strong>the</strong> heroes get <strong>the</strong> door open, go to<br />
Scene 2.<br />
2: THE ZOMBIE GUARDS<br />
When <strong>the</strong> heroes have successfully opened<br />
<strong>the</strong> door (whe<strong>the</strong>r by spell or Strength<br />
check), read <strong>the</strong> following out loud:<br />
The thick stone plug grinds as it pulls its<br />
way out on heavy iron hinges, revealing<br />
a circular hole in <strong>the</strong> cliffside. Inside, <strong>the</strong><br />
hole is dark and foreboding. What are<br />
you going to do?<br />
Look at <strong>the</strong> map on page 2. It shows <strong>the</strong><br />
entrance to <strong>the</strong> crypt and <strong>the</strong> zombie<br />
chamber beyond. In <strong>the</strong> zombie chamber,<br />
<strong>the</strong> location <strong>of</strong> each <strong>of</strong> <strong>the</strong> five zombies is<br />
clearly marked. This information is for your<br />
eyes only, to help you visualize <strong>the</strong> scene.<br />
The heroes have two choices here. They<br />
can leave (which isn’t really an option for<br />
heroes) or <strong>the</strong>y can enter <strong>the</strong> hole in <strong>the</strong><br />
cliff. When <strong>the</strong>y enter, read:<br />
A great doorway into <strong>the</strong> side <strong>of</strong> <strong>the</strong><br />
mountain yawns before you. The<br />
entrance is dark and eerily quiet. Just<br />
beyond <strong>the</strong> door lies an ancient<br />
anteroom, your meager torchlight<br />
barely making a dent in <strong>the</strong> cool<br />
darkness. You notice that a dusty<br />
mosaic tile pattern covers part <strong>of</strong> <strong>the</strong><br />
floor, and a great iron door is set into<br />
<strong>the</strong> far wall. Weird statues frame <strong>the</strong><br />
mosaic, like silent guardians <strong>of</strong> this<br />
strange place.<br />
Suddenly, <strong>the</strong> statues open evil red<br />
eyes and stumble toward you! You<br />
see now that <strong>the</strong>y aren’t statues—<br />
<strong>the</strong>y look like long-dead human<br />
warriors. They wear rotted lea<strong>the</strong>r<br />
armor and <strong>the</strong>ir flesh flakes <strong>of</strong>f<br />
<strong>the</strong>ir bones in long, parchmentlike<br />
tatters. They are zombies, and<br />
<strong>the</strong>re’s a malicious flicker in <strong>the</strong>ir<br />
dead, red eyes.<br />
What are you going to do?<br />
HANDY DM TIP:<br />
COOL VOICES<br />
If <strong>the</strong> heroes decipher <strong>the</strong><br />
runes, get dramatic with <strong>the</strong><br />
italicized words. This is<br />
supposed to be a frightening<br />
inscription, a warning to all<br />
those faint <strong>of</strong> heart to flee this<br />
place. Uncork your best “evil<br />
villain” voice and let fly!<br />
(Bwaa ha ha!)<br />
5
6<br />
HANDY DM TIP:<br />
WHAT<br />
DO I DO WITH<br />
DEAD HEROES?<br />
Death happens. The threat <strong>of</strong><br />
getting your hero’s clock cleaned<br />
adds excitement to <strong>the</strong> game.<br />
However, dead heroes aren’t<br />
much fun. Here are some options<br />
for retrieving dead characters:<br />
Is <strong>the</strong> Hero Really Dead?<br />
A character whose wounds equal<br />
or exceed her Hit Points is out <strong>of</strong><br />
<strong>the</strong> game—unless she gets some<br />
type <strong>of</strong> healing, like Delavan’s cure<br />
light wounds spell or Stardancer’s<br />
potion <strong>of</strong> healing. Ei<strong>the</strong>r one restores<br />
lost Hit Points if administered at<br />
<strong>the</strong> first opportunity.<br />
Share Characters. If a<br />
player is running two heroes,<br />
and ano<strong>the</strong>r player’s hero dies,<br />
give that player one <strong>of</strong> <strong>the</strong><br />
remaining heroes.<br />
Bring in a New Hero. The<br />
heroes could “recruit” a new<br />
hero with <strong>the</strong> same statistics as<br />
<strong>the</strong> dead hero. Just change <strong>the</strong><br />
name. Stardancer becomes<br />
Moonshadow, for example.<br />
Start Over in <strong>the</strong><br />
Village. If all <strong>of</strong> <strong>the</strong> heroes are<br />
killed (or a good percentage <strong>of</strong><br />
<strong>the</strong>m bite <strong>the</strong> dust), <strong>the</strong> village<br />
hires a new band <strong>of</strong> heroes.<br />
They have <strong>the</strong> same statistics as<br />
<strong>the</strong> previous group, <strong>the</strong>y just<br />
have different names (as<br />
described above).<br />
The zombies shamble forward, ready to<br />
attack everyone nearby. There are five<br />
zombies, one for each hero with one left<br />
over. The heroes have two obvious choices<br />
here: leave or stay.<br />
A. Leave<br />
If <strong>the</strong> heroes flee, <strong>the</strong>y quickly lose <strong>the</strong><br />
zombies in <strong>the</strong> pine woods surrounding<br />
<strong>the</strong> entrance. Later, if <strong>the</strong>y return, <strong>the</strong><br />
stone door is sealed (with <strong>the</strong> zombies<br />
back inside).<br />
B. Stay<br />
If <strong>the</strong> heroes stay, <strong>the</strong> zombies attack<br />
<strong>the</strong>m. The box below tells you how to run<br />
<strong>the</strong> fight.<br />
If some <strong>of</strong> <strong>the</strong> heroes leave and some <strong>of</strong><br />
<strong>the</strong>m stay, <strong>the</strong> zombies stick around to beat<br />
on those that remained.<br />
THE ZOMBIE BATTLE<br />
Zombies are slow. Unless <strong>the</strong> heroes just<br />
decide to totally ignore <strong>the</strong> zombies, <strong>the</strong>y<br />
get to attack first. The battle is pretty freeform;<br />
a hero can easily reach any zombie,<br />
or a hero can turn and run if that seems to<br />
be <strong>the</strong> best option.<br />
If <strong>the</strong> heroes and zombies battle, all <strong>the</strong><br />
action takes place in combat rounds. In a<br />
combat round, each hero makes one attack.<br />
If <strong>the</strong> attack succeeds, <strong>the</strong> hero’s player<br />
makes a damage roll. (The heroes can each<br />
fight a separate zombie, or <strong>the</strong>y can team up<br />
against a single zombie.)<br />
Then you make one attack for each<br />
monster, rolling for damage if a zombie<br />
successfully hits a hero. As DM, you get to<br />
run <strong>the</strong> zombies as you see fit. You decide<br />
which heroes get attacked and what <strong>the</strong><br />
zombies do in <strong>the</strong> round. (See <strong>the</strong> box in <strong>the</strong><br />
next column for full details.)<br />
If <strong>the</strong>re are still heroes and monsters<br />
standing after <strong>the</strong> first round, play through<br />
ano<strong>the</strong>r round. Keep playing through<br />
rounds until <strong>the</strong> monsters have been<br />
defeated or all <strong>of</strong> <strong>the</strong> heroes have fallen.<br />
If <strong>the</strong> heroes have been killed or chased<br />
<strong>of</strong>f, <strong>the</strong> zombies shut <strong>the</strong> door. The heroes<br />
must return (ei<strong>the</strong>r <strong>the</strong> same heroes or a new<br />
group—use <strong>the</strong> same character sheets, just<br />
change <strong>the</strong> names <strong>of</strong> <strong>the</strong> dead heroes) and<br />
face <strong>the</strong> zombies again before you advance to<br />
<strong>the</strong> next section <strong>of</strong> <strong>the</strong> adventure.<br />
After <strong>the</strong> heroes defeat <strong>the</strong> zombies, go<br />
on to <strong>the</strong> next section <strong>of</strong> <strong>the</strong> adventure.<br />
Heroes Attack: The players make <strong>the</strong><br />
attack rolls for <strong>the</strong>ir heroes. To make an<br />
attack roll, a player rolls three dice.<br />
If <strong>the</strong> total is less than <strong>the</strong> hero’s To-<br />
Hit number (as recorded on each<br />
player’s character sheet), <strong>the</strong> hero’s<br />
attack misses.<br />
If <strong>the</strong> total is equal to or greater than<br />
<strong>the</strong> hero’s To-Hit number, <strong>the</strong> attack for<br />
this round succeeds.<br />
The player <strong>the</strong>n makes a damage<br />
roll, as listed on <strong>the</strong> hero’s character<br />
sheet. You record <strong>the</strong> damage on <strong>the</strong><br />
Zombie Wounds chart, below. When<br />
a zombie’s wound boxes are filled, it<br />
crumbles to dust.<br />
After each <strong>of</strong> <strong>the</strong> heroes has had a<br />
chance to attack once, <strong>the</strong>n it’s <strong>the</strong><br />
zombies’ turn …<br />
Zombies Attack: You roll for <strong>the</strong><br />
zombies. The zombies have a To-Hit<br />
number <strong>of</strong> 14. Roll three dice. If <strong>the</strong><br />
total equals or exceeds 14, a zombie<br />
hits. If a zombie hits a hero, it inflicts<br />
one die <strong>of</strong> damage.<br />
Make attack rolls for each zombie, just<br />
like <strong>the</strong> players did for <strong>the</strong> heros. If a<br />
zombie inflicts damage on a hero, <strong>the</strong><br />
hero’s player records that damage in <strong>the</strong><br />
Wound box on <strong>the</strong> character sheet.<br />
When a hero’s wound boxes are filled,<br />
<strong>the</strong> hero dies.<br />
Zombie Wounds<br />
Zombie 1<br />
Zombie 2<br />
Zombie 3<br />
Zombie 4<br />
Zombie 5<br />
● ● ● ● ● ●<br />
● ● ● ● ● ●<br />
● ● ● ● ● ●<br />
● ● ● ● ● ●<br />
● ● ● ● ● ●<br />
3. EXPLORING<br />
THE ROOM<br />
Once <strong>the</strong> heroes kill <strong>the</strong> last <strong>of</strong> <strong>the</strong> zombies,<br />
read <strong>the</strong> following to <strong>the</strong> players:<br />
CONT’D ON PAGE 11
® ®<br />
GRAYWULF<br />
Fighter (Human)<br />
ABILITY SCORES<br />
Strength 17<br />
Dexterity 13<br />
Constitution 14<br />
Intelligence 10<br />
Wisdom 13<br />
Charisma 14<br />
TO-HIT NUMBER 10<br />
To make an attack, roll three dice. If<br />
you roll a total <strong>of</strong> 10 or better, you hit.<br />
DAMAGE 1D+3<br />
Graywulf attacks with a large war<br />
hammer and is very strong. When you hit,<br />
roll one die and add 3 to <strong>the</strong> result. This is<br />
<strong>the</strong> amount <strong>of</strong> damage Graywulf inflicts<br />
with a successful attack.<br />
HIT POINTS: 18<br />
● ● ● ● ● ● ● ● ●<br />
● ● ● ● ● ● ● ● ●<br />
STARDANCER<br />
Rogue (Elf )<br />
ABILITY SCORES<br />
Strength 15<br />
Dexterity 17<br />
Constitution 15<br />
Intelligence 13<br />
Wisdom 11<br />
Charisma 16<br />
TO-HIT NUMBER 13<br />
To make an attack, roll three dice. If<br />
you roll a total <strong>of</strong> 13 or better, you hit.<br />
DAMAGE<br />
1D<br />
Stardancer attacks with a long sword.<br />
When you hit, roll one die. This is <strong>the</strong><br />
amount <strong>of</strong> damage Stardancer inflicts with<br />
a successful attack.<br />
FIND TRAPS 11<br />
To search for traps, roll three dice. If<br />
you roll a total <strong>of</strong> 11 or less, you succeed.<br />
OPEN LOCK 10<br />
To pick a lock, roll three dice. If you<br />
roll a total <strong>of</strong> 10 or less, you succeed.<br />
HIT POINTS: 14<br />
● ● ● ● ● ● ● ● ● ● ● ● ● ●<br />
© 1999 TSR, Inc. All rights reserved. © 1999 TSR, Inc. All rights reserved.<br />
7
TREASURE<br />
Record any gold and treasure Stardancer finds here.<br />
TREASURE<br />
Record any gold and treasure Graywulf finds here.<br />
Long Sword<br />
Damage: Roll one die<br />
WEAPONS<br />
WEAPONS<br />
War Hammer<br />
Damage: Roll one die and add 3<br />
Stardancer has no magical spells<br />
SPELLS<br />
Graywulf has no magical spells<br />
SPELLS<br />
8<br />
EQUIPMENT<br />
In addition to her long sword, Stardancer<br />
carries:<br />
A Torch<br />
A pouch <strong>of</strong> 10 gold pieces<br />
A pouch <strong>of</strong> thieves’ tools<br />
A Potion <strong>of</strong> Healing – This is a small<br />
bottle, which, if drunk, heals two dice <strong>of</strong><br />
damage. Once drunk, scratch this <strong>of</strong>f <strong>the</strong><br />
equipment list.<br />
WHO IS STARDANCER?<br />
Stardancer is an elf mercenary who<br />
appreciates <strong>the</strong> finer things in life. She has<br />
teamed up with <strong>the</strong> o<strong>the</strong>r heroes to defeat<br />
<strong>the</strong> forces <strong>of</strong> evil and, more importantly,<br />
take <strong>the</strong>ir stuff.<br />
WHO SHOULD PLAY<br />
STARDANCER?<br />
If you want to play a sneaky hero who lives<br />
by her wits, is extremely curious, and is<br />
skilled at picking locks and spotting traps,<br />
you should select Stardancer <strong>the</strong> Thief.<br />
EQUIPMENT<br />
In addition to his war hammer, Graywulf<br />
carries:<br />
A Torch<br />
Some rations<br />
A 50-foot coil <strong>of</strong> rope<br />
WHO IS GRAYWULF?<br />
Graywulf is a barbarian warrior from <strong>the</strong> far<br />
north. He has come to <strong>the</strong>se lands to seek<br />
out and destroy ancient evil wherever he<br />
encounters it. His weapon is a skull-headed<br />
war hammer, a powerful weapon <strong>of</strong> his<br />
ancestors that smashes bones and<br />
dispatches undead with ease.<br />
WHO SHOULD PLAY<br />
GRAYWULF?<br />
If you want to play an extremely powerful,<br />
exceedingly brave warrior who likes to use<br />
his might and muscles to defeat evil, you<br />
should select Graywulf <strong>the</strong> Barbarian.
® ®<br />
ABILITY SCORES<br />
DELAVAN<br />
Priest (Dwarf )<br />
ZANTHAR REX<br />
Wizard (Human)<br />
ABILITY SCORES<br />
Strength 11<br />
Dexterity 14<br />
Constitution 16<br />
Intelligence 12<br />
Wisdom 17<br />
Charisma 12<br />
TO-HIT NUMBER 12<br />
To make an attack, roll three dice. If<br />
you roll a total <strong>of</strong> 12 or better, you hit.<br />
Strength 9<br />
Dexterity 11<br />
Constitution 15<br />
Intelligence 17<br />
Wisdom 13<br />
Charisma 13<br />
TO-HIT NUMBER 14<br />
To make an attack, roll three dice. If<br />
you roll a total <strong>of</strong> 14 or better, you hit.<br />
DAMAGE<br />
1D<br />
DAMAGE<br />
1D<br />
Delavan attacks with a short metal club<br />
called a mace. When you hit, roll one die.<br />
This is <strong>the</strong> amount <strong>of</strong> damage Delavan<br />
inflicts with a successful attack.<br />
HIT POINTS: 15<br />
● ● ● ● ● ● ● ●<br />
● ● ● ● ● ● ●<br />
Zanthar attacks with a wooden staff.<br />
When you hit, roll one die. This is <strong>the</strong><br />
amount <strong>of</strong> damage Zanthar inflicts with a<br />
successful attack.<br />
HIT POINTS: 10<br />
● ● ● ● ● ● ● ● ● ●<br />
9<br />
© 1999 TSR, Inc. All rights reserved. © 1999 TSR, Inc. All rights reserved.
TREASURE<br />
Record any gold and treasure Zanthar Rex finds here.<br />
TREASURE<br />
Record any gold and treasure Delavan finds here.<br />
Quarterstaff<br />
Damage: Roll one die<br />
WEAPONS<br />
Mace<br />
Damage: Roll one die<br />
WEAPONS<br />
10<br />
SPELLS<br />
Magic Missile—When cast, a magical<br />
pulse <strong>of</strong> energy flies from his fingers to<br />
automatically hit a target for one die <strong>of</strong><br />
damage. This spell can be cast twice in <strong>the</strong><br />
adventure.<br />
EQUIPMENT<br />
In addition to his quarterstaff, Zanthar<br />
carries:<br />
A lantern<br />
A magical scroll with <strong>the</strong> knock spell—<br />
when read, a loud knock magically opens a<br />
locked door. It can be used once.<br />
WHO IS ZANTHAR REX?<br />
A student <strong>of</strong> magic, Zanthar seeks out<br />
mysteries and secrets. He has little patience<br />
for those who would seek to use knowledge<br />
to evil or selfish ends. He has joined <strong>the</strong><br />
heroes to discover more magical spells and<br />
increase his own ability to help o<strong>the</strong>rs.<br />
WHO SHOULD PLAY<br />
ZANTHAR REX?<br />
If you want to play a scholar <strong>of</strong> <strong>the</strong> arcane<br />
arts who uses his brain and his magical<br />
spells to put evil-doers in <strong>the</strong>ir place, you<br />
should select <strong>the</strong> wizard Zanthar Rex.<br />
SPELLS<br />
Cure Light Wounds—When cast on a hero,<br />
this spell restores two dice <strong>of</strong> Hit Points.<br />
This spell can be cast twice in <strong>the</strong><br />
adventure.<br />
EQUIPMENT<br />
In addition to his mace, Delavan carries:<br />
A lantern<br />
A mirror<br />
A 50-foot coil <strong>of</strong> rope<br />
WHO IS DELAVAN?<br />
A young (in dwarven terms) priest <strong>of</strong> <strong>the</strong><br />
Hollow Mountains, Delavan has joined <strong>the</strong><br />
o<strong>the</strong>r heroes to battle <strong>the</strong> forces <strong>of</strong> evil.<br />
Stalwart and loyal to his friends, Delavan<br />
looks for <strong>the</strong> o<strong>the</strong>r heroes to aid him in his<br />
battle against evil. In return, he uses his<br />
healing spells to keep his allies alive.<br />
WHO SHOULD PLAY<br />
DELAVAN?<br />
If you want to play a character who isn’t<br />
afraid to get into a fight but also enjoys<br />
helping o<strong>the</strong>rs and keeping his<br />
companions in good spirits, you should<br />
select Delavan <strong>the</strong> Priest.
CONT’D FROM PAGE 6<br />
The sounds <strong>of</strong> battle die out as <strong>the</strong> last<br />
zombie crumbles to dust. Now you can<br />
better examine <strong>the</strong> ancient anteroom.<br />
You see a strange pattern in <strong>the</strong> dirty tile<br />
floor. A great iron door blocks access to<br />
<strong>the</strong> mountain’s interior. Racks <strong>of</strong> rusted<br />
and decayed weapons line <strong>the</strong> sides <strong>of</strong><br />
<strong>the</strong> room, and an iron chest rests near<br />
<strong>the</strong> far wall.<br />
What are your heroes going to do?<br />
The heroes have killed <strong>the</strong> monsters in<br />
<strong>the</strong> room and now can explore <strong>the</strong>ir lair.<br />
There’s nothing else immediately<br />
dangerous in <strong>the</strong> room.<br />
The heroes can do different things in<br />
<strong>the</strong> room, ei<strong>the</strong>r toge<strong>the</strong>r or separately.<br />
Ask <strong>the</strong> players what <strong>the</strong>ir characters are<br />
doing, <strong>the</strong>n check below for <strong>the</strong> entry that<br />
comes closest to <strong>the</strong> heroes’ actions.<br />
Remember, if a hero tries something that<br />
isn’t covered herein, make it up! And don’t<br />
be afraid to embellish <strong>the</strong> details and add<br />
your own touches if you think <strong>of</strong><br />
something cool or creepy. Just be fair and<br />
consistent and everything should work<br />
out fine.<br />
A. Checking <strong>the</strong> Zombies<br />
The zombies didn’t have a lot on <strong>the</strong>m and<br />
little remains in <strong>the</strong> piles <strong>of</strong> dust <strong>the</strong>y<br />
reverted to when <strong>the</strong> heroes defeated <strong>the</strong>m.<br />
Tattered clothing is mixed with each pile <strong>of</strong><br />
dust. The remains <strong>of</strong> <strong>the</strong> last zombie also<br />
contain a jeweled bracelet that juts out <strong>of</strong><br />
<strong>the</strong> dust pile. The bracelet is fashioned in<br />
<strong>the</strong> shape <strong>of</strong> a coiled serpent, with eyes<br />
made <strong>of</strong> small rubies. The bracelet is worth<br />
300 gold pieces if taken back and sold in<br />
<strong>the</strong> village.<br />
B. Checking <strong>the</strong> Weapons<br />
The racks filled with spears, swords, and<br />
hammers once made an impressive armory,<br />
but now <strong>the</strong>se weapons are rusted and<br />
uselessness.<br />
C. Checking <strong>the</strong> Mosaic<br />
A thick layer <strong>of</strong> dust covers <strong>the</strong> floor, but <strong>the</strong><br />
pattern <strong>of</strong> <strong>the</strong> tiles can be seen peeking<br />
through in places. The picture in <strong>the</strong> tiles<br />
can only be seen if <strong>the</strong> dust is wiped away.<br />
The tiles depict a disturbing image: a great<br />
dragon <strong>of</strong> smoke and mist with blazing-red<br />
eyes rising from a dark brazier.<br />
D. Checking <strong>the</strong> Chest<br />
The chest isn’t locked and it contains no<br />
traps. Tell <strong>the</strong> player whose hero is<br />
examining <strong>the</strong> chest that it looks like a<br />
wooden chest bound with iron bands, with<br />
a simple latch on <strong>the</strong> front. Ask if <strong>the</strong> hero<br />
is going to open <strong>the</strong> chest. If <strong>the</strong> hero opens<br />
<strong>the</strong> chest, read <strong>the</strong> following:<br />
A small, open bag sits on <strong>the</strong> floor <strong>of</strong> <strong>the</strong><br />
chest. Gold coins spill out <strong>of</strong> <strong>the</strong> bag.<br />
There are 50 gold coins, each inscribed<br />
with <strong>the</strong> mark <strong>of</strong> a long-dead kingdom. Let<br />
<strong>the</strong> player tell you if <strong>the</strong> hero is taking <strong>the</strong><br />
coins or not.<br />
E. Checking <strong>the</strong> Iron Door<br />
When someone expresses interest in <strong>the</strong><br />
iron door, read <strong>the</strong> following out loud:<br />
The heavy iron door is smooth, without<br />
runes or o<strong>the</strong>r markings. It’s set into a<br />
thick oak frame. It has well-oiled hinges<br />
and appears to be locked.<br />
If Stardancer checks <strong>the</strong> door for traps<br />
(using her Find Traps skill) and succeeds,<br />
she notices <strong>the</strong> following:<br />
The heavy iron door is locked, and <strong>the</strong><br />
door is rigged with a trap <strong>of</strong> some kind.<br />
It looks like <strong>the</strong> trap will be sprung if<br />
<strong>the</strong> door is opened while <strong>the</strong> lock is<br />
still engaged.<br />
There are three ways to open this door:<br />
1. Stardancer can make an Open Lock<br />
check. This requires <strong>the</strong> player to roll<br />
equal to or less than Stardancer’s Open<br />
Lock number on three dice. This is <strong>the</strong><br />
best way to open <strong>the</strong> door, because once<br />
<strong>the</strong> lock is disengaged <strong>the</strong> trap can’t be<br />
sprung. If <strong>the</strong> player fails <strong>the</strong> Open Lock<br />
roll, Stardancer can’t unlock this door.<br />
2. Zanthar can use his knock spell<br />
scroll, if he didn’t use it on <strong>the</strong> stone<br />
door. If <strong>the</strong> scroll is used, <strong>the</strong> door<br />
opens and <strong>the</strong> trap goes <strong>of</strong>f without<br />
harming anyone.<br />
3. Any character can make a Strength<br />
check to bash open <strong>the</strong> door.<br />
Unfortunately, this sets <strong>of</strong>f <strong>the</strong> trap. The<br />
hero who successfully bashes through<br />
<strong>the</strong> iron door is hit by a spring-loaded ax<br />
HANDY DM TIP:<br />
WINGING IT<br />
<strong>Play</strong>ers will eventually try<br />
something that isn’t covered<br />
in <strong>the</strong> <strong>Fast</strong>-<strong>Play</strong> Game. That’s<br />
one <strong>of</strong> <strong>the</strong> cool things about<br />
<strong>the</strong> game, and <strong>the</strong> reason that<br />
it works best with a live DM<br />
and not a computer AI. As <strong>the</strong><br />
DM, you consider a player’s<br />
action and judge how<br />
successful his or her hero is.<br />
When a situation comes up<br />
that you don’t have an answer<br />
to, make something up! If<br />
you’re fair, consistent, and<br />
having fun, everything will<br />
turn out fine. This is <strong>the</strong> fine<br />
art <strong>of</strong> “Winging It.” It’s a<br />
perfectly acceptable tactic for<br />
handling <strong>the</strong> unexpected.<br />
Just onsider <strong>the</strong> situation.<br />
What is <strong>the</strong> player trying to<br />
have his or her character<br />
accomplish and how likely is<br />
it to succeed? If need be, call<br />
for a roll against a particular<br />
ability score. (Roll three dice.<br />
If <strong>the</strong> result is less than <strong>the</strong><br />
chosen ability score, <strong>the</strong><br />
check succeeds.) For example,<br />
trying to push past a zombie<br />
might require a Strength<br />
check, or trying to bargain<br />
with a skeletal warrior might<br />
require a Charisma check. As<br />
<strong>the</strong> DM, it’s up to you. Just be<br />
be fair, and keep in mind that<br />
it’s only a game—<strong>the</strong> object is<br />
to have fun.<br />
11
12<br />
HANDY DM TIP:<br />
RUNNING MAXIE<br />
Maxie is a dog, but he’s also a<br />
character controlled by you,<br />
<strong>the</strong> DM. That means that you<br />
decide what Maxie does and<br />
how he does it. Here are some<br />
things to keep in mind:<br />
Maxie barks a lot. He shows<br />
most <strong>of</strong> what he discovers by<br />
barking at it—heroes,<br />
monsters, treasure, lint.<br />
Maxie is loyal. He fights<br />
alongside his new master. Let<br />
<strong>the</strong> player running <strong>the</strong> hero that<br />
Maxie befriended make Maxie’s<br />
attack and damage rolls.<br />
Maxie is not smart. He has<br />
more loyalty than brains.<br />
What does Maxie look like?<br />
That’s up to you, as <strong>the</strong> DM.<br />
blade that slashes across <strong>the</strong> open<br />
doorway. That hero suffers damage equal<br />
to one die plus one. Mark this <strong>of</strong>f <strong>the</strong><br />
character’s Hit Point total.<br />
As soon as someone opens <strong>the</strong> door, read:<br />
Through <strong>the</strong> doorway, a passage slopes<br />
down. In <strong>the</strong> distance you hear <strong>the</strong><br />
sound <strong>of</strong> rushing water.<br />
When <strong>the</strong> heroes decide to press on, go<br />
to <strong>the</strong> next section.<br />
4. BRIDGE OVER<br />
RAGING WATERS<br />
When <strong>the</strong> heroes pass through <strong>the</strong> iron<br />
door, read <strong>the</strong> following:<br />
The sound <strong>of</strong> rushing water becomes<br />
louder as you follow <strong>the</strong> descending<br />
passage. Finally you reach <strong>the</strong> edge <strong>of</strong> a<br />
large underground chasm. Beneath you,<br />
an underground river surges violently,<br />
appearing out <strong>of</strong> <strong>the</strong> darkness to your<br />
left and disappearing to your right.<br />
Across <strong>the</strong> bridge is a rickety bridge,<br />
made <strong>of</strong> ropes and planks, that leads to<br />
ano<strong>the</strong>r iron door on <strong>the</strong> far side. The<br />
bridge sways dangerously above <strong>the</strong><br />
river. Two threatening forms step out <strong>of</strong><br />
<strong>the</strong> shadows on <strong>the</strong> far side <strong>of</strong> <strong>the</strong> bridge.<br />
Each wields a sword and wears armor. As<br />
<strong>the</strong>y move into <strong>the</strong> light, you see that<br />
<strong>the</strong>se figures are skeletons—more<br />
undead guardians to block <strong>the</strong> way!<br />
What are your heroes going to do?<br />
The figures with <strong>the</strong> swords are skeletal<br />
warriors—all bones and armor and<br />
nothing else. They are more formidable<br />
than <strong>the</strong> zombies. The heroes can cross <strong>the</strong><br />
bridge without a problem, though you<br />
might want to describe how it sways and<br />
shakes with every step a hero takes. Two<br />
heroes can walk side-by-side on <strong>the</strong> bridge,<br />
or <strong>the</strong>y can cross it in single file. When a<br />
hero gets about halfway across <strong>the</strong> bridge,<br />
one <strong>of</strong> <strong>the</strong> skeletal warriors steps forward to<br />
challenge <strong>the</strong> hero. See <strong>the</strong> box in <strong>the</strong> next<br />
column for combat details.<br />
If a skeletal warrior hits a hero for<br />
maximum damage, that hero has a chance<br />
<strong>of</strong> being knocked <strong>of</strong>f <strong>the</strong> bridge into <strong>the</strong><br />
raging river. The heroes can avoid this<br />
danger by using <strong>the</strong> ropes in <strong>the</strong>ir packs to<br />
tie safety lines to each o<strong>the</strong>r.<br />
Heroes Attack: The players make <strong>the</strong><br />
attack rolls for <strong>the</strong>ir heroes. To make an<br />
attack roll, a player rolls three dice.<br />
If <strong>the</strong> total is less than <strong>the</strong> hero’s To-<br />
Hit number, <strong>the</strong> hero’s attack misses.<br />
If <strong>the</strong> total is equal to or greater than<br />
<strong>the</strong> hero’s To-Hit number, <strong>the</strong> attack for<br />
this round succeeds.<br />
The player <strong>the</strong>n makes a damage roll.<br />
You record <strong>the</strong> damage on <strong>the</strong> Skeletal<br />
Warrior Wounds chart, below. When a<br />
skeleton’s wound boxes are filled, it<br />
collapses into a tangle <strong>of</strong> dead bones.<br />
After each <strong>of</strong> <strong>the</strong> heroes has had a<br />
chance to attack once, <strong>the</strong>n it’s <strong>the</strong><br />
skeletal warriors’ turn …<br />
Skeletal Warriors Attack: You roll for<br />
<strong>the</strong> skeletons. The skeletons have a To-<br />
Hit number <strong>of</strong> 12. Roll three dice. If <strong>the</strong><br />
total equals or exceeds 12, a skeleton<br />
hits. If a skeletal warrior hits a hero, it<br />
inflicts one die <strong>of</strong> damage plus 1<br />
additional point.<br />
If a skeletal warrior hits a hero and<br />
inflicts maximum damage (that’s 7<br />
points from one attack), <strong>the</strong> hero gets<br />
knocked to <strong>the</strong> side and might fall <strong>of</strong>f<br />
<strong>the</strong> bridge. The hero’s player must<br />
make a successful Dexterity check for<br />
<strong>the</strong> hero to stay atop <strong>the</strong> bridge.<br />
Skeletal Warrior Wounds<br />
Skeleton 1 ● ● ● ● ● ● ● ●<br />
Skeleton 2<br />
● ● ● ● ● ● ● ●<br />
If a skeletal warrior inflicts maximum<br />
damage on a hero who’s on <strong>the</strong> bridge, that<br />
heroes must make a Dexterity check to<br />
keep from falling into <strong>the</strong> raging river.<br />
To make a Dexterity check, a player<br />
rolls three dice. If <strong>the</strong> total is less than<br />
<strong>the</strong> hero’s Dexterity score, that hero stays<br />
on <strong>the</strong> bridge.<br />
If <strong>the</strong> total is equal to or greater than<br />
<strong>the</strong> hero’s Dexterity score, that hero falls<br />
into <strong>the</strong> water.<br />
If a falling hero was tied to ropes, <strong>the</strong> hero<br />
gets dunked in <strong>the</strong> cold river, but can be<br />
hauled back up. If not, read <strong>the</strong> following to
all <strong>the</strong> players, plugging in <strong>the</strong> hero’s name<br />
at <strong>the</strong> appropriate places:<br />
(Hero) takes a mighty blow and is knocked<br />
<strong>of</strong>f <strong>the</strong> bridge. (Hero) reaches out to grab<br />
<strong>the</strong> bridge, but <strong>the</strong> ropes are too slick.<br />
(Hero) plunges into <strong>the</strong> raging torrent <strong>of</strong><br />
<strong>the</strong> underground river, immediately disappearing<br />
beneath <strong>the</strong> cold, dark surface.<br />
After <strong>the</strong> heroes defeat <strong>the</strong> skeletal<br />
warriors, go to <strong>the</strong> next section.<br />
5. ON THE OTHER SIDE<br />
Once <strong>the</strong> heroes get across <strong>the</strong> river and<br />
defeat <strong>the</strong> skeletal warriors, <strong>the</strong>y see an<br />
iron door in front <strong>of</strong> <strong>the</strong>m.<br />
If <strong>the</strong> heroes check <strong>the</strong> skeletal warriors,<br />
<strong>the</strong>y find nothing <strong>of</strong> value. Even <strong>the</strong> swords<br />
that <strong>the</strong> skeletons used, which looked<br />
strong and deadly while <strong>the</strong> monsters were<br />
animated, now appear to be rusted and<br />
brittle.<br />
The heroes can check out <strong>the</strong> iron door,<br />
but this door isn’t locked and it contains no<br />
traps. When <strong>the</strong> heroes open <strong>the</strong> door, read<br />
<strong>the</strong> following to <strong>the</strong> players:<br />
The door opens into a short passage,<br />
which ends almost in a “T” intersection.<br />
Looking to <strong>the</strong> left, <strong>the</strong> passage<br />
continues and turns right. Looking to<br />
<strong>the</strong> right, <strong>the</strong> passage ends in ano<strong>the</strong>r<br />
iron door.<br />
Have a pencil ready. You might want to<br />
sketch what <strong>the</strong> heroes see on a piece <strong>of</strong><br />
paper for <strong>the</strong> players. Sketching maps is a<br />
common staple <strong>of</strong> <strong>the</strong> D&D Game, as it<br />
gives players a sense <strong>of</strong> where <strong>the</strong>ir<br />
characters are in <strong>the</strong> dungeon Use <strong>the</strong> map<br />
on page 2 as a guide. Don’t worry about<br />
exact distances—just give <strong>the</strong>m an idea<br />
that <strong>the</strong>y have two choices, right or left.<br />
If <strong>the</strong>y choose to go to <strong>the</strong> right, toward<br />
<strong>the</strong> iron door, go to “6. Maxie!” If <strong>the</strong>y<br />
choose to go left, continue with “7. The<br />
Smoke Dragon’s Lair”<br />
6. MAXIE!<br />
This iron door on <strong>the</strong> right isn’t locked<br />
or trapped. When <strong>the</strong> heroes open this<br />
door, read:<br />
The door opens into a small room. There<br />
are four things in <strong>the</strong> room: two chests, a<br />
body, and a good-sized dog.<br />
A. Checking <strong>the</strong> Chests<br />
The chests look like <strong>the</strong> ones in <strong>the</strong> zombie<br />
chamber.<br />
The first chest’s lid is open. Scorch marks<br />
surround <strong>the</strong> chest, indicating that a<br />
powerful, explosive trap was sprung when<br />
<strong>the</strong> lid was opened. There’s nothing in this<br />
chest.<br />
The second chest isn’t locked, but it is<br />
trapped. If Stardancer makes a successful<br />
Find Traps check, she can open <strong>the</strong> chest<br />
without setting <strong>of</strong>f <strong>the</strong> trap. If she fails <strong>the</strong><br />
check, or if anyone else simply tries to open<br />
<strong>the</strong> chest, <strong>the</strong> trap is sprung.<br />
If <strong>the</strong> trap on <strong>the</strong> second chest is sprung,<br />
a cloud <strong>of</strong> poison dust billows into <strong>the</strong> face<br />
<strong>of</strong> <strong>the</strong> hero who opened <strong>the</strong> chest’s lid. The<br />
hero must make a Constitution check to<br />
determine <strong>the</strong> full effects <strong>of</strong> <strong>the</strong> poison.<br />
To make a Constitution check, a player<br />
rolls three dice. If <strong>the</strong> total is less than<br />
<strong>the</strong> hero’s Constitution score, that hero<br />
only suffers 2 points <strong>of</strong> damage from <strong>the</strong><br />
poison dust.<br />
If <strong>the</strong> total is equal to or greater than<br />
<strong>the</strong> hero’s Constitution score, that hero<br />
suffers 5 points <strong>of</strong> damage from <strong>the</strong> dust.<br />
After <strong>the</strong> second chest is opened, <strong>the</strong><br />
heroes find a ring at <strong>the</strong> bottom <strong>of</strong> <strong>the</strong><br />
chest. The ring glows faintly and is made <strong>of</strong><br />
unadorned gold. Any hero who wears <strong>the</strong><br />
ring becomes harder to hit in combat. A<br />
monster’s To-Hit number is increased by 1<br />
point when <strong>the</strong> monster attacks <strong>the</strong> hero<br />
wearing <strong>the</strong> ring <strong>of</strong> protection.<br />
B. Checking <strong>the</strong> Body<br />
The body is sprawled in front <strong>of</strong> <strong>the</strong> open<br />
chest, face up, quite dead. It looks like an<br />
adventurer, though his body has been<br />
scorched and blackened by whatever<br />
exploded out <strong>of</strong> <strong>the</strong> chest. The dog growls<br />
and barks if <strong>the</strong> heroes try to get too close.<br />
13
14<br />
The heroes must deal with <strong>the</strong> dog before<br />
<strong>the</strong>y can examine <strong>the</strong> body.<br />
Once <strong>the</strong> heroes have dealt with <strong>the</strong> dog<br />
(see Checking <strong>the</strong> Dog, below), <strong>the</strong>y can search<br />
<strong>the</strong> dead body. There’s a mace and a potion <strong>of</strong><br />
healing on <strong>the</strong> body. The potion restores two<br />
dice <strong>of</strong> Hit Points when consumed.<br />
C. Checking <strong>the</strong> Dog<br />
The dog stands guard over <strong>the</strong> fallen body<br />
(its former master). It looks hungry and<br />
lonely, and its ribs can be seen beneath its<br />
matted fur. It wears a lea<strong>the</strong>r collar with a<br />
tag around its neck that reads “Maxie.”<br />
The heroes can leave <strong>the</strong> room, but<br />
<strong>the</strong>y hear <strong>the</strong> dog barking and whining<br />
from behind <strong>the</strong> closed door.<br />
The heroes can attack <strong>the</strong> dog, but<br />
<strong>the</strong>n it fights back until <strong>the</strong> heroes kill it<br />
or leave.<br />
Maxie has 5 hit points and a To-Hit<br />
number <strong>of</strong> 14. It inflicts one die <strong>of</strong><br />
damage when it makes a successful bite.<br />
Maxie<br />
● ● ● ● ●<br />
The heroes can befriend <strong>the</strong> dog.<br />
Maxie’s a good dog, but he won’t let<br />
anyone approach his former master until<br />
<strong>the</strong>y become friends. The first player who<br />
says his or her hero is being nice to <strong>the</strong><br />
dog must make a Charisma check. (If a<br />
hero <strong>of</strong>fers food to <strong>the</strong> dog, no Charisma<br />
check is needed. Maxie immediately<br />
befriends that hero.)<br />
To make a Charisma check, <strong>the</strong> player<br />
rolls three dice. If <strong>the</strong> total is less than<br />
<strong>the</strong> hero’s Charisma score, that hero<br />
befriends Maxie. If a hero fails, Maxie<br />
growls and barks at that hero. O<strong>the</strong>rs<br />
can try, but each hero can only attempt<br />
to befriend Maxie once.<br />
Once a hero befriends Maxie, <strong>the</strong><br />
dog allows <strong>the</strong> heroes to approach <strong>the</strong><br />
body <strong>of</strong> his former master and <strong>the</strong>y can<br />
recover <strong>the</strong> items discussed in<br />
Checking <strong>the</strong> Body, above. Then Maxie<br />
follows <strong>the</strong> heroes and fights at <strong>the</strong>ir<br />
side, adopting <strong>the</strong>m as his new masters<br />
and friends.<br />
7. LAIR OF THE<br />
SMOKE DRAGON<br />
When <strong>the</strong> heroes reach <strong>the</strong> corner, read:<br />
The passage ahead continues a short<br />
way and <strong>the</strong>n opens into a great vault. At<br />
<strong>the</strong> far end <strong>of</strong> <strong>the</strong> vault, a large shrine<br />
carved from black volcanic rock rises<br />
from <strong>the</strong> stone floor. A great bowlshaped<br />
brazier sits atop <strong>the</strong> shrine’s<br />
altar. Smoke billows from <strong>the</strong> brazier,<br />
ga<strong>the</strong>ring into a dark cloud above <strong>the</strong><br />
black shrine.<br />
What are your heroes doing?<br />
If <strong>the</strong> heroes haven’t checked out <strong>the</strong><br />
iron door yet (area 6), <strong>the</strong>y still have time to<br />
go back before <strong>the</strong>y enter <strong>the</strong> vault.<br />
O<strong>the</strong>rwise, continue with this section.<br />
When <strong>the</strong>y enter <strong>the</strong> vault, read:<br />
As you enter <strong>the</strong> great vault, <strong>the</strong> shrine at<br />
<strong>the</strong> far end begins to glow with reddish<br />
light. Smoke erupts from <strong>the</strong> brazier in a<br />
thick stream, ga<strong>the</strong>ring in <strong>the</strong> center <strong>of</strong><br />
<strong>the</strong> room. It quickly forms into <strong>the</strong> shape<br />
<strong>of</strong> a great winged dragon.<br />
The walls resound with laughter, and a<br />
dark, evil voice thunders from <strong>the</strong><br />
dragon-shaped cloud. “Fools! You have<br />
found only death in <strong>the</strong> lair <strong>of</strong> <strong>the</strong><br />
smoke dragon! Soon you will join my<br />
undead legions!”<br />
What are your heroes doing?<br />
Use your “Evil Voice” when you bellow<br />
<strong>the</strong> smoke dragon’s lines. He’s <strong>the</strong> Big Bad<br />
Guy, so play him up.<br />
A battle is inevitable. The smoke dragon<br />
doesn’t appreciate invaders in his lair, and<br />
he needs <strong>the</strong> bodies <strong>of</strong> <strong>the</strong> heroes to replace<br />
<strong>the</strong> undead guardians that <strong>the</strong> heroes have<br />
destroyed. Besides, if <strong>the</strong> heroes want to<br />
make sure that <strong>the</strong> village isn’t bo<strong>the</strong>red by<br />
more zombies in <strong>the</strong> future, <strong>the</strong>y have to<br />
destroy <strong>the</strong> smoke dragon.<br />
If <strong>the</strong> heroes turn and flee, <strong>the</strong> smoke<br />
dragon catches up with <strong>the</strong>m at <strong>the</strong> rope<br />
bridge. If <strong>the</strong>y remain in <strong>the</strong> vault, it<br />
pounces upon <strong>the</strong>m <strong>the</strong>re.<br />
Who attacks first? If <strong>the</strong> heroes stay in <strong>the</strong><br />
vault, <strong>the</strong>y get to attack first. If <strong>the</strong> heroes run<br />
to <strong>the</strong> bridge, <strong>the</strong> smoke dragon attacks first.
Heroes Attack: The players make attack<br />
rolls for <strong>the</strong>ir heroes (and don’t forget<br />
Maxie if he’s around). To make an attack<br />
roll, a player rolls three dice and tries to get<br />
a total that’s equal to or greater than <strong>the</strong><br />
hero’s To-Hit number.<br />
If <strong>the</strong> attack succeeds, <strong>the</strong> player <strong>the</strong>n<br />
makes a damage roll. Mark <strong>of</strong>f <strong>the</strong><br />
damage on <strong>the</strong> Smoke Dragon Wounds<br />
chart, below.<br />
Note that <strong>the</strong> smoke dragon becomes a<br />
more or less solid, sinuous cloud <strong>of</strong><br />
smoke when it attacks. It can hurt <strong>the</strong><br />
heroes and <strong>the</strong> heroes can hurt it.<br />
Describe how slash marks appear in <strong>the</strong><br />
smoke whenever a hero hits it; if a hero<br />
inflicts a lot <strong>of</strong> damage in an attack, <strong>the</strong><br />
smoke dragon even roars in pain.<br />
Smoke Dragon Attacks: You make <strong>the</strong><br />
attack rolls for <strong>the</strong> dragon. Roll three<br />
dice. The dragon has 30 hit points and a<br />
To-Hit number <strong>of</strong> 11. When it hits, roll<br />
two dice. The higher roll is <strong>the</strong> damage it<br />
inflicts for <strong>the</strong> hit.<br />
Who does <strong>the</strong> smoke dragon attack?<br />
That’s up to you. <strong>Play</strong> <strong>the</strong> dragon as an<br />
intelligent foe. It attacks powerful<br />
characters first, and defends its brazier if<br />
a hero gets too close to this source <strong>of</strong><br />
power (see below).<br />
Smoke Dragon Wounds<br />
● ● ● ● ● ● ● ● ● ●<br />
● ● ● ● ● ● ● ● ● ●<br />
● ● ● ● ● ● ● ● ● ●<br />
A. The Brazier<br />
The brazier is <strong>the</strong> smoke dragon’s<br />
source <strong>of</strong> power. If a hero destroys it,<br />
<strong>the</strong> smoke dragon immediately takes 15<br />
points <strong>of</strong> damage.<br />
A hero can reach <strong>the</strong> brazier in one<br />
round instead <strong>of</strong> attacking <strong>the</strong> smoke<br />
dragon. The next round, <strong>the</strong> hero can<br />
destroy <strong>the</strong> brazier with a sharp strike from<br />
any weapon (or <strong>the</strong> magic missile spell from<br />
a distance). No roll is required to hit and<br />
destroy <strong>the</strong> brazier.<br />
If someone decides to head for <strong>the</strong><br />
brazier, <strong>the</strong> dragon attacks that hero.<br />
When <strong>the</strong> dragon is reduced to zero Hit<br />
Points, read <strong>the</strong> following out loud:<br />
The smoke dragon lets out a loud roar<br />
and bellows “Fools! You may have won<br />
today, but I will return to destroy<br />
you! You have been warned …”<br />
And <strong>the</strong>n it fades away, <strong>the</strong> smoke<br />
losing its solidity and fading to wisps <strong>of</strong><br />
mist. You have won.<br />
COOL! SO, IS THERE ANY<br />
CASH LYING AROUND?<br />
The heroes discover a small alcove at <strong>the</strong><br />
back <strong>of</strong> <strong>the</strong> shrine. In <strong>the</strong> alcove <strong>the</strong>y find<br />
<strong>the</strong> following items:<br />
A large sack filled with gold coins (500<br />
gold total).<br />
A magical scroll (usable by Zanthar Rex)<br />
with a magical spell on it —<strong>the</strong> sleep spell<br />
that puts weak monsters to sleep.<br />
A magical scroll (usable by Delavan)<br />
with a priest’s spell on it—<strong>the</strong> spiritual<br />
hammer spell that lets <strong>the</strong> priest do damage<br />
from a distance<br />
Magical elf slippers, for Stardancer, that<br />
allow her to move silently.<br />
Metal armor large enough for Graywulf<br />
that makes it harder for creatures to hit him.<br />
WHAT’S NEXT?<br />
This <strong>Fast</strong>-<strong>Play</strong> Game is only <strong>the</strong> tip <strong>of</strong> <strong>the</strong><br />
iceburg when it comes to <strong>the</strong> DUNGEONS &<br />
DRAGONS Game. The full game <strong>of</strong>fers a<br />
complete and comprehensive set <strong>of</strong> rules<br />
that allows you to create your own fantastic<br />
sword-and-sorcery adventures.<br />
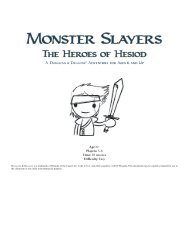
In <strong>the</strong> Dungeons & Dragons Adventure<br />
Game (shown on <strong>the</strong> back cover), you get<br />
everything you need: more rules, which means<br />
more options and more excitement; more hero<br />
characters to choose from; more monsters to<br />
battle; more magic and more equipment; and<br />
more ready-to-play adventures.<br />
After that, look for <strong>the</strong> Advanced<br />
Dungeons & Dragons <strong>Play</strong>er’s Handbook<br />
and Dungeon Master Guide. When you’re<br />
ready, <strong>the</strong>se rules books provide lots <strong>of</strong><br />
additional material, including rules for<br />
creating your own player character heroes<br />
and advice for <strong>the</strong> DM who wants to<br />
develop an ongoing sword-and-sorcery<br />
campaign. Look for <strong>the</strong>se products at a<br />
book or hobby store near you, or check out<br />
.<br />
15
If you liked this <strong>Fast</strong>-<strong>Play</strong> Game, you’ll<br />
love <strong>the</strong> Dungeons & Dragons<br />
Adventue Game! It’s a great way to learn<br />
<strong>the</strong> game and start playing now. It<br />
includes everything you need to play.<br />
<strong>Play</strong> <strong>the</strong> World’s Greatest Game!<br />
Look for this product at your nearest book<br />
or game store, or contact us at<br />
.<br />
©1999 TSR, Inc. All rights reserved. ® and designate registered trademarks <strong>of</strong> TSR, Inc. TSR, Inc. is a subsidiary <strong>of</strong> <strong>Wizards</strong> <strong>of</strong> <strong>the</strong> <strong>Coast</strong>, Inc.