cat eye enduro 2 cateye velo 2 cat
cat eye enduro 2 cateye velo 2 cat
cat eye enduro 2 cateye velo 2 cat

You also want an ePaper? Increase the reach of your titles
YUMPU automatically turns print PDFs into web optimized ePapers that Google loves.
CAT EYE ENDURO 2<br />
CATEYE MITY VELO 32<br />
CYCLOCOMPUTER<br />
CC-VL200<br />
CYCLOCOMPUTER<br />
CC-ED200 [with Heavy Duty Wire]<br />
CC-MT300 [with Normal Wire]<br />
®<br />
U.S. Pat. Nos. 4633216/4642606/5236759/5226340/5264791<br />
Pat. and Design Pat. Pending<br />
Copyright© 1998 CAT EYE Co., Ltd.<br />
CCMED2/MT3-981116 Printed in Japan 0687460 3<br />
LIMITED WARRANTY<br />
1-Year Warranty for Main Unit Only<br />
(Accessories/Attachments and Battery Consumption excluded)<br />
If trouble occurs during normal use, the part of the Main Unit will be repaired or replaced free of charge. The service must<br />
be performed by Cat Eye Co., Ltd. To return the product, pack it carefully and remember to enclose the warranty certifi<strong>cat</strong>e<br />
with instruction for repair. Please write or type your name and address clearly on the warranty certifi<strong>cat</strong>e. Insurance,<br />
handling and transportation charges to our service shall be borne by person desiring service.<br />
(Address for service)<br />
CO.,LTD.<br />
2-8-25, Kuwazu, Higashi Sumiyoshi-ku, Osaka 546-0041 Japan<br />
Attn.: CAT EYE Customer Service Section<br />
Service & Research Address for United States Consumers:<br />
CAT EYE Service & Research Center<br />
GARANTIE LIMITEE<br />
1705 14th St. 115 Boulder, CO 80302<br />
Phone : 303-443-4595 Toll Free : 800-5CATEYE<br />
Fax : 303-473-0006 e-mail : CatEyeUSA@aol.com<br />
1 An de Garantie Unité Principale Uniquement<br />
(à l'exclusion des accessoires et de la pile)<br />
Ce produit est garanti, sous réserve d'une utilisation normale, pendant une période d'un an. Les réparations effectuées dans le cadre de la<br />
présente garantie sont gratuites et doivent être effectuées par CAT EYE Co., Ltd. Le produit à réparer doit être retourné à CAT EYE Co.,<br />
Ltd. directement par l'acheteur. Tout produit retourné au département de réparation CAT EYE doit être soigneusement emballé et le<br />
certifi<strong>cat</strong> de garantie ainsi que les instructions de réparation doivent accompagner le produit. Il est conseillé à l'acheteur d'écrire lisiblement<br />
ou de dactylographier ses nom et adresse sur le certifi<strong>cat</strong> de garantie, afin que le produit lui soit directement retourné après réparation.<br />
Le coût de l'assurance ainsi que les frais de manutention et de transport sont à charge de la personne souhaitant une réparation sous garantie.<br />
(Adresse d'envoi pour réparation)<br />
CO.,LTD.<br />
2-8-25, Kuwazu, Higashi Sumiyoshi-ku, Osaka 546-0041 Japon<br />
Attn. : CAT EYE Customer Service Section<br />
GARANTIE<br />
1 Jahr Garantie nur auf den Computer<br />
(Die Zubehör-/Montageteile und Batterie sind von Garantieleistungen ausgeschlossen)<br />
Falls während des normalen Gebrauchs Fehler auftreten, wird das entsprechende Teil des Computers kostenlos repariert oder ersetzt.<br />
Die Reparatur muß von Cat Eye Co., Ltd durchgeführt werden. Wenn Sie das Gerät einsenden, packen Sie es sorgfältig ein und fügen<br />
Sie die Garantiekarte sowie Reparaturhinweise anbei. Achten Sie darauf, Ihren Namen und Ihre Anschrift mit Schreibmaschine oder<br />
in Druckbuchstaben deutlich lesbar auf die Garantiekarte zu schreiben. Versicherungskosten und Kosten für den Transport bis zu<br />
unserem Kundendienst gehen zu Lasten der Person, die unseren Kundendienst in Anspruch nehmen möchte.<br />
(Anschrift des Kundendienstes)<br />
CO.,LTD.<br />
2-8-25 Kuwazu, Higashi Sumiyoshi-ku, Osaka, 546-0041 Japan<br />
Attn.: CAT EYE Customer Service Section<br />
GARANZIA LIMITATA<br />
1 Anno di Garanzia soltanto sull'Unità Principale<br />
(Gli accessori e la pila sono esclusi dalla garanzia)<br />
In caso di problema durante l'impiego normale, l'unità principale verrà riparata o sostituita gratuitamente da Cat Eye Co., Ltd.. Al<br />
momento del ritorno del prodotto occorre imballarlo con cura allegandovi il certifi<strong>cat</strong>o di garanzia con le istruzioni per le riparazioni.<br />
Il nome e l'indirizzo dell'acquirente devono essere presenti in modo leggibile sul certifi<strong>cat</strong>o di garanzia. Le spese di<br />
assicurazione, di manutenzione e di spedizione al nostro Servizio Riparazioni saranno a carico del richiedente la riparazione.<br />
(Indirizzo Servizio Riparazioni)<br />
CO.,LTD.<br />
2-8-25 Kuwazu, Higashi Sumiyoshi-ku, OSAKA 546-0041, Giappone.<br />
Att:Dipartamento Assistenza Clienti<br />
GARANTLE BEPALINGEN<br />
1 jaar garantie op de computer unit<br />
(bedrading, magneet, sensor, batterij en bevestigingsmateriaal uitgezonderd)<br />
Indien er problemen optreden gedurende normaalgebruik, binnen de garantie periode, dan geschiedt reparatie of vervanging kosteloos.<br />
Dit dient door de fabrikant Cat <strong>eye</strong> Co. Ltd. uitgevoerd te worden. de computer moet door de importeur terug gezonden worden. Bij<br />
terugzenden van de computer moet deze zorgvuldig verpakt worden en dient het garantie bewijs, de aankoopbon en een beschrijving<br />
van het probleem meegezonden te worden. Verzekering- en verzend- en transportkosten zijn voor rekening van de koper.<br />
GARANTÍA LIMITADA<br />
(Service adres)<br />
CO.,LTD.<br />
2-8-25, Kuwazu, Higashi Sumiyoshi-Ku, Osaka 546-0041 Japan<br />
Attn.: Cat <strong>eye</strong> consumer service section<br />
1- Año de Garantía Sólo para la Unidad Principal<br />
(Se excluyen Accesorios/Acoplamientos y Batería)<br />
En caso de problemas durante su uso normal, la unidad principal será reparada o reemplazada sin coste alguno. El servicio<br />
debe ser realizado por el distribuidor CAT EYE en su país. Para enviar el producto al servicio de reparación, empaquételo<br />
primero cuidadosamente y no olvide incluir el certificado de garantía e instrucciones para el servicio de reparación. En el<br />
certificado de garantía deberá constar su nombre y dirección completa. Los gastos de seguro, manipulación y transporte o<br />
correo deberán correr a cargo de quien solicite dicho servicio.<br />
(Dirección para las reparaciones)<br />
CO.,LTD.<br />
2-8-25, Kuwazu, Higashi Sumiyoshi-Ku, Osaka 546-0041 JAPAN<br />
ATT: CAT EYE Customer Service Section<br />
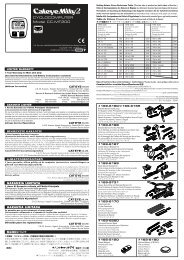
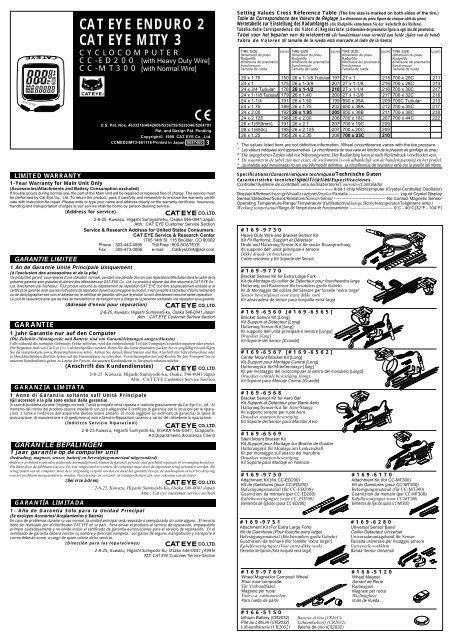
Setting Values Cross Reference Table (The tire size is marked on both sides of the tire.)<br />
Table de Correspondance des Valeurs de Réglage (La dimension du pneu figure de chaque côté du pneu)<br />
Wertetabelle zur Einstellung des Radumfanges (die Radgröße entnehmen Sie der Aufschrift des Reifens)<br />
Tabella delle Corrispondenze dei Valori di Regolazione (La dimensione del pneumatico figura su ogni lato del pneumatico)<br />
Tabel voor het bepalen van de wielomtrek (de bandenmaat staat vermeld aan beide zijden van de band)<br />
Tabla de Valores (El tamaño de la rueda está marcado al lado de la llanta)<br />
TIRE SIZE<br />
L(cm) TIRE SIZE<br />
L(cm) TIRE SIZE<br />
L(cm) TIRE SIZE<br />
L(cm)<br />
dimension du pneu<br />
Radgröße<br />
dimensione del pneumatico<br />
bandenmaat<br />
Tamaña de rueda<br />
dimension du pneu<br />
Radgröße<br />
dimensione del pneumatico<br />
bandenmaat<br />
Tamaña de rueda<br />
dimension du pneu<br />
Radgröße<br />
dimensione del pneumatico<br />
bandenmaat<br />
Tamaña de rueda<br />
dimension du pneu<br />
Radgröße<br />
dimensione del pneumatico<br />
bandenmaat<br />
Tamaña de rueda<br />
20 x 1.75<br />
24 x 1<br />
24 x 3/4 Tubular<br />
24 x 1-1/8 Tubular<br />
24 x 1-1/4<br />
24 x 1.75<br />
24 x 2.00<br />
24 x 2.125<br />
26 x 1(559mm)<br />
26 x 1(650c)<br />
26 x 1.25<br />
150<br />
175<br />
178<br />
179<br />
191<br />
189<br />
192<br />
196<br />
191<br />
195<br />
195<br />
26 x 1-1/8 Tubular<br />
26 x 1-3/8<br />
26 x 1-1/2<br />
26 x 1.40<br />
26 x 1.50<br />
26 x 1.75<br />
26 x 1.95<br />
26 x 2.00<br />
26 x 2.1<br />
26 x 2.125<br />
26 x 2.35<br />
197<br />
207<br />
210<br />
200<br />
199<br />
202<br />
205<br />
206<br />
207<br />
207<br />
208<br />
27 x 1<br />
27 x 1-1/8<br />
27 x 1-1/4<br />
27 x 1-3/8<br />
650 x 35A<br />
650 x 38A<br />
650 x 38B<br />
700 x 18C<br />
700 x 19C<br />
700 x 20C<br />
700 x 23C<br />
215<br />
216<br />
216<br />
217<br />
209<br />
212<br />
211<br />
207<br />
209<br />
209<br />
210<br />
700 x 25C<br />
700 x 28C<br />
700 x 30C<br />
700 x 32C<br />
700C Tubular<br />
700 x 35C<br />
700 x 38C<br />
700 x 44C<br />
211<br />
214<br />
217<br />
216<br />
213<br />
217<br />
218<br />
222<br />
* The values listed here are not definitive information. Wheel circumference varies with the tire pressure.<br />
* Les valeurs indiquées sont approximatives. La circonférence de roue varie en fonction de la pression de gonflage du pneu.<br />
* Die angegebenen Zahlen sind nur Näherungswerte. Der Radumfang kann je nach Reifendruck verschieden sein.<br />
* De waarden in de tabel zijn niet exact, de wielomtrek is ook afhankelijk van de bandenspanning en het profiel.<br />
* Las medidas aquí mencionadas no son una información definitiva. La circunferencia del neumático varía con la presión del mismo.<br />
Specifi<strong>cat</strong>ions/Caractéristiques techniques/Technische Daten<br />
Caratteristiche tecniche/specifi<strong>cat</strong>ies/Especificaciones<br />
Controller/Systéme de contrôle/Controler/Elaboratore/Controller/Controlador<br />
------------------------------------------------------------------ 4-bit 1-chip Microcomputer (Crystal Controlled Oscillator)<br />
Display/Afficheur/Anzeige/Visualizzazione/Display/Pantalla ----------------------------------- Liquid Crystal Display<br />
Sensor/Détecteur/Sensor/Rivelatore/Sensor/Sensor ------------------------------------ No Contact Magnetic Sensor<br />
Operating Temperature Range/Température d'utilisation/zulässige Betriebstemperatur/Toegestane temp./<br />
Werking temperatuur/Rango de Temperatura de Funcionamiento --------------------------------- 0°C - 40°C(32°F - 104°F)<br />
#169-9730<br />
Heavy Duty Wire and Bracket Sensor Kit<br />
Kit Fil Renforcè, Support et Détecteur<br />
Draht und Halterung/Sensor-Kit für starke Beanspruchung<br />
Kit supporto dell’ unità principale e sensore<br />
Dikke draad- en bracketset<br />
Cable resistente y Kit Soporte del Sensor<br />
#169-9770<br />
Bracket Sensor Kit for Extra Large Fork<br />
Kit de Montage du collier de Détecteur pour fourcheextra large<br />
Halterung und Radsensor für besonders große Gabeln<br />
Kit di Montaggio del collare del Sensore per forcelle "extra large"<br />
Sensor bevestiginset voor extra dikke vork<br />
Kit abrazadera de sensor para horquilla extra larga<br />
#169-6560 [#169-6565]<br />
Bracket Sensor Kit [Long]<br />
Kit Support et Détecteur [Long]<br />
Halterung/Sensor-Kit [lang]<br />
Kit supporto dell'unità principale e sensore [Lungo]<br />
Draadset [lang]<br />
Kit Soporte del Sensor [Grande]<br />
#169-6567 [#169-6562]<br />
Center Mount Bracket Kit [Long]<br />
Kit Support pour Montage Central [Long]<br />
Halterungskit für Mittelmontage [lang]<br />
Kit per montaggio del ciclocomputer al centro del manubrio [Lungo]<br />
Draadset centrale bevestiging [lang]<br />
Kit Soporte para Montaje Central [Grande]<br />
#169-6568<br />
Bracket Sensor Kit for Aero Bar<br />
Kit Support et Détecteur pour Barre Aéro<br />
Halterung/Sensor-Kit für Aero-Stange<br />
Kit supporto sensore per ruote Aero<br />
Draadset stuurpen bevestiging<br />
Kit Soporte del Sensor para Manillar Aero<br />
#169-6569<br />
Stem Mount Bracket Kit<br />
Kit Support pour Montage sur Broche de Guidon<br />
Halterungskit für Montage am Lenkerschaft<br />
Kit per montaggio sull'attacco del manubrio<br />
Draadset stuurpen bevestiging<br />
Kit Soporte para Montaje en Potencia<br />
#169-9750 #169-6170<br />
Attachment Kit (for CC-ED200)<br />
Attachment Kit (for Kit de Gamitures (pour CC-ED200)<br />
Kit de Gamitures (pour CC-MT300)<br />
Befestigungsmaterial (für CC-ED200)<br />
Befestigungsmaterial (für CC-MT300)<br />
Guarnizioni da montare (per CC-ED200)<br />
Guarnizioni da montare (per CC-MT300)<br />
Kabelbevestigingset (voor CC-ED200)<br />
Kabelbevestigingset (voor CC-MT300)<br />
Elementos de fijación (para CC-ED200)<br />
Elementos de fijación (para CC-MT300)<br />
#169-9751 #169-6280<br />
Attachment Kit (For Extra Large Fork)<br />
Universal Sensor Band<br />
Kit de Gamitures (Pour fourche extra large)<br />
Collier Détecteur Universel<br />
Befestigungsmaterial (Für besonders große Gebeln) Universalmontageband für Sensor<br />
Guarnizioni da montare (Per forcelle "extra large") Fascetta universale per fissaggio sensore<br />
Kabelbevestigingset (Voor extra dikke vork)<br />
Universele vorkklem<br />
Elementos de fijación (Para horquilla extra larga)<br />
Banda Sensor Universal<br />
#169-9760 #166-5120<br />
Wheel Magnet for Composit Wheel<br />
Wheel Magnet<br />
Pour roue composite<br />
Aimant de Roue<br />
Für Verbundräder<br />
Radmagnet<br />
Magnete per ruote<br />
Magnete per ruota<br />
Voor o.a, carbonwielen<br />
Wielmagneet<br />
Para rueda de palos<br />
Imán de Rueda<br />
#166-5150<br />
Lithium Battery (CR2032)<br />
Pile au Lithium (CR2032)<br />
Lithiumbatterie (CR2032)<br />
Batteria al litio (CR2032)<br />
Lithiumbatterij (CR2032)<br />
Batería de Litio (CR2032)
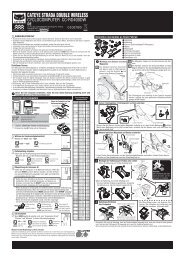
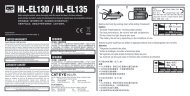
E<br />
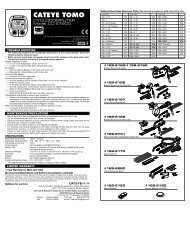
OPERATING INSTRUCTIONS<br />
SET<br />
A. Upper Display<br />
(Usually Current Speed)<br />
B. Mode Symbol<br />
C. Average Pace Arrow<br />
D. Speed Scale<br />
E. Auto Mode Symbol<br />
F. Wheel Selection Symbol<br />
G. Lower Display<br />
(Selected Function)<br />
H. Mode Button<br />
I. S Button (Start/Stop)<br />
J. SET Button<br />
K. Battery Cover<br />
L. Contact<br />
Precautions<br />
• Don't pay too much attention to your computer functions while riding. Keep your <strong>eye</strong>s on<br />
the road and pay attention to traffic conditions.<br />
• Securely attach the magnet, sensor and bracket to your bicycle. Periodically check if the<br />
screws and secure bands have loosened.<br />
• Safely dispose of the old battery. Do not place it within children's reach. If swallowed by<br />
mistake, consult a doctor immediately.<br />
• Do not leave the main unit exposed to direct sunlight. Never disassemble the main unit.<br />
• For cleaning, use neutral detergent on soft cloth, and wipe off with dry cloth. Do not<br />
apply paint thinner, benzine or alcohol, to avoid damages on the surface.<br />
• If there is mud, sand or the like clogged between the button and the body, button operation<br />
can become impaired. Softly wash away such objects with water.<br />
• Before each ride, insure the computer is completely and securely mounted to the<br />
bracket.<br />
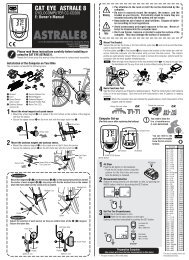
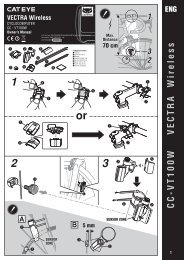
HOW TO ATTACH TO BICYCLE<br />
Refer to the "Installation Manual".<br />
MAIN UNIT PREPARATION<br />
Using this unit After<br />
for the first time replacing battery<br />
All Clear Operation<br />
Press all the three buttons simultaneously.<br />
All displays illuminate, and then "K" symbol flashes.<br />
Speed Scale Selection<br />
Press MODE button and select "K"(=km) or "M"(=mile).<br />
Odo Data Input<br />
Hold down MODE button to reach Odo input display.<br />
Input the figure by MODE button.<br />
Press S button to change the flickering digit.<br />
Press S or SET button to fix it<br />
Wheel Circumference Setting<br />
Input wheel circumference A<br />
by S button (–) or MODE button (+).<br />
For inputting wheel circumference B, hold down SET button;<br />
the display changes to B. Input the figure in the same way.<br />
Press SET button to fix it<br />
Preparation Completed<br />
Set the Clock time<br />
All Clear Operation<br />
SET (on back)<br />
S<br />
When<br />
When<br />
SET (on back)<br />
S<br />
Press all<br />
the three buttons<br />
simultaneously.<br />
MODE<br />
Wheel circumference setting is the<br />
actual distance in centimeters on<br />
the ground of one wheel revolution<br />
measures. For the most accurate<br />
settings, do this roll-out. Otherwise,<br />
consult the Cross Reference Table<br />
for approximate setting.<br />
MODE<br />
is on:<br />
is off:<br />
In Wheel Circumference Setting Display:<br />
If SET button is pressed in Odo display (stop state),<br />
wheel circumference setting display appears.<br />
S<br />
SET (on back)<br />
In Measuring Functions:<br />
When measuring, the speed scale flashes.<br />
L<br />
Button Operation<br />
Just press<br />
Hold down<br />
(2 sec.)<br />
MODE<br />
In Tm, Av and Dst(1, 2) display<br />
Switches on/off<br />
Moves between wheel<br />
circumference and<br />
(How the display changes<br />
by MODE button)<br />
Tm<br />
Moves to the next function<br />
Moves to the next function Av Mx<br />
Shifts Tm/Av/Mx data to<br />
the upper display<br />
Starts/stops measuring<br />
Dst1 Dst2 Odo<br />
Shifts Tm/Av/Mx data to the upper display<br />
In Clock Time Setting Display:<br />
If SET button is pressed in (stop state), clock time setting display<br />
appears.<br />
SET (on back)<br />
Completes setting Ready for measuring<br />
Moves between wheel circumference A and B<br />
Increases the figure by one Wheel Circumference A & B<br />
Rapidly increases the figure<br />
Decreases the figure by one<br />
Rapidly decreases the figure<br />
S<br />
MODE<br />
Completes setting<br />
Ready for measuring<br />
Increases the figure by one<br />
Rapidly increases the figure<br />
Moves from hour digits<br />
to minute digits<br />
When "M" (=Mile) was chosen for speed<br />
scale, the clock time is in 12-hour. If "K"<br />
(=Km), the clock time is 24-hour.<br />
(Can switch between A & B any time)<br />
A: Best for road bikes and riding [Initial figure =210 cm]<br />
B: Best for MTB riding and low speed sensitivity<br />
[Initial figure =205 cm]<br />
When MODE button and S button are pressed<br />
simultaneously in Odo display, first the wheel<br />
circumference value appears. If these buttons are<br />
further held down for more than 3 seconds, the wheel<br />
circumference moves between A or B.<br />
Reset Operation<br />
S<br />
MODE<br />
Press S and MODE buttons<br />
simultaneously for 1 second<br />
Data to be reset:<br />
In Tm, Av, Mx, Dst1 and display:<br />
---- Resets Tm, Av, Mx and Dst1 data all together<br />
In Dst2 display: -------------- Resets only Dst2 data<br />
Spd Current Speed<br />
Wheel A: 0.0(3.0)-65 mph ±1 mph(under 31 mph)[0.0(4.0)-105km/h ±1km/h]<br />
Wheel B: 0.0(2.0)-65 mph ±1 mph(under 31 mph)[0.0(2.5)-105km/h ±1km/h]<br />
Usually displayed on the upper display and updated once a second. When Av<br />
or Mx data is shifted to the upper display, Spd shifts to the lower display.<br />
Average Pace Arrow<br />
Shows whether the current speed is faster or slower than the average<br />
speed. ------ Faster than the average speed<br />
------ Slower than the average speed<br />
When the average speed is zero, or when in the stop state, no pacer<br />
symbol appears.<br />
Odo Total Distance (Odometer)<br />
0.0 - 9999.9 /10000 - 99999 mile[km] ±0.1 mile[km]<br />
Continuously measured until battery wears down. Displayed with 0.1<br />
resolution up to 9999.9 km and with 1.0 resolution up to 99999 km. (With<br />
all clear operation, it returns to zero; to continue accumulation of data,<br />
input the previous Odo data after all clear operation.)<br />
Dst(1, 2) Trip Distance(1, 2)<br />
0.00 - 999.99 mile[km] ±0.01 mile[km]<br />
The trip distance from start to current point is displayed. Two different<br />
start points can be set (Dst1 and Dst2). Dst2 is best for measuring a sectional<br />
distance. With Reset operation, it returns to zero. [Reset of Dst1 is<br />
always done with reset of Tm, Av and Mx all together. Reset of Dst2 is<br />
done independently of the other reset and does not affect the other data.]<br />
Tm Elapsed Time<br />
0:00'00" - 9:59'59" ±0.003 %<br />
Elapsed time is measured from start to current point, in units of hours,<br />
minutes and seconds. At 10 hours, it returns to zero and counting begins<br />
anew. With the press of S button, Tm data shifts to the upper display. In<br />
this case, the lower display shows the hour digits of Tm data (instead of<br />
Spd). With Reset operation, it returns to zero.<br />
Av Average Speed<br />
0.0 - 65 mph [105 km/h] ±0.3 mph [km/h]<br />
The average speed from start to current point is displayed. If the elapsed<br />
time exceeds 27 hours or Dst1 exceeds 999.99km, (.E) is displayed and<br />
calculation ceases. With the press of S button, Av data shifts to the upper<br />
display. In this case, Spd data is shifted to the lower display. With reset<br />
operation, it returns to zero.<br />
Mx Maximum Speed<br />
0.0(3.0) - 65 mph [105 km/h] ±1 mph [km/h]<br />
Displays the highest recorded speed. With the press of S button, Mx data<br />
shifts to the upper display. In this case, Spd data is shifted to the lower<br />
display. With reset operation, it returns to zero.<br />
Clock time<br />
1:00' - 12:59' or 0:00' - 23:59' ±0.003 %<br />
If "M" is selected for speed scale, the clock time is in 12 hour. If "K", the<br />
clock time is 24 hour.<br />
Automatic Start/Stop Function<br />
When the symbol is on, the unit automatically starts and stops measuring while a wheel<br />
pulse is detected. (See the above “In Measuring Functions” for how to switch on/off .)<br />
Power Saving Function<br />
When the main unit does not receive a signal, or a button has not been pressed for 60-70<br />
minutes, the power supply is shut down and the main unit will only display the clock. By<br />
pressing either MODE or S button, or by receiving signal, this function is released.<br />
Maintenance<br />
When the main unit or the contact gets wet, dry it off with a cloth; rust will cause functional<br />
errors.<br />
Trouble Shooting<br />
No display.<br />
Has the battery in the main unit worn out?<br />
Replace it with a new one.<br />
Incorrect data appears or the screen is frozen.<br />
Do "All Clear" operation. (If possible, write down the Odo data before all clear operation,<br />
and input it again after the display returns normal.)<br />
Current speed does not appear. (When current speed does not appear, first short-circuit the<br />
contact on the back with metal; if the speed display appears, the main unit is normal and the<br />
problem must be in the bracket or the sensor.)<br />
Is there anything on the contact of the main unit or of the bracket?<br />
Wipe the contact clean. DO NOT use abrasives, sandpaper, etc.<br />
Is the distance between the sensor and the magnet too far?<br />
Are the marking line of the sensor and the center of magnet aligned?<br />
Adjust the position of the sensor and magnet again.<br />
Is the wire broken?<br />
Replace it with a new one.<br />
Dst1<br />
Dst2<br />
Tm moves up as<br />
Main Display<br />
Av moves up as<br />
Main Display<br />
Mx moves up as<br />
Main Display<br />
Close<br />
Open<br />
How to Replace Battery<br />
Insert a new lithium battery (CR2032) with the (+) pole upward. Perform<br />
ALL CLEAR OPERATION after replacing the battery.<br />
In order to continue accumulation of Odo data, write down the stored<br />
Odo before replacing the battery.<br />
Continuing Accumulation of Odo Data<br />
Although the Odo data returns to zero by all clear operation, you can<br />
continue accumulation of data by inputting the previous Odo data.<br />
Be sure to write down the data before replacing the battery.<br />
Specifi<strong>cat</strong>ions<br />
Applicable Wheel Circumference --- 100cm - 300cm<br />
Applicable Fork Diameter ------------ ED200; 11ø to 40ø (Sensor Band S: 11-26ø, Sensor Band L: 21-40ø)<br />
---------------------------------------------- MT300; 11ø to 36ø (Sensor Band S: 11-26ø, Sensor Band L: 21-36ø)<br />
Length of Wire -------------------------- 70cm<br />
Power Supply ---------------------------- Lithium Battery (CR2032) x 1<br />
Battery Life ------------------------------- Approx. 3 years<br />
(The life of the first factory-loaded battery may be shorter than this period.)<br />
Dimension/Weight ---------------------- 1-13/16” x 1-17/32” x 9/32” [46 x 39 x 17mm] / 0.92 oz [26 g]<br />
* The specifi<strong>cat</strong>ions and design are subject to change without notice.
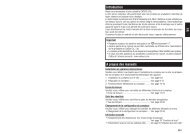
CAT EYE MITY3<br />
CC-MT300<br />
®<br />
E<br />
1<br />
8<br />
5<br />
6<br />
5<br />
2<br />
4<br />
3<br />
9<br />
7<br />
0<br />
2<br />
3<br />
1<br />
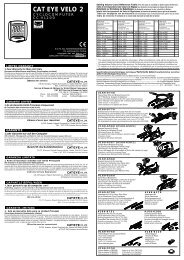
1 Bracket<br />
2 Wire<br />
3 Sensor<br />
4 Sensor Bands-A<br />
5 Sensor Band-B<br />
6 Magnet<br />
7 Sensor Band Rubber Pad<br />
8 Bracket Rubber Pad<br />
9 Nylon Tie<br />
0 Sensor Band Screw<br />
1 4<br />
Test<br />
Slide the main unit onto the bracket according to " How to Attach Main Unit to<br />
Bracket" (below). Make sure the computer is fully attached to the bracket. Spin the<br />
front wheel and check if the speed display appears. (If not, adjust the relative positions<br />
of magnet and sensor again.) Fasten the sensor securely, and remove the<br />
main unit.<br />
6<br />
2<br />
5<br />
Attach the sensor temporarily.<br />
Note: Sensor Band-A<br />
(Small) --------- 11Ø-26Ø<br />
(Large) --------- 21Ø-36Ø<br />
5<br />
9 9<br />
Secure the wire along the fork with the<br />
nylon ties 9, and wind it round the brake<br />
cable(3) up to the handlebar.<br />
Note: Allow enough wire length in the<br />
area marked with in the illustration,<br />
to insure full movement<br />
and unhindered operation of the<br />
handlebar.<br />
3<br />
7<br />
4<br />
1<br />
(3)<br />
3<br />
3<br />
(2)<br />
9<br />
1<br />
8<br />
6<br />
(1)<br />
Test the alignment of the magnet and sensor with the main unit attached.<br />
Align the magnet's center(1) and the<br />
sensor's marking line(2). Make sure of<br />
approx. 2mm clearance between the magnet<br />
6 and sensor 3.<br />
3<br />
6<br />
(1)<br />
2mm<br />
(2)<br />
(4)<br />
How to Attach Main Unit to<br />
Bracket<br />
Slide main unit onto the bracket from front until<br />
it clicks into position. To remove, pull it off forward<br />
while pushing down the lever(4).
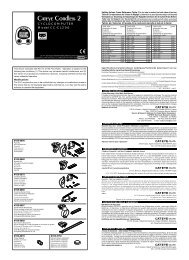
1<br />
SET button<br />
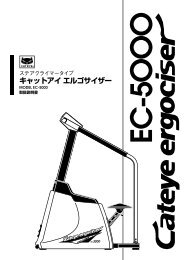
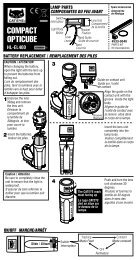
ORIGINAL SET UP FOR THE MITY 3 AND ENDURO 2<br />
ALL CLEAR<br />
OPERATION<br />
ST./STOP<br />
button (S)<br />
MODE button<br />
K (km/h)= 24hr. clock<br />
M (mph) = 12hr. clock<br />
L cm<br />
decrease the digits<br />
increase the digits<br />
on back<br />
SET UP<br />
FOR<br />
RIDING<br />
To set up your computer for the first time,<br />
perform an ALL CLEAR OPERATION first<br />
by pressing ALL THREE BUTTONS AT<br />
THE SAME TIME.<br />
Hint: Hold the computer upside down<br />
holding the MODE and START/<br />
STOP (S) Buttons DOWN. Now<br />
PRESS the SET Button with a pencil<br />
or other pointed object.<br />
2<br />
BUTTON NAVIGATION<br />
Time<br />
The complete screen will light up for a moment<br />
and then all fade away. The only<br />
thing on the screen will be a flashing "K".<br />
Select the speed scale you would like by<br />
pressing the MODE Button. "K" for kilometers<br />
and "M" for miles per hour. Note that<br />
the speed scale you select DICTATES<br />
CLOCK function in 12 or 24 hours. "K" will<br />
select a 24 hour clock. "M" will select a 12<br />
hour clock.<br />
Set the speed scale by PRESSING the<br />
ST./STOP (S) Button.<br />
Average<br />
Speed<br />
The number "210" will flash. This is a preset<br />
tire setting for 700X23C tires. Refer to<br />
the tire calibration chart in your manual or<br />
on our web site .<br />
Please note that this number is actually the<br />
DISTANCE in Centimeters your tire rolls<br />
with each revolution while you are on the<br />
bike. If you want to input the most accurate<br />
number you will need to do a wheel<br />
roll out.<br />
Distance<br />
One<br />
Increase the digits by PRESSING the<br />
MODE Button. Decrease the number by<br />
PRESSING the ST./STOP (S) Button. Set<br />
the number by PRESSING the SET Button<br />
on the back.<br />
Your computer is now set up for riding.<br />
Time<br />
2 sec.<br />
Clock<br />
The right Button is the MODE Button. The left button<br />
is the START/STOP (S) Button. You use the<br />
MODE Button to navigate through the modes.<br />
From the ELAPSED TIME function<br />
(Tm on the computer<br />
screen), you can PRESS the<br />
MODE Button to access the AV- ST./STOP(S) MODE<br />
ERAGE SPEED function (Av).<br />
PRESS the MODE Button to access the DISTANCE<br />
ONE (Dst1) function. This is the standard ride distance<br />
function. Now PRESS the MODE Button to get back to<br />
the TIME (Tm) function.<br />
2 sec. 2 sec.<br />
Max<br />
Speed<br />
TIME has a sub-function of CLOCK. You<br />
access this by PRESSING and HOLD-<br />
ING the MODE Button for 2 Seconds. To<br />
get out of the CLOCK press the MODE<br />
Button. You are now back in TIME.<br />
AVERAGE SPEED (Av) has a sub-function<br />
of MAXIMUM SPEED (Mx). To access<br />
MAX SPEED PRESS and HOLD<br />
the MODE Button when in AVERAGE<br />
SPEED. To get out of MAX SPEED<br />
PRESS the MODE Button.<br />
2 sec.<br />
Distance<br />
Two<br />
Odometer<br />
DISTANCE ONE (Dst1) has two sub-functions.<br />
PRESS and HOLD the MODE Button for 2 seconds<br />
to access DISTANCE TWO (Dst2).<br />
DISTANCE TWO is a separate Trip Distance that<br />
can be reset without resetting the other functions.<br />
To reset DISTANCE TWO, PRESS and HOLD the<br />
ST./STOP (S) and MODE Button for ONE SEC-<br />
OND.<br />
From DISTANCE TWO (Dst2) you can access the<br />
ODOMETER function (Odo). PRESS and HOLD<br />
the MODE Button for TWO SECONDS in DIS-<br />
TANCE TWO and you will now be in ODOMETER<br />
(Odo.).<br />
To navigate out of either of these two sub-functions<br />
to DISTANCE ONE, press the mode button.<br />
Resetting TIME and DISTANCE<br />
functions<br />
To reset the TIME, DISTANCE<br />
ONE, AVERAGE and MAX<br />
SPEEDS, PRESS AND HOLD<br />
the MODE and ST./STOP (S)<br />
Buttons for ONE SECOND.<br />
1 sec.<br />
DISTANCE TWO (Dst2) can<br />
only be reset while in DIS-<br />
TANCE TWO.<br />
AUTO MODE<br />
You can set the computer to record TIME,<br />
DISTANCE, MAX and AVERAGE SPEED<br />
automatically (AUTO MODE) or manually<br />
(STANDARD MODE).<br />
In STANDARD MODE you must press the<br />
ST./STOP (S) Button to begin recording<br />
TIME and DISTANCE.<br />
In AUTO MODE (AT) the computer starts<br />
and stops when ever it records a signal<br />
from the sensor at the wheel.<br />
To set the computer to AUTO MODE with<br />
the computer in the DISTANCE function or<br />
TIME function, press the SET Button on<br />
the back of the computer. A small symbol<br />
with the letters AT will appear on the<br />
screen indi<strong>cat</strong>ing AUTO MODE. You take<br />
the computer out of AUTO MODE the<br />
same way.<br />
DISTANCE, AVERAGE<br />
or TIME function<br />
on back<br />
Setting the CLOCK<br />
To set the CLOCK the computer must be<br />
turned off and the speed scale symbol (either<br />
M for Miles or K for Kilometers) must<br />
not be flashing. In the Time function<br />
PRESS AND HOLD the MODE Button.<br />
You will see little CLOCK symbol. Now<br />
PRESS the SET Button on the back of the<br />
computer. The hours will start flashing.<br />
The MODE Button advances the digits.<br />
The ST./STOP (S) Button changes from<br />
Hours to Minutes. PRESS the SET Button<br />
on the back to set the CLOCK.<br />
The CLOCK is set to either 24 HOUR or 12<br />
HOUR depending on the SPEED SCALE<br />
selected. In K (Kilometers per hour) a 24<br />
HOUR CLOCK is selected. In M (Mile per<br />
hour) a 12 HOUR CLOCK is selected.<br />
Clock<br />
STOP<br />
on back<br />
STATE<br />
change from Hours<br />
to Minutes<br />
advance the digits<br />
Moving TIME, AVERAGE and<br />
MAX SPEED to upper display<br />
When the computer is set in AUTO MODE<br />
(AT), the functions of TIME, AVERAGE<br />
and MAX SPEED can be switched to the<br />
upper display by PRESSING the ST./<br />
STOP (S) Button. You can move SPEED<br />
back to the upper display by pressing the<br />
ST./STOP (S) Button again.<br />
Time<br />
2 sec.<br />
In STANDARD MODE (AT symbol<br />
is off) PRESS and HOLD<br />
ST./STOP (S) Button for 2 seconds.<br />
WHEEL SETTING A or B<br />
The computer has two wheel settings for<br />
quickly and conveniently moving the between<br />
two bikes with different size of tires.<br />
You can tell which WHEEL SETTING you<br />
are in by the semicircle symbol with an "A"<br />
or "B" on the computer screen. Wheel setting<br />
"A" has been preset with a tire size for a<br />
700 X 23C road tire. Wheel setting "B" is<br />
preset for a mountain bike tire of 26 x 1.95.<br />
Wheel setting "B" is also specifically programed<br />
for low speed sensitivity. If you are<br />
using the computer on a mountain bike we<br />
recommend that you use Wheel setting "B".<br />
To select Wheel setting "A" or "B", HOLD<br />
the SET Button except in ODOMETER<br />
function.<br />
on back<br />
CHANGING the WHEEL SETTING<br />
CALIBRATION NUMBER<br />
When you are in the ODOMETER (Odo)<br />
function, you can view the WHEEL CALI-<br />
BRATION NUMBER by PRESSING the<br />
ST./STOP (S) and the MODE Button.<br />
To change the CALIBRATION NUMBER<br />
PRESS the SET Button on the back of the<br />
computer in ODOMETER (Odo) function.<br />
The WHEEL CALIBRATION NUMBER will<br />
flash on the screen. PRESS the MODE<br />
Button to increase the digits. PRESS the<br />
ST./STOP (S) button to decrease the digits.<br />
PRESS the SET Button on the back to<br />
set the new number.<br />
Odometer<br />
STOP<br />
STATE<br />
on back<br />
decrease the digits<br />
increase the digits<br />
REPLACING MILEAGE INTO THE<br />
ODOMETER<br />
This is done after replacing the battery in<br />
the unit or for transferring mileage from<br />
another computer.<br />
First PRESS ALL THREE BUTTONS, the<br />
MODE Button, the ST./STOP (S) Button<br />
and the SET Button on the back. Now the<br />
"K" flashes indi<strong>cat</strong>ing speed scale.<br />
PRESS the MODE Button to select between<br />
"K" for Kilometers or "M" for Miles<br />
per hour reading.<br />
To add previous mileage or kilometers you<br />
must NOW PRESS AND HOLD the MODE<br />
Button. ".0" will be flashing. Input the<br />
number with the MODE Button. PRESS<br />
the ST./STOP (S) Button to change to the<br />
next digit. You will be able to set distance<br />
up to 00,000.0 digits. Now press the SET<br />
Button on the back.<br />
change to the next<br />
digit<br />
Input the number<br />
Now you must input your tire calibration<br />
number. Please note that this number is<br />
actually the DISTANCE in Centimeters<br />
your tire rolls with each revolution while<br />
you are on the bike.