

Direct support and general support maintenance manual including
Direct support and general support maintenance manual including
Direct support and general support maintenance manual including

You also want an ePaper? Increase the reach of your titles
YUMPU automatically turns print PDFs into web optimized ePapers that Google loves.
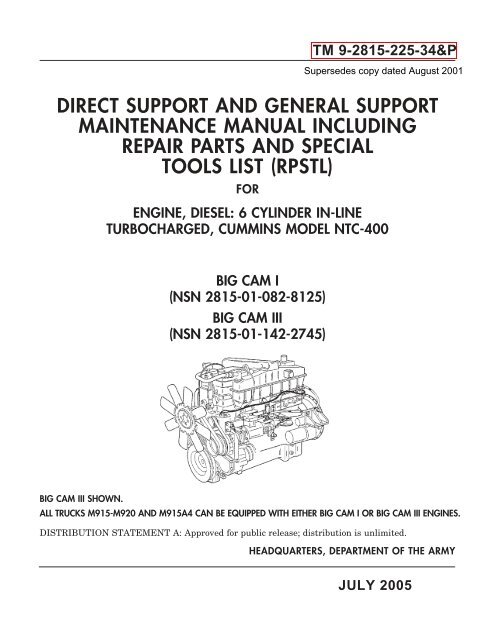
TM 9-2815-225-34&P<br />
Supersedes copy dated August 2001<br />
DIRECT SUPPORT AND GENERAL SUPPORT<br />
MAINTENANCE MANUAL INCLUDING<br />
REPAIR PARTS AND SPECIAL<br />
TOOLS LIST (RPSTL)<br />
FOR<br />
ENGINE, DIESEL: 6 CYLINDER IN-LINE<br />
TURBOCHARGED, CUMMINS MODEL NTC-400<br />
BIG CAM I<br />
(NSN 2815-01-082-8125)<br />
BIG CAM III<br />
(NSN 2815-01-142-2745)<br />
BIG CAM III SHOWN.<br />
ALL TRUCKS M915-M920 AND M915A4 CAN BE EQUIPPED WITH EITHER BIG CAM I OR BIG CAM III ENGINES.<br />
DISTRIBUTION STATEMENT A: Approved for public release; distribution is unlimited.<br />
HEADQUARTERS, DEPARTMENT OF THE ARMY<br />
JULY 2005
TM 9-2815-225-34&P<br />
WARNING SUMMARY<br />
Operating a deadlined vehicle without preliminary inspection will cause further damage to a<br />
malfunctioning component <strong>and</strong> possible injury to personnel.<br />
Use extreme care when h<strong>and</strong>ling heavy parts. Provide adequate <strong>support</strong> <strong>and</strong> use assistance during<br />
procedure. Ensure that any lifting device used is in good operating condition <strong>and</strong> of suitable load<br />
capacity. Keep clear of heavy components <strong>support</strong>ed only by lifting device. Failure to comply may result<br />
in death or injury to personnel.<br />
Compressed air used for cleaning purposes must not exceed 30 psi. Use only with effective chip<br />
guarding <strong>and</strong> personal protective equipment (goggles/shield, gloves, etc.). Failure to comply may result<br />
in death or injury to personnel.<br />
When removing hood tilt assist cables, hood must be <strong>support</strong>ed. Failure to comply may result in<br />
damage to equipment or injury to personnel.<br />
Use pry bars to free engine hangups or snags. Do not use h<strong>and</strong>s. Failure to comply may result in<br />
damage to equipment or death or injury to personnel.<br />
Use extreme care during engine accessory removal. Engine parts are heavy. Failure to comply may<br />
result in death or injury to personnel.<br />
Eye protection must be worn when using wire brush for cleaning. Failure to comply may result in<br />
injury to personnel.<br />
Wear rubber gloves when removing piston pin to prevent burns from hot water or hot piston. Failure to<br />
comply may result in injury to personnel<br />
Oil pump pressure regulator spring is under tension. Remove oil pump pressure regulator slowly <strong>and</strong><br />
wear proper eye protection. Failure to comply may result in injury to personnel.<br />
Oil pump pressure regulator spring is under tension. Install oil pump pressure regulator screw slowly<br />
<strong>and</strong> wear proper eye protection. Failure to comply may result in injury to personnel.<br />
Oil pump pressure regulator spring is under tension. Remove oil pump bypass screw slowly <strong>and</strong> wear<br />
proper eye protection. Failure to comply may result in injury to personnel.<br />
Turbine wheel machined edges are very sharp. Wear protective gloves when h<strong>and</strong>ling turbine wheel.<br />
Failure to comply may result in injury to personnel.<br />
Control valve cover is under control valve outer spring pressure. Hold cover securely when removing<br />
screws. Failure to comply may cause injury to personnel.<br />
Slave piston spring is highly compressed. Be extremely careful during disassembly. Personal injury can<br />
occur if spring force is not controlled.<br />
Use gloves during piston pin installation if piston has been soaked in hot water. Failure to comply may<br />
result in injury to personnel.<br />
Do not perform fuel system procedures while smoking or within 50 ft (15.2 m) of sparks or open flame.<br />
Diesel fuel is flammable <strong>and</strong> may explode. Failure to comply may result in injury or death to personnel.<br />
a
TM 9-2815-225-34&P<br />
WARNING SUMMARY (Contd)<br />
Allow adequate ventilation for engine exhaust gases. Do not perform fuel system procedures while<br />
smoking or within 50 ft (15.2 m) of sparks or open flame. Diesel fuel is flammable <strong>and</strong> may explode.<br />
Failure to comply may result in serious injury or death to personnel.<br />
Use extreme caution during disassembly or assembly; engine components are heavy. Failure to comply<br />
may result in damage to equipment or injury to personnel.<br />
All personnel must st<strong>and</strong> clear during lifting operations. A snapped chain or swinging or shifting load<br />
may result in injury to personnel.<br />
When installing hood tilt assist cables, hood must be <strong>support</strong>ed. Failure to comply may result in<br />
damage to equipment or injury to personnel.<br />
Compressed air source must not exceed 30 psi (207 kPa). Wear eyeshields when cleaning with<br />
compressed air. Failure to comply may result in injury to personnel.<br />
b
TM 9-2815-225-34&P<br />
LIST OF EFFECTIVE PAGES/WORK PACKAGES<br />
The date of issue for original pages/work pages for this TM is:<br />
Original 21 July 2005<br />
TOTAL NUMBER OF PAGES IN THIS PUBLICATION IS 651.<br />
TOTAL NUMBER OF WORK PACKAGES IS 62.<br />
THE PAGES/WORK PACKAGES CONSIST OF THE FOLLOWING:<br />
Page No. . . . . . . . . . . . . .Change No. *<br />
Warning a–Warning b . . . . . . . . . . . . . .0<br />
A . . . . . . . . . . . . . . . . . . . . . . . . . . . . . . . .0<br />
B blank . . . . . . . . . . . . . . . . . . . . . . . . . . .0<br />
i . . . . . . . . . . . . . . . . . . . . . . . . . . . . . . . . .0<br />
ii blank . . . . . . . . . . . . . . . . . . . . . . . . . . .0<br />
iii–vii . . . . . . . . . . . . . . . . . . . . . . . . . . . . .0<br />
viii blank . . . . . . . . . . . . . . . . . . . . . . . . .0<br />
WP 0001 00–WP 0062 00 . . . . . . . . . . .0<br />
Index 1–Index 3 . . . . . . . . . . . . . . . . . . .0<br />
Index 4 blank . . . . . . . . . . . . . . . . . . . . .0 0<br />
*Zero in this column indicates original page.<br />
A/B blank
TM 9-2815-225-34&P<br />
*Supersedes copy dated 28 August 2001<br />
HEADQUARTERS,<br />
DEPARTMENT OF THE ARMY<br />
WASHINGTON, D.C., 21 July 2005<br />
DIRECT SUPPORT AND GENERAL SUPPORT<br />
MAINTENANCE MANUAL INCLUDING<br />
REPAIR PARTS AND SPECIAL<br />
TOOLS LIST (RPSTL)<br />
FOR<br />
ENGINE, DIESEL: 6 CYLINDER IN-LINE<br />
TURBOCHARGED, CUMMINS MODEL NTC-400<br />
BIG CAM I<br />
(NSN 2815-01-082-8125)<br />
BIG CAM III<br />
(NSN 2815-01-142-2745)<br />
ALL TRUCKS M915-M920 AND M915A4 CAN BE EQUIPPED WITH EITHER BIG CAM I OR<br />
BIG CAM III ENGINES.<br />
REPORTING ERRORS AND RECOMMENDING IMPROVEMENTS<br />
You can help improve this publication. If you find any mistakes or if you know of a way to<br />
improve the procedures, please let us know. Submit your DA Form 2028 (Recommended<br />
Changes to Publications <strong>and</strong> Blank Forms), through the Internet, on the Army Electronic<br />
Product Support (AEPS) website. The Internet address is http://aeps.ria.army.mil. If you<br />
need a password, scroll down <strong>and</strong> click on “ACCESS REQUEST FORM.” The DA Form 2028<br />
is located in the ONLINE FORMS PROCESSING section of the AEPS. Fill out the form <strong>and</strong><br />
click on SUBMIT. Using this form on the AEPS will enable us to respond quicker to your<br />
comments <strong>and</strong> better manage the DA Form 2028 program. You may also mail, fax or E-mail<br />
your letter or DA Form 2028 direct to: AMSTA-LC-CI Tech Pubs, TACOM-RI, 1 Rock Isl<strong>and</strong><br />
Arsenal, Rock Isl<strong>and</strong>, IL 61299-7630. The E-mail address is TACOM-TECH-<br />
PUBS@ria.army.mil. The fax number is DSN 793-0726 or Commercial (309) 782-0726.<br />
DISTRIBUTION STATEMENT A: Approved for public release; distribution is unlimited.<br />
i/ii blank
TM 9-2815-225-34&P<br />
TABLE OF CONTENTS<br />
Work Package/Page No.<br />
How to Use This Technical Manual (TM) . . . . . . . . . . . . . . . . . .<br />
v<br />
CHAPTER 1 GENERAL INFORMATION, EQUIPMENT<br />
DESCRIPTION, AND THEORY OF OPERATION<br />
General Information . . . . . . . . . . . . . . . . . . . . . . . . . . . . . . . . . . . WP 0001 00-1<br />
Equipment Characteristics, Capabilities, <strong>and</strong> Features . . . . . . . WP 0002 00-1<br />
Theory of Operation . . . . . . . . . . . . . . . . . . . . . . . . . . . . . . . . . . . . WP 0003 00-1<br />
CHAPTER 2 TROUBLESHOOTING PROCEDURES<br />
Engine Troubleshooting . . . . . . . . . . . . . . . . . . . . . . . . . . . . . . . . . WP 0004 00-1<br />
CHAPTER 3 MAINTENANCE INSTRUCTIONS<br />
Preventive Maintenance Checks <strong>and</strong><br />
Services (PMCS) Introduction . . . . . . . . . . . . . . . . . . . . . . . . . . WP 0005 00-1<br />
Preventive Maintenance Checks <strong>and</strong><br />
Services (PMCS) Instructions . . . . . . . . . . . . . . . . . . . . . . . . . . WP 0006 00-1<br />
Big Cam I Engine Removal . . . . . . . . . . . . . . . . . . . . . . . . . . . . . . WP 0007 00-1<br />
Big Cam III Engine Removal . . . . . . . . . . . . . . . . . . . . . . . . . . . . WP 0008 00-1<br />
Mounting Engine on Maintenance St<strong>and</strong> . . . . . . . . . . . . . . . . . . . WP 0009 00-1<br />
Engine Accessories Removal . . . . . . . . . . . . . . . . . . . . . . . . . . . . . WP 0010 00-1<br />
Cylinder Head <strong>and</strong> Cylinder Head Components Removal . . . . . WP 0011 00-1<br />
Cylinder Block Components Removal . . . . . . . . . . . . . . . . . . . . . . WP 0012 00-1<br />
Cylinder Block . . . . . . . . . . . . . . . . . . . . . . . . . . . . . . . . . . . . . . . . WP 0013 00-1<br />
Cylinder Head . . . . . . . . . . . . . . . . . . . . . . . . . . . . . . . . . . . . . . . . WP 0014 00-1<br />
Vibration Damper <strong>and</strong> Crankshaft Pulley<br />
Cleaning <strong>and</strong> Inspection . . . . . . . . . . . . . . . . . . . . . . . . . . . . . . WP 0015 00-1<br />
Crankshaft Cleaning <strong>and</strong> Inspection . . . . . . . . . . . . . . . . . . . . . . WP 0016 00-1<br />
Flexplate, Flywheel, Flywheel Housing, <strong>and</strong> Rear Cover<br />
Cleaning <strong>and</strong> Inspection . . . . . . . . . . . . . . . . . . . . . . . . . . . . . . WP 0017 00-1<br />
Pistons, Connecting Rods, <strong>and</strong> Bearings . . . . . . . . . . . . . . . . . . . WP 0018 00-1<br />
Camshaft, Camshaft Followers, <strong>and</strong> Push Rods . . . . . . . . . . . . . WP 0019 00-1<br />
Rocker Levers <strong>and</strong> Rocker Lever Housing . . . . . . . . . . . . . . . . . . WP 0020 00-1<br />
Oil Cooler . . . . . . . . . . . . . . . . . . . . . . . . . . . . . . . . . . . . . . . . . . . . WP 0021 00-1<br />
Oil Pan, Dipstick, Oil Suction Tubes, <strong>and</strong> Breather Tube . . . . . WP 0022 00-1<br />
Oil Pump . . . . . . . . . . . . . . . . . . . . . . . . . . . . . . . . . . . . . . . . . . . . . WP 0023 00-1<br />
Air Aftercooler . . . . . . . . . . . . . . . . . . . . . . . . . . . . . . . . . . . . . . . . WP 0024 00-1<br />
Exhaust Manifold . . . . . . . . . . . . . . . . . . . . . . . . . . . . . . . . . . . . . . WP 0025 00-1<br />
Turbocharger . . . . . . . . . . . . . . . . . . . . . . . . . . . . . . . . . . . . . . . . . WP 0026 00-1<br />
Turbocharger HT-3B . . . . . . . . . . . . . . . . . . . . . . . . . . . . . . . . . . . WP 0027 00-1<br />
Front Gear Cover . . . . . . . . . . . . . . . . . . . . . . . . . . . . . . . . . . . . . . WP 0028 00-1<br />
Accessory Drive <strong>and</strong> Accessory Drive Pulley . . . . . . . . . . . . . . . . WP 0029 00-1<br />
Engine Retarder . . . . . . . . . . . . . . . . . . . . . . . . . . . . . . . . . . . . . . . WP 0030 00-1<br />
iii
TM 9-2815-225-34&P<br />
TABLE OF CONTENTS (Contd)<br />
Work Package/Page No.<br />
CHAPTER 3 MAINTENANCE INSTRUCTIONS (Contd)<br />
Air Compressor . . . . . . . . . . . . . . . . . . . . . . . . . . . . . . . . . . . . . . . . WP 0031 00-1<br />
Fuel Injector . . . . . . . . . . . . . . . . . . . . . . . . . . . . . . . . . . . . . . . . . . WP 0032 00-1<br />
Fuel Pump Disassembly . . . . . . . . . . . . . . . . . . . . . . . . . . . . . . . . WP 0033 00-1<br />
Solenoid Valve . . . . . . . . . . . . . . . . . . . . . . . . . . . . . . . . . . . . . . . . WP 0034 00-1<br />
Fuel Damper <strong>and</strong> Head . . . . . . . . . . . . . . . . . . . . . . . . . . . . . . . . . WP 0035 00-1<br />
Fuel Gear Pump . . . . . . . . . . . . . . . . . . . . . . . . . . . . . . . . . . . . . . . WP 0036 00-1<br />
Fuel Pump Governor Spring . . . . . . . . . . . . . . . . . . . . . . . . . . . . . WP 0037 00-1<br />
Fuel Pump Front Cover <strong>and</strong> Governor . . . . . . . . . . . . . . . . . . . . . WP 0038 00-1<br />
Fuel Pump Main Housing . . . . . . . . . . . . . . . . . . . . . . . . . . . . . . . WP 0039 00-1<br />
Fuel Pump Assembly . . . . . . . . . . . . . . . . . . . . . . . . . . . . . . . . . . . WP 0040 00-1<br />
Water Pump . . . . . . . . . . . . . . . . . . . . . . . . . . . . . . . . . . . . . . . . . . WP 0041 00-1<br />
Cylinder Block Components Installation . . . . . . . . . . . . . . . . . . . WP 0042 00-1<br />
Cylinder Head <strong>and</strong> Cylinder Head Components Installation . . . WP 0043 00-1<br />
Fuel Pump Testing <strong>and</strong> Calibration . . . . . . . . . . . . . . . . . . . . . . . WP 0044 00-1<br />
Engine Accessories Installation . . . . . . . . . . . . . . . . . . . . . . . . . . WP 0045 00-1<br />
Removing Engine from Maintenance St<strong>and</strong> . . . . . . . . . . . . . . . . WP 0046 00-1<br />
Engine Testing . . . . . . . . . . . . . . . . . . . . . . . . . . . . . . . . . . . . . . . . WP 0047 00-1<br />
Big Cam III Engine Installation . . . . . . . . . . . . . . . . . . . . . . . . . . WP 0048 00-1<br />
Big Cam I Engine Installation . . . . . . . . . . . . . . . . . . . . . . . . . . . WP 0049 00-1<br />
Big Cam III Modification Kit Installation Instructions . . . . . . . WP 0050 00-1<br />
General Maintenance Instructions . . . . . . . . . . . . . . . . . . . . . . . . WP 0051 00-1<br />
Illustrated List of Manufactured Items . . . . . . . . . . . . . . . . . . . . WP 0052 00-1<br />
Torque Limits . . . . . . . . . . . . . . . . . . . . . . . . . . . . . . . . . . . . . . . . . WP 0053 00-1<br />
Wear Limits . . . . . . . . . . . . . . . . . . . . . . . . . . . . . . . . . . . . . . . . . . WP 0054 00-1<br />
CHAPTER 4 SUPPORTING INFORMATION<br />
References . . . . . . . . . . . . . . . . . . . . . . . . . . . . . . . . . . . . . . . . . . . . WP 0055 00-1<br />
Repair Parts Introduction . . . . . . . . . . . . . . . . . . . . . . . . . . . . . . . WP 0056 00-1<br />
Repair Parts . . . . . . . . . . . . . . . . . . . . . . . . . . . . . . . . . . . . . . . . . . WP 0057 00-1<br />
Repair Parts <strong>and</strong> Special Tools List (RPSTL) . . . . . . . . . . . . . . . WP 0058 00-1<br />
National Stock Number (NSN) Index . . . . . . . . . . . . . . . . . . . . . . WP 0059 00-1<br />
Expendable <strong>and</strong> Durable Items . . . . . . . . . . . . . . . . . . . . . . . . . . . WP 0060 00-1<br />
Tools <strong>and</strong> Special Tools . . . . . . . . . . . . . . . . . . . . . . . . . . . . . . . . . WP 0061 00-1<br />
M<strong>and</strong>atory Replacement Parts . . . . . . . . . . . . . . . . . . . . . . . . . . . WP 0062 00-1<br />
Index . . . . . . . . . . . . . . . . . . . . . . . . . . . . . . . . . . . . . . . . . . . . . . . .<br />
Index-1<br />
iv
TM 9-2815-225-34&P<br />
HOW TO USE THIS<br />
TECHNICAL MANUAL (TM)<br />
INTRODUCTION<br />
This section explains the basic organization, contents, format, <strong>and</strong> special features of this Technical<br />
Manual (TM). After reading this section, spend some time reviewing the TM to familiarize yourself<br />
with the contents <strong>and</strong> layout. This will enable you to locate information easily <strong>and</strong> reduce the time<br />
needed to complete required procedures.<br />
ORGANIZATION AND CONTENTS<br />
This TM is divided into four main chapters. Chapter 1 presents <strong>general</strong> information <strong>and</strong> preliminary<br />
data; chapter 2 contains troubleshooting procedures; chapter 3 includes <strong>maintenance</strong> instructions; <strong>and</strong><br />
chapter 4 provides <strong>support</strong>ing tool, equipment, <strong>and</strong> parts information. The following table provides an<br />
overview of the material contained in each chapter of this TM.<br />
Table 1. TM Contents<br />
Chapter 1<br />
Chapter 2<br />
Chapter 3<br />
Chapter 4<br />
• Basic information about the component, along with <strong>general</strong> guidelines <strong>and</strong> criteria<br />
for inspection <strong>and</strong> repair or replacement<br />
• Detailed equipment description <strong>and</strong> data<br />
• Theory of operation<br />
• Detailed troubleshooting procedures<br />
• Detailed <strong>maintenance</strong> instructions for disassembly, inspection, repair or<br />
replacement, <strong>and</strong> assembly<br />
• Supporting information covering repair parts, expendable <strong>and</strong> durable items, tools<br />
<strong>and</strong> special tools, <strong>and</strong> m<strong>and</strong>atory replacement parts list<br />
You can locate specific information in the TM by using either the Table of Contents, located at the front<br />
of the TM, or the alphabetical subject Index, located at the back of the TM.<br />
v
TM 9-2815-225-34&P<br />
HOW TO USE THIS TECHNICAL MANUAL (TM) (Contd)<br />
FORMAT<br />
Work Package (WP) Format<br />
Each chapter in this TM is divided into WPs, which group data into st<strong>and</strong>-alone informational or taskoriented<br />
units. Here are some important things to know about the WP format:<br />
• Each WP has its own identification number, which appears in the upper right corner of each page.<br />
WPs are numbered sequentially throughout the <strong>manual</strong>.<br />
• Each WP starts with page number 1. Page numbers appear at the bottom of the pages, following<br />
the WP number.<br />
• Informational WPs begin with a listing of the specific topics covered, in the order in which they<br />
appear in the WP. This listing provides a quick overview of each WP <strong>and</strong> enables you to locate<br />
specific information easily.<br />
• Each task-oriented WP begins with an Initial Setup list that identifies all tools, m<strong>and</strong>atory<br />
replacement parts, personnel, <strong>and</strong> other materials needed to complete the procedure in the WP.<br />
Before you begin a procedure, review the Initial Setup information to ensure that all requirements<br />
have been met.<br />
• Task-oriented WPs (<strong>maintenance</strong> procedures) appear in the <strong>manual</strong> in the order of logical work<br />
sequence. This format makes the TM easy to follow <strong>and</strong> helps improve efficiency as you progress<br />
through the procedures.<br />
Text <strong>and</strong> Illustration Modular Layout<br />
Throughout this TM, <strong>maintenance</strong> procedures are set up in two-page modular layouts. This means that<br />
illustrations appear either on the same page as, or on the page facing, the step you are performing.<br />
This feature eliminates the need to search for illustrations that correlate with each procedural step.<br />
In addition, procedural text is cross-referenced to numerical callouts in the illustrations, helping you<br />
immediately identify <strong>and</strong> locate specific parts mentioned. Callout numbers referencing the illustrations<br />
appear in parentheses in the text.<br />
vi
TM 9-2815-225-34&P<br />
HOW TO USE THIS TECHNICAL MANUAL (TM) (Contd)<br />
SPECIAL FEATURES<br />
Illustration Features<br />
This TM utilizes a variety of illustration methods, such as locator views <strong>and</strong> exploded views, to help<br />
you locate <strong>and</strong> identify parts easily. Each illustration is identified by a title printed below it.<br />
The illustrations contain numerical callouts to identify parts, components, etc. mentioned in the text.<br />
Numerical callouts <strong>general</strong>ly appear in clockwise order in the illustrations, beginning at the 11 o’clock<br />
position.<br />
A special feature of this TM is that callout numbers for m<strong>and</strong>atory replacement parts are circled in<br />
the illustrations. This visually distinguishes m<strong>and</strong>atory replacement parts from those that may be<br />
repairable or otherwise reusable.<br />
Supporting Information<br />
The WPs at the end of this TM contain <strong>support</strong>ing information that <strong>support</strong>s the procedures in the<br />
TM. This information is cross-referenced in the Initial Setup list of each <strong>maintenance</strong> WP. The<br />
following supplemental information is included in this TM:<br />
• References—All publications referenced in this TM<br />
• Repair Parts Introduction—Specific introduction information regarding repair parts<br />
• Repair Parts—Source, Maintenance, <strong>and</strong> Recoverability (SMR) code; NSN; CAGEC; P/N; <strong>and</strong><br />
quantity for all parts required for the procedures in this TM<br />
• Expendable <strong>and</strong> Durable Items—National Stock Number (NSN), description, Commercial <strong>and</strong><br />
Governments Entity Code (CAGEC), Part Number (P/N), <strong>and</strong> description for all expendable <strong>and</strong><br />
durable items necessary to operate or maintain the equipment used in this TM<br />
• Tools <strong>and</strong> Special Tools—Name, P/N, <strong>and</strong> NSN for common <strong>and</strong> special tools required for the<br />
procedures in this TM<br />
• M<strong>and</strong>atory Replacement Parts—Names, P/N, <strong>and</strong> NSN for all parts that must be replaced during<br />
overhaul of the component; also includes cross-references to figure <strong>and</strong> item numbers in the<br />
Repair Parts WP<br />
vii/viii blank
TM 9-2815-225-34&P<br />
CHAPTER 1<br />
GENERAL INFORMATION, EQUIPMENT DESCRIPTION,<br />
AND THEORY OF OPERATION<br />
FOR<br />
ENGINE, DIESEL<br />
CUMMINS MODEL NTC-400<br />
M915, M915A1, M915A4,<br />
M916, M920 VEHICLES
TM 9-2815-225-34&P<br />
CHAPTER 1<br />
GENERAL INFORMATION, EQUIPMENT DESCRIPTION,<br />
AND THEORY OF OPERATION<br />
Work Package Title<br />
Work Package/Page No.<br />
General Information . . . . . . . . . . . . . . . . . . . . . . . . . . . . . . . . . WP 0001 00-1<br />
Equipment Characteristics, Capabilities, <strong>and</strong> Features . . . . . WP 0002 00-1<br />
Theory of Operation . . . . . . . . . . . . . . . . . . . . . . . . . . . . . . . . . . WP 0003 00-1
TM 9-2815-225-34&P 0001 00<br />
DIRECT SUPPORT AND GENERAL SUPPORT<br />
MAINTENANCE MANUAL<br />
INCLUDING REPAIR PARTS AND SPECIAL TOOLS LIST (RPSTL)<br />
FOR<br />
M915, M915A1, M915A4, M916, M920 VEHICLES<br />
NSN 2815-01-082-8125 P/N NTC400-3652-02 CUMMINS NTC-400 BIG CAM I DIESEL ENGINE<br />
W/CONTAINER<br />
NSN 2815-01-142-2745 P/N 11669835 CUMMINS NTC-400 BIG CAM III DIESEL ENGINE<br />
W/CONTAINER<br />
GENERAL INFORMATION<br />
THIS WORK PACKAGE (WP) COVERS:<br />
Scope; Maintenance Forms, Reporting Equipment Improvement Recommendations (EIRs); Corrosion<br />
Prevention <strong>and</strong> Control (CPC); Destruction of Army Materiel to Prevent Enemy Use; Preparation for<br />
Storage or Shipment; Warranty Information; List of Abbreviations; Quality of Material; Safety, Care<br />
<strong>and</strong> H<strong>and</strong>ling.<br />
SCOPE<br />
This <strong>manual</strong> contains repair procedures <strong>and</strong> supplemental data for the Cummins NTC-400 six-cylinder,<br />
in-line, turbocharged diesel engine. The repair procedures in this <strong>manual</strong> are for use at direct <strong>support</strong><br />
<strong>and</strong> <strong>general</strong> <strong>support</strong> <strong>maintenance</strong> levels. All information contained in this <strong>manual</strong> applies to both<br />
Big Cam I <strong>and</strong> Big Cam III engines except where differences are specifically noted.<br />
MAINTENANCE FORMS<br />
Department of the Army forms <strong>and</strong> procedures used for equipment <strong>maintenance</strong> will be those<br />
prescribed by DA PAM 738-750, Functional Users Manual for The Army Maintenance Management<br />
System (TAMMS).<br />
REPORTING EQUIPMENT IMPROVEMENT RECOMMENDATIONS (EIR’S)<br />
If your Cummins NTC-400 six cylinder diesel engine needs improvement, let us know. Send us an EIR.<br />
You, the user, are the only one who can tell us what you don’t like about your equipment. Let us know<br />
what you don’t like about the design or performance. The preferred method for submitting Quality<br />
Deficiency Reports (QDRs) is through the Army Electronic Product Support (AEPS) website under the<br />
Electronic Deficiency Reporting System (EDRS). The web address is: https://aeps.ria.army.mil. This is a<br />
secured site requiring a password that can be applied for on the front page of the website. If the above<br />
method is not available to you, put it on an SF 368, Product Quality Deficiency Report (PQDR), <strong>and</strong><br />
mail it to us at: Department of the Army, U.S. Army Tank-automotive <strong>and</strong> Armaments Comm<strong>and</strong>,<br />
ATTN: AMSTA-LC-CHMM, 6501 E. 11 Mile Road, Mail Stop 420, Warren, MI 48397-5000. We’ll send<br />
you a reply.<br />
0001 00-1
TM 9-2815-225-34&P 0001 00<br />
GENERAL INFORMATION (Contd)<br />
CORROSION PREVENTION AND CONTROL (CPC)<br />
Corrosion Prevention <strong>and</strong> Control (CPC) of Army materiel is a continuing concern. It is important that<br />
any corrosion problem with this item be reported so that the problem can be corrected <strong>and</strong><br />
improvements made to prevent the problem in the future.<br />
While corrosion is typically associated with rusting of metals, it can also include deterioration of other<br />
materials, such as rubber <strong>and</strong> plastic. Unusual cracking, softening, swelling, or breaking of these<br />
materials may be a corrosion problem.<br />
If a corrosion problem is identified, it can be reported using an SF 368, Quality Deficiency Report. Use<br />
of key words, such as corrosion, rust, deterioration, or cracking, will ensure that the information is<br />
identified as a CPC problem.<br />
The form should be submitted to the address specified in DA PAM 738-750, Functional Users Manual<br />
for The Army Maintenance Management System (TAMMS).<br />
DESTRUCTION OF ARMY MATERIEL TO PREVENT ENEMY USE<br />
Procedures for destruction of Army equipment to prevent enemy use can be found in TM 750-244-6.<br />
PREPARATION FOR STORAGE OR SHIPMENT<br />
Information concerning storage or shipment of equipment can be found in TM 740-90-1. Additional<br />
information concerning storage of Cummins NTC-400 engine can be found in Chapter 3, Maintenance<br />
Instructions.<br />
WARRANTY INFORMATION<br />
The Cummins diesel engine (model NTC-400) is warranted in accordance with TB 9-2300-295-15/21.<br />
The warranty starts on the date found in block 23, DA Form 2408-9. Report all defects in material or<br />
workmanship to your supervisor, who will take appropriate action.<br />
LIST OF ABBREVIATIONS<br />
AFC . . . . . . . . . . . . . . . . . . . . . . . . Air Fuel Control<br />
ASA . . . . . . . . . . . . . . . . . . .Air Signal Attenuator<br />
BHP . . . . . . . . . . . . . . . . . . . . . .Brake Horsepower<br />
C . . . . . . . . . . . . . . . . . . . . . . . . . . . . . . . . . .Celsius<br />
CFM . . . . . . . . . . . . . . . . . . . .cubic feet per minute<br />
CPC . . . . . . . . . .Corrosion Prevention <strong>and</strong> Control<br />
cu in. . . . . . . . . . . . . . . . . . . . . . . . . . . . . .cubic inch<br />
EIR . . . . . . . . . . . . . . . . .Equipment Improvement<br />
Recommendations<br />
EPA . . . . . . . . . .Environmental Protection Agency<br />
f . . . . . . . . . . . . . . . . . . . . . . . . . . . . . . . . . . . . .foot<br />
F . . . . . . . . . . . . . . . . . . . . . . . . . . . . . . .Fahrenheit<br />
ft alt . . . . . . . . . . . . . . . . . . . . . . . . . . .feet altitude<br />
QDR . . . . . . . . . . . . . . . .Quality Deficiency Report<br />
Hg . . . . . . . . . . . . . . . . . . . . . . . . . . . . . . . .Mercury<br />
hp . . . . . . . . . . . . . . . . . . . . . . . . . . . . . horsepower<br />
in. . . . . . . . . . . . . . . . . . . . . . . . . . . . . . . . . . . .inch<br />
kg . . . . . . . . . . . . . . . . . . . . . . . . . . . . . . . .kilogram<br />
kPa . . . . . . . . . . . . . . . . . . . . . . . . . . . . . .kilopascal<br />
L . . . . . . . . . . . . . . . . . . . . . . . . . . . . . . . . . . . . .liter<br />
lb-ft . . . . . . . . . . . . . . . . . . . . . . . . . . . . .pound foot<br />
lb/hr . . . . . . . . . . . . . . . . . . . . . . . .pounds per hour<br />
lb-in . . . . . . . . . . . . . . . . . . . . . . . . . . . . .pound inch<br />
N•m . . . . . . . . . . . . . . . . . . . . . . . . . .Newton meter<br />
pph . . . . . . . . . . . . . . . . . . . . . . . . .pounds per hour<br />
PQDR . . . . . . . .Product Quality Deficiency Report<br />
PT . . . . . . . . . . . . . . . . . . . . . . . . . .Pressure Timed<br />
psi . . . . . . . . . . . . . . . . . . . .pounds per square inch<br />
rpm . . . . . . . . . . . . . . . . . . .revolutions per minute<br />
STE/ICE . . . . . . . . .Simplified Test Equipment for<br />
Internal Combustion Engines<br />
TAMMS . . . . . . . . . . . . . . .The Army Maintenance<br />
Management System<br />
TM . . . . . . . . . . . . . . . . . . . . . . . .Technical Manual<br />
WP . . . . . . . . . . . . . . . . . . . . . . . . . . .Work Package<br />
0001 00-2
TM 9-2815-225-34&P 0001 00<br />
GENERAL INFORMATION (Contd)<br />
QUALITY OF MATERIAL<br />
Material used for replacement, repair, or modification must meet the requirements of this <strong>manual</strong>. If<br />
quality of material requirements are not stated in this <strong>manual</strong>, the material must meet the<br />
requirements of the drawings, st<strong>and</strong>ards, specifications, or approved engineering change proposals<br />
applicable to this Cummins engine.<br />
SAFETY, CARE, AND HANDLING<br />
Adequate safety precautions will be provided for the performance of <strong>maintenance</strong> operations. These<br />
precautions will include safety in work environment, selection <strong>and</strong> usage of equipment, <strong>and</strong> procedures<br />
provided for performing all operations. Inspection, which follows completion of <strong>maintenance</strong> procedures,<br />
will ensure equipment compliance with applicable safety st<strong>and</strong>ards.<br />
Supplies <strong>and</strong> materials such as cleaning fluids, sealers, adhesives, oils, <strong>and</strong> other products used in this<br />
<strong>manual</strong> may be dangerous or harmful if safety precautions are not observed. Read manufacturers’<br />
warnings <strong>and</strong> cautions on product labels before using <strong>and</strong> observe all recommended safety precautions.<br />
Ensure proper procedures are followed during lifting of heavy items. Follow all warnings <strong>and</strong> cautions<br />
identified in this <strong>manual</strong>.<br />
END OF WORK PACKAGE<br />
0001 00-3/4 blank
TM 9-2815-225-34&P 0002 00<br />
DIRECT SUPPORT AND GENERAL SUPPORT<br />
MAINTENANCE MANUAL<br />
INCLUDING REPAIR PARTS AND SPECIAL TOOLS LIST (RPSTL)<br />
FOR<br />
M915, M915A1, M915A4, M916, M920 VEHICLES<br />
NSN 2815-01-082-8125 P/N NTC400-3652-02 CUMMINS NTC-400 BIG CAM I DIESEL ENGINE<br />
W/CONTAINER<br />
NSN 2815-01-142-2745 P/N 11669835 CUMMINS NTC-400 BIG CAM III DIESEL ENGINE<br />
W/CONTAINER<br />
EQUIPMENT CHARACTERISTICS, CAPABILITIES, AND FEATURES<br />
The Cummins NTC-400 diesel engine is a turbocharged, liquid-cooled, overhead valve, four-cycle engine<br />
with an in-line, six-cylinder design. The NTC-400 engine has a compression ratio of 13.5:1 (Big Cam I)<br />
<strong>and</strong> 14.0:1 (Big Cam III), <strong>and</strong> develops 400 horsepower at 2100 rpm. Peak torque is 1150 lb-ft at 1500<br />
rpm (Big Cam I) <strong>and</strong> 1300 lb-ft at 1300 rpm (Big Cam III).<br />
FAN CLUTCH<br />
FLYWHEEL<br />
HOUSING<br />
TURBOCHARGER<br />
EXHAUST<br />
MANIFOLD<br />
WATER<br />
MANIFOLD<br />
THERMOSTAT<br />
HOUSING<br />
FAN<br />
WATER<br />
PUMP<br />
STARTER<br />
VIBRATION<br />
DAMPER AND<br />
CRANKSHAFT<br />
PULLEY<br />
AIR<br />
COMPRESSOR<br />
POWER<br />
STEERING<br />
PUMP<br />
FUEL PUMP<br />
OIL PAN<br />
Figure 1.<br />
Cummins NTC-400 Diesel Engine—Left Side.<br />
ENGINE OIL<br />
COOLER<br />
ALTERNATOR<br />
Figure 2.<br />
Cummins NTC-400 Diesel Engine—Right Side.<br />
0002 00-1
TM 9-2815-225-34&P 0002 00<br />
EQUIPMENT CHARACTERISTICS, CAPABILITIES, AND FEATURES (Contd)<br />
LOCATION AND DESCRIPTION OF MAJOR COMPONENTS<br />
ENGINE FEATURE/CHARACTERISTIC BIG CAM I BIG CAM III<br />
Camshaft<br />
Connecting Rods<br />
Table 1. Engine Features <strong>and</strong> Characteristics.<br />
2-1/2-inch diameter camshaft with gear drive controlling all valve<br />
<strong>and</strong> injector movement. Made of induction-hardened alloy steel.<br />
Camshaft followers are roller-type.<br />
Drop-forged, rifle-drilled for pressure lubrication.<br />
Crankshaft<br />
Cylinder Block<br />
High-tensile steel forging. Bearing journals <strong>and</strong> fillets-induction<br />
hardened. Fully counterweighted.<br />
Alloy cast iron with removable wet liners.<br />
Cylinder Heads<br />
Each head serves two cylinders. Drilled fuel supply <strong>and</strong> return<br />
lines. High temperature inserts on exhaust valve seats.<br />
Turbocharger Model T-50. Model HT-3B has a redesigned<br />
compressor wheel, compressor<br />
housing, turbine wheel <strong>and</strong><br />
shaft, bearing housing assembly,<br />
location of oil inlet line, <strong>and</strong><br />
V-b<strong>and</strong>s.<br />
Exhaust Manifold Conventional log-type. Pulse-type for less restriction.<br />
Fuel System<br />
Injectors<br />
Integral flywheel-type governor.<br />
Camshaft actuated top-stop type.<br />
Intake Manifold Conventional aftercooler. Triple-pass water aftercooler.<br />
Lubrication Oil Cooler<br />
Conventional oil cooler <strong>and</strong> filter<br />
with separately mounted bypass<br />
oil filter on engine firewall.<br />
Dem<strong>and</strong> flow automatically<br />
regulates oil pressure <strong>and</strong> routes<br />
engine coolant through engine<br />
oil cooler twice.<br />
Engine <strong>and</strong> cooler core are made<br />
of cast aluminum <strong>and</strong><br />
incorporates mounting adapters<br />
for spin-on type full-flow <strong>and</strong><br />
bypass oil filters, also<br />
incorporates a bypass valve <strong>and</strong><br />
pressure sending unit.<br />
Oil Pan Made of cast aluminum. Made of stamped steel.<br />
Water Transfer Tube Made of cast iron. Made of stamped, welded steel.<br />
0002 00-2
TM 9-2815-225-34&P 0002 00<br />
EQUIPMENT CHARACTERISTICS, CAPABILITIES, AND FEATURES (Contd)<br />
EQUIPMENT DATA<br />
Manufacturer . . . . . . . . . . . . . . . . . . . . . . . . . . . . . . . . . . . . . . . . . . . . . Cummins Engine Company, Inc.<br />
Model . . . . . . . . . . . . . . . . . . . . . . . . . . . . . . . . . . . . . . . . . . . . . . . . . . . . . . . . . . . . . . . . . . . . . . . . NTC-400<br />
Type. . . . . . . . . . . . . . . . . . . . . . . . . . . . . . . . . . . . . . . . . . . . . . . . . . . . . . . . . 4-cycle, turbocharged diesel,<br />
compression ignition<br />
DIMENSIONS<br />
Length . . . . . . . . . . . . . . . . . . . . . . . . . . . . . . . . . . . . . . . . . . . . . . . . . . . . . . . . . . . . . . 58.88 in. (149.6 cm)<br />
Width . . . . . . . . . . . . . . . . . . . . . . . . . . . . . . . . . . . . . . . . . . . . . . . . . . . . . . . . . . . . . . . . 33.63 in. (85.4 cm)<br />
Height . . . . . . . . . . . . . . . . . . . . . . . . . . . . . . . . . . . . . . . . . . . . . . . . . . . . . . . . . . . . . . 50.91 in. (129.3 cm)<br />
Net Weight, Dry. . . . . . . . . . . . . . . . . . . . . . . . . . . . . . . . . . . . . . . . . . . . . . . . . . . . . . 2,600 lb (1,180.4 kg)<br />
CYLINDERS<br />
Number. . . . . . . . . . . . . . . . . . . . . . . . . . . . . . . . . . . . . . . . . . . . . . . . . . . . . . . . . . . . . . . . . . . . . . . . . . . . . 6<br />
Arrangement. . . . . . . . . . . . . . . . . . . . . . . . . . . . . . . . . . . . . . . . . . . . . . . . . . . . . . . . . . . . . . . . . . . . In-line<br />
Firing Order . . . . . . . . . . . . . . . . . . . . . . . . . . . . . . . . . . . . . . . . . . . . . . . . . . . . . . . . . . . . . . . . . 1-5-3-6-2-4<br />
Bore. . . . . . . . . . . . . . . . . . . . . . . . . . . . . . . . . . . . . . . . . . . . . . . . . . . . . . . . . . . . . . . . . . . . . 5.5 in. (14 cm)<br />
Stroke . . . . . . . . . . . . . . . . . . . . . . . . . . . . . . . . . . . . . . . . . . . . . . . . . . . . . . . . . . . . . . . . . . . 6 in. (15.2 cm)<br />
Displacement . . . . . . . . . . . . . . . . . . . . . . . . . . . . . . . . . . . . . . . . . . . . . . . . . . . . . . . . . . . 855 cu-in. (14 L)<br />
Compression Ratio:<br />
Big Cam I . . . . . . . . . . . . . . . . . . . . . . . . . . . . . . . . . . . . . . . . . . . . . . . . . . . . . . . . . . . . . . . . . . . . . . 13.5:1<br />
Big Cam III . . . . . . . . . . . . . . . . . . . . . . . . . . . . . . . . . . . . . . . . . . . . . . . . . . . . . . . . . . . . . . . . . . . . 14.0:1<br />
GOVERNED SPEED<br />
Full Load . . . . . . . . . . . . . . . . . . . . . . . . . . . . . . . . . . . . . . . . . . . . . . . . . . . . . . . . . . . . . . . . . . . . 2100 rpm<br />
No Load . . . . . . . . . . . . . . . . . . . . . . . . . . . . . . . . . . . . . . . . . . . . . . . . . . . . . . . . . . . . . . . . . . . . . 2460 rpm<br />
Idle Speed. . . . . . . . . . . . . . . . . . . . . . . . . . . . . . . . . . . . . . . . . . . . . . . . . . . . . . . . . . . . . . . . . . . . . 600 rpm<br />
LUBRICATION SYSTEM<br />
Type. . . . . . . . . . . . . . . . . . . . . . . . . . . . . . . . . . . . . . . . . . . . . . . . . . . . . . . . . . . . . . . . . . . . . . . . . Force-fed<br />
Operating Pressure (Normal):<br />
Big Cam I . . . . . . . . . . . . . . . . . . . . . . . . . . . . . . . . . . . . . . . . . . . . . . . . . . . . . . 50–70 psi (345–483 kPa)<br />
Big Cam III . . . . . . . . . . . . . . . . . . . . . . . . . . . . . . . . . . . . . . . . . . . . . . . . . . . . . 35–45 psi (241–310 kPa)<br />
Operating Pressure (Minimum) . . . . . . . . . . . . . . . . . . . . . . . . . . . . . . . . . . . . . . . 15 psi (100 kPa) @ idle<br />
System Capacity Including Bypass Filter:<br />
Big Cam I. . . . . . . . . . . . . . . . . . . . . . . . . . . . . . . . . . . . . . . . . . . . . . . . . . . . . . . . . . . . . . . . 46 qt (43.5 L)<br />
Big Cam III . . . . . . . . . . . . . . . . . . . . . . . . . . . . . . . . . . . . . . . . . . . . . . . . . . . . . . . . . . . . . . 44 qt (41.6 L)<br />
Operating Temperature (Normal) . . . . . . . . . . . . . . . . . . . . . . . . . . . . . . . . . . . . . 200–250º F (93–121º C)<br />
Oil Pump . . . . . . . . . . . . . . . . . . . . . . . . . . . . . . . . . . . . . . . . . . . . . . . . . . . . . . . . . . . . . . . . . . . . Gear-type<br />
0002 00-3
TM 9-2815-225-34&P 0002 00<br />
EQUIPMENT CHARACTERISTICS, CAPABILITIES, AND FEATURES (Contd)<br />
COOLING SYSTEM<br />
Type . . . . . . . . . . . . . . . . . . . . . . . . . . . . . . . . . . . . . . . . . . . . . . . . . . . . . . . . Liquid with fan <strong>and</strong> radiator<br />
Operating Temperature (Normal) . . . . . . . . . . . . . . . . . . . . . . . . . . . . . . . . . . . . . . 175–195º F (79–91º C)<br />
Thermostat. . . . . . . . . . . . . . . . . . . . . . . . . . . . . . . . . . . . . . . . . . . . . . . . . . . . . . . . . . . . . . . . . . . . . . . . . . 1<br />
PERFORMANCE HEAD<br />
Maximum Torque:<br />
Big Cam I . . . . . . . . . . . . . . . . . . . . . . . . . . . . . . . . . . . . . . . . . . . . . . . . . . . . . . . . 1150 lb-ft @ 1500 rpm<br />
Big Cam III . . . . . . . . . . . . . . . . . . . . . . . . . . . . . . . . . . . . . . . . . . . . . . . . . . . . . . . 1300 lb-ft @ 1300 rpm<br />
Maximum Output. . . . . . . . . . . . . . . . . . . . . . . . . . . . . . . . . . . . . . . . . . . . . . . . . . . . . . . . . . . . . . 400 BHP<br />
Piston Speed @ 2100 rpm . . . . . . . . . . . . . . . . . . . . . . . . . . . . . . . . . . . . . . . . . . . . . . . . . . . . . 2100 ft/min<br />
Maximum No Load Governed Speed . . . . . . . . . . . . . . . . . . . . . . . . . . . . . . . . . . . . . . . . . . . . . . 2460 rpm<br />
Maximum Approved Altitude, Transient Mode . . . . . . . . . . . . . . . . . . . . . . . . . . . . . . 12,000 ft (3658 m)<br />
Maximum Approved Altitude, Continuous Operation . . . . . . . . . . . . . . . . . . . . . . . . . . 6000 ft (1829 m)<br />
Ambient Air Temperature Above Which<br />
Output Should be Limited . . . . . . . . . . . . . . . . . . . . . . . . . . . . . . . . . . . . . . . . . . . . . . . . 100º F (37.8º C)<br />
Air Flow @ 400 hp @ 2100 rpm. . . . . . . . . . . . . . . . . . . . . . . . . . . . . . . . . . . . . . . . . . . . . . . . . . . 985 CFM<br />
Exhaust Flow @ 400 hp @ 2100 rpm . . . . . . . . . . . . . . . . . . . . . . . . . . . . . . . . . . . . . . . . . . . . . 2320 CFM<br />
Nominal Fuel Consumption @ 2100 rpm . . . . . . . . . . . . . . . . . . . . . . . . . . . . . . . . . . . . . . . . . . . 144 lb/hr<br />
Nominal Fuel Consumption @ 500 rpm<br />
(Peak Torque) . . . . . . . . . . . . . . . . . . . . . . . . . . . . . . . . . . . . . . . . . . . . . . . . . . . . . . . . . . . . . . . . 116 lb/hr<br />
Maximum Fuel Flow to Pump @ 2100 rpm . . . . . . . . . . . . . . . . . . . . . . . . . . . . . . . . . . . . . . . . . 485 lb/hr<br />
Maximum Allowable Restriction to Pump:<br />
Clean Filter . . . . . . . . . . . . . . . . . . . . . . . . . . . . . . . . . . . . . . . . . . . . . . . . . . . . . . . . . . . . . . . . . 4.0 in. Hg<br />
Dirty Filter . . . . . . . . . . . . . . . . . . . . . . . . . . . . . . . . . . . . . . . . . . . . . . . . . . . . . . . . . . . . . . . . . 8.0 in. Hg<br />
Maximum Allowable Return Line Restriction . . . . . . . . . . . . . . . . . . . . . . . . . . . . . . . . . . . . . . 2.5 in. Hg<br />
END OF WORK PACKAGE<br />
0002 00-4
TM 9-2815-225-34&P 0003 00<br />
DIRECT SUPPORT AND GENERAL SUPPORT<br />
MAINTENANCE MANUAL<br />
INCLUDING REPAIR PARTS AND SPECIAL TOOLS LIST (RPSTL)<br />
FOR<br />
M915, M915A1, M915A4, M916, M920 VEHICLES<br />
NSN 2815-01-082-8125 P/N NTC400-3652-02 CUMMINS NTC-400 BIG CAM I DIESEL ENGINE<br />
W/CONTAINER<br />
NSN 2815-01-142-2745 P/N 11669835 CUMMINS NTC-400 BIG CAM III DIESEL ENGINE<br />
W/CONTAINER<br />
THEORY OF OPERATION<br />
ENGINE FEATURES, ENGINE OIL SYSTEM COMPONENTS AND PIPING, ENGINE OIL MONITORING SYSTEM,<br />
ENGINE RETARDER BRAKE CONTROL, ENGINE SPEED CONTROLS<br />
SCOPE<br />
This Work Package provides you with information regarding theory of operation for the Cummins<br />
NTC-400 diesel engine.<br />
0003 00-1
TM 9-2815-225-34&P 0003 00<br />
THEORY OF OPERATION (Contd)<br />
ENGINE FEATURES<br />
The Cummins NTC-400 diesel engine is used on all M915 through M920, M915A1, <strong>and</strong> M915A4 trucks.<br />
It is a turbocharged, liquid-cooled, overhead valve, four-cycle engine of in-line, six-cylinder design. The<br />
NTC-400 engine has a compression ratio of 13.5:1 (Big Cam I) <strong>and</strong> 14.0:1 (Big Cam III) <strong>and</strong> develops<br />
400 horsepower at 2100 rpm. Peak torque is 1150 lb-ft at 1500 rpm (Big Cam I) <strong>and</strong> 1300 lb-ft at 1300<br />
rpm (Big Cam III).<br />
The following engine characteristics <strong>and</strong> features apply to both Big Cam I <strong>and</strong> Big Cam III engines,<br />
except where differences are noted.<br />
Camshaft: 2 1/2-inch diameter camshaft with gear drive controlling all valve <strong>and</strong> injector movement.<br />
Made of induction hardened alloy steel. Camshaft followers are roller-type.<br />
Connecting Rods: Drop-forged, rifle-drilled for pressure lubrication.<br />
Crankshaft: High-tensile steel forging. Bearing journals <strong>and</strong> fillets are induction hardened. Fully<br />
counterweighted.<br />
Cylinder Block: Alloy cast iron with removable wet liners.<br />
Cylinder Heads: Each head serves two cylinders. Drilled fuel supply <strong>and</strong> return lines. High<br />
temperature inserts on exhaust valve seats.<br />
Turbocharger: Model T-50 (Big Cam I); Model T-46-B (Big Cam III) has a redesigned compressor<br />
wheel, compressor housing, turbine wheel <strong>and</strong> shaft, bearing housing assembly, location of oil inlet line,<br />
<strong>and</strong> V-b<strong>and</strong>s.<br />
Exhaust Manifold: Conventional log-type (Big Cam I). Pulse-type for less restriction (Big Cam III).<br />
Fuel System: Integral flywheel-type governor.<br />
Injectors: Camshaft actuated top stop-type.<br />
Intake Manifold: Conventional aftercooler (Big Cam I); triple-pass water aftercooler (Big Cam III).<br />
Lubrication Oil Cooler: Conventional oil cooler <strong>and</strong> filter with separately mounted bypass oil filter<br />
on engine firewall (Big Cam I). Dem<strong>and</strong> flow automatically regulates oil pressure <strong>and</strong> routes engine<br />
coolant through engine oil cooler twice.<br />
Engine <strong>and</strong> cooler cores are made of cast aluminum <strong>and</strong> incorporate mounting adapters for spin-on-type<br />
full-flow <strong>and</strong> bypass oil filters; also incorporate a bypass valve <strong>and</strong> pressure sending unit (Big Cam III).<br />
Oil Pan: Made of cast aluminum (Big Cam I). Made of stamped steel (Big Cam III).<br />
Water Transfer Tube: Made of cast iron (Big Cam I). Made of stamped, welded steel (Big Cam III).<br />
0003 00-2
TM 9-2815-225-34&P 0003 00<br />
THEORY OF OPERATION (Contd)<br />
ENGINE OIL SYSTEM COMPONENTS AND PIPING<br />
Breather Tube (1) – Allows fumes from hot oil to escape.<br />
Oil Filler (2) – Located in front rocker arm cover. Used for replenishing oil supply.<br />
Oil Pump (3) – Circulates oil through engine to provide cooling <strong>and</strong> lubrication.<br />
Oil Cooler (4) – Coolant circulates through internal tubes of cooler <strong>and</strong> carries away heat from<br />
engine oil.<br />
Primary Oil Filter (5) – Throwaway filter removes dirt <strong>and</strong> foreign particles from oil.<br />
Bypass Oil Filter (6) – Throwaway filter provides filtration when primary filter is clogged or damaged.<br />
Oil Return Line (7) – Carries return oil from turbocharger to engine block.<br />
Oil Level Dipstick (8) – Indicates engine oil level.<br />
Oil Supply Line (9) – Carries oil under pressure to cool <strong>and</strong> lubricate turbocharger.<br />
1<br />
2<br />
9<br />
8<br />
7<br />
6<br />
5<br />
4<br />
3<br />
Figure 1. Engine Oil System Components <strong>and</strong> Piping.<br />
0003 00-3
TM 9-2815-225-34&P 0003 00<br />
THEORY OF OPERATION (Contd)<br />
ENGINE OIL MONITORING SYSTEM<br />
Battery Pack – Consists of four 12-volt, <strong>maintenance</strong>-free batteries. Two batteries are wired in parallel<br />
in each set. Each set is connected in series for 24-volt output. Battery pack is used for both 12-volt <strong>and</strong><br />
24-volt output.<br />
Ignition Switch – Supplies 24-volt power to relay (RY-9), which in turn provides 12-volt power to<br />
electrical system, <strong>including</strong> oil pressure gauge <strong>and</strong> warning lamp circuits.<br />
Relay (RY-9) – Energized by 24-volt power from ignition switch. When energized, RY-9 supplies 12-volt<br />
power to circuit breaker (CB-2).<br />
Circuit Breaker (CB-2) – Protects electrical components of oil system by opening circuit when load<br />
exceeds 20 amperes. May be <strong>manual</strong>ly reset by pressing CB-2 button in.<br />
Oil Pressure Gauge – Activated by electrical signal from oil pressure sending unit. Indicates engine oil<br />
pressure.<br />
Oil Pressure Sending Unit – Provides electrical signal to oil pressure gauge to indicate engine oil<br />
pressure.<br />
Oil Warning Lamp – Indicator lamp is activated by 12-volt power from pressure switch when engine oil<br />
pressure drops below 5 psi.<br />
Pressure Switch – Closes to supply 12-volt power to oil warning lamp when oil pressure drops below<br />
5 psi.<br />
12V<br />
BATTERY<br />
PACK<br />
24V<br />
IGNITION<br />
SWITCH<br />
24V<br />
RY-9<br />
GROUND<br />
GROUND<br />
OIL PRESSURE<br />
SENDING UNIT<br />
OIL PRESSURE<br />
GAUGE<br />
CB-2<br />
GROUND<br />
PRESSURE<br />
SWITCH<br />
OIL WARNING<br />
LAMP<br />
Figure 2. Engine Oil Monitoring System.<br />
0003 00-4
TM 9-2815-225-34&P 0003 00<br />
THEORY OF OPERATION (Contd)<br />
ENGINE RETARDER BRAKE CONTROL<br />
Battery Pack – Consists of four 12-volt, <strong>maintenance</strong>-free batteries. Two batteries are wired in parallel<br />
in each set. Each set is connected in series for 24-volt output. Battery pack is used for both 12-volt <strong>and</strong><br />
24-volt output.<br />
Ignition Switch – Supplies 24-volt power to relay (RY-9), which in turn provides 12-volt power to<br />
electrical system, <strong>including</strong> engine retarder brake circuit.<br />
Relay (RY-9) – Energized by 24-volt power from ignition switch. When energized, RY-9 supplies 12-volt<br />
power to circuit breaker (CB-2).<br />
Circuit Breaker (CB-2) – Protects electrical components of engine retarder brake circuit by opening<br />
when load exceeds 20 amperes. May be <strong>manual</strong>ly reset by pressing CB-2 button in.<br />
Foot Switch – Allows driver to activate engine brake circuit with left foot. When depressed, switch<br />
supplies 12-volt power through CB-2, throttle switch, <strong>and</strong> engine retarder switch to energize selected<br />
solenoid valve(s).<br />
Throttle Switch – Switch is open when accelerator pedal is pressed down to prevent activation of<br />
engine retarder brake. Activating arm on fuel pump lever closes switch when accelerator is disengaged.<br />
Engine Retarder Switch – Three-position switch allows driver to select engine braking for two cylinders<br />
(LOW), four cylinders (MED), or six cylinders (HIGH). Depressing pedal-actuated foot switch completes<br />
12-volt power circuit to energize one, two, or three solenoids.<br />
Solenoid Valves – Operate engine braking mechanism when activated.<br />
BATTERY<br />
PACK<br />
IGNITION<br />
SWITCH<br />
RY-9<br />
CB-2<br />
GROUND<br />
CENTER ENGINE<br />
SOLENOID VALVE<br />
ENGINE<br />
RETARDER<br />
SWITCH<br />
THROTTLE<br />
SWITCH<br />
FOOT SWITCH<br />
GROUND<br />
FRONT ENGINE<br />
SOLENOID VALVE<br />
REAR ENGINE<br />
SOLENOID VALVE<br />
GROUND<br />
GROUND<br />
Figure 3. Engine Retarder Brake Controls.<br />
0003 00-5
TM 9-2815-225-34&P 0003 00<br />
THEORY OF OPERATION (Contd)<br />
ENGINE SPEED CONTROLS<br />
H<strong>and</strong> Throttle (1) – Allows <strong>manual</strong> control of engine rpm. Throttle motion is transferred by cable to<br />
engine mounted pivot lever (6).<br />
Throttle Cable (2) – Flex cable from h<strong>and</strong> throttle to engine-mounted pivot lever (6).<br />
Accelerator Pedal (3) – Connected by mechanical linkage to under-cab pivot lever (4).<br />
Pivot Lever (4) – Mechanical linkage that connects accelerator pedal to accelerator rod.<br />
Accelerator Rod (5) – Connects accelerator pedal <strong>and</strong> throttle linkage to accelerator lever on fuel pump.<br />
Engine Mounted Pivot Lever (6) – Connects under-dash h<strong>and</strong> throttle cable (ALL) <strong>and</strong> winch throttle<br />
cable (M916 <strong>and</strong> M920) to accelerator rod.<br />
Accelerator Lever (7) – Controls flow of fuel through fuel pump, setting engine speed.<br />
Fuel Control Return Spring (8) – Returns accelerator lever to normal position when h<strong>and</strong> throttle <strong>and</strong><br />
accelerator pedal are not engaged.<br />
CONTROL PANEL<br />
1<br />
8<br />
2<br />
FIREWALL<br />
3<br />
4<br />
6<br />
5<br />
7<br />
Figure 4. Engine Speed Controls.<br />
END OF WORK PACKAGE<br />
0003 00-6
TM 9-2815-225-34&P<br />
CHAPTER 2<br />
TROUBLESHOOTING PROCEDURES<br />
FOR<br />
ENGINE, DIESEL<br />
CUMMINS MODEL NTC-400<br />
M915, M915A1, M915A4,<br />
M916, M920 VEHICLES
TM 9-2815-225-34&P<br />
CHAPTER 2<br />
TROUBLESHOOTING PROCEDURES<br />
Work Package Title<br />
Work Package/Page No.<br />
Engine Troubleshooting . . . . . . . . . . . . . . . . . . . . . . . . . . . . . . WP 0004 00-1
TM 9-2815-225-34&P 0004 00<br />
DIRECT SUPPORT AND GENERAL SUPPORT<br />
MAINTENANCE MANUAL<br />
INCLUDING REPAIR PARTS AND SPECIAL TOOLS LIST (RPSTL)<br />
FOR<br />
M915, M915A1, M915A4, M916, M920 VEHICLES<br />
NSN 2815-01-082-8125 P/N NTC400-3652-02 CUMMINS NTC-400 BIG CAM I DIESEL ENGINE<br />
W/CONTAINER<br />
NSN 2815-01-142-2745 P/N 11669835 CUMMINS NTC-400 BIG CAM III DIESEL ENGINE<br />
W/CONTAINER<br />
ENGINE TROUBLESHOOTING<br />
SCOPE<br />
This Work Package (WP) contains troubleshooting information to diagnose <strong>and</strong> correct engine<br />
malfunctions for Big Cam I <strong>and</strong> Big Cam III engines. Use this information in conjunction with<br />
troubleshooting procedures in TM 9-2320-273-20 <strong>and</strong> TM 9-2320-273-34 for Big Cam I, <strong>and</strong><br />
TM 9-2320-283-20 <strong>and</strong> TM 9-2320-283-34 for Big Cam III. For further engine troubleshooting<br />
information, refer to the Cummins Troubleshooting <strong>and</strong> Repair Manual, NT 855 Engines, Bulletin No.<br />
3810298-00.<br />
Troubleshooting procedures are organized by malfunction, followed by a test or inspection to determine<br />
the corrective action required. Each step has a corrective action, along with appropriate WP references.<br />
Steps listed under each malfunction are in the order in which the causes are most likely to occur.<br />
GUIDELINES<br />
Observe the following guidelines when performing troubleshooting procedures.<br />
WARNING<br />
Operating a deadlined vehicle without preliminary inspection<br />
will cause further damage to a malfunctioning component <strong>and</strong><br />
possible injury to personnel.<br />
1. Check all tags, service request forms, <strong>and</strong> vehicle logbooks for repair history. This may provide<br />
information as to the source of the problem.<br />
2. Debrief the operator (if possible) for a <strong>general</strong> description of the problem, then attempt to verify<br />
the fault.<br />
3. When troubleshooting, always check the easiest <strong>and</strong> most obvious things first. This simple rule<br />
saves time <strong>and</strong> trouble. For example, low power complaints are often the result of loose throttle<br />
linkage, dirty fuel, or clogged air filters, <strong>and</strong> excessive oil consumption is often the result of leaky<br />
gaskets or loose line connections.<br />
4. Double-check before disassembly. The source of many engine problems can be traced to more than<br />
one part in a system. For example, excessive fuel consumption may not be caused by the fuel<br />
pump alone. Instead, the trouble could be a clogged air cleaner or a restricted exhaust passage<br />
causing severe back pressure.<br />
0004 00-1
TM 9-2815-225-34&P 0004 00<br />
ENGINE TROUBLESHOOTING (Contd)<br />
MALFUNCTION TEST OR INSPECTION CORRECTIVE ACTION<br />
1. ENGINE WILL NOT<br />
CRANK<br />
Table 1. Engine Troubleshooting.<br />
a. Remove rocker covers <strong>and</strong> rotate<br />
engine by attaching a socket <strong>and</strong><br />
breaker bar to accessory drive<br />
nut.<br />
b. Test for mechanical or hydraulic<br />
seizure.<br />
c. Check for bent pushrod(s) <strong>and</strong><br />
valve(s) not opening or closing.<br />
b. If valve fails to open or close,<br />
<strong>manual</strong>ly open valve with 3/4-in.<br />
wrench. If valve(s) are seized,<br />
remove corresponding cylinder<br />
head (WP 0011 00).<br />
Remove fuel injectors<br />
(WP 0011 00).<br />
Turn engine over several times to<br />
displace liquid from cylinders<br />
through injector openings.<br />
If engine can be turned freely<br />
after all liquids have been<br />
displaced, install injectors. If<br />
engine cannot be turned over<br />
freely by h<strong>and</strong>, disassemble<br />
engine <strong>and</strong> replace defective parts.<br />
c. Replace pushrods <strong>and</strong> valves if<br />
damaged.<br />
2. ENGINE CRANKS<br />
BUT FAILS TO START<br />
a. Test for broken fuel gear pump<br />
driveshaft.<br />
b. Test for dirty or damaged<br />
injectors.<br />
c. Test for defective fuel solenoid<br />
valve.<br />
d. Test for faulty fuel pump.<br />
(Disconnect fuel outlet hose;<br />
crank engine to see if fuel comes<br />
out.)<br />
e. Test for incorrect injector<br />
adjustment.<br />
a. Replace fuel gear pump drive<br />
shaft if damaged (WP 0036 00).<br />
b. Replace injectors (WP 0011 00<br />
<strong>and</strong> WP 0043 00).<br />
c. Replace fuel solenoid valve<br />
(WP 0034 00).<br />
d. Replace fuel pump (WP 0010 00<br />
<strong>and</strong> WP 0040 00).<br />
e. Adjust injectors (WP 0043 00).<br />
3. ENGINE STARTS,<br />
MOTOR OPERATES<br />
BUT DOES NOT<br />
ENGAGE THE<br />
RING GEAR<br />
f. Test for incorrect valve clearance.<br />
g. Test for incorrect injector timing.<br />
a. Inspect for defective starter<br />
pinion gear.<br />
b. Inspect for defective ring gear.<br />
f. Adjust valve(s) (WP 0043 00).<br />
g. Adjust injector system timing<br />
(WP 0043 00).<br />
a. Replace starter pinion gear<br />
(TM 9-2320-283-34).<br />
b. Replace ring gear (WP 0007 00<br />
<strong>and</strong> WP 0049 00).<br />
0004 00-2
TM 9-2815-225-34&P 0004 00<br />
ENGINE TROUBLESHOOTING (Contd)<br />
Table 1. Engine Troubleshooting (Contd).<br />
MALFUNCTION TEST OR INSPECTION CORRECTIVE ACTION<br />
4. ENGINE STOPS a. Check if engine is overheated.<br />
b. Check for loose fuel solenoid wire<br />
<strong>and</strong> defective fuel solenoid valve.<br />
c. Check for faulty fuel pump.<br />
a. See malfunction 6.<br />
b. Replace fuel solenoid valve<br />
(WP 0033 00).<br />
c. Replace fuel pump (WP 0010 00).<br />
5. ENGINE FAILS TO STOP a. Check for stuck fuel solenoid<br />
valve.<br />
b. Check for turbocharger oil seal<br />
leak in compressor end.<br />
6. ENGINE OVERHEATS Check for leaking or noisy water<br />
pump.<br />
a. Replace fuel solenoid valve<br />
(WP 0033 00).<br />
b. Replace compressor oil seal<br />
(WP 0026 00 <strong>and</strong> WP 0027 00).<br />
Repair water pump (WP 0041 00).<br />
7. EXCESSIVE EXHAUST<br />
SMOKE<br />
a. Check for incorrect injector<br />
adjustment.<br />
b. Check for defective fuel<br />
injector(s).<br />
c. Check for blocked fuel return line<br />
in fuel system.<br />
d. Check for improperly seated<br />
valves.<br />
e. Check for incorrect injection<br />
timing.<br />
a. Adjust injectors (WP 0044 00).<br />
b. Replace defective fuel injector(s)<br />
(WP 0011 00).<br />
c. Repair fuel return line<br />
(TM 9-2320-283-20).<br />
d. Reseat or replace valves<br />
(WP 0014 00).<br />
e. Adjust injection system timing<br />
(WP 0042 00).<br />
8. LOW OIL PRESSURE a. Check pressure regulator<br />
b. Check for spun camshaft<br />
bushing.<br />
c. Inspect oil pump gasket.<br />
d. Check for worn camshaft.<br />
e. Check for worn crankshaft.<br />
f. Inspect main bearings.<br />
g. Inspect connecting rod bearings.<br />
h. Inspect oil pump gears.<br />
i. Check for high oil temperature.<br />
j. Check for worn crankshaft.<br />
a. Free up pressure regulator or<br />
replace oil pump (WP 0010 00).<br />
b. Replace camshaft bushing<br />
(WP 0013 00).<br />
c. Replace gasket (WP 0023 00).<br />
d. Replace camshaft (WP 0013 00).<br />
e. Replace crankshaft <strong>and</strong> install<br />
new bearings (WP 0012 00).<br />
f. Replace main bearings<br />
(WP 0012 00).<br />
g. Replace connecting rod bearings<br />
(WP 0012 00).<br />
h. Repair oil pump (WP 0023 00).<br />
i. Inspect <strong>and</strong> clean oil cooler<br />
(WP 0021 00).<br />
j. Repair crankshaft (WP 0016 00).<br />
0004 00-3
TM 9-2815-225-34&P 0004 00<br />
ENGINE TROUBLESHOOTING (Contd)<br />
Table 1. Engine Troubleshooting (Contd).<br />
MALFUNCTION TEST OR INSPECTION CORRECTIVE ACTION<br />
9. ENGINE KNOCKS a. Check for broken piston.<br />
b. Check for broken injector cup.<br />
c. Check for incorrect valve<br />
adjustment.<br />
d. Check for incorrect injector<br />
adjustment.<br />
e. Check for loose connecting rod<br />
capscrews.<br />
f. Check for worn connecting rod<br />
bearings.<br />
g. Check for loose main bearing<br />
capscrews.<br />
h. Check for worn main bearings.<br />
i. Check for excessive crankshaft<br />
end clearance.<br />
j. Check for worn crankshaft.<br />
k. Check for worn piston pins.<br />
l. Check for broken piston.<br />
m.Check for incorrect injection<br />
timing.<br />
a. Replace piston (WP 0018 00).<br />
b. Repair injector (WP 0032 00).<br />
c. Adjust valves (WP 0043 00).<br />
d. Adjust injectors (WP 0043 00).<br />
e. Tighten connecting rod capscrews<br />
to proper torque <strong>and</strong> check<br />
bearings (WP 0042 00).<br />
f. Replace connecting rod bearings<br />
(WP 0012 00 <strong>and</strong> WP 0042 00).<br />
g. Torque main bearing capscrews<br />
(WP 0042 00).<br />
h. Replace main bearings<br />
(WP 0042 00).<br />
i. Check crankshaft end clearance<br />
(WP 0042 00).<br />
j. Replace crankshaft <strong>and</strong> install<br />
new bearings (WP 0042 00).<br />
k. Replace worn piston pins <strong>and</strong><br />
bushings or replace rods<br />
(WP 0018 00).<br />
l. Replace piston (WP 0018 00).<br />
m.Adjust injector system timing<br />
(WP 0041 00).<br />
10. EXCESSIVE<br />
FUEL CONSUMPTION<br />
a. Check for incorrect valve <strong>and</strong><br />
injector adjustment.<br />
b. Check for excessive fuel pressure.<br />
c. Check for restricted fuel drain.<br />
d. Check for defective injector(s).<br />
e. Check for leaking cylinder head<br />
gasket(s).<br />
f. Check for incorrect injection<br />
timing.<br />
a. Adjust valves <strong>and</strong> injectors<br />
(WP 0043 00).<br />
b. Test <strong>and</strong> calibrate fuel pump<br />
(WP 0044 00).<br />
c. Repair fuel crossover tubes<br />
(WP 0010 00).<br />
d. Replace defective injector(s)<br />
(WP 0011 00).<br />
e. Replace cylinder head gasket(s)<br />
(WP 0011 00).<br />
f. Adjust injector system timing<br />
(WP 0043 00).<br />
0004 00-4
TM 9-2815-225-34&P 0004 00<br />
ENGINE TROUBLESHOOTING (Contd)<br />
Table 1. Engine Troubleshooting (Contd).<br />
MALFUNCTION TEST OR INSPECTION CORRECTIVE ACTION<br />
11. EXCESSIVE OIL<br />
CONSUMPTION<br />
a. Check for external leaks.<br />
b. Check turbocharger oil seals.<br />
c. Check for worn, stuck, or broken<br />
piston rings.<br />
d. Check for worn piston(s) <strong>and</strong><br />
cylinder liner(s).<br />
e. Check for cracked piston.<br />
a. Tighten external oil connections<br />
<strong>and</strong> replace damaged gasket(s).<br />
b. Replace turbocharger oil seals<br />
(WP 0026 00 <strong>and</strong> WP 0027 00).<br />
c. Replace piston rings<br />
(WP 0018 00).<br />
d. Install new pistons <strong>and</strong> cylinder<br />
liners (WP 0012 00).<br />
e. Replace damaged piston<br />
(WP 0012 00).<br />
12. EXCESSIVE ENGINE<br />
VIBRATION<br />
a. Check for loose or worn engine<br />
insulators.<br />
b. Check for loose or worn cab<br />
insulators.<br />
c. Check for burned valves.<br />
d. Check for excessive flexdisk <strong>and</strong><br />
ring gear runout.<br />
e. Check for loose flexdisk <strong>and</strong> ring<br />
gear mounting screws.<br />
f. Check for loose flywheel housing<br />
screws.<br />
g. Check for misalignment of<br />
flywheel housing.<br />
h. Check for unbalanced flexdisk<br />
<strong>and</strong> ring gear.<br />
i. Check for loose vibration damper.<br />
j. Check for unbalanced vibration<br />
damper.<br />
k. Check adjustment of valves <strong>and</strong><br />
injectors.<br />
l. Check timing for air compressor.<br />
m.Check for incorrect injection<br />
timing.<br />
a. Replace mounts<br />
(TM 9-2320-283-34).<br />
b. Replace insulators<br />
(TM 9-2320-283-34).<br />
c. Replace valves (WP 0014 00).<br />
d. Correct flexdisk <strong>and</strong> ring gear<br />
runout (WP 0042 00).<br />
e. Tighten flexdisk <strong>and</strong> ring gear<br />
mounting screws (WP 0042 00).<br />
f. Tighten flywheel housing screws<br />
(WP 0042 00).<br />
g. Align flywheel housing<br />
(WP 0042 00).<br />
h. Replace the flexdisk <strong>and</strong> ring<br />
gear (WP 0013 00 <strong>and</strong><br />
WP 0042 00).<br />
i. Tighten vibration damper screws<br />
(WP 0042 00).<br />
j. Install new vibration damper<br />
(WP 0042 00).<br />
k. Adjust valves <strong>and</strong> injectors<br />
(WP 0043 00).<br />
l. Adjust air compressor timing<br />
(WP 0042 00).<br />
m.Adjust injector system timing<br />
(WP 0042 00).<br />
0004 00-5
TM 9-2815-225-34&P 0004 00<br />
ENGINE TROUBLESHOOTING (Contd)<br />
Table 1. Engine Troubleshooting (Contd).<br />
MALFUNCTION TEST OR INSPECTION CORRECTIVE ACTION<br />
12. EXCESSIVE ENGINE<br />
VIBRATION (Contd)<br />
n. Check for excessive flywheel<br />
runout.<br />
o. Check for unbalanced flywheel or<br />
one or more injectors not<br />
performing properly.<br />
n. Correct flywheel runout<br />
(WP 0042 00).<br />
o. Replace flywheel (WP 0042 00)<br />
or replace faulty injectors<br />
(WP 0043 00).<br />
13. ENGINE<br />
WILL NOT IDLE<br />
14. FUEL LEAKS<br />
AT FUEL PUMP<br />
OR INJECTOR<br />
15. ENGINE DOES NOT<br />
DEVELOP FULL<br />
POWER<br />
a. Check fuel pump idle setting.<br />
b. Check for improperly assembled<br />
governor spring.<br />
c. Check for stuck governor spring<br />
plunger.<br />
d. Check for plugged governor<br />
barrel.<br />
a. Check for faulty seals <strong>and</strong><br />
O-rings in fuel pump.<br />
b. Check for mutilated injector<br />
O-rings.<br />
c. Check for faulty fuel filter<br />
gasket.<br />
a. Check for damaged turbocharger.<br />
b. Check for improperly adjusted<br />
valves <strong>and</strong> injectors.<br />
c. Check for worn or scored fuel<br />
pump components.<br />
d. Check for dirty fuel injector(s).<br />
e. Check for scuffed cylinder liners.<br />
f. Check for incorrect injection<br />
timing.<br />
g. Check for plugged electric shutoff<br />
(solenoid) valve.<br />
h. Check for plugged fuel pump<br />
throttle control shaft.<br />
i. Check for burned valves.<br />
j. Check for plugged Air Fuel<br />
Control (AFC) breather<br />
(check valve).<br />
a. Adjust idle setting (WP 0044 00).<br />
b. Assemble governor spring<br />
correctly (WP 0037 00).<br />
c. Free governor spring plunger<br />
(WP 0037 00).<br />
d. Clean governor barrel<br />
(WP 0037 00).<br />
a. Install new seals <strong>and</strong> O-rings<br />
(WP 0033 00).<br />
b. Replace injector mounting<br />
O-rings (WP 0039 00).<br />
c. Replace gasket (WP 0039 00).<br />
a. Repair turbocharger<br />
(WP 0026 00 <strong>and</strong> WP 0027 00).<br />
b. Adjust valves <strong>and</strong> injectors<br />
(WP 0043 00).<br />
c. Repair fuel pump (WP 0033 00).<br />
d. Clean fuel injector(s)<br />
(WP 0032 00).<br />
e. Replace cylinder liners<br />
(WP 0013 00).<br />
f. Adjust injection system timing<br />
(WP 0042 00).<br />
g. Clean electric shutoff valve<br />
(solenoid) (WP 0034 00).<br />
h. Clean or replace fuel pump<br />
throttle control shaft<br />
(WP 0040 00).<br />
i. Reface or replace valves <strong>and</strong><br />
valve seats (WP 0014 00).<br />
j. Replace AFC breather<br />
(WP 0040 00).<br />
0004 00-6
TM 9-2815-225-34&P 0004 00<br />
ENGINE TROUBLESHOOTING (Contd)<br />
Table 1. Engine Troubleshooting (Contd).<br />
MALFUNCTION TEST OR INSPECTION CORRECTIVE ACTION<br />
16. ENGINE MISSES OR<br />
RUNS ERRATICALLY<br />
a. Check for improperly adjusted<br />
valves <strong>and</strong> injectors.<br />
b. Check injector for leaking middle<br />
O-ring.<br />
c. Check for damaged rocker arms.<br />
d. Check for broken fuel injector<br />
plunger spring.<br />
e. Check for broken or deformed<br />
injector cup.<br />
f. Check for plugged injector cup<br />
spray holes.<br />
g. Check for plugged metering or<br />
drain orifice in fuel injectors.<br />
h. Check for burned or excessively<br />
pitted valves.<br />
i. Check for cracked or broken<br />
valve seat inserts.<br />
j. Check for incorrect injection<br />
timing.<br />
k. Check for leaking injector<br />
sleeves.<br />
a. Adjust valves <strong>and</strong> injectors<br />
(WP 0043 00).<br />
b. Replace injector middle O-ring<br />
(WP 0032 00).<br />
c. Replace rocker arms<br />
(WP 0020 00).<br />
d. Replace fuel injector plunger<br />
spring (WP 0032 00).<br />
e. Replace injector cup (WP 0032 00).<br />
f. Clean injector cups<br />
(WP 0032 00).<br />
g. Clean fuel injectors<br />
(WP 0032 00).<br />
h. Reface or replace valves <strong>and</strong><br />
valve seat inserts (WP 0014 00).<br />
i. Replace damaged valve seat<br />
inserts (WP 0014 00).<br />
j. Adjust injection system timing<br />
(WP 0043 00).<br />
k. Replace injector sleeves<br />
(WP 0043 00).<br />
17. EXCESSIVE<br />
GEAR NOISE<br />
a. Check for broken or worn gear<br />
teeth.<br />
b. Check for excessive gear<br />
backlash.<br />
a. Replace gears or units having<br />
damaged teeth (refer to<br />
WP 0013 00, WP 0017 00<br />
<strong>and</strong> WP 0036 00).<br />
b. Replace defective gears or shafts<br />
(refer to WP 0042 00).<br />
18. EXCESSIVE OIL LOSS a. Check for cracked or broken front<br />
gearcase cover.<br />
b. Check for defective seals <strong>and</strong><br />
gaskets.<br />
c. Check for leaking rear cover oil<br />
seal or gaskets.<br />
a. Replace front gearcase cover<br />
(WP 0010 00 <strong>and</strong> WP 0045 00).<br />
b. Replace faulty seals <strong>and</strong> gaskets<br />
as required.<br />
c. Replace rear cover oil seal or<br />
gaskets (WP 0013 00).<br />
19. SLUDGE FORMATION<br />
IN CRANKCASE<br />
Check for moisture in crankcase.<br />
a. Isolate the source <strong>and</strong> repair as<br />
required.<br />
b. Inspect for tears on head gasket<br />
cylinder openings.<br />
0004 00-7
TM 9-2815-225-34&P 0004 00<br />
ENGINE TROUBLESHOOTING (Contd)<br />
Table 1. Engine Troubleshooting (Contd).<br />
MALFUNCTION TEST OR INSPECTION CORRECTIVE ACTION<br />
20. LUBRICATING OIL<br />
DILUTED<br />
a. Check for moisture in crankcase.<br />
b. Check injector for damaged<br />
O-ring.<br />
c. Check for defective injector(s).<br />
d. Check for broken piston.<br />
e. Check for cracked or broken<br />
piston rings.<br />
a. Isolate source <strong>and</strong> repair as<br />
required.<br />
b. Inspect for tears at head gasket<br />
cylinder openings.<br />
c. Replace injector O-ring<br />
(WP 0032 00).<br />
d. Repair injectors (WP 0032 00).<br />
e. Replace piston (WP 0018 00).<br />
f. Replace broken piston rings<br />
(WP 0018 00).<br />
21. LOW COMPRESSION a. Check adjustment of valve <strong>and</strong><br />
injectors.<br />
b. Check for worn cylinder liners.<br />
c. Check for leaking cylinder head<br />
gasket.<br />
d. Check for worn piston rings.<br />
e. Check for incorrect timing.<br />
f. Check for valves not seating.<br />
22. ENGINE OVERSPEED a. Check for improperly adjusted<br />
governor.<br />
b. Check for defective governor or<br />
fuel pump.<br />
a. Adjust valves <strong>and</strong> injectors<br />
(WP 0043 00).<br />
b. Replace cylinder liners<br />
(WP 0013 00).<br />
c. Replace gasket (WP 0011 00 <strong>and</strong><br />
WP 0043 00).<br />
d. Replace piston rings<br />
(WP 0018 00).<br />
e. Adjust injection system timing<br />
(WP 0043 00).<br />
f. Reface valves <strong>and</strong> seats<br />
(WP 0014 00).<br />
a. Adjust governor (WP 0038 00).<br />
b. Repair governor or fuel injection<br />
pump as necessary (WP 0033 00<br />
<strong>and</strong> WP 0038 00).<br />
END OF WORK PACKAGE<br />
0004 00-8
TM 9-2815-225-34&P<br />
CHAPTER 3<br />
MAINTENANCE INSTRUCTIONS<br />
FOR<br />
ENGINE, DIESEL<br />
CUMMINS MODEL NTC-400<br />
M915, M915A1, M915A4,<br />
M916, M920 VEHICLES
TM 9-2815-225-34&P<br />
CHAPTER 3<br />
MAINTENANCE INSTRUCTIONS<br />
Work Package Title<br />
Work Package/Page No.<br />
Preventive Maintenance Checks <strong>and</strong><br />
Services (PMCS) Introduction . . . . . . . . . . . . . . . . . . . . . . . . WP 0005 00-1<br />
Preventive Maintenance Checks <strong>and</strong><br />
Services (PMCS) Instructions . . . . . . . . . . . . . . . . . . . . . . . . WP 0006 00-1<br />
Big Cam I Engine Removal . . . . . . . . . . . . . . . . . . . . . . . . . . . . WP 0007 00-1<br />
Big Cam III Engine Removal . . . . . . . . . . . . . . . . . . . . . . . . . . WP 0008 00-1<br />
Mounting Engine on Maintenance St<strong>and</strong> . . . . . . . . . . . . . . . . WP 0009 00-1<br />
Engine Accessories Removal . . . . . . . . . . . . . . . . . . . . . . . . . . . WP 0010 00-1<br />
Cylinder Head <strong>and</strong> Cylinder Head Components Removal . . . WP 0011 00-1<br />
Cylinder Block Components Removal . . . . . . . . . . . . . . . . . . . WP 0012 00-1<br />
Cylinder Block . . . . . . . . . . . . . . . . . . . . . . . . . . . . . . . . . . . . . . WP 0013 00-1<br />
Cylinder Head . . . . . . . . . . . . . . . . . . . . . . . . . . . . . . . . . . . . . . WP 0014 00-1<br />
Vibration Damper <strong>and</strong> Crankshaft Pulley<br />
Cleaning <strong>and</strong> Inspection . . . . . . . . . . . . . . . . . . . . . . . . . . . . WP 0015 00-1<br />
Crankshaft Cleaning <strong>and</strong> Inspection . . . . . . . . . . . . . . . . . . . . WP 0016 00-1<br />
Flexplate, Flywheel, Flywheel Housing, <strong>and</strong> Rear Cover<br />
Cleaning <strong>and</strong> Inspection . . . . . . . . . . . . . . . . . . . . . . . . . . . . WP 0017 00-1<br />
Pistons, Connecting Rods, <strong>and</strong> Bearings . . . . . . . . . . . . . . . . . WP 0018 00-1<br />
Camshaft, Camshaft Followers, <strong>and</strong> Pushrods . . . . . . . . . . . . WP 0019 00-1<br />
Rocker Levers <strong>and</strong> Rocker Lever Housing . . . . . . . . . . . . . . . . WP 0020 00-1<br />
Oil Cooler . . . . . . . . . . . . . . . . . . . . . . . . . . . . . . . . . . . . . . . . . WP 0021 00-1<br />
Oil Pan, Dipstick, Oil Suction Tubes, <strong>and</strong> Breather Tube . . . WP 0022 00-1<br />
Oil Pump . . . . . . . . . . . . . . . . . . . . . . . . . . . . . . . . . . . . . . . . . . WP 0023 00-1<br />
Air Aftercooler . . . . . . . . . . . . . . . . . . . . . . . . . . . . . . . . . . . . . . WP 0024 00-1<br />
Exhaust Manifold . . . . . . . . . . . . . . . . . . . . . . . . . . . . . . . . . . . WP 0025 00-1<br />
Turbocharger . . . . . . . . . . . . . . . . . . . . . . . . . . . . . . . . . . . . . . . WP 0026 00-1<br />
Turbocharger HT-3B . . . . . . . . . . . . . . . . . . . . . . . . . . . . . . . . . WP 0027 00-1<br />
Front Gear Cover . . . . . . . . . . . . . . . . . . . . . . . . . . . . . . . . . . . . WP 0028 00-1<br />
Accessory Drive <strong>and</strong> Accessory Drive Pulley . . . . . . . . . . . . . . WP 0029 00-1<br />
Engine Retarder . . . . . . . . . . . . . . . . . . . . . . . . . . . . . . . . . . . . . WP 0030 00-1<br />
Air Compressor . . . . . . . . . . . . . . . . . . . . . . . . . . . . . . . . . . . . . WP 0031 00-1<br />
Fuel Injector . . . . . . . . . . . . . . . . . . . . . . . . . . . . . . . . . . . . . . . . WP 0032 00-1<br />
Fuel Pump Disassembly . . . . . . . . . . . . . . . . . . . . . . . . . . . . . . WP 0033 00-1<br />
Solenoid Valve . . . . . . . . . . . . . . . . . . . . . . . . . . . . . . . . . . . . . . WP 0034 00-1<br />
Fuel Damper <strong>and</strong> Head . . . . . . . . . . . . . . . . . . . . . . . . . . . . . . . WP 0035 00-1<br />
Fuel Gear Pump . . . . . . . . . . . . . . . . . . . . . . . . . . . . . . . . . . . . . WP 0036 00-1<br />
Fuel Pump Governor Spring . . . . . . . . . . . . . . . . . . . . . . . . . . . WP 0037 00-1<br />
Fuel Pump Front Cover <strong>and</strong> Governor . . . . . . . . . . . . . . . . . . . WP 0038 00-1
TM 9-2815-225-34&P<br />
Work Package Title<br />
Work Package/Page No.<br />
Fuel Pump Main Housing . . . . . . . . . . . . . . . . . . . . . . . . . . . . . WP 0039 00-1<br />
Fuel Pump Assembly . . . . . . . . . . . . . . . . . . . . . . . . . . . . . . . . . WP 0040 00-1<br />
Water Pump . . . . . . . . . . . . . . . . . . . . . . . . . . . . . . . . . . . . . . . . WP 0041 00-1<br />
Cylinder Block Components Installation . . . . . . . . . . . . . . . . . WP 0042 00-1<br />
Cylinder Head <strong>and</strong> Cylinder Head Components<br />
Installation . . . . . . . . . . . . . . . . . . . . . . . . . . . . . . . . . . . . . . . WP 0043 00-1<br />
Fuel Pump Testing <strong>and</strong> Calibration . . . . . . . . . . . . . . . . . . . . . WP 0044 00-1<br />
Engine Accessories Installation . . . . . . . . . . . . . . . . . . . . . . . . WP 0045 00-1<br />
Removing Engine from Maintenance St<strong>and</strong> . . . . . . . . . . . . . . WP 0046 00-1<br />
Engine Testing . . . . . . . . . . . . . . . . . . . . . . . . . . . . . . . . . . . . . . WP 0047 00-1<br />
Big Cam III Engine Installation . . . . . . . . . . . . . . . . . . . . . . . . WP 0048 00-1<br />
Big Cam I Engine Installation . . . . . . . . . . . . . . . . . . . . . . . . . WP 0049 00-1<br />
Big Cam III Modification Kit Installation Instructions . . . . . WP 0050 00-1<br />
General Maintenance Instructions . . . . . . . . . . . . . . . . . . . . . . WP 0051 00-1<br />
Illustrated List of Manufactured Items . . . . . . . . . . . . . . . . . . WP 0052 00-1<br />
Torque Limits . . . . . . . . . . . . . . . . . . . . . . . . . . . . . . . . . . . . . . . WP 0053 00-1<br />
Wear Limits . . . . . . . . . . . . . . . . . . . . . . . . . . . . . . . . . . . . . . . . WP 0054 00-1
TM 9-2815-225-34&P 0005 00<br />
DIRECT SUPPORT AND GENERAL SUPPORT<br />
MAINTENANCE MANUAL<br />
INCLUDING REPAIR PARTS AND SPECIAL TOOLS LIST (RPSTL)<br />
FOR<br />
M915, M915A1, M915A4, M916, M920 VEHICLES<br />
NSN 2815-01-082-8125 P/N NTC400-3652-02 CUMMINS NTC-400 BIG CAM I DIESEL ENGINE<br />
W/CONTAINER<br />
NSN 2815-01-142-2745 P/N 11669835 CUMMINS NTC-400 BIG CAM III DIESEL ENGINE<br />
W/CONTAINER<br />
PREVENTIVE MAINTENANCE CHECKS AND SERVICES (PMCS) INTRODUCTION<br />
SCOPE<br />
This Work Package (WP) explains the content <strong>and</strong> format of the Unit Level PMCS Instructions table<br />
contained in WP 0006 00. Also included in this WP are PMCS <strong>and</strong> lubrication guidelines that should be<br />
reviewed before performing any PMCS procedures.<br />
EXPLANATION OF PMCS TABLE<br />
Item Number Column. Numbers in this column are for reference. When completing DA Form 2404<br />
(Equipment Inspection <strong>and</strong> Maintenance Worksheet), include the item number for the check/service<br />
indicating a fault. Item numbers also indicate the order in which you must perform checks <strong>and</strong> services<br />
for the interval listed.<br />
Interval Column. This column tells you when you must perform each procedure in each Procedure<br />
column.<br />
Before—procedures must be done immediately before you operate the vehicle.<br />
During—procedures must be done while you are operating the vehicle.<br />
After—procedures must be done immediately after you have operated the vehicle.<br />
Weekly—procedures must be done once each week.<br />
Monthly—procedures must be done once each month.<br />
Item to Inspect/Service Column. This column provides the location <strong>and</strong> item to be checked or<br />
serviced <strong>and</strong> manhours to complete task.<br />
Procedure Column. This column identifies the procedure you must perform to check or service the<br />
item listed in the Item to Inspect/Service column. You must perform the procedure at the time stated in<br />
the interval column.<br />
Equipment Not Ready/Available If: Column. Information in this column tells you what faults keep<br />
your equipment from being capable of performing its primary mission. If checks or service procedures<br />
show faults listed in this column, the equipment is not mission-capable. Follow st<strong>and</strong>ard operating<br />
procedures for maintaining the equipment or reporting equipment failure.<br />
0005 00-1
TM 9-2815-225-34&P 0005 00<br />
PREVENTIVE MAINTENANCE CHECKS AND SERVICES (PMCS) INTRODUCTION (Contd)<br />
PMCS GUIDELINES<br />
Before performing preventive <strong>maintenance</strong>, read all the checks required for the applicable interval <strong>and</strong><br />
prepare all the tools you need to make all the checks.<br />
Always perform PMCS in the same order so it becomes a habit. Once you’ve had some practice, you<br />
should be able to spot problems in a hurry. If the vehicle does not perform as required, refer to the<br />
appropriate troubleshooting procedure in WP 0004 00.<br />
If anything looks wrong <strong>and</strong> you can’t fix it, write it on your DA Form 2404. If you find something<br />
seriously wrong, IMMEDIATELY report it to your supervisor.<br />
Keep It Clean. Dirt, grease, oil, <strong>and</strong> debris get in the way <strong>and</strong> may cover up a serious problem. Clean<br />
as you work <strong>and</strong> as needed. Use detergent (Item 34, WP 0060 00) <strong>and</strong> water when you clean metal,<br />
rubber, plastic, <strong>and</strong> painted surfaces.<br />
Rust <strong>and</strong> Corrosion. Inspect metal parts for rust <strong>and</strong> corrosion. If any bare metal or corrosion exists,<br />
clean <strong>and</strong> apply a light coat of lubricating oil (Item 16, WP 0060 00) <strong>and</strong> report it to your supervisor.<br />
Bolts, Nuts, <strong>and</strong> Screws. Inspect bolts, nuts, <strong>and</strong> screws for obvious looseness <strong>and</strong> missing, bent, or<br />
broken condition. Inspect for chipped paint, bare metal, or rust around bolt heads. If you find one you<br />
think is loose, tighten it.<br />
Welds. Inspect for loose or chipped paint, rust, or gaps where parts are welded together. If you find a<br />
bad weld, report it to your supervisor.<br />
Electric Wires <strong>and</strong> Connectors. Inspect for cracked, chafed, or broken insulation, bare wires, <strong>and</strong><br />
loose or broken connectors. Tighten loose connectors <strong>and</strong> ensure that the wires are in good condition.<br />
Hoses <strong>and</strong> Fluid Lines. Inspect for wear, damage, <strong>and</strong> signs of leaks. Ensure that clamps <strong>and</strong> fittings<br />
are tight. Wet spots indicate leaks, but a stain around a fitting or connector can also mean a leak. If a<br />
leak comes from a loose fitting or connector, tighten it. If something is broken or worn out, report it to<br />
your supervisor.<br />
Fluid Leakage. It is necessary for you to know how fluid leakage affects the status of the engine.<br />
Following are types/classes of leakage you need to know to be able to determine the status of your<br />
truck. Learn these leakage definitions <strong>and</strong> remember: when in doubt, notify your supervisor.<br />
Leakage Definitions for PMCS<br />
Class I<br />
Class II<br />
Class III<br />
CAUTION<br />
• Equipment operation is allowed with minor leakages (Class I<br />
or II). Consideration must be given to fluid capacity in the<br />
item/system being checked/inspected. When in doubt, notify<br />
your supervisor.<br />
• When operating with Class I or II leaks, continue to check<br />
fluid levels as required in the PMCS.<br />
• Class III leaks should be reported immediately to your<br />
supervisor.<br />
Seepage of fluid (as indicated by wetness or discoloration) not great enough to form<br />
drops.<br />
Leakage of fluid great enough to form drops, but not enough to cause drops to drip from<br />
item being checked/inspected.<br />
Leakage of fluid great enough to form drops that fall from item being checked/inspected.<br />
0005 00-2
TM 9-2815-225-34&P 0005 00<br />
PREVENTIVE MAINTENANCE CHECKS AND SERVICES (PMCS) INTRODUCTION (Contd)<br />
LUBRICATION GUIDELINES<br />
1. These instructions are m<strong>and</strong>atory.<br />
2. This equipment is enrolled in the Army Oil Analysis Program (AOAP). Engine oil <strong>and</strong><br />
transmission oil must be sampled every 90 days as prescribed by DA PAM 738-750.<br />
3. Engines must receive lubrication with approved lubricants at recommended intervals in order to<br />
be mission-ready at all times.<br />
4. Recommended intervals are based on normal conditions of operation, temperature, <strong>and</strong> humidity.<br />
When operating under extreme conditions, lubricants should be changed more frequently. When<br />
in doubt, notify your supervisor.<br />
SPECIFIC LUBRICATION INSTRUCTIONS<br />
1. Keep all lubricants in a closed container <strong>and</strong> store in a clean, dry place away from extreme heat.<br />
Keep container covers clean <strong>and</strong> do not allow dust, dirt, or other foreign material to mix with<br />
lubricants. Keep lubrication equipment clean <strong>and</strong> ready for use.<br />
2. Maintain a record of lubrication performed <strong>and</strong> report any problems noted during lubrication.<br />
Refer to DA PAM 738-750 for <strong>maintenance</strong> forms <strong>and</strong> procedures to record <strong>and</strong> report any<br />
findings.<br />
3. Keep all external parts of equipment not requiring lubrication free of lubricants. After lubrication,<br />
wipe off excess lubricant to prevent accumulation of foreign matter.<br />
4. Refer to FM 9-207 for lubrication instructions in cold weather.<br />
END OF WORK PACKAGE<br />
0005 00-3/4 blank
TM 9-2815-225-34&P 0006 00<br />
DIRECT SUPPORT AND GENERAL SUPPORT<br />
MAINTENANCE MANUAL<br />
INCLUDING REPAIR PARTS AND SPECIAL TOOLS LIST (RPSTL)<br />
FOR<br />
M915, M915A1, M915A4, M916, M920 VEHICLES<br />
NSN 2815-01-082-8125 P/N NTC400-3652-02 CUMMINS NTC-400 BIG CAM I DIESEL ENGINE<br />
W/CONTAINER<br />
NSN 2815-01-142-2745 P/N 11669835 CUMMINS NTC-400 BIG CAM III DIESEL ENGINE<br />
W/CONTAINER<br />
PREVENTIVE MAINTENANCE CHECKS AND SERVICES (PMCS) INSTRUCTIONS<br />
INTERVALS<br />
An overhauled engine must receive periodic <strong>maintenance</strong> to ensure it remains reliable <strong>and</strong> meets its<br />
expected service life. To meet these in-service expectations, PMCS service items <strong>and</strong> intervals included<br />
in this in this Work Package (WP) are to be followed.<br />
These instruction apply only to vehicles in normal operation. Engines must be serviced more frequently<br />
to compensate for abnormal or extreme conditions, such as high or low temperatures, immersions in<br />
water, or exposure to s<strong>and</strong> or dust. Intervals for changing filters (fuel, oil, air, etc.) are the same.<br />
Lubricants that have become contaminated must be changed regardless of scheduled intervals.<br />
Intervals for items under warranty must follow manufacturer recommendations until after the<br />
warranty has expired.<br />
Points requiring lubrication at 1000 or 2000 miles on vehicles not accumulating that amount in a<br />
six-month period will be lubricated semi-annually. Points requiring lubrication at 10,000, 24,000, or<br />
50,000 miles on vehicles not accumulating that amount in a twelve-month period will be lubricated<br />
annually. When practicable, lubrication services will coincide with vehicle organizational PMCS.<br />
0006 00-1
TM 9-2815-225-34&P 0006 00<br />
PREVENTIVE MAINTENANCE CHECKS AND SERVICES (PMCS) INSTRUCTIONS (Contd)<br />
FUEL PUMP SCREEN AND FUEL FILTER<br />
WARNING<br />
Compressed air used for cleaning purposes must not exceed<br />
30 psi. Use only with effective chip guarding <strong>and</strong> personal<br />
protective equipment (goggles/shield, gloves, etc.).<br />
Fuel Pump Screen—Soak screen in a carbon dissolving agent, then flush it in a sonic cleaner unit, or<br />
clean screen in fuel oil <strong>and</strong> dry with compressed air. Visually inspect screen for holes or embedded<br />
metal particles in mesh. Discard screen if damaged or worn <strong>and</strong> replace with new part.<br />
Fuel Filter (spin-on type)—Change fuel filter at 10,000-mile intervals. Open petcock <strong>and</strong> drain fuel<br />
into a suitable container. Remove element with a filter wrench <strong>and</strong> transfer petcock from old filter to<br />
new.<br />
CRANKCASE<br />
Check oil level daily <strong>and</strong> change oil hot full flow bypass filter elements at 10,000 miles or six months,<br />
which ever occurs first. To check engine oil level, wait at least 1 minute after stopping to allow oil to<br />
drain into crankcase. Safe operating level is between ADD <strong>and</strong> FULL mark on dipstick. Engine<br />
capacity is 11.5 gallons with both filters. Check <strong>and</strong> clean crankcase breather <strong>and</strong> attaching hoses<br />
whenever oil is changed.<br />
STARTER<br />
NOTE<br />
Do not lubricate alternator <strong>and</strong> starter wiring.<br />
Remove starter every 100,000 miles for lubrication. Refer to TM 9-2320-273-20. Remove three socket<br />
head screws, add three to five drops of SAE oil to each reservoir, <strong>and</strong> lubricate drive <strong>and</strong> drive spline.<br />
Clean with solvent, then apply a thin coat of grease (GAA) so the pinion will move freely.<br />
ALTERNATOR<br />
Inspect alternator at 100,000-mile intervals. No lubrication is required. Bearings are sealed for life.<br />
AIR FILTER<br />
WARNING<br />
Compressed air used for cleaning purposes must not exceed<br />
30 psi. Use only with effective chip guarding <strong>and</strong> personal<br />
protective equipment (goggles/shield, gloves, etc.).<br />
Service air filter when red shows in window of restriction indicator or at 2000 miles, which ever comes<br />
first. Refer to TM 9-2320-273-10 for location <strong>and</strong> function of indicator Outside element can be washed<br />
up to five times or blown clean with air an indefinite number of times. Outside element is costly <strong>and</strong><br />
should be reused. H<strong>and</strong>le <strong>and</strong> clean carefully. Inside safety filter should not be washed or blown clean<br />
<strong>and</strong> should be replaced every 10,000 miles.<br />
Clean the outside element by tapping the element, reverse flow cleaning with compressed air, or<br />
washing in water with a mild non-sudsing detergent.<br />
TEMPERATURE RISE<br />
If ambient temperature rises to +70º F for no more than one week, use of OE/HDO 10 lubricating oil is<br />
permissible. If ambient temperature rises to +32º F for no more than one week, use of OEA lubricating<br />
oil is permissible.<br />
0006 00-2
TM 9-2815-225-34&P 0006 00<br />
PREVENTIVE MAINTENANCE CHECKS AND SERVICES (PMCS) INSTRUCTIONS (Contd)<br />
UNIT LEVEL PMCS<br />
Table 1. Unit Level PMCS Instructions.<br />
ITEM<br />
NO.<br />
INTERVAL<br />
MAN<br />
HOURS<br />
ITEM TO<br />
CHECK/SERVICE<br />
PROCEDURE<br />
1 Semi-annual 0.5 Pre-service a. Notice if starter engages<br />
smoothly <strong>and</strong> turns engine<br />
at normal cranking speed.<br />
b. Listen for unusual engine<br />
noise at idle, at operating<br />
speeds, <strong>and</strong> under<br />
acceleration. Be alert for<br />
excessive vibration <strong>and</strong><br />
the smell of oil, fuel, <strong>and</strong><br />
exhaust.<br />
c. Check engine operation at<br />
all speeds. Ensure that<br />
engine does not go above,<br />
or below, engine governed<br />
speed (600–2100 rpm)<br />
2 Semi-annual 2.0 Fuel system a. Inspect fuel filter/water<br />
separator assembly for<br />
dents <strong>and</strong> cracks that<br />
could cause leaks.<br />
b. Replace filter element<br />
every 3,000 miles<br />
(4,827 km) or<br />
semiannually, whichever<br />
occurs first.<br />
WARNING<br />
Adhesives, solvents, <strong>and</strong><br />
sealing compounds can burn<br />
easily, give off harmful<br />
vapors, <strong>and</strong> damage skin <strong>and</strong><br />
clothing. To avoid injury or<br />
death, keep away from fire<br />
<strong>and</strong> use in well-ventilated<br />
area. If adhesive, solvents, or<br />
sealing compound get on<br />
skin or clothing, wash<br />
immediately with soap <strong>and</strong><br />
water.<br />
c. Clean screen by soaking in<br />
a carbon dissolving agent,<br />
then flush in a sonic<br />
cleaner unit, or clean<br />
screen in fuel oil <strong>and</strong> dry<br />
with compressed air.<br />
Visually inspect screen for<br />
holes or embedded metal<br />
particles in mesh.<br />
EQUIPMENT NOT READY/<br />
AVAILABLE IF:<br />
a. Starter inoperative or<br />
makes excessive grinding<br />
noise.<br />
b. Engine knocks, rattles,<br />
or smokes excessively.<br />
c. Engine governed speed<br />
at no-load is below<br />
600 rpm or exceeds<br />
2100 rpm.<br />
a. Any Class III leak.<br />
b. Fuel filter clogged.<br />
c. Screen is worn or<br />
damaged.<br />
0006 00-3
TM 9-2815-225-34&P 0006 00<br />
PREVENTIVE MAINTENANCE CHECKS AND SERVICES (PMCS) INSTRUCTIONS (Contd)<br />
Table 1. Unit Level PMCS Instructions (Contd).<br />
ITEM<br />
NO.<br />
INTERVAL<br />
MAN<br />
HOURS<br />
ITEM TO<br />
CHECK/SERVICE<br />
PROCEDURE<br />
EQUIPMENT NOT READY/<br />
AVAILABLE IF:<br />
2<br />
(Contd)<br />
4.8 d. Purge <strong>and</strong> clean fuel tank<br />
(TB 43-0212), if required.<br />
e. Inspect fuel injection<br />
pump, nozzle lines, <strong>and</strong><br />
fittings for leaks <strong>and</strong><br />
damage.<br />
e. Rubber cap missing or<br />
torn on return line.<br />
f. Inspect all fuel lines for<br />
loose connections, splits,<br />
cracks, <strong>and</strong> kinks that<br />
could leak.<br />
f. Any Class III leak.<br />
3 Semi-annual 2.0 Aftercooler Inspect aftercooler for leaks<br />
<strong>and</strong> loose hardware.<br />
4 Semi-annual 0.5 Engine<br />
accessory<br />
drive<br />
Inspect for missing, broken,<br />
cracked, <strong>and</strong> frayed<br />
drivebelts; dry rot; excessive<br />
fraying; <strong>and</strong> cracks.<br />
5 Semi-annual 0.5 Water pump a. Inspect pulley for<br />
alignment.<br />
6 Semi-annual 0.5 Thermostat<br />
housing <strong>and</strong><br />
front, center,<br />
<strong>and</strong> rear<br />
water<br />
manifolds<br />
7 Semi-annual 0.5 Alternator<br />
wiring <strong>and</strong><br />
engine mount<br />
b. Inspect belt for proper<br />
tension (1/2–3/4 in.<br />
(1.2–1.9 cm)) deflection<br />
when you press down<br />
firmly.<br />
c. Inspect water pump for<br />
leaks <strong>and</strong> inspect fan<br />
shrouds for secure<br />
mounting.<br />
Inspect thermostat housing<br />
<strong>and</strong> water manifold for leaks.<br />
a. Inspect for loose wiring<br />
connections or worn<br />
insulation.<br />
b. Inspect for cracked or<br />
loose engine mounts.<br />
Class III leaks or loose<br />
hardware.<br />
Any drivebelt is missing or<br />
broken; belt fiber has more<br />
than one crack (50% of belt<br />
thickness) or has frays<br />
more than 2 in. (5.08 cm)<br />
long.<br />
b. Any drivebelt is missing<br />
or broken; belt fiber has<br />
more than one crack<br />
(50% of belt thickness) or<br />
has frays more than 2 in.<br />
(5.08 cm) long.<br />
a. Loose connections or<br />
worn insulation.<br />
b. Cracked or loose engine<br />
mounts.<br />
0006 00-4
TM 9-2815-225-34&P 0006 00<br />
PREVENTIVE MAINTENANCE CHECKS AND SERVICES (PMCS) INSTRUCTIONS (Contd)<br />
Table 1. Unit Level PMCS Instructions (Contd).<br />
ITEM<br />
NO.<br />
INTERVAL<br />
MAN<br />
HOURS<br />
ITEM TO<br />
CHECK/SERVICE<br />
8 Semi-annual 1.0 Cooling<br />
system<br />
PROCEDURE<br />
WARNING<br />
If vehicle has been operating,<br />
use extreme care to avoid<br />
being burned when removing<br />
cooling system radiator cap.<br />
Use heavy rags or gloves to<br />
protect h<strong>and</strong>s. Turn radiator<br />
cap only one-half turn<br />
counterclockwise <strong>and</strong> allow<br />
pressure to be relieved before<br />
fully removing cap.<br />
NOTE<br />
Coolant level is correct when<br />
sight glass is full<br />
(TM 9-2320-273-10).<br />
Use MIL-A-46153 in<br />
temperatures above 0° F<br />
(-18° C).<br />
a. Inspect coolant condition.<br />
Test coolant to see if<br />
draining is required<br />
(TB 750-651).<br />
b. Inspect all hoses for<br />
looseness, splits, wear,<br />
<strong>and</strong> cracks that would<br />
cause leaks.<br />
c. Inspect hose clamps for<br />
wear <strong>and</strong> serviceability.<br />
EQUIPMENT NOT READY/<br />
AVAILABLE IF:<br />
a. Coolant condition/testing<br />
shows draining is<br />
required.<br />
b. Class III leakage evident.<br />
Hoses are loose or have<br />
splits or cracks.<br />
c. Hose clamps are worn or<br />
unserviceable.<br />
9 Semi-annual Engine<br />
crankcase<br />
NOTE<br />
For operation of equipment<br />
in expected continuous<br />
temperatures below 0° F<br />
(-18° C), remove lubricants<br />
prescribed for temperatures<br />
above 0° F (-18° C).<br />
Relubricate with lubrication<br />
specified for temperatures<br />
0° F to -50° F (-18° C to<br />
-460° C).<br />
NOTE<br />
If AOAP laboratory is not<br />
available, drain <strong>and</strong> refill<br />
engine crankcase with<br />
OE/HDO every 6,000 miles<br />
(9,654 km) or semiannually,<br />
whichever comes first.<br />
Lubricate fan clutch with<br />
GAA.<br />
“Do not operate” received<br />
from AOAP lab.<br />
0006 00-5
TM 9-2815-225-34&P 0006 00<br />
PREVENTIVE MAINTENANCE CHECKS AND SERVICES (PMCS) INSTRUCTIONS (Contd)<br />
Table 1. Unit Level PMCS Instructions (Contd).<br />
ITEM<br />
NO.<br />
INTERVAL<br />
MAN<br />
HOURS<br />
ITEM TO<br />
CHECK/SERVICE<br />
10 Semi-annual 1.0 Engine<br />
crankcase<br />
PROCEDURE<br />
a. Drain <strong>and</strong> refill crankcase<br />
with OE/HDO lubricating<br />
oil.<br />
b. Replace engine oil filter<br />
<strong>and</strong> bypass oil filter.<br />
c. Inspect all oil lines <strong>and</strong><br />
hoses for cracks <strong>and</strong> wear<br />
that could cause leaks.<br />
d. Inspect oil filter housing<br />
<strong>and</strong> oil pan drain plug for<br />
looseness. Ensure oil pan<br />
bolts are tight.<br />
EQUIPMENT NOT READY/<br />
AVAILABLE IF:<br />
b. Oil filter has Class III<br />
leak.<br />
c. Cracks, frays, leaks, <strong>and</strong><br />
wear are evident.<br />
d. Drain plugs <strong>and</strong> oil pan<br />
bolts are loose.<br />
11 Semi-annual 0.4 Rocker cover<br />
gaskets<br />
12 Semi-annual 0.5 Oil cooler<br />
<strong>and</strong> lines<br />
Inspect rocker cover gasket<br />
for oil leaks. If necessary,<br />
tighten bolts <strong>and</strong>/or replace<br />
gaskets.<br />
Inspect oil cooler for leaks,<br />
loose hardware, <strong>and</strong><br />
damaged fittings.<br />
Crack, frays, leaks, <strong>and</strong><br />
wear are evident.<br />
Crack, frays, leaks, <strong>and</strong><br />
wear are evident.<br />
0006 00-6
TM 9-2815-225-34&P 0006 00<br />
PREVENTIVE MAINTENANCE CHECKS AND SERVICES (PMCS) INSTRUCTIONS (Contd)<br />
MAINTENANCE ALLOCATION CHART<br />
The Maintenance Allocation Charts (MACs), tables 2 <strong>and</strong> 3, designate overall authority <strong>and</strong><br />
responsibility for the performance of <strong>maintenance</strong> functions on the identified end item or component.<br />
The application of the <strong>maintenance</strong> functions to the end item or component will be consistent with the<br />
capacities <strong>and</strong> capabilities of the designated <strong>maintenance</strong> categories.<br />
EXPLANATION OF MAINTENANCE ALLOCATION CHART<br />
Column 1, Group Number—Column 1 lists code numbers, which identify <strong>maintenance</strong> significant<br />
components, assemblies, subassemblies, <strong>and</strong> modules with the higher assembly.<br />
Column 2, Component/Assembly—Column 2 contains the names of components, assemblies,<br />
subassemblies, <strong>and</strong> modules for which <strong>maintenance</strong> is authorized.<br />
Column 3, Maintenance Function—Column 3 lists the functions to be performed on the item listed<br />
in Column 2.<br />
Column 4, Maintenance Category—Column 4 specifies the category of <strong>maintenance</strong> authorized to<br />
perform each <strong>maintenance</strong> function at the indicated category of <strong>maintenance</strong>. If the number or<br />
complexity of the tasks within the listed <strong>maintenance</strong> function varies at different <strong>maintenance</strong><br />
categories, appropriate “work time” figures will be shown for each category. The “work time” figure<br />
represents the average time required to restore an item (assembly, subassembly, component, module,<br />
end item, or system) to a serviceable condition under typical field operating conditions. This time<br />
includes preparation time (<strong>including</strong> any necessary disassembly/assembly time), troubleshooting/fault<br />
location time, <strong>and</strong> quality assurance/quality control time in addition to the time required to perform<br />
each specific task. The symbol designations for the various <strong>maintenance</strong> categories are as follows:<br />
F . . . . . . . . . . . . . . . . . . . . . . . . . . . . . . . . . . . . . . . . . . . . . . . . <strong>Direct</strong> Support Maintenance<br />
H . . . . . . . . . . . . . . . . . . . . . . . . . . . . . . . . . . . . . . . . . . . . . . General Support Maintenance<br />
Column 5, Tools <strong>and</strong> Equipment—Column 5 specifies, by code, those common tool sets (not<br />
individual tools) <strong>and</strong> special tools, TMDE, <strong>and</strong> <strong>support</strong> equipment required to perform the designated<br />
function.<br />
0006 00-7
TM 9-2815-225-34&P 0006 00<br />
PREVENTIVE MAINTENANCE CHECKS AND SERVICES (PMCS) INSTRUCTIONS (Contd)<br />
Table 2. Maintenance Allocation Chart for M915–M920.<br />
(1)<br />
GROUP<br />
NO.<br />
(2)<br />
COMPONENT/<br />
ASSEMBLY<br />
(3)<br />
MAINTENANCE<br />
FUNCTION<br />
(4)<br />
MAINTENANCE<br />
CATEGORY<br />
(5)<br />
TOOLS AND<br />
EQUIPMENT<br />
F<br />
H<br />
01 ENGINE Repair<br />
Adjust<br />
Test<br />
19.2<br />
3.8<br />
0.4<br />
2-3-4<br />
0100 Engine (Diesel)<br />
Service<br />
Replace<br />
Repair<br />
11.0<br />
65.0 1 thru 77, 81, 84,<br />
85, 97<br />
Engine Mount<br />
Inspect<br />
Replace<br />
0.4<br />
99 thru 180, 189<br />
thru 221<br />
0101 Cylinder Head<br />
Inspect<br />
Replace<br />
Repair<br />
1.0<br />
7.0<br />
10.4<br />
2 thru 44, 50<br />
Engine Block<br />
Inspect<br />
Repair<br />
2.0<br />
40.0<br />
8<br />
99 thru 116<br />
128, 129<br />
Cylinder <strong>and</strong><br />
Sleeve Assembly<br />
Inspect<br />
Replace<br />
0.5<br />
18.0<br />
99 thru 101<br />
128<br />
0102 Crankshaft <strong>and</strong><br />
Main Bearings<br />
Inspect<br />
Replace<br />
0.5<br />
17.3 117 thru 119<br />
Main Seals<br />
Vibration Damper<br />
Inspect<br />
Replace<br />
Inspect<br />
Replace<br />
0.1<br />
20.0<br />
0.5<br />
1.0<br />
120 thru 127<br />
194, 195<br />
0103 Flywheel<br />
Assembly<br />
Replace 13.0 45<br />
0104 Connecting Rods,<br />
Bearings <strong>and</strong><br />
Pistons Assembly<br />
Inspect<br />
Replace<br />
Repair<br />
0.3<br />
27.0<br />
8.0<br />
207 thru 215<br />
221<br />
0006 00-8
TM 9-2815-225-34&P 0006 00<br />
PREVENTIVE MAINTENANCE CHECKS AND SERVICES (PMCS) INSTRUCTIONS (Contd)<br />
Table 2. Maintenance Allocation Chart for M915–M920 (Contd).<br />
(1)<br />
GROUP<br />
NO.<br />
(2)<br />
COMPONENT/<br />
ASSEMBLY<br />
(3)<br />
MAINTENANCE<br />
FUNCTION<br />
(4)<br />
MAINTENANCE<br />
CATEGORY<br />
(5)<br />
TOOLS AND<br />
EQUIPMENT<br />
F<br />
H<br />
0105 Valves<br />
Inspect<br />
Adjust<br />
Replace<br />
0.8<br />
1.8<br />
14.0<br />
71 thru 77<br />
2<br />
Chamshaft <strong>and</strong><br />
Bearing<br />
Inspect<br />
Adjust<br />
Replace<br />
27.0<br />
197 thru 206<br />
Cam Follower<br />
Housing<br />
Cam Follower<br />
Push Tubes<br />
(Valve)<br />
Timing Gear<br />
Rocker Arm<br />
Assembly<br />
Inspect<br />
Replace<br />
Inspect<br />
Replace<br />
Inspect<br />
Replace<br />
Inspect<br />
Replace<br />
Inspect<br />
Replace<br />
0.6<br />
2.5<br />
0.2<br />
12.0<br />
0.2<br />
14.0<br />
0.1<br />
8.0<br />
0.6<br />
24.0<br />
46 thru 49<br />
51 thru 54, 81<br />
Valve Cover <strong>and</strong><br />
Gasket<br />
Inspect<br />
Replace<br />
0006 00-9
TM 9-2815-225-34&P 0006 00<br />
PREVENTIVE MAINTENANCE CHECKS AND SERVICES (PMCS) INSTRUCTIONS (Contd)<br />
Table 2. Maintenance Allocation Chart for M915–M920 (Contd).<br />
(1)<br />
GROUP<br />
NO.<br />
(2)<br />
COMPONENT/<br />
ASSEMBLY<br />
(3)<br />
MAINTENANCE<br />
FUNCTION<br />
(4)<br />
MAINTENANCE<br />
CATEGORY<br />
(5)<br />
TOOLS AND<br />
EQUIPMENT<br />
F<br />
H<br />
0106 Oil Pump<br />
Inspect<br />
Replace<br />
Repair<br />
1.5<br />
2.5<br />
65.0 130 thru 132<br />
Oil Filter<br />
Service<br />
Replace<br />
10.8<br />
143<br />
Oil Filter Adapter<br />
Replace<br />
Bypass Oil Filter<br />
Oil Pan<br />
Service<br />
Replace<br />
External Lines<br />
Inspect<br />
Replace<br />
Repair<br />
2.0<br />
1.3<br />
Oil Breather<br />
Inspect<br />
Replace<br />
Oil Cooler<br />
Inspect<br />
Service<br />
Replace<br />
Oil Pressure<br />
Regulator<br />
Level Gauge<br />
(dipstick)<br />
Inspect<br />
Replace<br />
Inspect<br />
Test<br />
Replace<br />
Replace<br />
3.0<br />
0.1<br />
0.8<br />
0.2<br />
55<br />
0108 Aftercooler<br />
Inspect<br />
Repair<br />
Replace<br />
2.0<br />
2.5<br />
Exhaust Manifold<br />
Inspect<br />
Replace<br />
2.8<br />
109 Accessory Drive Inspect<br />
Repair<br />
Replace<br />
0112 Engine Retarder Inspect<br />
Repair<br />
Replace<br />
Adjust<br />
0.5<br />
2.0<br />
4.5<br />
3.0<br />
1.5<br />
56 thru 65<br />
6.0 81<br />
0006 00-10
TM 9-2815-225-34&P 0006 00<br />
PREVENTIVE MAINTENANCE CHECKS AND SERVICES (PMCS) INSTRUCTIONS (Contd)<br />
Table 2. Maintenance Allocation Chart for M915–M920 (Contd).<br />
(1)<br />
GROUP<br />
NO.<br />
(2)<br />
COMPONENT/<br />
ASSEMBLY<br />
(3)<br />
MAINTENANCE<br />
FUNCTION<br />
(4)<br />
MAINTENANCE<br />
CATEGORY<br />
(5)<br />
TOOLS AND<br />
EQUIPMENT<br />
F<br />
H<br />
03 FUEL SYSTEM<br />
0301 Fuel Injector<br />
Assembly<br />
Test<br />
Adjust<br />
Replace<br />
Calibrate<br />
Repair<br />
0.8<br />
4.0<br />
4.0<br />
1.0<br />
1.8<br />
71 thru 77, 84<br />
3 thru 12-84<br />
152<br />
0302 Fuel Pump<br />
Assembly<br />
Service of Filter<br />
<strong>and</strong> Screw<br />
Inspect<br />
Service<br />
Test<br />
Replace<br />
4.8<br />
2.0<br />
159<br />
160<br />
166 thru 171<br />
174<br />
192<br />
Engine Fuel Lines<br />
<strong>and</strong> Fittings<br />
Calibrate<br />
Repair<br />
Inspect<br />
Replace<br />
3.5<br />
8.9<br />
155, 156,<br />
158<br />
161 thru 164<br />
165, 172, 173<br />
177 thru 179<br />
189 thru 191, 193,<br />
216 thru 220<br />
0006 00-11
TM 9-2815-225-34&P 0006 00<br />
PREVENTIVE MAINTENANCE CHECKS AND SERVICES (PMCS) INSTRUCTIONS (Contd)<br />
Table 3. Maintenance Allocation Chart for M915A1.<br />
(1)<br />
GROUP<br />
NO.<br />
(2)<br />
COMPONENT/<br />
ASSEMBLY<br />
(3)<br />
MAINTENANCE<br />
FUNCTION<br />
(4)<br />
MAINTENANCE<br />
CATEGORY<br />
(5)<br />
TOOLS AND<br />
EQUIPMENT<br />
F<br />
H<br />
01 ENGINE<br />
0100 Engine (Diesel)<br />
Service<br />
Replace<br />
Repair<br />
16.0<br />
65.0<br />
83<br />
143<br />
Engine Mount<br />
Inspect<br />
Replace<br />
0.4<br />
0101 Cylinder Head<br />
Inspect<br />
Replace<br />
Repair<br />
1.0<br />
7.0<br />
10.4<br />
2.0<br />
10.0<br />
84, 86, 87,<br />
88, 90, 91,<br />
95 thru 95<br />
103, 104,<br />
109, 110,<br />
112, 114,<br />
121 thru<br />
124, 126,<br />
141, 168<br />
Engine Block<br />
Inspect<br />
Repair<br />
144, 145,<br />
158, 170,<br />
171<br />
Cylinder <strong>and</strong><br />
Sleeve Assembly<br />
Inspect<br />
Replace<br />
0.5<br />
18.0<br />
166<br />
0102 Crankshaft <strong>and</strong><br />
Main Bearings<br />
Inspect<br />
Replace<br />
0.5<br />
17.3 143<br />
Main Seals<br />
Inspect<br />
Replace<br />
0.1<br />
20.0<br />
100, 172<br />
Vibration Damper<br />
Inspect<br />
Replace<br />
0.5<br />
1.0<br />
0103 Disk & Gear<br />
Assembly<br />
Replace 13.0<br />
0104 Connecting Rods,<br />
Bearings <strong>and</strong><br />
Pistons Assembly<br />
Inspect<br />
Replace<br />
Repair<br />
0.3<br />
7.0<br />
8.0<br />
135,138,<br />
161,154,<br />
133,134,147<br />
0006 00-12
TM 9-2815-225-34&P 0006 00<br />
PREVENTIVE MAINTENANCE CHECKS AND SERVICES (PMCS) INSTRUCTIONS (Contd)<br />
Table 3. Maintenance Allocation Chart for M915A1 (Contd).<br />
(1)<br />
GROUP<br />
NO.<br />
(2)<br />
COMPONENT/<br />
ASSEMBLY<br />
(3)<br />
MAINTENANCE<br />
FUNCTION<br />
(4)<br />
MAINTENANCE<br />
CATEGORY<br />
(5)<br />
TOOLS AND<br />
EQUIPMENT<br />
F<br />
H<br />
0105 Valves<br />
Inspect<br />
Adjust<br />
Replace<br />
0.8<br />
1.8<br />
14.0<br />
71 thru 77<br />
2<br />
Chamshaft <strong>and</strong><br />
Bearing<br />
Inspect<br />
Replace<br />
0.8<br />
27.0<br />
197 thru 206<br />
Cam Follower<br />
Housing<br />
Inspect<br />
Replace<br />
0.2<br />
12.0<br />
46 thru 49<br />
51 thru 54, 81<br />
Cam Follower<br />
Inspect<br />
Replace<br />
0.2<br />
14.0<br />
Push Tubes<br />
(Valve)<br />
Inspect<br />
Replace<br />
0.1<br />
8.0<br />
Timing Gear<br />
Inspect<br />
Replace<br />
0.6<br />
24.0<br />
106, 113, 117<br />
Rocker Arm<br />
Assembly<br />
Inspect<br />
Replace<br />
0.6<br />
2.5<br />
93<br />
Valve Cover <strong>and</strong><br />
Gasket<br />
Inspect<br />
Replace<br />
0006 00-13
TM 9-2815-225-34&P 0006 00<br />
PREVENTIVE MAINTENANCE CHECKS AND SERVICES (PMCS) INSTRUCTIONS (Contd)<br />
Table 3. Maintenance Allocation Chart for M915A1 (Contd).<br />
(1)<br />
GROUP<br />
NO.<br />
(2)<br />
COMPONENT/<br />
ASSEMBLY<br />
(3)<br />
MAINTENANCE<br />
FUNCTION<br />
(4)<br />
MAINTENANCE<br />
CATEGORY<br />
(5)<br />
TOOLS AND<br />
EQUIPMENT<br />
F<br />
H<br />
0106 Oil Pump<br />
Inspect<br />
Replace<br />
Repair<br />
1.5<br />
2.5<br />
3.0<br />
142.165<br />
Oil Filter<br />
Service<br />
Replace<br />
82<br />
Oil Filter Adapter<br />
Oil Pan<br />
External Lines<br />
Oil Breather<br />
Oil Cooler<br />
Oil Pressure<br />
Regulator<br />
Level Gauge<br />
(dipstick)<br />
Replace<br />
Inspect<br />
Replace<br />
Repair<br />
Inspect<br />
Replace<br />
Inspect<br />
Service<br />
Replace<br />
Inspect<br />
Replace<br />
Repair<br />
Inspect<br />
Test<br />
Replace<br />
Replace<br />
2.0<br />
1.3<br />
3.0<br />
0.1<br />
0.8<br />
0.2<br />
2.0<br />
0108 Aftercooler<br />
Inspect<br />
Repair<br />
Replace<br />
2.0<br />
2.5<br />
Exhaust Manifold<br />
Inspect<br />
Replace<br />
0109 Accessory Drive Inspect<br />
Repair<br />
Replace<br />
0112 Engine Retarder Inspect<br />
Repair<br />
Replace<br />
Adjust<br />
0121 Engine Repair<br />
Replace<br />
2.8<br />
0.5<br />
2.0<br />
4.5<br />
3.0<br />
1.5<br />
4.0<br />
2.0<br />
111, 129<br />
129<br />
6.0 121, 130<br />
117<br />
34, 43, 40, 94, 101<br />
0006 00-14
TM 9-2815-225-34&P 0006 00<br />
PREVENTIVE MAINTENANCE CHECKS AND SERVICES (PMCS) INSTRUCTIONS (Contd)<br />
TOOL AND TEST EQUIPMENT REQUIREMENTS<br />
Column 1—Reference Code. The tool <strong>and</strong> test equipment reference code correlates with a code used in<br />
tables 2 <strong>and</strong> 3, Column 5.<br />
Column 2—Maintenance Category. The lowest category of <strong>maintenance</strong> authorized to use the tool or<br />
test equipment.<br />
Column 3—Nomenclature. Name or identification of the tool or test equipment.<br />
Column 4—National Stock Number. The national stock number of the tool or test equipment.<br />
Column 5—Tool Number. The manufacturer’s part number.<br />
0006 00-15
TM 9-2815-225-34&P 0006 00<br />
PREVENTIVE MAINTENANCE CHECKS AND SERVICES (PMCS) INSTRUCTIONS (Contd)<br />
Table 4. Tool <strong>and</strong> Test Equipment Requirements for M915–M920.<br />
REF<br />
CODE<br />
MAINTENANCE<br />
CATEGORY<br />
NOMENCLATURE<br />
NATIONAL STOCK NO. TOOL NUMBER<br />
1<br />
2<br />
3<br />
4<br />
5<br />
6<br />
7<br />
8<br />
9<br />
10<br />
11<br />
12<br />
13<br />
14<br />
15<br />
16<br />
17<br />
18<br />
19<br />
20<br />
21<br />
22<br />
23<br />
24<br />
25<br />
26<br />
27<br />
28<br />
29<br />
30<br />
31<br />
32<br />
33<br />
34<br />
35<br />
36<br />
F H<br />
F H<br />
F H<br />
F H<br />
F H<br />
F H<br />
F H<br />
F H<br />
F H<br />
F H<br />
F H<br />
F H<br />
F H<br />
F H<br />
F H<br />
F H<br />
F H<br />
F H<br />
F H<br />
F H<br />
F H<br />
F H<br />
F H<br />
F H<br />
F H<br />
F H<br />
F H<br />
F H<br />
F H<br />
F H<br />
F H<br />
F H<br />
F H<br />
F H<br />
F H<br />
F H<br />
Checking Tool, Blow-By<br />
Reamer, Valve Guide<br />
Cutting Tool, Bead<br />
Exp<strong>and</strong>er, Tube, Roller<br />
Cage<br />
Roll<br />
Nut, Thrust<br />
M<strong>and</strong>rel<br />
Cutter, Injector Sleeve<br />
Holder<br />
Cutter<br />
Pilot<br />
Tool, Cylinder Head<br />
Lockscrew<br />
Bearing<br />
Plug, Locking<br />
Insert, Fiber<br />
Screw Assembly, Adjusting<br />
Tool Holder<br />
Tool Bit<br />
Tool, Grooving<br />
Body (5-1/2 In. Bore)<br />
Nut, Adjusting (1-1/4-20 Thread)<br />
Capscrew (1/4-28 x 3/16 In.)<br />
Sleeve, Rod<br />
Rod, Tool Adjusting<br />
Spring, Rod<br />
Cap, Tool Setting<br />
Cutting Tool<br />
Spring, Tool<br />
Sleeve Injector<br />
Holding Tool, Injector Sleeve<br />
Driver, Injector Sleeve<br />
Puller, Injector Sleeve<br />
Tip, Extractor<br />
Rod<br />
5110-00-980-7347<br />
5110-00-932-2089<br />
3441-00-922-6699<br />
4910-00-981-3105<br />
4910-00-999-1499<br />
5120-00-178-0948<br />
4910-00-150-5858<br />
5120-00-104-1795<br />
5120-00-981-3108<br />
5120-00-113-5271<br />
3375150<br />
ST-646<br />
ST-788<br />
ST-880<br />
ST-880-1<br />
ST-880-2<br />
ST-880-6<br />
ST-880-7<br />
ST-884<br />
ST-884-1<br />
ST-884-3<br />
ST-884-6<br />
ST-913<br />
ST-913-1<br />
ST-913-7<br />
ST-913-11<br />
ST-913-18<br />
ST-913-23<br />
ST-913-14<br />
ST-913-17<br />
ST-1100<br />
ST-1100-10<br />
ST-1100-7<br />
ST-1100-6<br />
ST-1100-8<br />
ST-1100-11<br />
ST-1100-9<br />
ST-1100-14<br />
ST-1100-13<br />
ST-1100-12<br />
ST-1140<br />
ST-1179<br />
ST-1227<br />
ST-1244<br />
ST-1244-7<br />
ST-1244-2<br />
0006 00-16
TM 9-2815-225-34&P 0006 00<br />
PREVENTIVE MAINTENANCE CHECKS AND SERVICES (PMCS) INSTRUCTIONS (Contd)<br />
Table 4. Tool <strong>and</strong> Test Equipment Requirements for M915–M920 (Contd).<br />
REF<br />
CODE<br />
MAINTENANCE<br />
CATEGORY<br />
NOMENCLATURE<br />
NATIONAL STOCK NO. TOOL NUMBER<br />
37<br />
38<br />
39<br />
40<br />
41<br />
42<br />
43<br />
44<br />
45<br />
46<br />
47<br />
48<br />
49<br />
50<br />
51<br />
52<br />
53<br />
54<br />
55<br />
56<br />
57<br />
58<br />
59<br />
60<br />
61<br />
62<br />
63<br />
64<br />
65<br />
66<br />
67<br />
68<br />
69<br />
70<br />
71<br />
72<br />
F H<br />
F H<br />
F H<br />
F H<br />
F H<br />
F H<br />
F H<br />
F H<br />
F H<br />
F H<br />
F H<br />
F H<br />
F H<br />
F H<br />
F H<br />
F H<br />
F H<br />
F H<br />
F H<br />
F H<br />
F H<br />
F H<br />
F H<br />
F H<br />
F H<br />
F H<br />
F H<br />
F H<br />
F H<br />
F H<br />
F H<br />
F H<br />
F H<br />
F H<br />
F H<br />
F H<br />
Collar, Forming<br />
Spacer<br />
Bridge, Support<br />
Washer, Thrust<br />
Nut (l-8 Thread)<br />
Nut (9/16-12 Thread)<br />
Driver<br />
Driver, Valve Guide<br />
Attachment, Dial Gauge<br />
Bushing, Block <strong>and</strong> M<strong>and</strong>rel, Lever<br />
M<strong>and</strong>rel<br />
M<strong>and</strong>rel<br />
Sleeve<br />
Spacer, Crosshead Guide<br />
M<strong>and</strong>rel Set, Machine<br />
M<strong>and</strong>rel<br />
Block<br />
M<strong>and</strong>rel<br />
M<strong>and</strong>rel, O-Ring, Lubricating Oil Cooler<br />
Pulley Assembly, Tool<br />
Arbor<br />
Nut<br />
Adapter, Ball, Thrust Bearing<br />
Spacer<br />
Adapter<br />
Adapter (2-1/4 In. x 7/8 In. Dia.)<br />
Adapter (2-1/4 In. x 1 In. Dia.)<br />
Adapter (2-1/4 In. x 1 In. Dia.)<br />
Adapter (1-7/8 In. x 1 In. Dia.)<br />
M<strong>and</strong>rel, Water Pump Seal<br />
M<strong>and</strong>rel, Water Pump Seal<br />
Fixture, Bearing Disassembly<br />
Water Pump Seal Driver<br />
Driver, Water Pump Drive Shaft Oil Seal<br />
Adapter, Torque Wrench<br />
Driver, 3/8 In., Plastic H<strong>and</strong>le<br />
5180-00-916-1813<br />
4910-00-150-3797<br />
3460-00-499-1210<br />
5180-00-944-0374<br />
5120-00-159-8916<br />
5120-00-103-4687<br />
ST-1244<br />
ST-1244<br />
ST-1244<br />
ST-1244-5<br />
ST-1244<br />
ST-1244<br />
ST-1244<br />
3375282<br />
ST-1325<br />
ST-249<br />
ST-249-1<br />
ST-249-2<br />
ST-249-3<br />
ST-633<br />
ST-691<br />
ST-691-1<br />
ST-691-2<br />
ST-691-3<br />
ST-1218<br />
ST-386<br />
ST-386-2<br />
ST-386-3<br />
ST-386-11<br />
ST-386-5<br />
3375205<br />
ST-386-10<br />
ST-386-9<br />
ST-386-8<br />
ST-386-6<br />
ST-658<br />
ST-659<br />
ST-1114<br />
ST-1159<br />
3375180<br />
ST-669<br />
F-40A<br />
0006 00-17
TM 9-2815-225-34&P 0006 00<br />
PREVENTIVE MAINTENANCE CHECKS AND SERVICES (PMCS) INSTRUCTIONS (Contd)<br />
Table 4. Tool <strong>and</strong> Test Equipment Requirements for M915–M920 (Contd).<br />
REF<br />
CODE<br />
MAINTENANCE<br />
CATEGORY<br />
NOMENCLATURE<br />
NATIONAL STOCK NO. TOOL NUMBER<br />
73<br />
74<br />
75<br />
76<br />
77<br />
78<br />
79<br />
80<br />
81<br />
82<br />
83<br />
84<br />
85<br />
86<br />
87<br />
88<br />
89<br />
90<br />
91<br />
92<br />
93<br />
94<br />
95<br />
96<br />
97<br />
98<br />
99<br />
100<br />
101<br />
102<br />
103<br />
104<br />
105<br />
106<br />
107<br />
108<br />
109<br />
110<br />
F H<br />
F H<br />
F H<br />
F H<br />
F H<br />
F H<br />
F H<br />
F H<br />
F H<br />
O F H<br />
O F H<br />
F H<br />
F H<br />
F H<br />
F H<br />
F H<br />
F H<br />
F H<br />
F H<br />
F H<br />
F H<br />
F H<br />
F H<br />
O F H<br />
O F H<br />
O F H<br />
H<br />
H<br />
H<br />
H<br />
H<br />
H<br />
H<br />
H<br />
H<br />
H<br />
H<br />
H<br />
H<strong>and</strong>le<br />
Blade, Screwdriver 1/2 In. x 0.062 In.<br />
Blade, Screwdriver 1/4 In. x 0.032 In.<br />
Socket, 3/4 In. Deep Double Hex<br />
Socket, 9/16 In. Deep Double Hex<br />
Rod, Exp<strong>and</strong>ing<br />
Collet 43/64 to 52/64<br />
Socket 1/4 In. 12 Point, 1/4 In. Drive<br />
Socket, Jacobs Brake<br />
Installing Tool, Seal<br />
H<strong>and</strong>le, Seal Installing Tool<br />
Fixture, Injector Timing<br />
Wrench, Air Compressor<br />
Bar, Bearing Puller<br />
Yoke Installer<br />
Wrench, Differential Adjusting Nut<br />
Tool, Remove-Replace Windshield Moulding<br />
Tool, Yoke Installer<br />
Shaft, 1-1/4-12 Thread<br />
Nut<br />
Shaft 1-1/4-12<br />
Sleeve<br />
Wear Sleeve Installation Tool<br />
Socket, Pusher Axle 3-3/16 In.<br />
Thermostat Seal M<strong>and</strong>rel<br />
Socket, Wheel Bearing<br />
Tool, Counterbore<br />
Holder, Tool<br />
Tool Bit, Counterbore<br />
Boring Tool, Liner Counterbore<br />
Bearing, Drive<br />
Screw, Drive<br />
Shaft, Drive<br />
Sprocket, Drive<br />
Chain, Drive<br />
Sprocket, Drive<br />
Tool Bit<br />
Ring, Snap, Drive Shaft<br />
4910-00-712-0537<br />
5120-01-072-2952<br />
5120-00-279-8422<br />
4120-01-014-0017<br />
5120-00-150-7488<br />
5120-00-150-7489<br />
ST-699-1<br />
M-1302 A-5<br />
TM-82<br />
M-1302B-24<br />
M-1302B-18<br />
CG-40-4<br />
CG-40-11<br />
STMD-8<br />
B1465A<br />
RD259A<br />
RD263<br />
ST-593<br />
3375159<br />
11074<br />
J-26422-10<br />
J-972<br />
CPR109701<br />
J-26422<br />
J-26422-2<br />
J-26422-3<br />
J-26422-4<br />
J-26422-1<br />
J-26424<br />
J-7757-2<br />
ST-1225<br />
1902<br />
ST-1295<br />
ST-1065<br />
ST-1059-17<br />
ST-1168<br />
ST-1168-4<br />
ST-1168-6<br />
ST-1168-3<br />
ST-1168-5<br />
ST-1168-7<br />
ST-1168-10<br />
ST-1168-19<br />
ST-1168-8<br />
0006 00-18
TM 9-2815-225-34&P 0006 00<br />
PREVENTIVE MAINTENANCE CHECKS AND SERVICES (PMCS) INSTRUCTIONS (Contd)<br />
Table 4. Tool <strong>and</strong> Test Equipment Requirements for M915–M920 (Contd).<br />
REF<br />
CODE<br />
MAINTENANCE<br />
CATEGORY<br />
NOMENCLATURE<br />
NATIONAL STOCK NO. TOOL NUMBER<br />
111<br />
112<br />
113<br />
114<br />
115<br />
116<br />
117<br />
118<br />
119<br />
120<br />
121<br />
122<br />
123<br />
124<br />
125<br />
126<br />
127<br />
128<br />
129<br />
130<br />
131<br />
132<br />
133<br />
134<br />
135<br />
136<br />
137<br />
138<br />
139<br />
140<br />
141<br />
142<br />
143<br />
144<br />
145<br />
146<br />
147<br />
148<br />
149<br />
H<br />
H<br />
H<br />
H<br />
H<br />
H<br />
H<br />
H<br />
H<br />
H<br />
H<br />
H<br />
H<br />
H<br />
H<br />
H<br />
H<br />
H<br />
H<br />
H<br />
H<br />
H<br />
H<br />
H<br />
H<br />
H<br />
H<br />
H<br />
H<br />
H<br />
H<br />
H<br />
H<br />
H<br />
H<br />
H<br />
H<br />
H<br />
H<br />
Ring, Snap, Drive Bearing<br />
Counterbore Tool Liner<br />
Chamfer Tool, Lower Bore Sleeve<br />
Tool Bit<br />
Bore Tool, Lower Liner<br />
Tool Bit<br />
Puller, Shoulder Bolt, Gear Crank<br />
Puller, Gear, Crank Bridge Assembly<br />
Puller, Jaw, Crankshaft Gear<br />
Puller-installer, Oil Seal<br />
Spacer Ring (1-7/16 In.)<br />
Plate, Top<br />
Spacer Ring (3/16 In.)<br />
Screw, Allen Head (1/4-20 x 1/2 In.)<br />
Screw, Main Puller (1/2-13 x 2 In.)<br />
Screw, Allen Head (1/4-20 x 1-3/4 In.)<br />
Screw, Seal Puller<br />
Clamp, Cylinder Liner<br />
Driver<br />
Gear & Spacer M<strong>and</strong>rel, Lubricating Oil<br />
Bushing M<strong>and</strong>rel, Lubricating Pump<br />
Bushing Tool, Lubrication Pump Body Cover<br />
Bushing, Guide<br />
Adapter, Drive<br />
Housing, Main Bore<br />
Knob, Plastic<br />
Dial Indicator<br />
Tool Bit<br />
Tool Bit<br />
Tool Bit<br />
Knob, Cutter Adjusting<br />
Bushing, Guide<br />
Bushing, Guide<br />
Orifice Torque<br />
Driver, Torque Wrench<br />
Screwdriver<br />
Screw, Set<br />
Wrench, Allen, 5/64 In.<br />
Checking Tool, Injector Protrusion<br />
5120-00-104-1816<br />
5120-01-072-2955<br />
ST-1168-9<br />
ST-1255<br />
ST-1318<br />
ST-1318-23<br />
ST-1287<br />
ST-1287-10<br />
3375081<br />
3375075<br />
3375077<br />
ST-1259<br />
ST-1259-4<br />
ST-1259-1<br />
ST-1259-2<br />
ST-1259-3<br />
ST-1259-7<br />
ST-1259-5<br />
ST-1259-6<br />
ST-1184<br />
3375153<br />
ST-1157<br />
ST-1158<br />
3375206<br />
3375223<br />
3375229<br />
3375220<br />
3375228<br />
3375227<br />
3375226<br />
3375225<br />
3375207<br />
3375224<br />
3375221<br />
3375222<br />
ST-1090<br />
ST-1090-1<br />
ST-1090-2<br />
ST-1090-4<br />
ST-1090-3<br />
ST-981<br />
0006 00-19
TM 9-2815-225-34&P 0006 00<br />
PREVENTIVE MAINTENANCE CHECKS AND SERVICES (PMCS) INSTRUCTIONS (Contd)<br />
Table 4. Tool <strong>and</strong> Test Equipment Requirements for M915–M920 (Contd).<br />
REF<br />
CODE<br />
MAINTENANCE<br />
CATEGORY<br />
NOMENCLATURE<br />
NATIONAL STOCK NO. TOOL NUMBER<br />
150<br />
151<br />
152<br />
153<br />
154<br />
155<br />
156<br />
157<br />
158<br />
159<br />
160<br />
161<br />
162<br />
163<br />
164<br />
165<br />
166<br />
167<br />
168<br />
169<br />
170<br />
171<br />
172<br />
173<br />
174<br />
175<br />
176<br />
177<br />
178<br />
179<br />
180<br />
181<br />
182<br />
183<br />
184<br />
185<br />
186<br />
H<br />
H<br />
H<br />
H<br />
H<br />
H<br />
H<br />
H<br />
H<br />
H<br />
H<br />
H<br />
H<br />
H<br />
H<br />
H<br />
H<br />
H<br />
H<br />
H<br />
H<br />
H<br />
H<br />
H<br />
H<br />
H<br />
H<br />
H<br />
H<br />
H<br />
H<br />
H<br />
H<br />
H<br />
H<br />
H<br />
H<br />
Torque Tool, Injector<br />
Fixture, Top Stop Injector Setting<br />
Tool, Adjusting<br />
Crowsfoot, 1-3/8 In., Locknut Wrench<br />
Wrench, Inch Pound Torque<br />
Block, Weight Carrier<br />
Puller, Tachometer Drive<br />
Collar<br />
Collet<br />
Adapter Plate, Fuel Filter<br />
Gasket<br />
Front Cover, Main Shaft Assembly<br />
Driver, Front Cover<br />
Driver, Main Shaft Seal<br />
Installation Tool, Main Shaft & Bearing<br />
Installation Tool, Throttle Shaft Ball<br />
Adjust Kit, AFC Fuel Pump<br />
Installation Tool, No Air Screw O-Ring<br />
Tool, AFC No Air Adjusting<br />
Installation Tool, Glyd Ring<br />
Forming Tool, Glyd Ring<br />
Tool, AFC Adjusting<br />
Installation Tool, Cast Governor Weight<br />
M<strong>and</strong>rel, Tachometer Drive Cup Plug<br />
Throttle Travel Template<br />
Turbo Support Block<br />
Socket, Wrench<br />
Puller Assembly<br />
Screw<br />
Puller<br />
Holder<br />
Lock Tester, 2 In.<br />
Lock Tester, 3 In.<br />
Step Plate, Mechanic<br />
Bracket<br />
Installer<br />
Staking Tool, Pinion Bearing<br />
5120-01-074-0020<br />
5120-00-116-7625<br />
5120-00-065-1031<br />
5120-00-923-0856<br />
5120-00-473-6921<br />
ST-1145<br />
3375160<br />
3375165<br />
3375166<br />
3375232<br />
ST-1231<br />
ST-1326<br />
ST-1326-2<br />
ST-1326-1<br />
3375014<br />
3375015<br />
3375175<br />
3375174<br />
3375173<br />
3375172<br />
3375204<br />
3375189<br />
3375148<br />
3375140<br />
3375146<br />
3375147<br />
3375137<br />
3375230<br />
3375271<br />
3375355<br />
ST-608<br />
ST-1095<br />
ST-544<br />
ST-544-2<br />
ST-544-1<br />
ST-851<br />
TLN-1000<br />
ITL42<br />
8B7560<br />
FT901<br />
2P8260<br />
26883<br />
0006 00-20
TM 9-2815-225-34&P 0006 00<br />
PREVENTIVE MAINTENANCE CHECKS AND SERVICES (PMCS) INSTRUCTIONS (Contd)<br />
Table 4. Tool <strong>and</strong> Test Equipment Requirements for M915–M920 (Contd).<br />
REF<br />
CODE<br />
MAINTENANCE<br />
CATEGORY<br />
NOMENCLATURE<br />
NATIONAL STOCK NO. TOOL NUMBER<br />
187<br />
188<br />
189<br />
190<br />
191<br />
192<br />
193<br />
194<br />
195<br />
196<br />
197<br />
198<br />
199<br />
200<br />
201<br />
202<br />
203<br />
204<br />
205<br />
206<br />
207<br />
208<br />
209<br />
210<br />
211<br />
212<br />
213<br />
214<br />
215<br />
216<br />
217<br />
218<br />
219<br />
220<br />
221<br />
H<br />
H<br />
H<br />
H<br />
H<br />
H<br />
H<br />
H<br />
H<br />
H<br />
H<br />
H<br />
H<br />
H<br />
H<br />
H<br />
H<br />
H<br />
H<br />
H<br />
H<br />
H<br />
H<br />
H<br />
H<br />
H<br />
H<br />
H<br />
H<br />
H<br />
H<br />
H<br />
H<br />
H<br />
H<br />
Carrier St<strong>and</strong><br />
Adapter Pot, Injector<br />
Assembly Tool, O-Ring<br />
Assembly Tool, Tube<br />
Driver, Governor Cylinder<br />
Adjusting Tool<br />
Assembly Tool, Tachometer<br />
Driver, Seal, Crankshaft<br />
Pins<br />
Wrench, Injector<br />
M<strong>and</strong>rel, Camshaft Bushing<br />
Shank, M<strong>and</strong>rel<br />
Driver<br />
Puller Assembly<br />
Guide<br />
Guide (2-1/2 In.)<br />
Shaft Assembly<br />
Roll Pin<br />
Rod<br />
Slide Hammer<br />
Bushing Driver<br />
Block<br />
Cup<br />
Pin, Cotter<br />
Driver (Tapered)<br />
Knock-Out Ring (Tapered)<br />
Knock-Out Ring (Straight)<br />
Driver, Straight<br />
M<strong>and</strong>rel<br />
Fixture, Ream, Fuel Pump Front Main<br />
Puller, Mechanical<br />
Puller, Bushing<br />
Vise, Ball Joint<br />
Front Seal Assembly<br />
Gauge, Groove Wear<br />
5120-00-396-8089<br />
5120-00-999-1505<br />
4910-00-150-5801<br />
4910-00-150-5805<br />
5120-00-896-8087<br />
4910-00-150-5810<br />
5120-00-150-7492<br />
5120-00-055-4013<br />
4910-00-150-5802<br />
5110-00-981-3107<br />
5120-00-999-1504<br />
4910-00-999-5106<br />
5120-00-896-8097<br />
5210-00-999-1209<br />
J-3409-1<br />
3375086<br />
ST-422<br />
ST-835<br />
ST-853<br />
ST-984<br />
ST-1032<br />
ST-997<br />
ST-997-6<br />
ST-995<br />
ST-1228<br />
ST-1228-3<br />
ST-1228-9<br />
ST-1228-13<br />
ST-1228-5<br />
3375154<br />
ST-1228-4<br />
ST-1228-14<br />
ST-1228-2<br />
ST-1228-1<br />
ST-1242<br />
ST-1242-3<br />
ST-1242-2<br />
ST-1242-6<br />
ST-1242-4<br />
ST-1242-5<br />
ST-1242-7<br />
ST-1242-8<br />
ST-1242-1<br />
ST-490<br />
ST-709<br />
3375108<br />
ST-302<br />
ST-419<br />
ST-560<br />
0006 00-21
TM 9-2815-225-34&P 0006 00<br />
PREVENTIVE MAINTENANCE CHECKS AND SERVICES (PMCS) INSTRUCTIONS (Contd)<br />
Table 5. Tool <strong>and</strong> Test Equipment Requirements for M915A1.<br />
REF<br />
CODE<br />
MAINTENANCE<br />
CATEGORY<br />
NOMENCLATURE<br />
NATIONAL STOCK NO. TOOL NUMBER<br />
Chassis Tools <strong>and</strong> Test Equipment<br />
1<br />
2<br />
3<br />
4<br />
5<br />
6<br />
7<br />
8<br />
9<br />
10<br />
11<br />
12<br />
13<br />
14<br />
15<br />
16<br />
17<br />
18<br />
19<br />
20<br />
21<br />
22<br />
23<br />
24<br />
25<br />
26<br />
27<br />
28<br />
29<br />
30<br />
31<br />
32<br />
33<br />
34<br />
0<br />
0<br />
0<br />
0<br />
0<br />
0<br />
0<br />
0<br />
0<br />
0<br />
0<br />
0<br />
0<br />
0<br />
0<br />
0<br />
00<br />
0<br />
0<br />
0<br />
F<br />
F<br />
F<br />
F<br />
F<br />
F<br />
F<br />
F<br />
F<br />
F<br />
F<br />
H<br />
H<br />
H<br />
Pin, Oil Pan Guide<br />
Indicator Set, Dial<br />
Driver, Bushing<br />
Wrench, Hexagon Locknut,<br />
4-1/8 Inch<br />
Wrench, Hexagon Locknut,<br />
2-1/4 Inch<br />
Analyzer, Power Steering<br />
Bar, Holding, Pinion Yoke<br />
<strong>and</strong> Flange<br />
H<strong>and</strong>le<br />
Adapter<br />
Plug, Bearing<br />
Adapter<br />
Plug, Bearing<br />
Removal Tool, Contact<br />
Removal Tool, Contact<br />
Crimping Tool<br />
Crimping Tool<br />
Locator, Socket Contact<br />
Insertion Tool, Contact<br />
Extraction Tool, Contact<br />
Tester, Lock Fifth Wheel,<br />
2 Inches<br />
Remover, Seal <strong>and</strong> Dust Shield<br />
Installer, Output Shaft Seal<br />
H<strong>and</strong>le, Driver<br />
Jack, Transmission<br />
Tool, Spanner<br />
Service Set, Torque Rod Bushing<br />
Service Set, Equalizing<br />
Tube, Receiving<br />
Adapter, Removing<br />
Adapter, Installing<br />
Remover <strong>and</strong> Installer,<br />
Windshield<br />
H<strong>and</strong>le, Driver<br />
Gauge, Clearance Clutch Pack,<br />
0.080–0.120 Inch<br />
Gauge, Clearance, Clutch Pack,<br />
0.060–0.120 Inch<br />
5315-01-151-1106<br />
5120-00-402-9619<br />
5120-01-159-1841<br />
5120-01-145-5793<br />
5120-01-089-9068<br />
5120-01-158-4707<br />
5120-01-158-4708<br />
5120-00-251-3990<br />
5120-01-131-0138<br />
5120-01-131-0140<br />
5120-01-131-0139<br />
5120-01-097-0170<br />
5120-01-048-2153<br />
5120-01-159-1852<br />
5120-01-054-4048<br />
4910-00-585-3622<br />
4910-01-159-1734<br />
5180-01-084-6010<br />
4910-01-159-1735<br />
5120-01-159-1843<br />
5120-01-159-1845<br />
5120-00-677-2259<br />
5210-01-048-2161<br />
5210-01-048-2162<br />
J 3387-2<br />
J 7872<br />
700291<br />
1915<br />
1920<br />
J 26487<br />
J 3453<br />
450237<br />
427<br />
706<br />
446<br />
715<br />
114010<br />
0411-204-<br />
1605<br />
5417<br />
MS3191A<br />
600092<br />
CIT-F80-16<br />
CET-F80-16<br />
TLN-1000<br />
J 24171<br />
J 24202-1A<br />
J 24202-4<br />
49<br />
294514<br />
Y-820<br />
Y-850-A<br />
Y-860<br />
Y-861<br />
Y-862<br />
C-4009-B<br />
J 8092<br />
J 24192<br />
J 24193<br />
0006 00-22
TM 9-2815-225-34&P 0006 00<br />
PREVENTIVE MAINTENANCE CHECKS AND SERVICES (PMCS) INSTRUCTIONS (Contd)<br />
Table 5. Tool <strong>and</strong> Test Equipment Requirements for M915A1 (Contd).<br />
REF<br />
CODE<br />
MAINTENANCE<br />
CATEGORY<br />
NOMENCLATURE<br />
NATIONAL STOCK NO. TOOL NUMBER<br />
35<br />
36<br />
37<br />
38<br />
39<br />
40<br />
41<br />
42<br />
43<br />
44<br />
45<br />
46<br />
47<br />
48<br />
49<br />
50<br />
51<br />
52<br />
53<br />
54<br />
55<br />
56<br />
57<br />
58<br />
59<br />
60<br />
61<br />
62<br />
63<br />
64<br />
65<br />
66<br />
67<br />
H<br />
H<br />
H<br />
H<br />
H<br />
H<br />
1<br />
H<br />
H<br />
H<br />
H<br />
H<br />
H<br />
H<br />
H<br />
H<br />
H<br />
H<br />
H<br />
H<br />
H<br />
H<br />
H<br />
H<br />
H<br />
H<br />
H<br />
H<br />
H<br />
H<br />
H<br />
H<br />
H<br />
Gauge, Clearance, Clutch Pack,<br />
0.095–0.145 Inch<br />
Bracket, Lifting, Center Support<br />
Bracket, Lifting, Mainshaft<br />
Installer, Bearing, Front<br />
Support Hub<br />
Installer, Oil Seal, Oil Pump<br />
Installer <strong>and</strong> Staking Set,<br />
Collector Ring<br />
Installer, Bushing, Output Shaft<br />
Compressor, Clutch Spring<br />
Installer <strong>and</strong> Remover,<br />
Speedometer Bushing<br />
Installer, Sleeve, Front<br />
Planetary Bushing<br />
Compressor Set, Center Support<br />
Fixture, Lifting, Fourth Clutch<br />
Protector, Inner Seal, Clutch<br />
Piston<br />
Protector, Seal, Forward Clutch<br />
Installer Mainshaft Orifice<br />
Ring Retainer, Stator Camspring<br />
<strong>and</strong> Roller<br />
Compressor, Spring<br />
Fixture, Alignement, Fourth<br />
Clutch<br />
Fixture, Holding, Transmission<br />
Pin Set, Guide<br />
Lifting Tool, Flywheel<br />
Installer, Bushing, Rear<br />
Planetary Carrier<br />
Installer, Orifice Plug<br />
Puller, Universal<br />
Installer, Bearing, Rear<br />
Installer, Retaining Ring<br />
Remover, Rear Bearing,<br />
In-Vehicle<br />
Installer, Seal, Shift Lever<br />
Remover, Seal, Shift Lever<br />
Remover <strong>and</strong> Installer, Snapring,<br />
Pump<br />
Staking Tool, Bushing, Sun Gear<br />
Reamer Set, Bushing, Sun Gear<br />
Installer <strong>and</strong> Staking Set,<br />
Bushing, Center Support<br />
5210-01-048-5283<br />
5210-01-116-6048<br />
5210-01-115-1157<br />
5120-01-115-1160<br />
5120-01-054-4049<br />
5120-01-048-3124<br />
5120-01-115-9174<br />
5120-01-048-3129<br />
5120-01-116-5017<br />
4910-01-158-3989<br />
5120-01-116-5016<br />
5120-01-115-1159<br />
5120-01-048-2156<br />
5120-01-048-2157<br />
5120-01-115-1162<br />
5120-01-115-1158<br />
5120-01-048-2160<br />
5120-01-115-1156<br />
5120-01-115-1165<br />
5120-01-115-1163<br />
5120-01-116-6049<br />
5120-01-159-1844<br />
5120-01-054-4053<br />
5120-00-999-4053<br />
5120-01-054-4054<br />
5120-01-054-4050<br />
5120-01-054-0188<br />
5120-01-115-1161<br />
5120-01-118-6264<br />
5110-01-150-9755<br />
4910-01-158-3971<br />
J 24194<br />
J 24195<br />
J 24196<br />
J 24197<br />
J 24198<br />
J 24200<br />
J 24203<br />
J 24204<br />
J 24205-A<br />
J 24207<br />
J 24208-C<br />
J 24209<br />
J 24210<br />
J 24216-01<br />
J 24217<br />
J 24218-2<br />
J 24219<br />
J 24221<br />
J 24310<br />
J 24315<br />
J 24365<br />
J 24368<br />
J 24369<br />
J 24420<br />
J 24447<br />
J 24453<br />
J 24534<br />
J 26282<br />
J 26401<br />
J 26598-A<br />
J 26997-A<br />
J 28489<br />
J 28525<br />
0006 00-23
TM 9-2815-225-34&P 0006 00<br />
PREVENTIVE MAINTENANCE CHECKS AND SERVICES (PMCS) INSTRUCTIONS (Contd)<br />
Table 5. Tool <strong>and</strong> Test Equipment Requirements for M915A1 (Contd).<br />
REF<br />
CODE<br />
MAINTENANCE<br />
CATEGORY<br />
NOMENCLATURE<br />
NATIONAL STOCK NO. TOOL NUMBER<br />
68<br />
69<br />
70<br />
71<br />
72<br />
73<br />
74<br />
75<br />
76<br />
77<br />
78<br />
79<br />
H<br />
H<br />
H<br />
H<br />
H<br />
H<br />
H<br />
H<br />
H<br />
H<br />
H<br />
H<br />
Installer, Bearing<br />
Installer, Pin, Governor Support<br />
Gauge, Ring, Center <strong>and</strong> Front<br />
Support Seal<br />
Lifter, Clutch Assembly<br />
Remover <strong>and</strong> Installer, Driven<br />
Gear Shaft<br />
Scale, Tension<br />
Staking Tool<br />
St<strong>and</strong>, Repair, Differential<br />
Compressor, Spring, Slider<br />
Driver Bushing<br />
Adjusting Tool, Valve Ring<br />
Fixture Set, Gear Removing<br />
5120-01-159-1842<br />
5120-01-122-1179<br />
5210-01-133-6888<br />
4910-01-159-1736<br />
4910-00-779-6832<br />
4910-01-085-7729<br />
4910-01-158-3986<br />
J 28646-A<br />
J 28684<br />
J 29198-3<br />
J 33079<br />
J 33080<br />
J 8129<br />
J 26883<br />
J 3409-01<br />
TLN-2500<br />
J 24201<br />
J 24314<br />
J 26899<br />
Engine Tools <strong>and</strong> Test Equipment<br />
80<br />
81<br />
82<br />
83<br />
84<br />
85<br />
86<br />
87<br />
88<br />
89<br />
90<br />
91<br />
92<br />
93<br />
94<br />
95<br />
96<br />
97<br />
98<br />
99<br />
100<br />
101<br />
102<br />
103<br />
104<br />
O<br />
O<br />
O<br />
F<br />
F<br />
F<br />
F<br />
F<br />
F<br />
F<br />
F<br />
F<br />
F<br />
F<br />
F<br />
F<br />
F<br />
F<br />
F<br />
F<br />
F<br />
F<br />
F<br />
F<br />
F<br />
Gauge, Manifold Pressure<br />
M<strong>and</strong>rel, Thermostat Seal<br />
Wrench, Oil <strong>and</strong> Fuel Filter,<br />
Spin-On<br />
Fixture, Engine Lifting<br />
Tool, Valve Seat Insert<br />
Vise, Ball Joint<br />
Compressor, Valve Spring<br />
Fixture, Head Holding<br />
Spacer, Crosshead Guide<br />
M<strong>and</strong>rel, Water Pump Bearing<br />
Cutter, Valve Seat Insert<br />
Arbor, Valve Guide<br />
Adapter, Torque Wrench<br />
Block <strong>and</strong> M<strong>and</strong>rel, Rocker Lever<br />
Plate, Air Compressor Mounting<br />
Tool, Bead Cutting<br />
Tool, Injector Seat Cutting<br />
Brush, Fuel Passage Cleaning<br />
Exp<strong>and</strong>er, Injector Sleeve<br />
Cutter, Injector Seat<br />
Driver, Crankshaft Oil Seal<br />
M<strong>and</strong>rel, Air Compressor Bushing<br />
Fixture, Bearing Disassembly<br />
Driver, Valve Seat Insert<br />
Staking Tool<br />
Pilot, Valve Seat Insert<br />
Staking Tool<br />
6220-01-147-9954<br />
4910-01-097-6948<br />
5120-01-160-8863<br />
2815-00-362-2042<br />
4910-00-345-3708<br />
4910-00-999-1506<br />
5120-01-145-7293<br />
4920-00-711-9307<br />
4910-00-150-5797<br />
4910-00-097-6986<br />
5133-00-999-1208<br />
3640-00-999-1173<br />
5120-00-103-4687<br />
3460-00-999-1210<br />
4910-01-159-8701<br />
5110-00-932-2089<br />
4910-00-925-0755<br />
7920-00-168-3244<br />
3441-00-922-6699<br />
4910-00-981-3105<br />
4910-00-150-5810<br />
4910-01-097-6987<br />
4910-00-150-5843<br />
4910-00-150-5844<br />
ST-1273<br />
ST-1225<br />
3375049<br />
ST-125<br />
ST-257<br />
ST-302<br />
ST-448<br />
ST-583<br />
ST-633<br />
ST-658<br />
ST-662<br />
ST-663<br />
ST-669<br />
ST-691<br />
ST-749<br />
ST-788<br />
ST-824<br />
ST-876<br />
ST-880<br />
ST-884<br />
ST-997<br />
ST-1105<br />
ST-1114<br />
ST-1122<br />
ST-1124<br />
0006 00-24
TM 9-2815-225-34&P 0006 00<br />
PREVENTIVE MAINTENANCE CHECKS AND SERVICES (PMCS) INSTRUCTIONS (Contd)<br />
Table 5. Tool <strong>and</strong> Test Equipment Requirements for M915A1 (Contd).<br />
REF<br />
CODE<br />
MAINTENANCE<br />
CATEGORY<br />
NOMENCLATURE<br />
NATIONAL STOCK NO. TOOL NUMBER<br />
105<br />
106<br />
107<br />
108<br />
109<br />
110<br />
111<br />
112<br />
113<br />
114<br />
115<br />
116<br />
117<br />
118<br />
119<br />
120<br />
121<br />
122<br />
123<br />
124<br />
125<br />
126<br />
127<br />
128<br />
129<br />
130<br />
131<br />
132<br />
133<br />
134<br />
135<br />
136<br />
137<br />
138<br />
139<br />
140<br />
141<br />
142<br />
143<br />
F<br />
F<br />
F<br />
F<br />
F<br />
F<br />
F<br />
F<br />
F<br />
F<br />
F<br />
F<br />
F<br />
F<br />
F<br />
F<br />
F<br />
F<br />
F<br />
F<br />
F<br />
F<br />
F<br />
F<br />
F<br />
F<br />
F<br />
H<br />
H<br />
H<br />
H<br />
H<br />
H<br />
H<br />
H<br />
H<br />
H<br />
H<br />
H<br />
M<strong>and</strong>rel, Seal Wear Sleeve<br />
M<strong>and</strong>rel, Seal<br />
Tool, Injector Sleeve Holding<br />
Driver, Oil Seal<br />
Driver, Injector Sleeve<br />
Puller, Injector Sleeve<br />
Puller<br />
Tester, Valve Vacuum<br />
Installer, Oil Seal<br />
Extractor, Valve Seat<br />
Attachment, Dial Gauge<br />
Tool, Blowby Checking<br />
Exp<strong>and</strong>er, Oil Seal<br />
Wrench, Air Compressor<br />
Puller, Injector<br />
Pilot, Oil Seal<br />
Tester, Spring<br />
Driver, Expansion Plug, 3/4"<br />
Driver, Expansion Plug, 1"<br />
Driver, Expansion Plug, 1-1/4"<br />
Puller<br />
Driver, Valve Guide<br />
M<strong>and</strong>rel, Water Pump Seal<br />
Dial Indicator <strong>and</strong> Sleeve<br />
Assembly<br />
Assembly Tool, Pulley<br />
Installation<br />
Wrench, Solenoid Valve<br />
Socket, Special, 5/8" X 1/2"<br />
Drive<br />
Fixture, Ream<br />
Gauge, Piston Ring Groove<br />
Fixture, Connecting Rod<br />
Checking<br />
M<strong>and</strong>rel, Connecting Rod<br />
Locating<br />
Tool, Burnishing<br />
Puller, Governor Weight<br />
Exp<strong>and</strong>er, Piston Ring<br />
Wrench, Injector Cup<br />
Extension, Plunger<br />
Extractor, Dowel Pin<br />
M<strong>and</strong>rel, Spacer<br />
Puller, Main Bearing Cap<br />
4910-01-097-6988<br />
4910-01-161-2115<br />
5120-00-104-1795<br />
5120-01-160-8867<br />
5120-00-981-3108<br />
5120-00-113-5271<br />
5120-01-128-2678<br />
4910-01-128-2691<br />
4910-01-106-0492<br />
5120-01-128-2679<br />
4910-01-097-6972<br />
4910-01-085-9211<br />
5120-01-072-2952<br />
4910-01-097-6989<br />
4910-01-142-4929<br />
4910-01-143-3336<br />
4910-01-143-3337<br />
4910-01-143-2023<br />
5120-01-155-3795<br />
4910-01-097-6971<br />
5120-01-128-2675<br />
5120-01-157-2291<br />
5120-01-156-4183<br />
5110-00-981-3107<br />
5210-00-999-1209<br />
4910-00-977-7507<br />
4910-01-146-7130<br />
4910-00-999-1503<br />
5120-00-999-1504<br />
5120-00-150-7486<br />
5120-00-150-7492<br />
4910-00-150-5819<br />
4910-00-150-5848<br />
4910-01-097-6913<br />
5120-01-141-5777<br />
ST-1159<br />
ST-1173<br />
ST-1179<br />
ST-1191<br />
ST-1227<br />
ST-1244<br />
3376663<br />
ST-1257-A<br />
ST-1259<br />
ST-1279<br />
ST-1325<br />
3375150<br />
3375151<br />
3375159<br />
3375161<br />
3375180<br />
3375182<br />
3375190<br />
3375191<br />
3375192<br />
3375257<br />
3375282<br />
3375448<br />
3376050<br />
3376326<br />
011494<br />
SINL-200<br />
ST-490<br />
ST-560<br />
ST-561<br />
ST-563<br />
ST-708<br />
ST-709<br />
ST-763<br />
ST-995<br />
ST-1089<br />
ST-1134<br />
ST-1157<br />
ST-1178<br />
0006 00-25
TM 9-2815-225-34&P 0006 00<br />
PREVENTIVE MAINTENANCE CHECKS AND SERVICES (PMCS) INSTRUCTIONS (Contd)<br />
Table 5. Tool <strong>and</strong> Test Equipment Requirements for M915A1 (Contd).<br />
REF<br />
CODE<br />
MAINTENANCE<br />
CATEGORY<br />
NOMENCLATURE<br />
NATIONAL STOCK NO. TOOL NUMBER<br />
144<br />
145<br />
146<br />
147<br />
148<br />
149<br />
150<br />
151<br />
152<br />
153<br />
154<br />
155<br />
156<br />
157<br />
158<br />
159<br />
160<br />
161<br />
162<br />
163<br />
164<br />
165<br />
166<br />
167<br />
168<br />
169<br />
170<br />
171<br />
172<br />
173<br />
174<br />
175<br />
176<br />
177<br />
178<br />
179<br />
180<br />
H<br />
H<br />
H<br />
H<br />
H<br />
H<br />
H<br />
H<br />
H<br />
H<br />
H<br />
H<br />
H<br />
H<br />
H<br />
H<br />
H<br />
H<br />
H<br />
H<br />
H<br />
H<br />
H<br />
H<br />
H<br />
H<br />
H<br />
H<br />
H<br />
H<br />
H<br />
H<br />
H<br />
H<br />
H<br />
H<br />
H<br />
Clamp, Cylinder Liner<br />
Driver, Liner<br />
Tool, Plunger Protrusion<br />
Checking<br />
Driver, Connecting Rod Bushing<br />
Conversion Kit<br />
Injector, Master K<br />
St<strong>and</strong>, Injector<br />
Pot, Injector Adapter<br />
Plate, Fuel Pump Mounting<br />
Fixture, Setting, Top Stop<br />
Injector<br />
Compressor, Piston Ring<br />
Tool Kit, AFC Fuel Pump<br />
Adjusting, Tool<br />
Tool, Installing, Throttle Shaft<br />
Ball<br />
Kit, Crack Detection<br />
Tool, Cylinder Block Counterbore<br />
Fixture, Injection Timing<br />
Puller, AFC Barrel<br />
Pin, Connecting Rod Guide<br />
Indicator, Level & Angle<br />
Driver, Pressurizing Valve<br />
Tool, Adjusting, Fuel Pump Idle<br />
Fixture, AFC Pressure Valve<br />
Puller, Cylinder Liner,<br />
Universal<br />
Driver, Lock Cup<br />
Block, Gauge<br />
Wrench, Torque, Inch-Pound<br />
Kit, Camshaft Bushing Driver<br />
Driver, Camshaft Bushing<br />
Oil Seal Assembly Tool<br />
Front Cover <strong>and</strong> Mainshaft Assembly<br />
Tool<br />
Tester, Injector Leakage<br />
St<strong>and</strong>, Injector Test<br />
Tester, Injector Cup Spray<br />
Link<br />
Orifice<br />
Injector Adapter Pot<br />
Kit, K-Cam<br />
5120-00-104-1816<br />
5120-00-999-1206<br />
4910-01-141-8388<br />
4910-01-098-1914<br />
4910-01-147-7896<br />
4910-01-154-6406<br />
4910-01-082-1346<br />
4910-00-185-8508<br />
4910-01-128-2685<br />
4910-01-097-6926<br />
5120-01-128-2758<br />
5180-01-102-8418<br />
4910-01-118-3747<br />
6850-00-145-0255<br />
4910-01-150-9713<br />
4910-00-999-1269<br />
5120-01-128-2688<br />
4910-01-074-0020<br />
4910-01-143-2034<br />
4910-00-150-5805<br />
4910-01-152-2743<br />
5120-01-143-2032<br />
4910-00-150-5801<br />
5210-01-157-3091<br />
4910-01-097-6929<br />
5120-01-146-7131<br />
5120-01-156-6186<br />
5120-00-896-8097<br />
5120-01-029-6861<br />
4910-01-128-9810<br />
4910-00-999-1501<br />
ST-1184<br />
ST-1229<br />
ST-1241<br />
ST-1242<br />
ST-1261<br />
ST-1262<br />
ST-1298<br />
3375086<br />
3375133<br />
3375160<br />
3375162<br />
3375189<br />
3375204<br />
3375432<br />
3375455<br />
3375522<br />
3375599<br />
3375601<br />
3375855<br />
3375959<br />
3375981<br />
3376011<br />
3376015<br />
3376136<br />
3376220<br />
3376592<br />
3376633<br />
3376637<br />
ST-419<br />
3375175<br />
ST-990<br />
ST-790<br />
ST-668<br />
ST790-362<br />
ST790-363<br />
ST-1254<br />
J 33113<br />
END OF WORK PACKAGE<br />
0006 00-26
TM 9-2815-225-34&P 0007 00<br />
DIRECT SUPPORT AND GENERAL SUPPORT<br />
MAINTENANCE MANUAL<br />
INCLUDING REPAIR PARTS AND SPECIAL TOOLS LIST (RPSTL)<br />
FOR<br />
M915, M915A1, M915A4, M916, M920 VEHICLES<br />
NSN 2815-01-082-8125 P/N NTC400-3652-02 CUMMINS NTC-400 BIG CAM I DIESEL ENGINE<br />
W/CONTAINER<br />
NSN 2815-01-142-2745 P/N 11669835 CUMMINS NTC-400 BIG CAM III DIESEL ENGINE<br />
W/CONTAINER<br />
BIG CAM I ENGINE REMOVAL<br />
INITIAL SETUP:<br />
Tools <strong>and</strong> Special Tools<br />
General mechanic’s tool kit: automotive<br />
(Item 1, WP 0061 00)<br />
Maintenance <strong>and</strong> repair shop equipment:<br />
automotive (Item 2, WP 0061 00)<br />
Automotive <strong>maintenance</strong> <strong>and</strong> repair<br />
supplemental set no.2<br />
(Item 3, WP 0061 00)<br />
Lifting brackets (Item 43, WP 0061 00)<br />
Lifting sling (Item 42, WP 0061 00)<br />
Equipment Condition<br />
Horn wire removed (TM 9-2320-283-20).<br />
Grille shell removed (TM 9-2320-283-20).<br />
Air cleaner removed (TM 9-2320-283-20).<br />
Fan removed (TM 9-2320-283-20).<br />
Fenders removed (TM 9-2320-283-20).<br />
Upper radiator fan shroud removed<br />
(TM 9-2320-283-20).<br />
Radiator <strong>support</strong> brackets removed<br />
(TM 9-2320-283-20).<br />
Radiator <strong>and</strong> <strong>support</strong> rods removed<br />
(TM 9-2320-283-20).<br />
Turbocharger exhaust tube removed<br />
(TM 9-2320-283-20).<br />
Cooling system hoses removed<br />
(TM 9-2320-283-20).<br />
Power steering pump hydraulic lines removed<br />
(TM 9-2320-283-20).<br />
Equipment Condition (Contd)<br />
Steering system to proper level removed<br />
(TM 9-2320-283-12).<br />
Transmission oil cooler lines removed<br />
(TM 9-2320-283-20).<br />
Steering system drained<br />
(TM 9-2320-283-12).<br />
Bumper <strong>and</strong> towing eyes removed<br />
(TM 9-2320-283-20).<br />
Brush guard <strong>and</strong> spotter mirrors removed<br />
(TM 9-2320-283-20).<br />
Air reservoir draincocks opened<br />
(TM 9-2320-283-20).<br />
Battery cables disconnected<br />
(TM 9-2320-283-20).<br />
Engine oil drained (TM 9-2320-283-12).<br />
Hood removed (TM 9-2320-283-20).<br />
Cooling system drained<br />
(TM 9-2320-283-12).<br />
Personnel Required<br />
Two assistants<br />
0007 00-1
TM 9-2815-225-34&P 0007 00<br />
BIG CAM I ENGINE REMOVAL (Contd)<br />
1. Position <strong>and</strong> secure suitable transmission jack under transmission (3). Ensure transmission<br />
weight is <strong>support</strong>ed by transmission jack.<br />
2. Remove flywheel bolt access cover screw (8) securing breather tube clamp (9) to flywheel<br />
housing (6) <strong>and</strong> position breather tube clamp (9), <strong>and</strong> breather tube (10) away from flywheel<br />
housing (6).<br />
3. Remove flywheel bolt access cover screw (8) <strong>and</strong> flywheel bolt access cover (11) from flywheel<br />
housing (6).<br />
NOTE<br />
Rotate engine using accessory drive pulley nut to gain access to<br />
flywheel bolts.<br />
4. Remove twelve flywheel bolts (1) <strong>and</strong> washers (2) securing ring gear (5) to flywheel (4) through<br />
flywheel bolt access hole (7).<br />
5. Loosen two lower alternator screws (12) securing alternator (30) to alternator mounting bracket<br />
(27).<br />
6. Remove alternator bolt (25), washer (24), <strong>and</strong> nut (13) securing alternator (30) to alternator<br />
adjusting rod block (23).<br />
7. Remove alternator adjusting rod bolt (18), lockwasher (17), washer (16), alternator adjusting<br />
rod (20), alternator adjusting rod block (23), three alternator adjusting rod nuts (21) <strong>and</strong> two<br />
washers (22) as an assembly, from engine (14). Discard alternator adjusting rod lockwasher (17).<br />
NOTE<br />
Rotate alternator in towards engine to allow for clearance<br />
during engine removal.<br />
8. Rotate alternator (30) in towards engine (14) <strong>and</strong> tighten two lower alternator screws (12) to<br />
retain alternator (30) in position.<br />
9. Remove two belts (19) from alternator pulley (26) <strong>and</strong> crankshaft pulley (15). Discard belts (19).<br />
10. Remove two lower alternator screws (12), nut (28), washer (29), <strong>and</strong> alternator (30) from<br />
alternator mounting bracket (27).<br />
0007 00-2
TM 9-2815-225-34&P 0007 00<br />
BIG CAM I ENGINE REMOVAL (Contd)<br />
~<br />
10<br />
9<br />
11<br />
1<br />
2<br />
5<br />
4<br />
3<br />
7<br />
8<br />
6<br />
Figure 1. Ring Gear Removal.<br />
15<br />
13<br />
14<br />
16<br />
17 18<br />
~<br />
12<br />
30<br />
26<br />
21<br />
22<br />
21<br />
23 22<br />
24<br />
25<br />
20<br />
19<br />
29<br />
28<br />
27<br />
Figure 2. Alternator Belt Removal.<br />
0007 00-3
TM 9-2815-225-34&P 0007 00<br />
BIG CAM I ENGINE REMOVAL (Contd)<br />
11. Remove heater hose clamp (2) <strong>and</strong> heater valve (1) from heater hose (3).<br />
1<br />
2<br />
3<br />
Figure 3. Heater Valve Removal.<br />
0007 00-4
TM 9-2815-225-34&P 0007 00<br />
BIG CAM I ENGINE REMOVAL (Contd)<br />
12. Remove three heater hose nuts (4) <strong>and</strong> screws (8) retaining hoses (6) <strong>and</strong> (12), clamps (5), <strong>and</strong><br />
starter battery cable (7) from mounting brackets (9).<br />
13. Disconnect heater hose adapter (10) from water outlet fitting (11).<br />
14. Position heater hose (6) <strong>and</strong> (12), clamps (5), <strong>and</strong> starter battery cable (7) aside to allow clearance<br />
for engine removal.<br />
7<br />
4<br />
5<br />
8<br />
9<br />
5<br />
6<br />
4<br />
5<br />
8<br />
5<br />
10<br />
11<br />
8 12<br />
9<br />
4<br />
Figure 4. Heater Hose <strong>and</strong> Starter Wiring Harness Removal.<br />
0007 00-5
TM 9-2815-225-34&P 0007 00<br />
BIG CAM I ENGINE REMOVAL (Contd)<br />
15. Disconnect engine harness electrical connectors (1) at firewall (2).<br />
16. Remove engine harness screw (3) <strong>and</strong> engine harness bracket (4) from engine (5).<br />
17. Disconnect air compressor line (6) from air compressor (7).<br />
18. Disconnect fuel line (10) from fuel filter <strong>and</strong> damper (11).<br />
19. Disconnect tachometer shaft assembly (15) from tachometer (14).<br />
20. Cut plastic tie (9) securing tachometer shaft assembly (15) to ether quick start kit bracket (8).<br />
Discard plastic tie (9).<br />
21. Remove ether quick start kit bracket nut (17), screw (12), two clamps (13) <strong>and</strong> (16) <strong>and</strong> ether<br />
quick start kit bracket (8) from engine (5).<br />
22. Cut plastic tie (21) securing speedometer shaft assembly (22) to fuel return line (20). Discard<br />
plastic tie (21).<br />
23. Disconnect fuel return line (20) from fuel rail male branch tree (19).<br />
24. Disconnect air compressor hose (23) from air compressor line (24).<br />
25. Disconnect air compressor line (25) from air compressor line T-adapter (18).<br />
1 2<br />
3<br />
4<br />
5<br />
Figure 5. Firewall Electrical Harness Disconnections.<br />
0007 00-6
TM 9-2815-225-34&P 0007 00<br />
BIG CAM I ENGINE REMOVAL (Contd)<br />
8<br />
9<br />
5<br />
6<br />
15<br />
17<br />
16<br />
10<br />
~<br />
7<br />
14<br />
13<br />
12<br />
11<br />
Figure 6. Air Compressor Disconnection.<br />
Figure 7. Fuel Filter <strong>and</strong> Lines Removal.<br />
18<br />
19<br />
20<br />
21<br />
25<br />
24<br />
23<br />
22<br />
Figure 8. Fuel <strong>and</strong> Air Compressor Lines Disconnection.<br />
0007 00-7
TM 9-2815-225-34&P 0007 00<br />
BIG CAM I ENGINE REMOVAL (Contd)<br />
26. Remove return spring (5) from transmission modulator control bracket (6) <strong>and</strong> return spring<br />
clip (4).<br />
27. Remove accelerator link nut (2), washer (3), spring clip (4), <strong>and</strong> accelerator link (15) from fuel<br />
control lever pin (17).<br />
28. Remove retaining pin (13), washer (14), <strong>and</strong> transmission modulator control link (16) from fuel<br />
control lever (18). Discard retaining pin (13).<br />
29. Remove two nuts (12), washers (11), shim (10), <strong>and</strong> U-bolt (9) from transmission modulator<br />
control bracket (6).<br />
30. Remove two transmission modulator control bracket bolts (8), lockwashers (7), <strong>and</strong> transmission<br />
modulator control bracket (6) from engine (1). Discard lockwashers (7).<br />
31. Remove ground strap bolt (33), starwasher (32), ground strap (34), <strong>and</strong> starter motor ground strap<br />
(31) from engine (1). Discard star washer (32).<br />
32. Remove two starter motor terminal nuts (30), lockwashers (29), negative battery cable (28), <strong>and</strong><br />
positive battery cable (26) from starter motor (27). Discard lockwashers (29).<br />
33. Remove front hose clamp screw (35), nut (38), <strong>and</strong> hose clamp (36) from cooler hose bracket (37).<br />
34. Remove middle cooler hose bracket screw (25) <strong>and</strong> middle cooler hose bracket (23) from oil<br />
pan (24).<br />
35. Remove rear cooler hose bracket screw (22), washer (21), <strong>and</strong> rear cooler hose bracket (20) from<br />
transmission (19).<br />
7<br />
8<br />
6<br />
9<br />
10<br />
5<br />
2<br />
3<br />
4<br />
15<br />
11<br />
12<br />
1<br />
~<br />
17<br />
18 16 14<br />
13<br />
Figure 9. Accelerator Cable Disconnection.<br />
0007 00-8
TM 9-2815-225-34&P 0007 00<br />
BIG CAM I ENGINE REMOVAL (Contd)<br />
1<br />
19<br />
20<br />
24<br />
38<br />
25<br />
23<br />
22<br />
21<br />
26<br />
37 36<br />
35<br />
30<br />
1<br />
31<br />
27<br />
31<br />
30<br />
29<br />
32<br />
33<br />
28<br />
34<br />
Figure 10. Starter Cables Removal.<br />
0007 00-9
TM 9-2815-225-34&P 0007 00<br />
BIG CAM I ENGINE REMOVAL (Contd)<br />
36. Remove two locknuts (10), lockwashers (9), U-bolt (5), shim (4), <strong>and</strong> cable mounting bracket (11)<br />
from shift control cable (12). Discard locknuts (10) <strong>and</strong> lockwashers (9).<br />
37. Remove trunnion retaining pin (7) <strong>and</strong> trunnion (8) from transmission shift lever (6).<br />
38. Remove floor mat (2) from floor pan access cover (1).<br />
39. Remove ten screws (3), floor pan access cover (1), <strong>and</strong> shifter (13) from cab floor.<br />
40. Remove transmission temperature sending unit nut (35), washer (36), <strong>and</strong> electrical connector (37)<br />
from transmission temperature sending unit (38).<br />
41. Remove twelve transmission bolts (30) securing transmission (26) to engine (18).<br />
42. Install two lifting brackets (17) on top of engine (18) with four bolts (16).<br />
43. Install lifting sling <strong>and</strong> lifting device on engine lifting brackets (17).<br />
44. Remove two rear engine mount nuts (29), washers (31) <strong>and</strong> bolts (14) from frame (32).<br />
45. Remove two front engine mount nuts (27), bolts (24) <strong>and</strong> washers (23) from crossmember (25).<br />
WARNING<br />
Use extreme care when h<strong>and</strong>ling heavy parts. Provide adequate<br />
<strong>support</strong> <strong>and</strong> use assistance during procedure. Ensure that any<br />
lifting device used is in good operating condition <strong>and</strong> of suitable load<br />
capacity. Keep clear of heavy components <strong>support</strong>ed only by lifting<br />
device. Failure to do so may result in death or injury to personnel.<br />
CAUTION<br />
Raise engine slowly <strong>and</strong> carefully to prevent damage to splined<br />
shaft. Failure to comply may result in damage to engine.<br />
46. Using lifting device <strong>and</strong> lifting sling, raise engine <strong>and</strong> remove two rear frame flat washers (34)<br />
<strong>and</strong> rear vibration insulators (33) from rear engine mounting brackets (15).<br />
1 2<br />
3<br />
13<br />
12<br />
4<br />
5<br />
11<br />
10<br />
9<br />
8 7<br />
6<br />
Figure 11. Shifter Removal.<br />
0007 00-10
TM 9-2815-225-34&P 0007 00<br />
BIG CAM I ENGINE REMOVAL (Contd)<br />
47. Remove two front frame flat washers (20) <strong>and</strong> front vibration insulators (21) from front engine<br />
crossmember (25).<br />
48. Using lifting device <strong>and</strong> lifting sling, remove engine (18) from frame (32). Ensure there is proper<br />
clearance between frame (32), alternator (28), engine (18), <strong>and</strong> power steering pump (22).<br />
49. Install engines in approved engine container.<br />
LIFTING<br />
DEVICE<br />
16<br />
LIFTING<br />
SLING<br />
14<br />
17<br />
15<br />
18<br />
34<br />
37<br />
33<br />
35<br />
32<br />
31<br />
36<br />
30<br />
29<br />
28<br />
27<br />
19<br />
20 21<br />
38<br />
26<br />
25<br />
23 22<br />
24<br />
Figure 12. Engine Removal.<br />
END OF WORK PACKAGE<br />
0007 00-11/12 blank
TM 9-2815-225-34&P 0008 00<br />
DIRECT SUPPORT AND GENERAL SUPPORT<br />
MAINTENANCE MANUAL<br />
INCLUDING REPAIR PARTS AND SPECIAL TOOLS LIST (RPSTL)<br />
FOR<br />
M915, M915A1, M915A4, M916, M920 VEHICLES<br />
NSN 2815-01-082-8125 P/N NTC400-3652-02 CUMMINS NTC-400 BIG CAM I DIESEL ENGINE<br />
W/CONTAINER<br />
NSN 2815-01-142-2745 P/N 11669835 CUMMINS NTC-400 BIG CAM III DIESEL ENGINE<br />
W/CONTAINER<br />
BIG CAM III ENGINE REMOVAL<br />
INITIAL SETUP:<br />
Tools <strong>and</strong> Special Tools<br />
General mechanic’s tool kit: automotive<br />
(Item 1, WP 0061 00)<br />
Maintenance <strong>and</strong> repair shop equipment:<br />
automotive (Item 2, WP 0061 00)<br />
Automotive <strong>maintenance</strong> <strong>and</strong> repair<br />
supplemental set no. 2 (Item 3, WP 0061 00)<br />
Tilt sling (Item 67, WP 0061 00)<br />
Lifting sling (Item 42, WP 0061 00)<br />
Personnel Required<br />
Three assistants<br />
Equipment Condition<br />
Horn wire disconnected (TM 9-2320-283-20).<br />
Grille shell removed (TM 9-2320-283-20).<br />
Fenders removed (TM 9-2320-283-20).<br />
Upper radiator fan shroud removed<br />
(TM 9-2320-283-20).<br />
Steering system to proper level removed<br />
(TM 9-2320-283-12).<br />
Transmission lines removed<br />
(TM 9-2320-283-20).<br />
Air reservoir draincocks opened<br />
(TM 9-2320-283-20).<br />
Bumper <strong>and</strong> towing eyes removed<br />
(TM 9-2320-283-20).<br />
Brush guard <strong>and</strong> spotter mirrors removed<br />
(TM 9-2320-283-20).<br />
0008 00-1
TM 9-2815-225-34&P 0008 00<br />
BIG CAM III ENGINE REMOVAL (Contd)<br />
1. Disconnect two negative battery cable clamps (2) from two negative battery cable post (3) <strong>and</strong><br />
remove negative battery cable (1) from battery (4).<br />
2. Open drain valve (6) on cooling tube outlet (5) <strong>and</strong> drain engine coolant from engine. When<br />
finished, close drain valve (6).<br />
3. Remove drain plug (7) from oil pan (8) <strong>and</strong> drain engine oil from oil pan (8). Install drain plug (7)<br />
in oil pan (8).<br />
2<br />
1<br />
4<br />
3<br />
Figure 1. Battery Cable Removal.<br />
0008 00-2
TM 9-2815-225-34&P 0008 00<br />
BIG CAM III ENGINE REMOVAL (Contd)<br />
5<br />
6<br />
Figure 2. Draining Engine Coolant.<br />
8<br />
7<br />
Figure 3. Oil Drain Plug Removal.<br />
0008 00-3
TM 9-2815-225-34&P 0008 00<br />
BIG CAM III ENGINE REMOVAL (Contd)<br />
CAUTION<br />
Mark <strong>and</strong> tag all wires, hoses, etc., removed from vehicle for<br />
proper reinstallation. Failure to comply may result in damage<br />
to equipment.<br />
4. Disconnect four lighting harness electrical connectors (4).<br />
5. Remove four lighting harness screws (3), washers (2), <strong>and</strong> clamps (1) from lights <strong>and</strong> hood (5).<br />
6. Cut plastic tie (6) <strong>and</strong> remove lighting harness (7) from hood (5) <strong>and</strong> position aside. Discard<br />
plastic tie (6).<br />
WARNING<br />
When removing hood tilt assist cables, hood must be <strong>support</strong>ed.<br />
Failure to do so may result in damage to equipment or injury<br />
to personnel.<br />
7. Support hood (5) <strong>and</strong> open two chain link nuts (10). Remove tilt assist cables (8) from chain links<br />
(9).<br />
8. Close hood (5) <strong>and</strong> remove two hood hinge locknuts (11) <strong>and</strong> bolts (12) from hood hinges (13).<br />
Discard locknuts (11).<br />
NOTE<br />
Use three assistants or lifting strap <strong>and</strong> lifting device to<br />
remove hood from vehicle.<br />
9. Remove hood (5) from vehicle.<br />
3<br />
4<br />
2<br />
1<br />
3<br />
2<br />
1<br />
3<br />
2<br />
2<br />
3<br />
1<br />
4<br />
1<br />
5<br />
7 6<br />
Figure 4. Lighting Harness Removal.<br />
0008 00-4
TM 9-2815-225-34&P 0008 00<br />
BIG CAM III ENGINE REMOVAL (Contd)<br />
8<br />
9<br />
10<br />
5<br />
8<br />
9 10<br />
Figure 5. Tilt Assist Cables Removal.<br />
11<br />
12<br />
5<br />
11<br />
12<br />
13 13<br />
Figure 6. Hood Hinge Removal.<br />
0008 00-5
TM 9-2815-225-34&P 0008 00<br />
BIG CAM III ENGINE REMOVAL (Contd)<br />
10. Release three air cleaner element clamps (1) <strong>and</strong> remove air cleaner element (2) from air cleaner<br />
housing (9). Discard air cleaner element (2).<br />
11. Loosen three clamps (4) <strong>and</strong> remove air cleaner duct assembly (5) from turbocharger outlet (8) <strong>and</strong><br />
air cleaner outlet elbow (3).<br />
12. Remove vent tube screw (11), locknut (18), <strong>and</strong> washer (12) from air duct <strong>support</strong> bracket (17).<br />
Discard locknut (18).<br />
13. Remove two air vent hose clamps (13), air vent hose (14), <strong>and</strong> air vent tube (10) from air duct<br />
<strong>support</strong> bracket (17).<br />
14. Remove four air cleaner housing bracket locknuts (22), washers (21), <strong>and</strong> screws (20) from <strong>support</strong><br />
brackets (17) <strong>and</strong> air cleaner housing (9). Discard locknuts (22).<br />
15. Remove indicator tube (16) <strong>and</strong> elbow (15) from air cleaner housing (9).<br />
16. Remove six air cleaner housing locknuts (31), washers (30), <strong>and</strong> air cleaner housing (9) from<br />
adapter duct (25). Discard locknuts (31).<br />
17. Disconnect air duct door spring (32) from air duct door (29) <strong>and</strong> firewall (19).<br />
18. Remove ten adapter duct locknuts (27), washers (26) <strong>and</strong> (24), screws (23), four reinforcement<br />
plates (28), <strong>and</strong> adapter duct (25) from air cleaner box (19). Discard locknuts (27).<br />
1 2<br />
3<br />
4<br />
4<br />
5<br />
~<br />
9<br />
1<br />
8 4<br />
Figure 7. Air Cleaner Removal.<br />
0008 00-6
TM 9-2815-225-34&P 0008 00<br />
BIG CAM III ENGINE REMOVAL (Contd)<br />
11 12<br />
15<br />
16<br />
10<br />
13<br />
14<br />
13<br />
17<br />
18<br />
19<br />
17<br />
20<br />
21<br />
21<br />
22<br />
21<br />
9<br />
21<br />
20<br />
Figure 8. Air Duct Removal.<br />
23<br />
24<br />
25<br />
19<br />
31<br />
30<br />
32<br />
26 27<br />
9<br />
29<br />
25<br />
28<br />
Figure 9. Air Cleaner Housing Removal.<br />
0008 00-7
TM 9-2815-225-34&P 0008 00<br />
BIG CAM III ENGINE REMOVAL (Contd)<br />
19. Loosen exhaust S-pipe clamp (3) <strong>and</strong> remove from turbocharger outlet flange (4).<br />
20. Loosen two exhaust pipe nuts (6), screws (2), <strong>and</strong> exhaust S-pipe clamp (1). Remove exhaust<br />
S-pipe (5) from exhaust pipe (7).<br />
21. Loosen heater hose clamp (9) <strong>and</strong> remove heater hose (8) <strong>and</strong> heater hose clamp (9) from heater<br />
hose tube (10).<br />
22. Loosen heater hose clamp (12) <strong>and</strong> remove heater hose (13) <strong>and</strong> heater hose clamp (12) from<br />
heater hose tube adapter (11).<br />
23. Loosen two vent hose clamps (16) <strong>and</strong> remove vent hoses (17) <strong>and</strong> vent hose clamps (16) from<br />
radiator (15).<br />
24. Loosen bypass hose clamp (18) <strong>and</strong> remove bypass hose (19) from radiator (15).<br />
25. Loosen two lower radiator hose clamps (23) <strong>and</strong> remove lower radiator tube (28) <strong>and</strong> lower<br />
radiator hose clamps (23) from radiator (15).<br />
26. Loosen three cooling outlet tube clamps (24) at water pump inlet (31) <strong>and</strong> cooling outlet tube (29).<br />
27. Remove cooling outlet tube nut (26) <strong>and</strong> screw (27) from <strong>support</strong> bracket (25).<br />
28. Remove cooling outlet tube (29) from water pump (30).<br />
29. Loosen two upper radiator hose clamps (20) <strong>and</strong> remove upper radiator hose (22) <strong>and</strong> upper<br />
radiator hose clamps (20) from thermostat housing elbow (21) <strong>and</strong> radiator inlet tube (14).<br />
2 3<br />
1<br />
4<br />
7<br />
6<br />
5<br />
Figure 10. Turbocharger Hose Removal.<br />
0008 00-8
TM 9-2815-225-34&P 0008 00<br />
BIG CAM III ENGINE REMOVAL (Contd)<br />
9 10<br />
15<br />
14<br />
~<br />
16<br />
17<br />
18<br />
19<br />
8<br />
20<br />
~<br />
21<br />
11<br />
13<br />
12<br />
22<br />
Figure 11. Heater Hose Removal.<br />
Figure 12. Upper Radiator Hose Removal.<br />
24<br />
23<br />
23<br />
30<br />
22<br />
~<br />
29<br />
~<br />
28<br />
27<br />
25<br />
15<br />
31<br />
26<br />
Figure 13. Lower Radiator Tube Removal.<br />
Figure 14. Water Pump <strong>and</strong> Water Pump Inlet.<br />
0008 00-9
TM 9-2815-225-34&P 0008 00<br />
BIG CAM III ENGINE REMOVAL (Contd)<br />
30. Disconnect A/C compressor clutch electrical connector (7) from engine wiring harness (6).<br />
31. Loosen two A/C compressor mounting bracket locknuts (23), bolts (26), <strong>and</strong> washers (24).<br />
32. Loosen two jam nuts (11) on A/C compressor adjusting rod (15).<br />
33. Push A/C compressor (5) in towards engine (20). Remove A/C drive belt (19) from A/C clutch<br />
pulley (25) <strong>and</strong> accessory drive pulley (17).<br />
34. Remove A/C compressor adjusting rod locknut (12), two washers (13), bolt (18), <strong>and</strong> A/C<br />
compressor adjusting rod (15) from front cover (16). Discard locknut (12).<br />
35. Remove A/C compressor hose locknut (21) washer (22), screw (2), <strong>and</strong> clamp (1) from top of engine<br />
(20). Discard A/C compressor hose locknut (21).<br />
36. Remove two A/C compressor line screws (9), washers (10), <strong>and</strong> clamps (8) <strong>and</strong> (14) from A/C<br />
compressor (5).<br />
37. Remove two A/C compressor mounting bracket locknuts (23), bolts (26), <strong>and</strong> washers (24) from<br />
A/C compressor mounting bracket (27). Discard A/C compressor mounting bracket locknuts (23).<br />
NOTE<br />
Do not disconnect A/C lines or hoses. A/C compressor can be<br />
removed <strong>and</strong> positioned on passenger side of vehicle for engine<br />
removal with A/C lines <strong>and</strong> hoses attached.<br />
38. Remove A/C compressor (5) with A/C compressor lines (3) <strong>and</strong> A/C compressor hoses (4) <strong>and</strong><br />
position A/C compressor (5) aside.<br />
0008 00-10
TM 9-2815-225-34&P 0008 00<br />
BIG CAM III ENGINE REMOVAL (Contd)<br />
1<br />
2 3<br />
4<br />
5<br />
6 7<br />
22<br />
8 9<br />
21<br />
20<br />
10<br />
11<br />
19<br />
18<br />
13<br />
12<br />
13<br />
9<br />
14 10<br />
11<br />
15<br />
17<br />
4<br />
16<br />
Figure 15. A/C Compressor Mounting Bracket Removal.<br />
3<br />
23<br />
24<br />
5<br />
27<br />
26<br />
25<br />
19<br />
17<br />
Figure 16. A/C Compressor Mounting Bolts Removal.<br />
0008 00-11
TM 9-2815-225-34&P 0008 00<br />
BIG CAM III ENGINE REMOVAL (Contd)<br />
NOTE<br />
Do not disconnect A/C lines or hoses from A/C condenser. A/C<br />
condenser can be removed from radiator <strong>and</strong> positioned on<br />
outside of passenger side frame rail for engine removal.<br />
39. Remove three A/C condenser line locknuts (6), washers (7), screws (1), <strong>and</strong> clamps (8) from<br />
radiator <strong>support</strong> brackets (9). Discard locknuts (6).<br />
40. Remove four A/C condenser locknuts (2) <strong>and</strong> A/C condenser (4) with A/C compressor lines (5)<br />
attached, from two <strong>support</strong> brackets (3) on front of radiator (10). Discard locknuts (2).<br />
41. Remove coolant temperature sender terminal nut (12) <strong>and</strong> coolant temperature sender electrical<br />
connector (13) from coolant temperature sender terminal (14).<br />
42. Remove coolant temperature sender terminal screw (11) <strong>and</strong> coolant temperature sender electrical<br />
connectors (15) from coolant temperature sender terminals (14) on radiator (10).<br />
3 4<br />
2<br />
1<br />
8<br />
7<br />
6<br />
2 5<br />
Figure 17. A/C Condenser Hoses Removal.<br />
0008 00-12
TM 9-2815-225-34&P 0008 00<br />
BIG CAM III ENGINE REMOVAL (Contd)<br />
10<br />
9<br />
~<br />
5<br />
6<br />
8<br />
1<br />
7<br />
9<br />
8<br />
1<br />
6<br />
7<br />
Figure 18. A/C Condenser Lines Removal.<br />
11<br />
15<br />
14<br />
13 12<br />
Figure 19.<br />
Temperature Sender Electrical Connectors Removal.<br />
0008 00-13
TM 9-2815-225-34&P 0008 00<br />
BIG CAM III ENGINE REMOVAL (Contd)<br />
43. Attach chains <strong>and</strong> lifting device on radiator (1).<br />
44. Remove two ground strap locknuts (3), washers (2), isolators (5), <strong>and</strong> ground strap (4) from<br />
radiator (1) <strong>and</strong> frame front crossmember (15). Discard locknuts (3).<br />
45. Remove four radiator <strong>support</strong> rod locknuts (10), eight washers (8), four spacers (7), four screws (9),<br />
<strong>and</strong> three radiator <strong>support</strong> rods (11) from radiator (1) <strong>and</strong> firewall brackets (6). Discard locknuts<br />
(10).<br />
46. Remove two radiator crossmember mount locknuts (14), washers (12), <strong>and</strong> isolators (13) from<br />
crossmember (15). Discard locknuts (14).<br />
47. Using lifting device <strong>and</strong> chains, remove radiator (1) from front crossmember (15) <strong>and</strong> lower<br />
radiator (1) to floor.<br />
48. Remove lifting device, chains, two isolators (13), <strong>and</strong> washers (12) from radiator (1).<br />
1<br />
5<br />
2<br />
3<br />
2<br />
5<br />
3<br />
4<br />
Figure 20. Radiator Ground Strap Removal.<br />
0008 00-14
TM 9-2815-225-34&P 0008 00<br />
BIG CAM III ENGINE REMOVAL (Contd)<br />
9<br />
8<br />
11<br />
LIFTING<br />
DEVICE<br />
9<br />
11<br />
9<br />
8<br />
8<br />
7<br />
6<br />
10<br />
8<br />
8<br />
10<br />
7<br />
7<br />
9<br />
8<br />
7<br />
CHAINS<br />
8<br />
10<br />
1<br />
8<br />
10<br />
12<br />
13<br />
12<br />
13<br />
13<br />
12<br />
15<br />
13<br />
12<br />
14<br />
Figure 21. Radiator Removal.<br />
0008 00-15
TM 9-2815-225-34&P 0008 00<br />
BIG CAM III ENGINE REMOVAL (Contd)<br />
49. Remove six cooling fan nuts (1), lockwashers (2), washers (3), <strong>and</strong> cooling fan (4) from cooling fan<br />
clutch studs (5). Discard lockwashers (2).<br />
50. Position container under power steering reservoir (8), remove drain plug (9) <strong>and</strong> drain power<br />
steering fluid. Install drain plug (9).<br />
NOTE<br />
Cap <strong>and</strong> plug all openings, hoses, <strong>and</strong> lines to prevent fluid<br />
contamination.<br />
51. Loosen two power steering hose clamps (7) <strong>and</strong> remove power steering hoses (6) <strong>and</strong> clamps (7)<br />
from power steering reservoir (8) <strong>and</strong> power steering pump (12).<br />
52. Remove power steering hose (11) from elbow (10) on power steering reservoir (8).<br />
53. Remove fuel return line (20) from fuel return line T-fitting (19) on engine (16).<br />
54. Remove fuel supply line (24) from fuel filter fitting (25).<br />
55. Remove retaining pin (15) <strong>and</strong> transmission modulator cable (23) from throttle lever (27).<br />
56. Remove two throttle position sensor cable clamp locknuts (26), screws (18), four washers (21),<br />
clamp (17), <strong>and</strong> transmission modulator cable (23) from mounting bracket (22). Discard<br />
locknuts (26).<br />
57. Remove two accelerator return springs (31), accelerator rod locknut (32), screw (30), <strong>and</strong><br />
accelerator rod (28) from lower throttle lever (29). Discard locknut (32).<br />
58. Remove tachometer cable (14) from fuel pump tachometer drive (13).<br />
1 2<br />
3<br />
4<br />
5<br />
Figure 22. Cooling Fan Removal.<br />
0008 00-16
TM 9-2815-225-34&P 0008 00<br />
BIG CAM III ENGINE REMOVAL (Contd)<br />
8<br />
7<br />
6<br />
9<br />
10<br />
11<br />
7<br />
12<br />
Figure 23. Power Steering Hoses Removal.<br />
15<br />
16<br />
17 18<br />
19<br />
14<br />
13<br />
~<br />
20<br />
21<br />
22<br />
23<br />
24<br />
21<br />
25<br />
27<br />
26<br />
32<br />
29<br />
31<br />
28<br />
30<br />
Figure 24. Throttle Lever Removal.<br />
0008 00-17
~<br />
TM 9-2815-225-34&P 0008 00<br />
BIG CAM III ENGINE REMOVAL (Contd)<br />
59. Disconnect air compressor hose (1) at top of transmission (2).<br />
60. Disconnect oil sample hose (3) from elbow fitting (4) on oil filter housing (5).<br />
61. Disconnect two air lines (6) from air compressor (7).<br />
62. Disconnect air line (9) from fan temperature switch (8).<br />
63. Disconnect two transmission oil cooler hoses (10) <strong>and</strong> (11) from transmission (2).<br />
64. Remove transmission oil cooler hose nut (13), washer (12), screw (15), clamp (16), <strong>and</strong> transmission<br />
oil cooler hoses (10) <strong>and</strong> (11) from transmission oil cooler base mounting bracket (14).<br />
1<br />
2<br />
3<br />
4<br />
5<br />
~<br />
Figure 25. Air Compressor Hose Removal.<br />
Figure 26. Engine Oil Sampling Hose Removal.<br />
6<br />
7<br />
Figure 27. Air Compressor Lines Removal.<br />
0008 00-18
TM 9-2815-225-34&P 0008 00<br />
BIG CAM III ENGINE REMOVAL (Contd)<br />
8 9<br />
10<br />
11<br />
2<br />
Figure 28. Fan Temperature Switch Removal.<br />
Figure 29.<br />
Transmission Oil Cooler Hoses Removal.<br />
10 13<br />
12<br />
14<br />
11<br />
16<br />
15<br />
2<br />
Figure 30. Transmission Oil Cooler Hose Clamp Removal.<br />
0008 00-19
TM 9-2815-225-34&P 0008 00<br />
BIG CAM III ENGINE REMOVAL (Contd)<br />
65. Remove transmission oil temperature sensor electrical connector nut (4), washer (3), <strong>and</strong><br />
transmission oil temperature sensor electrical connector (1) from transmission oil temperature<br />
sensor (2).<br />
66. Disconnect engine speed sensor electrical connector (6) from engine speed sensor (5) on<br />
transmission (7).<br />
67. Disconnect turbine speed sensor electrical connector (9) from turbine speed sensor jumper<br />
harness (10) on transmission (7).<br />
68. Disconnect output speed sensor electrical connector (11) from output speed sensor (12) on<br />
transmission (7).<br />
69. Remove transmission electrical harness nut (17), screw (14), clamp (13), two washers (15), <strong>and</strong><br />
transmission electrical harness (8) from transmission (7).<br />
70. Disconnect control valve module electrical harness (16) from transmission electrical harness (8).<br />
1<br />
4<br />
3<br />
2<br />
Figure 31.<br />
Transmission Oil Temperature<br />
Sensor Removal.<br />
10<br />
6 5<br />
9<br />
7<br />
8<br />
Figure 32.<br />
Engine Speed <strong>and</strong> Turbine Sensor Removal.<br />
0008 00-20
TM 9-2815-225-34&P 0008 00<br />
BIG CAM III ENGINE REMOVAL (Contd)<br />
11<br />
12<br />
Figure 33. Output Speed Sensor Removal.<br />
7<br />
14<br />
13<br />
15 16<br />
8<br />
7<br />
15<br />
17<br />
Figure 34. Transmission Electrical Harness Removal.<br />
0008 00-21
TM 9-2815-225-34&P 0008 00<br />
BIG CAM III ENGINE REMOVAL (Contd)<br />
71. Loosen two alternator mounting bracket screws (3).<br />
72. Loosen two alternator jam nuts (1) on alternator adjusting rod (6).<br />
73. Push alternator (5) in towards engine (2) <strong>and</strong> remove two drive belts (4).<br />
74. Remove alternator terminal nut (19), washer (18), <strong>and</strong> engine electrical harness positive lead (15)<br />
from alternator positive terminal (17).<br />
75. Remove alternator terminal nut (7), washer (8), <strong>and</strong> engine electrical harness negative lead (9)<br />
from alternator negative terminal (16).<br />
76. Remove alternator terminal nut (10), washer (11), <strong>and</strong> engine electrical harness<br />
transformer/rectifier positive lead (14) from alternator transformer/rectifier positive terminal (21).<br />
77. Remove alternator terminal nut (12), washer (13), <strong>and</strong> engine electrical harness<br />
transformer/rectifier negative lead (22) from alternator transformer/rectifier negative<br />
terminal (20).<br />
1<br />
2<br />
6<br />
1<br />
5<br />
4<br />
3<br />
Figure 35. Alternator Belt Removal.<br />
0008 00-22
TM 9-2815-225-34&P 0008 00<br />
BIG CAM III ENGINE REMOVAL (Contd)<br />
7 8 9<br />
14<br />
15<br />
10<br />
11<br />
12<br />
13<br />
16<br />
22<br />
21<br />
20<br />
19<br />
18<br />
17<br />
Figure 36. Alternator Electrical Connections Removal.<br />
0008 00-23
TM 9-2815-225-34&P 0008 00<br />
BIG CAM III ENGINE REMOVAL (Contd)<br />
78. Disconnect temperature sensor electrical connector (1) from temperature sensor (11).<br />
79. Remove fan temperature switch screw (4), washer (5), pressure harness lead (6), <strong>and</strong> solenoid<br />
lead (8) from fan temperature switch (10), terminal A.<br />
80. Remove fan temperature switch screw (3), washer (2), pressure harness lead (9), <strong>and</strong> engine<br />
harness lead (7) from fan temperature switch (10), terminal B.<br />
81. Remove 12V power stud grommet (12), nut (15), washer (14), two engine harness leads (16) <strong>and</strong><br />
(17), <strong>and</strong> 12V power lead (18) from 12V power stud (13).<br />
4<br />
2<br />
3<br />
5 6<br />
1<br />
7<br />
8<br />
A<br />
9<br />
10<br />
B<br />
11<br />
Figure 37. Fan Temperature Switch Electrical Connections.<br />
0008 00-24
TM 9-2815-225-34&P 0008 00<br />
BIG CAM III ENGINE REMOVAL (Contd)<br />
13<br />
12<br />
14<br />
15<br />
18<br />
17<br />
16<br />
Figure 38. 12V Harness Leads Removal.<br />
0008 00-25
TM 9-2815-225-34&P 0008 00<br />
BIG CAM III ENGINE REMOVAL (Contd)<br />
82. Remove starter S-terminal nut (15), lockwasher (16), <strong>and</strong> starter electrical harness lead no. 74<br />
(17) from starter S-terminal (18). Discard lockwasher (16).<br />
83. Remove starter positive terminal nut (4), lockwasher (6), battery positive cable (5), <strong>and</strong> three<br />
starter electrical harness leads no. 202 (7), no. 82 (8), <strong>and</strong> no. 421 (9) from starter positive<br />
terminal (19). Discard lockwasher (6).<br />
84. Remove starter ground terminal nut (1), lockwasher (2), battery ground cable (22), ground jumper<br />
cable (3), <strong>and</strong> starter electrical harness lead no. 83 (21) from starter ground terminal (20). Discard<br />
lockwasher (2).<br />
85. Remove A/C electrical harness ground lead screw (13), two starwashers (11) <strong>and</strong> (12), A/C electrical<br />
harness ground lead (10), <strong>and</strong> ground jumber cable (3) from engine (14). Discard starwashers (11).<br />
86. Remove fuel solenoid terminal nut (25), lockwasher (24), <strong>and</strong> fuel solenoid electrical harness<br />
lead (26) from fuel solenoid (23). Discard lockwasher (24).<br />
87. Disconnect fuel pump pressure sensor electrical connector (28) from fuel pump pressure<br />
sensor (27).<br />
10<br />
11<br />
14<br />
9<br />
3<br />
12<br />
13<br />
~<br />
7<br />
6<br />
4 5<br />
8<br />
15 16<br />
3<br />
1<br />
2<br />
22<br />
20<br />
19<br />
18<br />
17<br />
21<br />
Figure 39. Starter Motor Electrical Connections Removal.<br />
0008 00-26
TM 9-2815-225-34&P 0008 00<br />
BIG CAM III ENGINE REMOVAL (Contd)<br />
23 24 25<br />
26<br />
27<br />
28<br />
Figure 40. Solenoid <strong>and</strong> Pressure Sensor Wiring Removal.<br />
0008 00-27
TM 9-2815-225-34&P 0008 00<br />
BIG CAM III ENGINE REMOVAL (Contd)<br />
88. Disconnect jacob brake electrical connector (1) from engine harness connector (2).<br />
89. Disconnect front (4), middle (5), <strong>and</strong> rear (6) jacob brake electrical connectors from cylinder<br />
heads (3).<br />
90. Disconnect transmission TPS harness electrical connector (8) from vehicle TPS harness electrical<br />
connector (7).<br />
2<br />
1<br />
Figure 41. Jacob Brake Harness Removal.<br />
4<br />
3<br />
Figure 42. Front Jacob Brake Electrical Connector.<br />
0008 00-28
TM 9-2815-225-34&P 0008 00<br />
BIG CAM III ENGINE REMOVAL (Contd)<br />
6<br />
3 5<br />
Figure 43.<br />
Middle Jacob Brake Electrical Connector.<br />
3<br />
Figure 44. Rear Jacob Brake Electrical Connector.<br />
8 7<br />
Figure 45. Transmission Harness Electrical Connector.<br />
0008 00-29
TM 9-2815-225-34&P 0008 00<br />
BIG CAM III ENGINE REMOVAL (Contd)<br />
91. Disconnect ether quick-start tube (3) from atomizer (4) on intake manifold (1).<br />
92. Position <strong>and</strong> secure suitable transmission jack under transmission (11). Ensure transmission<br />
weight is <strong>support</strong>ed by transmission jack.<br />
93. Remove flywheel bolt access cover screw (5) from P-clamp (6) <strong>and</strong> flywheel housing (13) <strong>and</strong><br />
position P-clamp (6) away from flywheel housing (13).<br />
94. Remove flywheel bolt access cover screws (5) <strong>and</strong> flywheel bolt access cover (7) from flywheel<br />
housing (13).<br />
NOTE<br />
Rotate engine using accessory drive pulley nut to gain access to<br />
flywheel bolts.<br />
95. Remove twelve flywheel bolts (8) <strong>and</strong> washers (9) from flywheel (10) <strong>and</strong> torque converter (12).<br />
96. Remove twelve transmission bolts (25) from transmission (11) <strong>and</strong> flywheel housing (13).<br />
97. Attach tilt sling <strong>and</strong> lifting device to engine lifting brackets (2).<br />
98. Remove two front engine crossmember mount nuts (23), four washers (19), two insulators (20),<br />
<strong>and</strong> bolts (22) from front engine crossmember mount (21).<br />
99. Remove four mounting bracket nuts (26), insulators (28), eight washers (27), <strong>and</strong> four bolts (15)<br />
from mounting brackets (16).<br />
WARNING<br />
Use extreme care when h<strong>and</strong>ling heavy parts. Provide adequate<br />
<strong>support</strong> <strong>and</strong> use assistance during procedure. Ensure that any<br />
lifting device used is in good operating condition <strong>and</strong> of suitable<br />
load capacity. Keep clear of heavy components <strong>support</strong>ed only<br />
by lifting device. Failure to do so may result in death or injury<br />
to personnel.<br />
Use pry bars to free engine hangups or snags. Do not use<br />
h<strong>and</strong>s. Failure to do so may result in damage to equipment or<br />
death or injury to personnel.<br />
100. Using lifting device <strong>and</strong> lifting sling, remove engine (17) from frame (14). Ensure there is proper<br />
clearance between frame (14), alternator (24), engine (17), <strong>and</strong> power steering pump (18).<br />
101. To mount engine on <strong>maintenance</strong> st<strong>and</strong> refer to WP 0009 00.<br />
1<br />
2<br />
TILT<br />
SLING<br />
4<br />
3<br />
Figure 46. Ether Quick Start Tube.<br />
0008 00-30
TM 9-2815-225-34&P 0008 00<br />
BIG CAM III ENGINE REMOVAL (Contd)<br />
10<br />
FLYWHEEL BOLT<br />
ACCESS HOLE<br />
6<br />
7<br />
12<br />
11<br />
5<br />
8<br />
9<br />
13<br />
Figure 47. Disconnect Flywheel from Torque Converter.<br />
LIFTING DEVICE<br />
14 15 16<br />
CHAINS<br />
17<br />
27<br />
28<br />
25<br />
27<br />
26<br />
19<br />
24<br />
23<br />
19<br />
21<br />
20<br />
18<br />
22<br />
11<br />
Figure 48. Engine Removal from Frame.<br />
END OF WORK PACKAGE<br />
0008 00-31/32 blank
TM 9-2815-225-34&P 0009 00<br />
DIRECT SUPPORT AND GENERAL SUPPORT<br />
MAINTENANCE MANUAL<br />
INCLUDING REPAIR PARTS AND SPECIAL TOOLS LIST (RPSTL)<br />
FOR<br />
M915, M915A1, M915A4, M916, M920 VEHICLES<br />
NSN 2815-01-082-8125 P/N NTC400-3652-02 CUMMINS NTC-400 BIG CAM I DIESEL ENGINE<br />
W/CONTAINER<br />
NSN 2815-01-142-2745 P/N 11669835 CUMMINS NTC-400 BIG CAM III DIESEL ENGINE<br />
W/CONTAINER<br />
MOUNTING ENGINE ON MAINTENANCE STAND<br />
INITIAL SETUP:<br />
Tools <strong>and</strong> Special Tools<br />
General mechanic’s tool kit: automotive<br />
(Item 1, WP 0061 00)<br />
Maintenance <strong>and</strong> repair shop equipment:<br />
automotive (Item 2, WP 0061 00)<br />
Automotive <strong>maintenance</strong> <strong>and</strong> repair<br />
supplemental set no. 2 (Item 3, WP 0061 00)<br />
Maintenance st<strong>and</strong><br />
Lifting device<br />
Chains<br />
Equipment Condition<br />
Engine removed from vehicle<br />
(WP 0007 00 or WP 0008 00).<br />
Personnel Required<br />
Assistant<br />
Materials/Parts<br />
Four screws<br />
0009 00-1
TM 9-2815-225-34&P 0009 00<br />
MOUNTING ENGINE ON MAINTENANCE STAND (Contd)<br />
1. Remove oil pressure gauge sensing unit (4) <strong>and</strong> low oil pressure warning light sending unit (3)<br />
from cylinder block (2).<br />
NOTE<br />
Perform step 2 for Big Cam I engines only.<br />
2. Remove transmission control-body heating elements ON/OFF switch (1) from cylinder block (2).<br />
3. Remove oil level dipstick (9) from oil level dipstick tube <strong>and</strong> cover (10).<br />
4. Remove screw (8), lockwasher (7), <strong>and</strong> washer (6) from tube brace (5). Discard lockwasher (7).<br />
5. Remove nut (11), lockwasher (12), two washers (13), screw (8), clamp (14), <strong>and</strong> tube brace (5) from<br />
oil level dipstick tube <strong>and</strong> cover (10).<br />
6. Remove four captive washer screws (15), washers (16), oil level dipstick tube <strong>and</strong> cover (10), <strong>and</strong><br />
gasket (17) from cylinder block (2). Discard gasket (17).<br />
1<br />
2<br />
4<br />
3<br />
Figure 1. Oil Pressure Gauge Sensing Unit Removal.<br />
6 7<br />
8<br />
9<br />
10<br />
17<br />
5<br />
13<br />
8<br />
14<br />
11<br />
12<br />
13<br />
2<br />
15<br />
16<br />
Figure 2. Oil Level Dipstick Tube Removal.<br />
0009 00-2
TM 9-2815-225-34&P 0009 00<br />
MOUNTING ENGINE ON MAINTENANCE STAND (Contd)<br />
7. Loosen clamps (23) <strong>and</strong> (25) retaining turbocharger air crossover (22) <strong>and</strong> hose (24) to<br />
turbocharger (26).<br />
8. Remove hose (18) <strong>and</strong> fitting (19) from turbocharger air crossover (22).<br />
9. Remove four bolts (20), washers (21), turbocharger air crossover (22), hose (24) <strong>and</strong> gasket (28)<br />
from aftercooler cover (27) <strong>and</strong> turbocharger (26). Discard hose (24) <strong>and</strong> gasket (28).<br />
10. Remove bolt (30) securing clamp (29) <strong>and</strong> turbocharger oil supply hose (28) to turbocharger<br />
adapter (27) <strong>and</strong> elbow (31).<br />
11. Remove turbocharger oil supply hose (28) from turbocharger (26).<br />
NOTE<br />
Perform step 12 for Big Cam I only.<br />
12. Loosen clamps (40) <strong>and</strong> (42), <strong>and</strong> remove oil return tube (38) from elbows (37) <strong>and</strong> (45).<br />
NOTE<br />
Perform steps 13 <strong>and</strong> 14 for Big Cam III only.<br />
13. Remove oil return tube (36) <strong>and</strong> two bushings (43) <strong>and</strong> (46) from oil return tube (39) <strong>and</strong> filter<br />
head (44).<br />
14. Remove oil return tube (38), two clamps (40) <strong>and</strong> (42), <strong>and</strong> hose (41) from elbows (35) <strong>and</strong> (45).<br />
15. Remove four nuts (34), turbocharger (26), <strong>and</strong> gasket (33) from exhaust manifold (32). Discard<br />
gasket (33).<br />
16. For turbocharger (26) repair, refer to WP 0026 00 or WP 0027 00.<br />
20<br />
26 27<br />
19<br />
21 22<br />
28<br />
29<br />
18<br />
23<br />
28<br />
27<br />
24<br />
25<br />
30<br />
31<br />
26<br />
Figure 3. Turbocharger Air Crossover Removal.<br />
Figure 4. Turbocharger Oil Supply Hose Removal.<br />
32 33 34<br />
26<br />
46<br />
35<br />
36<br />
45<br />
44 43<br />
39<br />
42<br />
41<br />
40<br />
Figure 5. Turbocharger Removal.<br />
38<br />
37<br />
0009 00-3
TM 9-2815-225-34&P 0009 00<br />
MOUNTING ENGINE ON MAINTENANCE STAND (Contd)<br />
NOTE<br />
Perform steps 17 <strong>and</strong> 18 for Big Cam I only.<br />
17. Bend tabs of four lockplates (4) <strong>and</strong> remove eight bolts (6), lockwashers (5), <strong>and</strong> lockplates (4)<br />
securing exhaust manifold (3) to cylinder head (1) <strong>and</strong> dowels (13). Discard lockplates (4) <strong>and</strong><br />
lockwashers (5).<br />
18. Bend tabs of two lockplates (11) <strong>and</strong> remove four bolts (10), lockplates (11), clamps (12), exhaust<br />
manifold (3), <strong>and</strong> six gaskets (2) from cylinder heads (1). Discard lockplates (11) <strong>and</strong> gaskets (2).<br />
NOTE<br />
Perform step 19 for Big Cam III only.<br />
19. Remove twelve captive head screws (9), exhaust manifold (7), <strong>and</strong> six gaskets (2) from cylinder<br />
heads (1). Discard gaskets (2). Do not separate manifolds <strong>and</strong> spacer inserts (8) at this time.<br />
20. For exhaust manifold (7) or (3) repair, refer to WP 0025 00.<br />
1<br />
1<br />
3<br />
2<br />
4 5<br />
13<br />
12<br />
7 8<br />
11<br />
10<br />
7<br />
6<br />
8<br />
9<br />
Figure 6. Exhaust Manifold Removal.<br />
0009 00-4
TM 9-2815-225-34&P 0009 00<br />
MOUNTING ENGINE ON MAINTENANCE STAND (Contd)<br />
NOTE<br />
Perform steps 21 through 23 for Big Cam I only.<br />
21. Remove screw (23) <strong>and</strong> lockwasher (17) securing oil cooler <strong>support</strong> bracket (18) to cylinder block<br />
(14). Discard lockwasher (17).<br />
22. Loosen clamp (16) <strong>and</strong> remove water transfer hose (15) from oil cooler (22).<br />
23. Remove five screws (19), lockwashers (20), oil cooler (22), <strong>and</strong> gasket (21) from cylinder block (14).<br />
Discard lockwashers (20) <strong>and</strong> gasket (21).<br />
NOTE<br />
Perform steps 24 <strong>and</strong> 25 for Big Cam III only.<br />
24. Remove two screws (27), lockwashers (28), <strong>and</strong> washers (29) securing rear of oil cooler (30) to<br />
cylinder block (14). Discard lockwashers (28).<br />
25. Remove six screws (26), lockwashers (25), oil cooler (30), <strong>and</strong> gasket (24) from cylinder block (14).<br />
Discard lockwashers (25) <strong>and</strong> gasket (24).<br />
26. For oil cooler (30) or (22) repair, refer to WP 0021 00.<br />
14<br />
27<br />
28<br />
29<br />
30<br />
15<br />
23<br />
17<br />
16 18<br />
19<br />
20 21<br />
24<br />
25<br />
25<br />
22<br />
20<br />
20<br />
26<br />
19<br />
Figure 7. Oil Cooler Removal.<br />
0009 00-5
TM 9-2815-225-34&P 0009 00<br />
MOUNTING ENGINE ON MAINTENANCE STAND (Contd)<br />
NOTE<br />
Perform steps 27 <strong>and</strong> 28 for Big Cam I only.<br />
27. Loosen four clamps (5) <strong>and</strong> remove two water transfer hoses (4) <strong>and</strong> water transfer tube (6) from<br />
water transfer flange (2). Discard hoses (4).<br />
28. Remove six screws (1), water transfer flange (2), <strong>and</strong> gasket (3) from cylinder block (7). Discard<br />
gasket (3).<br />
NOTE<br />
Perform steps 29 through 31 for Big Cam III only.<br />
29. Remove twelve screws (10), two water header covers (9), <strong>and</strong> gaskets (8) from cylinder block (7).<br />
Discard gaskets (8).<br />
30. Remove six screws (13) <strong>and</strong> piston cooling nozzles (12) from cylinder block (7).<br />
31. Remove six O-rings (11) from piston cooling nozzles (12) Discard O-rings (11).<br />
2<br />
3<br />
1<br />
5<br />
6<br />
5<br />
4<br />
7<br />
11<br />
8<br />
13<br />
12<br />
9<br />
10<br />
Figure 8. Piston Cooling Nozzles Removal.<br />
0009 00-6
TM 9-2815-225-34&P 0009 00<br />
MOUNTING ENGINE ON MAINTENANCE STAND (Contd)<br />
32. Install right side of cylinder block (7) on <strong>maintenance</strong> st<strong>and</strong> with four screws (14).<br />
33. Remove engine lifting device from engine lifting brackets.<br />
LIFTING DEVICE<br />
ENGINE LIFTING BRACKETS<br />
MAINTENANCE STAND<br />
7<br />
14<br />
Figure 9. Mounting Engine on Maintenance St<strong>and</strong>.<br />
END OF WORK PACKAGE<br />
0009 00-7/8 blank
TM 9-2815-225-34&P 0010 00<br />
DIRECT SUPPORT AND GENERAL SUPPORT<br />
MAINTENANCE MANUAL<br />
INCLUDING REPAIR PARTS AND SPECIAL TOOLS LIST (RPSTL)<br />
FOR<br />
M915, M915A1, M915A4, M916, M920 VEHICLES<br />
NSN 2815-01-082-8125 P/N NTC400-3652-02 CUMMINS NTC-400 BIG CAM I DIESEL ENGINE<br />
W/CONTAINER<br />
NSN 2815-01-142-2745 P/N 11669835 CUMMINS NTC-400 BIG CAM III DIESEL ENGINE<br />
W/CONTAINER<br />
ENGINE ACCESSORIES REMOVAL<br />
VIBRATION DAMPER AND CRANKSHAFT PULLEY, ACCESSORY DRIVE PULLEY, FUEL PUMP AND<br />
FUEL LINES, AIR COMPRESSOR, ACCESSORY DRIVE HOUSING, OIL PUMP, AIR AFTERCOOLER<br />
INITIAL SETUP:<br />
Tools <strong>and</strong> Special Tools<br />
General mechanic’s tool kit:<br />
automotive (Item 1, WP 0061 00)<br />
Maintenance <strong>and</strong> repair shop equpment:<br />
automotive (Item 2, WP 0061 00)<br />
Automotive <strong>maintenance</strong> <strong>and</strong> repair<br />
supplemental set no. 2 (Item 3, WP 0061 00)<br />
Air compressor wrench<br />
(Item 18, WP 0061 00)<br />
Equipment Condition<br />
Engine mounted on <strong>maintenance</strong> st<strong>and</strong><br />
(WP 0009 00).<br />
Materials/Parts<br />
Cap <strong>and</strong> plug set (Item 29, WP 0060 00)<br />
0010 00-1
TM 9-2815-225-34&P 0010 00<br />
ENGINE ACCESSORIES REMOVAL (Contd)<br />
VIBRATION DAMPER AND CRANKSHAFT PULLEY<br />
WARNING<br />
Use extreme care during engine accessory removal. Engine<br />
parts are heavy. Failure to do so may result in death or injury<br />
to personnel.<br />
CAUTION<br />
Do not pound on vibration damper with hammer or other tools<br />
during removal. Damage to vibration damper will occur.<br />
1. Insert prybar in teeth of flyweel <strong>and</strong> flywheel housing to prevent crankshaft (5) from turning.<br />
2. Remove six screws (1), washers (2), vibration damper (3), <strong>and</strong> crankshaft pulley (4) from<br />
crankshaft (5).<br />
ACCESSORY DRIVE PULLEY<br />
NOTE<br />
Perform steps 1 through 4 for Big Cam III engines only.<br />
Do not let accessory drive pulley rotate when removing screws.<br />
1. Remove six screws (6) <strong>and</strong> front accessory drive pulley (9) from rear accessory drive pulley (11).<br />
2. Remove locknut (7) <strong>and</strong> washer (8) retaining rear accessory drive pulley (11) on accessory<br />
driveshaft (12). Discard locknut (7).<br />
CAUTION<br />
Do not use jaw-type puller. Damage to accessory drive pulley<br />
may result.<br />
When installing puller, ensure screws do not bottom-out<br />
against front cover, or damage to front cover will result.<br />
3. Using puller, remove rear accessory drive pulley (11) from accessory driveshaft (12).<br />
4. Remove keyway seal (10) from accessory driveshaft (12). Discard keyway seal (10).<br />
NOTE<br />
Perform steps 5 through 7 for Big Cam I engines only.<br />
5. Remove locknut (7) <strong>and</strong> washer (8) retaining accessory drive pulley (13) on accessory<br />
driveshaft (12). Discard locknut (7).<br />
CAUTION<br />
Do not use jaw-type puller. Damage to accessory drive pulley<br />
may result.<br />
6. Using puller, remove accessory drive pulley (13) from accessory driveshaft (12).<br />
7. Remove keyway seal (10) from accessory driveshaft (13). Discard keyway seal (10).<br />
8. For accessory drive pulley (9) <strong>and</strong> (13) repair, refer to WP 0029 00.<br />
0010 00-2
TM 9-2815-225-34&P 0010 00<br />
ENGINE ACCESSORIES REMOVAL (Contd)<br />
3<br />
4<br />
1<br />
2<br />
5<br />
Figure 1. Vibration Damper <strong>and</strong> Crankshaft Pulley Removal.<br />
11<br />
9<br />
10<br />
6<br />
7<br />
8<br />
12<br />
BIG CAM III<br />
13<br />
7<br />
8<br />
10<br />
12<br />
BIG CAM I<br />
Figure 2. Accessory Drive Pulley Removal.<br />
0010 00-3
TM 9-2815-225-34&P 0010 00<br />
ENGINE ACCESSORIES REMOVAL (Contd)<br />
FUEL PUMP AND FUEL LINES<br />
NOTE<br />
Cap or plug all openings immediately after removal to prevent<br />
contamination.<br />
Perform steps 1 through 4 for Big Cam I equipped with air<br />
signal attenuator (ASA) air tank.<br />
1. Remove four hose clamps (3) <strong>and</strong> two air supply hoses (4) from ASA air tank (1).<br />
2. Remove air aftercooler elbow (5) from air aftercooler (6).<br />
3. Remove ASA hose fittings (2) from ASA air tank (1).<br />
4. Remove screw (21), lockwasher (20), washer (19), <strong>and</strong> ASA air tank (1) from air aftercooler (6).<br />
Discard lockwasher (20).<br />
5. Remove nut (22), lockwasher (23), washer (24), <strong>and</strong> screw (18) securing bracket (25) <strong>and</strong> air<br />
supply line (26) to air aftercooler (6). Discard lockwasher (23).<br />
6. Remove adapter (17) from air aftercooler (6).<br />
7. Remove air supply line (26) <strong>and</strong> valve (27) from fuel pump (29).<br />
8. Remove two screws (13), lockwashers (12), <strong>and</strong> washers (11) securing fuel supply line (9) <strong>and</strong> fuel<br />
return line (10) to air aftercooler (6). Discard lockwashers (12).<br />
9. Remove fuel return lines (10) <strong>and</strong> (15) <strong>and</strong> fuel pump adapter (28) from fuel pump (29).<br />
10. Remove fuel supply line (9) <strong>and</strong> fuel pump adapter (16) from fuel pump (29).<br />
11. Remove fuel return line (10), fuel supply line (9), <strong>and</strong> two cylinder head adapters (8) from<br />
cylinder head (7).<br />
12. Remove fuel pump adapter (14) from fuel pump (29).<br />
0010 00-4
TM 9-2815-225-34&P 0010 00<br />
ENGINE ACCESSORIES REMOVAL (Contd)<br />
4<br />
5<br />
2<br />
3<br />
3<br />
1 6<br />
2<br />
19<br />
7 8<br />
3<br />
4<br />
3<br />
2<br />
21<br />
23<br />
22<br />
26<br />
20<br />
24<br />
25<br />
11<br />
18<br />
17<br />
10<br />
9<br />
27<br />
28<br />
13<br />
12<br />
16<br />
15<br />
14<br />
13<br />
12<br />
11<br />
29<br />
Figure 3. Fuel Lines Removal.<br />
0010 00-5
TM 9-2815-225-34&P 0010 00<br />
ENGINE ACCESSORIES REMOVAL (Contd)<br />
FUEL PUMP AND FUEL LINES (Contd)<br />
13. Remove bolt (6) <strong>and</strong> lockwasher (7) securing <strong>support</strong> bracket (9) to cylinder head (8). Discard<br />
lockwasher (7).<br />
NOTE<br />
Perform step 14 for Big Cam I only.<br />
14. Using air compressor wrench, remove four bolts (5), washers (4), <strong>support</strong> bracket (9) securing <strong>and</strong><br />
fuel pump (12) to air compressor (1).<br />
NOTE<br />
Perform steps 15 <strong>and</strong> 16 for Big Cam III only.<br />
15. Using air compressor wrench, remove bolt (13) <strong>and</strong> washer (14) securing fuel pump (12) to air<br />
compressor (1).<br />
16. Remove three bolts (11), washers (10), <strong>and</strong> <strong>support</strong> bracket (9) securing fuel pump (12) to air<br />
compressor (1).<br />
17. Using a soft-sided mallet, tap fuel pump (12) lightly to remove from air compressor (1).<br />
NOTE<br />
Gasket <strong>and</strong> spider coupling may remain on air compressor or<br />
fuel pump during removal.<br />
18. Remove gasket (2) <strong>and</strong> spider coupling (3) from air compressor (1) or fuel pump (12). Discard<br />
gasket (2).<br />
19. For fuel pump repair, refer to WP 0033 00.<br />
0010 00-6
TM 9-2815-225-34&P 0010 00<br />
ENGINE ACCESSORIES REMOVAL (Contd)<br />
4 5<br />
8<br />
1<br />
2<br />
9<br />
3<br />
6<br />
7<br />
10<br />
11<br />
12<br />
14<br />
13<br />
Figure 4. Fuel Pump Removal.<br />
0010 00-7
TM 9-2815-225-34&P 0010 00<br />
ENGINE ACCESSORIES REMOVAL (Contd)<br />
AIR COMPRESSOR<br />
NOTE<br />
Big Cam III is shown. Big Cam I is similar.<br />
1. Remove coolant inlet tube (11), coolant outlet tube (4), two bushings (3), <strong>and</strong> elbow (2) from air<br />
coolant adapters (1) <strong>and</strong> (12). Discard bushings (3).<br />
2. Remove coolant inlet tube (11), coolant outlet tube (4), two bushings (3), <strong>and</strong> two adapters (5)<br />
from air compressor (6). Discard bushings (3).<br />
3. Remove two air inlet hose clamps (8) <strong>and</strong> air inlet hose (9) from air compressor (6) <strong>and</strong> elbow (7).<br />
4. Remove elbow (7) from cylinder block (10).<br />
5. Using air compressor wrench, remove two bolts (21) <strong>and</strong> lockwashers (20) securing air<br />
compressor (6) to accessory drive housing (13). Discard lockwashers (20).<br />
6. Remove two nuts (19), lockwashers (18), washers (17), <strong>and</strong> bolts (14) securing air compressor (6)<br />
to accessory drive housing (13). Discard lockwashers (18).<br />
7. Remove air compressor (6) from accessory drive housing (13).<br />
NOTE<br />
Gasket <strong>and</strong> drive coupling may remain on air compressor or<br />
accessory drive housing during removal.<br />
8. Remove gasket (16) <strong>and</strong> drive coupling (15) from air compressor (6) or accessory drive<br />
housing (13). Discard gasket (16).<br />
9. For air compressor repair, refer to WP 0031 00.<br />
0010 00-8
TM 9-2815-225-34&P 0010 00<br />
ENGINE ACCESSORIES REMOVAL (Contd)<br />
4<br />
3<br />
2<br />
5<br />
1<br />
3<br />
12<br />
3<br />
11<br />
3<br />
5<br />
6<br />
7<br />
8<br />
9<br />
10<br />
6<br />
8<br />
Figure 5. Air Compressor Lines Removal.<br />
6<br />
17<br />
18<br />
19<br />
13<br />
14<br />
15<br />
16<br />
21<br />
20<br />
Figure 6. Air Compressor Removal.<br />
0010 00-9
TM 9-2815-225-34&P 0010 00<br />
ENGINE ACCESSORIES REMOVAL (Contd)<br />
ACCESSORY DRIVE HOUSING<br />
1. Remove five bolts (4), accessory drive housing (3), <strong>and</strong> gasket (2) from front gear cover (1).<br />
Discard gasket (2).<br />
2. For accessory drive housing assembly repair, refer to WP 0029 00.<br />
OIL PUMP<br />
NOTE<br />
Perform steps 1 through 6 for Big Cam III.<br />
1. Remove two screws (16), lockwashers (15), <strong>and</strong> washers (14) securing oil suction tube (13) to oil<br />
pan (20). Discard lockwashers (15).<br />
2. Remove two screws (17), lockwashers (18), washers (19), <strong>and</strong> oil suction tube (13) from oil pan<br />
(20) <strong>and</strong> oil pump (7). Discard lockwashers (18).<br />
3. Remove two O-rings (12) <strong>and</strong> one gasket (11) from oil suction tube (13). Discard O-rings (12) <strong>and</strong><br />
gasket (11).<br />
4. Remove oil transfer tube (8) from oil pump (7) <strong>and</strong> cylinder block (5).<br />
5. Remove five bolts (9) <strong>and</strong> lockwashers (10) securing oil pump (7) to accessory drive housing (21).<br />
Discard lockwashers (10).<br />
6. Remove oil pump (7) <strong>and</strong> gasket (6) from accessory drive housing (21). Discard gasket (6).<br />
3<br />
4<br />
1<br />
2<br />
Figure 7. Accessory Drive Housing Removal.<br />
0010 00-10
TM 9-2815-225-34&P 0010 00<br />
ENGINE ACCESSORIES REMOVAL (Contd)<br />
7<br />
8<br />
5<br />
6<br />
9<br />
~<br />
10<br />
11<br />
20<br />
12<br />
12<br />
13<br />
14<br />
15<br />
21<br />
16<br />
19<br />
18<br />
17<br />
Figure 8. Big Cam III Oil Pump Removal.<br />
0010 00-11
TM 9-2815-225-34&P 0010 00<br />
ENGINE ACCESSORIES REMOVAL (Contd)<br />
OIL PUMP (Contd)<br />
NOTE<br />
Perform steps 7 through 13 for Big Cam I.<br />
7. Remove bolt (14), lockwasher (13), washer (12), clamp (11), spacer (10), <strong>and</strong> locknut (15) securing<br />
oil suction hose (5) to bracket (9). Discard lockwasher (13) <strong>and</strong> locknut (15).<br />
8. Remove bolt (17), lockwasher (16), <strong>and</strong> bracket (9) from oil pan (21) <strong>and</strong> cylinder block (1).<br />
Discard lockwasher (16).<br />
9. Remove two screws (6), lockwashers (7), oil suction hose (5), <strong>and</strong> gasket (8) from oil pan (21).<br />
Discard lockwashers (7) <strong>and</strong> gasket (8).<br />
10. Remove oil suction hose (5) <strong>and</strong> adapter (4) from cylinder block (1).<br />
11. Remove three long bolts (18), two short bolts (20), <strong>and</strong> five lockwashers (19) securing oil pump (3)<br />
to accessory drive housing (22). Discard lockwashers (19).<br />
12. Remove oil pump (3) <strong>and</strong> gasket (2) from accessory drive housing (22). Discard gasket (2).<br />
13. For oil pump repair, refer to WP 0023 00.<br />
0010 00-12
TM 9-2815-225-34&P 0010 00<br />
ENGINE ACCESSORIES REMOVAL (Contd)<br />
4<br />
5<br />
2<br />
3<br />
19<br />
15<br />
18<br />
16<br />
19<br />
17<br />
9<br />
20<br />
10<br />
11<br />
8<br />
7<br />
12<br />
13<br />
14<br />
6<br />
1<br />
~<br />
21<br />
22<br />
Figure 9. Big Cam I Oil Pump Removal.<br />
0010 00-13
TM 9-2815-225-34&P 0010 00<br />
ENGINE ACCESSORIES REMOVAL (Contd)<br />
AIR AFTERCOOLER<br />
NOTE<br />
Perform steps 1 <strong>and</strong> 2 for Big Cam I only.<br />
1. Remove three bolts (5), lockwashers (4), <strong>and</strong> washers (3) securing air aftercooler (2) to cylinder<br />
heads (1). Discard lockwashers (4).<br />
2. Remove six bolts (7) <strong>and</strong> washers (6) securing air aftercooler (2) to cylinder heads (1).<br />
NOTE<br />
Perform steps 3 through 6 for Big Cam III only.<br />
3. Remove screw (8), lockwasher (4), <strong>and</strong> washer (3) securing air aftercooler (2) to cylinder<br />
heads (1). Discard lockwasher (4).<br />
4. Remove two screws (5), lockwashers (4), <strong>and</strong> washers (3) securing air aftercooler (2) to cylinder<br />
heads (1). Discard lockwashers (4).<br />
5. Remove six screws (7) <strong>and</strong> washers (6) securing air aftercooler (2) to cylinder heads (1).<br />
6. Remove air aftercooler (2) <strong>and</strong> three gaskets (9) from cylinder heads (1). Discard gaskets (9).<br />
7. For air aftercooler repair, refer to WP 0024 00.<br />
0010 00-14
TM 9-2815-225-34&P 0010 00<br />
ENGINE ACCESSORIES REMOVAL (Contd)<br />
1<br />
2<br />
3<br />
4<br />
9<br />
6<br />
5<br />
3<br />
4<br />
8<br />
7<br />
Figure 10. Air Aftercooler Removal.<br />
END OF WORK PACKAGE<br />
0010 00-15/16 blank
TM 9-2815-225-34&P 0011 00<br />
DIRECT SUPPORT AND GENERAL SUPPORT<br />
MAINTENANCE MANUAL<br />
INCLUDING REPAIR PARTS AND SPECIAL TOOLS LIST (RPSTL)<br />
FOR<br />
M915, M915A1, M915A4, M916, M920 VEHICLES<br />
NSN 2815-01-082-8125 P/N NTC400-3652-02 CUMMINS NTC-400 BIG CAM I DIESEL ENGINE<br />
W/CONTAINER<br />
NSN 2815-01-142-2745 P/N 11669835 CUMMINS NTC-400 BIG CAM III DIESEL ENGINE<br />
W/CONTAINER<br />
CYLINDER HEAD AND CYLINDER HEAD COMPONENTS REMOVAL<br />
ROCKER COVER, ENGINE BRAKE RETARDER, ROCKER ARM HOUSING, FUEL INJECTOR, CYLINDER HEAD<br />
INITIAL SETUP:<br />
Tools <strong>and</strong> Special Tools<br />
General mechanic’s tool kit: automotive<br />
(Item 1, WP 0061 00)<br />
Maintenance <strong>and</strong> repair shop equipment:<br />
automotive (Item 2, WP 0061 00)<br />
Automotive <strong>maintenance</strong> <strong>and</strong> repair<br />
supplemental set no. 2 (Item 3, WP 0061 00)<br />
Fuel injector puller (Item 8, WP 0061 00)<br />
Equipment Condition<br />
Engine mounted on <strong>maintenance</strong> st<strong>and</strong><br />
(WP 0009 00).<br />
Engine accessories removed (WP 0010 00).<br />
Material/Parts<br />
Lint-free cloth (Item 6, WP 0060 00)<br />
0011 00-1
TM 9-2815-225-34&P 0011 00<br />
CYLINDER HEAD AND CYLINDER HEAD COMPONENTS REMOVAL (Contd)<br />
ROCKER COVER<br />
1. Remove five screws (1), rocker cover (2), <strong>and</strong> gasket (3) from engine brake retarder (4). Discard<br />
gasket (3).<br />
2. Repeat step 1 to remove remaining two rocker covers (2).<br />
ENGINE BRAKE RETARDER<br />
WARNING<br />
Use extreme care during cylinder head disassembly. Cylinder<br />
head parts are heavy. Failure to do so may result in death or<br />
injury to personnel.<br />
1. Scribe a locating mark (7) on engine brake retarder (4) <strong>and</strong> rocker arm housing (10) before<br />
removal.<br />
2. Bend tabs on locking plates (5) down <strong>and</strong> remove six nuts (6) <strong>and</strong> locking plates (5) securing<br />
engine brake retarder (4) on studs (11) in rocker arm housing (10). Discard locking plates (5).<br />
3. Remove engine brake retarder (4), gasket (8), <strong>and</strong> O-ring (9) from rocker arm housing (10).<br />
Discard gasket (8) <strong>and</strong> O-ring (9).<br />
4. Repeat steps 1 through 3 to remove remaining two engine brake retarders (4).<br />
5. For engine brake retarder (4) repair, refer to WP 0030 00.<br />
0011 00-2
TM 9-2815-225-34&P 0011 00<br />
CYLINDER HEAD AND CYLINDER HEAD COMPONENTS REMOVAL (Contd)<br />
1<br />
2<br />
5<br />
6<br />
4<br />
3<br />
7<br />
8<br />
4<br />
11<br />
9<br />
7<br />
10<br />
Figure 1. Rocker Cover Removal.<br />
Figure 2. Engine Brake Retarder Removal.<br />
0011 00-3
TM 9-2815-225-34&P 0011 00<br />
CYLINDER HEAD AND CYLINDER HEAD COMPONENTS REMOVAL (Contd)<br />
ROCKER ARM HOUSING<br />
1. Scribe a locating mark (6) on rocker arm housing (1) <strong>and</strong> cylinder head (11) before removal.<br />
2. Loosen six adjusting nuts (5) <strong>and</strong> screws (4) by turning counter-clockwise to until tension is<br />
relieved.<br />
3. Remove six rocker arm housing studs (3) <strong>and</strong> washer bearings (2) securing rocker arm housing (1)<br />
to cylinder head (11). Discard washer bearings (2).<br />
4. Remove rocker arm housing (1) <strong>and</strong> gasket (10) from cylinder head (11). Discard gasket (10).<br />
NOTE<br />
Mark each pushrod or place in a suitable rack in the order they<br />
are removed to ensure proper installation.<br />
5. Remove two intake pushrods (7), injector pushrods (8), <strong>and</strong> exhaust pushrods (9) from cylinder<br />
head (11).<br />
6. Repeat steps 1 through 5 to remove remaining two rocker arm housings (1).<br />
7. For rocker arm housing <strong>and</strong> shaft repair, refer to WP 0020 00.<br />
FUEL INJECTOR<br />
NOTE<br />
Fuel injectors on Big Cam III engines maybe retained with a<br />
clamp instead of a retaining plate. Removal procedures are the<br />
same for Big Cam I <strong>and</strong> Big Cam III engines.<br />
1. Remove two screws (12) <strong>and</strong> retaining plate (13) securing fuel injector (15) in cylinder head (11).<br />
2. Remove detent plunger (14) from fuel injector (15).<br />
3. Using fuel injector puller, remove fuel injector (15) from cylinder head (11).<br />
NOTE<br />
Ensure injectors, injector links, <strong>and</strong> plungers are not<br />
intermixed. Keep all injector parts with individual injectors.<br />
Place all injectors in a suitable rack in the order they were<br />
removed to ensure proper installation.<br />
4. Wrap each fuel injector (15) in clean lint free cloth after removal to prevent dirt from entering fuel<br />
injector (15) openings.<br />
5. Repeat steps 1 through 4 for remaining fuel injectors (15).<br />
6. For fuel injector (15) repair, refer to WP 0032 00.<br />
0011 00-4
TM 9-2815-225-34&P 0011 00<br />
CYLINDER HEAD AND CYLINDER HEAD COMPONENTS REMOVAL (Contd)<br />
3<br />
2<br />
1<br />
4 5<br />
6<br />
7 8 9<br />
10<br />
6<br />
Figure 3. Rocker Arm Housing <strong>and</strong> Push Rod Removal.<br />
11<br />
14<br />
12<br />
13<br />
15<br />
11<br />
Figure 4. Fuel Injector Removal.<br />
0011 00-5
TM 9-2815-225-34&P 0011 00<br />
CYLINDER HEAD AND CYLINDER HEAD COMPONENTS REMOVAL (Contd)<br />
CYLINDER HEAD<br />
1. Scribe a locating mark (6) on cylinder head (7) <strong>and</strong> cylinder block (8) before removal.<br />
NOTE<br />
Perform step 2 if removing front <strong>and</strong> rear cylinder head.<br />
2. Remove four screws (3), fuel crossover connection (2), <strong>and</strong> four O-rings (1) from cylinder head (7).<br />
Discard O-rings (1).<br />
NOTE<br />
Perform step 3 if removing center cylinder head.<br />
3. Remove eight screws (3), two fuel crossover connections (2), <strong>and</strong> eight O-rings (1) from center<br />
cylinder head (7). Discard O-rings (1).<br />
4. Remove twelve bolts (5) <strong>and</strong> washers (4) in sequence (9) securing cylinder head (7) to cylinder<br />
block (8).<br />
5. Remove cylinder head (7) <strong>and</strong> gasket (10) from cylinder block (8). Discard gasket (10).<br />
6. Repeat steps 1 through 5 for remaining cylinder heads (7).<br />
7. For cylinder head repair (7), refer to WP 0014 00.<br />
6<br />
5<br />
7<br />
8<br />
3<br />
4<br />
2<br />
1<br />
7<br />
9<br />
10<br />
~<br />
8<br />
Figure 5. Cylinder Head Removal.<br />
END OF WORK PACKAGE<br />
0011 00-6
TM 9-2815-225-34&P 0012 00<br />
DIRECT SUPPORT AND GENERAL SUPPORT<br />
MAINTENANCE MANUAL<br />
INCLUDING REPAIR PARTS AND SPECIAL TOOLS LIST (RPSTL)<br />
FOR<br />
M915, M915A1, M915A4, M916, M920 VEHICLES<br />
NSN 2815-01-082-8125 P/N NTC400-3652-02 CUMMINS NTC-400 BIG CAM I DIESEL ENGINE<br />
W/CONTAINER<br />
NSN 2815-01-142-2745 P/N 11669835 CUMMINS NTC-400 BIG CAM III DIESEL ENGINE<br />
W/CONTAINER<br />
CYLINDER BLOCK COMPONENTS REMOVAL<br />
FLYWHEEL, FLEXPLATE, AND FLYWHEEL HOUSING; OIL PAN; FRONT GEAR COVER; PISTONS AND<br />
CONNECTING RODS; CAMSHAFT FOLLOWERS; CRANKSHAFT AND MAIN BEARINGS<br />
INITIAL SETUP:<br />
Tools <strong>and</strong> Special Tools<br />
General mechanic’s tool kit: automotive<br />
(Item 1, WP 0061 00)<br />
Maintenance <strong>and</strong> repair shop equipment:<br />
automotive (Item 2, WP 0061 00)<br />
Automotive <strong>maintenance</strong> <strong>and</strong> repair<br />
supplemental set no. 2 (Item 3, WP 0061 00)<br />
Stud 5/8-18x6 in.<br />
Jack screw 1/2-13x6 in.<br />
Camshaft pilot tool (Item 62, WP 0061 00)<br />
Main bearing cap puller (Item 68, WP 0061 00)<br />
Lifting device<br />
Equipment Condition<br />
Engine mounted on <strong>maintenance</strong> st<strong>and</strong><br />
(WP 0009 00).<br />
Engine accessories removed (WP 0010 00).<br />
Cylinder heads removed (WP 0011 00).<br />
Personnel Required<br />
Two Assistants<br />
0012 00-1
TM 9-2815-225-34&P 0012 00<br />
CYLINDER BLOCK COMPONENTS REMOVAL (Contd)<br />
FLYWHEEL, FLEXPLATE, AND FLYWHEEL HOUSING<br />
WARNING<br />
Use extreme care when h<strong>and</strong>ling heavy parts. Provide<br />
adequate <strong>support</strong> <strong>and</strong> use assistance during procedure. Ensure<br />
that any lifting device used is in good operating condition <strong>and</strong><br />
of suitable load capacity. Keep clear of heavy components<br />
<strong>support</strong>ed only by lifting device. Failure to do so may result in<br />
death or injury to personnel.<br />
NOTE<br />
Big Cam I engines are equipped with a wet flywheel housing<br />
which is sealed with O-rings between cylinder block <strong>and</strong><br />
flywheel housing.<br />
Perform steps 1 through 5 for Big Cam I engine.<br />
1. Remove six bolts (16) <strong>and</strong> washers (15) from flywheel (12).<br />
2. Install two studs (17) in opposite holes on crankshaft (19).<br />
3. Install two jack screws (18) in opposite threaded holes in flywheel (12).<br />
4. Alternately tighten jack screws (18) <strong>and</strong> remove flywheel (12) from crankshaft (19).<br />
5. Remove two studs (17) from crankshaft (19) <strong>and</strong> two jack screws (18) from flywheel (12).<br />
6. Remove two bolts (25), lockwashers (27), washers (26), <strong>and</strong> nuts (28) from flywheel housing (8).<br />
Discard lockwashers (27).<br />
7. Remove four short bolts (24) <strong>and</strong> washers (23) from flywheel housing (8).<br />
8. Remove nine long bolts (10) <strong>and</strong> washers (9) from flywheel housing (8).<br />
9. Remove flywheel housing (8) from cylinder block (1).<br />
NOTE<br />
Perform steps 10 through 12 for Big Cam I engine.<br />
10. Remove eleven O-rings (7) from flywheel housing (8). Discard O-rings (7).<br />
11. Remove twelve bolts (14), washers (13), <strong>and</strong> spacer gear (11) from flywheel (12).<br />
12. Remove O-ring (6) from crankshaft (19). Discard O-ring (6).<br />
NOTE<br />
Perform steps 13 <strong>and</strong> 14 for Big Cam III engine.<br />
13. Remove six bolts (32), washers (31), washer bearing (30), flywheel (12) <strong>and</strong> flexplates (33), <strong>and</strong><br />
retaining plate (29) from crankshaft (19).<br />
14. Remove four bolts (20), lockwashers (21), <strong>and</strong> washers (22) from rear cover (3). Discard<br />
lockwashers (21).<br />
15. Remove eight bolts (4), rear cover (3), <strong>and</strong> gasket (2) from cylinder block (1). Discard gasket (2).<br />
16. Remove rear main seal (5) from rear cover (3). Discard rear main seal (5).<br />
17. For flywheel <strong>and</strong> flywheel housing repair, refer to WP 0017 00.<br />
0012 00-2
TM 9-2815-225-34&P 0012 00<br />
CYLINDER BLOCK COMPONENTS REMOVAL (Contd)<br />
8<br />
11<br />
12 13 14<br />
15<br />
16<br />
1<br />
2<br />
3<br />
4<br />
5<br />
6<br />
7<br />
28<br />
27<br />
26<br />
25<br />
10<br />
9<br />
24<br />
23<br />
18<br />
17 19<br />
19<br />
22<br />
3<br />
21<br />
20<br />
Figure 1. Flexplate <strong>and</strong> Flywheel Removal (Big Cam I).<br />
12<br />
33<br />
1<br />
2<br />
3<br />
4<br />
5<br />
8<br />
28<br />
29<br />
27<br />
26<br />
25<br />
23<br />
9<br />
10<br />
24<br />
30<br />
31<br />
32<br />
19<br />
22<br />
21<br />
20<br />
Figure 2. Flexplate <strong>and</strong> Flywheel Removal (Big Cam III).<br />
3<br />
0012 00-3
TM 9-2815-225-34&P 0012 00<br />
CYLINDER BLOCK COMPONENTS REMOVAL (Contd)<br />
OIL PAN<br />
NOTE<br />
Removal procedures are the same for Big Cam I <strong>and</strong> Big Cam III.<br />
Both oil pans are shown in Figure 3.<br />
Rotate engine on <strong>maintenance</strong> st<strong>and</strong> so the oil pan is facing up.<br />
1. Remove four bolts (10) <strong>and</strong> engine shipping <strong>support</strong> (9) from oil pan (4).<br />
2. Remove four bolts (7), lockwashers (6), <strong>and</strong> washers (5) from rear of oil pan (4). Discard<br />
lockwashers (6).<br />
3. Remove twenty-eight bolts (8), oil pan (4), <strong>and</strong> gasket (3) from cylinder block (2). Discard gasket (3).<br />
4. Remove four bolts (12) securing front of oil pan (1) to cylinder block (2).<br />
5. Remove four bolts (7), lockwashers (6), <strong>and</strong> washers (5) from rear of oil pan (1). Discard<br />
lockwashers (6).<br />
6. Remove twenty-eight bolts (11), oil pan (1), <strong>and</strong> gasket (3) from cylinder block (2). Discard<br />
gasket (3).<br />
7. For oil pan repair, refer to WP 0022 00.<br />
2<br />
2<br />
3<br />
BIG CAM I<br />
BIG CAM III<br />
1<br />
4<br />
5<br />
6<br />
12<br />
11<br />
9<br />
10<br />
8<br />
7<br />
Figure 3. Oil Pan Removal.<br />
0012 00-4
TM 9-2815-225-34&P 0012 00<br />
CYLINDER BLOCK COMPONENTS REMOVAL (Contd)<br />
FRONT GEAR COVER<br />
1. Remove six short bolts (13) <strong>and</strong> washers (14) from front engine <strong>support</strong> (15).<br />
2. Remove two long bolts (27), washers (28), <strong>and</strong> front engine <strong>support</strong> (15) from front gear cover (23).<br />
NOTE<br />
Perform steps 3 <strong>and</strong> 4 for Big Cam I engine.<br />
3. Remove three screws (16), lockwashers (29), washers (30), camshaft <strong>support</strong> (17), shim pack (18),<br />
<strong>and</strong> O-ring (19) from front gear cover (23). Discard O-ring (19) <strong>and</strong> lockwashers (29).<br />
4. Remove two screws (20), lockwashers (21), <strong>and</strong> washers (22) from front gear cover (23). Discard<br />
lockwashers (21).<br />
NOTE<br />
Perform steps 5 <strong>and</strong> 6 for Big Cam III engine.<br />
5. Remove three captive washer screws (16), camshaft <strong>support</strong> (17), shim pack (18), <strong>and</strong> O-ring (19)<br />
from front gear cover (23). Discard O-ring (19).<br />
6. Remove two captive washer screws (20) from front gear cover (23).<br />
7. Remove nine captive washer screws (26) <strong>and</strong> one captive washer screw (25) from front gear cover (23).<br />
8. Remove front gear cover (23) <strong>and</strong> gasket (24) from cylinder block (2). Discard gasket (24).<br />
2<br />
23<br />
24<br />
17<br />
18<br />
19<br />
22<br />
16<br />
21<br />
13 14 15<br />
29<br />
20 26<br />
30<br />
28<br />
27<br />
13<br />
14<br />
Figure 4. Front Gear Cover Removal.<br />
25<br />
0012 00-5
TM 9-2815-225-34&P 0012 00<br />
CYLINDER BLOCK COMPONENTS REMOVAL (Contd)<br />
PISTONS AND CONNECTING RODS<br />
1. Place cylinder block (7) in a vertical position with rear of cylinder block (7) facing down.<br />
WARNING<br />
Eye protection must be worn when using wire brush for<br />
cleaning. Failure to do so may result in injury to personnel.<br />
2. Using a rotary wire brush or aluminum bladed scraper, remove carbon deposits from upper inside<br />
of cylinder walls (3).<br />
3. Rotate crankshaft (8) until connecting rod cap (6) is accessible.<br />
NOTE<br />
Ensure connecting rod cap <strong>and</strong> connecting rod are identified<br />
together by cylinder number. Mark cylinder number <strong>and</strong> the<br />
Letter L on flat surfaces of connecting rod cap <strong>and</strong> connecting<br />
rod before removal.<br />
4. Loosen two connecting rod bolts (5) until there is approximately 3/8 in. (9.5 mm) clearance<br />
between head of bolts (5) <strong>and</strong> connecting rod cap (6).<br />
5. Using a soft-faced hammer, tap on head of bolts (5) until connecting rod cap (6) <strong>and</strong> connecting<br />
rod (1) are separated.<br />
6. Remove bolts (5) <strong>and</strong> connecting rod cap (6) from connecting rod (1) <strong>and</strong> crankshaft (8).<br />
7. Install two nylon guide screws (4) in connecting rod (1).<br />
8. Push piston (2) <strong>and</strong> connecting rod (1) out of cylinder liner (3).<br />
9. Remove two nylon guide screws (4) from connecting rod (1).<br />
10. Repeat steps 1 through 9 to remove remaining five connecting rod caps (6), connecting rods (1),<br />
<strong>and</strong> pistons (2).<br />
11. For piston <strong>and</strong> connecting rod repair, refer to WP 0018 00.<br />
2<br />
3<br />
1<br />
6<br />
5<br />
8<br />
7 1<br />
4<br />
6<br />
4<br />
5<br />
Figure 5. Piston <strong>and</strong> Connecting Rod Removal.<br />
0012 00-6
TM 9-2815-225-34&P 0012 00<br />
CYLINDER BLOCK COMPONENTS REMOVAL (Contd)<br />
CAMSHAFT FOLLOWERS<br />
NOTE<br />
Scribe locating mark on cam follower <strong>and</strong> cylinder block before<br />
removal.<br />
1. Remove six screws (13) <strong>and</strong> lockwashers (14) from cam follower (12). Discard lockwashers (14).<br />
2. Remove cam follower (12), <strong>and</strong> gasket (11) from cylinder block (10).<br />
NOTE<br />
Measuring thickness of gasket for each cam follower is required<br />
for correct timing of injectors due to individual differences<br />
between castings.<br />
3. Using a micrometer, measure gasket (11) at three points (A), (B), <strong>and</strong> (C) <strong>and</strong> record average<br />
thickness. Discard gasket (11) when all measurements have been taken <strong>and</strong> recorded.<br />
4. Repeat steps 1 through 3 to remove remaining cam followers (12).<br />
CAUTION<br />
Use extreme care when removing camshaft or damage to<br />
camshaft bushings may occur.<br />
5. Install four camshaft pilot tools on front of camshaft (9).<br />
6. Using camshaft pilot tools, slowly turn camshaft (9) <strong>and</strong> remove camshaft (9) from cylinder block<br />
(10).<br />
7. Remove camshaft pilot tools from camshaft (9).<br />
8. For camshaft repair, refer to WP 0019 00.<br />
9<br />
10<br />
A<br />
B<br />
C<br />
11<br />
12<br />
14 13<br />
Figure 6. Camshaft <strong>and</strong> Camshaft Followers Removal.<br />
0012 00-7
TM 9-2815-225-34&P 0012 00<br />
CYLINDER BLOCK COMPONENTS REMOVAL (Contd)<br />
CRANKSHAFT AND MAIN BEARINGS<br />
CAUTION<br />
Cylinder block <strong>and</strong> main bearing caps are line bored. Mark all<br />
main bearing caps to their position in the cylinder block before<br />
removal to ensure correct assembly. Installing a main bearing<br />
cap in the wrong position will cause damage to the engine.<br />
1. Bend tabs on fourteen locking plates (7) down.<br />
2. Remove fourteen bolts (6) <strong>and</strong> locking plates (7) from seven main bearing caps (3). Discard locking<br />
plates (7).<br />
3. Using main bearing cap puller, remove seven main bearing caps (3), main bearing halves (4), <strong>and</strong><br />
retaining rings (5) from cylinder block (1).<br />
NOTE<br />
Ensure hooks on chain are covered with rubber hose or<br />
equivalent to prevent damage to crankshaft.<br />
4. Using lifting device, remove crankshaft (2) from cylinder block (1).<br />
5. For crankshaft repair, refer to WP 0016 00.<br />
6. For cylinder block repair, refer to WP 0013 00.<br />
LIFTING<br />
DEVICE<br />
1<br />
2<br />
Figure 7. Crankshaft Removal.<br />
MAIN<br />
BEARING<br />
CAP<br />
PULLER<br />
3<br />
4<br />
2<br />
7<br />
5<br />
1<br />
Figure 8. Main Bearings Removal.<br />
6<br />
END OF WORK PACKAGE<br />
0012 00-8
TM 9-2815-225-34&P 0013 00<br />
DIRECT SUPPORT AND GENERAL SUPPORT<br />
MAINTENANCE MANUAL<br />
INCLUDING REPAIR PARTS AND SPECIAL TOOLS LIST (RPSTL)<br />
FOR<br />
M915, M915A1, M915A4, M916, M920 VEHICLES<br />
NSN 2815-01-082-8125 P/N NTC400-3652-02 CUMMINS NTC-400 BIG CAM I DIESEL ENGINE<br />
W/CONTAINER<br />
NSN 2815-01-142-2745 P/N 11669835 CUMMINS NTC-400 BIG CAM III DIESEL ENGINE<br />
W/CONTAINER<br />
CYLINDER BLOCK<br />
DISSASSEMBLY, CLEANING AND INSPECTION, ASSEMBLY<br />
INITIAL SETUP:<br />
Tools <strong>and</strong> Special Tools<br />
General mechanic’s tool kit: automotive<br />
(Item 1, WP 0061 00)<br />
Maintenance <strong>and</strong> repair shop equipment:<br />
automotive (Item 2, WP 0061 00)<br />
Automotive <strong>maintenance</strong> <strong>and</strong> repair<br />
supplemental set no. 2 (Item 3, WP 0061 00)<br />
Cylinder sleeve driver (Item 47, WP 0061 00)<br />
Cylinder sleeve clamp (Item 48, WP 0061 00)<br />
Gauge block (Item 49, WP 0061 00)<br />
Engine block counterbore tool<br />
(Item 50, WP 0061 00)<br />
Universal cylinder sleeve puller<br />
(Item 52, WP 0061 00)<br />
Materials/Parts (Contd)<br />
Two expansion plugs<br />
(Item 7, Table 1, WP 0062 00)<br />
Six shims (Item 8, Table 1, WP 0062 00)<br />
Equipment Condition<br />
Engine mounted on <strong>maintenance</strong> st<strong>and</strong><br />
(WP 0009 00).<br />
Cylinder block disassembled (WP 0012 00).<br />
Materials/Parts<br />
Oil, lubricating, OE/HDO 10<br />
(Item 19, WP 0060 00)<br />
Cloth, emery, 290-grit (Item 5, WP 0060 00)<br />
Sealant, pipe (Item 25, WP 0060 00)<br />
Six gaskets (Item 1, Table 1, WP 0062 00)<br />
Six black O-rings (Item 2, Table 1, WP 0062 00)<br />
Six red O-rings<br />
(Item 3, Table 1, WP 0062 00)<br />
Four expansion plugs<br />
(Item 4, Table 1 WP 0062 00)<br />
Expansion plug (Item 5, Table 1, WP 0062 00)<br />
Cap (Item 6, Table 1, WP 0062 00)<br />
0013 00-1
TM 9-2815-225-34&P 0013 00<br />
CYLINDER BLOCK (Contd)<br />
DISASSEMBLY<br />
NOTE<br />
Rotate the engine so cylinder sleeves are facing up. All cylinder<br />
sleeves are removed the same way. The following procedure<br />
covers one cylinder sleeve.<br />
1. Using universal cylinder sleeve puller, remove cylinder sleeve (1) from cylinder block (11).<br />
NOTE<br />
If shims are used under cylinder sleeve, do not discard shims.<br />
Using a micrometer or equivalent, measure <strong>and</strong> record<br />
thickness of six shims <strong>and</strong> tag the location of each cylinder<br />
sleeve <strong>and</strong> shims to aid in assembly.<br />
2. Remove red O-ring (4), black O-ring (5), gasket (3) <strong>and</strong> shims (2) from cylinder sleeve (1). Discard<br />
red O-ring (4), black O-ring (5), <strong>and</strong> gasket (3).<br />
3. Perform steps 1 <strong>and</strong> 2 for remaining cylinder sleeves.<br />
4. Remove sixteen expansion plugs (6) from cylinder block (11). Discard expansion plugs (6).<br />
5. Remove expansion plug (9) <strong>and</strong> washer (10) from cylinder block (11). Discard expansion plug (9).<br />
6. Remove six dowel pins (12) from cylinder block (11).<br />
7. Remove six cam follower dowel pins (8) from cylinder block (11).<br />
8. Using hammer <strong>and</strong> punch, remove cap (7) from cylinder block (11). Discard cap (7).<br />
CLEANING AND INSPECTION<br />
1. For <strong>general</strong> parts cleaning information, refer to CLEANING, WP 0051 00.<br />
2. For <strong>general</strong> parts inspection information, refer to INSPECTION, WP 0051 00.<br />
NOTE<br />
Replace any part that does not pass visual inspection or that is<br />
outside specified wear limits.<br />
Cylinder block must be checked on a flat surface to prevent<br />
distortion <strong>and</strong> incorrect measurements.<br />
Do not inspect cylinder block on <strong>maintenance</strong> st<strong>and</strong>.<br />
3. Using crack detector dye, inspect cylinder sleeves (1) <strong>and</strong> cylinder block (11) for cracks.<br />
4. Inspect cylinder sleeves (1) for excessive corrosion, erosion, <strong>and</strong> pits. Maximum pit depth is .0625<br />
in. (1.6 mm).<br />
5. Inspect underside top flange of cylinder sleeves (1) for dents, pitting, or worn surfaces. If surface<br />
cannot be smoothed out with 290-grit emery cloth, discard cylinder sleeve (1).<br />
6. Using dial bore gauge, measure inside bore of cylinder sleeve (1). Maximum inside diameter is<br />
5.505 in. (13.983 cm).<br />
7. Inspect all cylinder block (11) plug holes <strong>and</strong> threaded holes for damaged threads <strong>and</strong> surfaces.<br />
8. Inspect all dowel pins (8) <strong>and</strong> (12) for cracks or distortion.<br />
9. Using straightedge <strong>and</strong> 0.02 in. (0.51 mm) feeler gauge, check cylinder block (11) for flatness. If<br />
gap between straightedge <strong>and</strong> cylinder block (10) is more than 0.02 in. (0.51 mm), cylinder block<br />
(11) must be milled.<br />
0013 00-2
TM 9-2815-225-34&P 0013 00<br />
CYLINDER BLOCK (Contd)<br />
CLEANING AND INSPECTION (Contd)<br />
10. Inspect cylinder liner counterbore of cylinder block (10) for dirty or rough edges.<br />
NOTE<br />
Counterbore diameter must be measured in liner press fit area<br />
0.100 in. (2.54 mm) maximum below deck. Repair <strong>and</strong> shim<br />
cylinder liner counterbore if the following conditions are not<br />
met.<br />
11. Using engine block counterbore tool, measure inside diameter <strong>and</strong> depth of counterbore at four<br />
equally spaced positions. Difference in measurement around circumference must not exceed 0.001<br />
in. (0.0254 mm).<br />
NOTE<br />
When checking cylinder liner protrusion, ensure shim(s) <strong>and</strong><br />
cylinder sleeve correspond to cylinder being inspected as tagged<br />
during removal.<br />
Cylinder sleeve shims are available in the following<br />
thicknesses: 0.007 in. (0.178 mm), 0.008 in. (0.203 mm),<br />
0.009 in. (0.229 mm), 0.020 in. (0.508 mm), 0.031 in.<br />
(0.787 mm), <strong>and</strong> 0.062 in. (1.575 mm).<br />
Cylinder liner counterbore depth is 0.412 in. (10.465 mm).<br />
12. Using depth micrometer, measure depth of cylinder sleeve counterbore of cylinder block (11) <strong>and</strong><br />
outside flange of cylinder sleeve (1) for corresponding cylinder. Subtract difference to determine<br />
amount of shims <strong>and</strong>/or depth of counterbore cut.<br />
1<br />
2<br />
3<br />
4<br />
5<br />
COUNTERBORE<br />
DIAMETER<br />
6<br />
7<br />
12<br />
11<br />
8<br />
COUNTERBORE DEPTH<br />
Counterbore Diameter Measured<br />
in Top 0.100 in. (2.54 mm) of Counterbore<br />
10<br />
6<br />
6<br />
9<br />
Figure 1. Cylinder Block Disassembly,<br />
Clean, <strong>and</strong> Inspect.<br />
Figure 2. Cylinder Sleeve<br />
Counterbore Measurement.<br />
0013 00-3
TM 9-2815-225-34&P 0013 00<br />
CYLINDER BLOCK (Contd)<br />
ASSEMBLY<br />
1. Apply pipe sealant to threads of new expansion plug (6). Install expansion plug (6) on cylinder<br />
block (14). Tighten plug (6) 30 lb-ft (41 N•m).<br />
2. Apply pipe sealant to threads of two new expansion plugs (12). Install expansion plugs (12) on<br />
cylinder block (14). Tighten expansion plugs (12) 45 lb-ft (61 N•m).<br />
3. Apply pipe sealant to threads of four new expansion plugs (9). Install expansion plugs (9) on<br />
cylinder block (14). Tighten expansion plugs (9) 15 lb-ft (20 N•m).<br />
4. Apply pipe sealant to threads of five new expansion plugs (13). Install expansion plugs (13) on<br />
cylinder block (14). Tighten expansion plugs (13) 35 lb-ft (48 N•m).<br />
5. Apply pipe sealant to threads of new expansion plug (10). Install expansion plug (10) <strong>and</strong> washer<br />
(11) on cylinder block (14). Tighten expansion plug (10) 70 lb-ft (95 N•m).<br />
6. Install cylinder sleeve shims (2), as required, on cylinder sleeve (1).<br />
7. Install new cap (7) on cylinder block (14).<br />
CAUTION<br />
Do not lubricate O-rings until ready to install assembled<br />
cylinder sleeve. O-rings will increase in size once in contact<br />
with OE/HDO 10 lubricating oil for more than 10 minutes.<br />
Prior to installing a cylinder sleeve, apply a bead of inner<br />
sealer on counterbore of cylinder sleeve flange. Do not use an<br />
excessive amount of sealer. Excessive amounts can cause<br />
problems in cooling system.<br />
Do not permit lubricating oil, once applied to O-rings, to come<br />
in contact with liner sealant. Oil will prevent sealant from<br />
adhering to liner flange <strong>and</strong> counterbore contact surface.<br />
NOTE<br />
Diameter of applied sealer bead must be at least 3/64 in.<br />
(1.2 mm) <strong>and</strong> not more than 1/16 in. (1.6 mm) wide. Cylinder<br />
sleeve must be installed within 5 minutes after sealer has been<br />
applied.<br />
All cylinder sleeves are installed the same way. The following<br />
procedure covers one cylinder liner installation.<br />
8. Install new gasket (3) with chamfer down in top groove on cylinder sleeve (1).<br />
9. Install new black O-ring (5) on center groove of cylinder sleeve (1).<br />
10. Install new red O-ring (4) on bottom groove of cylinder sleeve (1).<br />
11. Apply OE/HDO 10 lubricating oil to gasket (3) <strong>and</strong> O-rings (4) <strong>and</strong> (5) <strong>and</strong> install assembled<br />
cylinder sleeve (1) on cylinder block (15) within 10 minutes.<br />
12. Position cylinder sleeve (1) on bore of cylinder block (14) by h<strong>and</strong> <strong>and</strong> push downward with one<br />
quick stroke.<br />
13. Using cylinder sleeve driver <strong>and</strong> mallet, drive flange against counterbore edge.<br />
14. Install two cylinder sleeve clamps on cylinder block (14) <strong>and</strong> cylinder sleeve (1). Tighten clamps<br />
50 lb-ft (68 N•m).<br />
15. Using gauge block, check protrusion of cylinder sleeve (1). Amount of protrusion must not exceed<br />
0.003–0.006 in. (0.076–0.152 mm).<br />
16. Remove cylinder sleeve clamps from cylinder block (14) <strong>and</strong> cylinder sleeve (1).<br />
17. Repeat steps 7 through 15 for remaining cylinder sleeves.<br />
0013 00-4
TM 9-2815-225-34&P 0013 00<br />
CYLINDER BLOCK (Contd)<br />
1<br />
2<br />
15<br />
14<br />
3<br />
6<br />
5<br />
4<br />
7<br />
8<br />
13<br />
11<br />
9<br />
12<br />
10<br />
Figure 3. Cylinder Block Assembly.<br />
GAUGE BLOCK<br />
CYLINDER<br />
SLEEVE<br />
CLAMPS<br />
14<br />
Figure 4. Measuring Cylinder Sleeve Protrusion.<br />
END OF WORK PACKAGE<br />
0013 00-5/6 blank
TM 9-2815-225-34&P 0014 00<br />
DIRECT SUPPORT AND GENERAL SUPPORT<br />
MAINTENANCE MANUAL<br />
INCLUDING REPAIR PARTS AND SPECIAL TOOLS LIST (RPSTL)<br />
FOR<br />
M915, M915A1, M915A4, M916, M920 VEHICLES<br />
NSN 2815-01-082-8125 P/N NTC400-3652-02 CUMMINS NTC-400 BIG CAM I DIESEL ENGINE<br />
W/CONTAINER<br />
NSN 2815-01-142-2745 P/N 11669835 CUMMINS NTC-400 BIG CAM III DIESEL ENGINE<br />
W/CONTAINER<br />
CYLINDER HEAD<br />
DISASSEMBLY, CLEANING AND INSPECTION, ASSEMBLY<br />
INITIAL SETUP:<br />
Tools <strong>and</strong> Special Tools<br />
General mechanic’s tool kit: automotive<br />
(Item 1, WP 0061 00)<br />
Maintenance <strong>and</strong> repair shop equipment:<br />
automotive (Item 2, WP 0061 00)<br />
Automotive <strong>maintenance</strong> <strong>and</strong> repair<br />
supplemental set no. 2 (Item 3, WP 0061 00)<br />
Valve spring compressor<br />
(Item 53, WP 0061 00)<br />
Valve seat extractor (Item 54, WP 0061 00)<br />
Expansion plug driver (Item 55, WP 0061 00)<br />
Valve vacuum tester (Item 56, WP 0061 00)<br />
Materials/Parts<br />
Lubricating oil (Item 19, WP 0060 00)<br />
Liquid thread sealant (Item 26, WP 0060 00)<br />
Twenty-four valve spring retainers<br />
(Item 1, Table 2, WP 0062 00)<br />
Twenty-four valve springs<br />
(Item 2, Table 2, WP 0062 00)<br />
Twenty-four valve spring retainers<br />
(Item 3, Table 2, WP 0062 00)<br />
Six injector O-rings<br />
(Item 4, Table 2, WP 0062 00)<br />
Six expansion plugs<br />
(Item 5, Table 2, WP 0062 00)<br />
Twenty-four valve seat inserts<br />
(Item 6, Table 2, WP 0062 00)<br />
Twelve intake valves<br />
(Item 7, Table 2, WP 0062 00)<br />
Materials/Parts (Contd)<br />
Twelve exhaust valves<br />
(Item 8, Table 2, WP 0062 00)<br />
Expansion plug<br />
(Item 9, Table 2, WP 0062 00)<br />
Two expansion plugs<br />
(Item 10, Table 2, WP 0062 00)<br />
Twenty-four valve stem guides<br />
(Item 11, Table 2, WP 0062 00)<br />
Locknut (Item 12, Table 2, WP 0062 00)<br />
Twelve O-rings (Item 13, Table 2, WP 0062 00)<br />
Equipment Condition<br />
Engine crankshaft <strong>and</strong> main bearings removed<br />
(WP 0012 00).<br />
0014 00-1
TM 9-2815-225-34&P 0014 00<br />
CYLINDER HEAD (Contd)<br />
DISASSEMBLY<br />
1. Remove locknut (23) <strong>and</strong> adjusting screw (24) from exhaust valve crosshead (22). Discard<br />
locknut (23).<br />
2. Remove exhaust valve crosshead (22) <strong>and</strong> crosshead guide (21) from cylinder head (25).<br />
NOTE<br />
All intake <strong>and</strong> exhaust valves are removed the same. The<br />
following procedure covers removal of one exhaust valve.<br />
3. Using valve spring compressor, compress exhaust valve spring (4).<br />
NOTE<br />
It may be necessary to tap valve lightly to loosen it.<br />
4. Remove two valve collets (2) from exhaust valve (15).<br />
NOTE<br />
If spacers are used, cylinder head has been resurfaced<br />
previously.<br />
5. Remove exhaust valve (15), spring retainer (3), valve spring (4), <strong>and</strong> spacer (5), if used, from<br />
cylinder head (25). Discard exhaust valve (15), valve spring (4), retainer (3), <strong>and</strong> spacer (5).<br />
6. Remove valve stem guide (6) from cylinder head (25). Discard valve stem guide (6).<br />
7. Using valve seat extractor, remove valve seat insert (14) from cylinder head (25). Discard valve<br />
seat insert (14).<br />
8. Perform steps 1 through 7 for remaining exhaust <strong>and</strong> intake valves.<br />
9. Using injector sleeve puller, remove two injector sleeves (8) <strong>and</strong> injector O-rings (7) from cylinder<br />
head (25). Discard injector O-rings (7).<br />
10. Remove two screws (20), cover plate (19), <strong>and</strong> two O-rings (18) from cylinder head (25). Discard<br />
O-rings (18).<br />
11. Remove four pipe plugs (17) from cylinder head (25).<br />
12. Using hammer <strong>and</strong> punch, tap outside diameter of expansion plugs (12) <strong>and</strong> (16) to force one side<br />
out from cylinder head (25).<br />
13. Using screwdriver, remove six expansion plugs (12), plug (16), <strong>and</strong> two plugs (26) from cylinder<br />
head (25). Discard expansion plugs (12), (16), <strong>and</strong> (26).<br />
14. Remove four screws (9), two fuel connections (10), <strong>and</strong> four O-rings (11) from cylinder head (25).<br />
Discard O-rings (11).<br />
15. Remove two dowels (13) from cylinder head (25).<br />
16. Perform steps 1 through 15 for remaining cylinder heads (25).<br />
CLEANING AND INSPECTION<br />
1. For <strong>general</strong> parts cleaning information, refer to CLEANING, WP 0051 00.<br />
2. For <strong>general</strong> parts inspection information, refer to INSPECTION, WP 0051 00.<br />
NOTE<br />
Replace any part that does not pass visual inspection or is<br />
outside specified wear limits.<br />
3. Inspect cylinder head (25) for cracks, breaks, distortion, <strong>and</strong> broken-out areas.<br />
4. Using straightedge <strong>and</strong> feeler gauge, inspect cylinder head (25) for distortion on mating surface.<br />
Maximum distortion is 0.002 in. (0.051 mm).<br />
0014 00-2
TM 9-2815-225-34&P 0014 00<br />
CYLINDER HEAD (Contd)<br />
2<br />
3<br />
1<br />
4<br />
5<br />
9<br />
24<br />
6<br />
7<br />
10<br />
23<br />
8<br />
11<br />
22<br />
21<br />
26<br />
12<br />
20<br />
25<br />
19<br />
13<br />
18<br />
17<br />
12<br />
16<br />
14<br />
12<br />
15<br />
Figure 1. Cylinder Head Disassembly <strong>and</strong> Cleaning <strong>and</strong> Inspection.<br />
0014 00-3
TM 9-2815-225-34&P 0014 00<br />
CYLINDER HEAD (Contd)<br />
CLEANING AND INSPECTION (Contd)<br />
5. Using vernier depth gauge, measure cylinder head (25) height. Minimum cylinder head height is<br />
4.30 in. (11.024 cm).<br />
6. Inspect injector sleeves (8) for scratches <strong>and</strong> cracks.<br />
7. Inspect all parts for cracking, breaking, excessive wear, or other damage.<br />
8. Inspect all threaded parts for stripped threads or cross-threading.<br />
ASSEMBLY<br />
1. Apply cup plug sealant to six new expansion plugs (12), new plug (16), <strong>and</strong> two new plugs (26),<br />
<strong>and</strong> to inside diameter of water holes on cylinder head (25).<br />
2. Using expansion plug driver, install expansion plugs (12), (16), <strong>and</strong> (26) on cylinder head (25).<br />
NOTE<br />
Step 3 does not apply to No. 2 cylinder head.<br />
3. Apply clean lubricating oil to two new O-rings (18). Install cover plate (19) <strong>and</strong> O-rings (18) on<br />
cylinder head (25) with two screws (20).<br />
NOTE<br />
All intake <strong>and</strong> exhaust valves are installed the same. The<br />
following procedure covers installation of one exhaust valve.<br />
4. Using valve seat inserter, install new valve seat insert (14) on cylinder head (25).<br />
5. Using valve stem guide driver, install new valve stem guide (6) on cylinder head (25).<br />
6. Apply clean lubricating oil to new exhaust valve (15) <strong>and</strong> install exhaust valve (15) on new valve<br />
stem guide (6) from bottom side of cylinder head (25).<br />
7. Place cylinder head (25) on protective surface with machined surface down.<br />
8. Install new spacer (5), if necessary, new valve spring (4), <strong>and</strong> new retainer (3) over valve stem<br />
guide (6) on cylinder head (25).<br />
NOTE<br />
Stud of valve spring compressor should be installed on rocker<br />
lever screw hole.<br />
9. Using valve spring compressor, compress valve spring (4) <strong>and</strong> install valve collet (2) on stem of<br />
valve (15).<br />
10. Using valve vacuum tester, check seal between valve (15) <strong>and</strong> valve seat (14).<br />
11. Install two adjusting screws (24) <strong>and</strong> new locknuts (23) on exhaust valve crosshead (22).<br />
12. Install exhaust valve crosshead (22) <strong>and</strong> crosshead guide (21) on cylinder head (25).<br />
13. Perform steps 4 through 12 for remaining intake <strong>and</strong> exhaust valves.<br />
14. Apply clean lubricating oil to new O-ring (11). Install screw (9), fuel connection (10), <strong>and</strong><br />
O-ring (11) on cylinder head (25).<br />
15. Apply clean lubricating oil to new O-rings (7). Using injector sleeve driver, install injector<br />
sleeve (8) <strong>and</strong> injector O-ring (7) on cylinder head (25).<br />
16. Apply clean lubricating oil to eleven dowels (13), <strong>and</strong> install eleven dowels (13) on cylinder head (25).<br />
17. Apply liquid thread sealant to four pipe plugs (17), <strong>and</strong> install pipe plugs (17) on cylinder head (25).<br />
0014 00-4
TM 9-2815-225-34&P 0014 00<br />
CYLINDER HEAD (Contd)<br />
2<br />
3<br />
1<br />
4<br />
5<br />
9<br />
24<br />
6<br />
7<br />
10<br />
23<br />
8<br />
11<br />
22<br />
21<br />
26<br />
12<br />
20<br />
25<br />
19<br />
13<br />
18<br />
17<br />
12<br />
16<br />
14<br />
12<br />
15<br />
Figure 2. Cylinder Head Assembly.<br />
0014 00-5
TM 9-2815-225-34&P 0014 00<br />
CYLINDER HEAD (Contd)<br />
NOTE<br />
Step 18 is for Big Cam I engines only.<br />
18. Tighten pipe plugs (17) as shown in table 1.<br />
19. Perform steps 1 through 18 for remaining cylinder heads (25).<br />
Table 1. Pipe Plugs Torque Specifications.<br />
PIPE PLUG SIZE MINIMUM MAXIMUM<br />
INCH (MM) LB FT (N•m) LB FT (N•m)<br />
3/16 9.525 35 47 45 61<br />
1/2 12.70 60 81 70 95<br />
3/4 19 65 88 75 102<br />
1 25 135 183 145 197<br />
END OF WORK PACKAGE<br />
0014 00-6
TM 9-2815-225-34&P 0015 00<br />
DIRECT SUPPORT AND GENERAL SUPPORT<br />
MAINTENANCE MANUAL<br />
INCLUDING REPAIR PARTS AND SPECIAL TOOLS LIST (RPSTL)<br />
FOR<br />
M915, M915A1, M915A4, M916, M920 VEHICLES<br />
NSN 2815-01-082-8125 P/N NTC400-3652-02 CUMMINS NTC-400 BIG CAM I DIESEL ENGINE<br />
W/CONTAINER<br />
NSN 2815-01-142-2745 P/N 11669835 CUMMINS NTC-400 BIG CAM III DIESEL ENGINE<br />
W/CONTAINER<br />
VIBRATION DAMPER AND CRANKSHAFT PULLEY CLEANING AND INSPECTION<br />
INITIAL SETUP:<br />
Tools <strong>and</strong> Special Tools<br />
General mechanic’s tool kit: automotive<br />
(Item 1, WP 0061 00)<br />
Maintenance <strong>and</strong> repair shop equipment:<br />
automotive (Item 2, WP 0061 00)<br />
Automotive <strong>maintenance</strong> <strong>and</strong> repair<br />
supplemental set no. 2 (Item 3, WP 0061 00)<br />
Materials/Parts<br />
Spotcheck developer (Item 10, WP 0060 00)<br />
290-grit emery cloth (Item 5, WP 0060 00)<br />
Equipment Condition<br />
Vibration damper <strong>and</strong> crankshaft pulley<br />
removed from engine (WP 0010 00).<br />
0015 00-1
TM 9-2815-225-34&P 0015 00<br />
VIBRATION DAMPER AND CRANKSHAFT PULLEY CLEANING AND INSPECTION (Contd)<br />
1. For <strong>general</strong> parts cleaning information, refer to CLEANING, WP 0051 00.<br />
2. For <strong>general</strong> parts inspection information, refer to INSPECTION, WP 0051 00.<br />
NOTE<br />
Replace vibration damper <strong>and</strong> crankshaft pulley if they do<br />
not pass visual inspection or are outside specified wear<br />
limits.<br />
3. Inspect vibration damper (1) for cracks, breaks, or other damage.<br />
4. Inspect crankshaft pulley (2) for cracks, breaks, or other damage.<br />
5. Spray vibration damper (1) with spotcheck developer <strong>and</strong> place in preheated 200°F (93°C) oven<br />
for two hours. Remove from oven <strong>and</strong> inspect vibration damper (1) for leaks. Discard if leak is<br />
found.<br />
6. Using 290-grit emery cloth, remove paint from four opposite corners of vibration damper (1) to<br />
measure outside diameter thickness.<br />
7. Using micrometer or equivalent, measure vibration damper (1) outside diameter thickness at four<br />
corners. Maximum thickness is 0.125 in. (3.175 mm). Discard vibration damper (1) if any two<br />
measurements are more than 0.010 in. (0.254 mm).<br />
8. For installation of vibration damper (1) <strong>and</strong> crankshaft pulley (2), refer to WP 0045 00.<br />
0015 00-2
TM 9-2815-225-34&P 0015 00<br />
VIBRATION DAMPER AND CRANKSHAFT PULLEY CLEANING AND INSPECTION (Contd)<br />
2<br />
1<br />
Figure 1. Vibration Damper <strong>and</strong> Crankshaft Pulley Inspection.<br />
END OF WORK PACKAGE<br />
0015 00-3/4 blank
TM 9-2815-225-34&P 0016 00<br />
DIRECT SUPPORT AND GENERAL SUPPORT<br />
MAINTENANCE MANUAL<br />
INCLUDING REPAIR PARTS AND SPECIAL TOOLS LIST (RPSTL)<br />
FOR<br />
M915, M915A1, M915A4, M916, M920 VEHICLES<br />
NSN 2815-01-082-8125 P/N NTC400-3652-02 CUMMINS NTC-400 BIG CAM I DIESEL ENGINE<br />
W/CONTAINER<br />
NSN 2815-01-142-2745 P/N 11669835 CUMMINS NTC-400 BIG CAM III DIESEL ENGINE<br />
W/CONTAINER<br />
CRANKSHAFT CLEANING AND INSPECTION<br />
INITIAL SETUP:<br />
Tools <strong>and</strong> Special Tools<br />
General mechanic’s tool kit: automotive<br />
(Item 1, WP 0061 00)<br />
Maintenance <strong>and</strong> repair shop equipment,<br />
automotive (Item 2, WP 0061 00)<br />
Automotive <strong>maintenance</strong> <strong>and</strong> repair<br />
supplemental set no. 2 (Item 3, WP 0061 00)<br />
Equipment Condition<br />
Engine crankshaft <strong>and</strong> main bearings removed<br />
(WP 0012 00).<br />
0016 00-1
TM 9-2815-225-34&P 0016 00<br />
CRANKSHAFT CLEANING AND INSPECTION (Contd)<br />
1. For <strong>general</strong> parts cleaning information, refer to CLEANING, WP 0051 00.<br />
2. For <strong>general</strong> parts inspection information, refer to INSPECTION, WP 0051 00.<br />
NOTE<br />
Replace any part that does not pass visual inspection or is<br />
outside specified wear limits.<br />
3. Inspect crankshaft (1) for cracks, breaks, damage, or wear.<br />
4. Inspect rear oil seal contact area (3) for wear <strong>and</strong> grooves.<br />
5. Using vernier caliper, measure outside diameter of rear oil seal contact area (3). Minimum<br />
diameter is 5.998 in. (15.234 cm).<br />
6. Inspect front oil seal contact area (6) for wear <strong>and</strong> grooves.<br />
7. Using vernier caliper, measure outside diameter of front oil seal contact area (6). Minimum<br />
diameter is 3.625 in. (9.207 cm).<br />
8. Inspect main bearing halves (8) for pits, scratches, or grooves.<br />
9. Using micrometer, measure thickness of main bearing halves (8). Minimum thickness is 0.123 in.<br />
(3.124 mm). Maximum thickness is 0.1238 in. (3.144 mm). Wear limit is 0.1215 in. (3.0861 mm).<br />
10. Using vernier caliper, measure rod bearing journal (5) diameter at three <strong>and</strong> six o’clock positions.<br />
Minimum diameter is 3.124 in. (7.933 cm).<br />
11. Using vernier caliper, measure main bearing journal (4) diameter. Minimum diameter is 4.489 in.<br />
(11.426 cm).<br />
NOTE<br />
Prior to measuring thrust ring thickness, place crankshaft on<br />
cylinder block with corresponding bearing halves <strong>and</strong> caps<br />
installed.<br />
12. Measure thickness of each thrust ring (9) at different locations. Minimum thrust ring (9)<br />
thickness is 0.245 in. (6.223 mm). If endplay clearance exceeds 0.022 in. (0.559 mm), install<br />
oversize thrust rings.<br />
13. Inspect two thrust ring pins (10) for damage or wear.<br />
14. Inspect seven retaining rings (11) for wear, out-of-round, or cracks.<br />
15. Inspect crankshaft gear (7) for worn, cracked, or broken gear teeth.<br />
16. Inspect crankshaft gear (7) for loose or worn keyway.<br />
17. Inspect crankshaft keyway (13) for looseness, wear, or damage.<br />
18. Using vernier caliper, measure width of keyway (13). Maximum width is 0.375 in. (9.525 mm).<br />
19. Inspect crankshaft gear step (12) for wear, grooves, or damage.<br />
20. Using vernier caliper, measure outside diameter of crankshaft gear step (12). Minimum diameter<br />
is 3.761 in. (9.552 cm).<br />
NOTE<br />
Perform steps 21 <strong>and</strong> 22 for Big Cam I engine only.<br />
21. Using vernier caliper, measure crankshaft thrust flange (4). Wear greater than 0.003 in. (0.076<br />
mm) requires regrinding to restore flatness.<br />
0016 00-2
TM 9-2815-225-34&P 0016 00<br />
CRANKSHAFT CLEANING AND INSPECTION (Contd)<br />
1<br />
4<br />
2 3<br />
6<br />
5<br />
Figure 1. Crankshaft Cleaning <strong>and</strong> Inspection.<br />
8<br />
1<br />
8<br />
7<br />
10<br />
9<br />
11<br />
13 12<br />
Figure 2. Crankshaft Cleaning <strong>and</strong> Inspection.<br />
0016 00-3
TM 9-2815-225-34&P 0016 00<br />
CRANKSHAFT CLEANING AND INSPECTION (Contd)<br />
22. Using vernier caliper <strong>and</strong> micrometer, measure crankshaft dimensions shown in Figure 3.<br />
Compare measurements to specifications in Table 1. Wear greater than 0.002 in. (0.051 mm), or<br />
greater than 0.003 in. (0.076 mm) for item 8, requires regrinding.<br />
Table 1. Crankshaft Dimensions <strong>and</strong> Points of Measurements.<br />
1 51.813 in. (131.604 mm)<br />
2 4.497–4.500 in. (11.426–11.43 cm)<br />
3 2.438 in. (6.191 cm)<br />
4 2.126–2.128 in. (5.40–5.405 cm)<br />
5 2.00 in. (5.08 cm)<br />
6 2.50 in. (6.35 cm)<br />
7 2.00 in. (5.08 cm)<br />
8 3.001–3.003 in. (7.622–7.628 cm)<br />
9 5.998–6.000 in. (15.234–15.24 cm)<br />
10 5.151–5.163 in. (13.083–13.114 cm)<br />
11 0.173–0.196 in. (7.933–7.937 cm)<br />
12 3.124–3.125 in. (4.389–4.973 cm)<br />
13 3.761 in. (9.552 cm)<br />
14 0.375 in. (0.953 mm)<br />
15 3.625–3.626 in. (9.207–9.300 cm)<br />
0016 00-4
TM 9-2815-225-34&P 0016 00<br />
CRANKSHAFT CLEANING AND INSPECTION (Contd)<br />
1<br />
15<br />
14<br />
3 4<br />
5 6<br />
7 8<br />
9<br />
13<br />
12 2<br />
10<br />
11 CRANKSHAFT<br />
15<br />
14<br />
13<br />
Figure 3. Crankshaft Measurements.<br />
END OF WORK PACKAGE<br />
0016 00-5/6 blank
TM 9-2815-225-34&P 0017 00<br />
DIRECT SUPPORT AND GENERAL SUPPORT<br />
MAINTENANCE MANUAL<br />
INCLUDING REPAIR PARTS AND SPECIAL TOOLS (RPSTL)<br />
FOR<br />
M915, M915A1, M915A4, M916, M920 VEHICLES<br />
NSN 2815-01-082-8125 P/N NTC400-3652-02 CUMMINS NTC-400 BIG CAM I DIESEL ENGINE<br />
W/CONTAINER<br />
NSN 2815-01-142-2745 P/N 11669835 CUMMINS NTC-400 BIG CAM III DIESEL ENGINE<br />
W/CONTAINER<br />
FLEXPLATE, FLYWHEEL, FLYWHEEL HOUSING,<br />
AND REAR COVER CLEANING AND INSPECTION<br />
INITIAL SETUP:<br />
Tools <strong>and</strong> Special Tools<br />
General mechanic’s tool kit:<br />
automotive (Item 1, WP 0061 00)<br />
Maintenance <strong>and</strong> repair shop equipment:<br />
automotive (Item 2, WP 0061 00)<br />
Automotive <strong>maintenance</strong> <strong>and</strong> repair<br />
supplemental set no. 2 (Item 3, WP 0061 00)<br />
Magnetic crack detector (Item 5, WP 0061 00)<br />
Equipment Condition<br />
Flexplate, flywheel, flywheel housing, <strong>and</strong> rear<br />
cover removed from engine (WP 0012 00).<br />
0017 00-1
TM 9-2815-225-34&P 0017 00<br />
FLEXPLATE, FLYWHEEL, FLYWHEEL HOUSING, AND REAR COVER CLEANING AND<br />
INSPECTION (Contd)<br />
1. For <strong>general</strong> parts cleaning information, refer to CLEANING, WP 0051 00.<br />
2. For <strong>general</strong> parts inspection information, refer to INSPECTION, WP 0051 00.<br />
NOTE<br />
Replace any part that does not pass visual inspection or that is<br />
outside specified wear limits.<br />
Perform steps 3 <strong>and</strong> 4 for Big Cam I only.<br />
3. Inspect flywheel (5) <strong>and</strong> spacer gear (4) for cracks, damaged teeth, <strong>and</strong> stripped or elongated bolt<br />
holes. Repair any stripped holes.<br />
4. Using magnetic crack detector, inspect flywheel (5) for cracks. Follow manufacturer’s instructions.<br />
Replace flywheel (5) or spacer gear (4) if damaged.<br />
NOTE<br />
Perform steps 5 <strong>and</strong> 6 for Big Cam III only.<br />
5. Inspect flexplates (8), flywheel (7), retaining plate (9), <strong>and</strong> washer bearing (6) for cracks, damaged<br />
teeth, <strong>and</strong> stripped or elongated bolt holes. Repair any stripped holes.<br />
6. Using magnetic crack detector, inspect flexplates (8) <strong>and</strong> flywheel (7) for cracks. Follow<br />
manufacturer’s instructions. Replace flexplate (7) if damaged.<br />
7. Inspect mounting surface of cylinder block (1) for cracks <strong>and</strong> stripped or elongated bolt holes.<br />
Repair any stripped holes.<br />
8. Inspect rear cover (2) <strong>and</strong> flywheel housing (3) for cracks <strong>and</strong> stripped or elongated bolt holes.<br />
Repair any stripped holes.<br />
9. Inspect dowel pins (10) for cracks <strong>and</strong> bends.<br />
10. For flexplates (8), flywheel (5), flywheel housing (3), <strong>and</strong> rear cover (2) installation, refer to<br />
WP 0042 00.<br />
0017 00-2
TM 9-2815-225-34&P 0017 00<br />
FLEXPLATE, FLYWHEEL, FLYWHEEL HOUSING, AND REAR COVER CLEANING AND<br />
INSPECTION (Contd)<br />
4<br />
5<br />
3<br />
BIG CAM I<br />
1<br />
2<br />
6<br />
10<br />
7<br />
9<br />
8<br />
BIG CAM III<br />
Figure 1. Flexplate, Flywheel, Flywheel Housing, <strong>and</strong> Rear Cover Cleaning <strong>and</strong> Inspection.<br />
END OF WORK PACKAGE<br />
0017 00-3/4 blank
TM 9-2815-225-34&P 0018 00<br />
DIRECT SUPPORT AND GENERAL SUPPORT<br />
MAINTENANCE MANUAL<br />
INCLUDING REPAIR PARTS AND SPECIAL TOOLS LIST (RPSTL)<br />
FOR<br />
M915, M915A1, M915A4, M916, M920 VEHICLES<br />
NSN 2815-01-082-8125 P/N NTC400-3652-02 CUMMINS NTC-400 BIG CAM I DIESEL ENGINE<br />
W/CONTAINER<br />
NSN 2815-01-142-2745 P/N 11669835 CUMMINS NTC-400 BIG CAM III DIESEL ENGINE<br />
W/CONTAINER<br />
PISTONS, CONNECTING RODS, AND BEARINGS<br />
DISASSEMBLY, CLEANING AND INSPECTION, ASSEMBLY<br />
INITIAL SETUP:<br />
Tools <strong>and</strong> Special Tools<br />
General mechanic’s tool kit: automotive<br />
(Item 1, WP 0061 00)<br />
Maintenance <strong>and</strong> repair shop equipment:<br />
automotive (Item 2, WP 0061 00)<br />
Automotive <strong>maintenance</strong> <strong>and</strong> repair<br />
supplemental set no. 2 (Item 3, WP 0061 00)<br />
Connecting rod bushing driver<br />
(Item 25, WP 0061 00)<br />
Piston ring groove gauge<br />
(Item 27, WP 0061 00)<br />
Piston ring exp<strong>and</strong>er (Item 28, WP 0061 00)<br />
Connecting rod checking fixture<br />
(Item 26, WP 0061 00)<br />
0.125 in. (3.175 mm) diameter rod<br />
(Item 41, WP 0061 00)<br />
Press<br />
Oven<br />
Materials/Parts (Contd)<br />
Six intermediate compression rings<br />
(Item 5, Table 3, WP 0062 00)<br />
Six oil control rings<br />
(Item 6, Table 3, WP 0062 00)<br />
Equipment Condition<br />
Piston, connecting rod, <strong>and</strong> bearing removed<br />
from engine (WP 0012 00).<br />
Materials/Parts<br />
Crocus cloth (Item 4, WP 0060 00)<br />
Rubber gloves (Item 32, WP 0060 00)<br />
Lubricating oil (Item 19, WP 0060 00)<br />
Six bushings (Item 1, Table 3, WP 0062 00)<br />
Twelve connecting rod bearings<br />
(Item 2, Table 3, WP 0062 00)<br />
Six first compression rings<br />
(Item 3, Table 3, WP 0062 00)<br />
Six second compression rings<br />
(Item 4, Table 3, WP 0062 00)<br />
0018 00-1
TM 9-2815-225-34&P 0018 00<br />
PISTONS, CONNECTING RODS, AND BEARINGS (Contd)<br />
DISASSEMBLY<br />
1. Remove first compression ring (2), second compression ring (1), intermediate compression ring<br />
(12), <strong>and</strong> oil control ring (11) from piston (10). Discard piston rings (2), (1), (12), <strong>and</strong> (11).<br />
NOTE<br />
Always discard connecting rod bearings as a set.<br />
2. Remove connecting rod bearings (8) from connecting rod (5) <strong>and</strong> connecting rod cap (7) if not<br />
previously removed. Discard connecting rod bearings (8).<br />
3. Remove two dowel pins (6) from connecting rod cap (7).<br />
4. Remove two retaining rings (4) from piston (10).<br />
WARNING<br />
Wear rubber gloves when removing piston pin to prevent<br />
burns from boiling hot water or hot piston. Failure to comply<br />
may result in injury to personnel.<br />
CAUTION<br />
Do not use hammer or any other tool to remove piston pin.<br />
Remove piston pin by h<strong>and</strong> only. Failure to comply may<br />
result in damage to piston.<br />
5. Heat piston (10), piston pin (3), <strong>and</strong> connecting rod (5) to 210° F (98.9° C) for 10 minutes in<br />
boiling water or oven.<br />
6. Remove piston pin (3) from piston (10) <strong>and</strong> connecting rod (5).<br />
7. Remove piston (10) from connecting rod (5).<br />
8. Using press <strong>and</strong> connecting rod bushing driver, remove bushing (9) from connecting rod (5).<br />
Discard bushing (9).<br />
9. Repeat steps 1 through 8 for all remaining piston (10), connecting rod (5), <strong>and</strong> bearing (8)<br />
assemblies.<br />
0018 00-2
TM 9-2815-225-34&P 0018 00<br />
PISTONS, CONNECTING RODS, AND BEARINGS (Contd)<br />
2<br />
1<br />
12<br />
11<br />
3<br />
4<br />
10<br />
4<br />
5<br />
9<br />
8<br />
6<br />
7<br />
Figure 1. Piston, Connecting Rod, <strong>and</strong> Bearing Disassembly.<br />
0018 00-3
TM 9-2815-225-34&P 0018 00<br />
PISTONS, CONNECTING RODS, AND BEARINGS (Contd)<br />
CLEANING AND INSPECTION<br />
1. For <strong>general</strong> parts cleaning information, refer to CLEANING, WP 0051 00.<br />
2. For <strong>general</strong> parts inspection information, refer to INSPECTION, WP 0051 00.<br />
NOTE<br />
Replace any part that does not pass visual inspection or is<br />
outside specified wear limits.<br />
3. Inspect piston (1) for cracks, breaks, scores, galling, or scratches. Remove small scratches with<br />
crocus cloth.<br />
4. Inspect piston ring grooves (2) for cracks, breaks, missing sections, <strong>and</strong> galling.<br />
NOTE<br />
There are two different ways to inspect piston ring groove<br />
clearance. Either method is acceptable. If using piston ring<br />
groove gauge, perform step 5. If piston ring groove gauge is<br />
not available, perform step 6.<br />
5. Using piston ring groove gauge, measure piston ring groove (2). Discard piston (1) if piston ring<br />
groove gauge widest shoulder comes in contact with piston (1).<br />
6. Position a new piston ring (3) in piston ring groove (2). Using a feeler gauge, check the clearance<br />
between piston ring (3) <strong>and</strong> piston ring groove (2). Replace piston (1) if clearance is more than<br />
0.006 in. (0.15 mm).<br />
NOTE<br />
Ensure temperature is 70°–90° F (21°–32° C), or false<br />
readings may be taken.<br />
7. Using micrometer or equivalent, measure piston outside diameter at point A, 1.0 in. (25.4 mm)<br />
below piston ring groove (2). Piston outside diameter at point A should be 5.477–5.480 in.<br />
(13.912–13.919 cm). Replace piston (1) if worn beyond specifications.<br />
8. Using micrometer or equivalent, measure piston skirt outside diameter at point B, 1.0 in.<br />
(25.4 mm) above bottom of piston (1). Piston outside diameter at point B should be 5.489–5.493<br />
in. (13.942–13.952 cm). Replace piston (1) if worn beyond specifications.<br />
NOTE<br />
Ensure temperature is 70°–90° F (21°–32° C). At 70° F<br />
(21° C), add 0.0005 in. (0.013 mm) for every 10° F (12° C)<br />
up to 90° F (32° C), or false readings may result.<br />
9. Using inside micrometer, measure piston pin bore at point C. Piston pin bore should be<br />
1.9985–1.9990 in. (5.076–5.078 cm). Replace piston (1) if piston pin bore is above 2.0000 in.<br />
(5.080 cm).<br />
10. Using micrometer or equivalent, measure piston pin (5) outside diameter. Piston pin (5) should<br />
be 1.9988–1.9990 in. (5.0769–5.0775 cm). Replace piston pin (5) if outside diameter is out of<br />
round more than 0.001 in. (0.025 mm).<br />
11. Inspect dowel pins (4) for cracks, chips, <strong>and</strong> bends.<br />
12. Using micrometer, measure outside diameter of two dowel pins (4). Dowel pins (4) should be<br />
0.220–0.250 in. (5.59–6.35 mm). Replace dowel pins (4) if not within specifications.<br />
0018 00-4
TM 9-2815-225-34&P 0018 00<br />
PISTONS, CONNECTING RODS, AND BEARINGS (Contd)<br />
PISTON RING GROOVE GAUGE<br />
1<br />
2<br />
FEELER GAUGE<br />
1<br />
3<br />
2<br />
Figure 2. Piston Ring Groove Measurement.<br />
1<br />
5<br />
2<br />
4<br />
A<br />
C<br />
B<br />
Figure 3. Piston Measurement.<br />
Figure 4. Dowel Pin <strong>and</strong> Piston Pin.<br />
0018 00-5
TM 9-2815-225-34&P 0018 00<br />
PISTONS, CONNECTING RODS, AND BEARINGS (Contd)<br />
CLEANING AND INSPECTION (Contd)<br />
13. Inspect twelve connecting rod bolts (1) for bends, cracks, chipped or stripped teeth. Replace<br />
connecting rod bolts (1) if damaged.<br />
14. Using a micrometer, inspect connecting rod bolt (1) pilot area outside diameter. Outside diameter<br />
of pilot area should be 0.541–0.545 in. (13.74–13.84 mm). Replace any connecting rod bolt (1) if<br />
outside diameter of pilot area exceeds 0.540 in. (13.72 mm).<br />
15. Using a micrometer, inspect connecting rod bolt (1) threaded area outside diameter. Outside<br />
diameter of threaded area should be 0.6245–0.6250 in. (15.862–15.875 mm). Replace connecting<br />
rod bolt (1) if outside diameter of threaded area exceeds 0.6242 in. (15.855 mm).<br />
NOTE<br />
Always replace connecting rod <strong>and</strong> connecting rod cap as a<br />
matched set.<br />
16. Inspect connecting rod (2) <strong>and</strong> connecting rod cap (3) for nicks, dents, scratches, <strong>and</strong> gouges.<br />
Replace connecting rod (2) <strong>and</strong> connecting rod cap (3) if any nicks, dents, scratches, or gouges are<br />
deeper than 0.03125 in. (0.7938 mm).<br />
NOTE<br />
Perform steps 17 <strong>and</strong> 18 for connecting rod assembly inside<br />
diameter measurement. Do not take measurement where<br />
connecting rod <strong>and</strong> connecting rod cap meet, or an incorrect<br />
measurement may result.<br />
17. Install connecting rod cap (3) on connecting rod (2) with two connecting rod bolts (4). Tighten bolts<br />
(4) 140–150 lb-ft (190–203 N•m).<br />
18. Using inside micrometer, measure inside diameter of connecting rod (2) at connecting rod cap (3)<br />
assembly at point A. Connecting rod inside diameter should be 3.3157–3.3167 in.<br />
(8.4219–8.4244 cm). Replace connecting rod (2) <strong>and</strong> connecting rod cap (3) if not within<br />
specifications.<br />
NOTE<br />
Perform steps 19 through 22 for connecting rod calibration.<br />
19. Install connecting rod (2) on connecting rod checking fixture.<br />
20. Using connecting rod checking fixture, check connecting rod (2) length. Replace connecting rod (2)<br />
if longer than calibration rod on connecting rod checking fixture, or if more than 0.002 in.<br />
(0.050 mm) shorter.<br />
21. Using connecting rod checking fixture, check alignment of connecting rod bores (5). Take first<br />
measurement of connecting rod bores (5). Remove connecting rod (2) from connecting rod checking<br />
fixture. Rotate connecting rod (2) 180°, install on connecting rod checking fixture, <strong>and</strong> take second<br />
measurement. Replace connecting rod (2) if there is more than 0.010 in. (0.254 mm) difference in<br />
measurements.<br />
22. Using feeler gauge, measure connecting rod (2) for twist between piston pin holding m<strong>and</strong>rel (6)<br />
<strong>and</strong> dial indicator holding plate. Replace connecting rod (2) if clearance between piston pin holding<br />
m<strong>and</strong>rel (6) <strong>and</strong> dial indicator holding plate is more than 0.020 in. (0.5078 mm).<br />
0018 00-6
TM 9-2815-225-34&P 0018 00<br />
PISTONS, CONNECTING RODS, AND BEARINGS (Contd)<br />
1<br />
Figure 5. Connecting Rod Bolt Inspection.<br />
2 2<br />
CONNECTING<br />
ROD<br />
CHECKING<br />
FIXTURE<br />
DIAL<br />
INDICATOR<br />
HOLDING<br />
PLATE<br />
5<br />
6<br />
2<br />
3<br />
A<br />
3<br />
5<br />
4<br />
4<br />
Figure 6. Connecting Rod Inspection.<br />
Figure 7. Connecting Rod Alignment.<br />
0018 00-7
TM 9-2815-225-34&P 0018 00<br />
PISTONS, CONNECTING RODS, AND BEARINGS (Contd)<br />
ASSEMBLY<br />
NOTE<br />
Apply lubricating oil to all parts before assembly.<br />
1. Align oil holes in new bushing (10) with oil holes in connecting rod (6). Using press <strong>and</strong><br />
connecting rod bushing driver, install new bushing (10) in connecting rod (6). Ensure that<br />
0.125 in. (3.175 mm) diameter rod can pass easily through oil holes.<br />
2. Install one retaining ring (4) in piston (5).<br />
WARNING<br />
Wear rubber gloves when installing piston pin to prevent<br />
burns from boiling hot water or hot piston. Failure to comply<br />
may result in injury to personnel.<br />
3. Heat piston (5) to 210° F (98.9° C) for 15 minutes in water or oven.<br />
CAUTION<br />
Do not use hammer or any other tool to install piston pin.<br />
Install piston pin by h<strong>and</strong> only. Failure to comply may result<br />
in damage to piston.<br />
4. Position connecting rod (6) in piston (5) <strong>and</strong> install connecting rod (6) to piston (5) with piston<br />
pin (3).<br />
5. Install retaining ring (4) in piston (5).<br />
NOTE<br />
If one or more four-ring-groove pistons are to be replaced,<br />
replace all pistons. New replacement piston will have three<br />
piston ring grooves instead of four. Never mismatch pistons.<br />
If you are installing three-ring-groove piston, perform step 6.<br />
If you are installing four-ring-groove piston, perform step 7.<br />
6. Using piston ring exp<strong>and</strong>er, install three new piston rings (13), (14), <strong>and</strong> (15) on piston (5) with<br />
word “top” facing up. Start with new oil control ring (13) on bottom, new second compression ring<br />
(14) in middle, <strong>and</strong> new first compression ring (15) on top.<br />
7. Using piston ring exp<strong>and</strong>er, install four new piston rings (11), (12), (1), <strong>and</strong> (2) on piston (5) with<br />
word “top” facing up. Start with new oil control ring (11) on bottom, new intermediate<br />
compression ring (12) second from bottom, new second compression ring (1) in middle, <strong>and</strong> a new<br />
first compression ring (2) on top.<br />
8. Install two dowel pins (7) in connecting rod cap (8).<br />
NOTE<br />
Always replace connecting rod bearings as a set.<br />
9. Install new connecting rod bearings (9) in connecting rod (6) <strong>and</strong> connecting rod cap (8).<br />
10. Repeat steps 1 through 9 for all remaining piston (5), connecting rod (8), <strong>and</strong> bearing (7)<br />
assemblies.<br />
11. For piston, connecting rod, <strong>and</strong> bearing installation, refer to WP 0042 00.<br />
0018 00-8
TM 9-2815-225-34&P 0018 00<br />
PISTONS, CONNECTING RODS, AND BEARINGS (Contd)<br />
2<br />
1<br />
12<br />
11<br />
3<br />
4<br />
15<br />
14<br />
4<br />
5<br />
13<br />
5<br />
6<br />
10<br />
9<br />
7<br />
8<br />
Figure 8.<br />
Piston, Connecting Rod, <strong>and</strong> Rod Bearing Assembly.<br />
Figure 9.<br />
Replacement Piston Ring Assembly.<br />
END OF WORK PACKAGE<br />
0018 00-9/10 blank
TM 9-2815-225-34&P 0019 00<br />
DIRECT SUPPORT AND GENERAL SUPPORT<br />
MAINTENANCE MANUAL<br />
INCLUDING REPAIR PARTS AND SPECIAL TOOLS LIST (RPSTL)<br />
FOR<br />
M915, M915A1, M915A4, M916, M920 VEHICLES<br />
NSN 2815-01-082-8125 P/N NTC400-3652-02 CUMMINS NTC-400 BIG CAM I DIESEL ENGINE<br />
W/CONTAINER<br />
NSN 2815-01-142-2745 P/N 11669835 CUMMINS NTC-400 BIG CAM III DIESEL ENGINE<br />
W/CONTAINER<br />
CAMSHAFT, CAMSHAFT FOLLOWERS, AND PUSH RODS<br />
DISASSEMBLY, CLEANING AND INSPECTION, ASSEMBLY<br />
INITIAL SETUP:<br />
Tools <strong>and</strong> Special Tools<br />
General mechanic’s tool kit: automotive<br />
(Item 1, WP 0061 00)<br />
Maintenance <strong>and</strong> repair shop equipment:<br />
automotive (Item 2, WP 0061 00)<br />
Automotive <strong>maintenance</strong> <strong>and</strong> repair<br />
supplemental set no. 2 (Item 3, WP 0061 00)<br />
Equipment Condition<br />
Camshaft, camshaft followers, <strong>and</strong> push rods<br />
removed from cylinder block (WP 0012 00).<br />
Materials/Parts<br />
240-grit aluminum oxide paper<br />
(Item 22, WP 0060 00)<br />
Prussian blue (Item 9, WP 0060 00)<br />
Thrust bearing (Item 1, Table 4, WP 0062 00)<br />
Two expansion plugs<br />
(Item 2, Table 4, WP 0062 00)<br />
0019 00-1
TM 9-2815-225-34&P 0019 00<br />
CAMSHAFT, CAMSHAFT FOLLOWERS, AND PUSH RODS (Contd)<br />
DISASSEMBLY<br />
1. Using press, remove camshaft gear (2) <strong>and</strong> thrust bearing (3) from camshaft (5). Discard thrust<br />
bearing (3).<br />
2. Remove keyway (4) <strong>and</strong> orifice plug (1) from camshaft (5).<br />
3. Remove two screws (6) retaining camshaft follower shaft (11) in camshaft follower housing (12).<br />
4. Remove two expansion plugs (10) from ends of camshaft follower housing (12). Discard expansion<br />
plugs (10).<br />
NOTE<br />
Tag camshaft followers in order as they are removed to aid in<br />
assembly.<br />
5. Using press <strong>and</strong> m<strong>and</strong>ral, remove two camshaft follower shafts (11), intake camshaft followers (7),<br />
injector camshaft followers (8), <strong>and</strong> exhaust camshaft followers (9) from camshaft follower housing<br />
(12).<br />
6. Repeat steps 3 through 5 for remaining two camshaft follower housings (12).<br />
NOTE<br />
Intake camshaft follower is shown. All camshaft followers are<br />
alike <strong>and</strong> disassembled in the same manner.<br />
7. Using hammer <strong>and</strong> drift punch, remove roll pin (13) securing roller pin (14) <strong>and</strong> roller (15) in<br />
intake camshaft follower (7).<br />
8. Remove roller pin (14) <strong>and</strong> roller (15) from intake camshaft follower lever (7).<br />
9. Repeat steps 7 <strong>and</strong> 8 for remaining five intake camshaft followers (7), six injector camshaft<br />
followers (8), <strong>and</strong> six exhaust camshaft followers (9).<br />
2<br />
3<br />
4 5<br />
1<br />
Figure 1. Camshaft Disassembly.<br />
0019 00-2
TM 9-2815-225-34&P 0019 00<br />
CAMSHAFT, CAMSHAFT FOLLOWERS, AND PUSH RODS (Contd)<br />
7<br />
8<br />
9<br />
6<br />
10<br />
11<br />
12<br />
Figure 2. Camshaft Follower Housing Disassembly.<br />
14<br />
13<br />
15<br />
7<br />
Figure 3. Camshaft Follower Disassembly.<br />
0019 00-3
TM 9-2815-225-34&P 0019 00<br />
CAMSHAFT, CAMSHAFT FOLLOWERS, AND PUSH RODS (Contd)<br />
CLEANING AND INSPECTION<br />
1. For <strong>general</strong> parts cleaning information, refer to CLEANING, WP 0051 00.<br />
2. For <strong>general</strong> parts inspection information, refer to INSPECTION, WP 0051 00.<br />
NOTE<br />
Replace any part that does not pass visual inspection or is<br />
outside specified wear limits.<br />
3. Inspect camshaft gear (1) for cracks, chips, rounded or stripped teeth.<br />
4. Using micrometer or equivalent, measure camshaft bearing journals (6) outside diameter. Camshaft<br />
bearing journals (6) outside diameter should be 2.496–2.497 in. (6.339–6.342 cm). Discard camshaft<br />
(2) if camshaft bearing journals (6) outside diameter is 2.495 in. (6.337 cm) or smaller.<br />
5. Inspect camshaft follower housing (10) for cracks, chips, <strong>and</strong> breaks.<br />
6. Inspect camshaft follower housing (10) for sharp edges, nicks, or burrs. Camshaft follower housing<br />
(10) should have a slight radius. Remove sharp edges, nicks, or burrs with 240-grit aluminum<br />
oxide paper attached to a split rod <strong>and</strong> drill.<br />
7. Inspect cam follower bushing (11) on intake (7), injector (8), <strong>and</strong> exhaust cam followers (9) for<br />
scratches, pitting, scoring <strong>and</strong> other damage. Discard intake (7), injector (8), <strong>and</strong> exhaust cam<br />
followers (9) if cam follower bushing (11) is damaged.<br />
NOTE<br />
Cam follower bushing inside diameter must measure<br />
0.7501–0.7511 in. (19.053–19.078 mm).<br />
8. Using micrometer, measure inside diameter of cam follower bushing (11). Discard intake (7),<br />
injector (8), or exhaust cam followers (9) if cam follower bushing (11) diameter measures more<br />
than 0.752 in. (19.101 mm).<br />
9. Inspect intake (7), injector (8), <strong>and</strong> exhaust cam follower levers (9) for cracks using magnetic<br />
particle inspection (WP 0051 00). Discard intake (7), injector (8), or exhaust cam follower<br />
levers (9) if any cracks are found.<br />
10. Inspect pushrod insert (13) for scoring, galling, pitting, <strong>and</strong> excessive wear.<br />
11. Inspect intake (3), injector (4), <strong>and</strong> exhaust pushrod (5) for bends or out-of-round. Discard intake<br />
(3), injector (4), or exhaust pushrod (5) if bent or out-of-round is more than 0.035 in. (0.889 mm).<br />
12. Check pushrod insert (13) using ball end of intake (3), injector (4), <strong>and</strong> exhaust pushrods (5) as follows:<br />
a. Apply a coat of Prussian blue compound to ball end of intake (3), injector (4), <strong>and</strong> exhaust<br />
pushrods (5).<br />
b. Install ball end of intake (3), injector (4), <strong>and</strong> exhaust pushrods (5) into pushrod insert (13)<br />
<strong>and</strong> rotate 80°.<br />
c. Replace intake (7), injector (8), <strong>and</strong> exhaust cam followers (9) if pushrod insert (13) is<br />
damaged or has less than 80% contact with ball end of intake (3), injector (4), <strong>and</strong> exhaust<br />
pushrods (5).<br />
13. Inspect roller (12) for cracks, breaks, <strong>and</strong> other damage. Discard intake (7), injector (8), or<br />
exhaust cam followers (9) if roller (12) is damaged.<br />
NOTE<br />
Intake <strong>and</strong> exhaust cam follower roller inside diameter must<br />
measure 0.5005–0.5015 in. (12.713–12.738 mm). Discard intake<br />
or exhaust cam followers if roller (12) is out-of-round. Discard<br />
intake injector, or exhaust cam followers if inside diameter<br />
measures more than 0.503 in. (12.776 mm).<br />
Injector cam follower roller inside diameter must measure<br />
0.703–0.704 in. (17.856–17.882 mm). Discard injector cam<br />
follower if inside diameter measures more than 0.705 in.<br />
(17.907 mm).<br />
14. Using small bore gauge, measure roller (12) inside diameter.<br />
0019 00-4
TM 9-2815-225-34&P 0019 00<br />
CAMSHAFT, CAMSHAFT FOLLOWERS, AND PUSH RODS (Contd)<br />
3<br />
4<br />
5<br />
1<br />
2<br />
6<br />
7<br />
8<br />
9<br />
~<br />
12<br />
13<br />
11<br />
10<br />
Figure 4. Camshaft, Camshaft Followers, <strong>and</strong> Push Rods Cleaning <strong>and</strong> Inspection.<br />
0019 00-5
TM 9-2815-225-34&P 0019 00<br />
CAMSHAFT, CAMSHAFT FOLLOWERS, AND PUSH RODS (Contd)<br />
CLEANING AND INSPECTION (Contd)<br />
15. Inspect roller (4) to ensure it is not out-of-round. Discard intake (1), injector (2), or exhaust cam<br />
follower (3) if roller (4) is out-of-round.<br />
NOTE<br />
Outside diameter of roller must measure 1.2495–1.2505 in.<br />
(31.737–31.763 mm).<br />
16. Using micrometer, measure roller (4) outside diameter. Discard intake (1), exhaust (3) or injector<br />
cam followers (2) if outside diameter measures less than 1.2485 in. (31.712 mm).<br />
17. Check concentricity of inside diameter with outside diameter of intake (1), injector (2), <strong>and</strong><br />
exhaust cam followers (3). Discard intake (1), injector (2), or exhaust cam followers (3) if<br />
concentricity of inside diameter with outside diameter is not within 0.0020 in. (0.051 mm).<br />
18. Check intake (1), injector (2), <strong>and</strong> exhaust cam follower (3) squareness of sides with roller pin<br />
bore. Discard intake (1), injector (2), <strong>and</strong> exhaust cam followers (3) if sides are not parallel to each<br />
other or not square to bore within 0.0040 in. (0.102 mm).<br />
19. Inspect roller pin (6) for cracks, breaks, <strong>and</strong> other damage. Discard intake (1), injector (2), <strong>and</strong><br />
exhaust cam followers (3) if roller pin (6) is damaged.<br />
NOTE<br />
Intake or exhaust roller pin outside diameter must measure<br />
0.4997–0.500 in. (12.692–12.700 mm). Injector roller pin<br />
outside diameter must measure 0.6997–0.7000 in.<br />
(17.772–17.780 mm).<br />
20. Using micrometer, measure outside diameter of roller pin (6).<br />
a. Discard intake (1) or exhaust cam followers (3) if outside diameter measures less than 0.497<br />
in. (12.624 mm).<br />
b. Discard injector cam follower (2) if outside diameter measures less than 0.697 in. (17.704<br />
mm).<br />
21. Using micrometer, measure roller pin bore (5).<br />
a. Discard intake (1) or exhaust cam followers (3) if roller pin bore (5) is not within<br />
0.4990–0.4995 in. (12.675–12.687 mm).<br />
b. Discard injector cam follower (2) if roller pin bore (5) is not within 0.6992–0.6997 in.<br />
(17.760–17.772 mm).<br />
0019 00-6
TM 9-2815-225-34&P 0019 00<br />
CAMSHAFT, CAMSHAFT FOLLOWERS, AND PUSH RODS (Contd)<br />
6<br />
5<br />
1<br />
2<br />
3<br />
4<br />
Figure 5. Intake, Injector, <strong>and</strong> Exhaust Cam Followers Cleaning <strong>and</strong> Inspection.<br />
0019 00-7
TM 9-2815-225-34&P 0019 00<br />
CAMSHAFT, CAMSHAFT FOLLOWERS, AND PUSH RODS (Contd)<br />
ASSEMBLY<br />
1. Install roller pin (2) <strong>and</strong> roller (3) on intake cam follower (4).<br />
2. Using 0.006 in. (0.15 mm) feeler gauge between intake cam follower (4) <strong>and</strong> roller (3), install roller<br />
pin (2) on intake cam follower (4) <strong>and</strong> roller (3). Secure roller pin (2) to intake cam follower (4)<br />
with roll pin (1).<br />
NOTE<br />
All camshaft follower housings are assembled in the same<br />
manner. Repeat step 3 for remaining cam follower housings.<br />
Ensure injector cam follower is in center position <strong>and</strong> that cam<br />
follower pushrod sockets are on the same side as dowel holes in<br />
housing.<br />
3. Install two exhaust camshaft followers (6), injector camshaft followers (5), intake camshaft<br />
followers (4), <strong>and</strong> camshaft follower shafts (8) on camshaft follower housing (9).<br />
NOTE<br />
Expansion plugs should be at least flush with edge of hole or<br />
not more than 0.010 in. (0.254 mm) below edge of hole.<br />
Apply light coat of cup plug sealant to expansion plug hole in<br />
each end.<br />
4. Using press <strong>and</strong> m<strong>and</strong>rel, install two new expansion plugs (7) on ends of camshaft follower<br />
housing (9).<br />
5. Install two screws (10) securing camshaft follower shaft (8) on camshaft follower housing (9).<br />
6. Install orifice plug (11) <strong>and</strong> keyway (14) on camshaft (15). Tighten orifice plug (11) 5–10 lb-ft<br />
(7–13 N•m).<br />
WARNING<br />
Use insulated gloves when h<strong>and</strong>ling heated camshaft drive<br />
gear. Failure to observe this warning may result in injury to<br />
personnel.<br />
CAUTION<br />
Do not use cutting torch to heat camshaft gear; damage will<br />
result.<br />
7. Heat camshaft gear (12) evenly in oven to 400º F (209° C).<br />
8. Using press, install hot camshaft gear (12), new thrust bearing (13), <strong>and</strong> keyway (14) on<br />
camshaft (15).<br />
0019 00-8
TM 9-2815-225-34&P 0019 00<br />
CAMSHAFT, CAMSHAFT FOLLOWERS, AND PUSH RODS (Contd)<br />
1<br />
2<br />
4<br />
3<br />
Figure 6. Camshaft Follower Assembly.<br />
4<br />
5<br />
6<br />
7<br />
10<br />
8<br />
Figure 7. Camshaft Follower Assembly.<br />
9<br />
12<br />
13<br />
14 15<br />
11<br />
Figure 8. Camshaft Assembly.<br />
END OF WORK PACKAGE<br />
0019 00-9/10 blank
TM 9-2815-225-34&P 0020 00<br />
DIRECT SUPPORT AND GENERAL SUPPORT<br />
MAINTENANCE MANUAL<br />
INCLUDING REPAIR PARTS AND SPECIAL TOOLS LIST (RPSTL)<br />
FOR<br />
M915, M915A1, M915A4, M916, M920 VEHICLES<br />
NSN 2815-01-082-8125 P/N NTC400-3652-02 CUMMINS NTC-400 BIG CAM I DIESEL ENGINE<br />
W/CONTAINER<br />
NSN 2815-01-142-2745 P/N 11669835 CUMMINS NTC-400 BIG CAM III DIESEL ENGINE<br />
W/CONTAINER<br />
ROCKER LEVERS AND ROCKER LEVER HOUSING<br />
DISASSEMBLY, CLEANING AND INSPECTION, ASSEMBLY<br />
INITIAL SETUP:<br />
Tools <strong>and</strong> Special Tools<br />
General mechanic’s tool kit:<br />
automotive (Item 1, WP 0061 00)<br />
Maintenance <strong>and</strong> repair shop equipment:<br />
automotive (Item 2, WP 0061 00)<br />
Automotive <strong>maintenance</strong> <strong>and</strong> repair<br />
supplemental set no. 2 (Item 3, WP 0061 00)<br />
Rocker lever block <strong>and</strong> m<strong>and</strong>rel set<br />
(Item 30, WP 0061 00)<br />
0.250 in. (6.350 mm) radius gauge<br />
(Item 31, WP 0061 00)<br />
Split rod (Item 32, WP 0061 00)<br />
M<strong>and</strong>rel (Item 39, WP 0061 00)<br />
Press<br />
Equipment Condition<br />
Rocker levers <strong>and</strong> rocker lever housing<br />
removed from engine (WP 0012 00).<br />
Materials/Parts<br />
Lubricating oil (Item 19, WP 0060 00)<br />
240-grit aluminum oxide paper<br />
(Item 22, WP 0060 00)<br />
Six O-rings (Item 1, Table 5, WP 0062 00)<br />
Eighteen bushings<br />
(Item 2, Table 5, WP 0062 00)<br />
Six ball socket seats<br />
(Item 3, Table 5, WP 0062 00)<br />
0020 00-1
TM 9-2815-225-34&P 0020 00<br />
ROCKER LEVERS AND ROCKER LEVER HOUSING (Contd)<br />
DISASSEMBLY<br />
1. Remove two exhaust rocker lever adjusting screws (3) <strong>and</strong> nuts (4) from exhaust rocker levers (2).<br />
2. Remove two injector rocker lever adjusting screws (8) <strong>and</strong> nuts (9) from injector rocker levers (7).<br />
3. Remove two intake rocker lever adjusting screws (12) <strong>and</strong> nuts (13) from intake rocker levers (11).<br />
4. Remove setscrew (14) from rocker lever shaft (16) <strong>and</strong> rocker arm housing (15).<br />
NOTE<br />
Tag all rocker levers before disassembly to aid in assembly.<br />
5. Using press <strong>and</strong> m<strong>and</strong>rel, remove rocker lever shaft (16), two exhaust rocker levers (2), injector<br />
rocker levers (7), <strong>and</strong> intake rocker levers (11) from rocker lever housing (15).<br />
6. Remove two plugs (18) <strong>and</strong> O-rings (17) from each end of rocker lever shaft (16). Discard O-rings<br />
(17) <strong>and</strong> expansion plugs (18).<br />
7. Using press <strong>and</strong> rocker lever block <strong>and</strong> m<strong>and</strong>rel set, remove two bushings (1) from exhaust rocker<br />
levers (2). Discard bushings (1).<br />
8. Using press <strong>and</strong> rocker lever block <strong>and</strong> m<strong>and</strong>rel set, remove two bushings (5) from injector rocker<br />
levers (7). Discard bushings (5).<br />
9. Remove two ball socket seats (6) from injector rocker levers (7). Discard ball socket seats (6).<br />
10. Using press <strong>and</strong> rocker lever block <strong>and</strong> m<strong>and</strong>rel set, remove two bushings (10) from intake rocker<br />
levers (11). Discard bushings (10).<br />
11. Repeat steps 1 through 10 for remaining two rocker lever housings.<br />
CLEANING AND INSPECTION<br />
1. For <strong>general</strong> parts cleaning information, refer to CLEANING, WP 0051 00.<br />
2. For <strong>general</strong> parts inspection information, refer to INSPECTION, WP 0051 00.<br />
NOTE<br />
Replace any part that does not pass visual inspection or is<br />
outside specified wear limits.<br />
3. Inspect rocker lever housing (15) for cracks, breaks, chips, elongated or stripped bolt holes. Repair<br />
any damaged bolt holes.<br />
4. Inspect rocker lever housing (15) breather vent hole <strong>and</strong> oil passages for blockage <strong>and</strong> obstructions.<br />
Clean out breather vent hole <strong>and</strong> oil passages if obstructed.<br />
5. Inspect rocker lever housing (15) shaft bore, for sharp edges, nicks, or burrs. Rocker lever housing<br />
(15) shaft bore should have slight radius. Remove sharp edges, nicks, or burrs with 240-grit<br />
aluminum oxide paper attached to a split rod <strong>and</strong> drill.<br />
6. Using inside micrometer, measure rocker lever housing (15) shaft bore inside diameter. Rocker<br />
lever housing (15) shaft bore inside diameter should be 1.1238–1.1246 in. (2.855–2.857 cm).<br />
Replace rocker lever housing (15) if rocker lever housing (15) shaft bore inside diameter is<br />
not within specifications.<br />
7. Inspect rocker lever shaft (16) for scoring or ridges created from rocker lever movement.<br />
8. Using micrometer, measure rocker lever shaft (16) outside diameter. rocker lever shaft (16) outside<br />
diameter should be 1.1230–1.1240 in. (2.552–2.855 cm). Replace rocker lever shaft (16) if outside<br />
diameter exceeds 1.1220 in. (2.850 cm).<br />
0020 00-2
TM 9-2815-225-34&P 0020 00<br />
ROCKER LEVERS AND ROCKER LEVER HOUSING (Contd)<br />
CLEANING AND INSPECTION (Contd)<br />
9. Inspect adjusting screws (3), (8), <strong>and</strong> (12) for stripped threads.<br />
10. Using a 0.250 in. (6.350 mm) radius gauge, measure adjusting screws (3), (8), <strong>and</strong> (12) ball end.<br />
Replace adjusting screws (3), (8), <strong>and</strong> (12) if ball end is flat or out-of-round.<br />
11. Inspect adjusting nuts (4), (9), <strong>and</strong> (13) for stripped threads.<br />
12. Inspect rocker levers (2), (7), <strong>and</strong> (11) for cracks, bends, or stripped threads.<br />
4<br />
7<br />
6<br />
13<br />
11 5<br />
12<br />
9<br />
8<br />
2 3<br />
1<br />
4<br />
2 3<br />
7<br />
6<br />
5<br />
9<br />
8<br />
13<br />
11 12<br />
10<br />
10<br />
14<br />
1<br />
15<br />
16<br />
18<br />
17<br />
Figure 1. Rocker Levers <strong>and</strong> Rocker Lever Housing Disassembly.<br />
0020 00-3
TM 9-2815-225-34&P 0020 00<br />
ROCKER LEVERS AND ROCKER LEVER HOUSING (Contd)<br />
ASSEMBLY<br />
NOTE<br />
Apply lubricating oil to all parts before assembly.<br />
On intake rocker levers with oil drilling to crosshead nose end,<br />
install new bushing so nose hole is closed <strong>and</strong> slot hole is in<br />
line with adjusting screw hole.<br />
1. Using press <strong>and</strong> rocker lever block <strong>and</strong> m<strong>and</strong>rel set, install two new bushings (10) in intake rocker<br />
levers (11).<br />
NOTE<br />
On injector <strong>and</strong> exhaust rocker levers, install new bushing so<br />
oil holes to crosshead nose or injector link <strong>and</strong> adjusting screw<br />
are open to allow for oil flow.<br />
2. Using press <strong>and</strong> rocker lever block <strong>and</strong> m<strong>and</strong>rel set, install two new bushings (1) in exhaust<br />
rocker levers (2).<br />
3. Using press <strong>and</strong> rocker lever block <strong>and</strong> m<strong>and</strong>rel set, install two new bushings (5) in injector rocker<br />
levers (7).<br />
4. Install two new ball socket seats (6) on injector rocker levers (7).<br />
5. Using press, install two new plugs (18) in ends of rocker lever shaft (16).<br />
NOTE<br />
Remove tags from rocker levers before assembly.<br />
6. Position two exhaust rocker levers (2), injector rocker levers (7), <strong>and</strong> intake rocker levers (11) in<br />
their tagged positions in rocker lever housing (15).<br />
NOTE<br />
Ensure rocker lever shaft is positioned with oil supply screw<br />
hole facing up <strong>and</strong> seven oil holes facing flat side of rocker<br />
lever housing.<br />
7. Install rocker lever shaft (16) through rocker lever housing (15) <strong>and</strong> two exhaust rocker levers (2),<br />
injector rocker levers (7), <strong>and</strong> intake rocker levers (11). Leave 0.500 in. (12.70 mm) of rocker lever<br />
shaft (16) extending out of rocker lever housing (15).<br />
8. Install new O-ring (17) on rocker lever shaft (16) <strong>and</strong> push rocker lever shaft (16) back through<br />
rocker lever housing (15). Leave 0.500 in. (12.70 mm) of rocker lever shaft (16) extending out of<br />
rocker lever housing (15) opposite side.<br />
9. Install new O-ring (17) on rocker lever shaft (16) <strong>and</strong> push rocker lever shaft (16) through rocker<br />
lever housing (15) until rocker lever shaft (16) is even with rocker lever housing (15).<br />
10. Install setscrew (14) in rocker lever shaft (16) <strong>and</strong> rocker arm housing (15).<br />
11. Install two exhaust rocker lever adjusting screws (3) <strong>and</strong> nuts (4) in exhaust rocker levers (2).<br />
12. Install two injector rocker lever adjusting screws (8) <strong>and</strong> nuts (9) in injector rocker levers (7).<br />
13. Install two intake rocker lever adjusting screws (12) <strong>and</strong> nuts (13) in intake rocker levers (11).<br />
14. Repeat steps 1 through 14 for remaining two rocker lever <strong>and</strong> rocker lever housings.<br />
15. For rocker levers <strong>and</strong> rocker housing installation, refer to WP 0043 00.<br />
0020 00-4
TM 9-2815-225-34&P 0020 00<br />
ROCKER LEVERS AND ROCKER LEVER HOUSING (Contd)<br />
4<br />
7<br />
6<br />
13<br />
11 5<br />
12<br />
9<br />
8<br />
1<br />
2 3<br />
4<br />
2 3<br />
6<br />
7<br />
5<br />
9<br />
8<br />
11 12<br />
10<br />
13<br />
10<br />
14<br />
1<br />
15<br />
16<br />
18<br />
17<br />
Figure 2. Rocker Levers <strong>and</strong> Rocker Lever Housing Assembly.<br />
END OF WORK PACKAGE<br />
0020 00-5/6 blank
TM 9-2815-225-34&P 0021 00<br />
DIRECT SUPPORT AND GENERAL SUPPORT<br />
MAINTENANCE MANUAL<br />
INCLUDING REPAIR PARTS AND SPECIAL TOOLS LIST (RPSTL)<br />
FOR<br />
M915, M915A1, M915A4, M916, M920 VEHICLES<br />
NSN 2815-01-082-8125 P/N NTC400-3652-02 CUMMINS NTC-400 BIG CAM I DIESEL ENGINE<br />
W/CONTAINER<br />
NSN 2815-01-142-2745 P/N 11669835 CUMMINS NTC-400 BIG CAM III DIESEL ENGINE<br />
W/CONTAINER<br />
OIL COOLER<br />
DISASSEMBLY, CLEANING AND INSPECTION, ASSEMBLY<br />
INITIAL SETUP:<br />
Tools <strong>and</strong> Special Tools<br />
General mechanic’s tool kit: automotive<br />
(Item 1, WP 0061 00)<br />
Maintenance <strong>and</strong> repair shop equipment:<br />
automotive (Item 2, WP 0061 00)<br />
Automotive <strong>maintenance</strong> <strong>and</strong> repair<br />
supplemental set no. 2 (Item 3, WP 0061 00)<br />
Materials/Parts<br />
Pipe sealant (Item 25, WP 0060 00)<br />
Lubricating oil, OE/HDO 30<br />
(Item 20, WP 0060 00)<br />
Twelve lockwashers<br />
(Item 1, Table 6, WP 0062 00)<br />
O-ring (Item 2, Table 6, WP 0062 00)<br />
Gasket (Item 3, Table 6, WP 0062 00)<br />
Gasket (Item 4, Table 6, WP 0062 00)<br />
Spring (Item 5, Table 6, WP 0062 00)<br />
Spring (Item 6, Table 6, WP 0062 00)<br />
Gasket (Item 7, Table 6, WP 0062 00)<br />
O-ring (Item 8, Table 6, WP 0062 00)<br />
Oil cooler core (Item 9, Table 6, WP 0062 00)<br />
Vent valve (Item 10, Table 6, WP 0062 00)<br />
Lockwasher (Item 11, Table 6, WP 0062 00)<br />
Gasket (Item 12, Table 6, WP 0062 00)<br />
Spring (Item 13, Table 6, WP 0062 00)<br />
Gasket (Item 14, Table 6, WP 0062 00)<br />
Two retaining rings<br />
(Item 15, Table 6, WP 0062 00)<br />
Materials/Parts (Contd)<br />
Two O-rings (Item 16, Table 6, WP 0062 00)<br />
Element (Item 17, Table 6, WP 0062 00)<br />
Spring (Item 18, Table 6, WP 0062 00)<br />
Lockwasher (Item 19, Table 6, WP 0062 00)<br />
Gasket (Item 20, Table 6, WP 0062 00)<br />
O-ring (Item 21, Table 6, WP 0062 00)<br />
Equipment Condition<br />
Oil cooler removed from engine (WP 0009 00).<br />
0021 00-1
TM 9-2815-225-34&P 0021 00<br />
OIL COOLER (Contd)<br />
BIG CAM I DISASSEMBLY<br />
1. For removal of oil cooler, refer to WP 0009 00.<br />
2. Remove pipe plug (7) <strong>and</strong> vent valve (10) from oil cooler rear cover (3). Discard vent valve.<br />
3. Remove two pipe plugs (16) from oil cooler front cover (14).<br />
4. Remove expansion plug (31) or elbow (30) from oil cooler housing (12).<br />
5. Remove screw (24), lockwasher (25), washer (26), head (27), gasket (28), <strong>and</strong> O-ring (29) from oil<br />
cooler housing (12). Discard lockwasher (25), gasket (28), <strong>and</strong> O-ring (29).<br />
6. Remove seat (23), disc (22), <strong>and</strong> spring (21) from oil cooler housing (12). Discard spring (21).<br />
7. Remove plug (21), spacer (22), spring (21), <strong>and</strong> plunger (18) from oil cooler front cover (14).<br />
Discard spring (19).<br />
8. Remove six screws (15), lockwashers (8), oil cooler front cover (14), <strong>and</strong> gasket (13) from oil cooler<br />
housing (12). Discard lockwashers (8) <strong>and</strong> gasket (13).<br />
9. Remove six screws (2) <strong>and</strong> (9), four lockwashers (8), bracket (1), oil cooler rear cover (3), <strong>and</strong><br />
gasket (11) from oil cooler housing (12). Discard lockwashers (8) <strong>and</strong> gasket (11).<br />
10. Remove two retaining rings (4), O-rings (5), <strong>and</strong> element (6) from oil cooler housing (12). Discard<br />
O-rings (5) retaining rings <strong>and</strong>, element (6).<br />
0021 00-2
TM 9-2815-225-34&P 0021 00<br />
OIL COOLER (Contd)<br />
1<br />
2<br />
9<br />
10<br />
3<br />
4<br />
5<br />
6<br />
8<br />
7<br />
11<br />
12<br />
13<br />
31<br />
5<br />
4<br />
14<br />
8<br />
15<br />
30<br />
29<br />
28<br />
27<br />
21<br />
22<br />
23<br />
26<br />
25<br />
20 19<br />
18<br />
17 16<br />
24<br />
Figure 1. Oil Cooler Disassembly—Big Cam I Engine.<br />
0021 00-3
TM 9-2815-225-34&P 0021 00<br />
OIL COOLER (Contd)<br />
BIG CAM III DISASSEMBLY<br />
1. For removal of oil cooler, refer to WP 0009 00.<br />
2. Remove adapter (25) from head (12).<br />
3. Remove three screws (9), lockwashers (3), washers (10), <strong>and</strong> bracket (11) from head (12). Discard<br />
lockwashers (3).<br />
4. Remove three screws (27), lockwashers (3), washers (26), head (12), O-ring (13), <strong>and</strong> gasket (14)<br />
from oil cooler housing (15). Discard lockwashers (3), O-ring (13), <strong>and</strong> gasket (14).<br />
5. Remove spring (24), bypass valve piston (23), spring (22), bypass valve plunger (21), <strong>and</strong> pressure<br />
sensing piston (20) from oil cooler housing (15). Discard spring (22) <strong>and</strong> (24).<br />
6. Remove six screws (16), lockwashers (3), washers (17), <strong>support</strong> (7), <strong>and</strong> gasket (2) from oil cooler<br />
housing (15). Discard lockwashers (3) <strong>and</strong> gasket (2).<br />
7. Remove oil cooler core (1) <strong>and</strong> gasket (18) from oil cooler housing (15). Discard gasket (18) <strong>and</strong> oil<br />
cooler core (1).<br />
8. Remove two screws (4), lockwashers (3), valve (5), <strong>and</strong> O-ring (6) from <strong>support</strong> (7). Discard<br />
lockwashers (3) <strong>and</strong> O-ring (6).<br />
9. Remove two pipe plugs (8) from <strong>support</strong> (7).<br />
10. Remove adapter (19) from oil cooler housing (15).<br />
0021 00-4
TM 9-2815-225-34&P 0021 00<br />
OIL COOLER (Contd)<br />
4<br />
1<br />
3<br />
2<br />
5<br />
6<br />
7<br />
9<br />
3<br />
10<br />
11<br />
12<br />
8<br />
13<br />
14<br />
18<br />
27<br />
3<br />
26<br />
15<br />
16<br />
3<br />
17<br />
25<br />
24<br />
23<br />
22<br />
21<br />
20<br />
19<br />
Figure 2. Oil Cooler Disassembly—Big Cam III Engine.<br />
0021 00-5
TM 9-2815-225-34&P 0021 00<br />
OIL COOLER (Contd)<br />
CLEANING AND INSPECTION<br />
1. For <strong>general</strong> parts cleaning information, refer to CLEANING, WP 0051 00.<br />
2. For <strong>general</strong> parts inspection information, refer to INSPECTION, WP 0051 00.<br />
NOTE<br />
Replace any part that does not pass visual inspection or is<br />
outside specified wear limits.<br />
Perform step 3 for Big Cam I only.<br />
3. Inspect oil cooler rear cover (1), oil cooler housing (2), <strong>and</strong> oil cooler front cover (3) for cracks,<br />
plugged oil passages, <strong>and</strong> stripped threads or damaged holes. Repair all stripped threads.<br />
NOTE<br />
Perform step 4 for Big Cam III only.<br />
4. Inspect head (4), oil cooler housing (5), <strong>and</strong> <strong>support</strong> (6) for cracks, plugged oil passages, <strong>and</strong><br />
stripped threads or damaged holes. Repair all stripped threads.<br />
0021 00-6
TM 9-2815-225-34&P 0021 00<br />
OIL COOLER (Contd)<br />
1<br />
2<br />
3<br />
Figure 3. Oil Cooler Cleaning <strong>and</strong> Inspection—Big Cam I Engine.<br />
4<br />
5<br />
6<br />
Figure 4. Oil Cooler Cleaning <strong>and</strong> Inspection—Big Cam III Engine.<br />
0021 00-7
TM 9-2815-225-34&P 0021 00<br />
OIL COOLER (Contd)<br />
BIG CAM III ASSEMBLY<br />
1. Install adapter (19) in oil cooler housing (15).<br />
2. Apply pipe sealant on two pipe plugs (8) <strong>and</strong> install in <strong>support</strong> (7). Tighten pipe plugs (8) 60–84<br />
lb-in. (7–10 N•m).<br />
3. Apply OE/HDO 30 lubricating oil to new O-ring (6). Install O-ring (6) <strong>and</strong> valve (5) in <strong>support</strong> (7)<br />
with two new lockwashers (3) <strong>and</strong> screws (4). Tighten screws (4) 30–35 lb-ft (41–48 N•m).<br />
4. Install new gasket (18), new oil cooler core (1), new gasket (2), <strong>and</strong> <strong>support</strong> (7) on oil cooler<br />
housing (15) with six washers (17), new lockwashers (13), <strong>and</strong> screws (16). Tighten screws (16)<br />
30–35 lb-ft (41–48 N•m).<br />
5. Install pressure sensing piston (20), bypass valve plunger (21), new spring (22), bypass valve<br />
piston (23), <strong>and</strong> new spring (24) in oil cooler housing (15).<br />
6. Apply OE/HDO 30 lubricating oil to new O-ring (13) <strong>and</strong> install new gasket (14), O-ring (13), <strong>and</strong><br />
head (12) on oil cooler housing (15) with three washers (26), new lockwashers (3), <strong>and</strong> screws (27).<br />
Do not tighten screws (27).<br />
7. Install bracket (11) on head (12) with three washers (10), new lockwashers (3), <strong>and</strong> screws (9).<br />
Tighten screws (9) <strong>and</strong> (30) 30–35 lb-ft (41–48 N•m).<br />
8. Install adapter (25) in head (12).<br />
9. For installation of oil cooler, refer to WP 0046 00.<br />
0021 00-8
TM 9-2815-225-34&P 0021 00<br />
OIL COOLER (Contd)<br />
4<br />
1<br />
3<br />
2<br />
5<br />
6<br />
7<br />
9<br />
3<br />
10<br />
11<br />
12<br />
8<br />
13<br />
14<br />
18<br />
27<br />
3<br />
26<br />
15<br />
16<br />
3<br />
17<br />
25<br />
24<br />
23<br />
22<br />
21<br />
20<br />
19<br />
Figure 5. Oil Cooler Assembly—Big Cam III Engine.<br />
0021 00-9
TM 9-2815-225-34&P 0021 00<br />
OIL COOLER (Contd)<br />
BIG CAM I ASSEMBLY<br />
1. Apply OE/HDO 30 lubricating oil to two new O-rings (5) <strong>and</strong> install on new element (6).<br />
2. Align element (6) to oil cooler housing (12) <strong>and</strong> install in oil cooler housing (12). Ensure<br />
O-rings (5) are not pinched or twisted.<br />
3. Install two new retaining rings (4) in oil cooler housing (12).<br />
4. Install new gasket (11), oil cooler rear cover (3), <strong>and</strong> bracket (1) on oil cooler housing (12) with<br />
four new lockwashers (8) <strong>and</strong> six screws (2) <strong>and</strong> (9). Tighten screws (2) <strong>and</strong> (9) 30–35 lb-ft<br />
(41–48 N•m).<br />
5. Install new gasket (13) <strong>and</strong> oil cooler front cover (14) on oil cooler housing (12) with six new<br />
lockwashers (8) <strong>and</strong> screws (15). Tighten screws (15) 30–35 lb-ft (41–48 N•m).<br />
6. Install plunger (17), new spring (18), spacer (19), <strong>and</strong> plug (20) in oil cooler front cover (14).<br />
7. Install new spring (21), disc (22), <strong>and</strong> seat (23) in oil cooler housing (12).<br />
8. Apply OE/HDO 30 lubricating oil on new O-ring (29) <strong>and</strong> install in oil cooler housing (12).<br />
9. Install new gasket (28) <strong>and</strong> head (27) on oil cooler housing (12) with washer (26), new<br />
lockwasher (25), <strong>and</strong> screw (24).<br />
10. Install expansion plug (32) or elbow (31) on oil cooler housing (12).<br />
11. Apply pipe sealant on two pipe plugs (17) <strong>and</strong> install in oil cooler front cover (14).<br />
12. Apply pipe sealant on pipe plug (7) <strong>and</strong> new vent valve (10) <strong>and</strong> install in oil cooler rear cover (3).<br />
13. For installation of oil cooler, refer to WP 0046 00.<br />
0021 00-10
TM 9-2815-225-34&P 0021 00<br />
OIL COOLER (Contd)<br />
1<br />
2<br />
9<br />
10<br />
3<br />
4<br />
5<br />
6<br />
8<br />
7<br />
11<br />
12<br />
13<br />
31<br />
5<br />
4<br />
14<br />
8<br />
15<br />
30<br />
29<br />
28<br />
27<br />
21<br />
22<br />
23<br />
26<br />
25<br />
20 19<br />
18<br />
17 16<br />
24<br />
Figure 6. Oil Cooler Assembly—Big Cam I Engine.<br />
END OF WORK PACKAGE<br />
0021 00-11/12 blank
TM 9-2815-225-34&P 0022 00<br />
DIRECT SUPPORT AND GENERAL SUPPORT<br />
MAINTENANCE MANUAL<br />
INCLUDING REPAIR PARTS AND SPECIAL TOOLS LIST (RPSTL)<br />
FOR<br />
M915, M915A1, M915A4, M916, M920 VEHICLES<br />
NSN 2815-01-082-8125 P/N NTC400-3652-02 CUMMINS NTC-400 BIG CAM I DIESEL ENGINE<br />
W/CONTAINER<br />
NSN 2815-01-142-2745 P/N 11669835 CUMMINS NTC-400 BIG CAM III DIESEL ENGINE<br />
W/CONTAINER<br />
OIL PAN, DIPSTICK, OIL SUCTION TUBES, AND BREATHER TUBE<br />
DISASSEMBLY, CLEANING AND INSPECTION, ASSEMBLY<br />
INITIAL SETUP:<br />
Tools <strong>and</strong> Special Tools<br />
General mechanic’s tool kit: automotive<br />
(Item 1, WP 0061 00)<br />
Maintenance <strong>and</strong> repair shop equipment:<br />
automotive (Item 2, WP 0061 00)<br />
Automotive <strong>maintenance</strong> <strong>and</strong> repair<br />
supplemental set no. 2 (Item 3, WP 0061 00)<br />
Equipment Condition<br />
Oil pan, dipstick, oil suction tubes, <strong>and</strong><br />
breather tube removed from engine<br />
(WP 0012 00).<br />
0022 00-1
TM 9-2815-225-34&P 0022 00<br />
OIL PAN, DIPSTICK, OIL SUCTION TUBES, AND BREATHER TUBE (Contd)<br />
DISASSEMBLY<br />
NOTE<br />
Perform steps 1 <strong>and</strong> 2 for Big Cam I only.<br />
1. Remove two plugs (2) <strong>and</strong> one spacer (3) from oil pan (1).<br />
2. Remove four screws (4) <strong>and</strong> strainer element (5) from oil pan (1).<br />
NOTE<br />
Perform steps 3 through 5 for Big Cam III only.<br />
3. Remove washer (10) <strong>and</strong> nut (11) from oil pan (12).<br />
4. Remove clamp (9) <strong>and</strong> oil suction tube (8) from oil pan (12).<br />
5. Remove three pipe plugs (6), two plugs (7), <strong>and</strong> one spacer (13) from oil pan (12).<br />
CLEANING AND INSPECTION<br />
1. For <strong>general</strong> parts cleaning information, refer to CLEANING, WP 0051 00.<br />
2. For <strong>general</strong> parts inspection information, refer to INSPECTION, WP 0051 00.<br />
NOTE<br />
Replace any part that does not pass visual inspection or is<br />
outside specified wear limits.<br />
3. Inspect oil pan (12) <strong>and</strong> (1) for cracks, corrosion, warpage, <strong>and</strong> stripped or damaged threads.<br />
Repair damaged threads as necessary.<br />
4. Inspect plugs (2), (6), <strong>and</strong> (7) for stripped or damaged threads. Replace any damaged plug.<br />
5. Inspect strainer element (5) for damage. Replace strainer element (5) if damaged.<br />
0022 00-2
TM 9-2815-225-34&P 0022 00<br />
OIL PAN, DIPSTICK, OIL SUCTION TUBES, AND BREATHER TUBE (Contd)<br />
4<br />
5<br />
2 3<br />
1<br />
2<br />
BIG CAM I OIL PAN<br />
(CAST ALUMINUM)<br />
10<br />
11<br />
9<br />
8<br />
12<br />
6<br />
7<br />
6<br />
13<br />
6<br />
7<br />
BIG CAM III OIL PAN<br />
(STAMPED STEEL)<br />
Figure 1. Oil Pan Disassembly.<br />
0022 00-3
TM 9-2815-225-34&P 0022 00<br />
OIL PAN, DIPSTICK, OIL SUCTION TUBES, AND BREATHER TUBE (Contd)<br />
CLEANING AND INSPECTION (Contd)<br />
6. Inspect oil level dipstick (2) <strong>and</strong> oil level dipstick tube (1) for cracks, bends, dents, <strong>and</strong> corrosion.<br />
Discard oil level dipstick (2) or oil level dipstick tube (1) if damaged.<br />
NOTE<br />
Perform step 7 for Big Cam I only.<br />
7. Inspect oil suction tube (3) for cracks, bends, dents, corrosion, or rubbing marks caused by<br />
vibration. Replace oil suction tube (3) if damaged.<br />
NOTE<br />
Perform step 8 for Big Cam III only.<br />
8. Inspect oil suction tube (4) <strong>and</strong> fitting (5) for cracks, bends, dents, <strong>and</strong> corrosion. Replace oil<br />
suction tube (4) or fitting (5) if damaged.<br />
NOTE<br />
Perform steps 9 <strong>and</strong> 10 for Big Cam I only.<br />
9. Inspect breather tube (6) for cracks, bends, dents, <strong>and</strong> corrosion. Replace breather tube (6) if<br />
damaged.<br />
10. Inspect breather hose (7) for rubbing marks caused by vibration, swelling, or cracks. Replace<br />
breather hose (7) if damaged.<br />
NOTE<br />
Perform steps 11 <strong>and</strong> 12 for Big Cam III only.<br />
11. Inspect breather tubes (9) <strong>and</strong> (12) <strong>and</strong> aftercooler bracket (8) for cracks, bends, dents, <strong>and</strong><br />
corrosion. Replace breather tube (9) <strong>and</strong> (12) or bracket (8) if damaged.<br />
12. Inspect breather hoses (10) <strong>and</strong> (11) for rubbing marks caused by vibration, swelling, or cracks.<br />
Discard breather hose (10) or (11) if damaged.<br />
0022 00-4
TM 9-2815-225-34&P 0022 00<br />
OIL PAN, DIPSTICK, OIL SUCTION TUBES, AND BREATHER TUBE (Contd)<br />
1 2<br />
3<br />
4<br />
BIG CAM III<br />
5<br />
BIG CAM I<br />
Figure 2. Oil Dipstick, Oil Dipstick Tube, <strong>and</strong> Oil Suction Tubes Cleaning <strong>and</strong> Inspection.<br />
10<br />
9<br />
11<br />
6<br />
7<br />
8<br />
12<br />
BIG CAM I<br />
BIG CAM III<br />
Figure 3. Breather Tube Cleaning <strong>and</strong> Inspection.<br />
0022 00-5
TM 9-2815-225-34&P 0022 00<br />
OIL PAN, DIPSTICK, OIL SUCTION TUBES, AND BREATHER TUBE (Contd)<br />
ASSEMBLY<br />
NOTE<br />
Perform steps 1 <strong>and</strong> 2 for Big Cam III only.<br />
1. Install oil suction tube (8) <strong>and</strong> clamp (9) on oil pan (12) <strong>and</strong> secure with washer (10) <strong>and</strong> nut (11).<br />
2. Install three pipe plugs (6), one spacer (13), <strong>and</strong> two plugs (7) on oil pan (12).<br />
NOTE<br />
Perform steps 3 <strong>and</strong> 4 for Big Cam I only.<br />
3. Install one spacer (3) <strong>and</strong> two plugs (2) in oil pan (1).<br />
4. Install strainer element (5) in oil pan (1) with four screws (4).<br />
5. For oil pans (1) <strong>and</strong> (12), dipstick, oil suction tubes (8), <strong>and</strong> breather tube installation, refer to<br />
WP 0042 00.<br />
4<br />
5<br />
2 3<br />
1<br />
9<br />
10<br />
11<br />
8<br />
12<br />
2<br />
BIG CAM I OIL PAN<br />
(CAST ALUMINUM)<br />
6<br />
7<br />
6<br />
13<br />
6<br />
7<br />
END OF WORK PACKAGE<br />
BIG CAM III OIL PAN<br />
(STAMPED STEEL)<br />
Figure 4. Oil Pan Assembly.<br />
0022 00-6
TM 9-2815-225-34&P 0023 00<br />
DIRECT SUPPORT AND GENERAL SUPPORT<br />
MAINTENANCE MANUAL<br />
INCLUDING REPAIR PARTS AND SPECIAL TOOLS LIST (RPSTL)<br />
FOR<br />
M915, M915A1, M915A4, M916, M920 VEHICLES<br />
NSN 2815-01-082-8125 P/N NTC400-3652-02 CUMMINS NTC-400 BIG CAM I DIESEL ENGINE<br />
W/CONTAINER<br />
NSN 2815-01-142-2745 P/N 11669835 CUMMINS NTC-400 BIG CAM III DIESEL ENGINE<br />
W/CONTAINER<br />
OIL PUMP<br />
DISASSEMBLY, CLEANING AND INSPECTION, ASSEMBLY<br />
INITIAL SETUP:<br />
Tools <strong>and</strong> Special Tools<br />
General mechanic’s tool kit: automotive<br />
(Item 1, WP 0061 00)<br />
Maintenance <strong>and</strong> repair shop equipment:<br />
automotive (Item 2, WP 0061 00)<br />
Automotive <strong>maintenance</strong> <strong>and</strong> repair<br />
supplemental set no. 2 (Item 3, WP 0061 00)<br />
Gear puller (Item 40, WP 0061 00)<br />
Press<br />
M<strong>and</strong>rel (Item 39, WP 0061 00)<br />
Drill press<br />
Materials/Parts (Contd)<br />
Three lockwashers<br />
(Item 10, Table 7, WP 0062 00)<br />
Lockplate (Item 11, Table 7, WP 0062 00)<br />
Equipment Condition<br />
Oil pump removed from engine (WP 0010 00).<br />
Materials/Parts<br />
OE/HDO 10 lubricating oil<br />
(Item 19, WP 0060 00)<br />
Pipe sealant (Item 25, WP 0060 00)<br />
Gasket (Item 1, Table 7, WP 0062 00)<br />
Gasket (Item 2, Table 7, WP 0062 00)<br />
Bushing (Item 3, Table 7, WP 0062 00)<br />
Two bushings (Item 4, Table 7, WP 0062 00)<br />
Two O-rings (Item 5, Table 7, WP 0062 00)<br />
Pressure regulator spring<br />
(Item 6, Table 7, WP 0062 00)<br />
Pressure regulator spring<br />
(Item 7, Table 7, WP 0062 00)<br />
Bushing (Item 8, Table 7, WP 0062 00)<br />
Bypass valve spring<br />
(Item 8, Table 7, WP 0062 00)<br />
Two bushings (Item 9, Table 7, WP 0062 00)<br />
0023 00-1
TM 9-2815-225-34&P 0023 00<br />
OIL PUMP (Contd)<br />
NOTE<br />
This work package is divided into sections, Big Cam I <strong>and</strong> Big<br />
Cam III engines.<br />
BIG CAM I<br />
Disassembly<br />
1. Using gear puller, remove oil pump drive gear (25) from oil pump driveshaft (11).<br />
2. Remove woodruff key (9) from oil pump driveshaft (11).<br />
3. Remove snapring (20) <strong>and</strong> coupling (19) from oil pump driveshaft (11).<br />
4. Remove connector (16) from oil pump housing (15).<br />
5. Remove pipe plug (6) from oil pump body (7).<br />
WARNING<br />
Oil pump pressure regulator spring is under tension. Remove<br />
oil pump pressure regulator slowly <strong>and</strong> wear proper eye<br />
protection. Failure to do so may result in injury to personnel.<br />
6. Remove screw (1), lockplate (2), retaining yoke (3), pressure regulator spring (4), <strong>and</strong> plunger (5)<br />
from oil pump body (7). Discard lockplate (2) <strong>and</strong> pressure regulator spring (4).<br />
7. Remove six screws (18), three lockwashers (17), <strong>and</strong> two washers (21) securing oil pump housing<br />
(15) to oil pump body (7). Discard lockwashers (17).<br />
8. Remove oil pump housing (15) <strong>and</strong> gasket (14) from oil pump body (7). Discard gasket (14).<br />
9. Remove dowel pin (10) from oil pump body (7).<br />
10. Using press, remove oil pump driveshaft (11), with oil pumping gear (12) attached, from oil pump<br />
body (7).<br />
11. Using press, remove oil pump driveshaft (11) from oil pumping gear (12).<br />
12. Remove idler gear (23) from idler shaft (24).<br />
13. Using press, remove idler shaft (24) from oil pump body (7).<br />
14. Using press <strong>and</strong> m<strong>and</strong>rel, remove bushing (13) from oil pump housing (15). Discard bushing (13).<br />
15. Using press <strong>and</strong> m<strong>and</strong>rel, remove two bushings (8) from oil pump body (7). Discard bushings (8).<br />
16. Using press <strong>and</strong> m<strong>and</strong>rel, remove bushings (22) from idler gear (23). Discard bushing (24).<br />
Cleaning <strong>and</strong> Inspection<br />
1. For <strong>general</strong> parts cleaning information, refer to CLEANING, WP 0051 00.<br />
2. For <strong>general</strong> parts inspection information, refer to INSPECTION, WP 0051 00.<br />
NOTE<br />
Replace any part that does not pass visual inspection or is<br />
outside specified wear limits.<br />
3. Inspect oil pumping gear (12) <strong>and</strong> idler gear (23) for cracks <strong>and</strong> stripped or chipped teeth.<br />
4. Inspect oil pump body (7) <strong>and</strong> oil pump housing (15), for cracks <strong>and</strong> stripped or elongated<br />
threaded bolt holes. Repair all stripped or elongated threaded bolt holes.<br />
0023 00-2
TM 9-2815-225-34&P 0023 00<br />
OIL PUMP (Contd)<br />
BIG CAM I (Contd)<br />
Cleaning <strong>and</strong> Inspection (Contd)<br />
5. Inspect dowel pin (10) for cracks or distortion.<br />
6. Inspect coupling (19) for cracks or stripped teeth.<br />
7. Inspect oil pump driveshaft (11) <strong>and</strong> idler shaft (24) for galling, breaks, cracks, or bends.<br />
8. Using micrometer or equivalent, measure oil pump driveshaft (11) <strong>and</strong> idler shaft (25) outside<br />
diameter. Minimum outside diameter is 0.874 in. (22.20 mm).<br />
9. Inspect woodruff key (9) for damage <strong>and</strong> woodruff key slot on oil pump driveshaft (11). Replace<br />
woodruff key (9) <strong>and</strong> oil pump driveshaft (11) if woodruff key (9) fits loose in slot.<br />
10. Inspect pressure regulator plunger (5) for movement in bore of oil pump body (7). Replace<br />
pressure regulator plunger (5) if it sticks, binds, or is excessively loose.<br />
17<br />
18<br />
19 20<br />
1<br />
2<br />
3<br />
4<br />
5<br />
6<br />
15 16<br />
14<br />
13<br />
7 9 10 11 12<br />
8<br />
18<br />
21<br />
17<br />
18<br />
18<br />
24<br />
22<br />
23<br />
22<br />
8<br />
25<br />
Figure 1. Oil Pump Disassembly—Big Cam I.<br />
0023 00-3
TM 9-2815-225-34&P 0023 00<br />
OIL PUMP (Contd)<br />
BIG CAM I (Contd)<br />
Assembly<br />
NOTE<br />
Lubricate all parts with OE/HDO 10 lubricating oil before<br />
assembly.<br />
New bushings must be line reamed to size before oil pump<br />
assembly.<br />
1. Using press <strong>and</strong> m<strong>and</strong>rel, install new bushing (22) in idler gear (23). Do not press bushing (22)<br />
more than 0.020 in. (0.508 mm) below top surface of idler gear (23). Using drill press <strong>and</strong> reamer,<br />
line-ream inside diameter of bushing (22) to 0.8767–0.8777 in. (22.268–22.293 mm).<br />
2. Using press <strong>and</strong> m<strong>and</strong>rel, install two new bushings (8) in oil pump body (7). Do not press<br />
bushings (8) more than 0.020 in. (0.508 mm) below top surfaces of oil pump body (7). Using drill<br />
press <strong>and</strong> reamer, line-ream inside diameter of bushings (8) to 0.8767–0.8777 in.<br />
(22.268–22.293 mm).<br />
3. Using press <strong>and</strong> m<strong>and</strong>rel, install new bushing (13) in oil pump housing (15). Do not press<br />
bushing (13) more than 0.020 in. (0.508 mm) below top surfaces of oil pump housing (15). Using<br />
drill press <strong>and</strong> reamer, line-ream inside diameter of bushing (13) to 0.8767–0.8777 in.<br />
(22.268–22.293 mm).<br />
4. Using press, install oil pumping gear (12) on oil pump driveshaft (11).<br />
5. Using press, install oil pump driveshaft (11), with oil pumping gear (12) attached, in oil pump<br />
body (7) until oil pump driveshaft (11) protrudes 1.035–1.055 in. (26.29–26.80 mm) above oil<br />
pump body (7).<br />
6. Using press, install idler shaft (24), with large end facing up, in oil pump body (7) until large end<br />
protrudes 0.9375–1.0 in. (23.81–25.40 mm) above oil pump body (7).<br />
7. Install idler gear (23) on idler shaft (24).<br />
8. Using feeler gauge, check clearance from oil pumping gear (12) to oil pump body (7). Clearance<br />
should be 0.060–0.070 in. (1.52–1.78 mm). Remove <strong>and</strong> install oil pumping gear (12) until correct<br />
clearance is obtained.<br />
9. Install dowel pin (10) in oil pump body (7).<br />
10. Install new gasket (14) <strong>and</strong> oil pump housing (15) on oil pump body (7) with two washers (21),<br />
three new lockwashers (17), <strong>and</strong> six screws (18). Tighten screws (18) 35 lb-ft (48 N•m).<br />
WARNING<br />
Oil pump pressure regulator spring is under tension. Install<br />
oil pump pressure regulator screw slowly <strong>and</strong> wear proper eye<br />
protection. Failure to do so may result in injury to personnel.<br />
11. Install plunger (5), new pressure regulator spring (4), retaining yoke (3), new lockplate (2), <strong>and</strong><br />
screw (1), in oil pump body (7). Tighten screw (1) 35 lb-ft (48 N•m).<br />
12. Using pipe sealant, install pipe plug (6) in oil pump body (7). Tighten plug (6) 30 lb-ft (41 N•m).<br />
13. Install connector (16) on oil pump housing (15).<br />
0023 00-4
TM 9-2815-225-34&P 0023 00<br />
OIL PUMP (Contd)<br />
BIG CAM I (Contd)<br />
Assembly (Contd)<br />
14. Install coupling (19) <strong>and</strong> snapring (20) on oil pump driveshaft (11).<br />
15. Install woodruff key (9) in oil pump driveshaft (11).<br />
16. Using press, install oil pump drive gear (25) on oil pump driveshaft (11).<br />
17. Using a dial indicator, check oil pump driveshaft (11) end play. End play should be<br />
0.002–0.008 in. (0.05–0.20 mm).<br />
18. For oil pump installation, refer to WP 0042 00.<br />
17<br />
18<br />
19 20<br />
1<br />
2<br />
3<br />
4<br />
5<br />
6<br />
15 16<br />
14<br />
13<br />
7 9 10 11 12<br />
8<br />
18<br />
21<br />
17<br />
18<br />
18<br />
24<br />
22<br />
23<br />
22<br />
8<br />
25<br />
Figure 2. Oil Pump Assembly—Big Cam I.<br />
0023 00-5
TM 9-2815-225-34&P 0023 00<br />
OIL PUMP (Contd)<br />
BIG CAM III<br />
Disassembly<br />
1. For oil pump removal, refer to WP 0010 00.<br />
2. Using gear puller, remove oil pump drive gear (1) from oil pump driveshaft (10).<br />
3. Remove woodruff key (9) from oil pump driveshaft (10).<br />
4. Remove retaining ring (17) <strong>and</strong> coupling (16) from oil pump driveshaft (10).<br />
5. Remove pipe plug (15) from oil pump cover (14).<br />
WARNING<br />
Oil pump pressure regulator spring is under tension. Remove<br />
oil pump bypass screw slowly <strong>and</strong> wear proper eye protection.<br />
Failure to do so may result in injury to personnel.<br />
6. Remove screw (27), washer (26), retainer (25), pressure regulator spring (23), <strong>and</strong> plunger (22)<br />
from oil pump body (3). Discard pressure regulator spring (24).<br />
7. Remove two O-rings (24) from retainer (25). Discard O-rings (24).<br />
8. Remove seven screws (18), oil pump cover (14), <strong>and</strong> gasket (13) from oil pump body (3). Discard<br />
gasket (13).<br />
9. Remove dowel pin (8) from oil pump body (3).<br />
10. Remove bypass valve seat (7), bypass valve disc (6), washer (5), <strong>and</strong> bypass valve spring (4) from<br />
oil pump body (3). Discard bypass valve spring (4),<br />
11. Using press, remove oil pump driveshaft (10), with oil pumping gear (11) attached, from oil pump<br />
body (3).<br />
12. Using press, remove oil pump driveshaft (10), from oil pumping gear (11).<br />
13. Remove idler gear (20) from idler shaft (21).<br />
14. Using press, remove idler shaft (21) from oil pump body (3).<br />
15. Using press <strong>and</strong> m<strong>and</strong>rel, remove two bushings (2) from oil pump body (3). Discard bushings (2).<br />
16. Using press <strong>and</strong> m<strong>and</strong>rel, remove bushing (12) from oil pump cover (14). Discard bushings (12)<br />
<strong>and</strong> (19).<br />
17. Using press <strong>and</strong> m<strong>and</strong>rel, remove two bushings (21) from idler gear (20). Discard bushing (21).<br />
Cleaning <strong>and</strong> Inspection<br />
1. For <strong>general</strong> parts cleaning information, refer to CLEANING, WP 0051 00.<br />
2. For <strong>general</strong> parts inspection information, refer to INSPECTION, WP 0051 00.<br />
NOTE<br />
Replace any part that does not pass visual inspection or is<br />
outside specified wear limits.<br />
3. Inspect oil pump drive gear (11) <strong>and</strong> idler gear (20) for cracks <strong>and</strong> stripped or chipped teeth.<br />
4. Inspect oil pump body (3) <strong>and</strong> oil pump cover (14) for cracks <strong>and</strong> stripped or elongated threaded<br />
bolt holes. Repair all stripped or elongated threaded bolt holes.<br />
5. Inspect dowel pin (8) for cracks or distortion.<br />
0023 00-6
TM 9-2815-225-34&P 0023 00<br />
OIL PUMP (Contd)<br />
BIG CAM III (Contd)<br />
Cleaning <strong>and</strong> Inspection (Contd)<br />
6. Inspect coupling (16) for cracks or stripped teeth.<br />
7. Inspect oil pump driveshaft (10) <strong>and</strong> idler shaft (21) for galling, breaks, cracks, or bends.<br />
8. Using micrometer or equivalent, measure oil pump driveshaft (10) <strong>and</strong> idler shaft (21) outside<br />
diameter. Minimum outside diameter is 0.874 in (22.20 mm).<br />
9. Inspect woodruff key (9) for damage <strong>and</strong> woodruff key slot on oil pump driveshaft (10). Replace<br />
woodruff key (9) <strong>and</strong> oil pump driveshaft (10) if woodruff key (9) fits loose in slot.<br />
10. Inspect pressure regulator plunger (22) for movement in bore of oil pump body (3). Replace<br />
pressure regulator plunger (22) if it sticks, binds, or is excessively loose.<br />
11. Inspect bypass valve disc (6) for movement in bore of oil pump body (3). Replace bypass valve<br />
disc (6) if it sticks, binds, or is excessively loose.<br />
14<br />
15<br />
16 17<br />
13<br />
4<br />
5<br />
6<br />
7<br />
8 9<br />
10<br />
11<br />
12<br />
18<br />
3<br />
2<br />
19<br />
1<br />
21<br />
19<br />
20<br />
22<br />
23<br />
24<br />
25<br />
26<br />
27<br />
Figure 3. Oil Pump Disassembly—Big Cam III.<br />
0023 00-7
TM 9-2815-225-34&P 0023 00<br />
OIL PUMP (Contd)<br />
BIG CAM III (Contd)<br />
Assembly<br />
NOTE<br />
Lubricate all parts with OE/HDO 10 lubricating oil before<br />
assembly.<br />
New bushings must be line reamed to size before oil pump<br />
assembly.<br />
1. Using press <strong>and</strong> m<strong>and</strong>rel, install two new bushings (5) <strong>and</strong> (19) in idler gear (20). Do not press<br />
bushing (19) more than 0.020 in. (0.508 mm) below top surface of idler gear (20). Using drill press<br />
<strong>and</strong> reamer, line-ream inside diameter of bushing (19) to 0.8767–0.8777 in. (22.268–22.293 mm).<br />
2. Using press <strong>and</strong> m<strong>and</strong>rel, install two new bushings (2) in oil pump body (3). Do not press<br />
bushings (2) more than 0.020 in. (0.508 mm) below top surfaces of oil pump body (3). Using drill<br />
press <strong>and</strong> reamer, line-ream inside diameter of bushings (2) to 0.8767–0.8777 in.<br />
(22.268–22.293 mm).<br />
3. Using press <strong>and</strong> m<strong>and</strong>rel, install new bushing (12) in oil pump cover (14). Do not press bushing<br />
(12) more than 0.020 in. (0.508 mm) below top surfaces of oil pump cover (14). Using drill press<br />
<strong>and</strong> reamer, line-ream inside diameter of bushing (12) to 0.8767–0.8777 in. (22.268–22.293 mm).<br />
4. Using press, install oil pumping gear (11) on oil pump driveshaft (10).<br />
5. Using press, install oil pump driveshaft (10) with oil pumping gear (11) attached, in oil pump<br />
body (3) until oil pump driveshaft (10) protrudes 1.035–1.055 in. (2.629–2.680 cm) above oil pump<br />
body (3).<br />
6. Using press, install idler shaft (21) with large end facing up, in oil pump body (3) until large end<br />
protrudes 0.9375–1.0 in. (23.81–25.40 mm) above oil pump body (3).<br />
7. Install idler gear (20) on idler shaft (21).<br />
8. Using feeler gauge, check oil pumping gear (11) to oil pump body (3) clearance. Clearance should<br />
be 0.060–0.070 in. (1.52–1.78 mm). Remove <strong>and</strong> install oil pumping gear (11) until correct<br />
clearance is obtained.<br />
9. Install new bypass spring (4), washer (5), bypass valve disc (6), <strong>and</strong> bypass valve seat (7) in oil<br />
pump body (3).<br />
10. Install dowel pin (9) in oil pump body (3).<br />
11. Install new gasket (13) <strong>and</strong> oil pump cover (14) on oil pump body (3) with seven screws (18).<br />
Tighten screws (18) 35 lb-ft (48 N•m).<br />
12. Install two new O-rings (24) on retainer (25).<br />
WARNING<br />
Oil pump pressure regulator spring is under tension. Install<br />
oil pump pressure regulator screw slowly <strong>and</strong> wear proper eye<br />
protection. Failure to do so may result in injury to personnel.<br />
13. Install plunger (22), new pressure regulator spring (23), retainer (25), washer (26), <strong>and</strong> screw (27)<br />
in oil pump body (3).<br />
0023 00-8
TM 9-2815-225-34&P 0023 00<br />
OIL PUMP (Contd)<br />
BIG CAM III (Contd)<br />
Assembly (Contd)<br />
14. Using pipe sealant, install pipe plug (15) in oil pump cover (14). Tighten plug (15) 30 lb-ft<br />
(41 N•m).<br />
15. Install coupling (16) <strong>and</strong> snapring (17) on oil pump driveshaft (10).<br />
16. Install woodruff key (9) in oil pump driveshaft (10).<br />
17. Using press, install oil pump drive gear (1) on oil pump driveshaft (10).<br />
18. Using a dial indicator, check oil pump driveshaft (10) end play. End play should be between<br />
0.002–0.008 in. (0.05–0.20 mm).<br />
19. For oil pump installation, refer to WP 0042 00.<br />
14<br />
15<br />
16 17<br />
13<br />
4<br />
5<br />
6<br />
7<br />
8 9<br />
10<br />
11<br />
12<br />
18<br />
3<br />
2<br />
19<br />
1<br />
21<br />
19<br />
20<br />
22<br />
23<br />
24<br />
25<br />
26<br />
27<br />
Figure 4. Oil Pump Assembly—Big Cam III.<br />
END OF WORK PACKAGE<br />
0023 00-9/10 blank
TM 9-2815-225-34&P 0024 00<br />
DIRECT SUPPORT AND GENERAL SUPPORT<br />
MAINTENANCE MANUAL<br />
INCLUDING REPAIR PARTS AND SPECIAL TOOLS LIST (RPSTL)<br />
FOR<br />
M915, M915A1, M915A4, M916, M920 VEHICLES<br />
NSN 2815-01-082-8125 P/N NTC400-3652-02 CUMMINS NTC-400 BIG CAM I DIESEL ENGINE<br />
W/CONTAINER<br />
NSN 2815-01-142-2745 P/N 11669835 CUMMINS NTC-400 BIG CAM III DIESEL ENGINE<br />
W/CONTAINER<br />
AIR AFTERCOOLER<br />
DISASSEMBLY, CLEANING AND INSPECTION, ASSEMBLY<br />
INITIAL SETUP:<br />
Tools <strong>and</strong> Special Tools<br />
General mechanic’s tool kit:<br />
automotive (Item 1, WP 0061 00)<br />
Maintenance <strong>and</strong> repair shop equipment:<br />
automotive (Item 2, WP 0061 00)<br />
Automotive <strong>maintenance</strong> <strong>and</strong> repair<br />
supplemental set no. 2 (Item 3, WP 0061 00)<br />
Air pressure tester (Item 4, WP 0061 00)<br />
Equipment Condition<br />
Air aftercooler removed from engine<br />
(WP 0010 00).<br />
Materials/Parts<br />
OE/HDO 10 lubricating oil<br />
(Item 19, WP 0060 00)<br />
Gasket (Item 1, Table 8, WP 0062 00)<br />
Gasket (Item 2, Table 8, WP 0062 00)<br />
Gasket (Item 3, Table 8, WP 0062 00)<br />
Four O-rings (Item 4, Table 8, WP 0062 00)<br />
0024 00-1
TM 9-2815-225-34&P 0024 00<br />
AIR AFTERCOOLER (Contd)<br />
DISASSEMBLY<br />
NOTE<br />
This procedure covers air aftercooler repair for Big Cam I<br />
<strong>and</strong> Big Cam III engines. Big Cam III water outlet may be<br />
equipped with lockwashers. Discard lockwashers if equipped.<br />
1. Remove three screws (4), washers (3), water outlet (2), <strong>and</strong> gasket (1) from air aftercooler<br />
cover (5). Discard gasket (1).<br />
2. Remove two screws (11), water inlet (10), <strong>and</strong> gasket (9) from intake manifold (12). Discard<br />
gasket (9).<br />
3. Remove twenty-four screws (6), air aftercooler cover (5), <strong>and</strong> gasket (7) from intake manifold (12).<br />
Discard gasket (7).<br />
4. Remove eight screws (13), washers (14), <strong>and</strong> air aftercooler element (15) from intake<br />
manifold (12).<br />
5. Remove four O-rings (8) from air aftercooler element (15). Discard O-rings (8).<br />
CLEANING AND INSPECTION<br />
1. For <strong>general</strong> parts cleaning information, refer to CLEANING, WP 0051 00.<br />
2. For <strong>general</strong> parts inspection information, refer to INSPECTION, WP 0051 00.<br />
NOTE<br />
Replace any part that does not pass visual inspection or is<br />
outside specified wear limits.<br />
3. Inspect water outlet (2), water inlet (10), air aftercooler cover (5), <strong>and</strong> intake manifold (12) for<br />
cracks, corrosion, <strong>and</strong> stripped or elongated threaded holes. Repair any damaged threaded holes.<br />
4. Inspect air aftercooler element (15) for cracks, corrosion, <strong>and</strong> stripped or elongated threaded<br />
holes. Repair any damaged threaded holes.<br />
5. Inspect air aftercooler element (15) for leaks, as follows:<br />
a. Cap one end of air aftercooler element (15) airtight.<br />
b. Connect a suitable air pressure tester to other end of air aftercooler element (15).<br />
c. Immerse air aftercooler element (15) in tank of water, pressurize air aftercooler element (15) to<br />
20 psi (138 kPA) for 2 minutes, <strong>and</strong> look for bubbles.<br />
d. If a leak is detected, replace air aftercooler element (15).<br />
0024 00-2
TM 9-2815-225-34&P 0024 00<br />
AIR AFTERCOOLER (Contd)<br />
4 6<br />
3<br />
5<br />
2<br />
1<br />
7<br />
8<br />
8<br />
9<br />
10<br />
11<br />
15<br />
13<br />
14<br />
12<br />
14<br />
13<br />
Figure 1. Air Aftercooler Disassembly.<br />
0024 00-3
TM 9-2815-225-34&P 0024 00<br />
AIR AFTERCOOLER (Contd)<br />
ASSEMBLY<br />
1. Apply OE/HDO 10 lubricating oil to four new O-rings (8) <strong>and</strong> install O-rings on air aftercooler<br />
element (15).<br />
NOTE<br />
Air aftercooler element has a precision fit in intake manifold.<br />
Move air aftercooler element carefully during installation.<br />
2. Install air aftercooler element (15) in intake manifold (12).<br />
3. Hold air aftercooler element (15) to one side of intake manifold (12). Using feeler gauge, measure<br />
clearance between air aftercooler element (15) <strong>and</strong> intake manifold (12). Clearance must be<br />
0.003–0.013in. (0.076–0.330 mm).<br />
4. Align holes in intake manifold (12) with holes in air aftercooler element (15). Install air<br />
aftercooler element (15) in intake manifold (12) with eight washers (14) <strong>and</strong> screws (13). Tighten<br />
air aftercooler element screws (13) in sequence 15 lb-ft (20 N•m).<br />
5. Tighten air aftercooler element screws (13) in sequence again 25 lb-ft (34 N•m).<br />
6. Install new gasket (7) <strong>and</strong> air aftercooler cover (5) on intake manifold (12) with twenty-four<br />
screws (6). Do not tighten screws (6) at this time.<br />
7. Install new gasket (9) <strong>and</strong> water inlet (10) on intake manifold (12) with two screws (11). Tighten<br />
screws (11) 32 lb-ft (43 N•m).<br />
NOTE<br />
Big Cam III may be equipped with lockwashers. Replace<br />
lockwashers during water outlet installation.<br />
8. Install new gasket (1) <strong>and</strong> water outlet (2) on air aftercooler cover (5) with three washers (3) <strong>and</strong><br />
screws (4). Do not tighten screws (4) at this time.<br />
9. Tighten twenty-four screws (6) securing air aftercooler cover (5) to intake manifold (12) in<br />
sequence shown 25 lb-ft (34 N•m).<br />
10. Tighten three screws (4) securing water outlet (2) to air aftercooler cover (5) 20 lb-ft (27 N•m).<br />
11. For air aftercooler installation, refer to WP 0045 00.<br />
0024 00-4
~<br />
~<br />
TM 9-2815-225-34&P 0024 00<br />
AIR AFTERCOOLER (Contd)<br />
2<br />
3<br />
4<br />
5<br />
6<br />
1<br />
7<br />
8<br />
8<br />
9<br />
10<br />
15<br />
11<br />
13<br />
14<br />
12<br />
12<br />
FEELER GAUGE<br />
14<br />
13<br />
15<br />
Figure 2. Air Aftercooler Assembly.<br />
AIR AFTERCOOLER ELEMENT<br />
TIGHTENING SEQUENCE<br />
Figure 3. Air Aftercooler Cover Tightening Sequence.<br />
END OF WORK PACKAGE<br />
0024 00-5/6 blank
TM 9-2815-225-34&P 0025 00<br />
DIRECT SUPPORT AND GENERAL SUPPORT<br />
MAINTENANCE MANUAL<br />
INCLUDING REPAIR PARTS AND SPECIAL TOOLS LIST (RPSTL)<br />
FOR<br />
M915, M915A1, M915A4, M916, M920 VEHICLES<br />
NSN 2815-01-082-8125 P/N NTC400-3652-02 CUMMINS NTC-400 BIG CAM I DIESEL ENGINE<br />
W/CONTAINER<br />
NSN 2815-01-142-2745 P/N 11669835 CUMMINS NTC-400 BIG CAM III DIESEL ENGINE<br />
W/CONTAINER<br />
EXHAUST MANIFOLD<br />
DISASSEMBLY, CLEANING AND INSPECTION, ASSEMBLY<br />
INITIAL SETUP:<br />
Tools <strong>and</strong> Special Tools<br />
General mechanic’s tool kit:<br />
automotive (Item 1, WP 0061 00)<br />
Maintenance <strong>and</strong> repair shop equipment:<br />
automotive (Item 2, WP 0061 00)<br />
Automotive <strong>maintenance</strong> <strong>and</strong> repair<br />
supplemental set no. 2 (Item 3, WP 0061 00)<br />
Materials/Parts<br />
Antiseize compound (Item 7, WP 0060 00)<br />
Pipe sealant (Item 25, WP 0060 00)<br />
Two spacer inserts<br />
(Item 1, Table 9, WP 0062 00)<br />
Equipment Condition<br />
Exhaust manifold removed from engine<br />
(WP 0009 00).<br />
0025 00-1
TM 9-2815-225-34&P 0025 00<br />
EXHAUST MANIFOLD (Contd)<br />
DISASSEMBLY<br />
NOTE<br />
Big Cam I engines utilize a conventional log-type exhaust<br />
manifold. Big Cam III engines utilize a pulse-type exhaust<br />
manifold <strong>and</strong> a new design exhaust manifold with 2 spacer<br />
inserts. Disassembly <strong>and</strong> assembly of exhaust manifolds are<br />
basically alike for both engines.<br />
Exhaust manifold parts are fitted together tightly <strong>and</strong> may<br />
require extreme force to separate.<br />
Perform steps 1 through 3 for Big Cam I.<br />
1. Remove front exhaust manifold (1) <strong>and</strong> rear exhaust manifold (4) from center exhaust<br />
manifold (2).<br />
2. Remove two pipe plugs (3) from center exhaust manifold (2).<br />
3. Remove four turbocharger mounting studs (5) from center exhaust manifold (2).<br />
NOTE<br />
Perform steps 4 <strong>and</strong> 5 for Big Cam III.<br />
4. Remove front exhaust manifold (6) <strong>and</strong> rear exhaust manifold (9) from center exhaust<br />
manifold (7).<br />
5. Remove four turbocharger mounting studs (8) from center exhaust manifold (7).<br />
NOTE<br />
Perform steps 6 through 8 for Big Cam III new design.<br />
6. Remove front exhaust manifold (10) <strong>and</strong> rear exhaust manifold (14) from spacer inserts (11).<br />
7. Remove two spacer inserts (11) from center exhaust manifold (12). Discard spacer inserts (11).<br />
8. Remove four turbocharger mounting studs (13) from center exhaust manifold (12).<br />
CLEANING AND INSPECTION<br />
1. For <strong>general</strong> parts cleaning information, refer to CLEANING, WP 0051 00.<br />
2. For <strong>general</strong> parts inspection information, refer to INSPECTION, WP 0051 00.<br />
NOTE<br />
Replace any part that does not pass visual inspection or is<br />
outside specified wear limits.<br />
3. Inspect front exhaust manifold (1), (6), <strong>and</strong> (10), center exhaust manifold (2), (7), <strong>and</strong> (12), <strong>and</strong><br />
rear exhaust manifold (4), (9), <strong>and</strong> (14) for cracks, distortion, <strong>and</strong> corrosion.<br />
4. Inspect turbocharger mounting studs (5), (8), <strong>and</strong> (13) for stripped threads. Repair all damaged<br />
threads.<br />
5. Inspect center exhaust manifold (2), (7), <strong>and</strong> (12) for stripped threads or damaged holes. Repair<br />
all damaged threads <strong>and</strong> holes.<br />
0025 00-2
TM 9-2815-225-34&P 0025 00<br />
EXHAUST MANIFOLD (Contd)<br />
4<br />
3<br />
2<br />
1<br />
5<br />
BIG CAM I<br />
7<br />
8 9<br />
6<br />
BIG CAM III<br />
10<br />
11<br />
12 13 11 14<br />
BIG CAM III—NEW DESIGN<br />
Figure 1. Exhaust Manifold Disassembly.<br />
0025 00-3
TM 9-2815-225-34&P 0025 00<br />
EXHAUST MANIFOLD (Contd)<br />
ASSEMBLY<br />
NOTE<br />
Perform steps 1 through 4 for Big Cam III new design.<br />
1. Install four turbocharger mounting studs (4) in center exhaust manifold (3).<br />
2. Install two new spacer inserts (2) in center exhaust manifold (3).<br />
3. Apply antiseize compound to mating surfaces of front exhaust manifold (1), spacer inserts (2),<br />
<strong>and</strong> rear exhaust manifold (5).<br />
4. Install front exhaust manifold (1) <strong>and</strong> rear exhaust manifold (5) on spacer inserts (2).<br />
NOTE<br />
Perform steps 5 through 7 for Big Cam III.<br />
5. Install four turbocharger mounting studs (8) in center exhaust manifold (7).<br />
6. Apply antiseize compound to mating surfaces of front exhaust manifold (6), center exhaust<br />
manifold (7), <strong>and</strong> rear exhaust manifold (9).<br />
7. Install front exhaust manifold (6) <strong>and</strong> rear exhaust manifold (9) on center exhaust manifold (7).<br />
NOTE<br />
Perform steps 8 through 11 for Big Cam I.<br />
8. Install 4 turbocharger mounting studs (14) in center exhaust manifold (11).<br />
9. Apply pipe sealant on 2 pipe plugs (12) <strong>and</strong> install pipe plugs (12) in center exhaust<br />
manifold (11).<br />
10. Apply antiseize compound to mating surfaces of front exhaust manifold (10), center exhaust<br />
manifold (11), <strong>and</strong> rear exhaust manifold (13).<br />
11. Install front exhaust manifold (10) <strong>and</strong> rear exhaust manifold (13) on center exhaust<br />
manifold (11).<br />
12. Install exhaust manifold on engine (WP 0046 00).<br />
0025 00-4
TM 9-2815-225-34&P 0025 00<br />
EXHAUST MANIFOLD (Contd)<br />
1 2<br />
3 4 2 5<br />
BIG CAM III—NEW DESIGN<br />
7<br />
8 9<br />
6<br />
BIG CAM III<br />
13<br />
12<br />
11<br />
10<br />
14<br />
BIG CAM I<br />
Figure 2. Exhaust Manifold Assembly.<br />
END OF WORK PACKAGE<br />
0025 00-5/6 blank
TM 9-2815-225-34&P 0026 00<br />
DIRECT SUPPORT AND GENERAL SUPPORT<br />
MAINTENANCE MANUAL<br />
INCLUDING REPAIR PARTS AND SPECIAL TOOLS LIST (RPSTL)<br />
FOR<br />
M915, M915A1, M915A4, M916, M920 VEHICLES<br />
NSN 2815-01-082-8125 P/N NTC400-3652-02 CUMMINS NTC-400 BIG CAM I DIESEL ENGINE<br />
W/CONTAINER<br />
NSN 2815-01-142-2745 P/N 11669835 CUMMINS NTC-400 BIG CAM III DIESEL ENGINE<br />
W/CONTAINER<br />
TURBOCHARGER<br />
DISASSEMBLY, CLEANING AND INSPECTION, ASSEMBLY<br />
INITIAL SETUP:<br />
Tools <strong>and</strong> Special Tools<br />
General mechanic’s tool kit: automotive<br />
(Item 1, WP 0061 00)<br />
Maintenance <strong>and</strong> repair shop equipment:<br />
automotive (Item 2, WP 0061 00)<br />
Automotive <strong>maintenance</strong> <strong>and</strong> repair<br />
supplemental set no. 2 (Item 3, WP 0061 00)<br />
Press<br />
Equipment Condition<br />
Turbocharger removed from engine<br />
(WP 0009 00).<br />
Materials/Parts<br />
Crocus cloth (Item 4, WP 0060 00)<br />
Antiseize compound (Item 7, WP 0060 00)<br />
OE/HDO 30 lubricating oil<br />
(Item 20, WP 0060 00)<br />
Locknut (Item 3, Table 10, WP 0062 00)<br />
Sleeve (Item 1, Table 10, WP 0062 00)<br />
Ring seal (Item 2, Table 10, WP 0062 00)<br />
Bearing insert pad<br />
(Item 3, Table 10, WP 0062 00)<br />
Impeller locknut<br />
(Item 4, Table 10, WP 0062 00)<br />
Screw (Item 5, Table 10, WP 0062 00)<br />
Diffuser plate (Item 6, Table 10, WP 0062 00)<br />
O-ring (Item 7, Table 10, WP 0062 00)<br />
Bearing (Item 9, Table 10, WP 0062 00)<br />
Insulated packing<br />
(Item 10, Table 10, WP 0062 00)<br />
Two ring seals (Item 11, Table 10, WP 0062 00)<br />
0026 00-1
TM 9-2815-225-34&P 0026 00<br />
TURBOCHARGER (Contd)<br />
DISASSEMBLY<br />
1. For removal of turbocharger, refer to WP 0010 00.<br />
2. Scribe locating mark (2) on impeller housing (1), bearing housing (4), <strong>and</strong> turbine housing (3)<br />
before disassembly.<br />
3. Remove two adapters (12) <strong>and</strong> (19) from bearing housing (4).<br />
4. Remove two locknuts (8), screws (11), four washers (7) <strong>and</strong> (10), <strong>and</strong> V-b<strong>and</strong> clamp (9) from<br />
impeller housing (1), bearing housing (4), <strong>and</strong> turbine housing (3). Discard locknuts (8) <strong>and</strong><br />
screws (11).<br />
5. Remove impeller housing (1) from bearing housing (4).<br />
6. Remove turbine housing (3) from bearing housing (4).<br />
7. Remove impeller locknut (6) from wheel <strong>and</strong> shaft assembly (23). Discard locknut (6).<br />
8. Using press, remove wheel <strong>and</strong> shaft assembly (23) <strong>and</strong> turbocharger impeller (5) from bearing<br />
housing (4).<br />
9. Remove heat shield (21) <strong>and</strong> insulated packing (20) from bearing housing (4). Discard insulated<br />
packing (20).<br />
10. Remove diffuser plate (15), bearing insert pad (17), <strong>and</strong> bearing (18) from bearing housing (4).<br />
Discard bearing insert pad (17), bearing (18) <strong>and</strong> diffuser plate (15) which includes sleeve (13),<br />
ring seal (14) <strong>and</strong> O-ring (16).<br />
11. Remove two ring seals (22) from wheel <strong>and</strong> shaft assembly (23). Discard ring seals (22).<br />
CLEANING AND INSPECTION<br />
1. For <strong>general</strong> parts cleaning information, refer to CLEANING, WP 0051 00.<br />
2. For <strong>general</strong> parts inspection information, refer to INSPECTION, WP 0051 00.<br />
NOTE<br />
Replace any part that does not pass visual inspection or is<br />
outside specified wear limits.<br />
3. Inspect impeller housing (1) <strong>and</strong> turbine housing (3) for cracks, chips, <strong>and</strong> scratches. Remove<br />
small scratches <strong>and</strong> chips from machined surfaces with crocus cloth.<br />
4. Inspect diffuser plate (15) for cracks or damage at bearing insert pad (17), contact point.<br />
5. Inspect heat shield (21) for cracks <strong>and</strong> chips.<br />
6. Using a straightedge, inspect heat shield (21) for straightness. Discard heat shield (21) if warped.<br />
0026 00-2
TM 9-2815-225-34&P 0026 00<br />
TURBOCHARGER (Contd)<br />
1<br />
2<br />
4<br />
3<br />
Figure 1. Locating Marks.<br />
5<br />
6 8<br />
7<br />
9<br />
1<br />
10<br />
11<br />
3<br />
12<br />
23<br />
22<br />
21<br />
20<br />
19<br />
4<br />
18<br />
17<br />
16<br />
15<br />
14<br />
13<br />
Figure 2. Turbocharger Disassembly.<br />
0026 00-3
TM 9-2815-225-34&P 0026 00<br />
TURBOCHARGER (Contd)<br />
CLEANING AND INSPECTION (Contd)<br />
7. Inspect turbocharger impeller blades (1) for cracks <strong>and</strong> chips.<br />
8. Inspect bearing housing (2) for cracks, chips, <strong>and</strong> scratches. Remove small scratches <strong>and</strong> chips<br />
from machined surfaces with crocus cloth.<br />
9. Measure bearing housing (2) from compressor housing stop to turbine housing stop at four equal<br />
locations. Minimum length is 2.986 in. (7.584 cm). Replace bearing housing (2) if distorted.<br />
10. Inspect turbine blades (3) for cracks <strong>and</strong> chips.<br />
11. Inspect wheel <strong>and</strong> shaft seal ring grooves (6) for small grooves, chips, or cracks. Remove small<br />
grooves with crocus cloth.<br />
12. Inspect wheel <strong>and</strong> shaft weld area (4) for chips, scratches, or cracks. Replace wheel <strong>and</strong> shaft (5)<br />
if three or more cracks are found, or if cracks exceed 0.375 in. (9.525 mm) in length, have a<br />
minimum distance of 0.250 in. (6.35 mm), or exceed 0.0625 in. (1.587 mm) in length on welded<br />
area (4) circumference.<br />
13. Using dial indicator, measure wheel <strong>and</strong> shaft (5) runout 1 in. (25.4 mm) from bearing surface of<br />
wheel <strong>and</strong> shaft (5). Wheel <strong>and</strong> shaft (5) maximum runout is 0.00005 in. (0.0127 mm). Discard<br />
wheel <strong>and</strong> shaft (5), if runout is exceeded.<br />
1<br />
Figure 3. Impeller Blade Inspection.<br />
0026 00-4
TM 9-2815-225-34&P 0026 00<br />
TURBOCHARGER (Contd)<br />
2<br />
2.986 in.<br />
(7.584 cm)<br />
Figure 4. Bearing Housing Measurement.<br />
3<br />
4<br />
5<br />
1 in.<br />
(25.4 mm)<br />
DIAL INDICATOR<br />
LOCATION<br />
6<br />
Figure 5. Wheel <strong>and</strong> Shaft Inspection.<br />
0026 00-5
TM 9-2815-225-34&P 0026 00<br />
TURBOCHARGER (Contd)<br />
ASSEMBLY<br />
1. Apply OE/HDO 30 lubricating oil to new bearing (16) <strong>and</strong> install in bearing housing (17).<br />
2. Bend edges of new bearing insert pad (15) over bearing housing (17). Apply OE/HDO 30<br />
lubricating oil to bearing insert pad (15) <strong>and</strong> install on bearing (16).<br />
3. Apply OE/HDO 30 lubricating oil to new ring seal (12) <strong>and</strong> install on new sleeve (11).<br />
4. Install new sleeve (11) <strong>and</strong> ring seal (12), with spiral grooves facing bearing, in new diffuser<br />
plate (13) until sleeve is flush with turbocharger impeller (1) end.<br />
5. Apply OE/HDO 30 lubricating oil to new O-ring (14) <strong>and</strong> install on diffuser plate (13).<br />
CAUTION<br />
Do not rotate diffuser plate after assembly. Any rotation will<br />
displace <strong>and</strong> damage bearing insert pad.<br />
NOTE<br />
Ensure bearing insert pad is centered during diffuser plate<br />
installation.<br />
6. Install diffuser plate (13) on bearing housing (17).<br />
7. Position new insulated packing (19) on bearing housing (17), with flat side of insulated<br />
packing (19) facing out.<br />
8. Align heat shield (20) locating tabs with depressions in bearing housing (17) <strong>and</strong> install heat<br />
shield (20) on bearing housing (17).<br />
NOTE<br />
New seals must be exp<strong>and</strong>ed slightly before installation. Do<br />
not overexp<strong>and</strong> seals or an improper fit on wheel <strong>and</strong> shaft<br />
may occur.<br />
9. Install two new seals (21) on wheel <strong>and</strong> shaft (22). Rotate seal gaps 90º apart.<br />
WARNING<br />
Turbine wheel machined edges are very sharp. Wear<br />
protective gloves when h<strong>and</strong>ling turbine wheel. Failure to do<br />
so may result in injury to personnel.<br />
10. Install wheel <strong>and</strong> shaft (22) in bearing housing (17). Ensure heat shield (20) <strong>and</strong> sleeve (11)<br />
remain in position.<br />
11. Using press, install turbocharger impeller (1) on wheel <strong>and</strong> shaft (22).<br />
12. Install new impeller locknut (2) on wheel <strong>and</strong> shaft (22). Tighten locknut (2) 20–24 lb-ft<br />
(27–32 N•m).<br />
13. Apply antiseize compound to turbine housing (23). Align mark (7) made on turbine housing (23)<br />
to mark (7) on bearing housing (17). Install turbine housing (23) on bearing housing (17).<br />
14. Apply antiseize compound on impeller housing (6). Align mark (7) made on impeller housing (6)<br />
to mark (7) on bearing housing (17). Install impeller housing (6) on bearing housing (17).<br />
15. Install V-b<strong>and</strong> clamp (5) on impeller housing (6), bearing housing (17), <strong>and</strong> turbine housing (23)<br />
with two new screws (9), four washers (3) <strong>and</strong> (8), <strong>and</strong> two new locknuts (4). Tighten locknuts (4)<br />
58–68 lb-in. (6.6–7.7 N•m).<br />
16. Apply antiseize compound to two adapters (10) <strong>and</strong> (18) <strong>and</strong> install on bearing housing (17).<br />
Tighten adapter (10) 20–25 lb-ft (27–34 N•m). Tighten adapter (18) 50 lb-ft (68 N•m).<br />
17. Using feeler gauge, measure clearance between turbine housing (23) <strong>and</strong> V-b<strong>and</strong> clamp (5).<br />
Minimum clearance is 0.035 in. (0.889 mm). Loosen V-b<strong>and</strong> clamp (5) <strong>and</strong> adjust turbine housing<br />
(23) as necessary to obtain correct clearance.<br />
18. Using feeler gauge, measure clearance between impeller (1) <strong>and</strong> inside of impeller housing (6).<br />
Minimum clearance is 0.006–0.025 in. (0.152–0.635 mm). Loosen V-b<strong>and</strong> clamp (5) <strong>and</strong> adjust<br />
impeller housing (6) as necessary to obtain correct clearance.<br />
0026 00-6
TM 9-2815-225-34&P 0026 00<br />
TURBOCHARGER (Contd)<br />
ASSEMBLY (Contd)<br />
19. Using feeler gauge, measure clearance between wheel <strong>and</strong> shaft (22) <strong>and</strong> turbine housing (23).<br />
Minimum clearance is 0.005–0.043 in. (0.127–0.092 mm). Loosen V-b<strong>and</strong> clamp (5) <strong>and</strong> turbine<br />
housing (23) as necessary to obtain correct clearance.<br />
20. Using dial indicator, measure wheel <strong>and</strong> shaft (22) end play. Wheel <strong>and</strong> shaft (22) end play must<br />
be within 0.006–0.0018 in. (0.152–0.457 mm). Loosen <strong>and</strong> retighten impeller locknut (2) until<br />
correct endplay is obtained.<br />
21. For installation of turbocharger, refer to WP 0046 00.<br />
1<br />
2 4<br />
3<br />
5<br />
6<br />
8<br />
9<br />
7<br />
23<br />
7<br />
22<br />
10<br />
21<br />
20<br />
19<br />
7<br />
18 17<br />
16<br />
15<br />
14<br />
13<br />
12<br />
11<br />
Figure 6. Turbocharger Assembly.<br />
END OF WORK PACKAGE<br />
0026 00-7/8 blank
TM 9-2815-225-34&P 0027 00<br />
DIRECT SUPPORT AND GENERAL SUPPORT<br />
MAINTENANCE MANUAL<br />
INCLUDING REPAIR PARTS AND SPECIAL TOOLS LIST (RPSTL)<br />
FOR<br />
M915, M915A1, M915A4, M916, M920 VEHICLES<br />
NSN 2815-01-082-8125 P/N NTC400-3652-02 CUMMINS NTC-400 BIG CAM I DIESEL ENGINE<br />
W/CONTAINER<br />
NSN 2815-01-142-2745 P/N 11669835 CUMMINS NTC-400 BIG CAM III DIESEL ENGINE<br />
W/CONTAINER<br />
TURBOCHARGER HT-3B<br />
DISASSEMBLY, CLEANING AND INSPECTION, ASSEMBLY<br />
INITIAL SETUP:<br />
Tools <strong>and</strong> Special Tools<br />
General mechanic’s tool kit:<br />
automotive (Item 1, WP 0061 00)<br />
Maintenance <strong>and</strong> repair shop equipment:<br />
automotive (Item 2, WP 0061 00)<br />
Automotive <strong>maintenance</strong> <strong>and</strong> repair<br />
supplemental set no. 2 (Item 3, WP 0061 00)<br />
Turbocharger mounting plate<br />
(Item 19, WP 0061 00)<br />
Ball joint vise (Item 9, WP 0061 00)<br />
Materials/Parts<br />
Four retaining rings<br />
(Item 1, Table 11, WP 0062 00)<br />
Two seal rings (Item 2, Table 11, WP 0062 00)<br />
Seal (Item 3, Table 11, WP 0062 00)<br />
Two sleeve bearings<br />
(Item 4, Table 11, WP 0062 00)<br />
Thrust collar (Item 5, Table 11, WP 0062 00)<br />
Locknut (Item 6, Table 11, WP 0062 00)<br />
Ten lockwashers<br />
(Item 7, Table 11, WP 0062 00)<br />
Retaining ring (Item 8, Table 11, WP 0062 00)<br />
Oil seal plate (Item 9, Table 11, WP 0062 00)<br />
Oil slinger (Item 10, Table 11, WP 0062 00)<br />
O-ring (Item 11, Table 11, WP 0062 00)<br />
Oil baffle (Item 12, Table 11, WP 0062 00)<br />
Thrust bearing<br />
(Item 13, Table 11, WP 0062 00)<br />
Seal ring (Item 14, Table 11, WP 0062 00)<br />
Materials/Parts (Contd)<br />
Sleeve bushing<br />
(Item 15, Table 11, WP 0062 00)<br />
Lubricating oil OE/HDO 10<br />
(Item 19, WP 0060 00)<br />
Antiseize compound (Item 7, WP 0060 00)<br />
Crocus cloth (Item 4, WP 0060 00)<br />
Equipment Condition<br />
Turbocharger HT-3B removed from engine<br />
(WP 0009 00).<br />
0027 00-1
TM 9-2815-225-34&P 0027 00<br />
TURBOCHARGER HT-3B (Contd)<br />
DISASSEMBLY<br />
1. Install turbocharger HT-3B assembly (1) on turbocharger mounting plate <strong>and</strong> ball joint vise with<br />
two bolts (2).<br />
2. Scribe a locating mark (6) on impeller housing (3), bearing housing (4), <strong>and</strong> turbine housing (5) to<br />
aid in assembly.<br />
CAUTION<br />
Use care when removing impeller housing from bearing<br />
housing. Impeller blades can be easily damaged.<br />
3. Remove ten screws (20), lockwashers (21), two clamping plates (22), <strong>and</strong> impeller housing (3) from<br />
bearing housing (4). Discard lockwashers (21).<br />
CAUTION<br />
Use care when removing turbine housing from bearing housing.<br />
Turbine blades can be easily damaged.<br />
4. Remove nut (15), V-b<strong>and</strong> clamp (14), <strong>and</strong> turbine housing (5) from bearing housing (4).<br />
5. Remove locknut (23) <strong>and</strong> impeller (24) from wheel <strong>and</strong> shaft (7). Discard locknut (23).<br />
6. Remove wheel <strong>and</strong> shaft (7) from bearing housing (4).<br />
7. Remove two seal rings (8) from wheel <strong>and</strong> shaft (7). Discard seal rings (8).<br />
8. Remove retaining ring (25) <strong>and</strong> oil seal plate (26) from bearing housing (4). Discard retaining<br />
ring (25).<br />
9. Remove O-ring (29) from oil seal plate (26). Discard O-ring (29) <strong>and</strong> oil seal plate (26).<br />
10. Remove oil slinger (28) <strong>and</strong> seal ring (27) from bearing housing (4). Discard oil slinger (28) <strong>and</strong><br />
seal ring (27)<br />
11. Remove oil baffle (30), thrust bearing (31), thrust collar (19), <strong>and</strong> two dowel pins (16) from bearing<br />
housing (4). Discard oil baffle (30), thrust bearing (31), <strong>and</strong> thrust collar (19).<br />
12. Remove two retaining rings (17) <strong>and</strong> sleeve bearing (18) from bearing housing (4). Discard sleeve<br />
bearings (18) <strong>and</strong> retaining rings (17).<br />
13. Remove seal (9) <strong>and</strong> heat shield (10) from bearing housing (4). Discard seal (9).<br />
14. Remove two retaining rings (11), sleeve bushing (12), <strong>and</strong> sleeve bearing (13) from bearing<br />
housing (4). Discard sleeve bushing (12), sleeve bearing (13), <strong>and</strong> retaining rings (11).<br />
1<br />
2<br />
BALL JOINT VISE<br />
TURBOCHARGER MOUNTING PLATE<br />
Figure 1. Mounting Turbocharger on St<strong>and</strong>.<br />
0027 00-2
11<br />
11<br />
TM 9-2815-225-34&P 0027 00<br />
TURBOCHARGER HT-3B (Contd)<br />
3<br />
4<br />
5<br />
6 6 6<br />
Figure 2. Turbocharger HT-3B Locating Marks.<br />
5<br />
7<br />
8<br />
9 10<br />
12 13<br />
18<br />
14<br />
4<br />
15<br />
17<br />
16<br />
17 19<br />
31<br />
30<br />
29<br />
28<br />
27<br />
26<br />
20<br />
21<br />
25<br />
24<br />
23<br />
22<br />
3<br />
Figure 3. Turbocharger HT-3B Disassembly.<br />
0027 00-3
TM 9-2815-225-34&P 0027 00<br />
TURBOCHARGER HT-3B (Contd)<br />
CLEANING AND INSPECTION<br />
1. For <strong>general</strong> parts cleaning information, refer to CLEANING, WP 0051 00.<br />
2. For <strong>general</strong> parts inspection information, refer to INSPECTION, WP 0051 00.<br />
NOTE<br />
Replace any part that does not pass visual inspection or is<br />
outside specified wear limits.<br />
3. Inspect impeller housing (5) <strong>and</strong> turbine housing (1) for cracks, chips, <strong>and</strong> scratches. Use crocus<br />
cloth to remove small scratches <strong>and</strong> chips from machined surfaces.<br />
4. Inspect impeller (6) <strong>and</strong> wheel <strong>and</strong> shaft (2) vanes for cracks <strong>and</strong> chips.<br />
5. Inspect two dowel pins (4) for cracks, chips, <strong>and</strong> bends.<br />
6. Inspect V-b<strong>and</strong> clamp (11) for cracks, chips, bends, or separation.<br />
7. Inspect heat shield (3) for cracks <strong>and</strong> chips.<br />
8. Using a straightedge, inspect heat shield (3) for straightness <strong>and</strong> warpage. Discard heat shield (3)<br />
if warped.<br />
9. Inspect oil seal plate (7) for cracks, chips or galled bore.<br />
10. Inspect bearing housing (10) for cracks, chips, <strong>and</strong> scratches.<br />
11. Inspect bearing housing (10) for notches in dome area. Discard if notches are found.<br />
12. Using inside micrometer, measure bearing housing (10) bore inside diameter. Replace bearing<br />
housing (10) if inside diameter is more than 0.876 in. (22.268 mm).<br />
13. Using feeler gauge, insert outside edge of feeler gauge <strong>and</strong> new seal ring (13) in wheel <strong>and</strong> shaft<br />
(2) seal ring grooves. Replace wheel <strong>and</strong> shaft (2) if seal ring clearance is more than 0.0005 in.<br />
(0.13 mm).<br />
14. Using micrometer, measure wheel <strong>and</strong> shaft (2) bearing area outside diameter. Replace wheel <strong>and</strong><br />
shaft (2) if bearing area outside diameter is less than 0.5611 in. (14.252 mm).<br />
15. Using micrometer, measure thrust collar (9) thickness. Replace thrust collar (9) if thickness is less<br />
than 0.0980 in. (2.489 mm).<br />
16. Using feeler gauge, insert outside edge of feeler gauge <strong>and</strong> new seal ring (12) in oil slinger (8) seal<br />
ring groove. Replace oil slinger (8) if seal ring clearance is more than 0.0005 in. (0.13 mm).<br />
0027 00-4
TM 9-2815-225-34&P 0027 00<br />
TURBOCHARGER HT-3B (Contd)<br />
MICROMETER<br />
2<br />
1<br />
9<br />
MICROMETER<br />
2<br />
3<br />
13<br />
5<br />
FEELER<br />
GAUGE<br />
11<br />
4<br />
2<br />
12<br />
10<br />
9<br />
8<br />
INSIDE<br />
MICROMETER<br />
7<br />
6<br />
8 FEELER<br />
GAUGE<br />
10<br />
Figure 4. Turbocharger HT-3B Inspection.<br />
Figure 5. Turbocharger HT-3B Measurements.<br />
0027 00-5
TM 9-2815-225-34&P 0027 00<br />
TURBOCHARGER HT-3B (Contd)<br />
ASSEMBLY<br />
CAUTION<br />
Retaining rings must be installed with beveled edge facing<br />
bearing. Excessive bearing wear can result if retaining rings<br />
are installed incorrectly.<br />
NOTE<br />
Apply lubricating oil to all internal parts before assembly.<br />
1. Install two new retaining rings (7), new sleeve bearing (9), <strong>and</strong> new sleeve bushing (8) in bearing<br />
housing (11).<br />
2. Install heat shield (6) <strong>and</strong> new seal ring (5) in bearing housing (11).<br />
3. Install two new retaining rings (13) <strong>and</strong> new sleeve bearing (14) in bearing housing (11).<br />
4. Install two dowel pins (12), new thrust collar (15), <strong>and</strong> new thrust bearing (28) in bearing<br />
housing (11).<br />
5. Position new oil baffle (27) in bearing housing (11).<br />
6. Install new seal ring (24) on new oil slinger (25), <strong>and</strong> install new O-ring (26) on new oil seal<br />
plate (23).<br />
7. Install oil slinger (25), oil seal plate (23), <strong>and</strong> new retaining ring (22) in bearing housing (11).<br />
8. Install two new seal rings (4) on wheel <strong>and</strong> shaft (3).<br />
9. Install wheel <strong>and</strong> shaft (3) in bearing housing (11) heat shield (6) side.<br />
10. Install impeller (21) <strong>and</strong> new locknut (20) on wheel <strong>and</strong> shaft (3). Tighten locknut (20) 30 lb-ft<br />
(41 N•m).<br />
11. Apply antiseize compound to threads on V-b<strong>and</strong> clamp (10) <strong>and</strong> to mating surfaces of turbine<br />
housing (1) <strong>and</strong> bearing housing (11).<br />
12. Position V-b<strong>and</strong> clamp (10) on bearing housing (11).<br />
CAUTION<br />
Use care when installing turbine housing on bearing housing.<br />
Turbine blades can be easily damaged.<br />
13. Align scribe mark (2) on turbine housing (1) with scribe mark (2) on bearing housing (11). Install<br />
turbine housing (1) on bearing housing (11) with V-b<strong>and</strong> clamp (10) <strong>and</strong> nut (29). Tighten nut (29)<br />
10 lb-ft (13.6 N•m).<br />
CAUTION<br />
Use care when installing impeller housing on bearing housing.<br />
impeller blades can be easily damaged.<br />
14. Align scribe mark (2) on impeller housing (18) with scribe mark (2) on bearing housing (11).<br />
Install impeller housing (18) on bearing housing (11) with two clamping plates (19), ten new<br />
lockwashers (17), <strong>and</strong> screws (16). Tighten screws (16) 5 lb-ft (6.8 N•m).<br />
NOTE<br />
Turbine blade-to-turbine housing measurement area shown.<br />
Impeller blade-to-impeller housing measurement similar.<br />
15. Using feeler gauge, check turbine blade (30)-to-turbine housing (2) clearance. Minimum clearance<br />
allowed is 0.008 in. (0.20 mm).<br />
0027 00-6
TM 9-2815-225-34&P 0027 00<br />
TURBOCHARGER HT-3B (Contd)<br />
ASSEMBLY (Contd)<br />
16. Using feeler gauge, check impeller (19)-to-impeller housing (18) clearance. Minimum clearance<br />
allowed is 0.006 in. (0.15 mm).<br />
17. Using dial indicator, check wheel <strong>and</strong> shaft (3) end play. Wheel <strong>and</strong> shaft (3) end play should be<br />
0.001–0.004 in. (0.254–0.1 mm).<br />
18. Remove two bolts (31), turbocharger mounting plate, <strong>and</strong> turbocharger HT-3B from ball joint vise.<br />
19. For turbocharger HT-3B installation, refer to WP 0046 00.<br />
2<br />
1<br />
2<br />
3<br />
4<br />
FEELER<br />
GAUGE<br />
5 6<br />
7<br />
8<br />
9<br />
7 10<br />
29<br />
2<br />
11<br />
30<br />
13<br />
12<br />
14<br />
13 15<br />
DIAL<br />
INDICATOR<br />
28<br />
27<br />
26<br />
25<br />
24<br />
23<br />
16<br />
17<br />
18<br />
31<br />
22<br />
21<br />
20<br />
3<br />
19<br />
Figure 6. Turbocharger HT-3B Assembly.<br />
2<br />
BALL JOINT VISE<br />
MOUNTING PLATE<br />
Figure 7.<br />
Turbocharger HT-3B Assembly.<br />
END OF WORK PACKAGE<br />
0027 00-7/8 blank
TM 9-2815-225-34&P 0028 00<br />
DIRECT SUPPORT AND GENERAL SUPPORT<br />
MAINTENANCE MANUAL<br />
INCLUDING REPAIR PARTS AND SPECIAL TOOLS LIST (RPSTL)<br />
FOR<br />
M915, M915A1, M915A4, M916, M920 VEHICLES<br />
NSN 2815-01-082-8125 P/N NTC400-3652-02 CUMMINS NTC-400 BIG CAM I DIESEL ENGINE<br />
W/CONTAINER<br />
NSN 2815-01-142-2745 P/N 11669835 CUMMINS NTC-400 BIG CAM III DIESEL ENGINE<br />
W/CONTAINER<br />
FRONT GEAR COVER<br />
DISASSEMBLY, CLEANING AND INSPECTION, ASSEMBLY<br />
INITIAL SETUP:<br />
Tools <strong>and</strong> Special Tools<br />
General mechanic’s tool kit: automotive<br />
(Item 1, WP 0061 00)<br />
Maintenance <strong>and</strong> repair shop equipment:<br />
automotive (Item 2, WP 0061 00)<br />
Automotive <strong>maintenance</strong> <strong>and</strong> repair<br />
supplemental set no. 2 (Item 3, WP 0061 00)<br />
Puller/installer (Item 33, WP 0061 00)<br />
M<strong>and</strong>rel (Item 39, WP 0061 00)<br />
Oil seal exp<strong>and</strong>er<br />
(Item 29, WP 0061 00)<br />
Press<br />
Equipment Condition<br />
Front gear cover removed from engine<br />
(WP 0012 00).<br />
Materials/Parts<br />
Pipe sealant (Item 25, WP 0060 00)<br />
Oil seal (Item 1, Table 12, WP 0062 00)<br />
Crankshaft oil seal<br />
(Item 2, Table 12, WP 0062 00)<br />
O-ring (Item 3, Table 12, WP 0062 00)<br />
Sleeve bushing (Item 4, Table 12, WP 0062 00)<br />
0028 00-1
TM 9-2815-225-34&P 0028 00<br />
FRONT GEAR COVER (Contd)<br />
DISASSEMBLY<br />
1. Using puller/installer, remove accessory drive oil seal (5) from front gear cover (7). Discard oil<br />
seal (5).<br />
2. Using puller/installer, remove crankshaft oil seal (9) from front gear cover (7). Discard crankshaft<br />
oil seal (9).<br />
NOTE<br />
Do not discard shims. Leave shims in order of removal to aid<br />
in assembly.<br />
3. Remove three screws (1), camshaft <strong>support</strong> (2), <strong>and</strong> shims (3) from front gear cover (7).<br />
4. Remove O-ring (4) from camshaft <strong>support</strong> (2). Discard O-ring (4).<br />
5. Remove three threaded plugs (8) from front gear cover (7).<br />
6. Using m<strong>and</strong>rel <strong>and</strong> press, remove sleeve bushing (6) from front gear cover (7). Discard sleeve<br />
bushing (6).<br />
CLEANING AND INSPECTION<br />
1. For <strong>general</strong> parts cleaning information, refer to CLEANING, WP 0051 00.<br />
2. For <strong>general</strong> parts inspection information, refer to INSPECTION, WP 0051 00.<br />
NOTE<br />
Replace any part that does not pass visual inspection or is<br />
outside specified wear limits.<br />
3. Using inside micrometer, measure inside diameter of camshaft <strong>support</strong> (2). Maximum inside<br />
diameter is 1.757 in. (4.46 cm).<br />
4. Inspect camshaft <strong>support</strong> (2) for cracks, scoring, or pitting.<br />
5. Inspect front gear cover (7) for cracks, distortion, stripped or elongated bolt holes, or stripped<br />
holes. Repair any stripped holes.<br />
0028 00-2
TM 9-2815-225-34&P 0028 00<br />
FRONT GEAR COVER (Contd)<br />
5<br />
6<br />
3<br />
4<br />
2<br />
1<br />
7<br />
8<br />
9<br />
8<br />
8<br />
Figure 1. Front Gear Cover Disassembly.<br />
0028 00-3
TM 9-2815-225-34&P 0028 00<br />
FRONT GEAR COVER (Contd)<br />
ASSEMBLY<br />
CAUTION<br />
All surfaces in contact with oil seals must be completely free<br />
of oil. Oil on a teflon seal will destroy its sealing properties.<br />
1. Align oil holes in new sleeve bushing (6) with oil holes in front gear cover (7).<br />
2. Using m<strong>and</strong>rel <strong>and</strong> press, install sleeve bushing (6) in front gear cover (7).<br />
3. Apply pipe sealant to three threaded plugs (8) <strong>and</strong> install in front gear cover (7).<br />
4. Install new O-ring (4) on camshaft <strong>support</strong> (2).<br />
5. Install shims (3) <strong>and</strong> camshaft <strong>support</strong> (2) on front gear cover (7) with three screws (1). Tighten<br />
screws (1) 25 lb-ft (34 N•m).<br />
6. Using puller/installer <strong>and</strong> oil seal exp<strong>and</strong>er, install new crankshaft oil seal (9) in front gear<br />
cover (7).<br />
7. Using puller/installer, install new accessory drive oil seal (5) in front gear cover (7). Ensure oil<br />
seal (5) is flush with edge of front gear cover (7).<br />
8. Install front gear cover on engine (WP 0042 00).<br />
5<br />
6<br />
3<br />
4<br />
2<br />
1<br />
7<br />
8<br />
9<br />
8 8<br />
Figure 2. Front Gear Cover Assembly.<br />
END OF WORK PACKAGE<br />
0028 00-4
TM 9-2815-225-34&P 0029 00<br />
DIRECT SUPPORT AND GENERAL SUPPORT<br />
MAINTENANCE MANUAL<br />
INCLUDING REPAIR PARTS AND SPECIAL TOOLS LIST (RPSTL)<br />
FOR<br />
M915, M915A1, M915A4, M916, M920 VEHICLES<br />
NSN 2815-01-082-8125 P/N NTC400-3652-02 CUMMINS NTC-400 BIG CAM I DIESEL ENGINE<br />
W/CONTAINER<br />
NSN 2815-01-142-2745 P/N 11669835 CUMMINS NTC-400 BIG CAM III DIESEL ENGINE<br />
W/CONTAINER<br />
ACCESSORY DRIVE AND ACCESSORY DRIVE PULLEY<br />
DISASSEMBLY, CLEANING AND INSPECTION, ASSEMBLY<br />
INITIAL SETUP:<br />
Tools <strong>and</strong> Special Tools<br />
General mechanic’s tool kit: automotive<br />
(Item 1, WP 0061 00)<br />
Maintenance <strong>and</strong> repair shop equipment:<br />
automotive (Item 2, WP 0061 00)<br />
Automotive <strong>maintenance</strong> <strong>and</strong> repair<br />
supplemental set no. 2 (Item 3, WP 0061 00)<br />
Press<br />
M<strong>and</strong>rel (Item 39, WP 0061 00)<br />
Equipment Condition<br />
Accessory drive <strong>and</strong> accessory drive pulley<br />
removed from engine (WP 0010 00).<br />
Materials/Parts<br />
Lubricating oil (Item 19, WP 0060 00)<br />
Pipe sealant (Item 25, WP 0060 00)<br />
Sleeve (Item 1, Table 13, WP 0062 00)<br />
Thrust bearing (Item 2, Table 13, WP 0062 00)<br />
Thrust bearing (Item 3, Table 13, WP 0062 00)<br />
Bushing (Item 4, Table 13, WP 0062 00)<br />
0029 00-1
TM 9-2815-225-34&P 0029 00<br />
ACCESSORY DRIVE AND ACCESSORY DRIVE PULLEY (Contd)<br />
DISASSEMBLY<br />
1. Using 3/8 in. (9.525 mm) cold chisel, split <strong>and</strong> remove sleeve (2) from accessory drive pulley (1).<br />
Discard sleeve (2).<br />
2. Remove screw (12) <strong>and</strong> washer (11) from accessory drive shaft (5).<br />
CAUTION<br />
Install screw in accessory drive shaft when using puller.<br />
Failure to do so may result in damage to accessory drive<br />
shaft.<br />
3. Install screw (12) in accessory drive shaft (5). Using puller, remove spline coupling hub (10) from<br />
accessory drive shaft (5). Remove screw (12) from accessory drive shaft (5).<br />
4. Remove washer (9) <strong>and</strong> thrust bearing (8) from accessory drive shaft (5). Discard thrust<br />
bearing (8).<br />
5. Remove accessory drive shaft (5), with accessory drive gear (3) attached, from accessory drive<br />
housing (6).<br />
6. Using press <strong>and</strong> m<strong>and</strong>rel, remove accessory drive gear (3) <strong>and</strong> thrust bearing (4) from accessory<br />
drive shaft (5). Discard thrust bearing (4).<br />
7. Remove two dowel pins (14) from accessory drive shaft (5).<br />
8. Using press <strong>and</strong> m<strong>and</strong>rel, remove bushing (7) from accessory drive housing (6). Discard<br />
bushing (7).<br />
9. Remove threaded plug (13) from accessory drive housing (6).<br />
CLEANING AND INSPECTION<br />
1. For <strong>general</strong> parts cleaning information, refer to CLEANING, WP 0051 00.<br />
2. For <strong>general</strong> parts inspection information, refer to INSPECTION, WP 0051 00.<br />
NOTE<br />
Replace any part that does not pass visual inspection or is<br />
outside specified wear limits.<br />
3. Inspect front accessory drive pulley (15) <strong>and</strong> accessory drive pulley (1) for cracks <strong>and</strong> chips in<br />
hub, worn grooves, <strong>and</strong> distorted thread holes.<br />
4. Inspect accessory drive housing (6) for cracks, stripped threads, or damaged holes. Repair any<br />
damaged threads.<br />
5. Inspect accessory drive gear (3) <strong>and</strong> spline coupling hub (10) for cracks, chipped or stripped teeth,<br />
<strong>and</strong> uneven wear.<br />
6. Using a micrometer or equivalent, measure accessory drive shaft bushing surface outer<br />
dimension (16). Discard accessory drive shaft (5) if accessory drive shaft bushing surface outer<br />
dimension (16) is less than 1.310 in. (3.327 cm).<br />
7. Inspect accessory drive shaft (5) for elongated dowel pin holes <strong>and</strong> stripped threads. Repair all<br />
damaged threads.<br />
8. Inspect two dowel pins (14) for cracks, chips, <strong>and</strong> distortion.<br />
0029 00-2
TM 9-2815-225-34&P 0029 00<br />
ACCESSORY DRIVE AND ACCESSORY DRIVE PULLEY (Contd)<br />
1<br />
2<br />
Figure 1. Accessory Drive Sleeve Removal.<br />
6<br />
7<br />
8<br />
9<br />
10<br />
11<br />
12<br />
3<br />
4<br />
5<br />
13<br />
14<br />
Figure 2. Accessory Drive Disassembly.<br />
6<br />
5<br />
16<br />
10<br />
1<br />
3<br />
15<br />
14<br />
Figure 3. Accessory Drive Cleaning <strong>and</strong> Inspection.<br />
0029 00-3
TM 9-2815-225-34&P 0029 00<br />
ACCESSORY DRIVE AND ACCESSORY DRIVE PULLEY (Contd)<br />
ASSEMBLY<br />
NOTE<br />
Lubricate all parts with lubricating oil before assembly.<br />
1. Apply pipe sealant to threaded plug (11) <strong>and</strong> install threaded plug (11) in accessory drive<br />
housing (4).<br />
NOTE<br />
Ensure oil holes in bushing are aligned with oil hole in<br />
accessory drive housing before installing bushing.<br />
2. Using press <strong>and</strong> m<strong>and</strong>rel, install new bushing (5) in accessory drive housing (4).<br />
3. Install two dowel pins (12) in accessory drive shaft (3).<br />
4. Install new thrust bearing (2) on accessory drive shaft (3).<br />
5. Using press <strong>and</strong> m<strong>and</strong>rel, install accessory drive gear (1) on accessory drive shaft (3).<br />
6. Install accessory drive shaft (3), with accessory drive gear (1) attached, in accessory drive<br />
housing (4).<br />
NOTE<br />
Ensure grooved side of thrust bearing faces away from<br />
housing during installation.<br />
7. Install new thrust bearing (6) <strong>and</strong> washer (7) on accessory drive shaft (3).<br />
8. Using press <strong>and</strong> m<strong>and</strong>rel, install spline coupling hub (8) on accessory drive shaft (3).<br />
9. Using feeler gauge, measure clearance between accessory drive gear (1) <strong>and</strong> accessory drive<br />
housing (4). Allowable clearance is 0.002–0.012 in. (0.051–0.305 mm).<br />
10. Install washer (9) <strong>and</strong> screw (10) in accessory drive shaft (3). Tighten screw (10) 30–35 lb-ft<br />
(41–48 N•m).<br />
11. Using press <strong>and</strong> m<strong>and</strong>rel, install new sleeve (14) in accessory drive pulley (13) 0.015 in.<br />
(0.381 mm) below face of accessory drive pulley (13), with chamfered end away from accessory<br />
drive pulley (13).<br />
12. For installation of accessory drive <strong>and</strong> accessory drive pulley, refer to WP 0042 00.<br />
0029 00-4
TM 9-2815-225-34&P 0029 00<br />
ACCESSORY DRIVE AND ACCESSORY DRIVE PULLEY (Contd)<br />
4<br />
5<br />
6<br />
7 8 9 10<br />
3<br />
1<br />
2<br />
11<br />
12<br />
Figure 4. Accessory Drive Assembly.<br />
13<br />
14<br />
Figure 5. Accessory Drive Sleeve Installation.<br />
END OF WORK PACKAGE<br />
0029 00-5/6 blank
TM 9-2815-225-34&P 0030 00<br />
DIRECT SUPPORT AND GENERAL SUPPORT<br />
MAINTENANCE MANUAL<br />
INCLUDING REPAIR PARTS AND SPECIAL TOOLS LIST (RPSTL)<br />
FOR<br />
M915, M915A1, M915A4, M916, M920 VEHICLES<br />
NSN 2815-01-082-8125 P/N NTC400-3652-02 CUMMINS NTC-400 BIG CAM I DIESEL ENGINE<br />
W/CONTAINER<br />
NSN 2815-01-142-2745 P/N 11669835 CUMMINS NTC-400 BIG CAM III DIESEL ENGINE<br />
W/CONTAINER<br />
ENGINE RETARDER<br />
DISASSEMBLY, CLEANING AND INSPECTION, ASSEMBLY<br />
INITIAL SETUP:<br />
Tools <strong>and</strong> Special Tools<br />
General mechanic’s tool kit:<br />
automotive (Item 1, WP 0061 00)<br />
Maintenance <strong>and</strong> repair shop equipment:<br />
automotive (Item 2, WP 0061 00)<br />
Automotive <strong>maintenance</strong> <strong>and</strong> repair<br />
supplemental set no. 2 (Item 3, WP 0061 00)<br />
Solenoid valve wrench (Item 6, WP 0061 00)<br />
C-clamp (Item 7, WP 0061 00)<br />
Equipment Condition<br />
Engine brake retarder removed from engine<br />
(WP 0011 00).<br />
Materials/Parts<br />
OE/HDO 10 lubricating oil<br />
(Item 19, WP 0060 00)<br />
Six outer control valve springs<br />
(Item 1, Table 14, WP 0062 00)<br />
Six inner control valve springs<br />
(Item 2, Table 14, WP 0062 00)<br />
Six upper seal rings<br />
(Item 3, Table 14, WP 0062 00)<br />
Six center seal rings<br />
(Item 4, Table 14, WP 0062 00)<br />
Six lower seal rings<br />
(Item 5, Table 14, WP 0062 00)<br />
Six slave piston springs<br />
(Item 6, Table 14, WP 0062 00)<br />
Six master piston springs<br />
(Item 7, Table 14, WP 0062 00)<br />
Six locknuts (Item 8, Table 14, WP 0062 00)<br />
0030 00-1
TM 9-2815-225-34&P 0030 00<br />
ENGINE RETARDER (Contd)<br />
DISASSEMBLY<br />
WARNING<br />
Control valve cover is under control valve outer spring<br />
pressure. Hold cover securely when removing screws. Failure<br />
to comply may cause injury to personnel.<br />
1. Remove two screws (5) <strong>and</strong> control valve covers (4) from brake housing (13).<br />
2. Remove two outer control valve springs (2) <strong>and</strong> two inner control valve springs (3) from brake<br />
housing (13). Discard outer control valve springs (2) <strong>and</strong> inner control valve springs springs (3).<br />
3. Remove two control valves (1) from brake housing (13).<br />
4. Disconnect electrical harness (7) from solenoid valve (6).<br />
5. Using solenoid valve wrench, remove solenoid valve (6) from brake housing (13).<br />
6. Remove lower seal ring (10), center seal ring (9), <strong>and</strong> upper seal ring (8) from solenoid valve (6).<br />
Discard seal rings (10), (9), <strong>and</strong> (8).<br />
7. Remove two screws (17), washers (16), master piston springs (15), <strong>and</strong> master pistons (18) from<br />
brake housing (13). Discard springs (15).<br />
8. Remove two locknuts (11) from setscrews (12) <strong>and</strong> brake housing (13). Discard locknuts (11).<br />
9. Remove two setscrews (12) from brake housing (13).<br />
WARNING<br />
Slave piston spring is highly compressed. Be extremely<br />
careful during disassembly. Personal injury can occur if<br />
spring force is not controlled.<br />
NOTE<br />
Perform steps 10 <strong>and</strong> 11 to remove two slave piston<br />
assemblies.<br />
10. Using a C-clamp <strong>and</strong> deep-welled socket, compress slave piston spring (20) <strong>and</strong> remove retaining<br />
ring (22) from brake housing (13). Slowly release slave piston spring (20) pressure <strong>and</strong> remove<br />
C-clamp <strong>and</strong> deep-welled socket.<br />
11. Remove slave piston retainer (21), slave piston spring (20), <strong>and</strong> slave piston (19) from brake<br />
housing (13). Discard spring (20).<br />
12. Remove electrical terminal (14) from brake housing (13).<br />
13. Repeat steps 1 through 12 for remaining two engine retarders.<br />
CLEANING AND INSPECTION<br />
1. For <strong>general</strong> parts cleaning information, refer to CLEANING, WP 0051 00.<br />
2. For <strong>general</strong> parts inspection information, refer to INSPECTION, WP 0051 00.<br />
NOTE<br />
Replace any part that does not pass visual inspection or is<br />
outside specified wear limits.<br />
3. Inspect slave piston retainers (21) for cracks, breaks, or bends.<br />
4. Inspect brake housing (13) for cracks, breaks, stripped threaded holes, <strong>and</strong> scores or scratches in<br />
piston bores. Repair any stripped threaded holes.<br />
5. Ensure control valves (1), master pistons (18), <strong>and</strong> slave pistons (19) move freely in the bores.<br />
Replace control valves (1), master pistons (18), or slave pistons (19) if any binding occurs.<br />
0030 00-2
TM 9-2815-225-34&P 0030 00<br />
ENGINE RETARDER (Contd)<br />
5<br />
6<br />
7<br />
4<br />
3<br />
2<br />
1<br />
9<br />
8<br />
10<br />
12<br />
11<br />
14<br />
13<br />
22<br />
18<br />
19<br />
20<br />
21<br />
17<br />
16<br />
15<br />
Figure 1. Engine Retarder Disassembly.<br />
0030 00-3
TM 9-2815-225-34&P 0030 00<br />
ENGINE RETARDER (Contd)<br />
ASSEMBLY<br />
NOTE<br />
Lubricate all parts with OE/HDO 10 lubricating oil before<br />
assembly.<br />
1. Install electrical terminal (14) in brake housing (13).<br />
NOTE<br />
Perform steps 2 <strong>and</strong> 3 to install two slave piston assemblies.<br />
2. Install slave piston (19), new slave piston spring (20), <strong>and</strong> slave piston retainer (21) in brake<br />
housing (13).<br />
WARNING<br />
Slave piston spring is highly compressed. Be extremely<br />
careful during assembly. Personal injury can occur if spring<br />
force is not controlled.<br />
3. Using a C-clamp <strong>and</strong> deep-welled socket, compress slave piston spring (20) <strong>and</strong> install retaining<br />
ring (22) in brake housing (13). Slowly release slave piston spring (20) pressure <strong>and</strong> remove<br />
C-clamp <strong>and</strong> deep-welled socket.<br />
NOTE<br />
Setscrews <strong>and</strong> locknuts will be tightened during engine<br />
retarder installation.<br />
4. Install two setscrews (12) in brake housing (13). Do not tighten setscrews (12).<br />
5. Install two new locknuts (11) on setscrews (12). Do not tighten locknuts (11).<br />
6. Install two master pistons (18), new master piston springs (15), washers (16), <strong>and</strong> screws (17) in<br />
brake housing (13).<br />
7. Apply OE/HDO 10 lubricating oil on new upper seal ring (8), new center seal ring (9), <strong>and</strong> new<br />
lower seal ring (10), <strong>and</strong> install on solenoid valve (6).<br />
8. Using solenoid valve wrench, install solenoid valve (6) in brake housing (13).<br />
9. Connect electrical harness (7) to solenoid valve (6).<br />
10. Install two control valves (1) in brake housing (13).<br />
11. Install two new inner control valve springs (3) <strong>and</strong> two new outer control valve springs (2) on top<br />
of control valve (1) in brake housing (13).<br />
WARNING<br />
Control valve cover is under control valve outer spring<br />
pressure. Hold cover securely when installing screws. Failure<br />
to comply may cause injury to personnel.<br />
12. Install control valve cover (4) on brake housing (13) with two screws (5).<br />
13. Repeat steps 1 through 12 for remaining two engine retarders.<br />
14. For engine retarder installation, refer to WP 0043 00.<br />
0030 00-4
TM 9-2815-225-34&P 0030 00<br />
ENGINE RETARDER (Contd)<br />
5<br />
6<br />
7<br />
4<br />
3<br />
2<br />
1<br />
9<br />
8<br />
10<br />
12<br />
11<br />
14<br />
13<br />
22<br />
18<br />
19<br />
20<br />
21<br />
17<br />
16<br />
15<br />
Figure 2. Engine Retarder Assembly.<br />
END OF WORK PACKAGE<br />
0030 00-5/6 blank
TM 9-2815-225-34&P 0031 00<br />
DIRECT SUPPORT AND GENERAL SUPPORT<br />
MAINTENANCE MANUAL<br />
INCLUDING REPAIR PARTS AND SPECIAL TOOLS LIST (RPSTL)<br />
FOR<br />
M915, M915A1, M915A4, M916, M920 VEHICLES<br />
NSN 2815-01-082-8125 P/N NTC400-3652-02 CUMMINS NTC-400 BIG CAM I DIESEL ENGINE<br />
W/CONTAINER<br />
NSN 2815-01-142-2745 P/N 11669835 CUMMINS NTC-400 BIG CAM III DIESEL ENGINE<br />
W/CONTAINER<br />
AIR COMPRESSOR<br />
DISASSEMBLY, CLEANING AND INSPECTION, ASSEMBLY<br />
INITIAL SETUP:<br />
Tools <strong>and</strong> Special Tools<br />
General mechanic’s tool kit:<br />
automotive (Item 1, WP 0061 00)<br />
Maintenance <strong>and</strong> repair shop equipment:<br />
automotive (Item 2, WP 0061 00)<br />
Automotive <strong>maintenance</strong> <strong>and</strong> repair<br />
supplemental set no. 2 (Item 3, WP 0061 00)<br />
Air compressor mounting plate<br />
(Item 34, WP 0061 00)<br />
Ball joint vise (Item 9, WP 0061 00)<br />
Half coupling puller (Item 35, WP 0061 00)<br />
Air compressor bushing m<strong>and</strong>rel<br />
(Item 36, WP 0061 00)<br />
Line bore gauge (Item 37, WP 0061 00)<br />
Press<br />
M<strong>and</strong>rel (Item 39, WP 0061 00)<br />
Materials/Parts<br />
Lubricating oil (Item 19, WP 0060 00)<br />
Antiseize compound (Item 7, WP 0060 00)<br />
Large O-ring (Item 1, Table 15, WP 0062 00)<br />
Small O-ring (Item 2, Table 15, WP 0062 00)<br />
Spring (Item 3, Table 15, WP 0062 00)<br />
Spring (Item 4, Table 15, WP 0062 00)<br />
Four lockwashers<br />
(Item 5, Table 15, WP 0062 00)<br />
Gasket (Item 6, Table 15, WP 0062 00)<br />
Gasket (Item 7, Table 15, WP 0062 00)<br />
Large O-ring (Item 8, Table 15, WP 0062 00)<br />
Materials/Parts (Contd)<br />
Small O-ring (Item 9, Table 15, WP 0062 00)<br />
Spring (Item 10, Table 15, WP 0062 00)<br />
Thrust bearing<br />
(Item 11, Table 15, WP 0062 00)<br />
Four lockwashers<br />
(Item 12, Table 15, WP 0062 00)<br />
Gasket (Item 13, Table 15, WP 0062 00)<br />
Two retaining rings<br />
(Item 14, Table 15, WP 0062 00)<br />
Piston ring (Item 15, Table 15, WP 0062 00)<br />
Piston ring (Item 16, Table 15, WP 0062 00)<br />
Piston ring (Item 17, Table 15, WP 0062 00)<br />
Bushing (Item 18, Table 15, WP 0062 00)<br />
Bearing (Item 19, Table 15, WP 0062 00)<br />
Cap (Item 20, Table 15, WP 0062 00)<br />
Equipment Condition<br />
Air compressor removed from engine<br />
(WP 0011 00).<br />
0031 00-1
TM 9-2815-225-34&P 0031 00<br />
AIR COMPRESSOR (Contd)<br />
DISASSEMBLY<br />
1. Install air compressor mounting plate on air compressor (1) with two bolts (2).<br />
2. Install air compressor (1) <strong>and</strong> air compressor mounting plate on ball joint vise with two bolts (3).<br />
3. Using half coupling puller, remove half coupling (4) from crankshaft (5).<br />
4. Remove two screws (8), two washers (7), valve body (6), cap (44), <strong>and</strong> spring (43) from cover (12).<br />
Discard cap (44) <strong>and</strong> spring (43).<br />
5. Remove large O-ring (46) <strong>and</strong> small O-ring (45) from valve body (6). Discard large O-ring (46) <strong>and</strong><br />
small O-ring (45).<br />
6. Remove seat (42), valve (41), <strong>and</strong> spring (40) from cylinder head (14). Discard spring (40).<br />
7. Remove four bolts (9), lockwashers (10), washers (11), cover (12), <strong>and</strong> gasket (13) from cylinder<br />
head (14). Discard lockwashers (10) <strong>and</strong> gasket (13).<br />
8. Remove cylinder head (14) <strong>and</strong> gasket (15) from cylinder housing (24). Discard gasket (15).<br />
9. Using press <strong>and</strong> m<strong>and</strong>rel, remove seat (38) from bottom of cylinder head (14).<br />
10. Remove large O-ring (39) <strong>and</strong> small O-ring (37) from seat (38). Discard large O-ring (39) <strong>and</strong><br />
small O-ring (37).<br />
NOTE<br />
Do not discard shim. Shim will be reused during installation.<br />
11. Remove disc (36), spring (35), <strong>and</strong> shim (34) from cylinder head (14). Discard spring (35).<br />
12. Remove two screws (22) <strong>and</strong> plate (23) from cylinder housing (24).<br />
13. Remove drive coupling (33) from crankshaft (5) if not previously removed.<br />
14. Remove thrust bearing (32) from crankshaft (5). Discard thrust bearing (32).<br />
15. Remove two screws (25) securing <strong>support</strong> (29) to cylinder housing (24).<br />
16. Remove four screws (31), lockwashers (30), <strong>support</strong> (29), <strong>and</strong> gasket (28) from cylinder housing<br />
(24). Discard lockwashers (30) <strong>and</strong> gasket (28).<br />
17. Rotate piston (20) 90° before or after top dead center.<br />
18. Rotate crankshaft (5) while pulling out <strong>and</strong> remove crankshaft (5) from connecting rod (21) <strong>and</strong><br />
cylinder housing (24).<br />
19. Remove pipe plug (27) from crankshaft (5).<br />
20. Using a ridge reamer, remove any ridge or carbon deposits from top of cylinder housing (24).<br />
21. Remove piston (20) <strong>and</strong> connecting rod (21) out through top of cylinder housing (24).<br />
22. Remove two retaining rings (17) from piston (20). Discard retaining rings (17).<br />
1<br />
2<br />
AIR COMPRESSOR<br />
MOUNTING PLATE<br />
BALL JOINT<br />
VISE<br />
4<br />
5<br />
2<br />
3<br />
Figure 1. Mounting Air Compressor on St<strong>and</strong>.<br />
Figure 2. Half Coupling Removal.<br />
0031 00-2
TM 9-2815-225-34&P 0031 00<br />
AIR COMPRESSOR (Contd)<br />
DISASSEMBLY (Contd)<br />
WARNING<br />
Use gloves during piston pin removal if piston has been soaked<br />
in hot water. Failure to comply may result in injury to<br />
personnel.<br />
CAUTION<br />
Do not force or drive piston pin out from piston bore. If piston<br />
cannot be removed by h<strong>and</strong>, soak piston assembly in hot water<br />
to exp<strong>and</strong> piston bore <strong>and</strong> allow for removal of piston pin.<br />
Failure to comply may result in damage to piston.<br />
23. Remove piston pin (19) <strong>and</strong> piston (20) from connecting rod (21).<br />
CAUTION<br />
Do not scratch or score piston during piston ring removal.<br />
Failure to comply may result in damage to piston.<br />
24. Remove three piston rings (18) from piston (20). Discard piston rings (18).<br />
25. Using press <strong>and</strong> m<strong>and</strong>rel, remove bushing (16) from connecting rod (21). Discard bushing (16).<br />
26. Using press <strong>and</strong> air compressor bushing, remove bearing (26) from cylinder housing (24). Discard<br />
bearing (26).<br />
7 8<br />
18<br />
6<br />
46<br />
9<br />
19<br />
17<br />
45<br />
44<br />
43<br />
42<br />
10<br />
11<br />
12<br />
17<br />
20<br />
41<br />
40<br />
39<br />
38<br />
37<br />
36<br />
35<br />
34<br />
13<br />
14<br />
15<br />
22<br />
16<br />
23<br />
21<br />
24<br />
27<br />
26<br />
25<br />
33<br />
32<br />
31<br />
29<br />
30<br />
28<br />
5<br />
Figure 3. Air Compressor Disassembly.<br />
0031 00-3
TM 9-2815-225-34&P 0031 00<br />
AIR COMPRESSOR (Contd)<br />
CLEANING AND INSPECTION<br />
1. For <strong>general</strong> parts cleaning information, refer to CLEANING, WP 0051 00.<br />
2. For <strong>general</strong> parts inspection information, refer to INSPECTION, WP 0051 00.<br />
CAUTION<br />
Cylinder head top surface is contoured. Do not grind or<br />
machine cylinder head. Failure to do so will cause cylinder<br />
head leakage <strong>and</strong> damage to air compressor.<br />
NOTE<br />
Replace any part that does not pass visual inspection or is<br />
outside specified wear limits.<br />
3. Inspect cylinder head (1) <strong>and</strong> cover (2) mating surfaces for scratches, scoring, cracks <strong>and</strong> pitting.<br />
4. Inspect drive coupling (9) for chipped or stripped teeth, <strong>and</strong> cracks.<br />
5. Inspect <strong>support</strong> (8) for cracks, scratches, <strong>and</strong> scores.<br />
6. Inspect connecting rod (5) inside diameters for scratches, scoring <strong>and</strong> cracks.<br />
7. Using straight edge <strong>and</strong> feeler gauge, measure connecting rod (5) for bend <strong>and</strong> twist. Discard<br />
connecting rod (5) if bend is greater than 0.002 in. (0.508 mm) maximum, <strong>and</strong> twist maximum is<br />
greater than 0.004 in. (0.102 mm).<br />
8. Using inside micrometer, measure connecting rod (5) crankshaft end inside diameter. Maximum<br />
diameter is 1.935 in. (49.149 mm). Discard connecting rod (5) if maximum diameter is exceeded.<br />
9. Inspect cylinder housing (6) for scratches, scoring, <strong>and</strong> cracks.<br />
10. Using a line bore gauge, measure cylinder housing (6) bore inside diameter <strong>and</strong> bore out-of-round<br />
dimensions. Maximum cylinder housing (6) inside bore diameter allowed is 3.6285 in. (9.2164 cm).<br />
Maximum cylinder housing (6) bore out-of-round dimension allowed is 0.0015 in. (0.0381 mm).<br />
Discard cylinder housing (6) if either measurement is over limit.<br />
11. Hone bore of cylinder housing (6) to remove glaze.<br />
12. Inspect piston (3) for scoring, pitting, chips, or cracks.<br />
13. Using inside micrometer, measure piston pin (3) bore. Replace piston (3) if piston pin bore is<br />
above 0.6885 in. (17.4879 mm).<br />
14. Using micrometer or equivalent, measure piston pin (4) outside diameter. Replace piston pin (4) if<br />
outside diameter is above 0.6876 in. (17.4625 mm).<br />
15. Position a new piston ring (11) in piston ring groove (10). Using a feeler gauge, check the<br />
clearance between piston ring (11) <strong>and</strong> piston ring groove (10). Discard piston (9) if clearance is<br />
more than 0.004 in. (0.1016 mm).<br />
16. Position a new piston ring (11) in top of cylinder housing (6) bore. Using a feeler gauge, measure<br />
piston ring (11) end gap. Piston ring (11) gap must be between 0.010–0.020 in. (0.254–0.508 mm).<br />
If correct gap cannot be obtained, replace piston ring (11).<br />
0031 00-4
TM 9-2815-225-34&P 0031 00<br />
AIR COMPRESSOR (Contd)<br />
3 4<br />
2<br />
1<br />
5<br />
6<br />
7<br />
9<br />
8<br />
Figure 4. Air Compressor Inspection.<br />
FEELER GAUGE<br />
11<br />
FEELER<br />
GAUGE<br />
9<br />
6<br />
11<br />
10<br />
Figure 5. Piston Ring Groove Measurement.<br />
Figure 6. Piston Ring Gap Measurement.<br />
0031 00-5
TM 9-2815-225-34&P 0031 00<br />
AIR COMPRESSOR (Contd)<br />
CLEANING AND INSPECTION (Contd)<br />
17. Using micrometer, measure all crankshaft (1) journals. Refer to table 1 for crankshaft (1) journal<br />
measurements. Replace crankshaft (1) if any journal is beyond specifications.<br />
Table 1. Crankshaft Journal Specifications.<br />
CRANKSHAFT JOURNAL MINIMUM MAXIMUM WEAR LIMIT<br />
Front Support Journal 1.872 in. (4.755 cm) 1.873 in. (4.757 cm) 1.871 in (4.752 cm)<br />
Half Coupling Journal 1.003 in. (2.548 cm) 1.0035 in. (2.549 cm) —<br />
Rear Coupling Journal 1.872 in. (4.755 cm) 1.873 in. (4.757 cm) 1.933 in. (4.910 cm)<br />
18. Using depth micrometer, measure seat (2) height. Seat height minimum is 0.485 in. (12.319 mm).<br />
Discard seat (2) if below minimum.<br />
19. Using depth micrometer, measure height of seating area on seat (2). Seating area height<br />
minimum is 0.270 in. (6.858 mm). Discard seat (2) if below minimum.<br />
20. Using depth micrometer, measure <strong>support</strong> thrust flange (3) depth. Support (3) thrust flange<br />
should be 1.307–1.310 in. (3.320–3.327 cm).<br />
0031 00-6
TM 9-2815-225-34&P 0031 00<br />
AIR COMPRESSOR (Contd)<br />
MICROMETER<br />
1<br />
Figure 7. Crankshaft Measurement.<br />
DEPTH<br />
MICROMETER<br />
2<br />
Figure 8. Seat Measurement.<br />
1.307–1.310 in.<br />
(3.320–3.327 cm)<br />
3<br />
Figure 9. Support Measurement.<br />
0031 00-7
TM 9-2815-225-34&P 0031 00<br />
AIR COMPRESSOR (Contd)<br />
ASSEMBLY<br />
NOTE<br />
Apply lubricating oil on new bushing <strong>and</strong> new bearing before<br />
installation.<br />
1. Using press <strong>and</strong> m<strong>and</strong>rel, install new bushing (11) in connecting rod (16).<br />
2. Using press <strong>and</strong> m<strong>and</strong>rel, install new bearing (21) in cylinder housing (19).<br />
WARNING<br />
Use gloves during piston pin installation if piston has been<br />
soaked in hot water. Failure to comply may result in injury to<br />
personnel.<br />
CAUTION<br />
Do not force or drive piston pin in piston bore. If piston pin<br />
cannot be installed by h<strong>and</strong>, soak piston assembly in hot water<br />
to exp<strong>and</strong> piston bore to allow for installation of piston pin.<br />
Failure to comply may result in damage to piston.<br />
3. Install piston (15) on connecting rod (16) with piston pin (14).<br />
4. Install two new retaining rings (12) in piston (15).<br />
CAUTION<br />
Do not scratch or score piston during piston ring removal.<br />
Failure to comply may result in damage to piston.<br />
NOTE<br />
Piston rings are marked with word “top”. Install piston rings<br />
with word “top” facing up.<br />
5. Apply lubricating oil to three new piston rings (13) <strong>and</strong> install on piston (15).<br />
6. Stagger piston rings (13) gap 180° apart <strong>and</strong> ensure they are not positioned over piston pin bore.<br />
Install ring compressor on piston (15) <strong>and</strong> compress piston rings (13).<br />
CAUTION<br />
Do not force piston in cylinder housing bore. Excessive force will<br />
crack piston rings. Failure to comply may result in damage to<br />
equipment.<br />
7. Position piston (15) with connecting rod (16) attached, in cylinder housing (19) bore. Using hammer<br />
with wood h<strong>and</strong>le or equivalent, install connecting rod (16) <strong>and</strong> piston (15) in cylinder housing (19)<br />
by tapping piston (15) with wood end of hammer.<br />
8. Install pipe plug (22) in crankshaft (23).<br />
9. Rotate piston (15) 90° before or after top dead center in cylinder housing (19). To allow for<br />
crankshaft (23) installation.<br />
10. Apply lubricating oil to crankshaft (23), connecting rod (16), bearing (21), <strong>and</strong> cylinder<br />
housing (19).<br />
11. Rotate crankshaft (23) while pushing in to install crankshaft (23) in connecting rod (16) <strong>and</strong><br />
cylinder housing (19).<br />
12. Install new gasket (24) <strong>and</strong> <strong>support</strong> (25) on crankshaft (23) <strong>and</strong> cylinder housing (19) with six new<br />
lockwashers (26) <strong>and</strong> screws (27). Tighten screws (27) 30–35 lb-ft (41–47 N•m).<br />
13. Apply lubricating oil to new thrust bearing (28) <strong>and</strong> install on crankshaft (23).<br />
14. Apply lubricating oil to half coupling (29). Using press, install half coupling (29) on crankshaft (23).<br />
0031 00-8
TM 9-2815-225-34&P 0031 00<br />
AIR COMPRESSOR (Contd)<br />
ASSEMBLY (Contd)<br />
15. Install plate (18) on cylinder housing (19) with two screws (17).<br />
16. Apply lubricating oil to new large O-ring (35) <strong>and</strong> new small O-ring (33) <strong>and</strong> install on seat (34).<br />
17. Install disc (32) on seat (34).<br />
NOTE<br />
Use shim previously removed during disassembly for assembly.<br />
18. Install shim (30), new spring (31), seat (34), with disc (32) attached, in cylinder head (9).<br />
19. Install new spring (36), valve (37), <strong>and</strong> seat (38) in cylinder head (9).<br />
20. Install new gasket (10), cylinder head (9), new gasket (8), <strong>and</strong> cover (7) on cylinder housing (19)<br />
with four washers (6), new lockwashers (5), <strong>and</strong> bolts (4). Tighten bolts (4) 15–19 lb-ft<br />
(20–26 N•m).<br />
21. Apply lubricating oil to new large O-ring (42) <strong>and</strong> <strong>and</strong> install on valve body (1).<br />
22. Apply lubricating oil to new small O-ring (41) <strong>and</strong> install on valve body (1).<br />
23. Install new spring (39), new cap (40), <strong>and</strong> valve body (1) on cover (7) with two washers (2) <strong>and</strong><br />
screws (3). Tighten screws (3) 96–132 lb-in (11–15 N•m).<br />
2 3<br />
13<br />
1<br />
42<br />
4<br />
14<br />
12<br />
41<br />
40<br />
39<br />
38<br />
5<br />
6<br />
7<br />
12<br />
15<br />
37<br />
36<br />
35<br />
34<br />
33<br />
32<br />
31<br />
30<br />
9<br />
9<br />
10<br />
17<br />
11<br />
18<br />
16<br />
19<br />
22<br />
21<br />
20<br />
29<br />
28<br />
27<br />
25<br />
26<br />
24<br />
23<br />
Figure 10. Air Compressor Assembly.<br />
0031 00-9
TM 9-2815-225-34&P 0031 00<br />
AIR COMPRESSOR (Contd)<br />
ASSEMBLY (Contd)<br />
24. Install drive coupling (1) on half coupling (2) if not previously removed.<br />
25. Remove two bolts (5), air compressor mounting plate, <strong>and</strong> air compressor (3) from ball joint vise.<br />
26. Remove two bolts (4) <strong>and</strong> air compressor (3) from air compressor mounting plate.<br />
27. For air compressor installation, refer to WP 0042 00.<br />
3<br />
1<br />
2<br />
4<br />
5<br />
BALL JOINT<br />
VISE<br />
4 AIR COMPRESSOR MOUNTING PLATE<br />
Figure 11. Drive Coupling Installation.<br />
Figure 12. Removing Air Compressor from St<strong>and</strong>.<br />
END OF WORK PACKAGE<br />
0031 00-10
TM 9-2815-225-34&P 0032 00<br />
DIRECT SUPPORT AND GENERAL SUPPORT<br />
MAINTENANCE MANUAL<br />
INCLUDING REPAIR PARTS AND SPECIAL TOOLS LIST (RPSTL)<br />
FOR<br />
M915, M915A1, M915A4, M916, M920 VEHICLES<br />
NSN 2815-01-082-8125 P/N NTC400-3652-02 CUMMINS NTC-400 BIG CAM I DIESEL ENGINE<br />
W/CONTAINER<br />
NSN 2815-01-142-2745 P/N 11669835 CUMMINS NTC-400 BIG CAM III DIESEL ENGINE<br />
W/CONTAINER<br />
FUEL INJECTOR<br />
DISASSEMBLY, CLEANING AND INSPECTION, ASSEMBLY<br />
INITIAL SETUP:<br />
Tools <strong>and</strong> Special Tools<br />
General mechanic’s tool kit:<br />
automotive (Item 1, WP 0061 00)<br />
Maintenance <strong>and</strong> repair shop equipment:<br />
automotive (Item 2, WP 0061 00)<br />
Automotive <strong>maintenance</strong> <strong>and</strong> repair<br />
supplemental set no. 2 (Item 3, WP 0061 00)<br />
Injector st<strong>and</strong> (Item 11, WP 0061 00)<br />
Body <strong>and</strong> injector cup wrench<br />
(Item 12, WP 0061 00)<br />
Equipment Condition<br />
Fuel injector removed from engine<br />
(WP 0011 00).<br />
Materials/Parts<br />
Lubricating oil (Item 19, WP 0060 00)<br />
Prussian blue (Item 9, WP 0060 00)<br />
Diesel fuel (Item 18, WP 0060 00)<br />
Spring (Item 1, Table 16, WP 0062 00)<br />
Three gaskets (Item 2, Table 16, WP 0062 00)<br />
Filter screen (Item 3, Table 16, WP 0062 00)<br />
Gasket (Item 4, Table 16, WP 0062 00)<br />
0032 00-1
TM 9-2815-225-34&P 0032 00<br />
FUEL INJECTOR (Contd)<br />
DISASSEMBLY<br />
WARNING<br />
Do not perform fuel system procedures while smoking or<br />
within 50 ft (15.2 m) of sparks or open flame. Diesel fuel is<br />
flammable <strong>and</strong> may explode. Failure to comply may result in<br />
injury or death to personnel.<br />
1. Remove top-stop locknut (2) <strong>and</strong> top-stop screw (3) from top-stop adapter (6).<br />
2. Remove plunger (1), washer (4), <strong>and</strong> injector spring (5) from top-stop adapter (6). Discard spring (5).<br />
3. Remove three gaskets (7) from top-stop adapter (6). Discard gaskets (7).<br />
CAUTION<br />
Do not change position of orifice plug located behind filter<br />
screen. Orifice plug has been pre-set. Damage to injector or<br />
improper fuel delivery will result if orifice plug is adjusted.<br />
4. Remove filter screen clip (13), filter screen (14), <strong>and</strong> gasket (15) from top-stop adapter (6). Discard<br />
filter screen (14) <strong>and</strong> gasket (15).<br />
5. Install injector in injector st<strong>and</strong>. Using body <strong>and</strong> injector cup wrench, loosen cup retainer (12) on<br />
top-stop adapter (6). Remove injector from injector st<strong>and</strong>.<br />
6. Remove cup retainer (12) from top-stop adapter (6).<br />
CAUTION<br />
Do not pry against machined surface when removing roll pins.<br />
Damage to machined surface may result.<br />
7. Remove barrel (10) <strong>and</strong> injector cup (11) from cup retainer (12).<br />
8. Remove two roll pins (8) <strong>and</strong> check ball (9) from barrel (10).<br />
CLEANING AND INSPECTION<br />
1. For <strong>general</strong> parts cleaning information, refer to CLEANING, WP 0051 00.<br />
2. For <strong>general</strong> parts inspection information, refer to INSPECTION, WP 0051 00.<br />
NOTE<br />
Replace any part that does not pass visual inspection or is<br />
outside specified wear limits.<br />
3. Inspect cup retainer (12) for stripped threads, nicks <strong>and</strong> burrs.<br />
4. Inspect top-stop adapter (6) for stripped threads.<br />
5. Inspect top-stop adapter (6) for nicks <strong>and</strong> burrs around gasket sealing area <strong>and</strong> mating surfaces.<br />
6. Inspect top-stop adapter (6) for obstructions around orifice <strong>and</strong> fuel passage openings.<br />
7. Inspect check ball (9) for nicks <strong>and</strong> burrs.<br />
8. Using a depth micrometer, measure barrel (10) ball seat depth. Maximum barrel (10) ball seat<br />
depth allowed is 0.050 in. (1.27 mm).<br />
9. Inspect barrel (10) for scoring, nicks <strong>and</strong> burrs.<br />
10. Inspect barrel (10) for carbon, burrs, distorted radius, <strong>and</strong> blockage.<br />
11. Inspect barrel (10) for loose or cracked fuel passages.<br />
0032 00-2
TM 9-2815-225-34&P 0032 00<br />
FUEL INJECTOR (Contd)<br />
CLEANING AND INSPECTION (Contd)<br />
12. Inspect plunger (1) for scuffing or scoring.<br />
13. Inspect injector cup (11) for enlarged or distorted spray holes.<br />
14. Apply prussian blue to plunger (1) <strong>and</strong> install in cup (11) <strong>and</strong> rotate 90° to check plunger seat<br />
pattern. If less than 40% of seat area is covered, replace cup (11).<br />
3<br />
2<br />
1<br />
14 15<br />
13<br />
4<br />
5<br />
6<br />
7<br />
8<br />
8<br />
9<br />
10<br />
11<br />
12<br />
Figure 1. Fuel Injector Disassembly.<br />
0032 00-3
TM 9-2815-225-34&P 0032 00<br />
FUEL INJECTOR (Contd)<br />
ASSEMBLY<br />
WARNING<br />
Do not perform fuel system procedures while smoking or<br />
within 50 ft (15.2 m) of sparks or open flame. Diesel fuel is<br />
flammable <strong>and</strong> may explode. Failure to comply may result in<br />
injury or death to personnel.<br />
NOTE<br />
Apply lubricating oil to all parts before assembly.<br />
1. Install check ball (9) on barrel (10).<br />
2. Install two roll pins (8) in barrel (10).<br />
3. Install barrel (10) <strong>and</strong> injector cup (11) in top-stop adapter (6). Ensure check ball (9) stays<br />
positioned on barrel (10).<br />
4. Install cup retainer (12) on top-stop adapter (6) finger tight.<br />
5. Install plunger (1) in top-stop adapter (6).<br />
6. Install injector in injector st<strong>and</strong>. Tighten stud on injector st<strong>and</strong> 75 lb-in. (8.5 N•m) to align<br />
injector cup (11) with plunger (1). Using body <strong>and</strong> injector cup wrench, tighten cup retainer (12)<br />
53–57 lb-ft (72–77 N•m). Remove injector from injector st<strong>and</strong>.<br />
NOTE<br />
To check plunger to injector cup alignment, perform steps 7<br />
through 12.<br />
7. Remove plunger (1) from top-stop adapter (6) <strong>and</strong> coat plunger (1) with diesel fuel.<br />
8. Allow diesel fuel to run off plunger (1) into top-stop adapter (6) <strong>and</strong> barrel (10).<br />
9. Install plunger (1) in barrel (10) leaving a 0.050 in. (1.27 mm) gap between top of plunger (1) <strong>and</strong><br />
top-stop adapter (6).<br />
10. Seat plunger (1) in injector cup (11) by pushing down.<br />
11. Hold plunger (1) firmly in injector cup (11) <strong>and</strong> rotate 90°.<br />
12. Turn injector over <strong>and</strong> release plunger (1). Plunger (1) should slide out immediately. If plunger<br />
(1) does not slide out. Plunger (1) <strong>and</strong> injector cup (11) are not aligned. Disassemble injector <strong>and</strong><br />
realign.<br />
13. Repeat steps 7 through 12 until correct plunger (1) to injector cup (11) alignment is obtained.<br />
14. Install three new gaskets (7) on top-stop adapter (6).<br />
CAUTION<br />
Do not change position of orifice plug located behind filter<br />
screen. orifice plug has been pre-set. Damage to injector or<br />
improper fuel delivery will result if orifice plug is adjusted.<br />
15. Install new gasket (15), new filter screen (14), <strong>and</strong> filter screen clip (13) in top-stop adapter (6).<br />
16. Install new injector spring (5), washer (4), <strong>and</strong> plunger (1) in top-stop adapter (6).<br />
17. Install top-stop locknut (2) <strong>and</strong> top-stop screw (3) in top-stop adapter (6).<br />
18. For installation of fuel injector, refer to WP 0043 00.<br />
0032 00-4
TM 9-2815-225-34&P 0032 00<br />
FUEL INJECTOR (Contd)<br />
13<br />
3<br />
2<br />
1<br />
14 15<br />
4<br />
5<br />
6<br />
7<br />
8<br />
8<br />
9<br />
10<br />
11<br />
12<br />
Figure 2. Fuel Injector Assembly.<br />
END OF WORK PACKAGE<br />
0032 00-5/6 blank
TM 9-2815-225-34&P 0033 00<br />
DIRECT SUPPORT AND GENERAL SUPPORT<br />
MAINTENANCE MANUAL<br />
INCLUDING REPAIR PARTS AND SPECIAL TOOLS LIST (RPSTL)<br />
FOR<br />
M915, M915A1, M915A4, M916, M920 VEHICLES<br />
NSN 2815-01-082-8125 P/N NTC400-3652-02 CUMMINS NTC-400 BIG CAM I DIESEL ENGINE<br />
W/CONTAINER<br />
NSN 2815-01-142-2745 P/N 11669835 CUMMINS NTC-400 BIG CAM III DIESEL ENGINE<br />
W/CONTAINER<br />
FUEL PUMP DISASSEMBLY<br />
SOLENOID VALVE, FUEL DAMPER AND HEAD, FUEL GEAR PUMP,<br />
FUEL PUMP GOVERNOR SPRING, FUEL PUMP FRONT COVER AND GOVERNOR<br />
INITIAL SETUP:<br />
Tools <strong>and</strong> Special Tools<br />
General mechanic’s tool kit: automotive<br />
(Item 1, WP 0061 00)<br />
Maintenance <strong>and</strong> repair shop equipment:<br />
automotive (Item 2, WP 0061 00)<br />
Automotive <strong>maintenance</strong> <strong>and</strong> repair<br />
supplemental set no. 2 (Item 3, WP 0061 00)<br />
Ball joint vise (Item 9, WP 0061 00)<br />
Fuel pump mounting plate<br />
(Item 10, WP 0061 00)<br />
Equipment Condition<br />
Fuel pump removed from engine<br />
(WP 0010 00).<br />
0033 00-1
TM 9-2815-225-34&P 0033 00<br />
FUEL PUMP DISASSEMBLY (Contd)<br />
SOLENOID VALVE<br />
1. Install fuel pump (2) on fuel pump mounting plate with two screws (1) <strong>and</strong> nuts (3).<br />
2. Install fuel pump mounting plate with fuel pump (2) attached on ball joint vise with two<br />
screws (4).<br />
3. Remove two screws (5), lockwashers (6), washers (7), solenoid valve (8), <strong>and</strong> two rectangular ring<br />
seals (9) from fuel pump (2). Discard rectangular ring seals (9) <strong>and</strong> lockwashers (6).<br />
4. Repair solenoid valve (WP 0034 00).<br />
MOUNTING PLATE<br />
1<br />
1<br />
4<br />
3<br />
2<br />
BALL JOINT VISE<br />
Figure 1. Fuel Pump Disassembly.<br />
0033 00-2
TM 9-2815-225-34&P 0033 00<br />
FUEL PUMP DISASSEMBLY (Contd)<br />
5<br />
6<br />
7<br />
2<br />
8<br />
9<br />
Figure 2. Solenoid Valve Removal.<br />
0033 00-3
TM 9-2815-225-34&P 0033 00<br />
FUEL PUMP DISASSEMBLY (Contd)<br />
FUEL DAMPER AND HEAD<br />
1. Remove four screws (4), lockwashers (3), washers (2), <strong>and</strong> filter head (1) from fuel pump (5).<br />
Discard lockwashers (3).<br />
2. Remove two rectangular seal rings (6) <strong>and</strong> (7) from filter head (1). Discard rectangular seal rings<br />
(6) <strong>and</strong> (7).<br />
3. Repair fuel damper <strong>and</strong> head (WP 0035 00).<br />
FUEL GEAR PUMP<br />
1. Remove four screws (10), lockwashers (9), gasket (8), <strong>and</strong> fuel gear pump assembly (11) from fuel<br />
pump (5). Discard lockwashers (9) <strong>and</strong> gasket (8).<br />
2. Repair fuel gear pump (WP 0036 00).<br />
1<br />
2<br />
3<br />
4<br />
7<br />
6<br />
5<br />
Figure 3. Fuel Damper <strong>and</strong> Head Removal.<br />
0033 00-4
TM 9-2815-225-34&P 0033 00<br />
FUEL PUMP DISASSEMBLY (Contd)<br />
9<br />
10<br />
8<br />
11<br />
5<br />
Figure 4. Fuel Gear Pump Removal.<br />
0033 00-5
TM 9-2815-225-34&P 0033 00<br />
FUEL PUMP DISASSEMBLY (Contd)<br />
FUEL PUMP GOVERNOR SPRING<br />
1. Remove wire (7) <strong>and</strong> adjusting screw seal (8) from cover plug (9). Discard wire (7) <strong>and</strong> adjusting<br />
screw seal (8).<br />
2. Remove four screws (6), washers (5), spring pack cover (4), <strong>and</strong> gasket (3) from fuel pump (10).<br />
Discard gasket (3).<br />
3. Remove snapring (2) <strong>and</strong> fuel pump governor spring assembly (1) from fuel pump (10).<br />
4. Repair fuel pump governor spring (WP 0037 00).<br />
1 2<br />
3<br />
4 5 6<br />
7<br />
10<br />
9<br />
8<br />
Figure 5. Fuel Pump Governor Spring Removal.<br />
0033 00-6
TM 9-2815-225-34&P 0033 00<br />
FUEL PUMP DISASSEMBLY (Contd)<br />
FUEL PUMP FRONT COVER AND GOVERNOR<br />
1. Remove screw (11) <strong>and</strong> plastic bushing seal (12) from fuel pump front cover (13). Discard plastic<br />
bushing seal (12).<br />
2. Remove screw (20), lockwasher (19), <strong>and</strong> washer (18) securing fuel pump front cover (13) to fuel<br />
pump (16). Discard lockwasher (19).<br />
3. Remove five screws (17), fuel pump main housing (15), <strong>and</strong> gasket (14) from fuel pump front<br />
cover (13). Discard gasket (14).<br />
4. Repair fuel pump front cover <strong>and</strong> governor (WP 0038 00).<br />
11<br />
12<br />
15<br />
13<br />
14<br />
20<br />
19<br />
18<br />
17<br />
16<br />
Figure 6. Fuel Pump Cover <strong>and</strong> Governor Removal.<br />
END OF WORK PACKAGE<br />
0033 00-7/8 blank
TM 9-2815-225-34&P 0034 00<br />
DIRECT SUPPORT AND GENERAL SUPPORT<br />
MAINTENANCE MANUAL<br />
INCLUDING REPAIR PARTS AND SPECIAL TOOLS LIST (RPSTL)<br />
FOR<br />
M915, M915A1, M915A4, M916, M920 VEHICLES<br />
NSN 2815-01-082-8125 P/N NTC400-3652-02 CUMMINS NTC-400 BIG CAM I DIESEL ENGINE<br />
W/CONTAINER<br />
NSN 2815-01-142-2745 P/N 11669835 CUMMINS NTC-400 BIG CAM III DIESEL ENGINE<br />
W/CONTAINER<br />
SOLENOID VALVE<br />
DISASSEMBLY, CLEANING AND INSPECTION, ASSEMBLY<br />
INITIAL SETUP:<br />
Tools <strong>and</strong> Special Tools<br />
General mechanic’s tool kit: automotive<br />
(Item 1, WP 0061 00)<br />
Maintenance <strong>and</strong> repair shop equipment:<br />
automotive (Item 2, WP 0061 00)<br />
Automotive <strong>maintenance</strong> <strong>and</strong> repair<br />
supplemental set no. 2 (Item 3, WP 0061 00)<br />
Equipment Condition<br />
Solenoid valve removed from fuel pump<br />
(WP 0033 00).<br />
Material/Parts<br />
Lint-free cloth (Item 6, WP 0060 00)<br />
Lubricating oil (Item 19, WP 0060 00)<br />
Rectangular ring seal<br />
(Item 1, Table 17, WP 0062 00)<br />
O-ring (Item 2, Table 17, WP 0062 00)<br />
Shutoff valve spring<br />
(Item 3, Table 17, WP 0062 00)<br />
Valve disc (Item 4, Table 17, WP 0062 00)<br />
0034 00-1
TM 9-2815-225-34&P 0034 00<br />
SOLENOID VALVE (Contd)<br />
DISASSEMBLY<br />
1. Remove four screws (10), electrical solenoid (9), shutoff valve shield (8), rectangular ring seal (7),<br />
shutoff valve spring (6), <strong>and</strong> valve disc (5) from valve body (2). Discard rectangular ring seal (7),<br />
shutoff valve spring (6), <strong>and</strong> valve disc (5).<br />
NOTE<br />
Turn knob <strong>and</strong> shaft clockwise. Threads on shaft will act as a<br />
puller.<br />
2. Remove shutoff valve knob (1) from shutoff valve shaft (3).<br />
3. Remove shutoff valve shaft (3), with O-ring (4) attached, from valve body (2). Discard O-ring (4).<br />
4. Remove plug (11) from valve body (2).<br />
CLEANING AND INSPECTION<br />
1. For <strong>general</strong> parts cleaning information, refer to CLEANING, WP 0051 00.<br />
2. For <strong>general</strong> parts inspection information, refer to INSPECTION, WP 0051 00.<br />
NOTE<br />
Replace any part that does not pass visual inspection or that is<br />
outside specified wear limits.<br />
3. Wipe electrical solenoid (9) clean with lint-free cloth.<br />
4. Inspect valve seat on valve body (2) for wear, bonding separation, failure, <strong>and</strong> corrosion. Discard<br />
valve seat if damaged or worn.<br />
5. Using micrometer, measure width of valve seat. Discard valve body (2) if width of valve seat is<br />
less than 0.015 in. (0.381 mm).<br />
6. Using multimeter, check electrical solenoid (9) resistance between long terminal <strong>and</strong> base. Discard<br />
electrical solenoid (9) if resistance is not within 28–32 ohms.<br />
ASSEMBLY<br />
1. Apply light coat of lubricating oil to new O-ring (4) <strong>and</strong> shutoff valve shaft (3), <strong>and</strong> install O-ring<br />
(4) on shutoff valve shaft (3).<br />
2. Turn shutoff valve shaft (3) in valve body (2) until it reaches bottom of bore.<br />
3. Using depth micrometer, position shutoff valve shaft (3) tip 0.118 in. (2.997 mm) from face of<br />
valve body (2). Adjust shutoff valve shaft (3) until correct clearance is obtained.<br />
4. Without moving shutoff valve shaft (3), press shutoff valve knob (1) on shutoff valve shaft (3) until<br />
fully seated.<br />
5. Install new valve disc (5) in valve body (2) with rubber side toward valve body (2).<br />
6. Apply lubricating oil to new rectangular ring seal (7) <strong>and</strong> install in valve body (2).<br />
7. Install new shutoff valve shaft spring (6) in valve body (2) with concave side up.<br />
8. Install shutoff valve shield (8) <strong>and</strong> electrical solenoid (9) on valve body (2) with four screws (10).<br />
Tighten screws 25–30 lb-ft (34–40 N•m).<br />
9. Install solenoid valve (WP 0040 00).<br />
0034 00-2
TM 9-2815-225-34&P 0034 00<br />
SOLENOID VALVE (Contd)<br />
9<br />
8<br />
7<br />
5<br />
6<br />
10<br />
3<br />
4<br />
1<br />
2<br />
11<br />
Figure 1. Solenoid Valve Repair.<br />
END OF WORK PACKAGE<br />
0034 00-3/4 blank
TM 9-2815-225-34&P 0035 00<br />
DIRECT SUPPORT AND GENERAL SUPPORT<br />
MAINTENANCE MANUAL<br />
INCLUDING REPAIR PARTS AND SPECIAL TOOLS LIST (RPSTL)<br />
FOR<br />
M915, M915A1, M915A4, M916, M920 VEHICLES<br />
NSN 2815-01-082-8125 P/N NTC400-3652-02 CUMMINS NTC-400 BIG CAM I DIESEL ENGINE<br />
W/CONTAINER<br />
NSN 2815-01-142-2745 P/N 11669835 CUMMINS NTC-400 BIG CAM III DIESEL ENGINE<br />
W/CONTAINER<br />
FUEL DAMPER AND HEAD<br />
DISASSEMBLY, CLEANING AND INSPECTION, ASSEMBLY<br />
INITIAL SETUP:<br />
Tools <strong>and</strong> Special Tools<br />
General mechanic’s tool kit: automotive<br />
(Item 1, WP 0061 00)<br />
Maintenance <strong>and</strong> repair shop equipment:<br />
automotive (Item 2, WP 0061 00)<br />
Automotive <strong>maintenance</strong> <strong>and</strong> repair<br />
supplemental set no. 2 (Item 3, WP 0061 00)<br />
Equipment Condition<br />
Fuel damper <strong>and</strong> head removed from fuel<br />
pump (WP 0033 00).<br />
Material/Parts<br />
Lubricating oil (Item 19, WP 0060 00)<br />
Sealing compound (Item 25, WP 0060 00)<br />
Rectangular ring seal<br />
(Item 1, Table 18, WP 0062 00)<br />
Rectangular ring seal<br />
(Item 2, Table 18, WP 0062 00)<br />
Fuel pump damper diaphragm<br />
(Item 3, Table 18, WP 0062 00)<br />
Nylon washer<br />
(Item 4, Table 18, WP 0062 00)<br />
0035 00-1
TM 9-2815-225-34&P 0035 00<br />
FUEL DAMPER AND HEAD (Contd)<br />
DISASSEMBLY<br />
1. Remove two screws (1), plate (7), nylon washer (6), rectangular ring seal (5), fuel pump damper<br />
diaphragm (4), <strong>and</strong> rectangular ring seal (3) from filter head (2). Discard rectangular ring seals (3)<br />
<strong>and</strong> (5), fuel pump damper diaphragm (4), <strong>and</strong> nylon washer (6).<br />
2. Remove pipe plug (8) from filter head (2).<br />
CLEANING AND INSPECTION<br />
1. For <strong>general</strong> parts cleaning information, refer to CLEANING, WP 0051 00.<br />
2. For <strong>general</strong> parts inspection information, refer to INSPECTION, WP 0051 00.<br />
NOTE<br />
Replace any part that does not pass visual inspection or that is<br />
outside specified wear limits.<br />
3. Inspect filter head (2) <strong>and</strong> plate (7) for corrosion, excessive wear, <strong>and</strong> cracks. Discard damaged or<br />
worn parts.<br />
4. Inspect filter head (2) for stripped threaded holes or plugged fuel passages. Repair any stripped<br />
holes <strong>and</strong> clean any plugged fuel passages.<br />
ASSEMBLY<br />
1. Apply sealing compound to pipe plug (8) <strong>and</strong> install on filter head (2).<br />
2. Install new rectangular ring seal (5) <strong>and</strong> new nylon washer (6) on plate (7).<br />
3. Install new rectangular ring seal (3) on filter head (2).<br />
4. Apply lubricating oil to new fuel pump damper diaphragm (4) on plate (7). Ensure that fuel pump<br />
damper diaphragm (4) is clean.<br />
5. Install plate (7) on filter head (2) with two screws (1). Apply sealing compound to pipe plug (8) <strong>and</strong><br />
tighten screws (1) 11–13 lb-ft (15–18 N•m).<br />
6. For installation of fuel damper <strong>and</strong> head, refer to WP 0040 00.<br />
0035 00-2
TM 9-2815-225-34&P 0035 00<br />
FUEL DAMPER AND HEAD (Contd)<br />
7<br />
3<br />
4<br />
5<br />
6<br />
2<br />
1<br />
8<br />
Figure 1. Fuel Damper <strong>and</strong> Head Repair.<br />
END OF WORK PACKAGE<br />
0035 00-3/4 blank
TM 9-2815-225-34&P 0036 00<br />
DIRECT SUPPORT AND GENERAL SUPPORT<br />
MAINTENANCE MANUAL<br />
INCLUDING REPAIR PARTS AND SPECIAL TOOLS LIST (RPSTL)<br />
FOR<br />
M915, M915A1, M915A4, M916, M920 VEHICLES<br />
NSN 2815-01-082-8125 P/N NTC400-3652-02 CUMMINS NTC-400 BIG CAM I DIESEL ENGINE<br />
W/CONTAINER<br />
NSN 2815-01-142-2745 P/N 11669835 CUMMINS NTC-400 BIG CAM III DIESEL ENGINE<br />
W/CONTAINER<br />
FUEL GEAR PUMP<br />
DISASSEMBLY, CLEANING AND INSPECTION, ASSEMBLY<br />
INITIAL SETUP:<br />
Tools <strong>and</strong> Special Tools<br />
General mechanic’s tool kit: automotive<br />
(Item 1, WP 0061 00)<br />
Maintenance <strong>and</strong> repair shop equipment:<br />
automotive (Item 2, WP 0061 00)<br />
Automotive <strong>maintenance</strong> <strong>and</strong> repair<br />
supplemental set no. 2 (Item 3, WP 0061 00)<br />
Pressurizing valve driver<br />
(Item 38, WP 0061 00)<br />
Press<br />
Equipment Condition<br />
Fuel gear pump removed from fuel pump<br />
housing (WP 0033 00).<br />
Material/Parts<br />
Lubricating oil (Item 19, WP 0060 00)<br />
Pipe sealant (Item 25, WP 0060 00)<br />
Two lockwashers<br />
(Item 1, Table 19, WP 0062 00)<br />
Gasket (Item 2, Table 19, WP 0062 00)<br />
Pressure valve (Item 3, Table 19, WP 0062 00)<br />
Two bearing sleeves<br />
(Item 4, Table 19, WP 0062 00)<br />
Dowel ring (Item 5, Table 19, WP 0062 00)<br />
0036 00-1
TM 9-2815-225-34&P 0036 00<br />
FUEL GEAR PUMP (Contd)<br />
DISASSEMBLY<br />
1. Remove fuel supply elbow (9), adapter (8), <strong>and</strong> pipe plug (13) from gear body (7).<br />
2. Remove two screws (12), lockwashers (11), washers (10), gear cover (2), <strong>and</strong> gasket (6) from gear<br />
body (7). Discard lockwashers (11) <strong>and</strong> gasket (6).<br />
3. Remove idler shaft (4) <strong>and</strong> drive shaft (16) from gear body (7).<br />
4. Using press, remove idler gear (5) from idler shaft (4).<br />
5. Using press, remove drive gear (15) from drive shaft (16).<br />
6. Remove two dowel pins (3), dowel ring (1), pressure valve (17), <strong>and</strong> two bearing sleeves (14) from<br />
gear cover (2). Discard pressure valve (17), bearing sleeves (14), <strong>and</strong> dowel ring (1).<br />
0036 00-2
TM 9-2815-225-34&P 0036 00<br />
FUEL GEAR PUMP (Contd)<br />
9<br />
8<br />
10<br />
11<br />
12<br />
7<br />
6<br />
5<br />
4<br />
2<br />
3<br />
14<br />
13<br />
3<br />
15<br />
1<br />
16<br />
17<br />
Figure 1. Fuel Gear Pump Disassembly.<br />
0036 00-3
TM 9-2815-225-34&P 0036 00<br />
FUEL GEAR PUMP (Contd)<br />
CLEANING AND INSPECTION<br />
1. For <strong>general</strong> parts cleaning information, refer to CLEANING, WP 0051 00.<br />
2. For <strong>general</strong> parts inspection information, refer to INSPECTION, WP 0051 00.<br />
NOTE<br />
Replace any part that does not pass visual inspection or that is<br />
outside specified wear limits.<br />
The fuel supply elbow contains a check ball. Do not replace<br />
with a st<strong>and</strong>ard elbow.<br />
3. Inspect fuel supply elbow (7), adapter (6), <strong>and</strong> pipe plug (8) for cracks, chipped or stripped<br />
threads.<br />
4. Inspect idler shaft (3) <strong>and</strong> drive shaft (10) for scoring, bends, or stripped teeth.<br />
5. Using micrometer or equivalent, measure ends of idler shaft (3) outside diameter at center <strong>and</strong><br />
end of idler shaft (3). Minimum outside diameter is 0.499 in. (12.70 mm).<br />
6. Using micrometer or equivalent, measure drive shaft (10) outside diameter at end <strong>and</strong> center of<br />
drive shaft (10). Minimum outside diameter is 0.499 in. (12.70 mm).<br />
7. Inspect idler gear (4) <strong>and</strong> drive gear (9) for chips, cracks, <strong>and</strong> stripped teeth.<br />
8. Using micrometer or equivalent, measure idler gear (4) <strong>and</strong> drive gear (9) length. Idler gear (4)<br />
<strong>and</strong> drive gear (9) length should be 0.7483–0.7486 in. (19.007–19.014 mm).<br />
9. Inspect gear body (5) <strong>and</strong> gear cover (1) for scoring, cracks, or stripped threaded holes.<br />
10. Using depth micrometer, measure gear body (5) depth. Gear body depth should be 0.7478–0.7481<br />
in. (18.994–19.002 mm).<br />
11. Using telescoping gauge <strong>and</strong> micrometer, measure gear body (5) <strong>and</strong> gear cover (1) shaft bores<br />
inside diameter. Inside diameter should be 0.5011–0.5016 in. (12.728–12.741 mm).<br />
12. Inspect dowel pins (2) for cracks, chips, or bends.<br />
0036 00-4
TM 9-2815-225-34&P 0036 00<br />
FUEL GEAR PUMP (Contd)<br />
0.7483–0.7486 in. (19.007–19.014 mm)<br />
7<br />
6<br />
5<br />
4<br />
1<br />
2<br />
3<br />
2<br />
9<br />
8<br />
10<br />
Figure 2. Fuel Pump Cleaning <strong>and</strong> Inspection.<br />
0036 00-5
TM 9-2815-225-34&P 0036 00<br />
FUEL GEAR PUMP (Contd)<br />
ASSEMBLY<br />
NOTE<br />
Lubricate all parts, seals, seal rings, <strong>and</strong> O-rings with<br />
lubricating oil before installation.<br />
1. Using press, install two new bearing sleeves (15) in gear body (7).<br />
2. Using press, install two new bearing sleeves (15) <strong>and</strong> new dowel ring (1) in gear cover (2).<br />
3. Using pressurizing valve driver, install new pressure valve (18) 0.015 in. (0.381 mm) below face of<br />
gear cover (2).<br />
4. Install two dowel pins (3) in gear cover (2).<br />
5. Using press, install drive gear (16) on drive shaft (17) 0.680–0.690 in. (17.272–17.526 mm) from<br />
end of drive shaft (17).<br />
6. Using press, install idler gear (5) on idler shaft (4) 0.680–0.690 in. (17.272–17.526 mm) from end<br />
of idler shaft (4).<br />
7. Install idler shaft (4) with idler gear (5) attached <strong>and</strong> drive shaft (17) with drive gear (16)<br />
attached in gear cover (2).<br />
NOTE<br />
Location of notches or ridges on gear body <strong>and</strong> gear cover<br />
determine pump rotation.<br />
When a right-h<strong>and</strong> rotation pump is being assembled, place<br />
driven gear shaft of gear pump in pocket nearest locating<br />
notches or ridges. Place driving gear shaft in other pocket. The<br />
dowel ring is always located around drive shaft.<br />
8. Align notches in gear cover (2) with notches on gear body (7) <strong>and</strong> install new gasket (6) <strong>and</strong> gear<br />
cover (2) on gear body (7) with two screws (12), new lockwashers (11), <strong>and</strong> washers (10). Tighten<br />
screw (12) 11–13 lb-ft (15–18 N•m).<br />
9. Apply pipe sealant to pipe plug (14) <strong>and</strong> install in gear body (7). Tighten pipe plug (14) 10–13 lb-ft<br />
(14–18 N•m).<br />
10. Install adapter (8) <strong>and</strong> fuel supply elbow (9) on gear body (7).<br />
11. Using dial indicator, measure drive shaft (17) backlash. Backlash should be 0.001–0.004 in.<br />
(0.0254–0.1016 mm). If correct backlash cannot be obtained, disassemble fuel gear pump (13) <strong>and</strong><br />
replace idler gear (5) <strong>and</strong> drive shaft gear (16).<br />
12. Using dial indicator, measure drive shaft (17) end play. End play should be between<br />
0.0009–0.0015 in. (0.0228–0.038 mm). If correct end play cannot be obtained, disassemble fuel<br />
gear pump (13) <strong>and</strong> replace gear body (7) <strong>and</strong> drive shaft (17).<br />
13. Install fuel gear pump (13) on fuel pump housing. Refer to WP 0040 00.<br />
0036 00-6
TM 9-2815-225-34&P 0036 00<br />
FUEL GEAR PUMP (Contd)<br />
9<br />
8<br />
10<br />
11<br />
12<br />
7<br />
6<br />
5<br />
4<br />
13<br />
2<br />
3<br />
15<br />
14<br />
3<br />
16<br />
1<br />
17<br />
18<br />
Figure 3. Fuel Gear Pump Assembly.<br />
NOTCHES<br />
GEAR COVER<br />
GEAR BODY<br />
Figure 4. Fuel Gear Body <strong>and</strong> Gear Cover.<br />
END OF WORK PACKAGE<br />
0036 00-7/8 blank
TM 9-2815-225-34&P 0037 00<br />
DIRECT SUPPORT AND GENERAL SUPPORT<br />
MAINTENANCE MANUAL<br />
INCLUDING REPAIR PARTS AND SPECIAL TOOLS LIST (RPSTL)<br />
FOR<br />
M915, M915A1, M915A4, M916, M920 VEHICLES<br />
NSN 2815-01-082-8125 P/N NTC400-3652-02 CUMMINS NTC-400 BIG CAM I DIESEL ENGINE<br />
W/CONTAINER<br />
NSN 2815-01-142-2745 P/N 11669835 CUMMINS NTC-400 BIG CAM III DIESEL ENGINE<br />
W/CONTAINER<br />
FUEL PUMP GOVERNOR SPRING<br />
DISASSEMBLY, CLEANING AND INSPECTION, ASSEMBLY<br />
INITIAL SETUP:<br />
Tools <strong>and</strong> Special Tools<br />
General mechanic’s tool kit:<br />
automotive (Item 1, WP 0061 00)<br />
Maintenance <strong>and</strong> repair shop equipment:<br />
automotive (Item 2, WP 0061 00)<br />
Automotive <strong>maintenance</strong> <strong>and</strong> repair<br />
supplemental set no. 2 (Item 3, WP 0061 00)<br />
Equipment Condition<br />
Fuel pump governor spring removed from fuel<br />
pump (WP 0033 00).<br />
Material/Parts<br />
Lubricating oil (Item 19, WP 0060 00)<br />
Idling spring (Item 1, Table 20, WP 0062 00)<br />
Compression spring<br />
(Item 2, Table 20, WP 0062 00)<br />
Lead seal<br />
0037 00-1
TM 9-2815-225-34&P 0037 00<br />
FUEL PUMP GOVERNOR SPRING (Contd)<br />
DISASSEMBLY<br />
NOTE<br />
Do not discard shim.<br />
1. Remove spring retainer (7), shim (8), <strong>and</strong> compression spring (9) from guide (5). Discard<br />
compression spring (9).<br />
NOTE<br />
Lead seal is used on Big Cam I only.<br />
2. Remove idle adjusting screw (6), lead seal (1), idle spring plunger (2), idling spring (3), <strong>and</strong><br />
adjusting screw washer (4) from guide (5). Discard lead seal (1) <strong>and</strong> idling spring (3).<br />
CLEANING AND INSPECTION<br />
1. For <strong>general</strong> parts cleaning information, refer to CLEANING, WP 0051 00.<br />
2. For <strong>general</strong> parts inspection information, refer to INSPECTION, WP 0051 00.<br />
NOTE<br />
Replace any part that does not pass visual inspection or that is<br />
outside specified wear limits.<br />
3. Inspect guide (5) <strong>and</strong> idle adjusting screw (6) for crossthreading, stripped threads, <strong>and</strong> other<br />
damage.<br />
ASSEMBLY<br />
NOTE<br />
Lubricate all parts, seals, seal rings, <strong>and</strong> O-rings with<br />
lubricating oil before installation.<br />
1. Install idle adjusting screw (6) in guide (5).<br />
NOTE<br />
Lead seal is required for Big Cam I only.<br />
2. Install adjusting screw washer (4), new idling spring (3), idle spring plunger (2), <strong>and</strong> new lead<br />
seal (1) on idle adjusting screw (6).<br />
NOTE<br />
Final number of shims is determined at calibration.<br />
3. Install new compression spring (9), shim (8), <strong>and</strong> spring retainer (7) on guide (5).<br />
4. Install fuel pump governor spring (WP 0040 00).<br />
0037 00-2
TM 9-2815-225-34&P 0037 00<br />
FUEL PUMP GOVERNOR SPRING (Contd)<br />
1<br />
2<br />
3<br />
4<br />
5<br />
6<br />
9<br />
8 7<br />
Figure 1. Fuel Pump Governor Spring Disassembly, Cleaning <strong>and</strong> Inspection, <strong>and</strong> Assembly.<br />
END OF WORK PACKAGE<br />
0037 00-3/4 blank
TM 9-2815-225-34&P 0038 00<br />
DIRECT SUPPORT AND GENERAL SUPPORT<br />
MAINTENANCE MANUAL<br />
INCLUDING REPAIR PARTS AND SPECIAL TOOLS LIST (RPSTL)<br />
FOR<br />
M915, M915A1, M915A4, M916, M920 VEHICLES<br />
NSN 2815-01-082-8125 P/N NTC400-3652-02 CUMMINS NTC-400 BIG CAM I DIESEL ENGINE<br />
W/CONTAINER<br />
NSN 2815-01-142-2745 P/N 11669835 CUMMINS NTC-400 BIG CAM III DIESEL ENGINE<br />
W/CONTAINER<br />
FUEL PUMP FRONT COVER AND GOVERNOR<br />
DISASSEMBLY, CLEANING AND INSPECTION, ASSEMBLY<br />
INITIAL SETUP:<br />
Tools <strong>and</strong> Special Tools<br />
General mechanic’s tool kit: automotive<br />
(Item 1, WP 0061 00)<br />
Maintenance <strong>and</strong> repair shop equipment:<br />
automotive (Item 2, WP 0061 00)<br />
Automotive <strong>maintenance</strong> <strong>and</strong> repair<br />
supplemental set no. 2 (Item 3, WP 0061 00)<br />
Press<br />
Main shaft seal driver (Item 20, WP 0061 00)<br />
Front cover tachometer seal driver<br />
(Item 21, WP 0061 00)<br />
Main shaft gear <strong>and</strong> bearing installation tool<br />
(Item 22, WP 0061 00)<br />
Oil seal assembly tool (Item 23, WP 0061 00)<br />
Plunger protrusion checking tool<br />
(Item 24, WP 0061 00)<br />
Equipment Condition<br />
Fuel pump front cover <strong>and</strong> governor removed<br />
from fuel pump (WP 0033 00).<br />
Material/Parts<br />
Lubricating oil (Item 19, WP 0060 00)<br />
Spring (Item 1, Table 21, WP 0062 00)<br />
Retaining ring (Item 2, Table 21, WP 0062 00)<br />
Bearing (Item 3, Table 21, WP 0062 00)<br />
Two shaft seals (Item 4, Table 21, WP 0062 00)<br />
Seal (Item 5, Table 21, WP 0062 00)<br />
Bushing (Item 6, Table 21, WP 0062 00)<br />
Governor bushing<br />
(Item 7, Table 21, WP 0062 00)<br />
0038 00-1
TM 9-2815-225-34&P 0038 00<br />
FUEL PUMP FRONT COVER AND GOVERNOR (Contd)<br />
DISASSEMBLY<br />
NOTE<br />
Be careful not to lose spring <strong>and</strong> shims during removal of<br />
weight-assist plunger. Keep weight-assist plunger, shims, <strong>and</strong><br />
spring together.<br />
1. Remove weight-assist plunger (13), shims (12), <strong>and</strong> spring (11) from governor (14). Discard<br />
spring (11).<br />
2. Remove screw (20) <strong>and</strong> washer (21) securing fuel pump drive coupling (22) on fuel pump drive<br />
shaft (24).<br />
3. Using puller, remove fuel pump drive coupling (22), tachometer drive gear (23), <strong>and</strong> coupling<br />
key (19) from fuel pump drive shaft (24).<br />
4. Remove retaining ring (8) securing fuel pump drive shaft (24) in fuel pump front cover (16).<br />
Discard retaining ring (8).<br />
5. Remove fuel pump drive shaft (24), with bearing (7), fuel pump drive gear (9), <strong>and</strong> coupling (10)<br />
attached, from fuel pump front cover (16).<br />
6. Using press, remove coupling (10) <strong>and</strong> fuel pump drive gear (9) from fuel pump drive shaft (24).<br />
7. Using press, remove bearing (7) from fuel pump drive shaft (24). Discard bearing (7).<br />
8. Remove tachometer drive housing (2) from fuel pump front cover (16).<br />
9. Using brass punch <strong>and</strong> hammer, remove tachometer drive shaft (1), with seal (3), spacer (4),<br />
bushing (5), <strong>and</strong> gear (6) attached, from fuel pump front cover (16).<br />
10. Remove gear (6), bushing (5), spacer (4), <strong>and</strong> seal (3) from tachometer drive shaft (1). Discard seal<br />
(3) <strong>and</strong> bushing (5).<br />
11. Using press, remove two shaft seals (17) <strong>and</strong> (18) from fuel pump front cover (16). Discard shaft<br />
seals (17) <strong>and</strong> (18).<br />
12. Using brass punch <strong>and</strong> hammer, remove governor bushing (15) from fuel pump front cover (16).<br />
Discard governor bushing (15).<br />
CLEANING AND INSPECTION<br />
1. For <strong>general</strong> parts cleaning information, refer to CLEANING, WP 0051 00.<br />
2. For <strong>general</strong> parts inspection information, refer to INSPECTION, WP 0051 00.<br />
NOTE<br />
Replace any part that does not pass visual inspection or that is<br />
outside specified wear limits.<br />
3. Inspect weight-assist plunger (13), governor (14), fuel pump drive coupling (22), tachometer drive<br />
gear (23), fuel pump drive shaft (24), fuel pump drive gear (9), coupling (10), tachometer drive<br />
housing (2), gear (6), tachometer drive shaft (1), <strong>and</strong> fuel pump front cover (16) for cracks, breaks,<br />
excessive wear, <strong>and</strong> other damage.<br />
4. Inspect fuel pump drive shaft (24) <strong>and</strong> tachometer drive shaft (1) for scoring, wear, grooves, <strong>and</strong><br />
other damage.<br />
0038 00-2
TM 9-2815-225-34&P 0038 00<br />
FUEL PUMP FRONT COVER AND GOVERNOR (Contd)<br />
2<br />
1<br />
3<br />
4<br />
5<br />
6<br />
7<br />
8<br />
9<br />
10<br />
11<br />
12<br />
20<br />
21<br />
22<br />
23<br />
24<br />
19<br />
18 17 16<br />
15<br />
14<br />
13<br />
Figure 1. Fuel Pump Front Cover <strong>and</strong> Governor Disassembly, Cleaning, <strong>and</strong> Inspection.<br />
0038 00-3
TM 9-2815-225-34&P 0038 00<br />
FUEL PUMP FRONT COVER AND GOVERNOR (Contd)<br />
ASSEMBLY<br />
NOTE<br />
Lubricate all parts, seals, seal rings, <strong>and</strong> O-rings with<br />
lubricating oil before installation.<br />
1. Install new bushing (5) on tachometer drive shaft (1).<br />
2. Using press, install gear (6) on tachometer drive shaft (1) until 0.002–0.005-in. (0.050–0.127-mm)<br />
gap between bushing (5) <strong>and</strong> gear (6) is obtained. Using a feeler gauge, check clearance between<br />
gear (6) <strong>and</strong> bushing (5). Remove <strong>and</strong> install gear (6) until correct gear (6) to bushing (5) clearance<br />
is obtained.<br />
3. Align oil groove in top of bushing (5) with fuel pump drive shaft (1). Using press, install bushing (5)<br />
with tachometer drive shaft (1) <strong>and</strong> gear (6) attached on fuel pump front cover (16) until fully<br />
seated.<br />
4. Install spacer (4) on tachometer drive shaft (1) with slotted edge facing down until seated against<br />
top of bushing (5).<br />
5. Using front cover tachometer seal driver <strong>and</strong> hammer, install new seal (3) with spring side down in<br />
fuel pump front cover (16).<br />
6. Install tachometer drive housing (2) in fuel pump front cover (16).<br />
CAUTION<br />
Do not overtighten tachometer drive housing because it will<br />
compress spacer too much <strong>and</strong> will reduce its effectiveness.<br />
7. Lubricate fuel pump drive shaft (24) with clean diesel fuel. Using main shaft gear <strong>and</strong> bearing<br />
installation tool <strong>and</strong> press, install new bearing (7) on fuel pump drive shaft (24).<br />
8. Using main shaft gear <strong>and</strong> bearing installation tool <strong>and</strong> press, install fuel pump drive gear (9) on<br />
fuel pump drive shaft (24) until fully seated on bearing (7).<br />
9. Apply lubricating oil to fuel pump drive shaft (24) <strong>and</strong> bore of coupling (10). Using press, install<br />
coupling (10) on fuel pump drive shaft (24) until fully seated against fuel pump drive gear (9).<br />
10. Using main shaft seal driver <strong>and</strong> press, install first new shaft seal (17) in fuel pump front<br />
cover (16) with lip facing back of fuel pump front cover (16).<br />
11. Using main shaft seal driver <strong>and</strong> press, install second new shaft seal (18) on fuel pump front cover<br />
(16) with lip facing front of fuel pump front cover (16).<br />
12. Using oil seal assembly tool <strong>and</strong> press, install fuel pump drive shaft (24) with bearing (7) <strong>and</strong> gear<br />
(9) attached in fuel pump front cover (16) until bearing (7) is fully seated. Ensure first shaft seal<br />
(17) <strong>and</strong> second shaft seal (18) are not moved during assembly.<br />
13. Install new retaining ring (8) on fuel pump drive shaft (24) between fuel pump drive gear (9) <strong>and</strong><br />
bearing (7). Look through holes in fuel pump drive gear (9) to ensure retaining ring (8) is properly<br />
seated in groove.<br />
14. Install coupling key (19) in fuel pump drive shaft (24).<br />
15. Position tachometer drive gear (23) <strong>and</strong> fuel pump drive coupling (22) on fuel pump drive shaft (24).<br />
Using press, slowly install tachometer drive gear (23) <strong>and</strong> fuel pump drive coupling (22) on fuel<br />
pump drive shaft (24) until fully seated. Ensure tachometer drive gear (23) <strong>and</strong> tachometer gear<br />
teeth are properly aligned.<br />
16. Install screw (20) <strong>and</strong> washer (21) in fuel pump drive shaft (24). Tighten screw (20) 5 lb-ft (7 N•m).<br />
17. Using press, install new governor bushing (15) in fuel pump front cover (16).<br />
0038 00-4
TM 9-2815-225-34&P 0038 00<br />
FUEL PUMP FRONT COVER AND GOVERNOR (Contd)<br />
ASSEMBLY (Contd)<br />
18. Install governor (14) in governor bushing (15) <strong>and</strong> rotate governor (14) until weights are open.<br />
19. Install weight-assist plunger (13) with small end facing governor weights. Install shims (12) <strong>and</strong><br />
new spring (11) in bore of governor (14).<br />
20. Using plunger protrusion checking tool <strong>and</strong> dial indicator, measure protrusion of weight-assist<br />
plunger (13). Weight-assist plunger (13) protrusion should be 0.800 in. (20.32 mm). If weightassist<br />
plunger (13) protrusion is less than 0.800 in. (20.32 mm), add shims (12). If weight-assist<br />
plunger (13) protrusion is more than 0.800 in. (20.32 mm), remove shims (12) or grind end of<br />
weight-assist plunger (13). Repeat procedure until weight-assist plunger (13) protrusion is correct.<br />
21. Install fuel pump front cover <strong>and</strong> governor (Refer to WP 0040 00).<br />
2<br />
1<br />
3<br />
4<br />
5<br />
6<br />
7<br />
8<br />
9<br />
10<br />
11<br />
12<br />
20<br />
21<br />
22<br />
23<br />
24<br />
19<br />
18 17 16<br />
15<br />
14<br />
13<br />
Figure 2. Fuel Pump Front Cover <strong>and</strong> Governor Assembly.<br />
END OF WORK PACKAGE<br />
0038 00-5/6 blank
TM 9-2815-225-34&P 0039 00<br />
DIRECT SUPPORT AND GENERAL SUPPORT<br />
MAINTENANCE MANUAL<br />
INCLUDING REPAIR PARTS AND SPECIAL TOOLS LIST (RPSTL)<br />
FOR<br />
M915, M915A1, M915A4, M916, M920 VEHICLES<br />
NSN 2815-01-082-8125 P/N NTC400-3652-02 CUMMINS NTC-400 BIG CAM I DIESEL ENGINE<br />
W/CONTAINER<br />
NSN 2815-01-142-2745 P/N 11669835 CUMMINS NTC-400 BIG CAM III DIESEL ENGINE<br />
W/CONTAINER<br />
FUEL PUMP MAIN HOUSING<br />
DISASSEMBLY, CLEANING AND INSPECTION, ASSEMBLY<br />
INITIAL SETUP:<br />
Tools <strong>and</strong> Special Tools<br />
General mechanic’s tool kit: automotive<br />
(Item 1, WP 0061 00)<br />
Maintenance <strong>and</strong> repair shop equipment:<br />
automotive (Item 2, WP 0061 00)<br />
Automotive <strong>maintenance</strong> <strong>and</strong> repair<br />
supplemental set no. 2 (Item 3, WP 0061 00)<br />
Press<br />
AFC barrel puller (Item 69, WP 0061 00)<br />
Equipment Condition<br />
Fuel pump main housing removed from fuel<br />
pump (WP 0033 00).<br />
Material/Parts<br />
Lubricating oil (Item 19, WP 0060 00)<br />
Retaining ring (Item 1, Table 22, WP 0062 00)<br />
O-ring (Item 2, Table 22, WP 0062 00)<br />
Throttle shaft ball<br />
(Item 3, Table 22, WP 0062 00)<br />
O-ring (Item 4, Table 22, WP 0062 00)<br />
O-ring (Item 5, Table 22, WP 0062 00)<br />
Cap seal ring (Item 6, Table 22, WP 0062 00)<br />
Retaining ring (Item 7, Table 22, WP 0062 00)<br />
O-ring (Item 8, Table 22, WP 0062 00)<br />
O-ring (Item 9, Table 22, WP 0062 00)<br />
O-ring (Item 10, Table 22, WP 0062 00)<br />
O-ring (Item 11, Table 22, WP 0062 00)<br />
Gasket washer<br />
(Item 12, Table 22, WP 0062 00)<br />
Bellows (Item 13, Table 22, WP 0062 00)<br />
0039 00-1
TM 9-2815-225-34&P 0039 00<br />
FUEL PUMP MAIN HOUSING (Contd)<br />
DISASSEMBLY<br />
1. Remove two drive screws (19) from throttle shaft cover (18).<br />
2. Remove retaining ring (33) from throttle shaft (22). Discard retaining ring (33).<br />
3. Remove throttle shaft (22) <strong>and</strong> O-ring (23) from housing (9). Discard O-ring (23).<br />
4. Remove throttle shaft ball (17) from throttle shaft (22). Discard throttle shaft ball (17).<br />
5. Remove fuel adjusting screw (20) <strong>and</strong> O-ring (16) from throttle shaft (22). Discard O-ring (16).<br />
6. Remove setscrew (15) <strong>and</strong> throttle shaft (22) from stop (21).<br />
7. Loosen nut (14) from Air Fuel Control (AFC) needle valve (12).<br />
8. Remove AFC needle valve (12) <strong>and</strong> O-ring (13) from housing (9). Discard O-ring (13).<br />
9. Remove nut (14) from AFC needle valve (12).<br />
10. Remove threaded stud (11) secured with jamnut (10) from housing (9).<br />
11. Remove jamnut (10) securing tapered stud (31) from housing (9).<br />
12. Remove filter screen cap (5), cap seal ring (6), filter spring (7), <strong>and</strong> fuel filter screen (8) from<br />
housing (9). Discard cap seal ring (6).<br />
13. Remove check valve (39) from fuel control cover (40).<br />
14. Remove two screws (38), drilled head screw (37), <strong>and</strong> three washers (36) from fuel control cover (40).<br />
15. Move bellows (45) away from sealing surface on housing (9) <strong>and</strong> remove with attached parts.<br />
16. Remove spring (58), AFC shim (57), <strong>and</strong> retaining ring (56) from housing (9). Discard retaining<br />
ring (56).<br />
NOTE<br />
Heat governor housing in oven to 300° F (149° C) to prevent<br />
damage to housing bore during barrel removal.<br />
17. Using AFC barrel puller, remove barrel (52), <strong>and</strong> three O-rings (53), (54), <strong>and</strong> (55) from<br />
housing (9). Discard O-rings (53), (54), <strong>and</strong> (55).<br />
18. Remove barrel spring (51) from housing (9).<br />
NOTE<br />
Earlier pump models did not require a barrel spring.<br />
19. Remove jamnut (41) from throttle plunger (50).<br />
20. Remove throttle plunger (50) <strong>and</strong> O-ring (49) from air fuel control piston insert (42). Discard<br />
O-ring (49).<br />
21. Remove nut (48) securing air fuel control piston insert (42) <strong>and</strong> remove piston spacer (47), AFC<br />
piston (46), bellows (45), retainer washer (44), <strong>and</strong> gasket washer (41) from air fuel control piston<br />
insert (42). Discard gasket washer (43) <strong>and</strong> bellows (45).<br />
22. Remove governor plunger (30), three shims (29), <strong>and</strong> torque spring (28) from housing (9).<br />
23. Remove torque spring (28) <strong>and</strong> three shims (29) from governor plunger (30).<br />
24. Remove five pipe plugs (1) <strong>and</strong> (4) <strong>and</strong> roll pin (24) from housing (9).<br />
25. Remove spring pack (27) <strong>and</strong> governor barrel (26) from housing (9).<br />
26. Remove tachometer drive bushing (32), two AFC plug balls (34), <strong>and</strong> two dowels (25) <strong>and</strong> (35) from<br />
housing (9).<br />
27. Remove two screws (3) <strong>and</strong> nameplate (2) from housing (9).<br />
0039 00-2
TM 9-2815-225-34&P 0039 00<br />
FUEL PUMP MAIN HOUSING (Contd)<br />
CLEANING AND INSPECTION<br />
1. For <strong>general</strong> parts cleaning information, refer to CLEANING, WP 0051 00.<br />
2. For <strong>general</strong> parts inspection information, refer to INSPECTION, WP 0051 00.<br />
NOTE<br />
Replace any part that does not pass visual inspection or that is<br />
outside specified wear limits.<br />
3. Inspect tachometer drive bushing (32) for scoring, burrs, <strong>and</strong> other damage.<br />
4. Using vernier caliper, measure inside diameter of tachometer drive bushing (32). Maximum inside<br />
diameter is 0.752 in. (19.10 mm).<br />
5. Inspect governor barrel (26) for scoring, burrs, <strong>and</strong> other damage.<br />
6. Using outside micrometer, measure governor barrel (26) diameter of bore in housing (9) <strong>and</strong><br />
outside diameter of governor barrel (26). Diameter of bore should be 0.002 in. (0.051 mm) smaller<br />
than governor barrel (26) outside diameter.<br />
7. Inspect governor plunger (30), <strong>and</strong> shims (29) for scoring, burrs, <strong>and</strong> other damage.<br />
8. Inspect housing (1) <strong>and</strong> nameplate (2) for scoring, burrs, <strong>and</strong> other damage.<br />
9. Inspect fuel filter screen (8) for holes <strong>and</strong> embedded metal particles in mesh.<br />
10. Inspect dowels (25) <strong>and</strong> (35) for damage.<br />
33<br />
1<br />
35<br />
34<br />
2<br />
4<br />
3<br />
5<br />
6<br />
7<br />
8<br />
9 11 10<br />
12<br />
13<br />
37<br />
36<br />
46<br />
38<br />
36<br />
39<br />
40<br />
47<br />
48<br />
41<br />
49<br />
42<br />
43<br />
50<br />
44<br />
45<br />
32<br />
31<br />
30<br />
28<br />
29<br />
26<br />
27<br />
25<br />
24<br />
1<br />
10<br />
23<br />
22<br />
21<br />
20<br />
18<br />
16 17<br />
14 15 19<br />
58<br />
57<br />
56<br />
55 54<br />
53 52 51<br />
9<br />
Figure 1. Main Housing Disassembly.<br />
Figure 2. Main Housing Disassembly.<br />
0039 00-3
TM 9-2815-225-34&P 0039 00<br />
FUEL PUMP MAIN HOUSING (Contd)<br />
ASSEMBLY<br />
NOTE<br />
Lubricate all parts, seals, seal rings, <strong>and</strong> O-rings with<br />
lubricating oil before installation.<br />
1. Install two screws (3) <strong>and</strong> nameplate (2) on housing (9).<br />
2. Install two dowels (25) <strong>and</strong> (35), two AFC plug balls (34), <strong>and</strong> tachometer drive bushing (32) on<br />
housing (9).<br />
3. Install governor barrel (26) <strong>and</strong> spring pack (27) on housing (9).<br />
4. Install five pipe plugs (1) <strong>and</strong> (4), <strong>and</strong> roll pin (24) on housing (9). Tighten pipe plugs (1) <strong>and</strong> (4)<br />
5–8 lb-ft (7–11 N•m).<br />
NOTE<br />
Put small diameter of spring on shoulder end of plunger with<br />
twisting motion to avoid damaging spring.<br />
5. Install torque spring (28) <strong>and</strong> three shims (29) on governor plunger (30).<br />
6. Install governor plunger (30) on housing (9).<br />
NOTE<br />
Round end of retainer washer must be against bellows when<br />
assembled. If bellows has a part number, it must face toward<br />
piston.<br />
Ensure all parts are aligned <strong>and</strong> do not twist bellows.<br />
7. Install new gasket washer (43), retainer washer (44), new bellows (45), AFC piston (46), piston<br />
spacer (47), <strong>and</strong> nut (48) on air fuel control piston insert (42). Tighten nut (48) 30–40 lb-ft<br />
(41–54 N•m).<br />
8. Apply lubricating oil to new O-ring (49) <strong>and</strong> install throttle plunger (50) on air fuel control piston<br />
insert (42). Ensure that threaded end of throttle plunger (50) is flush with outer edge of piston<br />
insert (42).<br />
9. Tighten jamnut (41) on throttle plunger (50) until finger-tight.<br />
NOTE<br />
Earlier pump models did not require a barrel spring.<br />
10. Install barrel spring (51) in housing (9).<br />
11. Apply lubricating oil to three new O-rings (53), (54), <strong>and</strong> (55) <strong>and</strong> install O-rings (53), (54),<br />
<strong>and</strong> (55) with spring (50) on barrel (52).<br />
12. Using press, install barrel (52) in housing (9) <strong>and</strong> secure with new retaining ring (56).<br />
13. Apply 10 lb (4.54 kg) of load on spring (58) <strong>and</strong> AFC shim (57).<br />
14. Compress spring 0.300 in. (7.62 mm) more than dimension of step 13 <strong>and</strong> install AFC shim (57)<br />
<strong>and</strong> spring (58) on housing (9).<br />
15. Install bellows (45) down between AFC piston (46) <strong>and</strong> housing (9) <strong>and</strong> line up holes in<br />
bellows (45) with holes in housing (9). Ensure bellows (45) is flat where it touches housing (9).<br />
16. Install fuel control cover (40) on bellows (45) <strong>and</strong> housing (9) with two screws (38), drilled head<br />
screw (37), <strong>and</strong> three washers (36). Do not tighten screws (38).<br />
17. Ensure check ball is loose <strong>and</strong> hole near bottom of check valve (39) is not plugged. Turn check<br />
valve (39) on top of fuel control cover (40). Tighten fuel control cover (40) 5 lb-ft (7 N•m).<br />
0039 00-4
TM 9-2815-225-34&P 0039 00<br />
FUEL PUMP MAIN HOUSING (Contd)<br />
ASSEMBLY (Contd)<br />
18. Install fuel filter screen (8), filter spring (7), new cap seal ring (6), <strong>and</strong> filter screen cap (5) on<br />
housing (9). Tighten filter screen cap (5) 8–12 lb-ft (11–16 N•m).<br />
19. Install tapered stud (31) with jamnut (10) <strong>and</strong> threaded stud (11) on housing (9).<br />
20. Apply lubricating oil to new O-ring (13) <strong>and</strong> install AFC needle valve (12) on housing (9) until<br />
AFC needle valve (12) bottoms out.<br />
21. Install throttle shaft (22) on stop (21) <strong>and</strong> secure with setscrew (15). Do not tighten setscrew (15)<br />
at this time.<br />
22. Apply lubricating oil to new O-ring (16) securing fuel adjusting screw (20), <strong>and</strong> install O-ring (16)<br />
on throttle shaft (22) about six rotations. Ensure fuel hole in throttle shaft (22) is open.<br />
23. Apply lubricating oil to new O-ring (23) <strong>and</strong> install throttle shaft (22) in housing (9) with<br />
counterbore of fuel port facing down. Ensure setscrew (15) in stop (21) faces upward. Tighten<br />
setscrew (15) 7–9 lb-ft (9–12 N•m).<br />
NOTE<br />
New throttle shaft ball, throttle shaft cover, <strong>and</strong> two drive<br />
screws will be installed after fuel pump has been calibrated.<br />
24. Install new retaining ring (33) on end of throttle shaft (22).<br />
25. Install fuel pump main housing to fuel pump (WP 0040 00).<br />
33<br />
1<br />
35<br />
34<br />
2<br />
4<br />
3<br />
5<br />
6<br />
7<br />
8<br />
9 11 10<br />
12<br />
13<br />
37<br />
36<br />
46<br />
38<br />
36<br />
39<br />
47<br />
48<br />
40<br />
41<br />
49<br />
42<br />
43<br />
50<br />
44<br />
45<br />
32<br />
31<br />
30<br />
29<br />
28<br />
26<br />
27<br />
25<br />
24<br />
1<br />
10<br />
23<br />
22<br />
21<br />
20<br />
18<br />
16 17<br />
14 15 19<br />
58<br />
57<br />
56<br />
55 54<br />
53 52 51<br />
9<br />
Figure 3. Main Housing Assembly.<br />
Figure 4. Main Housing Assembly.<br />
END OF WORK PACKAGE<br />
0039 00-5/6 blank
TM 9-2815-225-34&P 0040 00<br />
DIRECT SUPPORT AND GENERAL SUPPORT<br />
MAINTENANCE MANUAL<br />
INCLUDING REPAIR PARTS AND SPECIAL TOOLS LIST (RPSTL)<br />
FOR<br />
M915, M915A1, M915A4, M916, M920 VEHICLES<br />
NSN 2815-01-082-8125 P/N NTC400-3652-02 CUMMINS NTC-400 BIG CAM I DIESEL ENGINE<br />
W/CONTAINER<br />
NSN 2815-01-142-2745 P/N 11669835 CUMMINS NTC-400 BIG CAM III DIESEL ENGINE<br />
W/CONTAINER<br />
FUEL PUMP ASSEMBLY<br />
FUEL PUMP FRONT COVER AND GOVERNOR, FUEL PUMP GOVERNOR SPRING, FUEL GEAR PUMP, FUEL<br />
DAMPER AND HEAD, SOLENOID VALVE<br />
INITIAL SETUP:<br />
Tools <strong>and</strong> Special Tools<br />
General mechanic’s tool kit: automotive<br />
(Item 1, WP 0061 00)<br />
Maintenance <strong>and</strong> repair shop equipment:<br />
automotive (Item 2, WP 0061 00)<br />
Automotive <strong>maintenance</strong> <strong>and</strong> repair<br />
supplemental set no. 2 (Item 3, WP 0061 00)<br />
Ball joint vise (Item 9, WP 0061 00)<br />
Fuel pump mounting plate<br />
(Item 10, WP 0061 00)<br />
Material/Parts (Contd)<br />
Gasket (Item 10, Table 23, WP 0062 00)<br />
Plastic bushing seal<br />
(Item 11, Table 23, WP 0062 00)<br />
Lubricating oil (Item 19, WP 0060 00)<br />
Equipment Condition<br />
Fuel pump removed from engine<br />
(WP 0010 00)<br />
Material/Parts<br />
Gasket (Item 1, Table 23, WP 0062 00)<br />
Two lockwashers<br />
(Item 2, Table 23, WP 0062 00)<br />
Four lockwashers<br />
(Item 3, Table 23, WP 0062 00)<br />
Four lockwashers<br />
(Item 4, Table 23, WP 0062 00)<br />
Two rectangular seals<br />
(Item 5, Table 23, WP 0062 00)<br />
Rectangular ring seal<br />
(Item 6, Table 23, WP 0062 00)<br />
Eight lockwashers<br />
(Item 7, Table 23, WP 0062 00)<br />
Gasket (Item 8, Table 23, WP 0062 00)<br />
Adjusting screw seal<br />
(Item 9, Table 23, WP 0062 00)<br />
0040 00-1
TM 9-2815-225-34&P 0040 00<br />
FUEL PUMP ASSEMBLY (Contd)<br />
FUEL PUMP FRONT COVER AND GOVERNOR<br />
NOTE<br />
Position governor weight housing carrier horizontally <strong>and</strong> hold<br />
governor weights while installing fuel pump main housing.<br />
Ensure governor weights are properly engaged with tang on<br />
governor plunger.<br />
1. Remove fuel pump front cover (3) from mounting plate <strong>and</strong> ball joint vise.<br />
2. Install new gasket (4), fuel pump (5), <strong>and</strong> screw (6) on fuel pump front cover (3). Tighten<br />
screws (6) 9–11 lb-ft (12–15 N•m).<br />
3. Install six washers (7), eight new lockwashers (8), <strong>and</strong> screws (9) securing fuel pump front cover<br />
(3) on fuel pump (5). Tighten screw (9) 9–11 lb-ft (12–15 N•m).<br />
4. Install new plastic bushing seal (2) <strong>and</strong> screw (1) on fuel pump front cover (3). Tighten screw (1)<br />
9–11 lb-ft (12–15 N•m).<br />
5. For fuel pump front cover <strong>and</strong> governor repair, refer to WP 0038 00.<br />
FUEL PUMP GOVERNOR SPRING<br />
1. Install fuel pump governor spring (13), snapring (17), shims (14) <strong>and</strong> (15) <strong>and</strong> spring seat (16), on<br />
guide (12).<br />
2. Install new gasket (18), spring pack cover (19), four washers (20), <strong>and</strong> screws (21) on fuel pump<br />
(5). Place screw (21) with lockwire hole in upper right corner of spring pack cover (19). Torque<br />
screws (21) 9–11 lb-ft (12–15 N•m).<br />
NOTE<br />
Final calibration <strong>and</strong> on-engine fuel pump adjustments must<br />
be made prior to installation of new adjusting screw seal <strong>and</strong><br />
wire.<br />
3. Install new adjusting screw seal (11) <strong>and</strong> wire (10) on cover plug (22).<br />
4. For fuel pump governor spring repair, refer to WP 0037 00.<br />
1<br />
2<br />
3<br />
4<br />
5<br />
9<br />
8<br />
7<br />
MOUNTING<br />
PLATE<br />
6<br />
BALL JOINT VISE<br />
Figure 1. Fuel Pump Front Cover <strong>and</strong> Governor Installation.<br />
0040 00-2
TM 9-2815-225-34&P 0040 00<br />
FUEL PUMP ASSEMBLY (Contd)<br />
5<br />
10<br />
11<br />
12 13 14 15 16 17<br />
18<br />
19 20 21<br />
22<br />
Figure 2. Fuel Pump Governor Spring Installation.<br />
0040 00-3
TM 9-2815-225-34&P 0040 00<br />
FUEL PUMP ASSEMBLY (Contd)<br />
FUEL GEAR PUMP<br />
NOTE<br />
Use correct gasket in step 2 <strong>and</strong> ensure that it is positioned<br />
correctly. Ensure main housing fuel holes match gear pump<br />
holes.<br />
1. Install fuel supply elbow (3) <strong>and</strong> adapter (4) on gear body (2).<br />
2. Position notch in upper right-h<strong>and</strong> corner <strong>and</strong> install fuel gear pump (7) <strong>and</strong> new gasket (1) on<br />
fuel pump (8). Secure with four screws (6) <strong>and</strong> new lockwashers (5). Tighten screws (6) 11–13 lb-ft<br />
(15–18 N•m).<br />
NOTE<br />
Check that gear pump shaft rotates freely.<br />
3. For fuel gear pump repair, refer to WP 0036 00.<br />
FUEL DAMPER AND HEAD<br />
1. Apply light coat of lubricating oil on new rectangular seals (9) <strong>and</strong> (14) on filter head (10).<br />
2. Install filter head (10) on fuel pump (8) <strong>and</strong> secure with four screws (13), new lockwashers (12),<br />
<strong>and</strong> washers (11). Tighten screws (13) 11–13 lb-ft (15–18 N•m).<br />
3. For fuel damper <strong>and</strong> head repair, refer to WP 0035 00.<br />
SOLENOID VALVE<br />
1. Apply light coat of lubricating oil on new rectangular ring seal (21) on solenoid valve (20).<br />
2. Install solenoid valve (20) on fuel pump (8) <strong>and</strong> secure with two screws (18), new<br />
lockwashers (17), <strong>and</strong> washers (19).<br />
3. Install plug (16) on valve body (15).<br />
4. For solenoid valve repair, refer to WP 0034 00.<br />
2<br />
4<br />
3<br />
5<br />
6<br />
1<br />
7<br />
Figure 3. Fuel Gear Pump Installation.<br />
8<br />
0040 00-4
TM 9-2815-225-34&P 0040 00<br />
FUEL PUMP ASSEMBLY (Contd)<br />
10<br />
11<br />
12<br />
13<br />
9<br />
14<br />
8<br />
Figure 4. Fuel Damper <strong>and</strong> Head Installation.<br />
16<br />
15<br />
18<br />
17<br />
19<br />
21<br />
20<br />
8<br />
Figure 5. Solenoid Valve Installation.<br />
END OF WORK PACKAGE<br />
0040 00-5/6 blank
TM 9-2815-225-34&P 0041 00<br />
DIRECT SUPPORT AND GENERAL SUPPORT<br />
MAINTENANCE MANUAL<br />
INCLUDING REPAIR PARTS AND SPECIAL TOOLS LIST (RPSTL)<br />
FOR<br />
M915, M915A1, M915A4, M916, M920 VEHICLES<br />
NSN 2815-01-082-8125 P/N NTC400-3652-02 CUMMINS NTC-400 BIG CAM I DIESEL ENGINE<br />
W/CONTAINER<br />
NSN 2815-01-142-2745 P/N 11669835 CUMMINS NTC-400 BIG CAM III DIESEL ENGINE<br />
W/CONTAINER<br />
WATER PUMP<br />
DISASSEMBLY, CLEANING AND INSPECTION, ASSEMBLY<br />
INITIAL SETUP:<br />
Tools <strong>and</strong> Special Tools<br />
General mechanic’s tool kit:<br />
automotive (Item 1, WP 0061 00)<br />
Maintenance <strong>and</strong> repair shop equipment:<br />
automotive (Item 2, WP 0061 00)<br />
Automotive <strong>maintenance</strong> <strong>and</strong> repair<br />
supplemental set no. 2 (Item 3, WP 0061 00)<br />
Bearing disassembly fixture<br />
(Item 13, WP 0061 00)<br />
Water pump bearing m<strong>and</strong>rel<br />
(Item 14, WP 0061 00)<br />
Water pump seal m<strong>and</strong>rel<br />
(Item 15, WP 0061 00)<br />
Oil seal driver (Item 16, WP 0061 00)<br />
Oil seal pilot (Item 17, WP 0061 00)<br />
Press<br />
Materials/Parts<br />
Grease (Item 13, WP 0060 00)<br />
Loctite (Item 14, WP 0060 00)<br />
Lubricating oil (Item 19, WP 0060 00)<br />
Pipe sealant (Item 25, WP 0060 00)<br />
Grease fitting (Item 33, WP 0060 00)<br />
Seat <strong>and</strong> seal (Item 1, Table 24, WP 0062 00)<br />
Seal (Item 2, Table 24, WP 0062 00)<br />
Two bearings (Item 3, Table 24, WP 0062 00)<br />
Retaining ring (Item 4, Table 24, WP 0062 00)<br />
Retaining ring (Item 5, Table 24, WP 0062 00)<br />
Seal (Item 6, Table 24, WP 0062 00)<br />
Sleeve (Item 7, Table 24, WP 0062 00)<br />
Seal (Item 8, Table 24, WP 0062 00)<br />
Retaining ring (Item 9, Table 24, WP 0062 00)<br />
O-ring (Item 10, Table 24, WP 0062 00)<br />
Bearing (Item 11, Table 24, WP 0062 00)<br />
Equipment Condition<br />
Water pump removed from engine<br />
(TM 9-2320-273-20, TM 9-2320-283-20).<br />
References<br />
TM 9-2320-273-20<br />
TM 9-2320-283-20<br />
0041 00-1
TM 9-2815-225-34&P 0041 00<br />
WATER PUMP (Contd)<br />
DISASSEMBLY<br />
1. Remove screw (12), nut (15), washer (16), <strong>and</strong> idler pulley (18) with idler shaft (17) attached,<br />
from water pump housing (10).<br />
2. Using puller, remove water pump pulley (1) from water pump shaft (8).<br />
3. Using puller, remove impeller (14) from water pump shaft (8).<br />
4. Remove seal (3) <strong>and</strong> retaining ring (4) from water pump housing (10). Discard seal (3) <strong>and</strong><br />
retaining ring (4).<br />
5. Remove water pump shaft (8) with two bearings (5), spacer (6), <strong>and</strong> retaining ring (7) attached<br />
from water pump housing (10).<br />
6. Remove seat <strong>and</strong> seal assembly (13) <strong>and</strong> seal (19) from water pump housing (10). Discard seat<br />
<strong>and</strong> seal assembly (13) <strong>and</strong> seal (19).<br />
7. Remove one large pipe plug (9) <strong>and</strong> two small pipe plugs (11) from water pump housing (10).<br />
8. Using bearing disassembly fixture, remove bearing (5) <strong>and</strong> spacer (6) from water pump shaft (8).<br />
Discard bearing (5).<br />
9. Remove retaining ring (7) from water pump shaft (8). Discard retaining ring (7).<br />
10. Using bearing disassembly fixture, remove bearing (5) from water pump shaft (8). Discard<br />
bearing (5).<br />
11. Using press <strong>and</strong> water pump bearing m<strong>and</strong>rel, remove sleeve (2) from water pump pulley (1).<br />
Discard sleeve (2).<br />
12. Remove pipe plug (20) from idler pulley shaft (17).<br />
13. Remove seal (24) from idler pulley (18). Discard seal (24).<br />
14. Remove retaining ring (24), spacer (23), <strong>and</strong> O-ring (22) from idler shaft (17). Discard O-ring (22)<br />
<strong>and</strong> retaining ring (24).<br />
15. Install idler pulley (18) with idler shaft (17) attached, in vise. Using a hammer <strong>and</strong> flat punch<br />
inserted through pipe plug opening in idler pulley (18), remove idler shaft (17) with bearing (21)<br />
attached, from idler pulley (19).<br />
16. Remove idler pulley (18) from vise.<br />
17. Using press <strong>and</strong> water pump bearing m<strong>and</strong>rel, remove bearing (21) from idler shaft (17). Discard<br />
bearing (21).<br />
0041 00-2
TM 9-2815-225-34&P 0041 00<br />
WATER PUMP (Contd)<br />
12<br />
14<br />
10<br />
11<br />
13<br />
9<br />
1<br />
2<br />
3<br />
4<br />
5<br />
6<br />
7<br />
5<br />
8<br />
19<br />
11<br />
17<br />
15<br />
16<br />
18<br />
Figure 1. Water Pump Disassembly.<br />
21<br />
22<br />
23<br />
24<br />
25<br />
18<br />
17<br />
20<br />
Figure 2. Water Pump Idler Pulley Disassembly.<br />
0041 00-3
TM 9-2815-225-34&P 0041 00<br />
WATER PUMP (Contd)<br />
CLEANING AND INSPECTION<br />
1. For <strong>general</strong> parts cleaning information, refer to CLEANING, WP 0051 00.<br />
2. For <strong>general</strong> parts inspection information, refer to INSPECTION, WP 0051 00.<br />
NOTE<br />
Replace any part that does not pass visual inspection or is<br />
outside specified wear limits.<br />
3. Inspect water pump pulley (1) <strong>and</strong> idler pulley (6) for cracks, chips, or damaged pulley grooves.<br />
4. Inspect water pump housing (3) for cracks, corrosion, <strong>and</strong> stripped or elongated bolt holes. Repair<br />
any stripped holes.<br />
5. Inspect water pump housing (3) weep hole for blockage. Clean weep hole if blocked.<br />
6. Using inside micrometer, measure water pump housing (3) bearing bore. Discard water pump<br />
housing (3) if bearing bore is larger than 2.45 in. (62.22 mm).<br />
7. Inspect impeller (4) for cracks, chips, or corrosion.<br />
NOTE<br />
Impeller must be 0.001 in. (0.025 mm) smaller than water<br />
pump shaft impeller end to maintain a press fit between<br />
components. Discard all parts that are out of specifications.<br />
8. Using micrometer, measure water pump shaft impeller (4) end outside diameter. Diameter<br />
should be 0.6262–0.6267 in. (15.905–15.918 mm).<br />
9. Using micrometer, measure water pump shaft (2) pulley end outside diameter. Diameter should<br />
be 0.6693–0.6696 in. (17.000–17.008 mm).<br />
NOTE<br />
Water pump pulley must be 0.001 in. (0.025 mm) smaller than<br />
water pump shaft pulley end to maintain a press fit between<br />
components. Discard all parts that are out of specifications.<br />
10. Using inside micrometer, measure water pump pulley (1) bore inside diameter. Diameter should<br />
be 0.6663–0.6673 in. (16.924–16.949 mm).<br />
11. Using inside micrometer, measure impeller (4) bore inside diameter. Diameter should be<br />
0.624–0.625 in. (15.85–15.88 mm).<br />
12. Inspect water pump shaft (2) <strong>and</strong> idler shaft (5) for cracks, bends, or damaged threads.<br />
0041 00-4
TM 9-2815-225-34&P 0041 00<br />
WATER PUMP (Contd)<br />
3<br />
4<br />
1<br />
2<br />
5<br />
6<br />
Figure 3. Water Pump Inspection.<br />
0041 00-5
TM 9-2815-225-34&P 0041 00<br />
WATER PUMP (Contd)<br />
ASSEMBLY<br />
NOTE<br />
Lubricate all parts with lubricating oil before assembly.<br />
1. Using press <strong>and</strong> water pump bearing m<strong>and</strong>rel, install new bearing (4) on idler shaft (3) until<br />
fully seated.<br />
2. Apply light coat of Loctite to outside diameter of bearing (4). Using press <strong>and</strong> water pump<br />
bearing m<strong>and</strong>rel, install bearing (4) <strong>and</strong> idler shaft (3) in idler pulley (2) until fully seated.<br />
3. Install new retaining ring (7), with flat side facing bearing (4), new O-ring (5), <strong>and</strong> spacer (6) on<br />
idler shaft (3).<br />
4. Using oil seal driver, install new seal (8) in idler pulley (2) with seal lip facing idler pulley (2).<br />
5. Apply pipe sealant to pipe plug (1) <strong>and</strong> install in idler pulley (2).<br />
6. Using oil seal driver, install new sleeve (10) in water pump pulley (9).<br />
7. Apply lubricating oil to new bearing (13). Using press <strong>and</strong> water pump bearing m<strong>and</strong>rel, install<br />
bearing (13) on water pump shaft (16) until fully seated.<br />
8. Install new retaining ring (15) on water pump shaft (16).<br />
9. Apply lubricating oil to new bearing (13). Using press <strong>and</strong> water pump bearing m<strong>and</strong>rel, install<br />
spacer (14) <strong>and</strong> bearing (13) on water pump shaft (16) until fully seated.<br />
10. Using hammer, oil seal driver, <strong>and</strong> oil seal pilot, install new seal (25) in water pump<br />
housing (18).<br />
11. Apply light coat of Loctite to outside diameter of bearings (13). Using press <strong>and</strong> water pump<br />
bearing m<strong>and</strong>rel, install bearings (13) with water pump shaft (16) attached, in water pump<br />
housing (18) until fully seated.<br />
12. Install new retaining ring (12) in water pump housing (18), with flat side of retaining ring (12)<br />
facing bearing (13).<br />
13. Using hammer, oil seal driver, <strong>and</strong> oil seal pilot, install new seal (11), with lip facing bearing<br />
(13), in water pump housing (18). Ensure seal (11) is flush with top edge of water pump housing<br />
(18) bore.<br />
14. Apply light coat of Loctite to outside diameter of new seal <strong>and</strong> seat assembly (21), <strong>and</strong> apply one<br />
drop of retaining compound between seal <strong>and</strong> seat assembly (21). Using press <strong>and</strong> water pump<br />
seal m<strong>and</strong>rel, install seat <strong>and</strong> seal assembly (21) in water pump housing (18).<br />
15. Apply pipe sealant to one long pipe plug (17) <strong>and</strong> two short pipe plugs (19) <strong>and</strong> install in water<br />
pump housing (18).<br />
16. Apply light coat of Loctite to bore of water pump pulley (9). Using press, install water pump<br />
pulley (9) on water pump shaft (16) until fully seated.<br />
17. Apply light coat of Loctite to bore of impeller (22). Using press, install impeller (22) on water<br />
pump shaft (16) until fully seated.<br />
18. Using feeler gauge, check clearance between impeller (22) <strong>and</strong> water pump housing (18).<br />
Clearance should be 0.020–0.040 in. (0.508–1.016 mm).<br />
19. Install idler pulley (2), with idler shaft (3) attached, on water pump housing (18) with washer<br />
(24) <strong>and</strong> nut (23).<br />
20. Install screw (20) in water pump housing (18).<br />
21. Install water pump (TM 9-2320-273-20 or TM 9-2320-283-20).<br />
0041 00-6
TM 9-2815-225-34&P 0041 00<br />
WATER PUMP (Contd)<br />
4<br />
5<br />
6<br />
7<br />
8<br />
2<br />
3<br />
1<br />
Figure 4. Water Pump Idler Pulley Assembly.<br />
20<br />
22<br />
18<br />
19<br />
21<br />
17<br />
9<br />
13<br />
12<br />
10 11<br />
16<br />
13<br />
14 15<br />
25<br />
19<br />
3<br />
23<br />
24<br />
2<br />
Figure 5. Water Pump Assembly.<br />
END OF WORK PACKAGE<br />
0041 00-7/8 blank
TM 9-2815-225-34&P 0042 00<br />
DIRECT SUPPORT AND GENERAL SUPPORT<br />
MAINTENANCE MANUAL<br />
INCLUDING REPAIR PARTS AND SPECIAL TOOLS LIST (RPSTL)<br />
FOR<br />
M915, M915A1, M915A4, M916, M920 VEHICLES<br />
NSN 2815-01-082-8125 P/N NTC400-3652-02 CUMMINS NTC-400 BIG CAM I DIESEL ENGINE<br />
W/CONTAINER<br />
NSN 2815-01-142-2745 P/N 11669835 CUMMINS NTC-400 BIG CAM III DIESEL ENGINE<br />
W/CONTAINER<br />
CYLINDER BLOCK COMPONENTS INSTALLATION<br />
CRANKSHAFT AND MAIN BEARINGS; CAMSHAFT; PISTONS AND CONNECTING RODS;<br />
ACCESSORY DRIVE HOUSING; OIL PUMP; ACCESSORY DRIVE PULLEY;<br />
AIR COMPRESSOR; FRONT GEAR COVER; FLYWHEEL, FLEXPLATE, AND FLYWHEEL HOUSING; OIL PAN<br />
INITIAL SETUP:<br />
Tools <strong>and</strong> Special Tools<br />
General mechanic’s tool kit: automotive<br />
(Item 1, WP 0061 00)<br />
Maintenance <strong>and</strong> repair shop equipment:<br />
automotive (Item 2, WP 0061 00)<br />
Automotive <strong>maintenance</strong> <strong>and</strong> repair supplemental<br />
set no. 2 (Item 3, WP 0061 00)<br />
Lifting strap<br />
Prybar<br />
Four camshaft pilot tools (Item 62, WP 0061 00)<br />
Piston ring exp<strong>and</strong>er (Item 28, WP 0061 00)<br />
Pulley installation assembly tool<br />
(Item 63, WP 0061 00)<br />
Crankshaft seal driver (Item 64, WP 0061 00)<br />
Piston ring compressor (Item 65, WP 0061 00)<br />
Material/Parts<br />
Gasket (Item 1, Table 25, WP 0062 00)<br />
Twelve compression rings<br />
(Item 2, Table 25, WP 0062 00)<br />
Gasket (Item 3, Table 25, WP 0062 00)<br />
Four lockwashers (Item 4, Table 25, WP 0062 00)<br />
Twelve compression rings<br />
(Item 5, Table 25, WP 0062 00)<br />
Six piston rings (Item 6, Table 25, WP 0062 00)<br />
Rear main seal (Item 7, Table 25, WP 0062 00)<br />
Four thrust bearing washers<br />
(Item 8, Table 25, WP 0062 00)<br />
Six piston rings (Item 9, Table 25, WP 0062 00)<br />
Gasket (Item 10, Table 25, WP 0062 00)<br />
Seal (Item 11, Table 25, WP 0062 00)<br />
O-ring (Item 12, Table 25, WP 0062 00)<br />
GAA grease (Item 13, WP 0060 00)<br />
Fourteen main bearing halves<br />
(Item 13, Table 25, WP 0062 00)<br />
Material/Parts (Contd)<br />
Cam follower housing gasket<br />
(Item 14, Table 25, WP 0062 00)<br />
Eighteen lockwashers<br />
(Item 15, Table 25, WP 0062 00)<br />
High-pressure lubricating oil (Item 15, WP 0060 00)<br />
Gasket (Item 16, Table 25, WP 0062 00)<br />
Gasket (Item 17, Table 25, WP 0062 00)<br />
Twelve connecting rod bearing halves<br />
(Item 18, Table 25, WP 0062 00)<br />
Locknut (Item 19, Table 25, WP 0062 00)<br />
Lubricating oil OHE/HDO 30 (Item 20, WP 0060 00)<br />
Keyway seal (Item 20, Table 25, WP 0062 00)<br />
Gasket (Item 21, Table 25, WP 0062 00)<br />
60-80 lubricating oil (Item 21, WP 0060 00)<br />
Fourteen lockplates (Item 22, Table 25, WP 0062 00)<br />
Lockwasher (Item 23, Table 25, WP 0062 00)<br />
Three lockwashers (Item 24, Table 25, WP 0062 00)<br />
Eleven O-rings (Item 25, Table 25, WP 0062 00)<br />
Pipe sealant (Item 25, WP 0060 00)<br />
Nine lockwashers (Item 26, Table 25, WP 0062 00)<br />
Thirteen lockwashers<br />
(Item 27, Table 25, WP 0062 00)<br />
Two lockwashers (Item 28, Table 25, WP 0062 00)<br />
Gasket (Item 29, Table 25, WP 0062 00)<br />
Four lockwashers (Item 30, Table 25, WP 0062 00)<br />
Two O-rings (Item 31, Table 25, WP 0062 00)<br />
Gasket (Item 32, Table 25, WP 0062 00)<br />
Personnel Required<br />
One assistant<br />
Equipment Condition<br />
Engine mounted on <strong>maintenance</strong> st<strong>and</strong><br />
(WP 0009 00)<br />
0042 00-1
TM 9-2815-225-34&P 0042 00<br />
CYLINDER BLOCK COMPONENTS INSTALLATION (Contd)<br />
CRANKSHAFT AND MAIN BEARINGS<br />
WARNING<br />
Use extreme caution during assembly. Engine components are<br />
heavy. Failure to comply may result in damage to equipment or<br />
injury to personnel.<br />
CAUTION<br />
Cylinder block saddle <strong>and</strong> cap mating surfaces must be clean<br />
<strong>and</strong> dry when bearing halves are installed, or engine damage<br />
may result. Wipe main bearing bores, main bearings, engine<br />
crankshaft, <strong>and</strong> related parts with a clean cloth. Ensure cloth<br />
does not leave any particles or lint in or on parts <strong>and</strong> bores, or<br />
engine damage may result.<br />
NOTE<br />
Upper main bearings have a groove <strong>and</strong> oil hole to permit<br />
lubrication of engine crankshaft; the lower main bearing halves<br />
do not. The upper main bearings for No. 2, 4, <strong>and</strong> 6 are the<br />
same. The groove in upper main bearing half for No. 7 is not in<br />
the center. Install No. 7 main bearing so wider part of the<br />
bearing (from groove) is toward flywheel end of cylinder block.<br />
Each main bearing has a groove. Install main bearings so<br />
grooves will fit retaining rings.<br />
Check for marks on crankshaft to determine size of main<br />
bearings <strong>and</strong> thrust rings. If there are no marks, use st<strong>and</strong>ard<br />
size parts.<br />
1. Apply lubricating oil to seven new upper main bearing halves (2) <strong>and</strong> retaining rings (3). Install<br />
seven new upper main bearing halves (2) <strong>and</strong> retaining rings (3) on cylinder block (1).<br />
2. Using lifting device or lifting strap, lower crankshaft (5) on cylinder block (1).<br />
NOTE<br />
Ensure grooved thrust side of thrust bearing washers is against<br />
the flange of crankshaft. Upper thrust rings are not doweled to<br />
cylinder block. Lower thrust bearing washers are doweled to<br />
No. 7 bearing cap.<br />
3. Install four new upper thrust bearing washers (4) into position on No. 7 journal of crankshaft (5).<br />
NOTE<br />
Lubricate contact surface of seven lower main bearing halves<br />
<strong>and</strong> main bearing journal surface of crankshaft. Upper thrust<br />
rings are not doweled to cylinder block. Lower thrust bearing<br />
washers are doweled to No. 7 bearing cap.<br />
4. Install seven new lower main bearing halves (2) on crankshaft (5). Ensure lower main bearing<br />
halves (2) are aligned with retaining rings (3).<br />
5. Position No. 1 through No. 6 bearing caps (9) on cylinder block (1).<br />
6. Install lower thrust bearing washers (4) on No.7 bearing cap (6).<br />
0042 00-2
TM 9-2815-225-34&P 0042 00<br />
CYLINDER BLOCK COMPONENTS INSTALLATION (Contd)<br />
CRANKSHAFT AND MAIN BEARINGS (Contd)<br />
7. Position No. 7 bearing cap (6) <strong>and</strong> thrust bearing washers (4) on cylinder block (1).<br />
8. Apply OE/HDO 30 lubricating oil to threads of fourteen new screws (8) <strong>and</strong> new lockplates (7).<br />
9. Install fourteen screws (8) <strong>and</strong> lockplates (7) on bearing caps (9) <strong>and</strong> (6) on cylinder block (1)<br />
finger-tight.<br />
1<br />
1<br />
~<br />
2<br />
4<br />
2<br />
3<br />
5<br />
4<br />
3<br />
1<br />
2<br />
6<br />
9<br />
7<br />
8<br />
Figure 1. Crankshaft <strong>and</strong> Main Bearings Installation.<br />
0042 00-3
TM 9-2815-225-34&P 0042 00<br />
CYLINDER BLOCK COMPONENTS INSTALLATION (Contd)<br />
CRANKSHAFT AND MAIN BEARINGS (Contd)<br />
10. Using rubber mallet, strike bearing caps (2) into position on cylinder block (1).<br />
11. Tighten screws (3) 250–260 lb-ft (339–353 N•m) in sequence as shown in figure 2.<br />
12. Loosen fourteen screws (3) three to five threads, or a minimum of three complete turns.<br />
13. Repeat step 11.<br />
14. Using h<strong>and</strong>s, rotate crankshaft (6). If crankshaft (6) does not rotate freely, refer to WP 0016 00,<br />
Crankshaft Cleaning <strong>and</strong> Inspection.<br />
15. Install dial indicator on rear of cylinder block (1) with contact tip resting on crankshaft (6) flange<br />
end face.<br />
16. Using prybar, pry crankshaft (6) toward front of cylinder block (1).<br />
17. Remove prybar <strong>and</strong> set dial indicator to zero.<br />
18. Pry crankshaft (6) toward rear of cylinder block (1). Total end clearance for new crankshaft (6)<br />
<strong>and</strong> new thrust bearing washers (4) should be 0.007–0.018 in. (0.178–0.457 mm). Maximum<br />
clearance for worn parts is 0.022 in. (0.559 mm).<br />
19. If clearance is less than 0.007 in. (0.178 mm), proceed as follows:<br />
a. Loosen fourteen screws (3) one turn.<br />
b. Pry crankshaft (6) toward front <strong>and</strong> rear of cylinder block (1).<br />
c. Tighten fourteen screws (3) according to steps 11–13.<br />
d. Recheck end clearance.<br />
NOTE<br />
If clearance is more than 0.022 in. (0.559 mm), use oversize<br />
thrust bearing washer.<br />
20. Bend tabs of fourteen lockplates (5) against heads of fourteen screws (3).<br />
0042 00-4
TM 9-2815-225-34&P 0042 00<br />
CYLINDER BLOCK COMPONENTS INSTALLATION (Contd)<br />
1<br />
2 3 4<br />
1<br />
4<br />
D<br />
H<br />
L<br />
M<br />
I<br />
E<br />
A<br />
C G K N J F B<br />
TIGHTENING<br />
SEQUENCE<br />
Figure 2. Main Bearings Installation.<br />
1<br />
3<br />
5<br />
6<br />
Figure 3. Crankshaft Installation.<br />
0042 00-5
TM 9-2815-225-34&P 0042 00<br />
CYLINDER BLOCK COMPONENTS INSTALLATION (Contd)<br />
CAMSHAFT<br />
CAUTION<br />
The oil grooves on thrust washer must be installed facing<br />
camshaft gear, or thrust washer failure will result.<br />
NOTE<br />
Four camshaft pilot tools may be used to assist with camshaft<br />
installation.<br />
1. Using high-pressure lubricant, coat both sides of thrust washer (3) <strong>and</strong> slide thrust washer (3)<br />
over end of camshaft (2) until seated next to camshaft gear (1).<br />
NOTE<br />
Lubricate cam lobes with high-pressure lubricant.<br />
2. Apply high-pressure lubricant to camshaft (2) lobes.<br />
3. Install camshaft (2) in cylinder block (4).<br />
4. Line up timing mark O on camshaft gear (1) with timing mark O on crankshaft gear (10) <strong>and</strong> fully<br />
seat camshaft (2) <strong>and</strong> thrust washer (3) against cylinder block (4). Remove camshaft pilot tools<br />
from camshaft (2), if utilized.<br />
5. Install dial indicator on front of cylinder block (4), <strong>and</strong> position tip of dial indicator against tooth<br />
on camshaft gear (1).<br />
6. Rotate camshaft gear (1) as far as it will freely move. Ensure crankshaft gear (10) does not move.<br />
7. Turn dial indicator to zero.<br />
8. Rotate camshaft gear (1) in opposite direction as far as it will freely move. Dial indicator reading<br />
shows amount of backlash between gears.<br />
9. Normal backlash is 0.004–0.016 in. (0.102–0.406 mm) between new camshaft gear (1) <strong>and</strong> new<br />
crankshaft gear (10). Minimum backlash for new camshaft gear (1) is 0.002 in. (0.051 mm). Gears<br />
will begin to make noise if backlash exceeds 0.010 in. (0.254 mm). If noise is acceptable, do not<br />
replace gears unless backlash exceeds 0.020 in. (0.508 mm).<br />
NOTE<br />
Perform steps 10 <strong>and</strong> 11 to install any one of the three cam<br />
follower assemblies. Repeat steps 10 <strong>and</strong> 11 as required to<br />
install each additional cam follower assembly.<br />
Gaskets must be the same thickness as those removed. Total<br />
gasket thickness must be 0.014–0.080 in. (0.356–2.032 mm).<br />
10. Install new cam follower housing gasket (6) on two dowel pins (5).<br />
NOTE<br />
Strike housing with soft-nose hammer to push it onto dowel<br />
pins on cylinder block.<br />
11. Install cam follower housing (7) with six screws (8) <strong>and</strong> new lockwashers (9) on cylinder block (4).<br />
Tighten screws (8) 15 lb-ft (20 N•m) in tightening sequence shown in figure 4, <strong>and</strong> then tighten<br />
30–35 lb-ft (41–48 N•m) in sequence shown in figure 4.<br />
0042 00-6
TM 9-2815-225-34&P 0042 00<br />
CYLINDER BLOCK COMPONENTS INSTALLATION (Contd)<br />
1 2<br />
3<br />
4<br />
5<br />
6<br />
7<br />
9<br />
8<br />
10<br />
1<br />
C A E<br />
F<br />
B<br />
D<br />
DIAL INDICATOR<br />
Figure 4. Cam Follower Installation.<br />
0042 00-7
TM 9-2815-225-34&P 0042 00<br />
CYLINDER BLOCK COMPONENTS INSTALLATION (Contd)<br />
PISTONS AND CONNECTING RODS<br />
NOTE<br />
Perform steps 1 through 18 to install any one of the six piston,<br />
connecting rod, <strong>and</strong> bearings assemblies. Repeat for remaining<br />
piston, connecting rod <strong>and</strong> bearing assemblies.<br />
Parts are not interchangeable. Do not mix parts from one<br />
assembly with another. Always replace bearing halves in pairs<br />
(upper <strong>and</strong> lower). Check for marks on crankshaft to determine<br />
bearing size. If there are no marks, use st<strong>and</strong>ard size parts.<br />
1. Using piston ring exp<strong>and</strong>er, install two new compression rings (1) <strong>and</strong> (3) <strong>and</strong> two new piston<br />
rings (2) <strong>and</strong> (4) on piston <strong>and</strong> connecting rod assembly (5). Stagger ring gaps so they are not in<br />
line with each other or with piston pin.<br />
2. Install new upper rod bearing half (7) on piston <strong>and</strong> connecting rod assembly (5). Ensure oil hole<br />
in bearing half (7) lines up with oil hole in connecting rod (6).<br />
3. Install new lower rod bearing half (7) on connecting rod cap (8).<br />
4. Using clean lubricating oil, lubricate two rod bearing halves (7).<br />
5. Immerse piston (5) into container of clean lubricating oil.<br />
6. Install two connecting rod guide pins (11) on piston <strong>and</strong> connecting rod assembly (5).<br />
7. Using piston ring compressor, compress rings (1), (2), (3), <strong>and</strong> (4) on piston <strong>and</strong> connecting rod<br />
assembly (5).<br />
8. Place cylinder block (12) in vertical position with rear of cylinder block (12) facing down.<br />
9. Rotate crankshaft (10) until journal for piston <strong>and</strong> connecting rod assembly (5) is installed at<br />
bottom dead center.<br />
10. Position piston <strong>and</strong> connecting rod assembly (5) toward camshaft side of cylinder block (12).<br />
NOTE<br />
Guide connecting rod on journal of crankshaft as piston is<br />
installed on cylinder liner.<br />
11. Push piston (5) through piston ring compressor <strong>and</strong> into cylinder liner (13). Ensure piston (5)<br />
moves freely in cylinder liner (13). If piston (5) does not move freely, remove <strong>and</strong> check for broken<br />
rings.<br />
12. Using connecting rod guide pins (11), pull connecting rod (6) in position against crankshaft (10).<br />
13. Remove two connecting rod guide pins (11) from piston <strong>and</strong> connecting rod assembly (5).<br />
14. Install connecting rod cap (8) on crankshaft (10) <strong>and</strong> on piston <strong>and</strong> connecting rod assembly (5).<br />
Ensure numbered side of connecting rod cap (8) is on same side as numbered side of connecting<br />
rod assembly (5).<br />
15. Using lubricating oil, lubricate two bolts (9).<br />
16. Install two bolts (9) on connecting rod cap (8) <strong>and</strong> connecting rod (6). Tighten bolts (9) as shown in<br />
table 1.<br />
17. Check piston <strong>and</strong> connecting rod assembly (5) side-to-side movement. Piston <strong>and</strong> connecting rod<br />
assembly (5) must move freely on crankshaft journal with h<strong>and</strong> pressure. If connecting rod does<br />
not move freely, remove connecting rod cap (8) <strong>and</strong> check for dirt, damage, or improper bearing<br />
half (7).<br />
18. Using feeler gauge, check side clearance of connecting rod cap (8) <strong>and</strong> crankshaft (10). Side<br />
clearance must be 0.004–0.013 in. (0.102–0.330 mm).<br />
0042 00-8
TM 9-2815-225-34&P 0042 00<br />
CYLINDER BLOCK COMPONENTS INSTALLATION (Contd)<br />
PISTONS AND CONNECTING RODS (Contd)<br />
Table 1. Tightening Sequence for Piston <strong>and</strong> Connecting Rod Bolts.<br />
STEP SEQUENCE MINIMUM MAXIMUM<br />
1. Tighten to 70 lb-ft (95 N•m) 75 lb-ft (102 N•m)<br />
2. Tighten to 140 lb-ft (190 N•m) 150 lb-ft (230 N•m)<br />
3. Loosen completely — —<br />
4. Tighten to 25 lb-ft (34 N•m) 30 lb-ft (41 N•m)<br />
5. Tighten to 70 lb-ft (95 N•m) 75 lb-ft (102 N•m)<br />
6. Tighten to 140 lb-ft (190 N•m) 150 lb-ft (230 N•m)<br />
1<br />
3<br />
2<br />
4<br />
13<br />
5<br />
6<br />
7<br />
10<br />
12<br />
5<br />
11<br />
8<br />
10<br />
9<br />
0.0004–0.013 in.<br />
Figure 5. Piston <strong>and</strong> Connecting Rod Installation.<br />
0042 00-9
TM 9-2815-225-34&P 0042 00<br />
CYLINDER BLOCK COMPONENTS INSTALLATION (Contd)<br />
ACCESSORY DRIVE HOUSING<br />
NOTE<br />
Rotate crankshaft clockwise when facing front of crankshaft.<br />
1. Turn crankshaft (5) in direction of engine rotation until No. 1 cylinder is at Top Dead Center<br />
(TDC) of compression stroke (6).<br />
2. Turn crankshaft (5) in direction of engine rotation to 90° past TDC (7).<br />
3. Position accessory drive housing (3) <strong>and</strong> new gasket (2) on cylinder block (1). Ensure that timing<br />
mark on accessory drive gear (9) lines up with timing mark on camshaft gear (8). This alignment<br />
is necessary so that valve <strong>and</strong> injector adjustments marks on accessory drive pulley will be<br />
correctly aligned.<br />
4. Install five bolts (4) on accessory drive housing (3). Tighten bolts (4) 40–45 lb-ft (54–61 N•m).<br />
5. Install dial indicator on front of cylinder block (1) <strong>and</strong> position tip of dial indicator against tooth of<br />
accessory drive gear (9).<br />
6. Rotate accessory drive gear (9) as far as it will freely move. Ensure camshaft gear (8) does not<br />
move.<br />
7. Turn dial on indicator to zero <strong>and</strong> rotate accessory drive gear (9) in opposite direction. Reading on<br />
dial indicator shows amount of backlash between gears.<br />
8. Normal backlash between new accessory drive gear (9) <strong>and</strong> new camshaft gear (8) is<br />
0.004–0.016 in. (0.102–0.406 mm). Backlash for new accessory drive gear (9) must be at least<br />
0.002 in. (0.051 mm). If backlash is more than 0.016 in. (0.406 mm), remove accessory drive<br />
housing (3) <strong>and</strong> replace accessory drive gear (9).<br />
0042 00-10
TM 9-2815-225-34&P 0042 00<br />
CYLINDER BLOCK COMPONENTS INSTALLATION (Contd)<br />
6<br />
5<br />
7<br />
FRONT OF CRANKSHAFT<br />
1<br />
3<br />
1<br />
~<br />
2<br />
4<br />
9<br />
8<br />
9<br />
9<br />
8<br />
Figure 6. Accessory Drive Housing Installation.<br />
0042 00-11
TM 9-2815-225-34&P 0042 00<br />
CYLINDER BLOCK COMPONENTS INSTALLATION (Contd)<br />
OIL PUMP<br />
NOTE<br />
Perform steps 1 through 6 for Big Cam III only.<br />
1. Apply pipe sealant to threads of elbow (2).<br />
2. Install elbow (2) on cylinder block (1).<br />
3. Apply pipe sealant to threads of oil transfer tube (3).<br />
4. Install oil transfer tube (3) on elbow (2).<br />
5. Install loose end of oil transfer tube (3) on oil pump (6).<br />
6. Install oil pump (6) <strong>and</strong> new gasket (7) on cylinder block (1) with five bolts (4) <strong>and</strong> new<br />
lockwashers (5). Tighten bolts (4) 45 lb-ft (61 N•m).<br />
1<br />
2<br />
3<br />
7<br />
6 5<br />
4<br />
Figure 7. Oil Transfer Tube <strong>and</strong> Elbow Installation.<br />
0042 00-12
TM 9-2815-225-34&P 0042 00<br />
CYLINDER BLOCK COMPONENTS INSTALLATION (Contd)<br />
OIL PUMP (Contd)<br />
NOTE<br />
Perform step 7 for Big Cam I only.<br />
7. Install oil pump (13) <strong>and</strong> new gasket (14) on cylinder block (1) with five new lockwashers (12), two<br />
short bolts (11), <strong>and</strong> three long bolts (10). Tighten bolts (10) <strong>and</strong> (11) 40 lb-ft (54 N•m).<br />
8. Install dial indicator <strong>and</strong> dial gauge attachment on front of cylinder block (1), <strong>and</strong> position tip of<br />
dial indicator against tooth of pump drive gear (8).<br />
9. Rotate pump drive gear (8) as far as it will freely move. Ensure that camshaft gear (15) does not<br />
move.<br />
10. Turn dial indicator to zero.<br />
11. Rotate pump drive gear (8) in opposite direction. The reading of dial indicator shows the amount<br />
of backlash between gears. Minimum backlash is 0.002 in. (0.051 mm) <strong>and</strong> maximum backlash is<br />
0.016 in. (0.406 mm). Replace pump drive gear if not within specifications.<br />
8<br />
1<br />
DIAL<br />
INDICATOR<br />
9<br />
OIL PUMP GEAR BACKLASH CHECK<br />
1<br />
14<br />
13<br />
12<br />
10<br />
11<br />
15<br />
Figure 8. Oil Pump Installation.<br />
8<br />
0042 00-13
TM 9-2815-225-34&P 0042 00<br />
CYLINDER BLOCK COMPONENTS INSTALLATION (Contd)<br />
ACCESSORY DRIVE PULLEY<br />
NOTE<br />
Remove pipe plug from front gear cover <strong>and</strong> ensure timing<br />
marks on camshaft gear <strong>and</strong> accessory drive gear are aligned.<br />
Reinstall pipe plug in front gear cover <strong>and</strong> torque to 35–45 lb-ft<br />
(48–61 N•m).<br />
1. Apply high pressure lubricant to accessory driveshaft (7).<br />
NOTE<br />
Ensure short leg of keyway seal faces toward inside of<br />
accessory drive shaft.<br />
2. Install new keyway seal (5) on accessory driveshaft (7).<br />
NOTE<br />
Perform steps 3 through 5 for Big Cam I engines only.<br />
3. Align accessory drive pulley (4) keyway with dowel pin (8) on accessory driveshaft (7).<br />
4. Using pulley installation tool, install accessory drive pulley (4) on accessory driveshaft (7).<br />
5. Align keyway seal (5) on keyway of accessory drive pulley (4). Ensure short leg of keyway seal (5)<br />
faces toward inside of accessory driveshaft (7) <strong>and</strong> washer (3) or it will crush against L of seal (5).<br />
NOTE<br />
Perform steps 6 through 8 for Big Cam III only.<br />
6. Align accessory drive pulley (6) keyway with dowel pin (8) on accessory driveshaft (7).<br />
7. Align new keyway seal (5) on keyway of accessory drive pulley (6). Ensure short leg of keyway seal<br />
(5) faces toward inside of accessory driveshaft (7) <strong>and</strong> washer (3) or it will crush against L of<br />
seal (5).<br />
NOTE<br />
Hold crankshaft at flywheel end when applying torque.<br />
8. Install new locknut (2) <strong>and</strong> washer (3) on accessory driveshaft (7). Tighten locknut (2) 300–310<br />
lb-ft (407–420 N•m).<br />
NOTE<br />
Perform step 9 for Big Cam III only.<br />
9. Position accessory drive pulley assembly (4) on accessory drive pulley (6) with six bolts (1).<br />
Tighten bolts 40–45 lb-ft (54–61 N•m).<br />
0042 00-14
TM 9-2815-225-34&P 0042 00<br />
CYLINDER BLOCK COMPONENTS INSTALLATION (Contd)<br />
8<br />
6<br />
4 5<br />
7<br />
2<br />
3<br />
1<br />
BIG CAM III<br />
8<br />
4 7<br />
3<br />
5<br />
2<br />
BIG CAM I<br />
Figure 9. Accessory Drive Pulley Installation.<br />
0042 00-15
TM 9-2815-225-34&P 0042 00<br />
CYLINDER BLOCK COMPONENTS INSTALLATION (Contd)<br />
AIR COMPRESSOR<br />
NOTE<br />
Air compressor must be timed to engine firing order.<br />
1. Rotate crankshaft (1) until valve set mark A on accessory drive pulley (2) is aligned with pointer<br />
(13) on front gear cover (3).<br />
2. Rotate air compressor crankshaft (14) until scribe mark on hub is positioned halfway between 9<br />
<strong>and</strong> 10 o’clock.<br />
3. Install drive coupling (5) on air compressor (10).<br />
4. Install air compressor (10) <strong>and</strong> new gasket (6) on accessory drive housing (11) with two screws (4)<br />
<strong>and</strong> (12), washers (7), four new lockwashers (8), <strong>and</strong> two nuts (9). Using air compressor wrench,<br />
tighten screws (4) <strong>and</strong> (12) 40–45 lb-ft (54–62 N•m).<br />
0042 00-16
TM 9-2815-225-34&P 0042 00<br />
CYLINDER BLOCK COMPONENTS INSTALLATION (Contd)<br />
AIR COMPRESSOR WRENCH<br />
10<br />
3<br />
4<br />
5 6<br />
7 8 9<br />
13<br />
2<br />
11<br />
14<br />
1<br />
12<br />
8<br />
13<br />
Figure 10. Drive Coupling Installation.<br />
0042 00-17
TM 9-2815-225-34&P 0042 00<br />
CYLINDER BLOCK COMPONENTS INSTALLATION (Contd)<br />
AIR COMPRESSOR (Contd)<br />
5. Apply pipe sealant to threads of plug (11), <strong>and</strong> install air inlet connector (10) <strong>and</strong> new gasket (12)<br />
on air compressor (1) with two washers (8), new lockwashers (7), screws (9) <strong>and</strong> (6), <strong>and</strong> plug (11).<br />
6. Install two air inlet hoses (3) <strong>and</strong> tube (5) on air inlet connector (10) <strong>and</strong> elbow (2) with four<br />
clamps (4).<br />
7. Apply pipe sealant to threads of three adapters (15) <strong>and</strong>, install adapters (15), coupling (17), <strong>and</strong><br />
elbow (18) on air compressor (1).<br />
8. Install four bushings (14), coolant outlet tube (13), <strong>and</strong> coolant inlet tube (16) on three adapters<br />
(15) <strong>and</strong> elbow (18).<br />
0042 00-18
TM 9-2815-225-34&P 0042 00<br />
CYLINDER BLOCK COMPONENTS INSTALLATION (Contd)<br />
1<br />
2<br />
3<br />
12<br />
11<br />
4<br />
5<br />
13<br />
10<br />
8<br />
7<br />
9<br />
8<br />
7<br />
6<br />
3<br />
14<br />
18<br />
17<br />
15<br />
15<br />
14<br />
16<br />
14<br />
1<br />
Figure 11. Air Compressor Installation.<br />
0042 00-19
TM 9-2815-225-34&P 0042 00<br />
CYLINDER BLOCK COMPONENTS INSTALLATION (Contd)<br />
FRONT GEAR COVER<br />
NOTE<br />
Perform step 1 for Big Cam I only.<br />
1. Remove three screws (4), lockwashers (18), <strong>and</strong> washers (17) from camshaft <strong>support</strong> (5).<br />
NOTE<br />
Perform step 2 for Big Cam III only.<br />
2. Remove three screws (4) from camshaft <strong>support</strong> (5).<br />
3. Remove camshaft <strong>support</strong> (5), shim pack (6), <strong>and</strong> seal (7) from gear cover (11).<br />
CAUTION<br />
All surfaces in contact with oil seals must be completely free of<br />
oil. Oil on a Teflon seal will destroy its sealing properties.<br />
4. Coat new gasket (12) with high pressure lubricant <strong>and</strong> install on gear cover (11).<br />
5. Install gear cover (11) <strong>and</strong> gasket (12) on two dowels (13) <strong>and</strong> cylinder block (14).<br />
NOTE<br />
Perform step 6 for Big Cam I only.<br />
6. Install screw (8), new lockwasher (9), washer (10), screw (15), <strong>and</strong> nine screws (16) on gear cover<br />
(11) <strong>and</strong> cylinder block (14). Tighten screws (16), (8), <strong>and</strong> (15) 45–55 lb-ft (61–75 N•m).<br />
NOTE<br />
Perform step 7 for Big Cam III only.<br />
7. Install three screws (8), screw (15), <strong>and</strong> nine screws (16) on gear cover (11) <strong>and</strong> cylinder block (14).<br />
Tighten screws (8), (15), <strong>and</strong> (16) 45–55 lb-ft (61–75 N•m).<br />
8. Position front engine <strong>support</strong> (3) on gear cover (11).<br />
NOTE<br />
Perform step 9 for Big Cam I only.<br />
9. Install six screws (1), washers (2), two screws (20), <strong>and</strong> washers (19) on front engine <strong>support</strong> (3)<br />
<strong>and</strong> gear cover (11). Tighten screws (1) <strong>and</strong> (20) 45–55 lb-ft (61–75 N•m).<br />
NOTE<br />
Perform step 10 for Big Cam III only.<br />
10. Install six screws (1), washers (2), <strong>and</strong> two screws (20) on front engine <strong>support</strong> (3) <strong>and</strong> gear<br />
cover (11). Tighten screws (1) <strong>and</strong> (20) 45–55 lb-ft (61–75 N•m).<br />
NOTE<br />
Trim off excess gasket material so gasket is even with oil pan<br />
mounting flange.<br />
11. Using straightedge <strong>and</strong> feeler gauge, check alignment of oil pan mounting flange on gear<br />
cover (11) with oil pan mounting flange on cylinder block (14). Gear cover flange must be even<br />
with front cylinder block flange within 0.004 in. (0.102 mm).<br />
0042 00-20
TM 9-2815-225-34&P 0042 00<br />
CYLINDER BLOCK COMPONENTS INSTALLATION (Contd)<br />
FRONT GEAR COVER (Contd)<br />
12. Install dial indicator on front of crankshaft <strong>and</strong> position tip of dial indicator against inner surface<br />
of crankshaft seal bore.<br />
13. Turn dial of indicator to zero.<br />
14. Rotate crankshaft one complete revolution. Reading on dial indicator shows difference. If total dial<br />
indicator reading exceeds 0.010 in. (0.254 mm), remove, clean, <strong>and</strong> relocate between common<br />
centers.<br />
15. Remove shim pack (6) <strong>and</strong> seal (7) from camshaft <strong>support</strong> (5).<br />
16. Install camshaft <strong>support</strong> (5) on gear cover (11) <strong>and</strong> hold against end of camshaft. Ensure camshaft<br />
is pushed against cylinder block (14).<br />
17. Using feeler gauge, measure space between mounting flange of camshaft <strong>support</strong> (5) <strong>and</strong> gear<br />
cover (11). Use measurement to determine thickness of shim pack (6) needed to provide<br />
0.008–0.130 in. (0.203–3.302 mm) clearance. Shim packs (6) are available in four different<br />
thicknesses.<br />
18. Remove camshaft <strong>support</strong> (5) from gear cover (11).<br />
19. Install shim pack (6) <strong>and</strong> new seal (7) on camshaft <strong>support</strong> (5).<br />
20. Install camshaft <strong>support</strong> (5), shim pack (6), <strong>and</strong> seal (7) on gear cover (11).<br />
NOTE<br />
Perform step 21 for Big Cam I only.<br />
21. Install three screws (4), new lockwashers (18), <strong>and</strong> washers (17) on camshaft <strong>support</strong> (5). Tighten<br />
screws (4) 15–20 lb-ft. (20–27 N•m).<br />
NOTE<br />
Perform step 22 for Big Cam III only.<br />
22. Install three screws (4) on camshaft <strong>support</strong> (5). Tighten screws (4) 15–20 lb-ft. (20–27 N•m).<br />
13<br />
14<br />
5<br />
6<br />
7 9<br />
10<br />
11 12<br />
13<br />
4<br />
1<br />
2<br />
3 18<br />
17<br />
8<br />
16<br />
20<br />
19<br />
1 2<br />
Figure 12. Front Cover Installation.<br />
15<br />
0042 00-21
TM 9-2815-225-34&P 0042 00<br />
CYLINDER BLOCK COMPONENTS INSTALLATION (Contd)<br />
FLYWHEEL, FLEXPLATE, AND FLYWHEEL HOUSING<br />
1. Install new gasket (3) <strong>and</strong> rear cover (4) on cylinder block (2) with eight screws (5). Tighten<br />
screws (5) only enough to hold rear cover (4) in position.<br />
2. Using crankshaft oil seal driver, align rear cover (4) with crankshaft (1).<br />
3. Using dial indicator, check alignment of rear cover (4) to crankshaft (1). Rear cover (4) must be on<br />
common center with crankshaft (1) within 0.010 in. (0.254 mm). Rear cover (4) must be square to<br />
centerline of crankshaft (1) within 0.010 in. (0.254 mm). Rear cover (4) must be within 0.004 in.<br />
(0.102 mm) of being flat with oil pan flange of cylinder block (2).<br />
4. Tighten eight screws (5) 30–35 lb-ft (41–48 N•m). Cut off excess gasket (3) material so that<br />
gasket (3) is even with, or not more than, 0.010 in. (0.254 mm) above oil pan flange.<br />
NOTE<br />
New rear main seals have an assembly tool which protects seal<br />
lip during shipment <strong>and</strong> installation. Do not use any lubricant<br />
to install seal. Oil seal must be installed with lip of seal <strong>and</strong><br />
crankshaft clean <strong>and</strong> dry.<br />
5. Install new rear main seal (6) on crankshaft (1). Position largest diameter of assembly tool toward<br />
cylinder block (2).<br />
6. Push rear main seal (6) from assembly tool onto crankshaft (1). Using crankshaft rear oil seal<br />
driver, drive rear main seal (6) on rear cover (4).<br />
7. Remove two dowel pins (12) if installing new flywheel housing (9), or if dowel is damaged or<br />
outside diameter is less than 0.5005 in. (12.713 mm), <strong>and</strong> install two flywheel housing guide pins<br />
in their place.<br />
NOTE<br />
Perform steps 8 <strong>and</strong> 9 for Big Cam I only.<br />
8. Install new seal (7) on crankshaft (1).<br />
9. Install eleven new O-rings (8) on flywheel housing (9).<br />
10. Install flywheel housing (9) on cylinder block (2) with seven of nine screws (10) <strong>and</strong> washers (11).<br />
Tighten screws (10) 10–20 lb-ft (14–27 N•m).<br />
11. Remove two flywheel housing (9) guide pins, if installed, <strong>and</strong> install two remaining screws (10)<br />
<strong>and</strong> washers (11) on flywheel housing (9).<br />
0042 00-22
TM 9-2815-225-34&P 0042 00<br />
CYLINDER BLOCK COMPONENTS INSTALLATION (Contd)<br />
9<br />
CRANKSHAFT OIL<br />
SEAL DRIVER<br />
8<br />
10<br />
1<br />
6<br />
2<br />
3<br />
4<br />
5<br />
11<br />
7<br />
4<br />
12<br />
~<br />
1<br />
DIAL INDICATOR<br />
Figure 13. Flywheel Housing Installation.<br />
0042 00-23
TM 9-2815-225-34&P 0042 00<br />
CYLINDER BLOCK COMPONENTS INSTALLATION (Contd)<br />
FLYWHEEL, FLEXPLATE, AND FLYWHEEL HOUSING (Contd)<br />
12. Install dial gauge attachment <strong>and</strong> dial indicator on crankshaft (5).<br />
13. Using chalk, mark flywheel housing (2) at 12, 3, 6, <strong>and</strong> 9 o’clock positions.<br />
NOTE<br />
If runout exceeds 0.008 in. (0.203 mm), move flywheel housing<br />
horizontally one-half distance of total indicator reading. Use<br />
prybars to move housing. If runout exceeds 0.008 in.<br />
(0.203 mm), move flywheel housing vertically one-half distance<br />
of total indicator reading. Use prybars to move housing. Total<br />
indicator reading must not exceed 0.008 in (0.203 mm). Adjust<br />
flywheel housing until within limit.<br />
14. Check readings at 3 o’clock <strong>and</strong> 9 o’clock positions.<br />
15. Check readings at 12 o’clock <strong>and</strong> 6 o’clock positions.<br />
16. After readings are within limits, tighten screws (3) 140–160 lb-ft (190–217 N•m) in sequence<br />
shown in figure 14.<br />
17. Adjust dial indicator to measure alignment of face on flywheel housing (2).<br />
18. Push crankshaft toward front of cylinder block (1) to remove crankshaft end clearance.<br />
NOTE<br />
Ensure crankshaft is pushed toward front of cylinder block<br />
when checking alignment. Total indicator reading must not<br />
exceed 0.008 in. (0.203 mm). If alignment is not within limits,<br />
remove flywheel housing <strong>and</strong> check mating surfaces.<br />
19. Rotate crankshaft (5) <strong>and</strong> check alignment of face on flywheel housing (2).<br />
20. If dowel pins (4) were removed from cylinder block (1), use drill <strong>and</strong> fixture to ream dowel holes to<br />
next oversize <strong>and</strong> install two new dowel pins (4), if required.<br />
0042 00-24
TM 9-2815-225-34&P 0042 00<br />
CYLINDER BLOCK COMPONENTS INSTALLATION (Contd)<br />
2<br />
3<br />
1<br />
4<br />
H<br />
I<br />
G<br />
DIAL<br />
5<br />
F<br />
E<br />
A<br />
D<br />
C<br />
DIAL GAUGE<br />
ATTACHMENT<br />
B<br />
TIGHTENING SEQUENCE<br />
Figure 14. Flexplate Installation.<br />
0042 00-25
TM 9-2815-225-34&P 0042 00<br />
CYLINDER BLOCK COMPONENTS INSTALLATION (Contd)<br />
FLYWHEEL, FLEXPLATE, AND FLYWHEEL HOUSING (Contd)<br />
NOTE<br />
Big Cam III engines are equipped with a flexplate-type<br />
flywheel with retaining plate <strong>and</strong> washer bearing.<br />
Perform steps 21 <strong>and</strong> 22 for Big Cam III only.<br />
21. Apply a thin coat of lubricating oil to threads of screws (7) <strong>and</strong> face of washers (6)<br />
22. Install retaining plate (2), flexplates (3), flywheel (4), <strong>and</strong> washer bearing (5) on crankshaft (1)<br />
with six screws (7) <strong>and</strong> washers (6). Tighten screws (7) 200–220 lb-ft (271–298 N•m) in sequence<br />
shown in figure 15.<br />
NOTE<br />
Perform steps 23 through 27 for Big Cam I only.<br />
23. Install two 5/8-18 x 6 in. guide studs in opposite holes on crankshaft (1) until fully seated.<br />
24. Apply lubricating oil to threads of screws (11) <strong>and</strong> face of washers (10). Allow excess oil to drain<br />
from screw threads.<br />
25. Install flywheel (9) <strong>and</strong> spacer gear (8) on crankshaft (1) with four screws (11) <strong>and</strong> washers (10).<br />
Tighten screws (11) h<strong>and</strong>-tight in sequence shown in figure 16.<br />
26. Remove two 5/8-18 x 6 in. guide studs from crankshaft (1).<br />
27. Install two remaining screws (11) <strong>and</strong> washers (10) on flywheel (9). Tighten screws (11) 70 lb-ft<br />
(95 N•m) then 140 lb-ft (190 N•m) <strong>and</strong> finally 200–220 lb-ft (271–298 N•m) in sequence shown in<br />
figure 16.<br />
NOTE<br />
The flywheel must be pushed toward front of engine to remove<br />
crankshaft end clearance when crankshaft is rotated <strong>and</strong><br />
measurements are taken. If total indicator readings exceed<br />
limits, remove flywheel; clean flywheel <strong>and</strong> crankshaft flange<br />
faces, install, <strong>and</strong> repeat runout checks.<br />
Perform steps 28 through 31 for Big Cam I only.<br />
28. Install dial gauge attachment <strong>and</strong> dial indicator on flywheel housing (12).<br />
29. Position contact tip of dial indicator against wide diameter of flywheel (9) bore <strong>and</strong> set dial<br />
indicator to zero. Rotate crankshaft (1) one complete revolution. Total indicator reading must not<br />
exceed 0.005 in. (0.127 mm).<br />
30. Inspect flywheel (9) face runout <strong>and</strong> install or reposition dial indicator on flywheel housing (12).<br />
31. Position contact tip of dial indicator against face of flywheel (9) as close to outside diameter as<br />
possible. Rotate crankshaft (1) one complete revolution. Total indicator reading must not exceed<br />
0.005 in. (0.127 mm).<br />
0042 00-26
TM 9-2815-225-34&P 0042 00<br />
CYLINDER BLOCK COMPONENTS INSTALLATION (Contd)<br />
2<br />
3<br />
4<br />
5 6<br />
7<br />
1<br />
D B<br />
Figure 15. Flexplate Installation (Big Cam III).<br />
F<br />
1<br />
A<br />
C<br />
E<br />
TIGHTENING<br />
SEQUENCE<br />
1<br />
9<br />
8<br />
E<br />
D B<br />
Figure 16. Flywheel Bolt Installation (Big Cam I).<br />
F<br />
10<br />
A<br />
11<br />
GUIDE STUDS<br />
C<br />
TIGHTENING<br />
SEQUENCE<br />
12<br />
DIAL GAUGE<br />
1 12<br />
9<br />
DIAL GAUGE<br />
ATTACHMENT<br />
1<br />
DIAL<br />
BORE RUNOUT<br />
FACE RUNOUT<br />
Figure 17. Measuring Flywheel Runout (Big Cam I).<br />
0042 00-27
TM 9-2815-225-34&P 0042 00<br />
CYLINDER BLOCK COMPONENTS INSTALLATION (Contd)<br />
OIL PAN<br />
1. Apply a thin coat of GAA grease to oil pan (3) or (37) mounting surface.<br />
2. Install new gasket (2) on cylinder block (1).<br />
3. Position oil pan (3) or (37) on cylinder block (1).<br />
4. Install twenty eight screws (12) on oil pan (3) or (37). Do not tighten screws (12) at this time.<br />
5. Install four screws (6), new lockwashers (5), <strong>and</strong> washers (4) on oil pan (3) or (37). Do not tighten<br />
screws (6) at this time.<br />
6. Install engine shipping <strong>support</strong> (15) on oil pan (3) or (37) with four screws (14) or (36). Do not<br />
tighten screws (14) or (36) at this time.<br />
NOTE<br />
Perform step 7 for Big Cam I only.<br />
7. Install two screws (18) <strong>and</strong> washers (19) on middle holes of oil pan (37).<br />
8. Finger-tighten two screws (12) on oil pan (3) or (37).<br />
NOTE<br />
Perform step 9 for Big Cam I only.<br />
9. Remove two screws (18) <strong>and</strong> washers (19) from oil pan (37).<br />
10. Finger-tighten four screws (12) on oil pan (3) or (37).<br />
11. Tighten twenty-eight screws (12) <strong>and</strong> four screws (14) or (36) 35–40 lb-ft (41–48 N•m).<br />
NOTE<br />
Perform steps 12 through 14 for Big Cam I only.<br />
12. Install four screws (18) <strong>and</strong> washers (19) on oil pan (37). Do not tighten screws (18) at this time.<br />
13. Install two screws (21), four washers (22), new lockwashers (23), <strong>and</strong> nuts (24) on oil pan (37). Do<br />
not tighten screws (21) at this time.<br />
14. Tighten four screws (18) <strong>and</strong> two nuts (24) 70–80 lb-ft (95–109 N•m).<br />
15. Tighten screws (6) 15–20 lb-ft (20–27 N•m).<br />
NOTE<br />
Perform steps 16 <strong>and</strong> 17 for Big Cam III only.<br />
16. Install new gasket (17), <strong>and</strong> two new O-rings (11) on oil suction tube (10). Position oil suction tube<br />
(10) on oil pan (3) <strong>and</strong> oil pump (16).<br />
17. Install oil suction tube (10) on oil pan (3) <strong>and</strong> oil pump (16) with two screws (7), screws (13), four<br />
new lockwashers (8), <strong>and</strong> washers (9). Tighten screws (7) 30–35 lb-ft (41–48 N•m). Tighten screws<br />
(13) 30–35 lb-ft (41–48 N•m).<br />
NOTE<br />
Perform steps 18 through 26 for Big Cam I only.<br />
18. Install oil suction hose (25) <strong>and</strong> new gasket (17) on oil pan (37) with screws (26) <strong>and</strong> new<br />
lockwashers (27). Do not tighten screws (26) at this time.<br />
19. Install adapter (35) <strong>and</strong> oil suction hose (25) on oil pump (16) <strong>and</strong> h<strong>and</strong>-tighten oil suction hose<br />
(25) nut until snug, then tighten oil suction hose (25) nut <strong>and</strong> additional 1 to 1 ¼ turn.<br />
20. Tighten two screws (26) 30–35 lb-ft (41–48 N•m).<br />
0042 00-28
TM 9-2815-225-34&P 0042 00<br />
CYLINDER BLOCK COMPONENTS INSTALLATION (Contd)<br />
OIL PAN (Contd)<br />
21. Tighten nut on oil suction hose (25) mounting flange until nut is against stop on mounting flange.<br />
22. Remove one screw (12) from left side of oil pan (37).<br />
23. Install bracket (31) on oil pan (37) with screw (32) <strong>and</strong> new lockwasher (33). Tighten screw (32)<br />
35–40 lb-ft (41–48 N•m).<br />
24. Position clamp (29) on oil suction hose (25).<br />
25. Position spacer (30) between bracket (31) <strong>and</strong> clamp (29).<br />
26. Install screw (28), new lockwasher (8), washer (9), <strong>and</strong> nut (34) on bracket (31). Tighten screw (28).<br />
1<br />
16<br />
2<br />
20<br />
19 18<br />
17<br />
3<br />
37<br />
21<br />
12<br />
36<br />
24<br />
31<br />
35<br />
34<br />
33<br />
32 8<br />
BIG CAM I<br />
4<br />
22<br />
5<br />
23 22 6<br />
15<br />
25<br />
14<br />
30<br />
26<br />
29 17 27<br />
9<br />
28<br />
Figure 18. Oil Pan Installation.<br />
11<br />
9<br />
8<br />
13<br />
12<br />
9 8<br />
10<br />
BIG CAM III<br />
4<br />
5<br />
6<br />
7<br />
END OF WORK PACKAGE<br />
0042 00-29/30 blank
TM 9-2815-225-34&P 0043 00<br />
DIRECT SUPPORT AND GENERAL SUPPORT<br />
MAINTENANCE MANUAL<br />
INCLUDING REPAIR PARTS AND SPECIAL TOOLS LIST (RPSTL)<br />
FOR<br />
M915, M915A1, M915A4, M916, M920 VEHICLES<br />
NSN 2815-01-082-8125 P/N NTC400-3652-02 CUMMINS NTC-400 BIG CAM I DIESEL ENGINE<br />
W/CONTAINER<br />
NSN 2815-01-142-2745 P/N 11669835 CUMMINS NTC-400 BIG CAM III DIESEL ENGINE<br />
W/CONTAINER<br />
CYLINDER HEAD AND CYLINDER HEAD COMPONENTS INSTALLATION<br />
CYLINDER HEAD, FUEL INJECTOR, ROCKER ARM HOUSING, ENGINE BRAKE RETARDER, ROCKER COVER<br />
INITIAL SETUP:<br />
Tools <strong>and</strong> Special Tools<br />
General mechanic’s tool kit: automotive<br />
(Item 1, WP 0061 00)<br />
Maintenance <strong>and</strong> repair shop equipment:<br />
automotive (Item 2, WP 0061 00)<br />
Automotive <strong>maintenance</strong> <strong>and</strong> repair<br />
supplemental set no. 2 (Item 3, WP 0061 00)<br />
Fuel injector puller (Item 8, WP 0061 00)<br />
Equipment Condition<br />
Engine mounted on <strong>maintenance</strong> st<strong>and</strong><br />
(WP 0009 00).<br />
Material/Parts<br />
Twelve O-rings (Item 1, Table 26, WP 0062 00)<br />
Three cylinder head gaskets<br />
(Item 2, Table 26, WP 0062 00)<br />
Three gaskets (Item 3, Table 26, WP 0062 00)<br />
Three gaskets (Item 4, Table 26, WP 0062 00)<br />
Three gaskets (Item 5, Table 26, WP 0062 00)<br />
Eighteen O-rings<br />
(Item 6, Table 26, WP 0062 00)<br />
Rust preventative lubricant<br />
(Item 16, WP 0060 00)<br />
OE/HDO 10 lubricating oil<br />
(Item 19, WP 0060 00)<br />
60-80/140 lubricating oil<br />
(Item 21, WP 0060 00)<br />
0043 00-1
TM 9-2815-225-34&P 0043 00<br />
CYLINDER HEAD AND CYLINDER HEAD COMPONENTS INSTALLATION (Contd)<br />
CYLINDER HEAD<br />
NOTE<br />
The following procedure covers installation of one cylinder head<br />
assembly. Installation of remaining cylinder heads is similar.<br />
Perform steps 1 through 10 to install each additional cylinder<br />
head assembly as required.<br />
Ensure marks made on each cylinder head <strong>and</strong> cylinder block<br />
during removal are matched together during installation so<br />
that each cylinder head assembly is installed in its original<br />
position on cylinder block.<br />
Ensure new cylinder head gasket has the side with word TOP<br />
facing upwards.<br />
1. Install new cylinder head gasket (7) on cylinder head (5).<br />
2. Install cylinder head (5) on cylinder block (6).<br />
3. Apply rust preventative lubricant to twelve screws (4). Allow excess lubricant to drip from screw<br />
threads before installation.<br />
4. Install twelve screws (4) <strong>and</strong> washers (3) on cylinder head (5). Tighten screws (4) 25 lb-ft (34 N•m)<br />
in sequence shown in figure 1.<br />
5. Tighten screws (4) 100 lb-ft (136 N•m) in sequence shown in figure 1.<br />
NOTE<br />
Perform step 6 for Big Cam I only.<br />
6. Tighten screws (4) 305 lb-ft (414 N•m) in sequence shown in figure 1.<br />
NOTE<br />
Perform step 7 for Big Cam III only.<br />
7. Tighten screws (4) 285 lb-ft (387 N•m) in sequence shown in figure 1.<br />
8. Apply OE/HDO 10 lubricating oil to four new O-rings (8).<br />
9. Install O-rings (8) on counterbores of cylinder head (5).<br />
10. Install two fuel crossover connections (1) on cylinder head (5) with four screws (2). Tighten screws<br />
(2) 38 lb-in (4.3 N•m).<br />
2 3<br />
4<br />
1<br />
8<br />
5<br />
E<br />
I<br />
L<br />
H<br />
D<br />
A<br />
B<br />
F<br />
J<br />
K<br />
G<br />
C<br />
7<br />
6<br />
TIGHTENING SEQUENCE<br />
Figure 1. Cylinder Head Installation.<br />
0043 00-2
TM 9-2815-225-34&P 0043 00<br />
CYLINDER HEAD AND CYLINDER HEAD COMPONENTS INSTALLATION (Contd)<br />
FUEL INJECTOR<br />
CAUTION<br />
If injector assembly fails to seat completely, remove <strong>and</strong> check<br />
for a twisted or damaged O-ring. Failure to comply may result<br />
in damage to equipment.<br />
NOTE<br />
Inspect fuel cooling sleeve in cylinder head prior to installing<br />
injector. Remove any dirt with a lint-free cloth.<br />
The following procedure covers installation of one injector<br />
assembly. Installation of remaining five injectors are similar.<br />
Ensure injectors are installed in same location as noted during<br />
removal.<br />
1. Apply OE/HDO 10 lubricating oil to three new O-rings (12) <strong>and</strong> fuel injector (13).<br />
2. Using injector puller, install fuel injector (13) in cylinder head (5).<br />
3. Install retaining plate (11) on fuel injector (13) with two screws (9). Do not tighten screws.<br />
4. Install detent plunger (10) on fuel injector (13).<br />
NOTE<br />
Check for free movement of detent plunger after tightening<br />
screws. If detent plunger does not move freely, loosen two<br />
screws <strong>and</strong> retighten. Detent plunger must move freely.<br />
5. Tighten screws (9) in steps of 5 lb-ft (7 N•m) until a final torque of 12 lb-ft (16 N•m) is obtained.<br />
10<br />
9<br />
11<br />
13<br />
12<br />
5<br />
Figure 2. Fuel Injector Installation.<br />
0043 00-3
TM 9-2815-225-34&P 0043 00<br />
CYLINDER HEAD AND CYLINDER HEAD COMPONENTS INSTALLATION (Contd)<br />
ROCKER ARM HOUSING<br />
NOTE<br />
The following procedure covers the installation of one rocker<br />
arm housing assembly. The installation of the remaining rocker<br />
arm housing assemblies is similar.<br />
1. Install new gasket (6) on cylinder head (5).<br />
2. Loosen six adjusting screws (2) three complete turns.<br />
3. Apply GO-80/140 lubricating oil to ball ends of four intake <strong>and</strong> exhaust pushrods (4) <strong>and</strong> two<br />
injector pushrods (3).<br />
NOTE<br />
The injector pushrods are larger in diameter than the valve<br />
pushrods. The valve pushrods are 0.007 in. (0.178 mm) longer<br />
than injector pushrods.<br />
Ensure each pushrod is installed in same position as noted<br />
during removal.<br />
Ball end of pushrods must fit into socket of cam followers. The<br />
injector pushrod is installed on center injector cam follower.<br />
4. Install four intake <strong>and</strong> exhaust pushrods (4) <strong>and</strong> two injector pushrods (3) on cam followers of<br />
cylinder head (5).<br />
NOTE<br />
Position six rocker levers so ball end of adjusting screw drops<br />
into sockets of six pushrods.<br />
5. Install rocker arm housing (7) on cylinder head (5).<br />
6. Install six new washer bearings (8) on rocker arm housing (7).<br />
NOTE<br />
There are three different sizes of rocker housing studs. Install<br />
correct rocker housing stud in correct rocker arm housing.<br />
Damage to rocker housing stud threads may result if<br />
substitution of length is made.<br />
7. Install six rocker housing studs (1), (9), <strong>and</strong> (10) on rocker housings (7) as shown in figure 3.<br />
Tighten studs (1), (9), <strong>and</strong> (10) 65 lb-ft (68 N•m) in sequence shown in figure 3.<br />
0043 00-4
TM 9-2815-225-34&P 0043 00<br />
CYLINDER HEAD AND CYLINDER HEAD COMPONENTS INSTALLATION (Contd)<br />
STUD TIGHTENING<br />
F<br />
C<br />
B<br />
D<br />
A<br />
E<br />
1<br />
8<br />
2<br />
7<br />
6<br />
3<br />
STUD INSTALLATION SEQUENCE<br />
4<br />
9<br />
10<br />
9<br />
10<br />
9<br />
1<br />
5<br />
4<br />
9 10<br />
7 7<br />
FRONT<br />
9<br />
10<br />
7<br />
REAR<br />
9<br />
Figure 3. Rocker Arm Housing Installation.<br />
0043 00-5
TM 9-2815-225-34&P 0043 00<br />
CYLINDER HEAD AND CYLINDER HEAD COMPONENTS INSTALLATION (Contd)<br />
ROCKER ARM HOUSING (Contd)<br />
NOTE<br />
Engine cylinders are numbered in sequence, starting at front<br />
with No. 1 cylinder. The engine firing order is 1-5-3-6-2-4.<br />
Valves <strong>and</strong> injectors for the same cylinder are not adjusted at<br />
same index mark on accessory drive pulley. One pair of valves<br />
from one cylinder <strong>and</strong> one injector on a different cylinder are<br />
adjusted at each pulley index mark before rotating accessory<br />
drive to next index mark.<br />
Two crankshaft revolutions are required to adjust all valves<br />
<strong>and</strong> injectors.<br />
8. Using medium grit emery cloth, remove paint on timing marks (2), (3), <strong>and</strong> (4) on accessory drive<br />
pulley (1).<br />
9. Rotate accessory drive pulley (1) clockwise until line in front of timing mark (2) aligns with<br />
pointer (6) on front gear cover (5).<br />
NOTE<br />
Steps 10 through 16 covers adjustment for cylinder No. 3.<br />
10. Loosen adjusting screw nut (8) several turns.<br />
11. Tighten adjusting screw (9) until all clearance is removed between rocker lever (10) <strong>and</strong> injector<br />
detent plunger.<br />
12. Tighten adjusting screw (9) one additional turn.<br />
13. Loosen adjusting screw (9) one complete turn until spring washer inside injector is against stop of<br />
injector.<br />
14. Tighten adjusting screw (9) 5–6 lb-in (0.6–0.7 N•m).<br />
15. Repeat step 14 several times to make certain adjusting screw (9) is correctly tightened.<br />
NOTE<br />
If torque driver ST-669 is used, tighten adjusting screw nut<br />
35 lb-ft (48 N•m).<br />
16. Prevent adjusting screw (9) from turning <strong>and</strong> tighten adjusting screw nut (8) 45 lb-ft (61 N•m).<br />
NOTE<br />
Adjustment for intake valve is similar to exhaust valve except<br />
for valve clearance difference.<br />
Steps 17 through 20 covers intake <strong>and</strong> exhaust valve<br />
adjustment for cylinder No. 5.<br />
17. Loosen adjusting screw nut (8).<br />
NOTE<br />
Cold valve clearance for exhaust valve is 0.023 in. (0.584 mm)<br />
<strong>and</strong> valve clearance for intake valve is 0.011 in. (0.279 mm).<br />
18. Place feeler gauge between rocker lever (10) <strong>and</strong> crosshead (11).<br />
19. Slowly tighten screw (9) until rocker lever (10) touches feeler gauge.<br />
0043 00-6
TM 9-2815-225-34&P 0043 00<br />
CYLINDER HEAD AND CYLINDER HEAD COMPONENTS INSTALLATION (Contd)<br />
ROCKER ARM HOUSING (Contd)<br />
NOTE<br />
If torque driver ST-669 is used, tighten adjusting screw nut<br />
40 lb-ft (54 N•m).<br />
20. Hold adjusting screw (9) in place <strong>and</strong> tighten adjusting screw nut (8) 45 lb-ft (61 N•m).<br />
21. Slowly rotate accessory drive pulley (1) clockwise until line in front of timing mark (3) aligns with<br />
pointer (6) on front gear cover (5).<br />
22. Perform steps 10 through 16 for cylinder No. 6 injector.<br />
23. Perform steps 17 through 20 for cylinder No. 3 intake <strong>and</strong> exhaust valves.<br />
24. Slowly rotate accessory drive pulley (1) clockwise until line in front of timing mark (4) aligns with<br />
pointer (6) on front gear cover (5).<br />
25. Perform steps 10 through 16 for cylinder No. 2 injector.<br />
26. Perform steps 17 through 20 for cylinder No. 6 intake <strong>and</strong> exhaust valves.<br />
27. Slowly rotate accessory drive pulley (1) clockwise until line in front of timing mark (2) aligns with<br />
pointer (6) on front gear cover (5).<br />
28. Perform steps 10 through 16 for cylinder No. 4 injector.<br />
29. Perform steps 17 through 20 for cylinder No. 2 intake <strong>and</strong> exhaust valves.<br />
30. Slowly rotate accessory drive pulley (1) clockwise until line in front of timing mark (3) aligns with<br />
pointer (6) on front gear cover (5).<br />
31. Perform steps 10 through 16 for cylinder No. 1 injector.<br />
32. Perform steps 17 through 20 for cylinder No. 4 intake <strong>and</strong> exhaust valves.<br />
33. Slowly rotate accessory drive pulley (1) clockwise until line in front of timing mark (4) aligns with<br />
pointer (6) on front gear cover (5).<br />
34. Perform steps 10 through 16 for cylinder No. 5 injector.<br />
35. Perform steps 17 through 20 for cylinder No. 1 intake <strong>and</strong> exhaust valves.<br />
1<br />
2<br />
3<br />
4<br />
7<br />
6<br />
5<br />
8<br />
9<br />
10<br />
11<br />
Figure 4. Injector Timing.<br />
0043 00-7
TM 9-2815-225-34&P 0043 00<br />
CYLINDER HEAD AND CYLINDER HEAD COMPONENTS INSTALLATION (Contd)<br />
ENGINE BRAKE RETARDER<br />
NOTE<br />
The following procedure covers installation of one engine brake<br />
retarder. Installation of remaining engine brake retarders are<br />
similar.<br />
1. Install new gasket (11) on rocker arm housing (13).<br />
2. Install engine brake retarder (3) on two rocker arm housing studs (14).<br />
3. Install fan bracket (1) <strong>and</strong> two spacers (5) on two rocker housing studs (14).<br />
4. Install six nuts (2) on rocker housing studs (14). Tighten nuts (2) 60 lb-ft (81 N•m) in sequence<br />
shown in figure 4.<br />
NOTE<br />
The following procedure covers adjustment for one slave piston.<br />
There are two slave pistons per brake retarder, or one per<br />
cylinder. The adjustment for the remaining five slave pistons is<br />
similar. Ensure locknuts are loose before adjusting setscrew.<br />
The adjustment procedure for slave piston requires engine<br />
crankshaft to be rotated <strong>and</strong> accessory drive pulley assembly<br />
positioned on timing mark A, B, or C. When positioned at<br />
timing mark A, cylinders No. 5 or 2 can be adjusted. When<br />
positioned at timing mark B, cylinders No. 3 or 4 can be<br />
adjusted. When positioned at timing mark C, cylinders No. 6 or<br />
1 can be adjusted.<br />
5. Loosen locknut (8) <strong>and</strong> setscrew (9) until there is no pressure or tension.<br />
6. Using feeler gauge, check slave piston (12) clearance between slave piston (12) <strong>and</strong> crosshead (4).<br />
Adjust clearance to 0.018 in. (0.457 mm).<br />
CAUTION<br />
After slave piston adjusting screw locknut has been tightened<br />
to specified value, check clearance with feeler gauge again. Do<br />
not overtighten adjusting screw locknut or clearance may<br />
change <strong>and</strong> result in damage to engine.<br />
7. Tighten locknut (8) 40 lb-ft (54 N•m).<br />
8. Using feeler gauge, recheck slave piston (12) clearance.<br />
9. Connect spade end of solenoid harness (7) to solenoid valve (6).<br />
10. Connect receiver end of solenoid harness (7) to terminal (10) inside engine brake retarder (3).<br />
0043 00-8
TM 9-2815-225-34&P 0043 00<br />
CYLINDER HEAD AND CYLINDER HEAD COMPONENTS INSTALLATION (Contd)<br />
1<br />
2<br />
4<br />
5<br />
6<br />
7<br />
8<br />
9<br />
3<br />
14<br />
12 10<br />
C<br />
F<br />
B<br />
D<br />
E<br />
A<br />
11<br />
TIGHTENING<br />
SEQUENCE<br />
13<br />
Figure 5. Engine Brake Retarder Installation.<br />
0043 00-9
TM 9-2815-225-34&P 0043 00<br />
CYLINDER HEAD AND CYLINDER HEAD COMPONENTS INSTALLATION (Contd)<br />
ROCKER COVER<br />
NOTE<br />
This procedure covers installation of one rocker cover. All three<br />
rocker covers are installed the same.<br />
Install new gasket (3) <strong>and</strong> rocker cover (2) on engine brake retarder (4) with five screws (1). Tighten<br />
screws (1) 12–17 lb-ft (16–23 N•m).<br />
1<br />
2<br />
3<br />
4<br />
Figure 6. Rocker Cover Installation.<br />
END OF WORK PACKAGE<br />
0043 00-10
TM 9-2815-225-34&P 0044 00<br />
DIRECT SUPPORT AND GENERAL SUPPORT<br />
MAINTENANCE MANUAL<br />
INCLUDING REPAIR PARTS AND SPECIAL TOOLS LIST (RPSTL)<br />
FOR<br />
M915, M915A1, M915A4, M916, M920 VEHICLES<br />
NSN 2815-01-082-8125 P/N NTC400-3652-02 CUMMINS NTC-400 BIG CAM I DIESEL ENGINE<br />
W/CONTAINER<br />
NSN 2815-01-142-2745 P/N 11669835 CUMMINS NTC-400 BIG CAM III DIESEL ENGINE<br />
W/CONTAINER<br />
FUEL PUMP TESTING AND CALIBRATION<br />
PREADJUSTMENT CHECKS, IDLE SPEED ADJUSTMENT, HIGH-SPEED ADJUSTMENT,<br />
CHECKING AND ADJUSTING FUEL RAIL, CHECKING AND ADJUSTING ENGINE FUEL,<br />
CHECKING AND ADJUSTING THROTTLE LEAKAGE, CHECKING FUEL FILTER RESTRICTION,<br />
FUEL PUMP SEAL INSTALLATION, THROTTLE SHAFT COVER PLATE INSTALLATION<br />
INITIAL SETUP:<br />
Tools <strong>and</strong> Special Tools<br />
General mechanic’s tool kit: automotive<br />
(Item 1, WP 0061 00)<br />
Maintenance <strong>and</strong> repair shop equipment,<br />
automotive (Item 2, WP 0061 00)<br />
Automotive <strong>maintenance</strong> <strong>and</strong> repair<br />
supplemental set no. 2 (Item 3, WP 0061 00)<br />
Fuel pump idle adjusting tool<br />
(Item 60, WP 0061 00)<br />
Throttle shaft ball installing tool<br />
(Item 61, WP 0061 00)<br />
Materials/Parts<br />
Snapring (Item 1, Table 27, WP 0062 00)<br />
Gasket (Item 2, Table 27, WP 0062 00)<br />
Throttle shaft cover plate<br />
(Item 3, Table 27, WP 0062 00)<br />
0044 00-1
TM 9-2815-225-34&P 0044 00<br />
FUEL PUMP TESTING AND CALIBRATION (Contd)<br />
WARNING<br />
Allow adequate ventilation for engine exhaust gases. Do not<br />
perform fuel system procedures while smoking or within 50 ft<br />
(15.2 m) of sparks or open flame. Diesel fuel is flammable <strong>and</strong><br />
may explode. Failure to comply may result in serious injury or<br />
death to personnel.<br />
PREADJUSTMENT CHECKS<br />
CAUTION<br />
Do not alter pump settings to match gauges <strong>and</strong> tachometers of<br />
unknown accuracy. Failure to comply may result in damage to<br />
equipment.<br />
NOTE<br />
Vehicle fuel control lever <strong>and</strong> throttle stop linkage should have<br />
a maximum throttle stop, so when fuel pump full throttle is<br />
obtained, override pressure will not be on throttle shaft.<br />
After proper calibration, fuel pump should require very little<br />
adjustment. Some adjustment may be required at idle, since<br />
this setting is dependent on parasitic loads. Fine adjustment of<br />
governor settings <strong>and</strong> fuel manifold pressure is permissible<br />
within the limits specified if justified by engine performance<br />
tests.<br />
Check <strong>and</strong> adjust throttle control linkage for full throttle<br />
operation <strong>and</strong> throttle released operation with the throttle<br />
stopped by the throttle leakage adjusting screw.<br />
IDLE SPEED ADJUSTMENT<br />
NOTE<br />
Idle speed adjustment should never be made on a cold engine.<br />
Engine must be operated for sufficient time to purge all air<br />
from the fuel system <strong>and</strong> to bring the engine up to operating<br />
temperature (at least 165° F (74° C) oil temperature).<br />
1. Remove plug (7) from spring pack cover (9) <strong>and</strong> start engine (1) on dynamometer (2).<br />
NOTE<br />
Fuel pump idle adjusting tool will not let the spring pack cover<br />
leak when the idle is adjusted.<br />
2. Turn idle adjusting screw (16) in to increase engine rpm, out to decrease rpm.<br />
3. Using idle adjusting tool (4), set idle to 600 +/- 2 rpm.<br />
4. Install plug (7) on spring pack cover (9).<br />
0044 00-2
TM 9-2815-225-34&P 0044 00<br />
FUEL PUMP TESTING AND CALIBRATION (Contd)<br />
HIGH-SPEED ADJUSTMENT<br />
1. Remove spring pack cover (9), three captive washer screws (6), screw (8), <strong>and</strong> four washers (5)<br />
from fuel pump (3).<br />
2. Remove fuel pump gasket (10) from fuel pump (3). Discard gasket (10).<br />
3. Remove snapring (11) from fuel pump (3). Discard snapring (11).<br />
4. Remove spring retainer (12) from fuel pump (3).<br />
NOTE<br />
Each 0.0001 in. (0.025 mm) shim thickness will change speed<br />
approximately 2 rpm.<br />
5. Add or remove shims (13) behind spring (14). High-speed adjustment should be 2130 to 2150 rpm.<br />
6. Install spring retainer (12) <strong>and</strong> new snapring (11) on guide (15).<br />
7. Install spring pack cover (9) <strong>and</strong> new gasket (10) on fuel pump (3) with three captive washer<br />
screws (6), screw (8), <strong>and</strong> four washers (5). Tighten screws (6) <strong>and</strong> (8) 9–11 lb-ft (12–15 N•m).<br />
NOTE<br />
Do not use this check to make governor speed adjustments. If<br />
no-load speed is much greater than specifications, examine<br />
governor for malfunction or faulty parts.<br />
8. Operate engine (1) to purge air from fuel system <strong>and</strong> bring up to operating temperature.<br />
9. Bring engine (1) to full throttle <strong>and</strong> hold. Note maximum rpm. Speed should be 10–12 percent<br />
greater than governor speed cutoff point.<br />
1 2<br />
3<br />
4<br />
5<br />
6<br />
7<br />
15<br />
16<br />
12<br />
5<br />
8<br />
10<br />
13 11<br />
14<br />
Figure 1. Idle Speed Adjustment.<br />
9<br />
0044 00-3
TM 9-2815-225-34&P 0044 00<br />
FUEL PUMP TESTING AND CALIBRATION (Contd)<br />
CHECKING AND ADJUSTING FUEL RAIL<br />
NOTE<br />
It should not be necessary to adjust fuel rail pressure on a<br />
newly calibrated fuel pump more than +/- 2 psi (+/- 14 kPa). If<br />
adjustments greater than this are required, fuel pump test<br />
st<strong>and</strong>, injector test st<strong>and</strong>, or engine problems may exist. Do not<br />
remove throttle shaft ball unless fuel rail pressure adjustment<br />
needs to be performed.<br />
The correct method of checking engine fuel rail pressure is with<br />
engine installed on a chassis or engine dynamometer.<br />
1. Check governor speed cutoff <strong>and</strong> adjust if necessary.<br />
2. Install fuel rail pressure gauge (4) between fuel supply elbow (11) on fuel pump assembly (10) <strong>and</strong><br />
female union tee (12).<br />
3. Bring engine (3) to full throttle load until rpm falls to rated speed.<br />
4. Note fuel rail pressure gauge (4) reading. If pressure is above or below 83 psi, perform steps 5–8.<br />
CAUTION<br />
Do not turn threaded stud out beyond maximum throttle<br />
travel. The fuel hole in the throttle shaft will begin to close.<br />
Never adjust fuel rail pressure above maximum specifications.<br />
This will void engine warranty <strong>and</strong> violate Environmental<br />
Protection Agency (EPA) requirements.<br />
5. Turn threaded stud (9) out to obtain maximum throttle travel <strong>and</strong> secure with jamnut (8).<br />
6. Remove throttle shaft ball (5) from throttle shaft (6).<br />
NOTE<br />
It should not be necessary to adjust fuel manifold pressure on a<br />
newly calibrated pump more than +/- 2 psi (+/- 14 kPa). If<br />
adjustments greater than these are required, fuel pump test,<br />
injector test st<strong>and</strong>, or engine problems may exist.<br />
7. Turn fuel adjusting screw (7) in throttle shaft (6) in to increase or out to decrease pressure while<br />
watching fuel rail pressure gauge (4).<br />
8. Using throttle shaft ball installing tool (1), install throttle shaft ball (5) into end of throttle shaft<br />
(6).<br />
0044 00-4
TM 9-2815-225-34&P 0044 00<br />
FUEL PUMP TESTING AND CALIBRATION (Contd)<br />
CHECKING AND ADJUSTING ENGINE FUEL<br />
1. Connect fuel pump (10) to fuel rate meter (2).<br />
2. Bring engine (3) to full throttle <strong>and</strong> increase dynamometer load until engine rpm falls to rated<br />
speed.<br />
3. Check governor speed cut-off while load is on engine (3).<br />
4. Check fuel rail pressure gauge (4) at maximum speed.<br />
5. Hold engine speed <strong>and</strong> load at maximum speed long enough for fuel rate meter (2) to stabilize.<br />
NOTE<br />
The fuel rate specified on fuel pump calibration specification is<br />
at full throttle <strong>and</strong> rated speed. An engine or chassis<br />
dynamometer must be used. Accurate fuel rail pressure <strong>and</strong><br />
speed readings must also be taken.<br />
6. Verify correct fuel rate measurement with fuel rate meter (2).<br />
2<br />
1<br />
~<br />
3<br />
12<br />
4<br />
10<br />
11<br />
9<br />
8<br />
7 6<br />
5<br />
Figure 2. Fuel Adjustment.<br />
0044 00-5
TM 9-2815-225-34&P 0044 00<br />
FUEL PUMP TESTING AND CALIBRATION (Contd)<br />
CHECKING AND ADJUSTING THROTTLE LEAKAGE<br />
NOTE<br />
If throttle leakage is adjusted correctly on fuel pump test<br />
st<strong>and</strong>, fuel pump will not need to be adjusted on engine.<br />
Vehicle throttle linkage must be adjusted so that threaded stud<br />
of throttle leakage adjusting screw (rear screw) just contacts<br />
stop in pump throttle.<br />
The purpose of the throttle leakage is to keep the fuel lines <strong>and</strong><br />
injector drilling full of fuel during closed throttle operation.<br />
The correct throttle leakage will help acceleration when the<br />
throttle is opened after going down a grade. Throttle leakage<br />
will also prevent stalling when it slows down to the idle speed.<br />
Too much leakage will cause slow deceleration.<br />
1. Bring engine (1) to full throttle <strong>and</strong> allow engine (1) to run at maximum no-load speed.<br />
2. Release or move throttle quickly <strong>and</strong> start a suitable timer or stopwatch at the same time.<br />
3. Stop timer when 1000 rpm is reached <strong>and</strong> check deceleration time. Repeat this check several<br />
times.<br />
4. Increase leakage as engine (1) begins to stall (idle governor does catch engine after deceleration<br />
from high idle) by turning in threaded stud (3).<br />
5. Recheck engine (1) deceleration until time is increased 1-2 seconds.<br />
6. Lock threaded stud (3) with jamnut (2).<br />
7. Recheck idle speed <strong>and</strong> readjust as necessary.<br />
8. Bring engine to 1000 rpm.<br />
0044 00-6
TM 9-2815-225-34&P 0044 00<br />
FUEL PUMP TESTING AND CALIBRATION (Contd)<br />
CHECKING AND ADJUSTING THROTTLE LEAKAGE (Contd)<br />
9. Check deceleration time when engine (1) is shut down.<br />
10. Decrease leakage by turning threaded stud (3) out until engine (1) tends to stall after deceleration<br />
to high idle.<br />
11. Turn in threaded stud (3) until deceleration is increased 1-2 seconds. Lock threaded stud (3) with<br />
jamnut (2).<br />
12. Recheck idle speed <strong>and</strong> readjust as necessary.<br />
NOTE<br />
Engine power cannot be set accurately in any other way except<br />
on engine dynamometer. Fuel pump adjustments must not be<br />
made on an engine when the engine power comes from an<br />
estimate. Before any adjustments on the fuel pump are made,<br />
the following engine performance data must be checked so that<br />
adjustments are justified.<br />
13. Check fuel rail pressure, fuel rate, speed setting, smoke, coolant temperature, combustion<br />
smoothness, exhaust restriction, fuel quality, air intake restriction, engine oil level, <strong>and</strong> engine<br />
power reducing factors.<br />
14. Check engine power by rechecking setting point of governor speed cutoff <strong>and</strong> readjust if necessary.<br />
1<br />
3<br />
2<br />
Figure 3. Checking <strong>and</strong> Adjusting Throttle Leakage.<br />
0044 00-7
TM 9-2815-225-34&P 0044 00<br />
FUEL PUMP TESTING AND CALIBRATION (Contd)<br />
CHECKING FUEL FILTER RESTRICTION<br />
1. Connect vacuum gauge (3) to fuel inlet (4) on fuel damper (5).<br />
2. Bring engine (1) to full throttle <strong>and</strong> full load on dynamometer (2) <strong>and</strong> check vacuum gauge (3).<br />
3. If restriction reads 8 in. (20.3 cm) of vacuum while engine is running at full throttle <strong>and</strong> full load,<br />
change fuel filter <strong>and</strong> check other sources of restriction.<br />
4. Use sight glass to check for moving bubbles <strong>and</strong> possible gasket or other leaks. If air bubbles are<br />
still seen, check float valve in float tank used for test. Fuel pump may be pumping more fuel than<br />
float valve will allow to pass into the float tank.<br />
FUEL PUMP SEAL INSTALLATION<br />
NOTE<br />
Fuel pump must be sealed after final adjustments are made to<br />
prevent tampering.<br />
1. Using lockwire <strong>and</strong> seal (8), insert lockwire through screw (12), plug (11), <strong>and</strong> threaded stud (14)<br />
on spring pack cover (13).<br />
2. Twist lockwires together until connection is secure <strong>and</strong> lockwire is tight.<br />
3. Bend twisted lockwire into seal <strong>and</strong> press on top half of seal.<br />
4. Using lockwire <strong>and</strong> seal (8), insert lockwire through screw (10), drilled fillister head screw (9), <strong>and</strong><br />
captive washer screw (7).<br />
5. Twist lockwires together until connection is secure <strong>and</strong> lockwire is tight.<br />
6. Bend twisted lockwire into seal <strong>and</strong> press on top half of seal.<br />
THROTTLE SHAFT COVER PLATE INSTALLATION<br />
NOTE<br />
Use etching tool or steel stamp <strong>and</strong> imprint date of repair on<br />
backside of throttle shaft cover plate (6) for future reference.<br />
1. Position new throttle shaft cover plate (6) on housing (16).<br />
2. Drill two new holes on opposite sides of throttle shaft cover plate (6) 0.235 in. (5.969 mm) into<br />
pump housing (16).<br />
3. Secure new throttle shaft cover plate (6) on housing (16) with two drive screws (15).<br />
0044 00-8
TM 9-2815-225-34&P 0044 00<br />
FUEL PUMP TESTING AND CALIBRATION (Contd)<br />
2<br />
1<br />
4<br />
3<br />
5<br />
Figure 4. Checking Fuel Filter Restriction.<br />
6<br />
16 15<br />
14<br />
10<br />
9<br />
8<br />
7<br />
11<br />
8<br />
12<br />
13<br />
Figure 5. Fuel Pump Seal Installation.<br />
END OF WORK PACKAGE<br />
0044 00-9/10 blank
TM 9-2815-225-34&P 0045 00<br />
DIRECT SUPPORT AND GENERAL SUPPORT<br />
MAINTENANCE MANUAL<br />
INCLUDING REPAIR PARTS AND SPECIAL TOOLS LIST (RPSTL)<br />
FOR<br />
M915, M915A1, M915A4, M916, M920 VEHICLES<br />
NSN 2815-01-082-8125 P/N NTC400-3652-02 CUMMINS NTC-400 BIG CAM I DIESEL ENGINE<br />
W/CONTAINER<br />
NSN 2815-01-142-2745 P/N 11669835 CUMMINS NTC-400 BIG CAM III DIESEL ENGINE<br />
W/CONTAINER<br />
ENGINE ACCESSORIES INSTALLATION<br />
AIR AFTERCOOLER, FUEL PUMP AND FUEL LINES,<br />
VIBRATION DAMPER AND CRANKSHAFT PULLEY<br />
INITIAL SETUP:<br />
Tools <strong>and</strong> Special Tools<br />
General mechanic’s tool kit: automotive<br />
(Item 1, WP 0061 00)<br />
Maintenance <strong>and</strong> repair shop equipment:<br />
automotive (Item 2, WP 0061 00)<br />
Automotive <strong>maintenance</strong> <strong>and</strong> repair<br />
supplemental set no. 2 (Item 3, WP 0061 00)<br />
Air compressor wrench (Item 18, WP 0061 00)<br />
Equipment Condition<br />
Engine mounted on <strong>maintenance</strong> st<strong>and</strong><br />
(WP 0009 00)<br />
References<br />
TM 9-2320-273-20<br />
TM 9-2320-283-20<br />
Material/Parts<br />
Lubricating oil (Item 19, WP 0060 00)<br />
High pressure lubricant (Item 15, WP 0060 00)<br />
Three gaskets (Item 1, Table 28, WP 0062 00)<br />
Three lockwashers<br />
(Item 2, Table 28, WP 0062 00)<br />
Gasket (Item 3, Table 28, WP 0062 00)<br />
Lockwasher (Item 4, Table 28, WP 0062 00)<br />
Three lockwashers<br />
(Item 5, Table 28, WP 0062 00)<br />
Two lockwasher<br />
(Item 6, Table 28, WP 0062 00)<br />
Lockwasher (Item 7, Table 28, WP 0062 00)<br />
0045 00-1
TM 9-2815-225-34&P 0045 00<br />
ENGINE ACCESSORIES INSTALLATION (Contd)<br />
AIR AFTERCOOLER<br />
1. Apply a small amount of high pressure lubricant to three new gaskets (9) on cylinder heads (1).<br />
NOTE<br />
Perform steps 2 <strong>and</strong> 3 for Big Cam III only. Tighten screws<br />
from the center outward.<br />
2. Install air aftercooler (2) on cylinder heads (1) with six washers (6) <strong>and</strong> screws (7). Tighten screws<br />
(7) 20–25 lb-ft (27–34 N•m).<br />
3. Install screw (8), two screws (5), three new lockwashers (4) <strong>and</strong> washers (3) on bottom of each<br />
cylinder head (1). Thread in screws (8) <strong>and</strong> (5) three to five times. Tighten screws (8) <strong>and</strong> (5)<br />
20–25 lb-ft (27–34 N•m).<br />
NOTE<br />
Two middle holes in air aftercooler are used for mounting ether<br />
starting kit. Refer to TM 9-2320-273-20 or TM 9-2320-283-20 to<br />
install ether starting kit.<br />
Tighten but do not torque screws after installation.<br />
Perform steps 4 <strong>and</strong> 5 for Big Cam I.<br />
4. Install air aftercooler (2) on cylinder heads (1) with six washers (6) <strong>and</strong> bolts (7).<br />
5. Install three washers (3), new lockwashers (4) <strong>and</strong> bolts (5) on three outside holes of air<br />
aftercooler (2). Thread in bolts (5) three to five times.<br />
0045 00-2
TM 9-2815-225-34&P 0045 00<br />
ENGINE ACCESSORIES INSTALLATION (Contd)<br />
1<br />
2<br />
3<br />
4<br />
9<br />
6<br />
5<br />
3<br />
4<br />
8<br />
7<br />
Figure 1. Air Aftercooler Installation.<br />
0045 00-3
TM 9-2815-225-34&P 0045 00<br />
ENGINE ACCESSORIES INSTALLATION (Contd)<br />
FUEL PUMP AND FUEL LINES<br />
1. Install new gasket (2) <strong>and</strong> fuel pump (12) with compressor spider coupling (3) on air compressor (1).<br />
NOTE<br />
Perform steps 2 <strong>and</strong> 3 for Big Cam III.<br />
2. Position <strong>support</strong> bracket (9) on fuel pump (12) <strong>and</strong> air compressor (1) with three washers (10) <strong>and</strong><br />
bolts (11).<br />
3. Using air compressor wrench, install washer (14) <strong>and</strong> bolt (13) on fuel pump (12) <strong>and</strong> into air<br />
compressor (1). Tighten bolt (13) finger-tight only.<br />
NOTE<br />
Perform step 4 only for Big Cam I.<br />
4. Using air compressor wrench, install <strong>support</strong> bracket (9) on fuel pump (12) <strong>and</strong> into air<br />
compressor (1) with four washers (4) <strong>and</strong> bolt (5).<br />
5. Install new lockwasher (7) <strong>and</strong> bolt (6) on <strong>support</strong> bracket (9) <strong>and</strong> cylinder head (8).<br />
0045 00-4
TM 9-2815-225-34&P 0045 00<br />
ENGINE ACCESSORIES INSTALLATION (Contd)<br />
4<br />
5<br />
8<br />
1<br />
2<br />
9<br />
3<br />
6<br />
7<br />
10<br />
11<br />
12<br />
14<br />
13<br />
Figure 2. Fuel Pump Installation.<br />
0045 00-5
TM 9-2815-225-34&P 0045 00<br />
ENGINE ACCESSORIES INSTALLATION (Contd)<br />
FUEL PUMP AND FUEL LINES (Contd)<br />
6. Install fuel pump adapter (14) on fuel pump (29).<br />
7. Install two cylinder head adapters (8), fuel supply line (9), <strong>and</strong> fuel return line (10) on cylinder<br />
head (7).<br />
8. Install fuel pump adapter (16) <strong>and</strong> fuel supply line (9) on fuel pump (29).<br />
9. Install fuel pump adapter (28) <strong>and</strong> fuel return lines (10) <strong>and</strong> (15) on fuel pump (29).<br />
10. Install fuel supply line (9) <strong>and</strong> fuel return line (10) on air aftercooler (6) with two washers (11),<br />
new lockwashers (12), <strong>and</strong> screws (13).<br />
11. Install valve (27) <strong>and</strong> air supply line (26) on fuel pump (29).<br />
12. Install adapter (17) on air aftercooler (6).<br />
13. Install bracket (25) <strong>and</strong> air supply line (26) with screw (18), washer (24), new lockwasher (23),<br />
<strong>and</strong> nut (22) on air aftercooler (6).<br />
NOTE<br />
Perform steps 14–16 for Big Cam I equipped with air signal<br />
attenuator (ASA) air tank.<br />
14. Install ASA air tank (1) with washer (19), new lockwasher (20), <strong>and</strong> screw (21) on air aftercooler<br />
(6).<br />
15. Install ASA hose fittings (2) on ASA air tank (1).<br />
16. Install air aftercooler elbow (5) on air aftercooler (6).<br />
17. Install two air supply hoses (4) <strong>and</strong> four hose clamps (3) on ASA air tank (1).<br />
0045 00-6
TM 9-2815-225-34&P 0045 00<br />
ENGINE ACCESSORIES INSTALLATION (Contd)<br />
4<br />
5<br />
3<br />
3<br />
2<br />
1<br />
6<br />
2<br />
3<br />
4<br />
21 20<br />
22<br />
23 24<br />
19<br />
25<br />
18<br />
7<br />
~<br />
8<br />
3<br />
17<br />
2<br />
26<br />
9<br />
11<br />
10<br />
28<br />
27<br />
13<br />
16<br />
12<br />
15<br />
13<br />
11<br />
12<br />
14<br />
29<br />
Figure 3. Fuel Lines Installation.<br />
0045 00-7
TM 9-2815-225-34&P 0045 00<br />
ENGINE ACCESSORIES INSTALLATION (Contd)<br />
VIBRATION DAMPER AND CRANKSHAFT PULLEY<br />
CAUTION<br />
To avoid engine damage, ensure mounting surfaces of vibration<br />
damper <strong>and</strong> crankshaft pulley are clean <strong>and</strong> dry. Do not get<br />
any lubricating oil on these surfaces.<br />
1. Install two vibration damper guide pins (5) on two opposite holes in face of crankshaft (6).<br />
2. Install crankshaft pulley (4) <strong>and</strong> vibration damper (3) on two guide pins (5) <strong>and</strong> push into<br />
crankshaft (6) until seated.<br />
3. Apply a coat of clean lubricating oil to threads of six screws (1) <strong>and</strong> washers (2).<br />
4. Install four screws (1) <strong>and</strong> washers (2) on vibration damper (3), crankshaft pulley (4), <strong>and</strong><br />
crankshaft (6).<br />
5. Install remaining two screws (1) <strong>and</strong> washers (2) on vibration damper (3), crankshaft pulley (4),<br />
<strong>and</strong> crankshaft (6). Tighten screws 190 lb-ft (258 N•m).<br />
NOTE<br />
Total indicator reading must not exceed 0.004 in. (0.102 mm)<br />
per 1.0 in. (25.4 mm) of vibration damper diameter. Remove<br />
<strong>and</strong> discard vibration damper if not within limits.<br />
6. Using dial indicator gauge, measure movement on vibration damper (3) circumference by rotating<br />
crankshaft (6).<br />
NOTE<br />
Crankshaft must be kept at front or rear limit of thrust<br />
clearance while measuring movement of vibration damper face.<br />
Total indicator reading must not exceed 0.007 in. (0.178 mm)<br />
per 1.0 in. (25.4 mm) of the vibration damper radius. Remove<br />
<strong>and</strong> discard vibration damper if not within limits.<br />
7. Using dial indicator gauge, measure movement of vibration damper (3) face by rotating<br />
crankshaft (6).<br />
3<br />
4<br />
5<br />
1<br />
2<br />
6<br />
Figure 4. Vibration Damper <strong>and</strong> Crankshaft Pulley Installation.<br />
END OF WORK PACKAGE<br />
0045 00-8
TM 9-2815-225-34&P 0046 00<br />
DIRECT SUPPORT AND GENERAL SUPPORT<br />
MAINTENANCE MANUAL<br />
INCLUDING REPAIR PARTS AND SPECIAL TOOLS LIST (RPSTL)<br />
FOR<br />
M915, M915A1, M915A4, M916, M920 VEHICLES<br />
NSN 2815-01-082-8125 P/N NTC400-3652-02 CUMMINS NTC-400 BIG CAM I DIESEL ENGINE<br />
W/CONTAINER<br />
NSN 2815-01-142-2745 P/N 11669835 CUMMINS NTC-400 BIG CAM III DIESEL ENGINE<br />
W/CONTAINER<br />
REMOVING ENGINE FROM MAINTENANCE STAND<br />
INITIAL SETUP:<br />
Tools <strong>and</strong> Special Tools<br />
General mechanic’s tool kit: automotive<br />
(Item 1, WP 0061 00)<br />
Maintenance <strong>and</strong> repair shop equipment:<br />
automotive (Item 2, WP 0061 00)<br />
Automotive <strong>maintenance</strong> <strong>and</strong> repair<br />
supplemental set no. 2 (Item 3, WP 0061 00)<br />
Maintenance st<strong>and</strong><br />
Chains<br />
Material/Parts<br />
Gasket (Item 1, Table 31, WP 0062 00)<br />
Two water transfer hoses<br />
(Item 2, Table 31, WP 0062 00)<br />
Two gaskets (Item 3, Table 31, WP 0062 00)<br />
Six O-rings (Item 4, Table 31, WP 0062 00)<br />
Gasket (Item 5, Table 31, WP 0062 00)<br />
Five lockwashers<br />
(Item 6, Table 31, WP 0062 00)<br />
Lockwasher (Item 7, Table 29, WP 0062 00)<br />
Six lockwashers<br />
(Item 8, Table 31, WP 0062 00 00)<br />
Three gaskets (Item 9, Table 31, WP 0062 00)<br />
Four lockplates<br />
(Item 10, Table 31, WP 0062 00)<br />
Four lockplates<br />
(Item 11, Table 31, WP 0062 00)<br />
Gasket (Item 12, Table 31, WP 0062 00)<br />
Hose (Item 13, Tale 31, WP 0062 00)<br />
Gasket (Item 14, Table 31, WP 0062 00)<br />
Gasket (Item 15, Table 31, WP 0062 00)<br />
Material/Parts (Contd)<br />
Lockwasher (Item 16, Table 31, WP 0062 00)<br />
Lockwasher (Item 17, Table 31, WP 0062 00)<br />
Equipment Condition<br />
Engine mounted on <strong>maintenance</strong> st<strong>and</strong><br />
(WP 0009 00).<br />
References<br />
TM 9-2320-273-20<br />
TM 9-2320-283-20<br />
0046 00-1
TM 9-2815-225-34&P 0046 00<br />
REMOVING ENGINE FROM MAINTENANCE STAND (Contd)<br />
WARNING<br />
Use extreme caution during disassembly or assembly; engine<br />
components are heavy. Failure to comply may result in damage<br />
to equipment or injury to personnel.<br />
1. Install lifting device on engine lifting brackets.<br />
2. Raise engine (1) just enough to take weight off <strong>maintenance</strong> st<strong>and</strong>.<br />
WARNING<br />
All personnel must st<strong>and</strong> clear during lifting operations. A<br />
snapped chain or swinging or shifting load may result in injury<br />
to personnel.<br />
3. Remove four mounting screws (2) securing engine (1) to <strong>maintenance</strong> st<strong>and</strong>.<br />
CAUTION<br />
Ensure engine is <strong>support</strong>ed by cylinder block, flywheel housing,<br />
or front <strong>support</strong>. Do not <strong>support</strong> engine on oil pan. Failure to<br />
comply may result in damage to engine.<br />
4. Raise engine (1) from <strong>maintenance</strong> st<strong>and</strong> <strong>and</strong> <strong>support</strong> engine (1) on suitable blocks.<br />
0046 00-2
TM 9-2815-225-34&P 0046 00<br />
REMOVING ENGINE FROM MAINTENANCE STAND (Contd)<br />
LIFTING DEVICE<br />
ENGINE LIFTING<br />
BRACKETS<br />
1<br />
MAINTENANCE<br />
STAND<br />
2<br />
Figure 1. Removing Engine from Maintenance St<strong>and</strong>.<br />
0046 00-3
TM 9-2815-225-34&P 0046 00<br />
REMOVING ENGINE FROM MAINTENANCE STAND (Contd)<br />
NOTE<br />
Perform steps 5 <strong>and</strong> 6 on Big Cam I only.<br />
5. Install new gasket (4) <strong>and</strong> water transfer flange (3) on cylinder block (1) with six screws (2).<br />
Tighten screws (2).<br />
6. Install water transfer tube (6) <strong>and</strong> two new water transfer hoses (7) on water transfer flange (3)<br />
with four clamps (5).<br />
NOTE<br />
Perform steps 7 through 9 on Big Cam III only.<br />
7. Install water head covers (9) <strong>and</strong> two new gaskets (8) on cylinder block (1) with twelve screws<br />
(10). Tighten screws (10).<br />
8. Apply lubricating oil to six new O-rings (11) <strong>and</strong> position O-rings (11) on piston cooling nozzles<br />
(12).<br />
9. Install six piston cooling nozzles (12) on cylinder block (1) with six screws (13). Tighten screws<br />
(13) 140 lb-in (16 N•m).<br />
10. Install the following components on engine (1). Refer to TM 9-2320-273-20 or TM 9-2320-283-20.<br />
a. Power steering pump <strong>and</strong> reservoir<br />
b. Water pump <strong>and</strong> drivebelts<br />
c. Fan brace, bracket, <strong>and</strong> spacers<br />
d. Fan, fan clutch, <strong>and</strong> fan clutch drivebelts<br />
e. Engine wiring harness<br />
f. Ether quick-start cylinder, valve, safety switch, <strong>and</strong> thermostat<br />
g. Modulator bracket <strong>and</strong> accelerator return spring<br />
h. Air compressor governor <strong>and</strong> air lines<br />
i. Air compressor intake tube<br />
j. Air compressor discharge hose<br />
k. Water bypass tube<br />
l. Water pump-to-radiator connection<br />
m. Water pump bypass hose<br />
0046 00-4
TM 9-2815-225-34&P 0046 00<br />
REMOVING ENGINE FROM MAINTENANCE STAND (Contd)<br />
3<br />
4<br />
2<br />
5<br />
6<br />
5<br />
1<br />
7<br />
11<br />
8<br />
13<br />
12<br />
10<br />
9<br />
Figure 2. Piston Cooling Nozzles Installation.<br />
0046 00-5
TM 9-2815-225-34&P 0046 00<br />
REMOVING ENGINE FROM MAINTENANCE STAND (Contd)<br />
NOTE<br />
Perform steps 11 through 13 on Big Cam I only.<br />
11. Install oil cooler (11) <strong>and</strong> new gasket (8) on cylinder block (1) with five screws (6) <strong>and</strong> (10), <strong>and</strong><br />
five new lockwashers (7) <strong>and</strong> (9). Tighten screws (6) <strong>and</strong> (10) 30–35 lb-ft (41–48 N•m).<br />
12. Install oil transfer hose (2) on oil cooler (11) with clamp (3). Tighten clamp (3) at water transfer<br />
hose (2).<br />
13. Install oil cooler <strong>support</strong> bracket (5) to cylinder block (1) with screw (12) <strong>and</strong> new lockwasher (4).<br />
Tighten screw (12) 30–35 lb-ft (41–48 N•m).<br />
NOTE<br />
Perform steps 14 <strong>and</strong> 15 on Big Cam III only.<br />
14. Install oil cooler (19) <strong>and</strong> new gasket (13) on cylinder block (1) with six screws (15) <strong>and</strong> (16), washers<br />
(18), <strong>and</strong> new lockwashers (14) <strong>and</strong> (17). Tighten screws (15) <strong>and</strong> (16) 30–35 lb-ft (41–48 N•m).<br />
15. Install the following components on cylinder block (1). Refer to TM 9-2320-273-20 or<br />
TM 9-2320-283-20.<br />
a. Engine oil filter elements<br />
b. Lower water transfer tube<br />
c. Alcohol evaporator<br />
d. Engine retarder microswitch<br />
e. Water manifolds<br />
f. Thermostat <strong>and</strong> thermostat housing<br />
g. Engine temperature sending units <strong>and</strong> fuel line fittings.<br />
h. Fan clutch air valve <strong>and</strong> air lines<br />
i. Water transfer tube <strong>and</strong> bracket<br />
j. Air compressor cooling tube<br />
0046 00-6
TM 9-2815-225-34&P 0046 00<br />
REMOVING ENGINE FROM MAINTENANCE STAND (Contd)<br />
1<br />
2<br />
3<br />
4 5<br />
6<br />
7<br />
8<br />
16<br />
17<br />
18<br />
19<br />
13 12<br />
14<br />
14<br />
11<br />
9<br />
10<br />
9<br />
15<br />
Figure 3. Oil Cooler Installation.<br />
0046 00-7
TM 9-2815-225-34&P 0046 00<br />
REMOVING ENGINE FROM MAINTENANCE STAND (Contd)<br />
16. Install three new gaskets (2) on cylinder block (1) with word OUT facing exhaust manifold (3) or (7).<br />
NOTE<br />
Perform steps 17 through 19 for Big Cam I only.<br />
17. Apply antiseize compound to threads of screws (10).<br />
18. Install exhaust manifold (3), two clamps (12), four new lockplates (11), <strong>and</strong> dowels (13) on cylinder<br />
block (1) with four screws (10). Do not tighten screws (10).<br />
19. Install four new lockplates (4) on exhaust manifold (3) with four screws (6) <strong>and</strong> new lockwashers<br />
(5). Tighten screws (6) <strong>and</strong> (10) alternately <strong>and</strong> evenly 15–20 lb-ft (20–27 N•m) <strong>and</strong> then 40–45<br />
lb-ft (54–61 N•m).<br />
NOTE<br />
Perform step 20 on Big Cam III only.<br />
20. Apply antiseize compound to threads of screws (9).<br />
21. Install exhaust manifold (7) <strong>and</strong> spacer inserts (8) on cylinder block (1) with twelve screws (9).<br />
Tighten screws (9) alternately <strong>and</strong> evenly 15–20 lb-ft (20–27 N•m) <strong>and</strong> then 40–45 lb-ft<br />
(54–61 N•m).<br />
22. Install the following components on cylinder block (1). Refer to TM 9-2320-273-20 or<br />
TM 9-2320-283-20.<br />
a. Water filter <strong>and</strong> bracket<br />
b. Water shutoff valves <strong>and</strong> hoses<br />
0046 00-8
TM 9-2815-225-34&P 0046 00<br />
REMOVING ENGINE FROM MAINTENANCE STAND (Contd)<br />
1<br />
1<br />
3<br />
2<br />
4<br />
5<br />
13<br />
12<br />
11 10<br />
6<br />
7<br />
8<br />
7<br />
Figure 4. Exhaust Manifold Installation.<br />
9<br />
8<br />
0046 00-9
TM 9-2815-225-34&P 0046 00<br />
REMOVING ENGINE FROM MAINTENANCE STAND (Contd)<br />
23. Apply antiseize compound to threads of studs (2) <strong>and</strong> install new gasket (3) on exhaust manifold<br />
studs (2).<br />
24. Install turbocharger (5) on exhaust manifold (1) with four nuts (4). Tighten nuts (4)<br />
20–25 lb-ft (27–34 N•m).<br />
NOTE<br />
Perform step 25 for Big Cam I only.<br />
25. Install oil return tube (9) <strong>and</strong> hose (12) on elbows (8) <strong>and</strong> (16) with two clamps (11) <strong>and</strong> (13).<br />
Tighten clamps (11) <strong>and</strong> (13) 35–45 lb-ft (48–61 N•m).<br />
NOTE<br />
Perform steps 26 <strong>and</strong> 27 on Big Cam III only.<br />
26. Install oil return tube (10) <strong>and</strong> hose (12) on elbows (6) <strong>and</strong> (16) with two clamps (11) <strong>and</strong> (13).<br />
Tighten clamps (11) <strong>and</strong> (13) 35–45 lb-ft (48–61 N•m).<br />
27. Install oil return tube (7) <strong>and</strong> two bushings (14) <strong>and</strong> (17) on filter head (15) <strong>and</strong> oil return tube<br />
(10). Tighten fittings on oil return tube (7) 50–60 lb-ft (68–81 N•m).<br />
28. Install oil supply hose (19) on adapter (18) <strong>and</strong> elbow (22). Tighten fittings on oil supply hose (19)<br />
50–60 lb-ft (68–81 N•m).<br />
29. Install clamp (20) <strong>and</strong> screw (21) on turbocharger (5). Tighten screw (21) 14 lb-ft (19 N•m).<br />
30. Install four bolts (25), washers (26), turbocharger air crossover (27), clamps (28) <strong>and</strong> (30), new<br />
hose (29), <strong>and</strong> new gasket (32) on aftercooler cover (31).<br />
31. Install hose (23) <strong>and</strong> fitting (24) on turbocharger air crossover (27).<br />
32. Tighten clamps (28) <strong>and</strong> (30) retaining turbocharger air crossover (27) <strong>and</strong> hose (29) to<br />
turbocharger (5).<br />
1 2 3<br />
4<br />
5<br />
6<br />
17<br />
7<br />
16<br />
15<br />
10<br />
14<br />
13<br />
9<br />
12 11<br />
Figure 5. Turbocharger Installation<br />
8<br />
5 18<br />
19<br />
20<br />
21<br />
23<br />
24 25<br />
32<br />
26 27<br />
28<br />
29<br />
31<br />
30<br />
22<br />
Figure 6. Turbocharger Oil Supply<br />
Hose Installation.<br />
Figure 7. Turbocharger Air<br />
Crossover Installation.<br />
5<br />
0046 00-10
TM 9-2815-225-34&P 0046 00<br />
REMOVING ENGINE FROM MAINTENANCE STAND (Contd)<br />
33. Install new gasket (45), <strong>and</strong> oil level dipstick tube <strong>and</strong> cover (38) on cylinder block (46) with four<br />
washers (44) <strong>and</strong> captive washer screws (43). Tighten captive washer screws (43) 30–35 lb-ft<br />
(41–48 N•m).<br />
34. Install tube brace (33) <strong>and</strong> clamp (42) on oil level dipstick tube <strong>and</strong> cover (38) with two washers<br />
(41), screw (36), new lockwasher (40), <strong>and</strong> nut (39). Tighten nut (39).<br />
35. Install tube brace (33) on cylinder block (46) with screw (36), washer (34), <strong>and</strong> new lockwasher (35).<br />
NOTE<br />
Perform step 36 for Big Cam I only.<br />
36. Install transmission control-body heating elements ON/OFF switch (47) on cylinder block (46).<br />
37. Install oil pressure gauge sending unit (48) <strong>and</strong> low oil pressure warning light sending unit (49)<br />
on cylinder block (46).<br />
33<br />
34 35<br />
36<br />
37<br />
38<br />
41<br />
36<br />
41<br />
39<br />
40<br />
46<br />
45<br />
42<br />
43<br />
44<br />
Figure 8. Oil Level Dipstick Tube Installation.<br />
47<br />
46<br />
48<br />
49<br />
Figure 9. Oil Pressure Gauge Sensing Unit Installation.<br />
END OF WORK PACKAGE<br />
0046 00-11/12 blank
TM 9-2815-225-34&P 0047 00<br />
DIRECT SUPPORT AND GENERAL SUPPORT<br />
MAINTENANCE MANUAL<br />
INCLUDING REPAIR PARTS AND SPECIAL TOOLS LIST (RPSTL)<br />
FOR<br />
M915, M915A1, M915A4, M916, M920 VEHICLES<br />
NSN 2815-01-082-8125 P/N NTC400-3652-02 CUMMINS NTC-400 BIG CAM I DIESEL ENGINE<br />
W/CONTAINER<br />
NSN 2815-01-142-2745 P/N 11669835 CUMMINS NTC-400 BIG CAM III DIESEL ENGINE<br />
W/CONTAINER<br />
ENGINE TESTING<br />
GENERAL INFORMATION, PRE-TEST INSPECTION,<br />
INSTALLATION OF ENGINE ON DYNAMOMETER, CONDITIONS FOR TESTING, FINAL ACCEPTANCE TEST,<br />
BREAK-IN RUNNING, ENGINE TEST, POWER CHECK, SMOKE LEVEL CHECK, FINAL CHECK<br />
INITIAL SETUP:<br />
Tools <strong>and</strong> Special Tools<br />
General mechanic’s tool kit: automotive<br />
(Item 1, WP 0061 00)<br />
Maintenance <strong>and</strong> repair shop equipment,<br />
automotive (Item 2, WP 0061 00)<br />
Automotive <strong>maintenance</strong> <strong>and</strong> repair<br />
supplemental set no. 2 (Item 3, WP 0061 00)<br />
Manometer (Item 57, WP 0061 00)<br />
Blow-by check tool (Item 58, WP 0061 00)<br />
Materials/Parts<br />
Lubricating oil, engine (Item 20, WP 0060 00)<br />
0047 00-1
TM 9-2815-225-34&P 0047 00<br />
ENGINE TESTING (Contd)<br />
GENERAL INFORMATION<br />
The engine test is a combination of a run-in procedure <strong>and</strong> a performance check. The run-in procedure<br />
provides an operating period that allows engine parts to achieve a final finish <strong>and</strong> fit. The performance<br />
check confirms that the engine will operate at its specified speed <strong>and</strong> torque rating, that it is leak free,<br />
that it is free of abnormal noises, <strong>and</strong> that its various systems are operating within specified values.<br />
In the event of conflicting instructions between this procedure <strong>and</strong> other references, this procedure will<br />
take precedence.<br />
Dynamometer must have sufficient capacity to permit testing at 100 percent of engine’s 400 hp @<br />
2100 rpm.<br />
PRE-TEST INSPECTION<br />
The engine will be inspected for completeness <strong>and</strong> obvious damage before testing/performance check<br />
(no missing accessories, drive belts installed properly, no missing screws or nuts, etc.).<br />
INSTALLATION OF ENGINE ON DYNAMOMETER<br />
1. Mount engine (4) on dynamometer test st<strong>and</strong> following manufacturer’s instructions.<br />
2. Cover, or plug, breather tube (2).<br />
NOTE<br />
Using blow-by measuring tool <strong>and</strong> water manometer, fill to 0<br />
mark at middle of scale. Close all other engine openings that<br />
would allow blow-by pressure to escape.<br />
3. Install blow-by measuring tool in place of oil filler cap (1).<br />
4. Connect air compressor (3) to a 0.125–0.130 in. (3.175–3.302 mm) diameter orifice adapter located<br />
downstream from a 150 psi (1034 kPa) pressure relief valve.<br />
CONDITIONS FOR TESTING<br />
CAUTION<br />
Failure to comply with the following could result in damage to<br />
equipment.<br />
1. Do not run engine (4) with less than 35 psi (241 kPa) of oil pressure.<br />
2. Engine oil pressure must not exceed 90 psi (689.5 kPa) at any time.<br />
3. Engine oil temperature must not exceed 250° F (121° C) at any time.<br />
4. Engine coolant temperature must not exceed 210° F (96.0° C) at any time.<br />
5. Do not run engine (4) under full power/load conditions when oil temperature or coolant<br />
temperature is below 190° F (88° C).<br />
6. Do not shut down engine (4) following heavy power/load runs without a minimum of a 5-minute<br />
cool-down, no-load run.<br />
0047 00-2
TM 9-2815-225-34&P 0047 00<br />
ENGINE TESTING (Contd)<br />
FINAL ACCEPTANCE TEST<br />
1. Start engine (4) <strong>and</strong> operate at idle for 5 minutes. Check for low oil pressure, high coolant<br />
temperature, leaks, <strong>and</strong> unusual noises. No fuel leaks are allowed. Only Class I oil leaks are<br />
allowed as described below.<br />
CLASS I— Seepage of fluid (as indicated by wetness or discoloration) not great enough to form<br />
drops.<br />
CLASS II— Leakage of fluid great enough to form drops, but not enough to cause drops to drip<br />
from item being checked/inspected.<br />
CLASS III—Leakage of fluid great enough to form drops that fall from the item being<br />
checked/inspected.<br />
2. Stop engine (4) after 5 minutes of operation. Allow engine (4) to st<strong>and</strong> for 2 minutes while<br />
checking for leaks <strong>and</strong> unusual conditions.<br />
CAUTION<br />
Except in emergency, do not stop engine immediately after<br />
completion of power/torque runs. Sudden stopping without cooldown<br />
may cause damage to engine components. Cool-down<br />
period is 5 minutes (minimum) after any power/torque run.<br />
3. Start engine (4), test, <strong>and</strong> record results.<br />
4. Prior to removal of engine (4) from dynamometer test st<strong>and</strong>, whether accepted or rejected, an oil<br />
sample must be taken as specified in AR 750-22.<br />
5. After completion of test, disconnect engine (4) <strong>and</strong> remove from dynamometer test st<strong>and</strong>.<br />
1<br />
2<br />
BLOW-BY<br />
MEASURING<br />
TOOL<br />
DYNAMOMETER<br />
TEST STAND<br />
4<br />
3<br />
PRESSURE<br />
RELIEF VALVE<br />
ORIFICE<br />
ADAPTER<br />
Figure 1. Engine Installation on Dynamometer Test St<strong>and</strong>.<br />
0047 00-3
TM 9-2815-225-34&P 0047 00<br />
ENGINE TESTING (Contd)<br />
BREAK-IN RUNNING<br />
CAUTION<br />
Once normal operating temperture is reached, oil pressure<br />
must remain at or near a constant figure for a constant engine<br />
speed <strong>and</strong> load. Acceptable lubricating oil pressures are 5–20<br />
psi (34–138 kPa) at idle speed <strong>and</strong> 35–45 psi (241–310 kPa) for<br />
Big Cam III <strong>and</strong> 40–75 psi (276–517 kPa) for Big Cam I at<br />
rated speed. Abnormally high pressures may indicate blocked<br />
lubricating oil lines. Abnormally low pressures indicate an<br />
insufficient supply of lubricating oil from the pump or<br />
increased engine clearance which may be due to bearing<br />
failure. Damage to engine may occur if oil pressure fails<br />
outside of acceptable range at indicated speeds.<br />
Lubricating oil temperature must not rise sharply above 225° F<br />
(107° C). Shut down engine <strong>and</strong> correct as necessary. Damage to<br />
engine may occur if oil temperature rises above acceptable limit.<br />
Check temperature of coolant. Temperature should not exceed<br />
200° F (93° C) or drop below 160° F (71° C) during engine tests.<br />
Do not turn engine off immediately after a load run. Heat<br />
stored in engine will boil coolant in the water jackets if air <strong>and</strong><br />
coolant circulation are immediately stopped while engine is<br />
hot. Allow engine to idle a minimum of 3 minutes before<br />
shutting down.<br />
Do not idle engine for prolonged periods of time before<br />
completing break-in running. Failure to comply may result in<br />
damage to equipment.<br />
1. Start engine (2) <strong>and</strong> idle at 1200 rpm no-load for 5–10 minutes. Operate air compressor (1) in<br />
pumping mode.<br />
2. Check oil pressure, oil temperature, water temperature <strong>and</strong> inspect for leaks.<br />
BLOW-BY<br />
MEASURING<br />
TOOL<br />
DYNAMOMETER<br />
TEST STAND<br />
2<br />
1<br />
Figure 2. Break-In Running <strong>and</strong> Engine Test.<br />
ORIFICE<br />
ADAPTER<br />
PRESSURE<br />
RELIEF VALVE<br />
0047 00-4
TM 9-2815-225-34&P 0047 00<br />
ENGINE TESTING (Contd)<br />
ENGINE TEST<br />
NOTE<br />
At each phase, record crankcase pressure blow-by, engine<br />
speed, <strong>and</strong> load at 1 minute intervals. Watch for increases or<br />
wide shifts in blow-by pressure. If a sudden increase in blow-by<br />
pressure occurs or if blow-by exceeds 12 in. H2O, return to the<br />
previous phase test or repeat phase 1 test <strong>and</strong> operate engine<br />
an additional 15 minutes. If blow-by does not reach an<br />
acceptable level after repeating test for 15 minutes, discontinue<br />
test <strong>and</strong> determine cause. If blow-by is within an acceptable<br />
level, proceed to next phase test.<br />
After each test, check for fuel, air, water, oil, or exhaust leaks<br />
<strong>and</strong> correct as necessary.<br />
Lubricating oil level is checked only when engine is shut down<br />
or incorrect readings on dipstick will result.<br />
Refer to Phase 1 Test in Dynamometer Test Chart for steps 1<br />
through 7.<br />
1. Apply load to engine (2) at +/- 10 percent horsepower, +/- 5 percent speed.<br />
2. Check crankcase pressure with blow-by measuring tool.<br />
3. Operate engine (2) until normal oil operating temperature is attained.<br />
4. Stop engine (2) <strong>and</strong> check lubricating oil level.<br />
5. Add lubricating oil to bring level up to H (high) on dipstick.<br />
6. Allow oil temperature to stabilize.<br />
7. Operate air compressor (1) in pumping mode.<br />
Dynamometer Test Chart<br />
HP @<br />
RPM<br />
FUEL RATE<br />
LB/HR<br />
AIR<br />
MANIFOLD<br />
PRESSURE<br />
IN/HG<br />
CRANKCASE<br />
PRESSURE<br />
W/TURBO<br />
T46B<br />
PHASE 1<br />
160° F HP<br />
@ RPM<br />
PHASE 2<br />
2 MIN. HP<br />
@ RPM<br />
PHASE 3<br />
5 MIN. HP<br />
@ RPM<br />
PHASE 4<br />
4 MIN. HP<br />
@ RPM<br />
POWER<br />
CHECK<br />
4 MIN. HP<br />
@ RPM<br />
400<br />
@ 2100<br />
139–145 39/47<br />
12 in.<br />
H2O<br />
100<br />
@ 1200<br />
160<br />
@ 1200<br />
260<br />
@ 1600<br />
Full Load<br />
@ 1200<br />
384<br />
@ 2100<br />
0047 00-5
TM 9-2815-225-34&P 0047 00<br />
ENGINE TESTING (Contd)<br />
ENGINE TEST (Contd)<br />
NOTE<br />
Refer to Phase 2 Test in Dynamometer Test Chart for steps 8<br />
through 12.<br />
8. Apply load to engine (2) at +/- 10 percent horsepower, +/- 5 percent speed.<br />
9. Check pressure with blow-by measuring tool.<br />
10. Set idle speed to 600 rpm <strong>and</strong> set full load governed speed to 2100 rpm.<br />
11. Adjust load <strong>and</strong> rpm until specified readings are obtained.<br />
12. Operate air compressor (1) in pumping mode.<br />
NOTE<br />
Refer to Phase 3 Test in Dynamometer Test Chart for steps 13<br />
through 15.<br />
13. Apply load to engine (2) at +/- 10 percent horsepower, +/- 5 percent speed.<br />
14. Check crankcase pressure with blow-by measuring tool.<br />
15. Operate air compressor (1) in pumping mode.<br />
NOTE<br />
After phase 4 test is completed, allow engine to run at low idle<br />
for a minimum of three minutes before shutting down.<br />
Refer to Phase 4 Test in Dynamometer Test Chart for steps 16<br />
through 19.<br />
16. Apply load to engine (2) at +/- 10 percent horsepower, +/- 5 percent speed.<br />
17. Check crankcase pressure with blow-by measuring tool.<br />
18. Check for leaks <strong>and</strong> retighten all external screws to correct specifications.<br />
19. Operate air compressor (1) in non-pumping mode.<br />
POWER CHECK<br />
CAUTION<br />
Do not shut engine down immediately after power check is<br />
complete. Serious engine damage may result.<br />
1. Run engine (2) at 2100 rpm for 4 minutes.<br />
2. Check crankcase pressure with blow-by measuring tool. Repeat procedure until engine (2)<br />
develops 96–100% rated horsepower at st<strong>and</strong>ard fuel rate within permissible crankcase pressure<br />
limit. Operate air compressor (1) in non-pumping mode.<br />
NOTE<br />
At each phase, record crankcase pressure (blow-by) engine<br />
speed, <strong>and</strong> load at one-minute intervals. Watch for increases or<br />
wide shifts in blow-by pressure. If sudden increase happens, or<br />
if it is more than 12 in. H2O, perform the preceding test over<br />
again <strong>and</strong> run engine 15 more minutes. When blow-by is OK,<br />
proceed to next test. If not OK, stop the test <strong>and</strong> find reason for<br />
too much blow-by. Check engine for fuel, oil, water, air, or<br />
exhaust leaks after each test <strong>and</strong> fix as needed.<br />
After each test, check for fuel, air, water, oil, or exhaust leaks<br />
<strong>and</strong> correct as necessary.<br />
3. Apply dynamometer test st<strong>and</strong> load as engine (2) rpm is increased until rated rpm <strong>and</strong><br />
horsepower are reached <strong>and</strong> load is stabilized.<br />
0047 00-6
TM 9-2815-225-34&P 0047 00<br />
ENGINE TESTING (Contd)<br />
POWER CHECK (Contd)<br />
Dynamometer Test Chart<br />
HP<br />
@ RPM<br />
FUEL RATE<br />
LB/HR<br />
AIR<br />
MANIFOLD<br />
PRESSURE<br />
IN/HG<br />
CRANKCASE<br />
PRESSURE<br />
W/TURBO<br />
T46B<br />
PHASE 1<br />
160° F HP<br />
@ RPM<br />
PHASE 2<br />
2 MIN. HP<br />
@ RPM<br />
PHASE 3<br />
5 MIN. HP<br />
@ RPM<br />
PHASE 4<br />
4 MIN. HP<br />
@ RPM<br />
POWER<br />
CHECK<br />
4 MIN. HP<br />
@ RPM<br />
400<br />
@ 2100<br />
139–145 39/47<br />
12 in.<br />
H2O<br />
100<br />
@ 1200<br />
160<br />
@ 1200<br />
260<br />
@ 1600<br />
Full Load<br />
@ 1200<br />
384<br />
@ 2100<br />
BLOW-BY<br />
MEASURING<br />
TOOL<br />
DYNAMOMETER<br />
TEST STAND<br />
2<br />
1<br />
PRESSURE<br />
RELIEF VALVE<br />
ORIFICE<br />
ADAPTER<br />
Figure 3. Engine Testing <strong>and</strong> Power Check.<br />
0047 00-7
TM 9-2815-225-34&P 0047 00<br />
ENGINE TESTING (Contd)<br />
SMOKE LEVEL CHECK<br />
NOTE<br />
Zero <strong>and</strong> place opacity meter at exhaust side of turbocharger.<br />
An accurate smoke reading can usually be obtained in 10 to 15<br />
seconds.<br />
1. Using 0–20 scale on opacity meter, record smoke reading. Specification is 12.84 percent<br />
(3.6 percent Bosch).<br />
2. Increase dynamometer test st<strong>and</strong> load until rpm is reduced to 60 percent of rated rpm.<br />
3. Using 0–20 scale on opacity meter, record smoke reading. Specification is 3.87 percent<br />
(1.0 percent Bosch). Remove meter after reading is taken.<br />
4. Reduce dynamometer test st<strong>and</strong> load <strong>and</strong> engine (3) rpm.<br />
5. Accelerate engine (3) to rated rpm, no-load <strong>and</strong> return to idle. Full acceleration should occur in<br />
3–5 seconds.<br />
NOTE<br />
Zero <strong>and</strong> place opacity meter at exhaust side of turbocharger.<br />
6. Using 0–100 scale on opacity meter, accelerate engine (3) to rated rpm, no-load <strong>and</strong> record highest<br />
reading. Specification is 22 percent (4.3 percent Bosch).<br />
7. Return engine (3) to idle.<br />
FINAL CHECK<br />
NOTE<br />
If there is no rapid change in excess of 2 in. of water <strong>and</strong><br />
reading does not exceed 100 percent of representative pressure,<br />
blow-by is acceptable. Manometer readings not exceeding<br />
0.3 in. (7.62 mm) surge are desirable.<br />
At each phase, record crankcase pressure (blow-by), engine<br />
speed, <strong>and</strong> load at one minute intervals. Watch for increases or<br />
wide shifts in blow-by pressure. If sudden increase happens, or<br />
if it is more than 12 in. H2O, perform the preceding test over<br />
again <strong>and</strong> run engine 15 more minutes. If not OK, stop the test<br />
<strong>and</strong> find reason for too much blow-by. Check engine for fuel,<br />
oil, water, air, or exhaust leaks after each test <strong>and</strong> fix as<br />
needed.<br />
1. Using blow-by measuring tool, check pressure at end of testing procedure. If pressure is greater<br />
than specification listed in test chart, run engine (3) for additional 30 minutes at 96–100 percent<br />
rated load <strong>and</strong> rpm.<br />
2. Remove orifice adapter from pressure relief valve.<br />
3. Remove blow-by measuring tool from engine (3) <strong>and</strong> install oil filler cap (1) on engine (3).<br />
4. Unplug breather tube (2).<br />
0047 00-8
TM 9-2815-225-34&P 0047 00<br />
ENGINE TESTING (Contd)<br />
FINAL CHECK (Contd)<br />
Dynamometer Test Chart<br />
HP<br />
@ RPM<br />
FUEL RATE<br />
LB/HR<br />
AIR<br />
MANIFOLD<br />
PRESSURE<br />
IN/HG<br />
CRANKCASE<br />
PRESSURE<br />
W/TURBO<br />
T46B<br />
PHASE 1<br />
160° F HP<br />
@ RPM<br />
PHASE 2<br />
2 MIN. HP<br />
@ RPM<br />
PHASE 3<br />
5 MIN. HP<br />
@ RPM<br />
PHASE 4<br />
4 MIN. HP<br />
@ RPM<br />
POWER<br />
CHECK<br />
4 MIN. HP<br />
@ RPM<br />
400<br />
@ 2100<br />
139–145 39/47<br />
12 in.<br />
H2O<br />
100<br />
@ 1200<br />
160<br />
@ 1200<br />
260<br />
@ 1600<br />
Full Load<br />
@ 1200<br />
384<br />
@ 2100<br />
1<br />
2<br />
BLOW-BY<br />
MEASURING<br />
TOOL<br />
DYNAMOMETER<br />
TEST STAND<br />
ORIFICE<br />
ADAPTER<br />
3<br />
PRESSURE<br />
RELIEF VALVE<br />
Figure 4. Final Check.<br />
END OF WORK PACKAGE<br />
0047 00-9/10 blank
TM 9-2815-225-34&P 0048 00<br />
DIRECT SUPPORT AND GENERAL SUPPORT<br />
MAINTENANCE MANUAL<br />
INCLUDING REPAIR PARTS AND SPECIAL TOOLS LIST (RPSTL)<br />
FOR<br />
M915, M915A1, M915A4, M916, M920 VEHICLES<br />
NSN 2815-01-082-8125 P/N NTC400-3652-02 CUMMINS NTC-400 BIG CAM I DIESEL ENGINE<br />
W/CONTAINER<br />
NSN 2815-01-142-2745 P/N 11669835 CUMMINS NTC-400 BIG CAM III DIESEL ENGINE<br />
W/CONTAINER<br />
BIG CAM III ENGINE INSTALLATION<br />
INITIAL SETUP:<br />
Tools <strong>and</strong> Special Tools<br />
General mechanic’s tool kit: automotive<br />
(Item 1, WP 0061 00)<br />
Maintenance <strong>and</strong> repair shop equipment:<br />
automotive (Item 2, WP 0061 00)<br />
Lifting sling (Item 42, WP 0061 00)<br />
Lifting bracket (Item 43, WP 0061 00)<br />
Tilt sling (Item 67, WP 0061 00)<br />
Materials/Parts<br />
Starter positive terminal lockwasher<br />
(Item 1, Table 29, WP 0062 00)<br />
Six air cleaner housing locknuts<br />
(Item 2, Table 29, WP 0062 00)<br />
Two hood hinge locknuts<br />
(Item 3, Table 29, WP 0062 00)<br />
Four air cleaner housing bracket locknuts<br />
(Item 4, Table 29, WP 0062 00)<br />
Four radiator <strong>support</strong> rod locknuts<br />
(Item 5, Table 29, WP 0062 00)<br />
Air cleaner element<br />
(Item 6, Table 29, WP 0062 00)<br />
Two radiator crossmember mount locknuts<br />
(Item 7, Table 29, WP 0062 00)<br />
Starter ground terminal lockwasher<br />
(Item 8, Table 29, WP 0062 00)<br />
Two transmission modulator clamp locknuts<br />
(Item 9, Table 29, WP 0062 00)<br />
Accelerator rod locknut<br />
Personnel Required<br />
Three assistants<br />
Equipment Condition<br />
Horn wire removed (TM 9-2320-283-20)<br />
Grille shell removed (TM 9-2320-283-20)<br />
Fenders removed (TM 9-2320-283-20)<br />
Upper radiator fan shroud removed<br />
(TM 9-2320-283-20)<br />
Steering system to proper level removed<br />
(TM 9-2320-283-20)<br />
Transmission oil cooler lines removed<br />
(TM 9-2320-283-20)<br />
Air reservoir draincocks opened<br />
(TM 9-2320-283-20)<br />
Bumper <strong>and</strong> towing eyes removed<br />
(TM 9-2320-283-20)<br />
Brush guard <strong>and</strong> spotter mirrors removed<br />
(TM 9-2320-283-20)<br />
0048 00-1
TM 9-2815-225-34&P 0048 00<br />
BIG CAM III ENGINE INSTALLATION (Contd)<br />
1. Attach two lifting brackets, lifting sling, <strong>and</strong> lifting device to engine (4).<br />
WARNING<br />
Use extreme care when h<strong>and</strong>ling heavy parts. Provide adequate<br />
<strong>support</strong> <strong>and</strong> use assistance during procedure. Ensure that any<br />
lifting device used is in good operating condition <strong>and</strong> of suitable<br />
load capacity. Keep clear of heavy components <strong>support</strong>ed only<br />
by lifting device. Failure to comply may result in death or<br />
injury to personnel.<br />
Use pry bars to free engine hangups or snags. Do not use<br />
h<strong>and</strong>s. Failure to comply may result in injury to personnel.<br />
NOTE<br />
Use drift pin to aid in alignment of the engine to the<br />
transmission.<br />
2. Using lifting device <strong>and</strong> lifting sling, lower engine (4) on frame (1). Ensure that engine <strong>and</strong><br />
transmission are properly aligned <strong>and</strong> there is proper clearance between frame (1) <strong>and</strong> alternator<br />
(11) <strong>and</strong> between frame (1) <strong>and</strong> power steering pump (5).<br />
3. Install transmission (12) to flywheel housing (21) with twelve bolts (13). Tighten bolts (13) 16 lb-ft<br />
(21 N•m).<br />
4. Install engine brackets (3) on frame (1) with four bolts (2), washers (15), insulators (16), <strong>and</strong><br />
nuts (14). Tighten nuts (14) 130–166 lb-ft (176–225 N•m).<br />
5. Install front engine crossmember mount (8) on frame (1) with two bolts (9), four washers (6), two<br />
insulators (7), <strong>and</strong> nuts (10). Tighten nuts (10) 130–166 lb-ft (176–225 N•m).<br />
6. Remove lifting sling <strong>and</strong> lifting device from engine lifting brackets (18) <strong>and</strong> remove transmission<br />
jack from transmission (12).<br />
NOTE<br />
Rotate accessory drive pulley nut to gain access to flywheel<br />
bolts.<br />
7. Install flywheel (19) on torque converter (20) with twelve bolts (24) <strong>and</strong> washers (23). Tighten<br />
bolts (24), 19–21 lb-ft (26–29 N•m).<br />
8. Install P-clamp (17) <strong>and</strong> flywheel bolt access cover (18) on flywheel housing (21) with two<br />
screws (25).<br />
9. Connect ether quick-start tube (27) to atomizer (28) on intake manifold (26).<br />
0048 00-2
TM 9-2815-225-34&P 0048 00<br />
BIG CAM III ENGINE INSTALLATION (Contd)<br />
1<br />
2<br />
3<br />
LIFTING SLING<br />
LIFTING BRACKET<br />
4<br />
13<br />
15<br />
16<br />
6<br />
14 11<br />
10 6<br />
9<br />
8<br />
7<br />
5<br />
12<br />
Figure 1. Engine Assembly on Frame.<br />
19<br />
17<br />
18<br />
25<br />
20<br />
23<br />
24<br />
22<br />
21<br />
Figure 2. Flywheel Housing Assembly.<br />
12<br />
26<br />
28<br />
27<br />
Figure 3. Connecting Quick Start Tube.<br />
0048 00-3
TM 9-2815-225-34&P 0048 00<br />
BIG CAM III ENGINE INSTALLATION (Contd)<br />
10. Connect transmission TPS harness electrical connector (2) to vehicle TPS harness electrical<br />
connector (1).<br />
11. Connect front (4), middle (5), <strong>and</strong> rear (6) jacob brake electrical connectors to cylinder heads (3).<br />
12. Connect jacob brake electrical connector (7) to engine harness electrical connector (8).<br />
2 1<br />
Figure 4. Transmission TPS Electrical Connectors.<br />
3<br />
4<br />
Figure 5. Front Jacob Brake Electrical Connector.<br />
0048 00-4
TM 9-2815-225-34&P 0048 00<br />
BIG CAM III ENGINE INSTALLATION (Contd)<br />
5<br />
3<br />
Figure 6. Middle Jacob Brake Electrical Connectors.<br />
6<br />
3<br />
Figure 7. Rear Jacob Brake Electrical Connectors.<br />
7<br />
8<br />
Figure 8. Jacob Brake Harness Installation.<br />
0048 00-5
TM 9-2815-225-34&P 0048 00<br />
BIG CAM III ENGINE INSTALLATION (Contd)<br />
13. Connect fuel pump pressure sensor electrical connector (6) to fuel pump pressure sensor (5).<br />
14. Install fuel solenoid electrical harness lead (4) on fuel solenoid (1) with fuel solenoid terminal<br />
lockwasher (2) <strong>and</strong> nut (3).<br />
15. Install A/C electrical harness ground lead (16) <strong>and</strong> ground jumber cable (17) on engine (19) with<br />
two new A/C electrical harness ground lead starwashers (15), <strong>and</strong> screw (18).<br />
16. Install battery ground cable (27), starter electrical harness lead no. 83 (26) <strong>and</strong> ground jumber<br />
cable (17) on starter ground terminal (25) with new starter ground terminal lockwasher (8) <strong>and</strong><br />
nut (7).<br />
17. Install battery positive cable (10) <strong>and</strong> three starter electrical harness leads no. 202 (12), no. 82<br />
(13), <strong>and</strong> no. 421 (14) on starter positive terminal (24) with new starter positive terminal<br />
lockwasher (11) <strong>and</strong> nut (9).<br />
18. Install starter electrical harness lead no. 74 (22) on starter S-terminal (23) with starter S-terminal<br />
lockwasher (20) <strong>and</strong> nut (21).<br />
1<br />
2<br />
3 4<br />
5<br />
6<br />
Figure 9. Fuel Solenoid <strong>and</strong> Pressure Sensor Wiring Installation.<br />
0048 00-6
TM 9-2815-225-34&P 0048 00<br />
BIG CAM III ENGINE INSTALLATION (Contd)<br />
15<br />
16<br />
19<br />
14<br />
17<br />
15<br />
18<br />
~<br />
13<br />
12<br />
11<br />
10<br />
21<br />
20<br />
9<br />
7<br />
8<br />
17<br />
25<br />
27<br />
26<br />
24<br />
23<br />
22<br />
Figure 10. Starter Motor Electrical Connections Installation.<br />
0048 00-7
TM 9-2815-225-34&P 0048 00<br />
BIG CAM III ENGINE INSTALLATION (Contd)<br />
NOTE<br />
Thread cables <strong>and</strong> wires through grommet before installing<br />
wires.<br />
19. Install 12V power lead (7) <strong>and</strong> two engine harness leads (5) <strong>and</strong> (6) on 12V power stud (2) with<br />
12V power stud washer (3), nut (4), <strong>and</strong> grommet (1).<br />
20. Install pressure harness lead (16) <strong>and</strong> fan solenoid lead (15) on fan temperature switch (17)<br />
terminal B with fan temperature switch washer (9) <strong>and</strong> screw (10).<br />
21. Install pressure harness lead (13) <strong>and</strong> engine harness lead (14) on fan temperature switch (17)<br />
terminal A with fan temperature switch washer (12) <strong>and</strong> screw (11).<br />
22. Connect temperature sensor electrical connector (8) to temperature sensor (18).<br />
2<br />
1<br />
7<br />
3<br />
4<br />
6<br />
5<br />
Figure 11. 12V Harness Leads Installation.<br />
0048 00-8
TM 9-2815-225-34&P 0048 00<br />
BIG CAM III ENGINE INSTALLATION (Contd)<br />
11<br />
10<br />
9<br />
12<br />
13 14<br />
8<br />
15<br />
16 17<br />
A<br />
B<br />
18<br />
Figure 12. Fan Temperature Switch Electrical Connections.<br />
0048 00-9
TM 9-2815-225-34&P 0048 00<br />
BIG CAM III ENGINE INSTALLATION (Contd)<br />
23. Install engine electrical harness transformer/rectifier negative lead (16) on alternator<br />
transformer/rectifier negative terminal (14) with alternator terminal washer (7) <strong>and</strong> nut (6).<br />
24. Install engine electrical harness transformer/rectifier positive lead (8) on alternator<br />
transformer/rectifier positive terminal (15) with alternator terminal washer (5) <strong>and</strong> nut (4).<br />
25. Install engine electrical harness negative lead (3) on alternator negative terminal (10) with<br />
alternator terminal washer (2) <strong>and</strong> nut (1).<br />
26. Install engine electrical harness positive lead (9) on alternator positive terminal (11) with<br />
alternator terminal washer (12) <strong>and</strong> nut (13).<br />
27. Install two drive belts (21) on alternator (22), drive pulley (25), <strong>and</strong> crankshaft pulley (26).<br />
28. Tighten jamnut (17) on adjusting rod (24) until tension on drivebelts (21) is 110 lbs (50 kg).<br />
29. Tighten jamnut (23).<br />
30. Tighten two alternator mounting bracket nuts (20) (hidden) <strong>and</strong> screws (19).<br />
3<br />
1<br />
2<br />
6<br />
9<br />
5<br />
8<br />
4<br />
7<br />
10<br />
16<br />
15<br />
11<br />
14<br />
13<br />
12<br />
Figure 13. Alternator Electrical Connections Installation.<br />
0048 00-10
TM 9-2815-225-34&P 0048 00<br />
BIG CAM III ENGINE INSTALLATION (Contd)<br />
17<br />
18<br />
24<br />
23<br />
22<br />
21<br />
20<br />
19<br />
Figure 14. Alternator Belt Installation.<br />
25<br />
26<br />
Figure 15. Drive Pulley <strong>and</strong> Camshaft Pulley Installation.<br />
0048 00-11
TM 9-2815-225-34&P 0048 00<br />
BIG CAM III ENGINE INSTALLATION (Contd)<br />
31. Connect control valve module electrical harness (6) to transmission electrical harness (2).<br />
32. Install transmission electrical harness (2) on transmission (1) with transmission electrical harness<br />
clamp (3), two washers (5), screw (4), <strong>and</strong> nut (7).<br />
33. Connect output speed sensor electrical connector (8) to output speed sensor (9).<br />
34. Connect turbine speed sensor electrical connector (12) on turbine speed sensor jumper harness (13).<br />
35. Connect engine speed sensor electrical connector (11) to engine speed sensor (10).<br />
36. Install transmission oil temperature sensor electrical connector (14) on transmission oil<br />
temperature sensor (15) with transmission oil temperature sensor electrical connector washer (16)<br />
<strong>and</strong> nut (17).<br />
4<br />
5 6<br />
8<br />
9<br />
3<br />
2<br />
1<br />
5<br />
Figure 16. Transmission<br />
Electrical Harness Installation.<br />
7<br />
Figure 17. Output Speed Sensor Installation.<br />
14<br />
13<br />
11<br />
10<br />
12<br />
2<br />
Figure 18. Engine Speed <strong>and</strong> Turbine Sensors<br />
Installation.<br />
1<br />
17 16<br />
15<br />
Figure 19. Transmission Oil Temperature Sensor<br />
Installation.<br />
0048 00-12
TM 9-2815-225-34&P 0048 00<br />
BIG CAM III ENGINE INSTALLATION (Contd)<br />
37. Connect two transmission oil cooler hoses (18) <strong>and</strong> (20) to transmission (19).<br />
38. Install transmission oil cooler hoses (18) <strong>and</strong> (20) on transmission oil cooler base mounting bracket<br />
(23) with transmission oil cooler hose clamp (25), washer (21), screw (24), <strong>and</strong> nut (22).<br />
39. Connect air line (27) to fan temperature switch (26).<br />
40. Connect two air lines (28) to air compressor (29).<br />
41. Connect oil sample hose (30) to elbow fitting (31) to oil filter housing (32).<br />
42. Connect air compressor hose (33) on top of transmission (22) to air compression hose (34).<br />
26 27<br />
18<br />
18<br />
22<br />
21<br />
23<br />
20<br />
19<br />
Figure 20. Oil Cooler Hoses<br />
Installation.<br />
20<br />
25<br />
24<br />
19<br />
Figure 21. Transmission Oil Cooler<br />
Hose Clamp Installation.<br />
Figure 22. Fan Temperature<br />
Switch Installation.<br />
28<br />
29<br />
30<br />
33<br />
34<br />
22<br />
31<br />
32<br />
~<br />
Figure 23. Air Compressor<br />
Lines Installation.<br />
Figure 24. Engine Oil Sampling<br />
Hose Installation.<br />
Figure 25. Air Compressor Hose<br />
Installation.<br />
0048 00-13
TM 9-2815-225-34&P 0048 00<br />
BIG CAM III ENGINE INSTALLATION (Contd)<br />
43. Install tachometer cable (2) on fuel pump tachometer drive (1).<br />
44. Install accelerator rod (16) on lower throttle lever (17) with accelerator rod screw (18), new locknut<br />
(20), <strong>and</strong> two accelerator return springs (19).<br />
45. Align locating mark on transmission modulator cable clamp (5) to locating mark on mounting<br />
bracket (10).<br />
46. Install transmission modulator cable (11) on mounting bracket (10) with transmission modulator<br />
cable clamp (5), two screws (6), four washers (9), <strong>and</strong> two new locknuts (14).<br />
47. Install transmission modulator cable (11) on throttle lever (15) with retaining pin (3).<br />
48. Install fuel supply line (12) on fuel filter fitting (13).<br />
49. Install fuel return line (8) to fuel return line T-fitting (7) on engine (4).<br />
50. Install power steering hose (21) on elbow (25) of power steering reservoir (23).<br />
51. Install two power steering hoses (21) <strong>and</strong> clamps (22) on power steering reservoir (23) <strong>and</strong> power<br />
steering pump (26). Tighten clamps (22).<br />
52. Install drain plug (24) in power steering reservoir (23).<br />
53. Install cooling fan (30) on cooling fan clutch studs (31) with six new cooling fan lockwashers (28),<br />
washers (29), <strong>and</strong> nuts (27).<br />
4<br />
7<br />
1<br />
2<br />
3<br />
~<br />
5<br />
6<br />
8<br />
9<br />
11<br />
10<br />
13 12<br />
14<br />
9<br />
19<br />
20 17<br />
18<br />
16<br />
15<br />
Figure 26. Throttle Lever Installation.<br />
0048 00-14
TM 9-2815-225-34&P 0048 00<br />
BIG CAM III ENGINE INSTALLATION (Contd)<br />
23<br />
22<br />
21<br />
24<br />
25<br />
21<br />
22<br />
26<br />
Figure 27. Power Steering Hoses Installation.<br />
27<br />
28<br />
29<br />
30<br />
31<br />
Figure 28. Cooling Fan Installation.<br />
0048 00-15
TM 9-2815-225-34&P 0048 00<br />
BIG CAM III ENGINE INSTALLATION (Contd)<br />
54. Install two isolators (9) <strong>and</strong> washers (8) on top of front crossmember (11).<br />
55. Install chains <strong>and</strong> lifting device on radiator (7).<br />
56. Using lifting device <strong>and</strong> chains, install radiator (7) on front crossmember (11).<br />
57. Secure radiator to front of crossmember (11) with two radiator crossmember mount isolators (9),<br />
washers (8), <strong>and</strong> new locknuts (10).<br />
58. Install three radiator <strong>support</strong> rods (6) on radiator (7) <strong>and</strong> firewall brackets (1) with four radiator<br />
<strong>support</strong> rod screws (4), eight washers (3), four spacers (2), <strong>and</strong> new locknuts (5).<br />
59. Install ground strap (14) on radiator (7) <strong>and</strong> frame front crossmember (11) with two ground strap<br />
isolators (15), washers (12), <strong>and</strong> new locknuts (13).<br />
60. Remove chains <strong>and</strong> lifting device from radiator (7).<br />
4 6<br />
4<br />
3<br />
6<br />
4<br />
LIFTING DEVICE<br />
4<br />
6 3<br />
1<br />
2<br />
3<br />
6<br />
3<br />
5<br />
2<br />
2<br />
3<br />
2<br />
3<br />
CHAINS<br />
5<br />
3<br />
7<br />
5<br />
8<br />
8<br />
9<br />
9<br />
9<br />
9<br />
8<br />
11<br />
8<br />
10<br />
Figure 29. Radiator Installation.<br />
0048 00-16
TM 9-2815-225-34&P 0048 00<br />
BIG CAM III ENGINE INSTALLATION (Contd)<br />
7<br />
~<br />
11<br />
14<br />
15<br />
12<br />
12<br />
15<br />
13<br />
Figure 30. Radiator Ground Strap Installation.<br />
0048 00-17
TM 9-2815-225-34&P 0048 00<br />
BIG CAM III ENGINE INSTALLATION (Contd)<br />
61. Install coolant temperature sender electrical connectors (5) on coolant temperature sender<br />
terminal (4) with coolant temperature sender terminal screw (1).<br />
62. Install coolant temperature sender electrical connector (3) on coolant temperature sender terminal<br />
(4) with coolant temperature sender terminal nut (2).<br />
63. Install A/C condensor (9) with A/C condensor lines (10) attached, on two <strong>support</strong> brackets (8) on<br />
front of radiator (15) with four new A/C condensor locknuts (7).<br />
64. Install A/C condensor lines (10) on radiator <strong>support</strong> brackets (14) with three A/C condensor lines<br />
clamps (13), screws (6), washers (12), <strong>and</strong> new locknuts (11).<br />
1<br />
5<br />
4<br />
3 2<br />
Figure 31. Coolant Temperature Sender Electrical Connectors Installation.<br />
0048 00-18
TM 9-2815-225-34&P 0048 00<br />
BIG CAM III ENGINE INSTALLATION (Contd)<br />
7<br />
8<br />
9<br />
6<br />
~<br />
13<br />
12<br />
11<br />
7<br />
10<br />
Figure 32. AC Condensor Hoses Installation.<br />
15<br />
~<br />
10<br />
14<br />
13<br />
11<br />
12<br />
6<br />
14<br />
6<br />
13<br />
Figure 33. AC Condensor Lines Installation.<br />
0048 00-19
TM 9-2815-225-34&P 0048 00<br />
BIG CAM III ENGINE INSTALLATION (Contd)<br />
65. Install A/C compressor (5) on mounting bracket (27) with two A/C compressor mounting bracket<br />
bolts (26), washers (24), <strong>and</strong> new locknuts (23).<br />
66. Install A/C compressor adjusting rod (15) on front cover (16) with A/C compressor adjusting rod<br />
bolt (18), two washers (13), <strong>and</strong> new locknut (12).<br />
67. Install A/C drive belt (19) on A/C clutch pulley (25) <strong>and</strong> accessory drive pulley (17).<br />
68. Tighten two jam nuts (11) on A/C compressor adjusting rod (15) to obtain 0.50 in. (12.7 mm)<br />
A/C drive belt (19) deflection.<br />
69. Install A/C compressor hose (4), clamp (1), screw (2), washer (22), <strong>and</strong> new locknut (21) on top of<br />
engine (20).<br />
70. Install A/C compressor lines (3), two clamps (8) <strong>and</strong> (14), washers (10), <strong>and</strong> screws (9) on A/C<br />
compressor (5).<br />
71. Connect A/C compressor clutch electrical connector (7) to engine wiring harness (6).<br />
0048 00-20
TM 9-2815-225-34&P 0048 00<br />
BIG CAM III ENGINE INSTALLATION (Contd)<br />
2<br />
3<br />
4 5<br />
6<br />
7<br />
1<br />
22<br />
21<br />
20<br />
19<br />
18<br />
13<br />
8<br />
9<br />
10 11<br />
12<br />
13<br />
9<br />
10<br />
14<br />
11<br />
15<br />
17<br />
4<br />
16<br />
Figure 34. AC Compressor Mounting Bracket Installation.<br />
3<br />
5<br />
24<br />
23<br />
15<br />
27<br />
26<br />
25<br />
19<br />
17<br />
Figure 35. AC Compressor Mounting Bolts Installation.<br />
0048 00-21
TM 9-2815-225-34&P 0048 00<br />
BIG CAM III ENGINE INSTALLATION (Contd)<br />
72. Install upper radiator hose (9) <strong>and</strong> two upper radiator hose clamps (7) on thermostat housing<br />
elbow (8) <strong>and</strong> radiator inlet tube (1). Tighten upper radiator hose clamps (7).<br />
73. Install cooling outlet tube (16) <strong>and</strong> three clamps (11) on water pump (17). Tighten clamps (11).<br />
74. Secure cooling tube outlet on <strong>support</strong> bracket (12) with cooling tube outlet screw (14) <strong>and</strong> nut (13).<br />
75. Install lower radiator hose (15) <strong>and</strong> two lower radiator hose clamps (10) on radiator (2). Tighten<br />
clamps (10).<br />
76. Install bypass hose (6) <strong>and</strong> clamp (5) on radiator (2). Tighten clamp (5).<br />
77. Install two vent hoses (4) <strong>and</strong> clamps (3) on radiator (2). Tighten clamps (3).<br />
78. Install heater hose (23) <strong>and</strong> clamp (22) on heater hose tube adapter (21). Tighten clamp (22).<br />
79. Install heater hose (18) <strong>and</strong> clamp (19) on heater hose tube (20). Tighten clamp (19).<br />
80. Install exhaust S-pipe (28) <strong>and</strong> clamp (24) on exhaust pipe (30) with two exhaust pipe screws (25)<br />
<strong>and</strong> nuts (29).<br />
81. Install exhaust S-pipe (28) <strong>and</strong> clamp (26) on turbocharger outlet flange (27). Tighten clamp (26).<br />
1<br />
2<br />
~<br />
3<br />
4<br />
5<br />
6<br />
7<br />
10<br />
11<br />
10<br />
~<br />
8<br />
16<br />
15<br />
9<br />
14<br />
13<br />
12<br />
Figure 36. Upper Radiator Hose Installation.<br />
Figure 37. Lower Radiator Hose Installation.<br />
0048 00-22
TM 9-2815-225-34&P 0048 00<br />
BIG CAM III ENGINE INSTALLATION (Contd)<br />
17<br />
11<br />
Figure 38. Water Pump Installation.<br />
19<br />
20<br />
18<br />
21<br />
23<br />
22<br />
Figure 39. Heater Hose Installation.<br />
24<br />
25<br />
26<br />
27<br />
30 29<br />
28<br />
Figure 40. Turbocharger Hose Installation.<br />
0048 00-23
TM 9-2815-225-34&P 0048 00<br />
BIG CAM III ENGINE INSTALLATION (Contd)<br />
82. Install adapter duct (3) on air cleaner box (4) with four reinforcement plates (7), ten adapter duct<br />
screws (1), washers (5) <strong>and</strong> (2), <strong>and</strong> new locknuts (6).<br />
83. Connect air duct door spring (12) on air duct door (9) <strong>and</strong> firewall (4).<br />
84. Install air cleaner housing (8) on adapter duct (3) with six air cleaner housing washers (10) <strong>and</strong><br />
new locknuts (11).<br />
85. Install indicator tube (19) <strong>and</strong> elbow (18) on air cleaner housing (8).<br />
86. Install air vent hose (17), two air vent hose clamps (16) on air duct <strong>support</strong> bracket (20) with four<br />
air cleaner housing bracket screws (22), washers (23), <strong>and</strong> new locknuts (24). Tighten clamps (16).<br />
87. Install air vent tube (13) on air duct <strong>support</strong> bracket (20) with vent tube screw (14), washer (15),<br />
<strong>and</strong> locknut (21).<br />
88. Install air cleaner duct assembly (29) <strong>and</strong> three clamps (28) on turbocharger outlet (30), outlet<br />
elbow (27), <strong>and</strong> air cleaner housing (8). Tighten clamps (28).<br />
89. Install outlet elbow (27) on air chamber (31).<br />
90. Install new air cleaner element (26) <strong>and</strong> three clamps (25) on air cleaner housing (8). Tighten<br />
clamps (25).<br />
1<br />
2<br />
3<br />
4<br />
11<br />
10<br />
12<br />
5<br />
9<br />
3<br />
7<br />
6<br />
8<br />
Figure 41. Air Cleaner Housing Installation.<br />
0048 00-24
TM 9-2815-225-34&P 0048 00<br />
BIG CAM III ENGINE INSTALLATION (Contd)<br />
14<br />
15<br />
16<br />
18<br />
19<br />
13<br />
17<br />
20<br />
21<br />
4<br />
20<br />
22<br />
23<br />
23<br />
24<br />
23<br />
8<br />
23<br />
22<br />
Figure 42. Air Duct Installation.<br />
25 26<br />
27<br />
28<br />
29<br />
~<br />
31<br />
Figure 43. Air Cleaner Installation.<br />
30<br />
28<br />
0048 00-25
TM 9-2815-225-34&P 0048 00<br />
BIG CAM III ENGINE INSTALLATION (Contd)<br />
NOTE<br />
Use three assistants or lifting strap <strong>and</strong> lifting device to install<br />
hood to vehicle.<br />
91. Install hood (3) on hood hinges (4) with two hood hinge bolts (2) <strong>and</strong> new locknuts (1).<br />
WARNING<br />
When installing hood tilt assist cables, hood must be <strong>support</strong>ed.<br />
Failure to do so may result in damage to equipment or injury to<br />
personnel.<br />
92. Support hood (3) <strong>and</strong> install two tilt assist cables (5) connected to chain links (6) on chain links<br />
nuts (7).<br />
93. Install lighting harness (13) on hood (3) with four lighting harness clamps (8), washers (9),<br />
screws (10), <strong>and</strong> new plastic tie (12).<br />
94. Connect four electrical connectors (11) to lighting harness (13).<br />
2<br />
1<br />
1<br />
3<br />
2<br />
4<br />
4<br />
Figure 44. Hood Hinge Installation.<br />
0048 00-26
TM 9-2815-225-34&P 0048 00<br />
BIG CAM III ENGINE INSTALLATION (Contd)<br />
5 6<br />
3<br />
5<br />
6<br />
7<br />
Figure 45. Tilt Assist Cables Installation.<br />
8<br />
9<br />
11<br />
10<br />
10<br />
9<br />
8<br />
9<br />
10<br />
13<br />
12<br />
8<br />
11<br />
3<br />
8<br />
13<br />
Figure 46. Lighting Harness Installation.<br />
0048 00-27
TM 9-2815-225-34&P 0048 00<br />
BIG CAM III ENGINE INSTALLATION (Contd)<br />
95. Fill cooling system with coolant to specified level (TM 9-2320-283-10).<br />
96. Fill transmission with transmission oil to specified level (TM 9-2320-283-10).<br />
97. Fill engine crankcase with engine oil to specified level (TM 9-2320-283-10).<br />
98. Fill steering system with steering fluid to specified level (TM 9-2320-283-10).<br />
99. Install negative battery cable (1) on battery (4) <strong>and</strong> connect two negative battery cable clamps (2)<br />
on two negative battery cable post (3).<br />
100. Install brush guard <strong>and</strong> spotter mirrors (TM 9-2320-283-20).<br />
101. Install bumper <strong>and</strong> towing eyes (TM 9-2320-283-20).<br />
102. Install transmission oil cooler lines (TM 9-2320-283-20).<br />
103. Close air reservoir draincocks (TM 9-2320-283-20).<br />
104. Install upper radiator fan shroud (TM 9-2320-283-20).<br />
105. Install fenders (TM 9-2320-283-20).<br />
106. Install grill shell (TM 9-2320-283-20).<br />
107. Install horn wire (TM 9-2320-283-20).<br />
CAUTION<br />
Always perform break-in procedures for a new or repaired<br />
engine to prevent premature bearing <strong>and</strong> ring failure.<br />
108. Perform engine testing (WP 0047 00).<br />
2<br />
1<br />
~<br />
4 3<br />
Figure 47. Battery Cable Installation.<br />
END OF WORK PACKAGE<br />
0048 00-28
TM 9-2815-225-34&P 0049 00<br />
DIRECT SUPPORT AND GENERAL SUPPORT<br />
MAINTENANCE MANUAL<br />
INCLUDING REPAIR PARTS AND SPECIAL TOOLS LIST (RPSTL)<br />
FOR<br />
M915, M915A1, M915A4, M916, M920 VEHICLES<br />
NSN 2815-01-082-8125 P/N NTC400-3652-02 CUMMINS NTC-400 BIG CAM I DIESEL ENGINE<br />
W/CONTAINER<br />
NSN 2815-01-142-2745 P/N 11669835 CUMMINS NTC-400 BIG CAM III DIESEL ENGINE<br />
W/CONTAINER<br />
BIG CAM I ENGINE INSTALLATION<br />
INITIAL SETUP:<br />
Tools <strong>and</strong> Special Tools<br />
General mechanic’s tool kit: automotive<br />
(Item 1, WP 0061 00)<br />
Maintenance <strong>and</strong> repair shop equipment:<br />
automotive (Item 2, WP 0061 00)<br />
Lifting sling (Item 42, WP 0061 00)<br />
Lifting brackets (Item 43, WP 0061 00)<br />
Materials/Parts<br />
Ground strap starwasher<br />
(Item 1, Table 30, WP 0062 00)<br />
Alternator adjusting rod lockwasher<br />
(Item 2, Table 30, WP 0062 00)<br />
Drive belts (Item 3, Table 30, WP 0062 00)<br />
Trunion retaining pin<br />
(Item 4, Table 30, WP 0062 00)<br />
Two starter motor terminal lockwashers<br />
(Item 5, Table 30, WP 0062 00)<br />
Two transmission shift control cable<br />
lockwashers (Item 6, Table 30, WP 0062 00)<br />
Two transmission shift control cable locknuts<br />
(Item 7, Table 30, WP 0062 00)<br />
Two transmission modulator control bracket<br />
lockwashers (Item 8, Table 30, WP 0062 00)<br />
Transmission modulator control link retaining<br />
pin (Item 9, Table 30, WP 0062 00)<br />
Plastic tie (Item 10, Table 30, WP 0062 00)<br />
Equipment Condition<br />
Horn wire removed (TM 9-2320-283-20)<br />
Grille shell removed (TM 9-2320-283-20)<br />
Fenders removed (TM 9-2320-283-20)<br />
Upper radiator fan shroud removed<br />
(TM 9-2320-283-20)<br />
Steering system to proper level removed<br />
(TM 9-2320-283-20)<br />
Transmission oil cooler lines removed<br />
(TM 9-2320-283-20)<br />
Air reservoir draincocks opened<br />
(TM 9-2320-283-20)<br />
Bumper <strong>and</strong> towing eyes removed<br />
(TM 9-2320-283-20)<br />
Brush guard <strong>and</strong> spotter mirrors removed<br />
(TM 9-2320-283-20)<br />
Personnel Required<br />
Two assistants<br />
0049 00-1
TM 9-2815-225-34&P 0049 00<br />
BIG CAM I ENGINE INSTALLATION (Contd)<br />
1. Attach two lifting brackets (4) with four bolts (3), lifting sling, <strong>and</strong> lifting device to engine (5).<br />
WARNING<br />
Use extreme care when h<strong>and</strong>ling heavy parts. Provide adequate<br />
<strong>support</strong> <strong>and</strong> use assistance during procedure. Ensure that any<br />
lifting device used is in good operating condition <strong>and</strong> of suitable<br />
load capacity. Keep clear of heavy components <strong>support</strong>ed only<br />
by lifting device. Failure to do so may result in death or injury<br />
to personnel.<br />
Use pry bars to free engine hangups or snags. Do not use<br />
h<strong>and</strong>s. Failure to do so may result in damage to equipment or<br />
death or injury to personnel.<br />
2. Using lifting device, lifting sling, <strong>and</strong> assistant, position engine over vehicle frame (22).<br />
3. Position two rear vibration insulators (23) <strong>and</strong> rear frame flat washers (24) on rear frame engine<br />
mounting brackets (2).<br />
4. Position two front vibration insulators (7) <strong>and</strong> front frame flat washers (6) on front engine<br />
crossmember (11).<br />
5. Using lifting device <strong>and</strong> lifting sling, lower engine (5) into vehicle frame (22). Ensure there is proper<br />
clearance between power steering pump (8) <strong>and</strong> alternator (13) during lowering of engine (5).<br />
NOTE<br />
Use suitable drift pin to align mounting holes as nessessary.<br />
6. Secure engine (5) to two rear engine mounts (2) with two rear engine mount bolts (1),<br />
washers (16), <strong>and</strong> nuts (15). Tighten nuts (15) finger-tight.<br />
7. Secure engine (5) to front engine crossmember (2) with two front engine mount washers (9),<br />
bolts (10), <strong>and</strong> nuts (12). Tighten nuts (12) finger-tight.<br />
8. Remove lifting device, lifting sling, <strong>and</strong> lifting brackets (4) from engine (5).<br />
NOTE<br />
Rotate engine using accessory drive pulley nut to install<br />
flywheel bolts.<br />
9. Using suitable drift pin <strong>and</strong> transmission jack, align transmission mounting holes (14) to flywheel<br />
housing mounting holes <strong>and</strong> install twelve transmission bolts (17). Tighten bolts (17) 60 lb-ft (80 N•m).<br />
10. Attach ring gear (29) to flywheel (28) with twelve flywheel washers (32) <strong>and</strong> bolts (33) through<br />
flywheel bolt access hole (31). Alternately tighten bolts (33) 42–48 lb-ft (57–65 N•m).<br />
11. Tighten two rear engine mount nuts (15) 270–295 lb-ft (366–400 N•m).<br />
12. Tighten two front engine mount nuts (12) 270–295 lb-ft (366–400 N•m).<br />
13. Install transmission temperature sender electrical connector (19), washer (20), <strong>and</strong> nut (21) on<br />
transmission temperature sender (18).<br />
14. Position breather tube clamp (25) <strong>and</strong> install flywheel bolt access cover (26) on flywheel<br />
housing (30) with two flywheel bolt access cover screw (34). Tighten screws (34) 15–20 lb-ft<br />
(20–27 N•m).<br />
15. Remove transmission jack from under transmission (27).<br />
0049 00-2
TM 9-2815-225-34&P 0049 00<br />
BIG CAM I ENGINE INSTALLATION (Contd)<br />
LIFTING DEVICE<br />
1<br />
2<br />
3<br />
LIFTING SLING<br />
4<br />
5<br />
21<br />
20<br />
19<br />
24<br />
23<br />
17<br />
22<br />
16<br />
15<br />
6<br />
7<br />
18<br />
13<br />
12<br />
11<br />
8<br />
14<br />
10<br />
9<br />
Figure 1. Engine Installation.<br />
~<br />
26<br />
25<br />
29<br />
28<br />
27<br />
31<br />
34<br />
33<br />
32<br />
30<br />
Figure 2. Ring Gear Installation.<br />
0049 00-3
TM 9-2815-225-34&P 0049 00<br />
BIG CAM I ENGINE INSTALLATION (Contd)<br />
16. Install transmission floor shifter assembly (2) <strong>and</strong> floor pan access cover (1) to cab floor with ten<br />
floor pan access cover screws (4). Tighten screws (4) 15–20 lb-ft (20–27 N•m).<br />
17. Position floor mat (3) around transmission floor shifter assembly (2) <strong>and</strong> floor pan access cover (1).<br />
18. Install trunion (10) in transmission shift lever (8) with new trunion retaining pin (9).<br />
NOTE<br />
Refer to TM 2320-283-20-2 for shift control cale adjustment<br />
procedures.<br />
19. Install transmission shift control cable assembly (14) to transmission shift control cable mounting<br />
bracket (13) with spacer plate (7), U-bolt (6), two new lockwashers (11), <strong>and</strong> new locknuts (12).<br />
Ensure grommet (5) is correctly positioned in U-bolt (6).<br />
20. Install rear cooler hose bracket (17) to transmission (16) with rear cooler hose bracket washer (18)<br />
<strong>and</strong> screw (19).<br />
21. Install middle cooler hose bracket (20) to oil pan (21) with middle cooler hose bracket screw (22).<br />
22. Install front hose clamp (33) on cooler hose bracket (34) with front hose clamp screw (32) <strong>and</strong> nut (35).<br />
23. Install positive battery cable (23), starter motor ground strap (28), <strong>and</strong> negative battery cable (25)<br />
on starter motor (24) with new starter motor terminal lockwasher (26) <strong>and</strong> nut (27).<br />
24. Install ground strap (31) <strong>and</strong> starter motor ground strap (28) on engine (15) with new ground strap<br />
starwasher (29) <strong>and</strong> bolt (30).<br />
25. Install transmission modulator control bracket (40) on engine (15) with two new transmission<br />
modulator control bracket lockwashers (41) <strong>and</strong> bolts (42).<br />
26. Install transmission modulator control link (50) on transmission modulator control bracket (40)<br />
with U-bolt (43), spacer plate (44), two washers (45), <strong>and</strong> nuts (46).<br />
27. Install transmission modulator control link (50) <strong>and</strong> washer (48) on fuel control lever (51) with new<br />
retaining pin (47).<br />
28. Install accelerator link (49) on fuel control lever (51) accelerator link washer (37), return spring<br />
clip (38), <strong>and</strong> nut (36).<br />
29. Install return spring (39) on transmission modulator control bracket (40) <strong>and</strong> spring clip (38).<br />
1<br />
2<br />
3<br />
4<br />
13<br />
14<br />
5<br />
6<br />
12<br />
11<br />
7<br />
10<br />
9<br />
8<br />
Figure 3. Transmission Shift Control Cable Installation.<br />
0049 00-4
TM 9-2815-225-34&P 0049 00<br />
BIG CAM I ENGINE INSTALLATION (Contd)<br />
15 16<br />
21<br />
17<br />
34<br />
33<br />
35<br />
22<br />
20<br />
19<br />
18<br />
23<br />
32<br />
15 28<br />
25<br />
24<br />
29<br />
27<br />
26<br />
28<br />
30<br />
31<br />
Figure 4. Starter Cable Installation.<br />
41<br />
42<br />
39<br />
40<br />
44<br />
43<br />
36 37<br />
38<br />
45<br />
49<br />
46<br />
15<br />
~<br />
51<br />
50 48<br />
47<br />
Figure 5. Accelerator Cable Installation.<br />
0049 00-5
TM 9-2815-225-34&P 0049 00<br />
BIG CAM I ENGINE INSTALLATION (Contd)<br />
30. Connect engine harness electrical connectors (1) at firewall (2).<br />
31. Install electrical harness bracket (4) on engine (5) with screw (3). Tighten screw (3) 15–20 lb-ft<br />
(20–27 N•m).<br />
32. Connect air compressor line (6) to air compressor (7).<br />
33. Connect fuel line (10) to fuel filter <strong>and</strong> damper (11).<br />
34. Connect tachometer shaft assembly (15) to tachometer (14).<br />
35. Install ether quick start kit bracket (8), on engine with two clamps (13) <strong>and</strong> (16) <strong>and</strong> bracket nut<br />
(17) <strong>and</strong> screw (12). Tighten nut (17) <strong>and</strong> screw (12) 15–20 lb-ft (20–27 N•m).<br />
36. Install tachometer shaft assembly (15) on ether quick start kit bracket (8) with new plastic tie (9).<br />
37. Install speedometer shaft assembly (22) on fuel return line (20) with new plastic tie (21).<br />
38. Connect fuel return line (20) to fuel rail male branch tree (19).<br />
39. Connect air compressor hose (23) to air compressor line (24).<br />
40. Connect air compressor lines (24) <strong>and</strong> (25) to air compressor line T-adapter (18).<br />
1<br />
2<br />
3<br />
4<br />
5<br />
Figure 6. Electrical Engine Harness Installation.<br />
0049 00-6
TM 9-2815-225-34&P 0049 00<br />
BIG CAM I ENGINE INSTALLATION (Contd)<br />
8<br />
9<br />
5<br />
6<br />
17<br />
16<br />
15<br />
7<br />
~<br />
Figure 7. Air Compressor Installation.<br />
14<br />
13 12 11<br />
10<br />
Figure 8. Fuel Filter <strong>and</strong> Lines Installation.<br />
19<br />
20<br />
18<br />
21<br />
25 24<br />
22<br />
23<br />
Figure 9. Fuel <strong>and</strong> Air Compressor Lines Connection.<br />
0049 00-7
TM 9-2815-225-34&P 0049 00<br />
BIG CAM I ENGINE INSTALLATION (Contd)<br />
41. Position heater tube (11) <strong>and</strong> secure to fitting (13) using flare nut (12). Do not tighten flare<br />
nut (12).<br />
42. Connect heater hose (4) to heater tube (11) <strong>and</strong> secure using clamp (6).<br />
43. Connect heater hose (5) to heater tube (9) <strong>and</strong> secure using clamp (6).<br />
44. Connect heater hose (15) to heater valve (14) <strong>and</strong> secure using clamp (6).<br />
45. Secure heater hose (4), heater hose (5), bracket (8), bracket (10), <strong>and</strong> battery cable terminal (7) in<br />
three places using clamps (2) bolts (3) <strong>and</strong> nuts (1).<br />
46. Tighten flare nut (12) to fitting (13).<br />
~<br />
1<br />
3<br />
7<br />
8<br />
2<br />
3<br />
5<br />
4<br />
6<br />
6<br />
9<br />
2<br />
1<br />
10<br />
3<br />
1<br />
2<br />
11<br />
12<br />
13<br />
Figure 10. Heater Hose Installation.<br />
0049 00-8
TM 9-2815-225-34&P 0049 00<br />
BIG CAM I ENGINE INSTALLATION (Contd)<br />
14<br />
6<br />
15<br />
1<br />
~<br />
Figure 11. Heater Valve Installation.<br />
0049 00-9
TM 9-2815-225-34&P 0049 00<br />
BIG CAM I ENGINE INSTALLATION (Contd)<br />
47. Loosen two lower alternator screws (1) retaining alternator (19) in position.<br />
48. Install new alternator adjusting rod lockwasher (6), washer (5), alternator adjusting rod (9),<br />
alternator adjusting rod block (12), three alternator adjusting rod nuts (10) <strong>and</strong> two washers (11)<br />
as an assembly on engine (3) with alternator adjusting rod bolt (7).<br />
49. Install alternator (19) to alternator adjusting rod block (12) with washer (13), nut (2), <strong>and</strong><br />
alternator bolt (14). Do not tighten alternator bolt (14) at this time.<br />
50. Install two new belts (8) on alternator pulley (15) <strong>and</strong> crankshaft pulley (4).<br />
51. Using alternator adjusting rod nuts (10), adjust alternator (19) belt tension 110 lbs (50 kg).<br />
52. Tighten two lower alternator nuts (17) <strong>and</strong> alternator adjusting rod nuts (10).<br />
53. Install horn wire (TM 9-2320-283-20).<br />
54. Install radiator <strong>and</strong> <strong>support</strong> rods (TM 9-2320-283-20).<br />
55. Install grille shell (TM 9-2320-283-20).<br />
56. Install fan (TM 9-2320-283-20).<br />
57. Install upper radiator fan shroud (TM 9-2320-283-20).<br />
58. Install radiator <strong>support</strong> brackets (TM 9-2320-283-20).<br />
59. Install air cleaner (TM 9-2320-283-20).<br />
60. Install turbocharger exhaust tube (TM 9-2320-283-20).<br />
61. Install cooling system hoses (TM 9-2320-283-20).<br />
62. Install power steering pump hydraulic lines (TM 9-2320-283-20).<br />
63. Fill steering system to proper level (TM 9-2320-283-20).<br />
64. Install transmission oil cooler lines (TM 9-2320-283-20).<br />
65. Fill cooling system to proper level (TM 9-2320-283-20).<br />
66. Fill engine crankcase to proper level (TM 9-2320-283-20).<br />
67. Install hood (TM 9-2320-283-20).<br />
68. Install fenders (TM 9-2320-283-20).<br />
69. Install bumper <strong>and</strong> towing eyes (TM 9-2320-283-20).<br />
70. Install brush guard <strong>and</strong> spotter mirrors (TM 9-2320-283-20).<br />
71. Close air reservoir draincocks (TM 9-2320-283-20).<br />
72. Install negative battery cable (20) on battery (23), <strong>and</strong> connect two negative battery cable clamps<br />
(21) on two negative battery cable posts (22).<br />
CAUTION<br />
Always perform break-in procedures for a new or repaired<br />
engine to prevent premature bearing <strong>and</strong> ring failure.<br />
73. Perform engine testing (WP 0047 00).<br />
0049 00-10
TM 9-2815-225-34&P 0049 00<br />
BIG CAM I ENGINE INSTALLATION (Contd)<br />
4<br />
2<br />
3<br />
5<br />
6<br />
7<br />
~<br />
1<br />
12<br />
19<br />
15<br />
16<br />
10<br />
11<br />
10<br />
11<br />
13<br />
14<br />
9<br />
8<br />
18<br />
17<br />
Figure 12. Alternator Belt Installation.<br />
21<br />
20<br />
~<br />
22<br />
23<br />
Figure 13. Battery Cables Installation.<br />
END OF WORK PACKAGE<br />
0049 00-11/12 blank
TM 9-2815-225-34&P 0050 00<br />
DIRECT SUPPORT AND GENERAL SUPPORT<br />
MAINTENANCE MANUAL<br />
INCLUDING REPAIR PARTS AND SPECIAL TOOLS LIST (RPSTL)<br />
FOR<br />
M915, M915A1, M915A4, M916, M920 VEHICLES<br />
NSN 2815-01-082-8125 P/N NTC400-3652-02 CUMMINS NTC-400 BIG CAM I DIESEL ENGINE<br />
W/CONTAINER<br />
NSN 2815-01-142-2745 P/N 11669835 CUMMINS NTC-400 BIG CAM III DIESEL ENGINE<br />
W/CONTAINER<br />
BIG CAM III MODIFICATION KIT INSTALLATION INSTRUCTIONS<br />
INITIAL SETUP:<br />
Tools <strong>and</strong> Special Tools<br />
General mechanic’s tool kit: automotive<br />
(Item 1, WP 0061 00)<br />
Maintenance <strong>and</strong> repair shop equipment,<br />
automotive (Item 2, WP 0061 00)<br />
Automotive <strong>maintenance</strong> <strong>and</strong> repair<br />
supplemental set no. 2 (Item 3, WP 0061 00)<br />
Personnel Required<br />
Assistant<br />
0050 00-1
TM 9-2815-225-34&P 0050 00<br />
BIG CAM III MODIFICATION KIT INSTALLATION INSTRUCTIONS (Contd)<br />
GENERAL INFORMATION<br />
NOTE<br />
The following guidelines apply for using the Big Cam III<br />
engines in other than M915A1 vehicles.<br />
1. Installing the Big Cam III requires that you retain <strong>and</strong> use the following components from the<br />
BIG Cam I:<br />
• Big Cam I flywheel housing<br />
• Big Cam I flywheel<br />
• Big Cam I lower alternator bracket<br />
NOTE<br />
It is recommended that you retain the Big Cam I engine for use<br />
of other miscellaneous parts.<br />
2. Refer to table 1 for parts which are required to complete the conversion.<br />
Table 1. Parts Required for Big Cam III Coversion.<br />
NAME PART NUMBER NATIONAL STOCK NUMBER QUANTITY<br />
Seal ring 2D6507 5330-01-066-4537 1<br />
Seal 5P3881 5330-01-079-4737 1<br />
Pipe plug 144027 4730-00-014-4027 2<br />
Pipe plug 444632 4730-00-044-4632 1<br />
Plug button 142083 5340-00-290-4532 1<br />
0050 00-2
TM 9-2815-225-34&P 0050 00<br />
BIG CAM III MODIFICATION KIT INSTALLATION INSTRUCTIONS (Contd)<br />
ENGINE PREPARATION<br />
NOTE<br />
All material removed <strong>and</strong> not reused during installation will be<br />
returned to stock for disposition in accordance with AR 725-50.<br />
1. Remove alternator, alternator drive belt, <strong>and</strong> alternator mounting bracket from Big Cam III<br />
engine (2). Refer to WP 0008.<br />
2. Install Big Cam I alternator mounting bracket (3) on Big Cam III engine (2) with three bolts (1).<br />
Tighten bolts (1).<br />
3. Install Big Cam I alternator <strong>and</strong> drive belt on Big Cam III engine. Refer to WP 0049.<br />
4. Remove exisiting Big Cam I engine from vehicle. Refer to WP 0007.<br />
BIG CAM III INSTALLATION PROCEDURES<br />
1. Drain oil from Big Cam III bypass filter (4) <strong>and</strong> remove oil bypass filter element from bypass filter (4).<br />
2. Remove two elbows (5) from oil bypass filter (4).<br />
3. Install two plugs (6) on Big Cam III oil bypass filter (4).<br />
2<br />
1<br />
3<br />
Figure 1. Big Cam I Alternator Bracket Installation on Big Cam III Engine.<br />
4<br />
4<br />
5<br />
6<br />
Figure 2. Oil Bypass Filter (Big Cam III).<br />
Figure 3. Oil Bypass Plug<br />
Installation (Big Cam III).<br />
0050 00-3
TM 9-2815-225-34&P 0050 00<br />
BIG CAM III MODIFICATION KIT INSTALLATION INSTRUCTIONS (Contd)<br />
BIG CAM III INSTALLATION PROCEDURES (Contd)<br />
4. Install two flywheel housing guide pins on Big Cam III engine (1).<br />
5. Install Big Cam I flywheel housing (2) on Big Cam III engine (1) with seven of nine screws (6) <strong>and</strong><br />
washers (7). Tighten screws (6) 10–20 lb-ft (14–27 N•m).<br />
6. Remove two flywheel housing guide pins from Big Cam III engine (1) <strong>and</strong> install two remaining<br />
screws (6) <strong>and</strong> washers (7) on Big Cam I flywheel housing (2). Tighten screws (6) 10–20 lb-ft<br />
(14–27 N•m).<br />
7. Install two 5/8–18x6 in. guide studs in opposite holes on Big Cam III crankshaft (8) until fully seated.<br />
8. Apply lubricating oil to threads of screws (4) <strong>and</strong> face of washers (3). Allow excess oil to drain<br />
from screw threads.<br />
9. Install Big Cam I flywheel (5) on Big Cam III crankshaft (8) with four screws (4) <strong>and</strong> washers (3).<br />
Tighten screws (4) h<strong>and</strong>-tight in sequence shown in figure 4.<br />
10. Remove two guide studs <strong>and</strong> install two remaining screws (4) <strong>and</strong> washers (3) on Big Cam I<br />
flywheel (5). Tighten screws (4) 70 lb-ft (95 N•m) then 140 lb-ft (190 N•m) <strong>and</strong> finally 200–220 lbft<br />
(271–298 N•m) in sequence shown in figure 4.<br />
NOTE<br />
The flywheel must be pushed toward front of engine to remove<br />
crankshaft end clearance when crankshaft is rotated <strong>and</strong><br />
measurements are taken. If total indicator readings exceed<br />
limits, remove flywheel; clean flywheel <strong>and</strong> crankshaft flange<br />
faces, install, <strong>and</strong> repeat runout checks.<br />
11. Install dial gauge attachment <strong>and</strong> dial indicator on Big Cam I flywheel housing (2).<br />
12. Position contact tip of dial indicator against wide diameter of Big Cam I flywheel (5) bore <strong>and</strong> set<br />
dial indicator to zero. Rotate crankshaft (8) one complete revolution. Total indicator reading must<br />
not exceed 0.005 in. (0.127 mm).<br />
13. Inspect Big Cam I flywheel (5) face runout <strong>and</strong> install or reposition dial indicator on Big Cam I<br />
flywheel housing (2).<br />
14. Position contact tip of dial indicator against face of Big Cam I flywheel (5) as close to outside<br />
diameter as possible. Rotate crankshaft (8) one complete revolution. Total indicator reading must<br />
not exceed 0.005 in. (0.127 mm).<br />
15. Install Big Cam III engine in vehicle. Refer to WP 0048.<br />
1<br />
2<br />
8<br />
3<br />
4<br />
7<br />
6<br />
5<br />
F<br />
A<br />
C<br />
FLYWHEEL HOUSING<br />
GUIDE PIN<br />
Figure 4. Big Cam I Flywheel Housing <strong>and</strong> Flywheel Installation.<br />
D<br />
B<br />
E<br />
0050 00-4
TM 9-2815-225-34&P 0050 00<br />
BIG CAM III MODIFICATION KIT INSTALLATION INSTRUCTIONS (Contd)<br />
BIG CAM III INSTALLATION PROCEDURES (Contd)<br />
16. Install button plug (10) on air cleaner intake port (9).<br />
2<br />
DIAL GAUGE<br />
ATTACHMENT<br />
DIAL GAUGE<br />
ATTACHMENT<br />
8<br />
8<br />
5<br />
BORE<br />
RUNOUT<br />
DIAL<br />
FACE<br />
RUNOUT<br />
Figure 5. Measuring Runout.<br />
9<br />
10<br />
Figure 6. Air Cleaner Plug Installation.<br />
END OF WORK PACKAGE<br />
0050 00-5/6 blank
TM 9-2815-225-34&P 0051 00<br />
DIRECT SUPPORT AND GENERAL SUPPORT<br />
MAINTENANCE MANUAL<br />
INCLUDING REPAIR PARTS AND SPECIAL TOOLS LIST (RPSTL)<br />
FOR<br />
M915, M915A1, M915A4, M916, M920 VEHICLES<br />
NSN 2815-01-082-8125 P/N NTC400-3652-02 CUMMINS NTC-400 BIG CAM I DIESEL ENGINE<br />
W/CONTAINER<br />
NSN 2815-01-142-2745 P/N 11669835 CUMMINS NTC-400 BIG CAM III DIESEL ENGINE<br />
W/CONTAINER<br />
GENERAL MAINTENANCE INSTRUCTIONS<br />
THIS WORK PACKAGE (WP) COVERS:<br />
Scope; Precautions; Special Processes; Tools <strong>and</strong> Equipment; Disassembly; Cleaning;<br />
Inspection—Acceptance <strong>and</strong> Rejection Criteria; Repair or Replacement; <strong>and</strong> Assembly.<br />
SCOPE<br />
This WP contains <strong>general</strong> <strong>maintenance</strong> instructions pertaining to disassembly, cleaning, inspection, repair,<br />
<strong>and</strong> assembly of the Cummins NTC-400 diesel engine. Detailed information will be found in specific WPs.<br />
The repair procedures in this <strong>manual</strong> are for use at direct <strong>support</strong> <strong>and</strong> <strong>general</strong> <strong>support</strong> <strong>maintenance</strong> levels.<br />
All information contained in this <strong>manual</strong> applies to both Big Cam I <strong>and</strong> Big Cam III engines except where<br />
differences are specifically noted.<br />
0051 00-1
TM 9-2815-225-34&P 0051 00<br />
GENERAL MAINTENANCE INSTRUCTIONS (Contd)<br />
PRECAUTIONS<br />
All material-h<strong>and</strong>ling equipment shall be adequate to ensure safe working conditions for personnel <strong>and</strong><br />
efficient processing of items.<br />
The component shall be properly mounted on a fixture for disassembly <strong>and</strong> assembly to ensure safe<br />
working conditions.<br />
Follow all WARNINGS, CAUTIONS, <strong>and</strong> NOTES included in specific WPs to ensure personnel safety <strong>and</strong><br />
prevent damage to equipment.<br />
SPECIAL PROCESSES<br />
Special processes <strong>and</strong> equipment required for <strong>maintenance</strong> operations, as specified in this <strong>manual</strong>, are<br />
defined or referenced at the point of their application. When a special process is required, the <strong>maintenance</strong><br />
activity (when requested) shall provide evidence of compliance with controlling specifications. Following is<br />
a summary of some of the special processes that may be required for this <strong>manual</strong>.<br />
SPECIAL PROCESS<br />
Liquid Penetrant Inspection<br />
Magnetic Particle Inspection<br />
Table 1. Special Processes.<br />
DESCRIPTION<br />
E 1417, St<strong>and</strong>ard Practice for Liquid Penetrant<br />
Examination, is followed when using fluorescent or<br />
visible dye to detect cracks, flaws, etc., open to the<br />
surface of any nonporous metal.<br />
E 1444, St<strong>and</strong>ard Practice for Magnetic Particle<br />
Examination, is used to detect cracks, etc., at or<br />
below surface of ferrous (ferromagnetic) metals.<br />
TOOLS AND EQUIPMENT<br />
Tools <strong>and</strong> equipment required to overhaul this component can be found in Tools <strong>and</strong> Special Tools,<br />
WP 0061 00.<br />
Torque wrench specifications are given in text, as applicable. Metric equivalents are in parentheses<br />
following the U.S. st<strong>and</strong>ard measurement. (Example: Tighten oil pump mounting bolts 33–40 lb-ft<br />
(45–54 N•m).) St<strong>and</strong>ard capscrew markings <strong>and</strong> torque specifications are found in Torque Limits,<br />
WP 0053 00. Tolerances, torque values, <strong>and</strong> adjustments are provided in each WP as necessary.<br />
0051 00-2
TM 9-2815-225-34&P 0051 00<br />
GENERAL MAINTENANCE INSTRUCTIONS (Contd)<br />
DISASSEMBLY<br />
Each appropriate WP will contain specific instructions for disassembly of the components.<br />
Take care in h<strong>and</strong>ling parts during disassembly. Nicks, scratches, or other damage caused by careless<br />
h<strong>and</strong>ling may cause premature failure of equipment.<br />
Matched, married, or mated items (examples: bearings <strong>and</strong> races, covers <strong>and</strong> housings, <strong>and</strong> some gear<br />
sets) should be fastened together or otherwise identified as parts being processed together. If one part fails<br />
inspection, both parts must be replaced as a set.<br />
CLEANING<br />
CAUTION<br />
Block all ports <strong>and</strong> mask machined surfaces of aluminum castings<br />
before using the following cleaning procedures. Failure to comply<br />
may result in damage to equipment.<br />
Do not separate or intermix matched, married, or mated parts<br />
during cleaning operations. Refer to Disassembly above.<br />
For authorized cleaning materials, refer to TM 9-247, Materials Used for Cleaning, Preserving, Abrading,<br />
<strong>and</strong> Cementing.<br />
Remove all rust <strong>and</strong> surface scale using a wire brush, s<strong>and</strong> blast, grit blast, or other effective methods in<br />
accordance with st<strong>and</strong>ard procedures.<br />
0051 00-3
TM 9-2815-225-34&P 0051 00<br />
GENERAL MAINTENANCE INSTRUCTIONS (Contd)<br />
INSPECTION—ACCEPTANCE AND REJECTION CRITERIA<br />
NOTE<br />
All components subjected to magnetic particle inspection shall be<br />
demagnetized prior to assembly.<br />
All components subjected to dye penetrant inspection shall be<br />
cleaned after inspection. Coat part with preservative oil as<br />
required.<br />
Throughout this <strong>manual</strong>, measurements are used to confirm serviceability of items after a visual<br />
inspection. Measurements will be performed as required by quality assurance, in-process inspection,<br />
<strong>maintenance</strong> procedures, engine test report, <strong>and</strong> Final Inspection Report (FIR).<br />
Used components <strong>and</strong> refinished parts, recovered as products of disassembly, will be examined<br />
100 percent to determine serviceability by contractor. Refer to the <strong>maintenance</strong> WPs, work directive,<br />
or contract for more detail.<br />
Parts showing evidence of overheating are unrepairable by any process. Discard these parts.<br />
WARNING<br />
Compressed air source must not exceed 30 psi (207 kPa). Wear<br />
eyeshields when cleaning with compressed air. Failure to comply<br />
may result in injury to personnel.<br />
NOTE<br />
Some parts may not look exactly like illustrations. Manufacturing<br />
methods may change part appearance, but parts are functionally<br />
the same.<br />
Table 2. General Inspection Guidelines.<br />
INSPECT<br />
ACTION<br />
Oil passages<br />
Threads (internal <strong>and</strong> external)<br />
Machined surfaces<br />
Gear<br />
Remove all obstructions with compressed air or by<br />
working a soft wire back <strong>and</strong> forth through oil<br />
passage.<br />
Inspect threads for minor irregularities. For<br />
damaged thread repair, refer to table 3, Repairable<br />
Defects.<br />
Check for damage that could cause oil leakage or<br />
malfunction of the part. Refer to table 3, Repairable<br />
Defects.<br />
Check for nicks, burrs, or scoring. If any such<br />
conditions are found, refer to table 3, Repairable<br />
Defects.<br />
0051 00-4
TM 9-2815-225-34&P 0051 00<br />
GENERAL MAINTENANCE INSTRUCTIONS (Contd)<br />
REPAIR OR REPLACEMENT<br />
Parts that are beyond wear limit tolerances, broken, cracked, or otherwise damaged may be considered for<br />
repair by special processes listed below by requesting approval from TACOM. In requesting approval, the<br />
<strong>maintenance</strong> activity will furnish:<br />
1. Written repair procedure<br />
2. Specifications covering the procedure<br />
3. Reference drawing<br />
Unrepairable Defects<br />
Do not repair any of the following:<br />
1. Casting cracks at through-bores, threaded holes, or high-stress areas<br />
2. Cracked, chipped, ridged, or pitted gear teeth<br />
3. Cracked or split keyways<br />
4. Scored or scratched bores<br />
5. Cracked or chipped snapring grooves<br />
6. Oil channels with cracked walls or chipped edges<br />
7. Pitted or grooved gear teeth, unless otherwise indicated in this <strong>manual</strong><br />
8. Parts showing evidence of overheating<br />
9. Chipped edges, burred sealing ridges, <strong>and</strong> longitudinal scratches on sealing surfaces<br />
0051 00-5
TM 9-2815-225-34&P 0051 00<br />
GENERAL MAINTENANCE INSTRUCTIONS (Contd)<br />
Repairable Defects<br />
Table 3. Repairable Defects.<br />
REPAIRABLE PART/AREA<br />
Machined surfaces<br />
Damaged external threads<br />
Damaged internal threads<br />
Housing; castings; <strong>and</strong><br />
shaped, machined surfaces<br />
Gears, splines, <strong>and</strong> shafts<br />
Surface rust <strong>and</strong> corrosion<br />
REPAIR PROCESS<br />
Small burrs <strong>and</strong> scratches may be removed with a fine mill file or fine grit<br />
emery cloth. Discard components that have burrs or scratches too large to<br />
repair. Cylinder block <strong>and</strong> cylinder head can be resurfaced to correct<br />
surface defects <strong>and</strong> warpage.<br />
Repair threads having slight irregularities. Remove burrs with a soft<br />
stone, fine mill file, or emery cloth. Clean up slight irregularities by<br />
running thread die of correct size over thread. Discard components not<br />
repairable.<br />
Repair threads in tapped holes having minor irregularities by retapping<br />
with correct size previously used hole tap. Drill-out tapped holes having<br />
badly damaged threads <strong>and</strong> install a threaded insert. Follow kit<br />
manufacturer's <strong>and</strong> NASM33537 instructions. When drilling, the l<strong>and</strong><br />
width (space between holes, or between edge of hole <strong>and</strong> edge of material)<br />
must measure no less than three-fourths of the hole diameter. Discard<br />
components not repairable.<br />
Unless otherwise indicated, use fine emery cloth, crocus cloth, or soft stone<br />
to repair minor nicks, burrs, <strong>and</strong> scoring. Minor surface irregularities on<br />
noncontact surfaces do not need repair. Discard components not repairable.<br />
Use crocus cloth, fine mill file, or soft stone to remove minor nicks, burrs,<br />
<strong>and</strong> scoring. Welding, grinding, machining, plating, etc. of gears to correct<br />
defects is not authorized. Discard components not repairable.<br />
Remove surface rust <strong>and</strong> corrosion from all internal parts <strong>and</strong> surfaces.<br />
Mechanical <strong>and</strong>/or chemical methods may be used. Use fine emery cloth,<br />
crocus cloth, or soft stone to remove minor surface rust <strong>and</strong> corrosion. Do<br />
not assemble components having rusted or corroded parts. Corrosion or<br />
rust may flake off <strong>and</strong> cause damage to component while circulating in oil<br />
during operation. Discard components not repairable.<br />
0051 00-6
TM 9-2815-225-34&P 0051 00<br />
GENERAL MAINTENANCE INSTRUCTIONS (Contd)<br />
ASSEMBLY<br />
Cleanliness is essential in all component assembly operations. Dust <strong>and</strong> dirt, even in minute quantities,<br />
are abrasive. Parts must be kept clean. See individual WPs for specific assembly instructions.<br />
Replace any part that does not pass visual inspection or that is outside specified wear limits listed in the<br />
<strong>maintenance</strong> WPs.<br />
Follow WP instructions for coating bearings, bushings, gears, shafts, seals, friction parts, <strong>and</strong> other<br />
contact surfaces with operating oil (engine oil for engine parts, etc.) to ensure lubrication of parts during<br />
initial operation after repair.<br />
Seal h<strong>and</strong>ling:<br />
1. Do not open seal packets until ready to install seal. Seals may become contaminated with dust or<br />
dirt. Some types of seals can absorb moisture, which may cause damage during installation <strong>and</strong>/or<br />
shorten the lifespan of the seals.<br />
2. Ensure lip-type seals are installed so spring-loaded lip faces toward lubricant. Tighten all capscrews,<br />
screws, bolts, nuts, <strong>and</strong> fittings to torque values specified in <strong>maintenance</strong> WPs <strong>and</strong> in WP 0053 00.<br />
For parts identification, refer to WP 0058 00.<br />
END OF WORK PACKAGE<br />
0051 00-7/8 blank
TM 9-2815-225-34&P 0052 00<br />
DIRECT SUPPORT AND GENERAL SUPPORT<br />
MAINTENANCE MANUAL<br />
INCLUDING REPAIR PARTS AND SPECIAL TOOLS LIST (RPSTL)<br />
FOR<br />
M915, M915A1, M915A4, M916, M920 VEHICLES<br />
NSN 2815-01-082-8125 P/N NTC400-3652-02 CUMMINS NTC-400 BIG CAM I DIESEL ENGINE<br />
W/CONTAINER<br />
NSN 2815-01-142-2745 P/N 11669835 CUMMINS NTC-400 BIG CAM III DIESEL ENGINE<br />
W/CONTAINER<br />
ILLUSTRATED LIST OF MANUFACTURED ITEMS<br />
SCOPE<br />
This Work Package (WP) includes complete instructions for making items authorized to be<br />
manufactured or fabricated.<br />
EXPLANATION OF THE ILLUSTRATIONS OF MANUFACTURED ITEMS<br />
All instructions needed by <strong>maintenance</strong> personnel to manufacture the item are included on the<br />
illustrations. All bulk materials needed for manufacture of an item are listed by part number or<br />
national stock number in a tabular list on the illustration.<br />
ITEM<br />
NO.<br />
Table 1. Manufactured Items Part Number Table of Contents.<br />
NSN PART NO. ITEM PAGE NO.<br />
1. 6680-01-108-7410 199453 Oil level dipstick 0052 00-2<br />
2. 5305-00-795-9336 204165<br />
3. 5305-01-145-8380 S-189-B<br />
Flywheel housing guide pin<br />
(two required)<br />
Vibration damper guide pin<br />
(two required)<br />
0052 00-3<br />
0052 00-4<br />
0052 00-1
TM 9-2815-225-34&P 0052 00<br />
ILLUSTRATED LIST OF MANUFACTURED ITEMS (Contd)<br />
39.13 in.<br />
(99.39 cm)<br />
H<br />
L<br />
36.31 in.<br />
(92.23 cm)<br />
2.06 in.<br />
(5.23 cm)<br />
PROCEDURE:<br />
1. Using roller, measure 39.13 in. (99.39 cm) down dipstick from bottom of rubber stopper<br />
<strong>and</strong> cut dipstick. Round off tip of dipstick.<br />
NOTE<br />
Use an electric engraver to perform etching in steps 2,<br />
3, <strong>and</strong> 4. Etch dipstick to a depth of 0.005–0.010 in.<br />
(0.127–0.254 mm).<br />
2. Measure 36.31 in. (92.23 cm) down dipstick from bottom of rubber stopper <strong>and</strong> etch a<br />
line on dipstick at this length. Etch an “H” next to this line.<br />
3. Measure 2.06 in. (5.23 cm) down dipstick from line etched in step 3 <strong>and</strong> etch another<br />
line at this length. Etch an “L” next to this line.<br />
4. Etch part number 199453 on dipstick near rubber stopper.<br />
ITEM 1. OIL LEVEL DIPSTICK<br />
0052 00-2
TM 9-2815-225-34&P 0052 00<br />
ILLUSTRATED LIST OF MANUFACTURED ITEMS (Contd)<br />
0.125 in.<br />
(3.17 mm)<br />
0.06 in.<br />
(1.57 mm)<br />
PROCEDURE:<br />
1. Using hack saw, cut off head of screw.<br />
2. Round off edge of non-threaded end of screw.<br />
3. Using press, cut a slit approximately 0.06 in. (1.57 mm) wide <strong>and</strong> 0.125 in. (3.17 mm)<br />
deep in non-threaded end of screw.<br />
4. Using grinding wheel, remove any burrs after cutting.<br />
ITEM 2. FLYWHEEL HOUSING GUIDE PIN<br />
0052 00-3
TM 9-2815-225-34&P 0052 00<br />
ILLUSTRATED LIST OF MANUFACTURED ITEMS (Contd)<br />
0.125 in.<br />
(3.17 mm)<br />
0.06 in.<br />
(1.57 mm)<br />
PROCEDURE:<br />
1. Using hack saw, cut off head of screw.<br />
2. Round off edge of non-threaded end of screw.<br />
3. Using press, cut a slit approximately 0.06 in. (1.57 mm) wide <strong>and</strong> 0.125 in. (3.17 mm)<br />
deep in non-threaded end of screw.<br />
4. Using grinding wheel, remove any burrs after cutting.<br />
ITEM 3. VIBRATION DAMPER GUIDE PIN<br />
END OF WORK PACKAGE<br />
0052 00-4
TM 9-2815-225-34&P 0053 00<br />
DIRECT SUPPORT AND GENERAL SUPPORT<br />
MAINTENANCE MANUAL<br />
INCLUDING REPAIR PARTS AND SPECIAL TOOLS LIST (RPSTL)<br />
FOR<br />
M915, M915A1, M915A4, M916, M920 VEHICLES<br />
NSN 2815-01-082-8125 P/N NTC400-3652-02 CUMMINS NTC-400 BIG CAM I DIESEL ENGINE<br />
W/CONTAINER<br />
NSN 2815-01-142-2745 P/N 11669835 CUMMINS NTC-400 BIG CAM III DIESEL ENGINE<br />
W/CONTAINER<br />
TORQUE LIMITS<br />
SCOPE<br />
CAUTION<br />
General torque specifications cannot be applied to screws or<br />
fasteners that retain rubber components. The rubber components<br />
will be damaged before the correct torque limit can be reached. If a<br />
special torque limit is not given in the <strong>maintenance</strong> instructions for<br />
use with a rubber component, tighten the screw or nut until it<br />
touches the component, then tighten it one more turn.<br />
This Work Package (WP) provides <strong>general</strong> torque limits for screws <strong>and</strong> fasteners used in this <strong>manual</strong>.<br />
Special torque limits are indicated in the <strong>maintenance</strong> procedures for applicable components <strong>and</strong> in table 4,<br />
Torque Specifications. The <strong>general</strong> torque limits given in this WP shall be used when specific torque limits<br />
are not indicated in the <strong>maintenance</strong> procedure.<br />
0053 00-1
TM 9-2815-225-34&P 0053 00<br />
TORQUE LIMITS (Contd)<br />
TORQUE TABLES<br />
Table 1 lists dry torque limits. Dry torque limits are used on screws that do not have lubricants applied to<br />
the threads. Table 2 lists wet torque limits. Wet torque limits are used on screws that have high-pressure<br />
lubricants applied to the threads. For metric fasteners, refer to table 3 for torque limit requirements.<br />
HOW TO USE TORQUE TABLES<br />
1. Measure the diameter of the screw you are installing.<br />
NOTE<br />
Perform step 2 for st<strong>and</strong>ard screws only. To determine if screw is<br />
st<strong>and</strong>ard or metric, check capscrew head <strong>and</strong> refer to the following<br />
illustration.<br />
Manufacturer’s marks may vary. Metric screws can be three grades: 8.8,<br />
Screws shown are all SAE Grade 5 (3-line). 10.9, <strong>and</strong> 12.9. Grades <strong>and</strong> manufacturer’s<br />
marks appear on the screw head.<br />
8.8 10.9 12.9<br />
STANDARD<br />
METRIC<br />
Figure 1. Capscrew Head Markings.<br />
2. Count the number of threads per inch.<br />
Figure 2. Measuring Screw Diameter.<br />
Figure 3. Counting Threads per Inch.<br />
3. Refer to the appropriate Torque Limits table. Under the heading SIZE, look down the left-h<strong>and</strong><br />
column until you find the diameter of the screw you are installing. (There usually will be two entries<br />
beginning with the same size.)<br />
NOTE<br />
Perform step 4 for st<strong>and</strong>ard screws only.<br />
4. In the second column under SIZE, find the number of threads per inch that matches the number of<br />
threads you counted in step 2.<br />
5. To find the grade screw you are installing, match the markings on the head to the correct picture in<br />
CAPSCREW HEAD MARKINGS preceding the torque tables.<br />
6. Look down the column under the picture you found in step 5. until you find the torque limit<br />
(lb-ft or N•m) for the diameter <strong>and</strong> threads per inch of the screw.<br />
0053 00-2
TM 9-2815-225-34&P 0053 00<br />
TORQUE LIMITS (Contd)<br />
Table 1. Torque Limits for Dry Fasteners.<br />
CAPSCREW HEAD MARKINGS<br />
Manufacturer’s marks may<br />
vary. Screws shown above<br />
are all SAE Grade 5 (3-line).<br />
TORQUE<br />
SIZE<br />
SAE GRADE SAE GRADE SAE GRADE SAE GRADE<br />
NO. 1 or 2 NO. 5 NO. 6 or 7 NO. 8<br />
DIA. THREADS DIA. POUND NEWTON POUND NEWTON POUND NEWTON POUND NEWTON<br />
INCHES PER INCH MILLIMETERS FEET METERS FEET METERS FEET METERS FEET METERS<br />
1/4 20 6.35 5 7 8 11 10 14 12 16<br />
1/4 28 6.35 6 9 10 14 12 16 14 19<br />
5/16 18 7.94 11 15 17 23 21 28 24 33<br />
5/16 24 7.94 12 16 19 26 24 33 27 37<br />
3/8 16 9.53 20 27 30 41 40 54 45 61<br />
3/8 24 9.53 23 31 35 47 45 61 50 68<br />
7/16 14 11.11 30 41 50 68 60 81 70 95<br />
7/16 20 35 47 55 75 70 95 80 108<br />
1/2 13 12.70 50 68 75 102 95 129 110 149<br />
1/2 20 55 75 90 122 100 136 120 163<br />
9/16 12 14.29 65 88 110 149 135 183 150 203<br />
9/16 18 75 102 120 163 150 203 170 231<br />
5/8 11 15.88 90 122 150 203 190 258 220 298<br />
5/8 18 100 136 180 244 210 285 240 325<br />
3/4 10 19.05 160 217 260 353 320 434 380 515<br />
3/4 16 180 244 300 407 360 488 420 597<br />
7/8 9 22.23 140 190 400 542 520 705 600 814<br />
7/8 14 155 210 440 597 580 786 660 895<br />
1 8 25.40 220 298 580 786 800 1085 900 1220<br />
1 12 240 325 640 868 860 1166 1000 1356<br />
1 1/8 7 25.58 300 407 800 1085 1120 1519 1280 1736<br />
1 1/8 12 340 461 880 1193 1260 1709 1440 1953<br />
1 1/4 7 31.75 420 570 1120 1519 1580 2142 1820 2468<br />
1 1/4 12 460 624 1240 1681 1760 2387 2000 2712<br />
1 3/8 6 34.93 560 759 1460 1980 2080 2820 2380 3227<br />
1 3/8 12 640 868 1690 2278 2380 3227 2720 3688<br />
1 1/2 6 38.10 740 1003 1940 2631 2780 3770 3160 4285<br />
1 1/2 12 840 1139 2200 2983 3100 4204 3560 4827<br />
0053 00-3
TM 9-2815-225-34&P 0053 00<br />
TORQUE LIMITS (Contd)<br />
Table 2. Torque Limits for Wet Fasteners.<br />
CAPSCREW HEAD MARKINGS<br />
Manufacturer’s marks may<br />
vary. Screws shown above<br />
are all SAE Grade 5 (3-line).<br />
TORQUE<br />
SIZE SAE GRADE SAE GRADE SAE GRADE SAE GRADE<br />
NO. 1 or 2 NO. 5 NO. 6 or 7 NO. 8<br />
DIA. THREADS DIA. POUND NEWTON POUND NEWTON POUND NEWTON POUND NEWTON<br />
INCHES PER INCH MILLIMETERS FEET METERS FEET METERS FEET METERS FEET METERS<br />
1/4 20 6.35 4 6 6 8 8 11 9 12<br />
1/4 28 6.35 5 7 7 9 9 12 10 14<br />
5/16 18 7.94 8 11 13 18 16 22 18 24<br />
5/16 24 7.94 9 12 14 19 18 24 20 27<br />
3/8 16 9.53 15 20 23 31 30 41 40 54<br />
3/8 24 9.53 17 23 25 34 30 41 44 60<br />
7/16 14 11.11 24 33 35 47 45 61 55 75<br />
7/16 20 25 34 40 54 50 68 60 81<br />
1/2 13 12.70 35 47 55 75 70 95 80 108<br />
1/2 20 40 54 65 88 80 108 90 122<br />
9/16 12 14.29 50 68 80 108 100 136 110 149<br />
9/16 18 55 75 90 122 110 149 130 176<br />
5/8 11 15.88 70 95 110 149 140 190 170 231<br />
5/8 18 80 108 130 176 160 217 180 244<br />
3/4 10 19.05 120 163 200 271 240 325 280 380<br />
3/4 16 140 190 220 298 280 380 320 434<br />
7/8 9 22.23 110 149 300 407 400 542 460 624<br />
7/8 14 120 163 320 434 440 597 500 678<br />
1 8 25.40 160 217 440 597 600 814 680 922<br />
1 12 170 231 480 651 660 895 740 1003<br />
1 1/8 7 25.58 220 298 600 814 840 1139 960 1302<br />
1 1/8 12 260 353 660 895 940 1275 1080 1464<br />
1 1/4 7 31.75 320 434 840 1139 1100 1492 1360 1844<br />
1 1/4 12 360 488 920 1248 1320 1790 1500 2034<br />
1 3/8 6 34.93 420 570 1100 1492 1560 2115 1780 2414<br />
1 3/8 12 460 624 1260 1709 1780 2414 2040 2766<br />
1 1/2 6 38.10 560 760 1460 1980 2080 2820 2360 3200<br />
1 1/2 12 620 841 1640 2224 2320 3146 2660 3607<br />
0053 00-4
TM 9-2815-225-34&P 0053 00<br />
TORQUE LIMITS (Contd)<br />
Table 3. Torque Limits for Metric Fasteners.<br />
CAPSCREW HEAD<br />
MARKINGS<br />
TORQUE<br />
SIZE METRIC GRADE METRIC GRADE METRIC GRADE<br />
8.8 10.9 12.9<br />
DIA. DIA. POUND NEWTON POUND NEWTON POUND NEWTON<br />
INCHES MILLIMETERS FEET METERS FEET METERS FEET METERS<br />
.157 4 2 3 3 4 4 5<br />
.197 5 4 5 6 8 7 9<br />
.237 6 7 9 10 14 11 15<br />
.276 7 11 15 16 22 20 27<br />
.315 8 18 24 25 34 29 39<br />
.394 10 32 43 47 64 58 79<br />
.473 12 58 79 83 113 100 136<br />
.552 14 94 127 133 180 159 216<br />
.630 16 144 195 196 266 235 319<br />
.709 18 190 258 269 365 323 438<br />
.788 20 260 353 366 496 440 597<br />
.867 22 368 499 520 705 678 919<br />
.946 24 470 637 664 900 794 1077<br />
1.064 27 707 959 996 1351 1235 1675<br />
1.182 30 967 1311 1357 1840 1630 2210<br />
0053 00-5
TM 9-2815-225-34&P 0053 00<br />
TORQUE LIMITS (Contd)<br />
TORQUE WRENCH ADAPTERS<br />
Some tasks require the use of a torque wrench adapter when the nut or screw cannot be reached with<br />
a regular socket on the end of the torque wrench. These adapters add to the overall length of the torque<br />
wrench <strong>and</strong> make the dial or scale reading less than the actual torque applied to the nut or screw. To<br />
prevent overtorquing <strong>and</strong> damage to equipment, calculate correct dial or scale reading using the following<br />
conversion formula.<br />
CONVERSION FORMULA<br />
Corrected dial or scale readings are determined by the use of the following formula:<br />
Corrected<br />
reading<br />
=<br />
Required<br />
torque value<br />
÷<br />
Length of torque wrench + Length of adapter<br />
Length of torque wrench<br />
NOTE<br />
The length of the torque wrench is<br />
measured from the center of the h<strong>and</strong>le<br />
to the center of the drive. The length of<br />
the adapter is measured from the center<br />
of the drive to the center of the wrench.<br />
Example:<br />
Length of<br />
torque wrench<br />
22 in. (55.9 cm)<br />
Length of<br />
adapter<br />
3 in. (7.6 cm)<br />
In this example, the torque wrench measures 22 in. (55.9 cm) <strong>and</strong> the adapter is 3 in. (7.6 cm). The<br />
required torque is 19 lb-ft (25.8 N•m).<br />
Corrected<br />
reading<br />
Corrected<br />
reading<br />
Corrected<br />
reading<br />
Corrected<br />
reading<br />
=<br />
=<br />
=<br />
=<br />
19 lb-ft (25.8 N•m) ÷ 22 in. (55.9 cm) + 3 in. (7.6 cm)<br />
22 in. (55.9 cm)<br />
19 lb-ft (25.8 N•m) ÷ 25 in. (63.5 cm)<br />
22 in. (55.9 cm)<br />
19 lb-ft (25.8 N•m) ÷ 1.14<br />
17 lb-ft (23.1 N•m)<br />
0053 00-6
TM 9-2815-225-34&P 0053 00<br />
TORQUE LIMITS (Contd)<br />
Table 4. Torque Specifications.<br />
ITEM LB-FT LB-IN N•m<br />
Accessory drive pulley 40–45 — 54–61<br />
Accessory drive pulley assembly 300–310 — 407–420<br />
Accessory drive pulley locknut 300–310 — 407–420<br />
Accessory drive pulley screws 40–45 — 54–61<br />
Adapter 50 — 68<br />
Adapter 20–25 — 27–34<br />
Adjustable water pump pulley<br />
Hex-head screw<br />
Locknut<br />
12–15<br />
45–55<br />
Aftercooler Cover capscrews 25 — 34<br />
Air aftercooler cover screw 25 — 34<br />
—<br />
16–20<br />
61–75<br />
Air compressor <strong>support</strong> 30–35 — 41–48<br />
Air crossover hose clamp — 30–35 3–4<br />
Brass filter fittings 30–40 — 41–54<br />
Cam follower capscrews 30–35 — 41–48<br />
Camshaft <strong>support</strong> screws 25 — 34<br />
Compact head capscrews 15–19 — 20–26<br />
Connecting rod nut<br />
Step 1 Torque to<br />
Step 2 Torque to<br />
Step 3 Loosen all completely<br />
Step 4 Torque to<br />
Step 5 Torque to<br />
Step 6 Torque to<br />
70–75<br />
140–150<br />
—<br />
25–30<br />
70–75<br />
140–150<br />
—<br />
95–102<br />
190–203<br />
—<br />
34–41<br />
95–102<br />
190–203<br />
Cover screw — 96–132 11–15<br />
Cylinder head bolt 15–19 — 20–26<br />
Cylinder head capscrews<br />
Step 1<br />
Step 2<br />
Step 3<br />
20–25<br />
80–100<br />
265–305<br />
—<br />
27–34<br />
109–136<br />
359–414<br />
Diffuser plate — 60–84 7–10<br />
Flywheel bolt 19–21 — 26–29<br />
Flywheel capscrews 190–200 — 258–271<br />
Flywheel capscrews with hardened washers 200–220 — 271–298<br />
0053 00-7
TM 9-2815-225-34&P 0053 00<br />
TORQUE LIMITS (Contd)<br />
Table 4. Torque Specifications (Contd).<br />
ITEM LB-FT LB-IN N•m<br />
Flywheel housing capscrews 140–160 — 190–217<br />
Front cover 45–55 — 61–75<br />
Front engine mount nut 270–295 — 366–400<br />
Front <strong>support</strong> 55 — 75<br />
Fuel crossover capscrews 3 — 4<br />
Fuel filter bracket capscrews 25 — 34<br />
Fuel fittings — 150 17<br />
Fuel injector orifice plug — 8–10 11–14<br />
Fuel pump front cover capscrews 9–11 — 12–15<br />
Fuel pump mounting capscrews 30–35 — 41–48<br />
Gear pump capscrews 11–13 — 15–18<br />
Governor spring pack capscrews 9–11 — 12–15<br />
Hose clamps<br />
Water pump mounting<br />
Water manifold<br />
30–35<br />
30–35<br />
Impeller housing screws 60 7<br />
Impeller locknut 30 — 41<br />
Injector adjusting screw — 72 8<br />
Injector st<strong>and</strong> stud — 75 9<br />
—<br />
41–48<br />
41–48<br />
Intake manifold 20–25 — 27–34<br />
Locknut, V-b<strong>and</strong> clamp — 58–68 7–8<br />
Locknuts with ST-669 adapter 30–35 — 41–48<br />
Main bearing capscrews<br />
Step 1 Torque to<br />
Step 2 Torque to<br />
Step 3 Loosen all 3 to 5 threads<br />
Step 4 Torque to<br />
Step 5 Torque to<br />
85<br />
250–260<br />
—<br />
85<br />
250–260<br />
—<br />
115<br />
339–353<br />
—<br />
115<br />
339–353<br />
Mounting capscrews 20–25 — 27–34<br />
Mounting locknut 22–48 — 30–65<br />
Oil cooler mounting capscrew 30–35 — 41–48<br />
Oil drain fitting 50 — 68<br />
Oil inlet fitting 20–25 — 27–34<br />
0053 00-8
TM 9-2815-225-34&P 0053 00<br />
TORQUE LIMITS (Contd)<br />
Table 4. Torque Specifications (Contd).<br />
Oil pan<br />
Captive washer screws<br />
Hex-head screws<br />
ITEM LB-FT LB-IN N•m<br />
35–40<br />
15–20<br />
—<br />
48–54<br />
20–27<br />
Oil pan drainplug 60–70 — 81–95<br />
Oil pump mounting capscrews 35–45 — 48–61<br />
Oil suction tube mounting capscrews 30–35 — 41–48<br />
Piston cooling nozzle hex-head screw 8–12 — 11–16<br />
Rear engine mount nut 270–295 — 366–400<br />
Retainer 53–57 — 72–77<br />
Rocker cover capscrews<br />
Cork casket<br />
Cork <strong>and</strong> cubber casket<br />
12–17<br />
—<br />
—<br />
75–95<br />
16–23<br />
9–11<br />
Rocker lever housing capscrews 55–65 — 75–88<br />
Rotor locknut 20–24 — 27–33<br />
Support screw 30–35 — 41–47<br />
Throttle shaft plug — 40–55 5–6<br />
Transmission bolt 60 — 80<br />
Transmission drainplug 18–24 — 25–32<br />
Transmission main housing bolt 40 — 54<br />
Universal joint bearing strap screw 36 — 49<br />
Unloader body capscrews — 96–120 11–14<br />
Valve crosshead nuts with ST-669 adapter 22–26 — 30–35<br />
Valve locknuts 40–45 — 54–61<br />
V-b<strong>and</strong> clamp — 32–36 3–4<br />
V-b<strong>and</strong> clamp nut 10 — 14<br />
Vibration damper bolts 190 — 258<br />
Vibration damper mounting capscrews 180–200 — 244–271<br />
Water header plates — 72–96 8–11<br />
Water inlet <strong>and</strong> outlet flange mounting<br />
Capscrews<br />
27–32 — 37–43<br />
Water inlet screw 32 — 43<br />
Water outlet connection 15–20 — 20–27<br />
Water outlet screw 20 — 27<br />
END OF WORK PACKAGE<br />
0053 00-9/10 blank
TM 9-2815-225-34&P 0054 00<br />
DIRECT SUPPORT AND GENERAL SUPPORT<br />
MAINTENANCE MANUAL<br />
INCLUDING REPAIR PARTS AND SPECIAL TOOLS LIST (RPSTL)<br />
FOR<br />
M915, M915A1, M915A4, M916, M920 VEHICLES<br />
NSN 2815-01-082-8125 P/N NTC400-3652-02 CUMMINS NTC-400 BIG CAM I DIESEL ENGINE<br />
W/CONTAINER<br />
NSN 2815-01-142-2745 P/N 11669835 CUMMINS NTC-400 BIG CAM III DIESEL ENGINE<br />
W/CONTAINER<br />
SCOPE<br />
WEAR LIMITS<br />
This Work Package (WP) contains a table of wear limit information for the M915, M915A1, M916,<br />
M915A4, M920 vehicle. Parts exceeding these wear limits must be replaced.<br />
0054 00-1
TM 9-2815-225-34&P 0054 00<br />
WEAR LIMITS (Contd)<br />
Table 1. Wear Limits.<br />
PART DESCRIPTION/LOCATION WEAR LIMIT<br />
Cylinder sleeve Maximum pit depth .0625 in. (1.6 mm) maximum<br />
Cylinder sleeve Inside bore diameter 5.505 in. (13.983 cm) maximum<br />
Main bearing halves Thickness 0.1215 in. (3.0861 mm) acutal limit<br />
Connecting rod Length 0.002 in. (0.050 mm) maximum<br />
Connecting rod for twist<br />
Camshaft follower roller<br />
Between piston pin<br />
holding m<strong>and</strong>rel <strong>and</strong> dial<br />
indicator holding plate<br />
Outside diameter<br />
0.20 in. (0.5078 mm) maximum<br />
1.2495 in. (31.737 mm) minimum<br />
1.2505 in. (31.763 mm) maximum<br />
Expansion plug Flush with edge of hole 0.010 in. (0.254 mm) maximum<br />
Rocker lever housing shaft bore<br />
Rocker lever shaft<br />
Inside diameter<br />
Outside diameter<br />
1.1238 in. (2.855 cm) minimum –<br />
1.1246 in. (2.857 cm) maximum<br />
1.1230 in. (2.552 cm) minimum –<br />
1.1240 in. (2.855 cm) maximum<br />
Turbocharger wheel <strong>and</strong> shaft Runout 0.00005 in. (0.0127 mm) maximum<br />
Turbocharger wheel <strong>and</strong> shaft <strong>and</strong><br />
turbine housing<br />
Turbocharger wheel <strong>and</strong> shaft<br />
Clearance<br />
End play<br />
0.005 in. (0.127 mm) minimum –<br />
0.043 in. (0.092 mm) maximum<br />
0.006 in. (0.152 mm) minimum –<br />
0.0018 in. (0.457 mm) maximum<br />
Camshaft <strong>support</strong> Inside diameter 1.757 in. (4.46 cm) maximum<br />
Accessory drive shaft bushing Surface outer dimension 1.310 in. (3.327 cm) minimum<br />
Accessory drive gear to accessory<br />
drive housing<br />
Connecting rod<br />
Allowable clearance<br />
Bend or twist<br />
0.002 in. (0.051 mm) minimum –<br />
0.012 in. (0.305 mm) maximum<br />
0.002 in. (0.508 mm) maximum<br />
bend <strong>and</strong> 0.004 in. (0.102 mm)<br />
maximum twist<br />
Connecting rod <strong>and</strong> crankshaft End inside diameter 1.935 in. (49.149 mm) maximum<br />
Cylinder housing inside bore Diameter 3.6285 in. (9.2164 cm) maximum<br />
Cylinder housing bore Out-of-round 0.0015 in. (0.0381 mm) maximum<br />
Piston pin bore Diameter 0.6885 in. (17.4879 mm) maximum<br />
Piston pin Outside diameter 0.6876 in. (17.4625 mm) maximum<br />
Piston ring<br />
Crankshaft front <strong>support</strong> journal<br />
Crankshaft half coupling journal<br />
End gap<br />
Diameter<br />
Diameter<br />
0.010 in. (0.254 mm) minimum –<br />
0.020 in. (0.508 mm) maximum<br />
1.872 in. (4.755 cm) minimum –<br />
1.873 in. (4.757 cm) maximum<br />
1.003 in. (2.548 cm) minimum –<br />
1.0035 in. (2.549 cm) maximum<br />
0054 00-2
TM 9-2815-225-34&P 0054 00<br />
WEAR LIMITS (Contd)<br />
Crankshaft rear coupling journal<br />
Table 1. Wear Limits (Contd).<br />
PART DESCRIPTION/LOCATION WEAR LIMIT<br />
Diameter<br />
1.872 in. (4.755 cm) minimum –<br />
1.873 in. (4.757 cm) maximum<br />
Air compressor seat Height 0.485 in. (12.319 mm) minimum<br />
Air compressor seating area on seat Height 0.270 in. (6.858 mm) minimum<br />
Air compressor <strong>support</strong> thrust flange<br />
Depth<br />
1.307 in. (3.320 cm) minimum –<br />
1.310 in. (3.327 cm) maximum<br />
Fuel injector barrel ball Seat depth 0.050 in. (1.27 mm) maximum<br />
Solenoid valve seat Width 0.015 in. (0.381 mm) minimum<br />
Fuel pump weight-assist plunger Protrusion 0.800 in. (20.32 mm) exact limit<br />
Camshaft follower intake, injector,<br />
<strong>and</strong> exhaust<br />
Camshaft follower intake, injector,<br />
<strong>and</strong> exhaust<br />
Fuel pump front cover gear <strong>and</strong><br />
bushing<br />
Cylinder block flatness<br />
Concentricity of inside<br />
diameter with outside<br />
diameter<br />
Squareness of sides with<br />
roller pin bore<br />
Clearance<br />
Between feeler gauge <strong>and</strong><br />
cylinder block<br />
0.0020 in. (0.051 mm) must be<br />
within this measurement<br />
0.0040 in. (0.102 mm) must be<br />
within this measurement<br />
0.002-0.005 in. (0.050-0.127 mm)<br />
0.02 in. (0.51 mm) max measured<br />
Cylinder liner counterbore Depth 0.412 in. (10.465 mm) maximum<br />
Cylinder sleeve Protrusion 0.006 in. (0.152 mm) maximum<br />
Vibration damper Thickness 0.125 in. (3.157 mm) maximum<br />
Rear oil seal Contact area 5.998 in. (15.234 cm) minimum<br />
Front oil seal Contact area 3.625 in. (9.207 cm ) minimum<br />
Rod bearing journal Diameter 3.124 in. (7.933 cm) minimum<br />
Main bearing journal Diameter 4.489 in. (11.426 cm) minimum<br />
Thrust ring Thickness 0.245 in. (6.223 mm)<br />
Crankshaft keyway Width 0.375 in. (9.525 mm) maximum<br />
Oil pump driveshaft<br />
End play<br />
Diameter<br />
0.002 in. (0.05 mm) minimum –<br />
0.008 in. (0.20 mm) maximum<br />
0.874 in. (22.20 mm) minimum<br />
Idler shaft Outside diameter 0.874 in. (22.20 mm) minimum<br />
Air Aftercooler to intake manifold Clearance 0.013 in. (0.330 mm) maximum<br />
Turbocharger bearing housing Length 2.986 in. (7.584 cm) minimum<br />
V-b<strong>and</strong> clamp to turbin housing Clearance 0.035 in. (0.889 mm) minimum<br />
Impeller to impeller housing Clearance 0.006 in. (0.152 mm) minimum<br />
0054 00-3
TM 9-2815-225-34&P 0054 00<br />
WEAR LIMITS (Contd)<br />
Table 1. Wear Limits (Contd).<br />
PART DESCRIPTION/LOCATION WEAR LIMIT<br />
Injector cam follower roller Inside diameter 0.704 in. (17.882 mm) maximum<br />
Intake/exhaust roller Pin diameter 0.4997 in. (12.692 mm) minimum<br />
Injector roller Pin diameter 0.6997 in. (17.772 mm) minimum<br />
Intake/exhaust cam follower roller Pin bore 0.4995 in. (12.687 mm) maximum<br />
Injector cam follower roller Pin bore 0.6997 in. (17.772 mm) maximum<br />
Oil pump driveshaft Diameter 0.874 in. (22.20 mm) minimum<br />
Oil pump gear<br />
Clearance<br />
0.060 (1.52 mm) minimum –<br />
0.070 in. (1.78 mm) maximum<br />
Piston pin dowel Diameter 0.220 in. (5.59 mm) minimum<br />
Connecting rod bolt<br />
Pilot area diameter<br />
Threaded area diameter<br />
0.541 in. (13.74 mm) minimum<br />
0.6245 (15.862 mm) minimum<br />
Connecting rod Inside diameter 3.3167 in. (8.4244 cm) maximum<br />
Camshaft bearing Journal diameter 2.495 in. (6.337 cm) minimum<br />
Cam follower bushing Inside diameter 0.7511 in. (19.078 mm) maximum<br />
Intake/exhaust cam follower roller Inside diameter 0.5015 in. (12.738 mm) maximum<br />
Crankshaft gear Step diameter 3.761 in. (9.552 cm) minimum<br />
Crankshaft Thrust flange 0.003 in. (0.076 mm) maximum<br />
Piston ring to piston ring groove Clearance 0.006 in. (0.15 mm) maximum<br />
Piston Outside diameter 5.480 in. (13.919 cm) minimum<br />
Piston skirt Outside diameter 5.493 in. (13.952 cm) minimum<br />
Piston pin bore Diameter 2.000 in. (5.080 cm) maximum<br />
Piston pin Outside diameter 1.9988 (5.0769 cm) minimum<br />
Fuel gear pump idler shaft Outside diameter 0.499 in. (12.70 mm) minimum<br />
Fuel gear pump idler gear<br />
Fuel gear pump<br />
Length<br />
Gear body depth<br />
0.7483 in. (19.007 mm) minimum –<br />
0.7486 in. (19.014 mm) maximum<br />
0.7478 in. (18.994 mm) minimum –<br />
0.7481 (19.002 mm) maximum<br />
Fuel gear pump gear body shaft bore Inside diameter 0.5016 in. (12.741 mm) maximum<br />
Fuel gear pump<br />
Driveshaft backlash<br />
Driveshaft endplay<br />
0.004 in. (0.1016 mm) maximum<br />
0.0009 in. (0.228 mm) minimum –<br />
0.0015 in. (0.038 mm) maximum<br />
Tachometer drive bushing Inside diameter 0.752 in. (19.10 mm) maximum<br />
Governor barrel<br />
Diameter<br />
0.002 in. (0.051 mm) smaller than<br />
governor barrel outside diameter<br />
0054 00-4
TM 9-2815-225-34&P 0054 00<br />
WEAR LIMITS (Contd)<br />
Cylinder head<br />
Table 1. Wear Limits (Contd).<br />
PART DESCRIPTION/LOCATION WEAR LIMIT<br />
Distortion on mating<br />
surface<br />
Height<br />
0.002 in. (0.051 mm) maximum<br />
4.30 in. (11.024 cm) minimum<br />
Turbocharger bearing housing bore Inside diameter 0.876 in. (22.268 mm) maximum<br />
Turbocharger wheel <strong>and</strong> shaft Seal ring clearance 0.0005 in. (0.13 mm) maximum<br />
Turbocharger wheel <strong>and</strong> shaft<br />
bearing area<br />
Outside diameter<br />
0.5611 in. (14.252 mm) minimum<br />
Turbocharger thrust collar Thickness 0.0980 in. (2.489 mm) minimum<br />
Turbocharger oil slinger Seal ring clearance 0.0005 in. (0.13 mm) maximum<br />
Turbocharger turbine blade Turbine housing clearance 0.008 in. (0.20 mm) minimum<br />
Turbocharger impeller<br />
Turbocharger wheel <strong>and</strong> shaft<br />
Impeller housing<br />
clearance<br />
End play<br />
0.006 in. (0.15 mm) minimum<br />
0.001 in. (0.254 mm) minimum –<br />
0.004 in (0.1 mm) maximum<br />
Water pump housing Bearing bore 2.45 in. (62.22 mm) maximum<br />
Impeller must be smaller than water<br />
pump shaft impeller end to<br />
Water pump shaft impeller<br />
Water pump shaft<br />
Water pump pulley must be smaller<br />
than water pump shaft pulley end to<br />
Water pump pulley bore<br />
Water pump impeller bore<br />
Impeller <strong>and</strong> water pump housing<br />
Crankshaft <strong>and</strong> thrust bearing<br />
washers<br />
Camshaft gear to crankshaft gear<br />
Crankshaft <strong>and</strong> main bearings<br />
gasket<br />
Connecting rod cap <strong>and</strong> crankshaft<br />
Maintain a press fit<br />
between components<br />
End outside diameter<br />
Pulley end outside<br />
diameter<br />
Maintain a press fit<br />
between components<br />
Inside diameter<br />
Inside diameter<br />
Clearance<br />
Total end clearance<br />
Clearance for worn parts<br />
Backlash<br />
Thickness<br />
Side clearance<br />
0.001 in. (0.025 mm)<br />
0.6262 in. (15.905 mm) minimum –<br />
0.6267 in. (15.918 mm) maximum<br />
0.6693 in. (17.000 mm) minimum –<br />
0.6696 in. (17.008 mm) maximum<br />
0.001 in. (0.025 mm)<br />
0.6663 in. (16.924 mm) minimum –<br />
0.6673 in. (16.949 mm) maximum<br />
0.624 in. (15.85 mm) minimum –<br />
0.6625 in. (15.88 mm) maximum<br />
0.020 in. (0.508 mm) minimum –<br />
0.040 in. (1.016 mm) maximum<br />
0.007 in. (0.178 mm) minimum –<br />
0.018 in. (0.457 mm) maximum.<br />
0.022 in. (0.559 mm) maximum<br />
0.002 in. (0.051 mm) minimum –<br />
0.020 in. (0.508 mm) maximum<br />
0.014 in. (0.356 mm) minimum –<br />
0.080 in. (2.032 mm) maximum<br />
0.004 in. (0.102 mm) minimum –<br />
0.013 in. (0.330 mm) maximum<br />
0054 00-5
TM 9-2815-225-34&P 0054 00<br />
WEAR LIMITS (Contd)<br />
Accessory drive gear to camshaft<br />
gear<br />
Oil pump drive gear<br />
PART DESCRIPTION/LOCATION WEAR LIMIT<br />
Oil pan mounting flange on gear<br />
cover with oil pan mounting flange<br />
on cylinder block<br />
Mounting flange of camshaft <strong>support</strong><br />
<strong>and</strong> gear cover<br />
Flywheel, flexplate, <strong>and</strong> flywheel<br />
housing dowel pins<br />
Crankshaft<br />
Table 1. Wear Limits (Contd).<br />
Backlash<br />
Backlash between gears<br />
Alignment<br />
Thickness of shim pack<br />
Outside diameter<br />
Alignment must not<br />
exceed<br />
0.002 in. (0.051 mm) minimum –<br />
0.016 in. (0.406 mm) maximum<br />
0.002 in. (0.051 mm) minimum –<br />
0.016 in. (0.406 mm) maximum<br />
Gear cover must be even with front<br />
cylinder block flange within 0.004<br />
in. (0.102 mm)<br />
0.008 in (0.203 mm) minimum –<br />
0.13 in. (3.302 mm) maximum<br />
0.5005 in. (12.713 mm) minimum<br />
0.008 in. (0.203 mm)<br />
END OF WORK PACKAGE<br />
0054 00-6
TM 9-2815-225-34&P<br />
CHAPTER 4<br />
SUPPORTING INFORMATION<br />
FOR<br />
ENGINE, DIESEL<br />
CUMMINS MODEL NTC-400<br />
M915, M915A1, M915A4,<br />
M916, M920 VEHICLES
TM 9-2815-225-34&P<br />
CHAPTER 4<br />
SUPPORTING INFORMATION<br />
Work Package Title<br />
Work Package/Page No.<br />
References . . . . . . . . . . . . . . . . . . . . . . . . . . . . . . . . . . . . . . . . . WP 0055 00-1<br />
Repair Parts Introduction . . . . . . . . . . . . . . . . . . . . . . . . . . . . . WP 0056 00-1<br />
Repair Parts Scope . . . . . . . . . . . . . . . . . . . . . . . . . . . . . . . . . . WP 0057 00-1<br />
Repair Parts <strong>and</strong> Special Tools List (RPSTL) . . . . . . . . . . . . . WP 0058 00-1<br />
National Stock Number (NSN) Index . . . . . . . . . . . . . . . . . . . . WP 0059 00-1<br />
Expendable <strong>and</strong> Durable Items . . . . . . . . . . . . . . . . . . . . . . . . WP 0060 00-1<br />
Tools <strong>and</strong> Special Tools . . . . . . . . . . . . . . . . . . . . . . . . . . . . . . . WP 0061 00-1<br />
M<strong>and</strong>atory Replacement Parts . . . . . . . . . . . . . . . . . . . . . . . . . WP 0062 00-1
TM 9-2815-225-34&P 0055 00<br />
DIRECT SUPPORT AND GENERAL SUPPORT<br />
MAINTENANCE MANUAL<br />
INCLUDING REPAIR PARTS AND SPECIAL TOOLS (RPSTL)<br />
FOR<br />
M915, M915A1, M915A4, M916, M920 VEHICLES<br />
NSN 2815-01-082-8125 P/N NTC400-3652-02 CUMMINS NTC-400 BIG CAM I DIESEL ENGINE<br />
W/CONTAINER<br />
NSN 2815-01-142-2745 P/N 11669835 CUMMINS NTC-400 BIG CAM III DIESEL ENGINE<br />
W/CONTAINER<br />
REFERENCES<br />
SCOPE<br />
This Work Package (WP) lists all forms, technical <strong>manual</strong>s, <strong>and</strong> other publications referenced in this<br />
TM.<br />
0055 00-1
TM 9-2815-225-34&P 0055 00<br />
REFERENCES (Contd)<br />
FORMS<br />
DA Form 1693<br />
DA Form 2028<br />
DA Form 2404<br />
DA Form 2408-9<br />
SF 368<br />
Engineering Change Proposal (Short Form)<br />
Recommended Changes to DA Publications <strong>and</strong> Blank Forms<br />
Equipment Inspection <strong>and</strong> Maintenance Worksheet<br />
Equipment Control Record<br />
Quality Deficiency Report<br />
TECHNICAL MANUALS<br />
TM 9-247<br />
TM 740-90-1<br />
TM 750-244-6<br />
TM 9-2320-273-10<br />
TM 9-2320-273-20<br />
TM 9-2320-273-34<br />
TM 9-2320-283-10<br />
TM 9-2320-283-12<br />
TM 9-2320-283-20<br />
TM 9-2320-283-34<br />
Materials Used for Cleaning, Preserving, Abrading, <strong>and</strong> Cementing<br />
Administrative Storage of Equipment<br />
Procedures for Destruction of Tank-Automotive Equipment<br />
Operator’s Manual<br />
Organizational Maintenance<br />
<strong>Direct</strong> Support <strong>and</strong> General Support Maintenance<br />
Operator’s Manual<br />
Lubrication Order<br />
Organizational Maintenance<br />
<strong>Direct</strong> Support <strong>and</strong> General Support Maintenance<br />
OTHER PUBLICATIONS<br />
AR 750-22<br />
Army Oil Analysis Program<br />
CTA 50-970 Expendable/Durable Items<br />
DA PAM 738-750 Functional Users Manual for The Army Maintenance Management System<br />
(TAMMS)<br />
E-1417 St<strong>and</strong>ard Practice for Liquid Penetrant Examination<br />
E-1444 St<strong>and</strong>ard Practice for Magnetic Particle Examination<br />
FM 9-207<br />
Operation <strong>and</strong> Maintenance of Ordnance Materiel in Cold Weather<br />
NASM33537 St<strong>and</strong>ard Assembly Dimensions for Insert, Screw Thread, Helical Coil, Course<br />
<strong>and</strong> Fine Thread<br />
TB 9-2300-295-15/21 Commercial Warranties<br />
TB 43-750-651 Use of Antifreeze Solutions <strong>and</strong> Cleaning Compounds in Engine Cooling System<br />
TB 43-0212 Purging <strong>and</strong> Cleaning of Fuel Tanks<br />
END OF WORK PACKAGE<br />
0055 00-2
TM 9-2815-225-34&P 0056 00<br />
DIRECT SUPPORT AND GENERAL SUPPORT<br />
MAINTENANCE MANUAL<br />
INCLUDING REPAIR PARTS AND SPECIAL TOOLS LIST (RPSTL)<br />
FOR<br />
M915, M915A1, M915A4, M916, M920 VEHICLES<br />
NSN 2815-01-082-8125 P/N NTC400-3652-02 CUMMINS NTC-400 BIG CAM I DIESEL ENGINE<br />
W/CONTAINER<br />
NSN 2815-01-142-2745 P/N 11669835 CUMMINS NTC-400 BIG CAM III DIESEL ENGINE<br />
W/CONTAINER<br />
REPAIR PARTS INTRODUCTION<br />
SCOPE<br />
The repair parts information in this Technical Manual (TM) consists of this Introduction Work Package<br />
(WP) <strong>and</strong> a separate WP containing the engine repair parts list. The introductory material provides the<br />
information needed to interpret <strong>and</strong> underst<strong>and</strong> the repair parts lists. Each column used in the repair<br />
parts list is identified <strong>and</strong> its purpose explained. All codes are listed <strong>and</strong> their meaning is defined. This<br />
introductory material should be read before proceeding to the Repair Parts WP.<br />
The Repair Parts WP lists <strong>and</strong> authorizes parts required for TM overhaul of the Cummins NTC-400<br />
diesel engine. It authorizes the requisitioning, issue, <strong>and</strong> disposition of repair parts as indicated by the<br />
Source, Maintenance, <strong>and</strong> Recoverability (SMR) codes.<br />
EXPLANATION OF COLUMNS IN THE REPAIR PARTS LIST<br />
Item No. (Column 1). Indicates the number used to identify items called out in the illustration.<br />
SMR Code (Column 2). A 5-position code containing supply/requisitioning information, <strong>maintenance</strong><br />
category authorization criteria, <strong>and</strong> disposition instruction, as shown in the following breakout:<br />
Source Maintenance Recoverability<br />
Code Code Code<br />
XX<br />
1st two<br />
positions<br />
XX<br />
X 5th position<br />
How you get an item 3rd position 4th position Who determines<br />
disposition<br />
action on an<br />
Who can install, replace Who can do complete unserviceable item<br />
or use the item<br />
repair* on the item<br />
*Complete Repair: Maintenance capacity, capability, <strong>and</strong> authority to perform all corrective<br />
<strong>maintenance</strong> tasks of the repair function in a use/user environment in order to restore serviceability<br />
to a failed item.<br />
0056 00-1
TM 9-2815-225-34&P 0056 00<br />
REPAIR PARTS INTRODUCTION (Contd)<br />
Source Code. The source code tells you how to get an item needed for <strong>maintenance</strong>, repair, or<br />
overhaul of an end item/equipment. Explanations of source codes follows.<br />
Code<br />
Explanation<br />
PA<br />
PB<br />
PC**<br />
PD<br />
PE<br />
PF<br />
PG<br />
KD<br />
KF<br />
KB<br />
MO-<br />
MF-<br />
MH-<br />
MD-<br />
AO-<br />
AF-<br />
AH-<br />
AL-<br />
AD-<br />
(Made at Unit Level)<br />
(Made at DS Level)<br />
(Made at Specialized<br />
Repair Act (SRA))<br />
(Made at Depot)<br />
(Assembled by Unit Level)<br />
(Assembled by DS Level)<br />
(Assembled by GS Level)<br />
(Assembled by SRA)<br />
(Assembled by Depot)<br />
Stocked items; use the applicable NSN to request/requisition<br />
items with these source codes. They are authorized to the<br />
category indicated by the code entered in the third position of<br />
the SMR code.<br />
** NOTE: Items coded PC are subject to deterioration.<br />
Items with these codes are not to be requested/requisitioned<br />
individually. They are part of a kit which is authorized to the<br />
<strong>maintenance</strong> category indicated in the third position of the SMR<br />
code. The complete kit must be requisitioned <strong>and</strong> applied.<br />
Items with these codes are not to be requested/requisitioned<br />
individually. They must be made from bulk material which is<br />
identified by the part number in the DESCRIPTION AND<br />
USABLE ON CODE (UOC) column <strong>and</strong> listed in the bulk<br />
material group of the repair parts list. If the item is authorized<br />
to you by the third position code of the SMR code, but the source<br />
code indicates it is made at a higher level, order the item from<br />
the higher level of <strong>maintenance</strong>.<br />
Items with these codes are not to be requested/requisitioned<br />
individually. The parts that make up the assembled item must<br />
be requisitioned or fabricated <strong>and</strong> assembled at the level of<br />
<strong>maintenance</strong> indicated by the source code. If the third position<br />
code of the SMR code authorized you to replace the item, but the<br />
source code indicates the item is assembled at a higher level,<br />
order the item from the higher level of <strong>maintenance</strong>.<br />
XA- Do not requisition an XA-coded item. Order the next higher assembly. (Also, refer to the note<br />
below.)<br />
XB- If an XB item is not available from salvage, order it using the Commercial <strong>and</strong> Government<br />
Entity Code (CAGEC) <strong>and</strong> Part Number (P/N) given.<br />
XC- Installation drawing, diagram, instruction sheet, field service drawing, that is identified by<br />
manufacturer’s part number.<br />
XD- Item is not stocked. Order an XD-coded item through normal supply channels using the CAGEC<br />
<strong>and</strong> part number given, if no National Stock Number (NSN) is available.<br />
NOTE<br />
Cannibalization or controlled exchange, when authorized, may<br />
be used as a source of supply for items with the above source<br />
codes, except for source code XA.<br />
Maintenance Code. Maintenance codes tell you the level(s) of <strong>maintenance</strong> authorized to USE <strong>and</strong><br />
REPAIR <strong>support</strong> items. The <strong>maintenance</strong> codes are entered in the third <strong>and</strong> fourth positions of the<br />
SMR code as follows:<br />
• Third Position. The <strong>maintenance</strong> code entered in the third position tells you the lowest<br />
<strong>maintenance</strong> level authorized to remove, replace, <strong>and</strong> use an item. The <strong>maintenance</strong> code entered<br />
in the third position will indicate authorization to one of the following levels of <strong>maintenance</strong>.<br />
Code<br />
Application/Explanation<br />
C<br />
– Crew or operator <strong>maintenance</strong> done within organizational <strong>maintenance</strong>.<br />
O<br />
– Unit level can remove, replace, <strong>and</strong> use the item.<br />
F<br />
– <strong>Direct</strong> <strong>support</strong> level can remove, replace, <strong>and</strong> use the item.<br />
H<br />
– General <strong>support</strong> level can remove, replace, <strong>and</strong> use the item.<br />
L<br />
– Specialized repair activity can remove, replace, <strong>and</strong> use the item.<br />
D<br />
– Depot level can remove, replace, <strong>and</strong> use the item.<br />
0056 00-2
TM 9-2815-225-34&P 0056 00<br />
REPAIR PARTS INTRODUCTION (Contd)<br />
• Fourth Position. The <strong>maintenance</strong> code entered in the fourth position tells you whether or not<br />
the item is to be repaired <strong>and</strong> identifies the lowest <strong>maintenance</strong> level with the capability to do<br />
complete repair (i.e., perform all authorized repair functions).<br />
NOTE<br />
Some limited repair may be done on the item at a lower level<br />
of <strong>maintenance</strong>, if authorized by the Maintenance Allocation<br />
Chart (MAC) <strong>and</strong> SMR codes. This position will contain one<br />
of the following <strong>maintenance</strong> codes.<br />
Code<br />
Application/Explanation<br />
O<br />
– Unit is the lowest level that can do complete repair of the item.<br />
F<br />
– <strong>Direct</strong> <strong>support</strong> is the lowest level that can do complete repair of the<br />
item.<br />
H<br />
– General <strong>support</strong> is the lowest level that can do complete repair of the<br />
item.<br />
L<br />
– Specialized repair activity (designate the specialized repair activity)<br />
is the lowest level that can do complete repair of the item.<br />
D<br />
– Depot is the lowest level that can do complete repair of the item.<br />
Z<br />
– Nonrepairable. No repair is authorized.<br />
B<br />
– No repair is authorized. (No parts or special tools are authorized for<br />
the <strong>maintenance</strong> of a B-coded item.) However, the item may be<br />
reconditioned by adjusting, lubricating, etc., at the user level.<br />
Recoverability Code. Recoverability codes are assigned to items to indicate the disposition action on<br />
unserviceable items. The recoverability code is entered in the fifth position of the SMR code as follows:<br />
Recoverability<br />
Code<br />
Application/Explanation<br />
Z<br />
– Nonrepairable item. When unserviceable, condemn <strong>and</strong> dispose of<br />
the item at the level of <strong>maintenance</strong> shown in third position of SMR<br />
code.<br />
O<br />
– Reparable item. When uneconomically reparable, condemn <strong>and</strong><br />
dispose of the item at unit level.<br />
F<br />
– Reparable item. When uneconomically reparable, condemn <strong>and</strong><br />
dispose of the item at the direct <strong>support</strong> level.<br />
H<br />
– Reparable item. When uneconomically reparable, condemn <strong>and</strong><br />
dispose of the item at the <strong>general</strong> <strong>support</strong> level.<br />
D<br />
– Reparable item. When beyond lower level repair capability, return to<br />
depot. Condemnation <strong>and</strong> disposal of item not authorized below<br />
depot level.<br />
L<br />
– Reparable item. Condemnation <strong>and</strong> disposal not authorized below<br />
specialized repair activity (SRA).<br />
A<br />
– Item requires special h<strong>and</strong>ling or condemnation procedures because<br />
of specific reasons (e.g., precious metal content, high dollar value,<br />
critical material, or hazardous material). Refer to appropriate<br />
<strong>manual</strong>s/directives for specific instructions.<br />
0056 00-3
TM 9-2815-225-34&P 0056 00<br />
REPAIR PARTS INTRODUCTION (Contd)<br />
NSN (Column 3). The NSN for the item is listed in this column.<br />
CAGEC (Column 4). A 5-digit numeric code used to identify the manufacturer, distributor, or<br />
Government agency/activity, that supplies the item.<br />
Part Number (Column 5). Indicates the primary number used by the manufacturer (individual,<br />
company, firm, corporation, or Government activity), which controls the design <strong>and</strong> characteristics of<br />
the item by means of its engineering drawings, specifications st<strong>and</strong>ards, <strong>and</strong> inspection requirements<br />
to identify an item or range of items. Part numbers not available (N/A) will be provided as updates to<br />
this <strong>manual</strong> when available.<br />
NOTE<br />
When you use an NSN to requisition an item, the item you<br />
receive may have a different part number from the part<br />
ordered.<br />
Description <strong>and</strong> Usable On Code (UOC) (Column 6). This column includes the following information:<br />
1 The Federal item name <strong>and</strong>, when required, a minimum description to identify the item.<br />
2 Items that are included in kits <strong>and</strong> sets are listed below the name of the kit or set.<br />
3 Spare/repair parts that make up an assembled item are indented <strong>and</strong> listed immediately following<br />
the assembled item line entry.<br />
4 Part numbers for bulk materials are referenced in this column in the line item entry for the item to<br />
be manufactured/fabricated.<br />
5 When the item is not used with all serial numbers of the same model, the effective serial numbers<br />
are shown on the last line(s) of the description (before UOC).<br />
6 The statement END OF FIGURE appears just below the last item description in column 6 for a<br />
given figure in both the repair parts list <strong>and</strong> special tools list work packages.<br />
QTY (Column 7). The QTY (quantity per figure column) indicates the quantity of the item used in<br />
the breakout shown on the illustration figure, which is prepared for a functional group, subfunctional<br />
group, or an assembly. The letter V appearing in this column in lieu of a quantity indicates that the<br />
quantity is variable <strong>and</strong> the quantity may change from application to application.<br />
HOW TO LOCATE REPAIR PARTS<br />
When NSN or P/N is not known:<br />
First. Determine the assembly or subassembly to which the item belongs.<br />
Second. Find the figure covering the assembly or subassembly to which the item belongs.<br />
Third. Identify the item on the figure <strong>and</strong> use the Figure <strong>and</strong> Item Number Index to find the NSN.<br />
Fourth. Look in the repair parts list work package for the figure <strong>and</strong> item numbers. The NSNs <strong>and</strong><br />
part numbers are on the same line as the associated item numbers.<br />
END OF WORK PACKAGE<br />
0056 00-4
TM 9-2815-225-34&P 0057 00<br />
DIRECT SUPPORT AND GENERAL SUPPORT<br />
MAINTENANCE MANUAL<br />
INCLUDING REPAIR PARTS AND SPECIAL TOOLS LIST (RPSTL)<br />
FOR<br />
M915, M915A1, M915A4, M916, M920 VEHICLES<br />
NSN 2815-01-082-8125 P/N NTC400-3652-02 CUMMINS NTC-400 BIG CAM I DIESEL ENGINE<br />
W/CONTAINER<br />
NSN 2815-01-142-2745 P/N 11669835 CUMMINS NTC-400 BIG CAM III DIESEL ENGINE<br />
W/CONTAINER<br />
REPAIR PARTS<br />
SCOPE<br />
This Repair Parts Work Package (WP), illustrations <strong>and</strong> parts lists are organized into functional groups<br />
that contain related parts. For example, components related to the Cummins NTC-400 diesel engine<br />
will be shown in one illustration, while those related to the container will be found on a separate page.<br />
0057
TM 9-2815-225-34&P 0057 00<br />
TABLE OF CONTENTS<br />
Illus/<br />
Fig<br />
Page<br />
GROUP 01 ENGINE<br />
0100 ENGINE ASSEMBLY<br />
Dressed Engine <strong>and</strong> Container . . . . . . . . . . . . . . . . . . . . . . . . . . . . . . . . . . . . . . . . . . . . . 01 . . . . . . . . 1-1<br />
0101 CRANKCASE, BLOCK, AND CYLINDER HEAD<br />
Engine Block . . . . . . . . . . . . . . . . . . . . . . . . . . . . . . . . . . . . . . . . . . . . . . . . . . . . . . . . . . 2 . . . . . . . . 2-1<br />
Cylinder Head Assembly . . . . . . . . . . . . . . . . . . . . . . . . . . . . . . . . . . . . . . . . . . . . . . . . . 3 . . . . . . . . 3-1<br />
0102 CRANKSHAFT<br />
Crankshaft Assembly . . . . . . . . . . . . . . . . . . . . . . . . . . . . . . . . . . . . . . . . . . . . . . . . . . . . 4 . . . . . . . . 4-1<br />
0103 FLEXDISK, RING GEAR AND HOUSING<br />
Flexdisk, Ring Gear <strong>and</strong> Housing . . . . . . . . . . . . . . . . . . . . . . . . . . . . . . . . . . . . . . . . . . 5 . . . . . . . . 5-1<br />
0104 PISTON AND CONNECTING ROD ASSEMBLY<br />
Piston <strong>and</strong> Connecting Rod Assembly . . . . . . . . . . . . . . . . . . . . . . . . . . . . . . . . . . . . . . . . 6 . . . . . . . . 6-1<br />
0105 VALVES, CAMSHAFTS AND TIMING SYSTEM<br />
Camshaft Assembly <strong>and</strong> Followers . . . . . . . . . . . . . . . . . . . . . . . . . . . . . . . . . . . . . . . . . 7 . . . . . . . . 7-1<br />
Rocker Arm Assembly . . . . . . . . . . . . . . . . . . . . . . . . . . . . . . . . . . . . . . . . . . . . . . . . . . . 8 . . . . . . . . 8-1<br />
Rocker Cover . . . . . . . . . . . . . . . . . . . . . . . . . . . . . . . . . . . . . . . . . . . . . . . . . . . . . . . . . . 9 . . . . . . . . 9-1<br />
0106 CRANKCASE, BLOCK AND CYLINDER HEAD<br />
Oil Cooler <strong>and</strong> Filter, Big Cam III. . . . . . . . . . . . . . . . . . . . . . . . . . . . . . . . . . . . . . . . . . 10 . . . . . . . . 10-1<br />
Oil Cooler <strong>and</strong> Filter, Big Cam I . . . . . . . . . . . . . . . . . . . . . . . . . . . . . . . . . . . . . . . . . . . 11. . . . . . . . . 11-1<br />
Oil Pan, Dipstick, <strong>and</strong> Breather Tube . . . . . . . . . . . . . . . . . . . . . . . . . . . . . . . . . . . . . . . 12 . . . . . . . . 12-1<br />
Oil Lubricating Pump. . . . . . . . . . . . . . . . . . . . . . . . . . . . . . . . . . . . . . . . . . . . . . . . . . . . 13 . . . . . . . . 13-1<br />
0108 MANIFOLDS<br />
Air Aftercooler . . . . . . . . . . . . . . . . . . . . . . . . . . . . . . . . . . . . . . . . . . . . . . . . . . . . . . . . . 14 . . . . . . . . 14-1<br />
Exhaust Manifolds . . . . . . . . . . . . . . . . . . . . . . . . . . . . . . . . . . . . . . . . . . . . . . . . . . . . . . 15 . . . . . . . . 15-1<br />
0109 ACCESSORY DRIVING MECHANISM<br />
Gear Cover . . . . . . . . . . . . . . . . . . . . . . . . . . . . . . . . . . . . . . . . . . . . . . . . . . . . . . . . . . . . 16 . . . . . . . . 16-1<br />
Accessory Drive Pulley <strong>and</strong> Fan Clutch . . . . . . . . . . . . . . . . . . . . . . . . . . . . . . . . . . . . . 17 . . . . . . . . 17-1<br />
0112 ENGINE BRAKE<br />
Engine Retarder . . . . . . . . . . . . . . . . . . . . . . . . . . . . . . . . . . . . . . . . . . . . . . . . . . . . . . . . 18 . . . . . . . . 18-1<br />
0121 COMPRESSOR ASSEMBLY<br />
Air Compressor Lines <strong>and</strong> Fittings . . . . . . . . . . . . . . . . . . . . . . . . . . . . . . . . . . . . . . . . . 19 . . . . . . . . 19-1<br />
Air Compressor <strong>and</strong> Governor Assembly . . . . . . . . . . . . . . . . . . . . . . . . . . . . . . . . . . . . 20 . . . . . . . . 20-1<br />
0301 CARBURATOR, FUEL INJECTOR<br />
Fuel Injector . . . . . . . . . . . . . . . . . . . . . . . . . . . . . . . . . . . . . . . . . . . . . . . . . . . . . . . . . . . 21 . . . . . . . . 21-1<br />
0302 FUEL PUMP<br />
Fuel Lines <strong>and</strong> Fittings. . . . . . . . . . . . . . . . . . . . . . . . . . . . . . . . . . . . . . . . . . . . . . . . . . . 22 . . . . . . . . 22-1<br />
Fuel Pump. . . . . . . . . . . . . . . . . . . . . . . . . . . . . . . . . . . . . . . . . . . . . . . . . . . . . . . . . . . . . 23 . . . . . . . . 23-1<br />
Fuel Pump Main Housing . . . . . . . . . . . . . . . . . . . . . . . . . . . . . . . . . . . . . . . . . . . . . . . . 24 . . . . . . . 24-1<br />
Fuel Gear Pump . . . . . . . . . . . . . . . . . . . . . . . . . . . . . . . . . . . . . . . . . . . . . . . . . . . . . . . . 25 . . . . . . . . 25-1
TM 9-2815-225-34&P 0057 00<br />
TABLE OF CONTENTS (Contd)<br />
GROUP 94<br />
GROUP 95<br />
0305 SUPERCHARGER, BLOWER, TURBOCHARGER, OR ALTITUDE COMPENSATOR<br />
Turbocharger <strong>and</strong> Component Parts. . . . . . . . . . . . . . . . . . . . . . . . . . . . . . . . . . . . . . . . . 26 . . . . . . . 26-1<br />
Turbocharger Assembly . . . . . . . . . . . . . . . . . . . . . . . . . . . . . . . . . . . . . . . . . . . . . . . . . . 27 . . . . . . . 27-1<br />
Turbocharger Assembly, Big Cam III . . . . . . . . . . . . . . . . . . . . . . . . . . . . . . . . . . . . . . . 28 . . . . . . . 28-1<br />
0306 TANKS, LINES, FITTINGS AND HEADERS<br />
Solenoid Valves . . . . . . . . . . . . . . . . . . . . . . . . . . . . . . . . . . . . . . . . . . . . . . . . . . . . . . . . 29 . . . . . . . 29-1<br />
0308 ENGINE SPEED GOVERNOR AND CONTROL<br />
Fuel Pump Front Cover, Governor,<br />
<strong>and</strong> Tach Drive . . . . . . . . . . . . . . . . . . . . . . . . . . . . . . . . . . . . . . . . . . . . . . . . . . . . . . . . . 30 . . . . . . . 30-1<br />
0309 FUEL PUMP DAMPER, HEAD, AND FUEL FILTER<br />
Fuel Pump Damper, Head, <strong>and</strong> Fuel Filter . . . . . . . . . . . . . . . . . . . . . . . . . . . . . . . . . . . 31 . . . . . . . 31-1<br />
0311 WHEEL ASSEMBLY<br />
Ether Quick-Start Kit. . . . . . . . . . . . . . . . . . . . . . . . . . . . . . . . . . . . . . . . . . . . . . . . . . . . . 32 . . . . . . . 32-1<br />
0312 FUEL CONTROL LEVER<br />
Fuel Control Lever . . . . . . . . . . . . . . . . . . . . . . . . . . . . . . . . . . . . . . . . . . . . . . . . . . . . . . 33 . . . . . . . 33-1<br />
0503 WATER MANIFOLD, HEADERS, THERMOSTATS AND HOUSING GASKET<br />
Thermostat Housing, Water Manifold, <strong>and</strong> Component Parts . . . . . . . . . . . . . . . . . . . . . 34 . . . . . . . 34-1<br />
Water Filter <strong>and</strong> Component Parts . . . . . . . . . . . . . . . . . . . . . . . . . . . . . . . . . . . . . . . . . . 35 . . . . . . . 35-1<br />
0504 WATER PUMP<br />
Water Pump <strong>and</strong> Idler. . . . . . . . . . . . . . . . . . . . . . . . . . . . . . . . . . . . . . . . . . . . . . . . . . . . 36 . . . . . . . 36-1<br />
REPAIR KITS<br />
9401 REPAIR KITS . . . . . . . . . . . . . . . . . . . . . . . . . . . . . . . . . . . . . . . . . . . . . . . . . . . . . . . . . . . . . . . . . . . . KIT-1<br />
BULK MATERIAL . . . . . . . . . . . . . . . . . . . . . . . . . . . . . . . . . . . . . . . . . . . . . . . . . . . . . . . . . . . . . BULK-1<br />
GROUP<br />
2604 DIRECT SUPPORT SPECIAL TOOLS<br />
<strong>Direct</strong> Support Special Tools-1 . . . . . . . . . . . . . . . . . . . . . . . . . . . . . . . . . . . . . . . . . . . . 37 . . . . . . . 37-1<br />
<strong>Direct</strong> Support Special Tools-2 . . . . . . . . . . . . . . . . . . . . . . . . . . . . . . . . . . . . . . . . . . . . 38 . . . . . . . 38-1<br />
<strong>Direct</strong> Support Special Tools-3 . . . . . . . . . . . . . . . . . . . . . . . . . . . . . . . . . . . . . . . . . . . . 39 . . . . . . . 39-1<br />
<strong>Direct</strong> Support Special Tools (Supplemental) Big Cam I . . . . . . . . . . . . . . . . . . . . . . . . 40 . . . . . . . 40-1<br />
General Support Special Tools-1 . . . . . . . . . . . . . . . . . . . . . . . . . . . . . . . . . . . . . . . . . . . 41 . . . . . . . 41-1<br />
General Support Common Tools-2. . . . . . . . . . . . . . . . . . . . . . . . . . . . . . . . . . . . . . . . . . 42 . . . . . . . 42-1<br />
General Support Special Tools-3 . . . . . . . . . . . . . . . . . . . . . . . . . . . . . . . . . . . . . . . . . . . 43 . . . . . . . 43-1<br />
General Support Special Tools-1 (Supplemental), Big Cam I. . . . . . . . . . . . . . . . . . . . . 44 . . . . . . . 44-1<br />
General Support Special Tools-2 (Supplemental), Big Cam I. . . . . . . . . . . . . . . . . . . . . 45 . . . . . . . 45-1<br />
General Support Special Tools-3 (Supplemental) . . . . . . . . . . . . . . . . . . . . . . . . . . . . . . 46 . . . . . . . 46-1<br />
<strong>Direct</strong> <strong>and</strong> General Support Special Tools-1 . . . . . . . . . . . . . . . . . . . . . . . . . . . . . . . . . . 47 . . . . . . . 47-1<br />
<strong>Direct</strong> Support Special Tools-2 . . . . . . . . . . . . . . . . . . . . . . . . . . . . . . . . . . . . . . . . . . . . 48 . . . . . . . 48-1<br />
<strong>Direct</strong> Support Special Tools-3 . . . . . . . . . . . . . . . . . . . . . . . . . . . . . . . . . . . . . . . . . . . . 49 . . . . . . . 49-1<br />
General Support Special Tools-1 . . . . . . . . . . . . . . . . . . . . . . . . . . . . . . . . . . . . . . . . . . . 50 . . . . . . . 50-1<br />
General Support Special Tools-2 . . . . . . . . . . . . . . . . . . . . . . . . . . . . . . . . . . . . . . . . . . . 51 . . . . . . . 51-1<br />
General Support Special Tools-3 . . . . . . . . . . . . . . . . . . . . . . . . . . . . . . . . . . . . . . . . . . . 52 . . . . . . . 52-1<br />
General Support Special Tools-4 . . . . . . . . . . . . . . . . . . . . . . . . . . . . . . . . . . . . . . . . . . . 53 . . . . . . . 53-1<br />
Illus/<br />
Fig<br />
Page
TM 9-2815-225-34&P<br />
1<br />
2<br />
thru<br />
10<br />
2<br />
3<br />
4<br />
5<br />
6<br />
9<br />
7<br />
8<br />
10<br />
Figure 1. Dressed Engine <strong>and</strong> Container.
TM 9-2815-225-34&P<br />
(1)<br />
ITEM<br />
NO<br />
(2)<br />
SMR<br />
CODE<br />
(3)<br />
NSN<br />
(4)<br />
CAGEC<br />
(5)<br />
PART<br />
NUMBER<br />
(6)<br />
DESCRIPTION AND USABLE ON CODE(UOC)<br />
GROUP 01 ENGINE<br />
GROUP 0100 ENGINE ASSEMBLY<br />
(7)<br />
QTY<br />
FIG. 1 DRESSED ENGINE AND CONTAINER<br />
1 PAFHD 2815-01-438-1517 19207 57K3603 ENGINE,DIESEL BIG CAM III.......... 1<br />
2 PAOZZ 5310-01-144-6115 75078 001094 .NUT,PLAIN,CONE SEAT................ 4<br />
3 PAOZZ 5310-00-584-5272 96906 MS35338-48 .WASHER,LOCK........................ 4<br />
4 PAOZZ 5365-01-147-5030 75078 001234 .SPACER,SLEEVE...................... 4<br />
5 PAOZZ 5342-00-404-2946 15434 170226 .BRACKET,ENGINE LIFT................ 2<br />
6 XBOZZ 15434 3003480 .LABEL BIG CAM I................... 1<br />
7 PAOZZ 5305-00-804-6318 15434 S-2286 .SCREW.............................. 5<br />
8 PAOZZ 7690-01-094-6720 15434 3074214 .MARKER,IDENTIFICATI BIG CAM I..... 1<br />
8 PAOZZ 9905-01-147-0933 15434 3027282 .PLATE,IDENTIFICATIO BIG CAM III... 1<br />
9 XAFHH 2815-01-142-2745 19207 11669835 .ENGINE,DIESEL DRESSED, W/O<br />
1<br />
CONTAINER, BIG CAM III..............<br />
10 PAFFF 8115-01-349-2459 19207 12389942 .BOX,SHIPPING WITHOUT ENGINE....... 1<br />
END OF FIGURE<br />
1-1
TM 9-2815-225-34&P<br />
Figure 2. Engine Block.<br />
1<br />
2<br />
thru<br />
5<br />
6<br />
7<br />
thru<br />
31<br />
37<br />
36<br />
2<br />
3 13<br />
11<br />
38<br />
12<br />
14<br />
15<br />
20<br />
19<br />
35<br />
27<br />
23<br />
21<br />
29<br />
25<br />
19<br />
30<br />
16<br />
17<br />
18<br />
16<br />
21<br />
22<br />
28<br />
34<br />
33<br />
32<br />
26<br />
21<br />
22<br />
22<br />
10<br />
8<br />
9<br />
7<br />
4<br />
5<br />
24<br />
26<br />
31<br />
39
TM 9-2815-225-34&P<br />
(1)<br />
ITEM<br />
NO<br />
(2)<br />
SMR<br />
CODE<br />
(3)<br />
NSN<br />
(4)<br />
CAGEC<br />
(5)<br />
PART<br />
NUMBER<br />
(6)<br />
DESCRIPTION AND USABLE ON CODE(UOC)<br />
GROUP 0101 CRANKCASE, BLOCK AND<br />
CYLINDER HEAD<br />
(7)<br />
QTY<br />
FIG. 2 ENGINE BLOCK<br />
1 PAHHH 2815-00-011-7786 15434 3801826 CYLINDER SLEEVE ASSEMBLY.......... 6<br />
2 XAHZZ 15434 213740. .CYLINDER SLEEVE................... 1<br />
3 PAHZZ 5330-00-064-4399 15434 215090 .GASKET............................ 1<br />
4 PAHZZ 5330-01-049-0466 15434 3008998 .PACKING BLACK.................... 1<br />
5 PAHZZ 5331-00-058-1767 15434 149105PC183049 .O-RING RED....................... 1<br />
6 PAHHH 2815-01-105-8768 15434 3013909 ENGINE BLOCK ASSEMB BIG CAM I..... 1<br />
6 PAHHH 2815-01-141-9370 15434 3801310 ENGINE BLOCK,DIESEL BIG CAM III... 1<br />
7 PAHZZ 5315-00-281-7610 15434 68445 .PIN,GROOVED,HEADLES HEAD TO BLOCK 6<br />
8 PAHZZ 4730-01-214-7081 15434 3008469 .PLUG,PIPE 3/4"................... 1<br />
9 PAHZZ 4730-00-081-9618 79470 C3159X2 .PLUG,PIPE 1/8-27 NPTF............ 7<br />
10 PAHZZ 4730-00-954-1281 02978 MS49005-4 .PLUG,PIPE 1/4-18 NPTF............ 3<br />
11 PAHZZ 5305-01-112-9021 15434 3013904 .SCREW WITH CAPTIVE WASHER, 1/4-20 6<br />
X 5/8..............................<br />
12 PAHZZ 5340-00-799-0843 15434 132019 .COVER,ACCESS WATER HEADER........ 1<br />
13 PFHZZ 5330-00-537-2382 15434 70089-1 .GASKET WATER HEADER COVER PART OF 1<br />
KIT P/N 3801235....................<br />
14 PAHZZ 4730-00-203-0549 15434 S-966E .PLUG,PIPE 1-1/2 NPT.............. 1<br />
15 PAHZZ 5340-00-050-1600 96906 MS35648-8 .PLUG,EXPANSION.................... 1<br />
16 PAHZZ 4730-01-161-5115 15434 3013786 .PLUG,PIPE 3/8 NPT................ 6<br />
17 PAHZZ 5340-01-145-9362 15434 3011952 .CAP,PROTECTIVE,DUST CAM HOLE..... 1<br />
18 PAHZZ 5315-00-014-1195 15434 68585 .PIN,STRAIGHT,HEADLE CAM FOLLOWER. 6<br />
19 PAHZZ 4730-00-221-2139 72452 1459-259 .PLUG,PIPE 1/2-14 NPT............. 2<br />
20 PAHZZ 5315-00-532-9388 64104 B2568 .PIN,STRAIGHT,HEADLE REAR MAIN<br />
2<br />
BEARING CAP TO BLOCK...............<br />
21 PAHZZ 5310-00-356-1447 15434 3009213 .WASHER,LOCK BLOCK,DIESEL<br />
14<br />
ENGINE,BIG CAM I...................<br />
21 PAHZZ 5310-00-082-1882 15434 140218 .WASHER,FLAT BLOCK,DIESEL ENGINE. 14<br />
BIG CAM III........................<br />
22 PAHZZ 5305-01-179-2380 15434 208346 .SCREW,CAP,HEXAGON H BIG CAM III.. 14<br />
23 PFHZZ 3130-01-146-1228 15434 3008049 .CAP,PILLOW BLOCK NUMBER 7. BIG CAM 1<br />
III................................<br />
24 PAHZZ 3130-00-408-9041 15434 42646 .CAP,PILLOW BLOCK MAIN 2,4 AND<br />
3<br />
6,BLOCK,DIESEL ENGINE. BIG CAM I...<br />
24 PBHZZ 3130-01-146-4504 15434 3008048 .CAP,BEARING NUMBER 2, 4 AND 6. BIG 3<br />
CAM III............................<br />
25 PAHZZ 2815-00-484-8359 15434 42645 .CAP,MAIN BEARING MAIN 1,3 AND<br />
3<br />
5,BLOCK,DIESEL ENGINE. BIG CAM I...<br />
25 PBHZZ 3130-01-146-1150 15434 3008047 .CAP,PILLOW BLOCK NUMBER 1, 3 AND 3<br />
5. BIG CAM III.....................<br />
26 PAHZZ 4730-00-801-8186 15434 S-915-A .PLUG,PIPE......................... 2<br />
27 PAHZZ 4730-00-018-9566 15434 S911B .PLUG,PIPE 1/8-27 NPT............. 2<br />
28 PAHZZ 5365-01-150-6257 15434 210884 .PLUG,MACHINE THREAD HEXAGON HEAD, 1<br />
7/8-18 UNS-2A......................<br />
29 PCHZZ 5310-00-197-5304 15434 66292 .WASHER,FLAT....................... 1<br />
30 PFHZZ 3120-01-079-6823 15434 3011951 .BEARING,SLEEVE CAMSHAFT,NUMBER 7. 1<br />
BIG CAM III PART OF KIT P/N 3801106<br />
30 PFHZZ 3120-01-208-8102 15434 3028075 .BUSHING,SLEEVE NUMBER 1,2,4 AND 6. 4<br />
BIG CAM III PART OF KIT P/N 3801106<br />
30 PFHZZ 3120-01-208-8103 15434 3028269 .BUSHING,SLEEVE NUMBER 3 AND 5.BIG 2<br />
CAM III PART OF KIT P/N 3801106...<br />
31 PAHZZ 5340-00-276-5847 15434 S719 .PLUG,EXPANSION 1"................ 1<br />
32 PAHZZ 5330-00-171-7267 15434 67963 GASKET............................. 1<br />
33 PFHZZ 4730-00-404-2909 15434 13264800 FLANGE,PIPE,BLIND.................. 1<br />
34 PAHZZ 5310-00-261-7340 15434 S604 WASHER,LOCK 3/8................... 2<br />
35 PAHZZ 5305-00-546-6698 15434 S129 SCREW,CAP,HEXAGON H................ 2<br />
36 PAHZZ 5305-01-144-6204 34623 5731317 SCREW,SELF-LOCKING................. 6<br />
2-1
TM 9-2815-225-34&P<br />
(1)<br />
Item<br />
NO<br />
(2)<br />
SMR<br />
Code<br />
(3)<br />
NSN<br />
(4)<br />
CAGEC<br />
(5)<br />
Part<br />
Number<br />
(6)<br />
DESCRIPTION AND USABLE ON CODE (UOC)<br />
(7)<br />
Qty<br />
37 PAHZZ 2910-01-146-7955 15434 3013591 NOZZLE,PISTON COOLI................ 6<br />
38 PCHZZ 5331-01-145-5377 15434 3007442 O-RING PISTON COOLING NOZZLE PART 1<br />
OF KIT P/N 3801235.................<br />
39 PBHZZ 5365-01-147-9802 15434 3019955 GASKET CYLINDER LINER, 0.007...... 6<br />
39 PBHZZ 5365-01-147-2497 15434 3019958 SPACER,RING CYLINDER LINER, 0.020. 6<br />
39 PBHZZ 5365-01-147-2496 15434 3019957 SHIM CYLINDER LINER, 0.009........ 6<br />
39 PBHZZ 5365-00-488-0799 15434 3019956 SPACER,RING CYLINDER LINER, 0.008. 6<br />
39 PBHZZ 5365-01-147-2495 15434 3019960 SHIM CYLINDER LINER, 0.062........ 6<br />
39 PBHZZ 5365-01-148-8353 15434 3019959 SHIM CYLINDER LINER, 0.031........ 6<br />
END OF FIGURE<br />
2-2/BLANK
TM 9-2815-225-34&P<br />
1<br />
2<br />
thru<br />
15<br />
17<br />
18<br />
19<br />
16<br />
17<br />
thru<br />
19<br />
2<br />
3<br />
4<br />
20<br />
5<br />
21<br />
29<br />
15<br />
7<br />
6<br />
8<br />
22<br />
14<br />
9<br />
28<br />
27<br />
20<br />
26<br />
9<br />
13<br />
10 10<br />
9<br />
22<br />
24<br />
25<br />
12 11<br />
23<br />
✱ a<br />
✱ a PART OF ITEM 23<br />
Figure 3. Cylinder Head Assembly.
TM 9-2815-225-34&P<br />
(1)<br />
ITEM<br />
NO<br />
(2)<br />
SMR<br />
CODE<br />
(3)<br />
NSN<br />
(4)<br />
CAGEC<br />
(5)<br />
PART<br />
NUMBER<br />
(6)<br />
DESCRIPTION AND USABLE ON CODE(UOC)<br />
(7)<br />
QTY<br />
GROUP 0101 CRANKCASE, BLOCK AND<br />
CYLINDER HEAD<br />
FIG. 3 CYLINDER HEAD ASSEMBLY<br />
1 PAFFD 2815-01-085-8282 15434 3041993 CYLINDER HEAD,DIESE................. 3<br />
2 PAFZZ 2805-00-293-9699 77220 H231 .LOCK,VALVE SPRING R 16<br />
3 PAFZZ 5340-00-933-3009 15434 170296 .SEAT,HELICAL COMPRE................ 8<br />
4 PAFZZ 5360-00-009-9270 15434 211999 .SPRING,HELICAL,COMP................ 8<br />
5 PAFZZ 5340-00-632-6239 15434 172034 .SEAT,HELICAL COMPRE................ 8<br />
6 PCFZZ 5331-01-072-4436 15434 3007759 .O-RING PART OF KIT P/N 3804280.... 2<br />
7 PAFZZ 2910-01-146-0048 15434 3011934 .SLEEVE,COOLING,FUEL SLEEVE,COOLING 2<br />
,FUEL BIG CAM III...................<br />
8 PAFZZ 5315-00-866-5015 15434 123558 .PIN,STRAIGHT,HEADLE VALVE<br />
4<br />
CROSSHEAD...........................<br />
9 PAFZZ 5340-01-087-0681 15434 213395 .PLUG,EXPANSION 1.010-1.012........ 6<br />
10 PAFZZ 2815-00-085-7434 15434 3017759 .INSERT,ENGINE VALVE INTAKE AND<br />
8<br />
EXHAUST.............................<br />
10 PAFZZ 2815-00-132-0240 15434 3014622 .INSERT,ENGINE VALVE 0.010 OVERSIZE V<br />
10 PAFZZ 2815-01-127-1060 15434 3014623 .INSERT,VALVE SEAT 0.020 OVERSIZE.. V<br />
10 PAFZZ 2815-01-127-3597 15434 3014624 .INSERT,ENGINE VALVE 0.030 OVERSIZE V<br />
10 PAFZZ 2815-01-127-3598 15434 3014625 .INSERT,VALVE SEAT 0.040 OVERSIZE.. V<br />
11 PAFZZ 2815-01-354-2702 15434 3803512 .VALVE,POPPET,ENGINE INTAKE BIG CAM 4<br />
III.................................<br />
12 PAFZZ 2815-00-962-5623 15434 3803524 .VALVE,POPPET,ENGINE EXHAUST....... 4<br />
13 PAFZZ 5340-01-087-0682 15434 213394 .PLUG,EXPANSION 3/4................ 1<br />
14 PAFZZ 5340-01-086-6193 15434 216524 .PLUG,EXPANSION 1-1/4.............. 2<br />
15 PAFZZ 2815-01-085-2618 15434 3006456 .GUIDE,VALVE STEM INTAKE AND<br />
8<br />
EXHAUST STANDARD....................<br />
15 PFFZZ 2815-01-490-0416 15434 3006457 .GUIDE,VALVE STEM 0.010 OVERSIZE... V<br />
15 XDFZZ 15434 3006458 .GUIDE,VALVE STEM 0.020 OVERSIZE... V<br />
16 PAFZZ 2815-01-159-1789 15434 3030038 VALVE,CROSSHEAD ASS INTAKE AND<br />
12<br />
EXHAUST.............................<br />
17 PAFZZ 5305-00-062-4378 15434 147389 .SETSCREW 3/8-24 UNF-2A THREAD..... 1<br />
18 PAFZZ 5310-00-426-3990 15434 203131 .NUT,CROSS HD....................... 1<br />
19 PAFZZ 2815-01-085-3733 75078 011573 .CROSSHEAD,VALVE.................... 1<br />
20 PAFZZ 5305-00-477-6769 15434 70772 SCREW,ASSEMBLED WAS 1/4-20 X 1/2... 12<br />
21 PAFZZ 2910-00-928-3505 15434 147100 CROSSOVER,FUEL...................... 2<br />
22 PCFZZ 5331-00-143-8485 15434 131026 O-RING PART OF KIT P/N 4024958 PART 12<br />
OF KIT P/N 3804280..................<br />
23 PAFZZ 5330-01-080-5021 15434 3349819 GASKET CYLINDER HEAD STANDARD PART 3<br />
OF KIT P/N 4024958 PART OF KIT<br />
3804280.............................<br />
23 XDFZZ 15434 3040180 GASKET,CYLINDER HEA 0.010-0.020<br />
3<br />
OVERSIZE............................<br />
24 PAFZZ 4730-00-018-9566 15434 S-911-B PLUG,PIPE 1/8-27 NPT............... 10<br />
25 PAFZZ 4730-00-444-1710 15434 181213 ELBOW,PIPE TO TUBE FUEL LINE TO<br />
2<br />
HEAD................................<br />
26 PAFZZ 2815-01-146-4164 15434 135308 PLATE,FUEL CROSSOVE................. 2<br />
27 PAFZZ 5310-00-285-8833 17576 538174 WASHER,FLAT 0.708-0.710............ 36<br />
28 PAFZZ 5305-01-145-8379 15434 3013623 SCREW,CAP,HEXAGON H................. 36<br />
29 XDFZZ 15434 68803-A VALVE SPRING SPACER................. 1<br />
END OF FIGURE<br />
3-1
TM 9-2815-225-34&P<br />
4<br />
2<br />
3<br />
1<br />
5<br />
6<br />
7<br />
8<br />
6<br />
9<br />
16<br />
17<br />
10<br />
11<br />
15<br />
12<br />
14<br />
13<br />
Figure 4. Crankshaft Assembly.
TM 9-2815-225-34&P<br />
(1)<br />
ITEM<br />
NO<br />
(2)<br />
SMR<br />
CODE<br />
(3)<br />
NSN<br />
(4)<br />
CAGEC<br />
(5)<br />
PART<br />
NUMBER<br />
(6)<br />
DESCRIPTION AND USABLE ON CODE(UOC)<br />
(7)<br />
QTY<br />
GROUP 0102 CRANKSHAFT<br />
FIG. 4 CRANKSHAFT ASSEMBLY<br />
1 PAFZZ 5330-00-361-2955 15434 3067616 GASKET PART OF KIT P/N 3801235..... 1<br />
2 PAHZZ 2990-01-120-2883 15434 216165 COVER,REAR BIG CAM I............... 1<br />
2 PAFZZ 2815-01-146-5925 15434 209919 COVER,TIMING GEAR,I BIG CAM III... 1<br />
3 PAFZZ 5305-01-130-6100 15434 3010594 SCREW,CAP,HEXAGON H WITH CAPTIVE 8<br />
WASHER, 3/8-24 X 1.500..............<br />
4 PAFZZ 5330-00-005-0858 01212 M39807 SEAL REAR OIL PART OF KIT<br />
1<br />
P/N 3801235.........................<br />
5 PCHZZ 5331-00-420-9624 15434 137075 O-RING REAR COVER BIG CAM I........ 1<br />
6 PAHZZ 3120-01-145-9132 15434 3801263 BEARING HALF SET,SL 0.030 UNDERSIZE 1<br />
6 PAHZZ 3120-01-193-7083 01212 5116M40 BEARING SET,SLEEVE 0.040 UNDERSIZE. 1<br />
6 PAHZZ 3120-01-144-8882 15434 3801262 BEARING HALF SET,SL 0.020 UNDERSIZE 1<br />
6 PAHZZ 3120-01-132-9339 15434 3801260 BEARING SET,SLEEVE STANDARD BIG CAM 1<br />
III.................................<br />
6 PAHZZ 3120-01-143-9547 15434 3801261 BEARING HALF SET,SL 0.010 UNDERSIZE 1<br />
7 PAHZZ 2815-01-303-4224 15434 3608833 CRANKSHAFT,ENGINE................... 1<br />
8 PAHZZ 3120-01-214-7779 15434 3019218 BEARING,WASHER,THRU STANDARD....... V<br />
8 XDHZZ 15434 157281 BEARING,WASHER,THRU 0.010 OVERSIZE. V<br />
8 XDHZZ 15434 157282 BEARING,WASHER,THRU................. V<br />
9 PAHZZ 5315-01-058-4551 15434 202903 PIN STRAIGHT HEXAGO 0.219 X 0.5475-<br />
0.5775..............................<br />
10 PAHZZ 5365-00-428-6201 15434 60575 SPACER,RING......................... 7<br />
11 PAHZZ 5330-01-240-1619 15434 3020183 SEAL,PLAIN ENCASED PART OF KIT<br />
1<br />
P/N 3801235.........................<br />
12 PAFZZ 3020-01-077-4411 15434 211918 PULLEY,GROOVE....................... 1<br />
13 PAFZZ 2815-01-079-1632 15434 21732300 DAMPENER,VIBRATION,................. 1<br />
14 PAFZZ 5305-00-795-9336 15434 204165 SCREW,CAP 1-5/8 LONG............... 6<br />
15 PAFZZ 5310-00-081-8500 15434 127316 WASHER,RECESSED..................... 6<br />
16 PAHZZ 3020-01-077-2229 15434 215965 GEAR,HELICAL BIG CAM I............. 1<br />
16 PAHZZ 3020-01-146-0107 15434 3014614 GEAR,HELICAL BIG CAM III........... 1<br />
17 PAFZZ 5315-01-079-6740 15434 210179 KEY,MACHINE GEAR TO CRANKSHAFT..... 1<br />
END OF FIGURE<br />
2<br />
4-1
TM 9-2815-225-34&P<br />
1<br />
2<br />
thru<br />
6<br />
11 12<br />
BIG CAM III<br />
5<br />
6<br />
4<br />
2<br />
7<br />
8<br />
9<br />
27<br />
17<br />
16<br />
3<br />
25<br />
26<br />
15<br />
14<br />
10<br />
24<br />
22<br />
23<br />
18<br />
20<br />
19<br />
13<br />
8<br />
21<br />
BIG CAM I<br />
12<br />
✱ a<br />
✱ a PART OF ITEM 11<br />
Figure 5. Flexdisk, Ring Gear, <strong>and</strong> Housing.
TM 9-2815-225-34&P<br />
(1)<br />
ITEM<br />
NO<br />
(2)<br />
SMR<br />
CODE<br />
(3)<br />
NSN<br />
(4)<br />
CAGEC<br />
(5)<br />
PART<br />
NUMBER<br />
(6)<br />
DESCRIPTION AND USABLE ON CODE(UOC)<br />
(7)<br />
QTY<br />
GROUP 0103 FLYWHEEL ASSEMBLY<br />
FIG. 5 FLEXDISK, RING,GEAR AND<br />
HOUSING<br />
1 XDFZZ 15434 3031751 DISC,FLEX ASSEMBLY USE ONLY FOR<br />
1<br />
INTERFACING BIG CAM III ENG<br />
W/ALLISON HT-750 CRD TRANSMISSION...<br />
2 PAFZZ 5305-00-269-3240 80204 B1821BH038F150N .SCREW,CAP,HEXAGON H 3/8-24 X 1.50 12<br />
BIG CAM III.........................<br />
3 PBFZZ 3040-01-146-0028 15434 3031752 .PLATE,RETAINING,SHA BIG CAM III... 1<br />
4 XDFZZ 15434 3031750 .DISKS,FLEXPLATE USE ONLY FOR<br />
1<br />
INTERFACING BIG CAM III ENG<br />
W/ALLISON HT-750 CRD TRANSMISSION...<br />
5 PBFZZ 2815-01-146-0102 15434 3031749 .FLYWHEEL,ENGINE BIG CAM III....... 1<br />
6 PBFZZ 3120-01-147-8118 15434 3031753 .BEARING,WASHER,THRU BIG CAM III... 1<br />
7 PAFZZ 5310-00-080-6004 96906 MS27183-14 WASHER,FLAT 3/8.................... 12<br />
8 PAFZZ 5310-00-134-4171 15434 200861 WASHER,FLAT......................... 12<br />
9 PAFZZ 5305-01-112-9698 15434 180175 SCREW,CAP,HEXAGON H 1.44 LONG BIG 6<br />
CAM III.............................<br />
10 PAFZZ 5305-00-795-9336 15434 204165 SCREW,CAP BIG CAM I................ 6<br />
11 PAFFF 2815-01-085-1881 15434 3021660 FLYWHEEL,ENGINE BIG CAM I.......... 1<br />
12 PAFZZ 3020-00-528-5053 15434 4797 .GEAR,SPUR BIG CAM I................ 1<br />
13 PAFZZ 5305-00-091-4009 15434 106289 SCREW,CAP,HEXAGON H FLYWHEEL HS'G 2<br />
TO CRANKCASE BIG CAM I..............<br />
14 PAFZZ 5310-00-081-8500 15434 127316 WASHER,RECESSED 0.630-0.650 X<br />
9<br />
1.185-1.195.........................<br />
15 PAFZZ 5305-01-145-8380 15434 S-189-B SCREW,CAP,HEXAGON H................. 9<br />
16 PAFZZ 5305-01-114-6386 15434 3012483 SCREW,CAP,HEXAGON H 1/2-13 X 2.00 4<br />
FLYWHEEL HS'G TO BLOCK BIG CAM I....<br />
17 PAFZZ 5310-00-134-4168 15434 S601 WASHER,FLAT FLYWHEEL HS'G TO BLOCK 1<br />
BIG CAM I...........................<br />
18 PBFZZ 4730-01-214-7081 15434 3008469 PLUG,PIPE 3/4 NPT FLYWHEEL HS'G<br />
1<br />
MOUNTED BIG CAM I...................<br />
19 PAFZZ 2815-01-160-5820 15434 3016637 HOUSING,FLYWHEEL BIG CAM I......... 1<br />
19 PFFZZ 2815-01-141-0845 15434 3036005 HOUSING,FLYWHEEL BIG CAM III....... 1<br />
20 PAFZZ 5310-00-584-5272 96906 MS35338-48 WASHER,LOCK 3/8 FLYWHEEL HS'G TO 2<br />
BLOCK BIG CAM I.....................<br />
21 PAFZZ 5310-00-469-3998 15434 S200 NUT,PLAIN,HEXAGON FLYWHEEL HS'G TO 2<br />
BLOCK BIG CAM I.....................<br />
22 PAFZZ 5315-00-014-1284 24617 141284 PIN,STRAIGHT,HEADLE FLYWHEEL HS'G 2<br />
MOUNTING............................<br />
23 PAFZZ 4730-00-018-9566 15434 S911B PLUG,PIPE FLYWHEEL HS'G MOUNTED, 1<br />
1/4-NPT, BIG CAM I..................<br />
24 PAFZZ 5305-01-147-4025 15434 3001646 SCREW,TAPPING FLYWHEEL INDEX HOLE 2<br />
COVER 1/4-20 X 5/8..................<br />
25 PAFZZ 5330-01-082-6985 15434 3021735 GASKET FLYWHEEL INDEX HOLE<br />
2<br />
COVER,BIG CAM I.....................<br />
26 PBFZZ 5340-01-122-8002 15434 70657 COVER,ACCESS FLYWHEEL INDEX HOLE... 1<br />
27 PCFZZ 5330-00-404-2920 15434 172648 PACKING,PREFORMED................... 11<br />
END OF FIGURE<br />
5-1
TM 9-2815-225-34&P<br />
8<br />
9<br />
thru<br />
11<br />
1<br />
2<br />
3<br />
4<br />
5<br />
6<br />
7<br />
6<br />
9<br />
✱ a<br />
12<br />
10<br />
✱ a<br />
11<br />
✱ a PART OF ITEM 8<br />
Figure 6. Piston <strong>and</strong> Connecting Rod Assembly.
TM 9-2815-225-34&P<br />
(1)<br />
ITEM<br />
NO<br />
(2)<br />
SMR<br />
CODE<br />
(3)<br />
NSN<br />
(4)<br />
CAGEC<br />
(5)<br />
PART<br />
NUMBER<br />
(6)<br />
DESCRIPTION AND USABLE ON CODE(UOC)<br />
(7)<br />
QTY<br />
GROUP 0104 PISTONS, CONNECTING RODS<br />
FIG. 6 PISTON AND CONNECTING ROD<br />
ASSEMBLY<br />
1 KFHZZ 15434 3012331 RING,PISTON TOP PART OF KIT<br />
6<br />
P/N 3801056.........................<br />
2 PFHZZ 15434 3804500 RING SET,PISTON BIG CAM III........ 3<br />
2 PFHZZ 2815-01-241-6580 15434 301233200 RING,PISTON PART OF KIT P/N 3801056 6<br />
3 PFHZZ 2815-01-241-6581 15434 214730 RING,PISTON PART OF KIT P/N 3801056 6<br />
4 PFHZZ 2815-00-994-4429 15434 3064398 RING,PISTON PART OF KIT P/N 3801056 6<br />
5 PAHZZ 2815-00-603-1381 15434 3804414 PISTON,INTERNAL COM BIG CAM I...... 6<br />
5 KFHZZ 15434 3804416 PISTON BIG CAM III PART OF KIT<br />
6<br />
P/N 3801058.........................<br />
6 PAHZZ 5325-01-241-4318 15434 175755 .RING,RETAINING PISTON PIN (OLD) 12<br />
BIG CAM I...........................<br />
6 PBHZZ 5325-00-804-2784 96906 MS16625-1200 .RING,RETAINING PART OF KIT<br />
12<br />
P/N 3801058.........................<br />
7 PFHZZ 2815-00-480-4347 15434 191970 PIN,PISTON PART OF KIT P/N 3801058. 6<br />
8 PAHHZ 2815-01-086-4508 15434 3013930 CONNECTING ROD,PIST ASSEMBLY....... 6<br />
9 PAHZZ 5365-00-132-0273 15434 187420 .BUSHING,PISTON PIN................. 1<br />
10 PBHZZ 2815-01-124-0232 15434 70550 .PIN,PISTON CONNECTING ROD 5/16 X 2<br />
1/2.................................<br />
11 PAHZZ 5306-01-079-7027 15434 219153 .BOLT,MACHINE....................... 2<br />
12 PAHZZ 3120-01-155-8707 15434 214953 BEARING,SLEEVE .030 UNDERSIZE...... 12<br />
12 PAHZZ 3120-01-155-4442 15434 214951 BEARING,SLEEVE 0.010 UNDERSIZE..... 12<br />
12 PAHZZ 3120-01-157-3316 15434 214952 BEARING,SLEEVE 0.020 UNDERSIZE..... 12<br />
12 PAHZZ 3120-01-087-3004 01212 3725CP BEARING STANDARD................... 12<br />
END OF FIGURE<br />
6-1
TM 9-2815-225-34&P<br />
11<br />
12<br />
thru<br />
27<br />
16<br />
17<br />
thru<br />
21<br />
22<br />
23<br />
thru<br />
27<br />
6<br />
7<br />
6<br />
2<br />
3<br />
4<br />
5<br />
1<br />
8<br />
19<br />
20<br />
25<br />
21<br />
26<br />
27<br />
24<br />
19<br />
20<br />
17<br />
21<br />
18<br />
✱ a<br />
17<br />
18<br />
✱ a<br />
23<br />
✱ b<br />
15<br />
14<br />
12<br />
13<br />
✱ a PART OF ITEM 16<br />
✱ b PART OF ITEM 22<br />
9<br />
10<br />
9<br />
10<br />
Figure 7. Camshaft Assembly <strong>and</strong> Followers.
TM 9-2815-225-34&P<br />
(1)<br />
ITEM<br />
NO<br />
(2)<br />
SMR<br />
CODE<br />
(3)<br />
NSN<br />
(4)<br />
CAGEC<br />
(5)<br />
PART<br />
NUMBER<br />
(6)<br />
DESCRIPTION AND USABLE ON CODE(UOC)<br />
(7)<br />
QTY<br />
GROUP 0105 VALVES,CAMSHAFTS AND<br />
FOLLOWERS<br />
FIG. 7 CAMSHAFT ASSEMBLY AND<br />
FOLLOWERS<br />
1 PAHZZ 5340-00-404-2944 15434 68193 PLUG,VENT CAMSHAFT ORIFICE, SPECIAL 1<br />
2 PAHZZ 3020-01-145-8568 15434 3002901 GEAR,HELICAL BIG CAM III .......... 1<br />
3 PAHZZ 3120-01-079-8194 15434 215233 BEARING,WASHER,THRU BIG CAM I ..... 1<br />
4 PAHZZ 5315-01-145-6080 15434 3021596 KEY,WOODRUFF GEAR TO CAMSHAFT,BIG 1<br />
CAM III ............................<br />
5 PAHZZ 2815-01-079-3380 15434 3801047 CAMSHAFT,ENGINE BIG CAM I ......... 1<br />
5 PAHZZ 2815-01-146-1049 15434 3049024 CAMSHAFT,ENGINE BIG CAM III ....... 1<br />
6 XDHZZ 15434 217929 PUSH ROD,ENGINE POP INTAKE AND<br />
12<br />
EXHAUST, CAM FOLLOWER ASSY, BIG CAM<br />
I ..................................<br />
6 PAFZZ 2815-01-146-1041 15434 3012462 PUSH ROD,ENGINE POP INTAKE AND<br />
12<br />
EXHAUST, CAM FOLLOWER ASSY, BIG CAM<br />
III ................................<br />
7 PAFZZ 2815-01-085-2615 15434 3032681 PUSH ROD,ENGINE POP ................ 6<br />
8 PCHZZ 5330-01-145-3983 15434 3074401 GASKET CAM FOLLOWER<br />
3<br />
HOUSING,STANDARD,BIG CAM III PART<br />
OF KIT P/N 3801235 .................<br />
8 PCHZZ 5330-01-146-9775 15434 3074402 GASKET CAM FOLLOWER HOUSING, 0.014- 3<br />
0.020 PART OF KIT P/N 3801235 .....<br />
8 PCHZZ 5330-01-145-3984 15434 3074404 GASKET CAM FOLLOWER HOUSING, 0.027- 3<br />
0.033, BIG CAM III PART OF KIT<br />
P/N 3801235 ........................<br />
8 PFHZZ 5330-01-146-9928 15434 3074403 GASKET CAM FOLLOWER HOUSING, 0.020- 3<br />
0.024 PART OF KIT P/N 3801235 .....<br />
8 PAHZZ 5330-01-146-7172 15434 3074400 GASKET CAM FOLLOWER<br />
3<br />
HOUSING,STANDARD,BIG CAM I PART OF<br />
KIT P/N 3018762 ....................<br />
9 PAHZZ 5310-00-261-7340 15434 S604 WASHER,LOCK 3/8 ................... 18<br />
10 PAHZZ 5305-00-546-6698 15434 S-129 SCREW,CAP,HEXAGON H ................ 18<br />
11 PFHZZ 2815-01-166-3415 15434 3066796 HOUSING ASSEMBLY,CA ................ 3<br />
12 PAHZZ 5340-00-485-0945 15434 175831 .PLUG,EXPANSION 3/4 INCH .......... 2<br />
13 PAHZZ 3040-00-388-3126 15434 3065125 .SHAFT,STRAIGHT CAM FOLLOWER<br />
2<br />
ASSEMBLY ...........................<br />
14 PBHZZ 2815-01-146-7039 15434 3016887 .COVER,ENGINE POPPET CAM FOLLOWER . 1<br />
15 PAHZZ 5305-00-339-1415 15434 69736 .SCREW,MACHINE SHAFT LOCKING, 5/16- 2<br />
18 UNC-2A ..........................<br />
16 PAHZZ 2815-01-305-8530 15434 3036935 .ROCKER ARM,ENGINE P CAM FOLLOWER 4<br />
ASSY,INTAKE & EXHAUST ..............<br />
17 PFHZZ 3120-00-659-7808 15434 118378 ..BEARING,SLEEVE CAM FOLLOWER<br />
4<br />
ASSY,INTAKE & EXHAUST ..............<br />
18 PAHZZ 2815-01-048-6702 15434 213559 ..SOCKET,CAM FOLLOWER INTAKE &<br />
4<br />
EXHAUST ............................<br />
19 XBHZZ 15434 3002069 ..PIN,STRAIGHT,HEADED CAM FOLLOWER 4<br />
ASSY,INTAKE & EXHAUST,BIG CAM I ....<br />
19 PAHZZ 5315-01-210-0616 15434 3013331 ..PIN,STRAIGHT,HEADED CAM FOLLOWER 4<br />
ASSY,INTAKE & EXHAUST,BIG CAM III ..<br />
20 PAHZZ 5315-00-777-3544 15434 118939 ..PIN,STRAIGHT,HEADLE CAM FOLLOWER 4<br />
ASSY,INTAKE & EXHAUST ..............<br />
21 PAHZZ 3120-01-212-4472 15434 3036933 ..ROLLER,LINEAR-ROTAR CAM FOLLOWER 4<br />
ASSY,INTAKE & EXHAUST ..............<br />
22 PAHZZ 2910-01-086-9757 15434 3056569 .ROCKER ARM,ENGINE P CAM FOLLOWER 2<br />
ASSY,INJECTOR ......................<br />
23 PFHZZ 3120-00-791-1440 15434 118377 ..BEARING,SLEEVE CAM FOLLOWER<br />
ASSY,INJECTOR ......................<br />
2<br />
7-1
TM 9-2815-225-34&P<br />
(1)<br />
Item<br />
NO<br />
(2)<br />
SMR<br />
Code<br />
(3)<br />
NSN<br />
(4)<br />
CAGEC<br />
(5)<br />
PART<br />
NUMBER<br />
(6)<br />
DESCRIPTION AND USABLE ON CODE(UOC)<br />
(7)<br />
Qty<br />
24 PAHZZ 2815-00-505-5119 15434 107738 ..SOCKET,CAM FOLLOWER INJECTOR .... 2<br />
25 XBHZZ 15434 219107 ..PIN,STRAIGHT,HEADED CAM FOLLOWER 2<br />
ASSY,INJECTOR ......................<br />
26 PAHZZ 5315-00-777-3544 15434 118939 ..PIN,STRAIGHT,HEADLE CAM FOLLOWER 2<br />
ASSY,INJECTOR ......................<br />
27 PFHZZ 3120-01-079-5451 15434 3036934 ..ROLLER,LINEAR-ROTAR CAM FOLLOWER<br />
ASSY,INJECTOR ......................<br />
2<br />
END OF FIGURE<br />
7-2/BLANK
TM 9-2815-225-34&P<br />
1<br />
2<br />
thru<br />
30<br />
2<br />
3<br />
thru<br />
5<br />
6<br />
7<br />
thru<br />
11<br />
12<br />
13<br />
thru<br />
15<br />
16<br />
17<br />
thru<br />
19<br />
20<br />
21<br />
thru<br />
23<br />
10<br />
3<br />
4<br />
10<br />
11<br />
7<br />
8<br />
10<br />
17<br />
13<br />
14<br />
✱ b<br />
5<br />
✱ a<br />
10<br />
10<br />
11<br />
8<br />
7<br />
18<br />
24<br />
25<br />
15<br />
✱ c<br />
9<br />
10<br />
21<br />
22<br />
✱ d<br />
19<br />
26<br />
9<br />
✱ b<br />
30<br />
31<br />
✱ e<br />
23<br />
29<br />
28<br />
32<br />
27<br />
✱ a PART OF ITEM 2<br />
✱ b PART OF ITEM 6<br />
✱ c PART OF ITEM 12<br />
✱ d PART OF ITEM 16<br />
✱ e PART OF ITEM 20<br />
Figure 8. Rocker Arm Assembly.
TM 9-2815-225-34&P<br />
(1)<br />
ITEM<br />
NO<br />
(2)<br />
SMR<br />
CODE<br />
(3)<br />
NSN<br />
(4)<br />
CAGEC<br />
(5)<br />
PART<br />
NUMBER<br />
(6)<br />
DESCRIPTION AND USABLE ON CODE(UOC)<br />
(7)<br />
QTY<br />
GROUP 0105 VALVES, CAMSHAFTS AND<br />
TIMING SYSTEM<br />
FIG. 8 ROCKER ARM ASSEMBLY<br />
1 PAFFF 2815-01-085-2569 15434 3035961 HOUSING AND ROCKER ROCKER ARM<br />
3<br />
ASSEMBLY............................<br />
2 PAFZZ 2815-01-096-9198 15434 BM95161 .ROCKER ARM,ENGINE P EXHAUST....... 1<br />
3 PAFZZ 5310-00-732-0560 96906 MS51968-14 ..NUT,PLAIN,HEXAGON ROCKER ARM<br />
1<br />
ADJUSTING SCREW,EXHAUST 1/2-20 UNF-<br />
2B R/H..............................<br />
4 PAFZZ 5305-00-947-3437 15434 168306 ..SETSCREW ROCKER ARM,EXH,HEADLESS 1<br />
W/SLOT 1/2-20X2.045 UNF-3A R/H......<br />
5 PAFZZ 3120-00-589-3537 15434 140330 ..BUSHING,SLEEVE ROCKER ARM EXHAUST 1<br />
6 PAFZZ 2815-00-005-7431 15434 AR-2308 .LEVER,INJECTOR,FUEL................ 2<br />
7 PAFZZ 5310-00-732-0560 96906 MS51968-14 ..NUT,PLAIN,HEXAGON ROCKER ARM<br />
1<br />
ADJUSTING SCREW,INJECTOR 1/2-20 UNF-<br />
2B R/H..............................<br />
8 PAFZZ 5305-00-947-3437 15434 168306 ..SETSCREW ROCKER ARM,INJ,HEADLESS 2<br />
W/SLOT 1/2-20X2.045 UNF-3A R/H......<br />
9 PAFZZ 3120-01-079-5208 15434 218153 ..BUSHING,SLEEVE ROCKER ARM<br />
2<br />
INJECTOR............................<br />
10 PAFZZ 5340-00-404-2940 15434 194037 ..SEAT,BALL SOCKET ROCKER ARM<br />
2<br />
INJECTOR............................<br />
11 PAFZZ 5320-01-163-2277 15434 208084 ..RIVET,BLIND ROCKER ARM INJECTOR.. 2<br />
12 PAFZZ 2815-00-195-5894 15434 BM95159 .ROCKER ARM,ENGINE P INTAKE........ 1<br />
13 PAFZZ 5310-00-732-0560 96906 MS51968-14 ..NUT,PLAIN,HEXAGON ROCKER ARM<br />
1<br />
ADJUSTING SCREW,INTAKE 1/2-20 UNF-2B<br />
R/H.................................<br />
14 PAFZZ 5305-00-947-3437 15434 168306 ..SETSCREW ROCKER ARM,INT,HEADLESS 1<br />
W/SLOT 1/2-20X2.045 UNF-3A R/H......<br />
15 PAFZZ 3120-00-589-3537 15434 140330 ..BUSHING,SLEEVE ROCKER ARM INTAKE. 1<br />
16 PAFZZ 2815-00-195-5897 15434 BM95160 .ROCKER ARM,ENGINE P INTAKE........ 1<br />
17 PAFZZ 5310-00-732-0560 96906 MS51968-14 ..NUT,PLAIN,HEXAGON ROCKER ARM<br />
1<br />
ADJUSTING SCREW,INTAKE 1/2-20 UNF-2B<br />
R/H.................................<br />
18 PAFZZ 5305-00-947-3437 15434 168306 ..SETSCREW ROCKER ARM,INT,HEADLESS 1<br />
W/SLOT 1/2-20X2.045 UNF-3A R/H......<br />
19 PAFZZ 3120-00-589-3537 15434 140330 ..BUSHING,SLEEVE ROCKER ARM INTAKE. 1<br />
20 PAFZZ 2815-00-851-7637 15434 BM95162 .ROCKER ARM,ENGINE P INTAKE........ 1<br />
21 PAFZZ 5310-00-732-0560 96906 MS51968-14 ..NUT,PLAIN,HEXAGON ROCKER ARM<br />
1<br />
ADJUSTING SCREW,EXHAUST 1/2-20 UNF-<br />
2B R/H..............................<br />
22 PAFZZ 5305-00-947-3437 15434 168306 ..SETSCREW ROCKER ARM,EXH,HEADLESS 1<br />
W/SLOT 1/2-20X2.045 UNF-3A R/H......<br />
23 PAFZZ 3120-00-589-3537 15434 140330 ..BUSHING,SLEEVE ROCKER ARM EXHUAST 1<br />
24 PAFZZ 5305-00-297-4022 15434 168319 .SETSCREW ROCKER ARM SHAFT......... 1<br />
25 PAFZZ 5330-01-145-6083 75078 010180 .PACKING,PREFORMED.................. 1<br />
26 PAFZZ 5340-01-163-7118 15434 216296 .PLUG,VENT ROCKER ARM HOUSING...... 1<br />
27 PAFZZ 4730-01-124-0293 15434 218736 .PLUG,QUICK DISCONNE ROCKER ARM<br />
2<br />
SHAFT...............................<br />
28 PCFZZ 5331-00-984-3756 19207 7374401 .O-RING ROCKER ARM SHAFT........... 2<br />
29 PAFZZ 3040-01-079-1799 15434 3801433 .SHAFT,STRAIGHT ROCKER ARM HOUSING. 1<br />
30 PBFZZ 2815-01-210-6947 15434 3036285 .HOUSING,ROCKER ARM................. 1<br />
31 PAFZZ 5305-01-129-6901 15434 3010589 SCREW,ASSEMBLED WAS ROCKER ARM<br />
18<br />
HOUSING ASSY 1/2-13 X 4.750 UNC-2A..<br />
32 PFFZZ 5330-00-861-8592 15434 3017750 GASKET ROCKER ARM HOUSING<br />
3<br />
ASSEMBLY PART OF KIT P/N 4024958<br />
PART OF KIT P/N 3804280.............<br />
END OF FIGURE<br />
8-1
TM 9-2815-225-34&P<br />
2<br />
5<br />
7<br />
1<br />
2<br />
4<br />
7<br />
2<br />
3<br />
7<br />
6<br />
Figure 9. Rocker Cover.
TM 9-2815-225-34&P<br />
(1)<br />
ITEM<br />
NO<br />
(2)<br />
SMR<br />
CODE<br />
(3)<br />
NSN<br />
(4)<br />
CAGEC<br />
(5)<br />
PART<br />
NUMBER<br />
(6)<br />
DESCRIPTION AND USABLE ON CODE(UOC)<br />
(7)<br />
QTY<br />
GROUP 0105 VALVES, CAMSHAFTS AND<br />
TIMING SYSTEM<br />
FIG. 9 ROCKER COVER<br />
1 PAOZZ 2590-00-590-7378 15434 101322 CAP,FILLER OPENING.................. 1<br />
2 PAOZZ 5305-01-118-8826 15434 3006182 SCREW,CAP,HEXAGON H CAPTIVE WASHER, 15<br />
3/8-16UNC-2A X 0.845-0.875..........<br />
3 PBOZZ 2815-01-164-6103 15434 3006349 COVER,ENGINE POPPET ROCKER AND<br />
1<br />
RETARDER,BIG CAM I..................<br />
3 PAOZZ 2815-01-159-1737 15434 3006187 COVER,ENGINE POPPET BIG CAM III.... 1<br />
4 PAOZZ 2815-01-142-1732 15434 3006183 COVER,ENGINE POPPET................. 1<br />
5 PAOZZ 2815-01-146-1024 15434 3006358 COVER,ENGINE POPPET................. 1<br />
6 PAOZZ 5330-01-285-4827 15434 3054841 GASKET ROCKER COVER,BIG CAM III.... 3<br />
7 PBOZZ 5365-01-241-3903 15434 64709 SPACER,SLEEVE BIG CAM I............ 15<br />
END OF FIGURE<br />
9-1
TM 9-2815-225-34&P<br />
1<br />
2<br />
thru<br />
29<br />
46<br />
2<br />
3<br />
4<br />
5<br />
9<br />
44<br />
45<br />
45<br />
28<br />
30<br />
44<br />
8<br />
39<br />
38<br />
37<br />
42<br />
41<br />
40<br />
26<br />
3<br />
27<br />
43<br />
25<br />
23<br />
7<br />
6<br />
22<br />
31<br />
33<br />
32<br />
31<br />
36<br />
11<br />
29<br />
3<br />
27<br />
10<br />
24<br />
17<br />
16<br />
15<br />
14<br />
13<br />
20<br />
19<br />
18<br />
21<br />
7<br />
35<br />
12<br />
34<br />
Figure 10. Oil Cooler <strong>and</strong> Filter, Big Cam III.
TM 9-2815-225-34&P<br />
(1)<br />
ITEM<br />
NO<br />
(2)<br />
SMR<br />
CODE<br />
(3)<br />
NSN<br />
(4)<br />
CAGEC<br />
(5)<br />
PART<br />
NUMBER<br />
(6)<br />
DESCRIPTION AND USABLE ON CODE(UOC)<br />
(7)<br />
QTY<br />
GROUP 0106 CRANKCASE, BLOCK AND<br />
CYLINDER HEAD<br />
FIG. 10 OIL COOLER AND FILTER,BIG<br />
CAM III<br />
1 PAFHH 2930-01-141-0918 15434 3032307 COOLER,LUBRICATING OIL............. 1<br />
2 PAHZZ 5305-00-091-4006 15434 137795 .SCREW,CAP,HEXAGON H 3/8-16X5/8.... 2<br />
3 PAHZZ 5310-00-261-7340 15434 S-604 .WASHER,LOCK........................ 11<br />
4 PAHZZ 2930-01-145-9537 15434 3023512 .VALVE,BYPASS....................... 1<br />
5 PCHZZ 5331-01-145-6085 15434 3045979 .O-RING PART OF KIT P/N 3801235.... 1<br />
6 PFHZZ 4730-00-042-8988 7X677 117244 .PLUG,PIPE 1/4..................... 1<br />
7 PAHZZ 4730-00-057-5555 15434 S-908 .PLUG,PIPE 3/8..................... 2<br />
8 PBHZZ 2930-01-145-9538 15434 302746000 .SUPPORT,OIL COOLER................. 1<br />
9 PFHZZ 5330-01-145-6911 15434 3047464 .GASKET OIL COOLER CORE PART OF 1<br />
KIT P/N 3801235.....................<br />
10 PAHZZ 5330-01-145-6910 15434 3047465 .GASKET PART OF KIT P/N 3801235.... 1<br />
11 XAHZZ 15434 3018690 .HOUSING,OIL COOLER................. 1<br />
12 PAOZZ 2940-01-145-9398 15434 303457800 .ADAPTER,FILTER HEAD................ 1<br />
13 PAHZZ 2940-01-145-9399 15434 3030804 .PISTON,BYPASS VALVE PRESSURE,<br />
1<br />
SENSING.............................<br />
14 PAHZZ 2940-01-145-9400 15434 3030806 .PLUNGER,BYPASS VALV................ 1<br />
15 PAHZZ 5360-01-145-3974 15434 3030803 .SPRING,HELICAL,COMP COMPRESSION... 1<br />
16 PAHZZ 4820-01-210-3573 15434 303080500 .PISTON,VALVE....................... 1<br />
17 PAHZZ 5360-01-145-3975 15434 3039296 .SPRING,HELICAL,COMP................ 1<br />
18 PAOZZ 5331-01-145-6086 15434 3030808 .O-RING PART OF KIT P/N 3801235.... 1<br />
19 PAOZZ 5305-01-144-6232 15434 3031005 .SCREW,CAP,HEXAGON H................ 1<br />
20 PFOZZ 5305-01-508-7097 0B8S3 101996 .SCREW,MACHINE 18-32 X 3/8......... 1<br />
21 PAOZZ 5930-01-177-0346 15434 3035028 .SWITCH,PRESSURE.................... 1<br />
22 PCHZZ 5330-01-145-6909 15434 3069014 .GASKET PART OF KIT P/N 3801235.... 1<br />
23 PFHZZ 5331-01-154-4316 15434 3018695 .O-RING PART OF KIT P/N 3801235.... 1<br />
24 PAOZZ 4330-01-146-1082 15434 3021656 .ADAPTER,FILTER HEAD................ 1<br />
25 PAHZZ 2940-01-146-5846 15434 303724200 .HEAD,FLUID FILTER.................. 1<br />
26 PAHZZ 5305-00-725-2317 80204 B1821BH038C150N .SCREW,CAP,HEXAGON H 3/8-16 X 1.50. 3<br />
27 PAHZZ 5310-00-080-6004 96906 MS27183-14 .WASHER,FLAT 13/32................. 9<br />
28 PAHZZ 2930-01-146-1081 15434 3412285 .CORE,OIL COOLER.................... 1<br />
29 PAHZZ 5305-00-782-9489 80204 B1821BH038C200N .SCREW,CAP,HEXAGON H 3/8-16 X 2.00. 6<br />
30 PFFZZ 5330-01-079-6514 15434 3008017 GASKET PART OF KIT P/N 3801235..... 1<br />
31 PAHZZ 5310-00-261-7340 15434 S-604 WASHER,LOCK......................... 6<br />
32 PAFZZ 5305-00-068-0511 80204 B1821BH038C125N SCREW,CAP,HEXAGON H 3/8-16 X 1.25.. 3<br />
33 PAFZZ 5305-00-404-1388 15434 S-199-B SCREW,CAP,HEXAGON H 3/8-16 X 3.75.. 3<br />
34 PAOZZ 2940-01-019-4513 15434 299670 FILTER ELEMENT,FLUI SPIN ON........ 1<br />
35 PAOZZ 2940-01-145-9455 15434 3313283 FILTER ELEMENT,FLUI SPIN ON........ 1<br />
36 PAOZZ 4820-00-276-9041 15434 107947 COCK,DRAIN.......................... 1<br />
37 PAHZZ 5310-01-103-6042 24617 120392 WASHER,FLAT......................... 2<br />
38 PAFZZ 5310-00-637-9541 96906 MS35338-46 WASHER,LOCK 3/8.................... 2<br />
39 PAFZZ 5305-00-638-8920 80204 B1821BH038C225N SCREW,CAP,HEXAGON H 3/8-16 X 2.25.. 2<br />
40 PAFZZ 5305-00-071-2517 80204 B1821BH025C350N SCREW,CAP,HEXAGON H 1/4-20 X 3.50.. 2<br />
41 PAFZZ 5310-00-159-6209 96906 MS122032 WASHER,LOCK 1/4.................... 2<br />
42 PAFZZ 5310-00-562-6560 15434 S-631 WASHER,FLAT 9/32................... 2<br />
43 PBFZZ 5340-01-145-0772 15434 3018697 BRACKET,ANGLE....................... 1<br />
44 PFOZZ 4730-00-365-2690 15434 S-1002-A ADAPTER,STRAIGHT,TU................. 2<br />
45 PAOZZ 5330-01-222-2306 15434 3034579 SEAL................................ 2<br />
46 XBOZZ 15434 3035595 TUBE ASSEMBLY,METAL................. 1<br />
END OF FIGURE<br />
10-1
TM 9-2815-225-34&P<br />
11<br />
12<br />
thru<br />
35<br />
27<br />
28<br />
thru<br />
35<br />
2<br />
3<br />
9<br />
1<br />
4<br />
5<br />
4<br />
6<br />
4<br />
5<br />
4<br />
7<br />
8<br />
13<br />
10<br />
12<br />
28<br />
29<br />
30<br />
15<br />
14<br />
26<br />
31<br />
36<br />
50<br />
35<br />
16<br />
17<br />
29<br />
18<br />
28<br />
38<br />
37<br />
36<br />
39<br />
49<br />
48<br />
32<br />
34<br />
33<br />
19<br />
47<br />
46<br />
45<br />
25<br />
23 22<br />
24<br />
21<br />
20<br />
41<br />
40<br />
44<br />
42<br />
43<br />
Figure 11. Oil Cooler <strong>and</strong> Filter, Big Cam I.
TM 9-2815-225-34&P<br />
(1)<br />
ITEM<br />
NO<br />
(2)<br />
SMR<br />
CODE<br />
(3)<br />
NSN<br />
(4)<br />
CAGEC<br />
(5)<br />
PART<br />
NUMBER<br />
(6)<br />
DESCRIPTION AND USABLE ON CODE(UOC)<br />
(7)<br />
QTY<br />
GROUP 0106 ENGINE LUBTICATING SYSTEM<br />
FIG. 11 OIL COOLER AND FILTER, BIG<br />
CAM I<br />
1 PAFZZ 5305-01-135-5344 15434 3011342 SCREW............................... 6<br />
2 PFFZZ 4730-01-241-7258 15434 301123300 ELBOW,FLANGE TO HOS................. 1<br />
3 PAFZZ 5330-00-537-2382 15434 70089-1 GASKET PART OF KIT P/N 3018762..... 2<br />
4 PAFZZ 4730-01-163-7192 0B8SE 3008690 CLAMP,HOSE.......................... 4<br />
5 PCFZZ 4720-01-085-2571 15434 3031560 HOSE,NONMETALLIC.................... 2<br />
6 PFFZZ 4710-01-181-1956 15434 3000907 TUBE,WATER TRANSFER................. 1<br />
7 PBFZZ 5305-01-203-6444 15434 S145 SCREW,CAP,HEXAGON H 1/2-13 X 1.25.. 1<br />
8 PAFZZ 5310-00-584-5272 96906 MS35338-48 WASHER,LOCK 3/8.................... 1<br />
9 PBFZZ 5305-01-085-8197 15434 3010595 SCREW,MACHINE 3/8-16 X 1.00........ 2<br />
10 PAFZZ 5340-01-242-0805 15434 210966 BRACKET,ANGLE....................... 1<br />
11 PAFHH 2520-01-090-4473 15434 3003814 COOLER ASSEMBLY,OIL................. 1<br />
12 PAOZZ 4820-00-276-9041 15434 107947 COCK,DRAIN.......................... 1<br />
13 PAHZZ 2930-01-231-1661 15434 217315 .COVER,COOLER....................... 1<br />
14 PFFZZ 5365-00-708-3434 15434 110907 .PLUG,MACHINE THREAD 1"-18 X1-1/16 1<br />
UNS R/H EXTERNAL....................<br />
15 PAFZZ 5305-01-088-6019 15434 3010596 SCREW,ASSEMBLED WAS HEXAGON HEAD 5<br />
WITH CAPTIVE WASHER, 3/8-16 X 3 3/4.<br />
16 PAFZZ 5330-01-046-3144 15434 3010030 .GASKET PART OF KIT P/N 3018762.... 1<br />
17 PAFZZ 5310-00-261-7340 96906 MS35338-8 .WASHER,LOCK 3/8................... 1<br />
18 PAFZZ 5305-00-177-5552 15434 S126 .SCREW,CAP,HEXAGON H................ 1<br />
19 PFHZZ 5340-01-342-3610 15434 210967 .COVER,ACCESS....................... 1<br />
20 XBHZZ 15434 142110 .PLUG,EXPANSION..................... 1<br />
21 PFHZZ 4730-00-042-8988 7X677 117244 .PLUG,PIPE 1/4 EXTERNAL R.H. NPT 1<br />
RECESSED HEX HEAD...................<br />
22 PAHZZ 2815-00-791-1453 15434 127558 .PLUNGER,OIL PUMP RE................ 1<br />
23 PAHZZ 5360-00-664-5343 15434 68274 .SPRING,HELICAL,COMP................ 1<br />
24 PCHZZ 5365-00-197-9327 15434 67946 .SPACER,RING PART OF KIT<br />
1<br />
P/N 3018762.........................<br />
25 PBFZZ 4730-01-309-3321 15434 3060882 .PLUG,TUBE FITTING,T................ 1<br />
26 PAFZZ 5330-01-046-1991 15434 218245 .GASKET PART OF KIT P/N 3018762.... 1<br />
27 PBFHZ 2930-01-165-4581 15434 AR-09999 .COOLER,LUBRICATING................. 1<br />
28 PAFZZ 5325-01-139-6738 15434 3006745 ..RING,RETAINING.................... 2<br />
29 PCHZZ 5330-01-086-6197 15434 3007713 ..PACKING,PREFORMED PART OF KIT<br />
2<br />
P/N 3018762.........................<br />
30 PAFZZ 2930-01-065-7113 15434 3021581 ..CORE,RADIATOR..................... 1<br />
31 PFHZZ 2815-01-241-4719 15434 21091500 ..HOUSING,OIL COOLER................ 1<br />
32 PFHZZ 5360-01-200-0323 15434 202128 ..SPRING,HELICAL,COMP............... 1<br />
33 XAHZZ 15434 210707 ..DISC,BY-PASS...................... 1<br />
34 PAHZZ 2940-01-146-1995 15434 179063 ..SEAT,BYPASS FILTER................ 1<br />
35 PAHZZ 4730-00-018-9566 15434 S911B ..PLUG,PIPE......................... 1<br />
36 PCOZZ 5331-01-077-5228 15434 212161 O-RING PART OF KIT P/N 3804280..... 2<br />
37 PAOZZ 4710-01-146-3086 15434 3024666 TUBE,BENT,METALLIC.................. 1<br />
38 PAFZZ 5305-01-088-6019 15434 3010596 SCREW,ASSEMBLED WAS 3/8-16 X 1 1/4. 2<br />
39 PAFZZ 5330-01-079-6514 15434 3008017 GASKET PART OF KIT P/N 3018762..... 1<br />
40 PAFZZ 5310-00-261-7340 96906 MS35338-8 WASHER,LOCK......................... 2<br />
41 PAFZZ 5305-00-165-8157 72582 450517 SCREW,CAP,HEXAGON H 3/8-16 X 4.75.. 2<br />
42 PAFZZ 5305-01-086-7036 15434 3010597 SCREW WITH LOCKWASHER, 3/8-16 X<br />
2<br />
3.75................................<br />
43 PAOZZ 2940-01-019-4513 15434 299670 FILTER ELEMENT,FLUI................. 1<br />
44 XBHZZ 15434 S152B SCREW,CAP,HEX HEAD.................. 1<br />
45 PFHZZ 5310-00-820-6653 15434 S627 WASHER,LOCK 5/8.................... 1<br />
46 PAFZZ 5310-00-134-4171 15434 200861 WASHER,FLAT 5/8.................... 1<br />
47 PAOZZ 2940-01-065-7076 0B8S3 3300908 HEAD,FLUID FILTER................... 1<br />
48 PAOZZ 5330-01-164-0944 33457 3308958 GASKET PART OF KIT P/N 3018762..... 1<br />
49 PAFZZ 5330-00-132-0248 15434 173368 PACKING,PREFORMED PART OF KIT<br />
1<br />
P/N 3018762.........................<br />
50 PAFZZ 4730-00-254-6227 79470 49X6X2 ELBOW,PIPE TO TUBE.................. 1<br />
11-1<br />
END OF FIGURE
TM 9-2815-225-34&P<br />
2<br />
3<br />
thru<br />
12<br />
1<br />
4<br />
3<br />
6<br />
5<br />
7<br />
9<br />
10<br />
23<br />
8<br />
37<br />
47<br />
8<br />
11<br />
12<br />
41<br />
40<br />
39<br />
24<br />
38<br />
36<br />
15<br />
13<br />
14<br />
13<br />
48<br />
30<br />
31<br />
32<br />
18<br />
35 34 33<br />
21<br />
26<br />
27<br />
18<br />
25<br />
17<br />
19<br />
20<br />
16<br />
17<br />
18<br />
44<br />
42<br />
43<br />
45<br />
29<br />
46<br />
28<br />
22<br />
17<br />
Figure 12. Oil Pan, Dipstick, <strong>and</strong> Breather Tube.
TM 9-2815-225-34&P<br />
(1)<br />
ITEM<br />
NO<br />
(2)<br />
SMR<br />
CODE<br />
(3)<br />
NSN<br />
(4)<br />
CAGEC<br />
(5)<br />
PART<br />
NUMBER<br />
(6)<br />
DESCRIPTION AND USABLE ON CODE(UOC)<br />
(7)<br />
QTY<br />
GROUP 0106 ENGINE LUBRICATION SYSTEM<br />
FIG. 12 OIL PAN, DIPSTICK, AND<br />
BREATHER TUBE<br />
1 PFFZZ 5330-01-147-0748 15434 3099083 GASKET PART OF KIT P/N 3801235..... 1<br />
2 PAFZZ 2815-01-133-2445 15434 193625 OIL PAN BIG CAM I.................. 1<br />
2 PBFFF 2815-01-141-0919 15434 303195900 OIL PAN BIG CAM III................ 1<br />
3 PAFZA 5310-00-828-4827 15434 69832 .NUT,GOVERNOR STUD 5/16-18......... 3<br />
4 PAFZZ 5310-00-562-6558 15434 S-626 .WASHER,FLAT 0.344 X 0.688......... 3<br />
5 PAFZZ 5340-01-146-9992 15434 3032708 .CLAMP,LOOP......................... 3<br />
6 PBFZZ 4710-01-146-1052 15434 3095051 .TUBE,BENT,METALLIC................. 1<br />
7 XAFZZ 15434 3030257 .PAN, ENGINE OIL.................... 1<br />
8 PAFZZ 4730-00-010-3867 77640 103879 PLUG,PIPE BIG CAM I................ 2<br />
8 PAFZZ 4730-99-214-1783 K4843 3008468 .PLUG,PIPE BIG CAM III............. 2<br />
9 PAFZZ 5342-01-143-6045 15434 3008470 .PLUG 1-11 1/2..................... 1<br />
10 PAFZZ 4730-00-044-4715 15434 S962 .PLUG,PIPE 1 INCH NPTF............. 1<br />
11 PCHZZ 5365-00-197-9327 15434 67946 .SPACER,RING PART OF KIT<br />
1<br />
P/N 3801235.........................<br />
12 PAOZZ 5365-00-695-1247 15434 3055069 .PLUG,MACHINE THREAD................ 1<br />
13 PAOZZ 4730-01-146-3111 15434 3008596 CLAMP,HOSE.......................... 2<br />
14 PCOZZ 4720-00-278-4890 81336 33-5490-060-000 HOSE,NONMETALLIC.................... 1<br />
15 PFOZZ 4710-01-146-0049 15434 3038035 TUBE,BENT,METALLIC BIG CAM III..... 1<br />
16 PAOZZ 5310-00-451-6643 15434 S-213-A NUT,FLYWHEEL 5/8-18................ 1<br />
17 PAOZZ 5310-00-261-7340 15434 S-604 WASHER,LOCK BIG CAM I.............. 4<br />
17 PAOZZ 5310-00-820-6653 15434 S-603 WASHER,LOCK BIG CAM III............ 4<br />
18 PAOZZ 5310-00-823-8803 96906 MS27183-21 WASHER,FLAT......................... 4<br />
19 PAOZZ 5340-00-839-0653 15434 68425 CLAMP,LOOP.......................... 1<br />
20 PFOZZ 5342-01-145-9540 15434 217934 BRACKET,AFTERCOOLER................. 1<br />
21 PAOZZ 5305-00-944-8292 80205 MS35308-458 SCREW,CAP,HEXAGON H................. 1<br />
22 PAOZZ 5305-00-546-6698 15434 S-129 SCREW,CAP,HEXAGON H 3/8-24 X 1.00.. 1<br />
23 PAOZZ 6680-01-108-7410 0B8S3 199453 GAGE ROD,LIQUID LEV................. 1<br />
24 PAFZZ 4710-01-142-1667 15434 3022377 BREATHER TUBE,OIL................... 1<br />
25 PAOZZ 5310-01-126-9404 24617 9422277 NUT,SELF-LOCKING,HE 3/8-16......... 1<br />
26 PAOZZ 5340-00-417-5800 15434 200064 CLAMP,LOOP.......................... 1<br />
27 PAFZZ 5310-00-080-6004 96906 MS27183-14 WASHER,FLAT BIG CAM III............ 4<br />
28 PBFZZ 5305-01-085-8197 15434 3010595 SCREW,MACHINE WITH CAPTIVE WASHER, 4<br />
3/8-16 X 1.00,BIG CAM III...........<br />
29 PAFZZ 5342-01-140-7158 15434 178074 BRACKET BIG CAM I.................. 1<br />
29 XBFZZ 15434 41044 BRACKET,OIL GAGE BIG CAM III....... 1<br />
30 PCFZZ 5330-00-246-0309 79150 26384 GASKET PART OF KIT P/N 3801235..... 1<br />
31 PAHZZ 5305-00-543-4372 80204 B1821BH038C075N SCREW,CAP,HEXAGON H BIG CAM I...... 5<br />
32 PFOZZ 5340-01-147-5389 15434 134561 BRACKET,ANGLE....................... 1<br />
33 PAOZZ 5305-01-032-2311 80204 B1821BH044C425N SCREW,CAP,HEXAGON H................. 1<br />
34 PAOZZ 5310-00-209-0965 96906 MS35338-47 WASHER,LOCK BIG CAM I 1<br />
35 PAOZZ 5310-00-809-4085 96906 MS27183-16 WASHER,FLAT BIG CAM III............ 1<br />
36 PAHZZ 5305-01-212-5210 15434 3008069 SCREW,CAP,HEXAGON H BIG CAM I...... 4<br />
36 PAFZZ 5305-01-145-8358 15434 3017049 SCREW,ASSEMBLED WAS BIG CAM III.... 4<br />
37 PFFZZ 5340-01-150-6248 15434 218813 PLATE,MENDING ENGINE SHIPPING BIG 1<br />
CAM III.............................<br />
38 PAFZZ 5305-01-145-1113 15434 3032674 SCREW HEXAGON...................... 28<br />
39 XBFZZ 80205 MS90725-90 SCREW,CAP,HEXAGON H 7/16-14 X 1 3/4 4<br />
40 PAFZZ 5310-00-407-9566 96906 MS35338-45 WASHER,LOCK......................... 4<br />
41 PAFZZ 5310-00-081-4219 96906 MS27183-12 WASHER,FLAT......................... 4<br />
42 MOOZZ 19207 8710557-10 HOSE, RUBBER, MAKE FROM HOSE,<br />
1<br />
NONMETALLIC, 10 IN. MAKE FROM P/N<br />
8710557.............................<br />
43 PAOZZ 4710-01-092-0109 34623 MB320-20011 TUBE,METALLIC BREATHER EXTENSION... 1<br />
44 PAOZZ 5340-01-153-9425 75272 COV-1109Z1 CLAMP,LOOP BIG CAM III............. 1<br />
45 PAOZZ 5305-01-112-9021 15434 3013904 SCREW BIG CAM III.................. 1<br />
46 PAOZZ 5310-00-637-9541 96906 MS35338-46 WASHER,LOCK BIG CAM III............ 2<br />
12-1
TM 9-2815-225-34&P<br />
(1)<br />
Item<br />
NO<br />
(2)<br />
SMR<br />
Code<br />
(3)<br />
NSN<br />
(4)<br />
CAGEC<br />
(5)<br />
PART<br />
NUMBER<br />
(6)<br />
DESCRIPTION AND USABLE ON CODE(UOC)<br />
(7)<br />
Qty<br />
47 XBFZZ 15434 S1354 SCREW BIG CAM I.................... 2<br />
48 PAFZZ 4730-00-338-6839 15434 2062200 STRAINER ELEMENT,SE BIG CAM I...... 1<br />
END OF FIGURE<br />
12-2/BLANK
TM 9-2815-225-34&P<br />
1<br />
2<br />
thru<br />
24<br />
3 4 25 26<br />
28<br />
51<br />
2<br />
5<br />
27<br />
50<br />
✱ a<br />
30<br />
29<br />
15<br />
16<br />
17<br />
18<br />
21<br />
22<br />
19<br />
4<br />
6<br />
33<br />
32<br />
31<br />
✱ b<br />
20<br />
34<br />
26<br />
23<br />
7<br />
8<br />
7<br />
39<br />
38<br />
37<br />
36<br />
27<br />
35<br />
40<br />
24<br />
14<br />
41<br />
49<br />
13<br />
12<br />
11<br />
10<br />
9<br />
47<br />
34<br />
47<br />
45<br />
9 44<br />
46 13<br />
27<br />
33<br />
36<br />
27<br />
35<br />
14<br />
42<br />
43<br />
36<br />
27<br />
✱ a PART OF ITEM 3<br />
✱ b PART OF ITEM 25<br />
48<br />
Figure 13. Oil Lubricating Pump.
TM 9-2815-225-34&P<br />
(1)<br />
ITEM<br />
NO<br />
(2)<br />
SMR<br />
CODE<br />
(3)<br />
NSN<br />
(4)<br />
CAGEC<br />
(5)<br />
PART<br />
NUMBER<br />
(6)<br />
DESCRIPTION AND USABLE ON CODE(UOC)<br />
(7)<br />
QTY<br />
GROUP 0106 ENGINE LUBRICATION SYSTEM<br />
FIG. 13 OIL LUBRICATING PUMP<br />
1 PAFHH 2815-01-085-2573 15434 AR10172 OIL PUMP ASSEMBLY,E BIG CAM I...... 1<br />
1 PAFHH 2815-01-141-5299 15434 3821572 PUMP ASSEMBLY,OIL BIG CAM III...... 1<br />
2 PFHZZ 5330-01-147-1274 15434 3014778 .GASKET BIG CAM III PART OF KIT 1<br />
P/N 3801235.........................<br />
2 PAFZZ 5330-01-066-3910 15434 203145 .GASKET OIL COVER TO PUMP,BIG CAM 1<br />
I PART OF KIT P/N 3018762..........<br />
3 XBHZZ 15434 AR8667 .HSG,HYDR ADAPTER BIG CAM I........ 1<br />
3 PAHZZ 5340-01-145-9451 15434 3014964 .COVER,ACCESS BIG CAM III.......... 1<br />
4 PAHZZ 3120-00-627-6697 15434 69521 ..BEARING,SLEEVE BIG CAM III....... 1<br />
5 PAHZZ 4730-01-214-7081 10988 A77505 .PLUG,PIPE BIG CAM I............... 1<br />
5 PAHZZ 4730-01-161-5115 15434 3013786 .PLUG,PIPE BIG CAM III............. 1<br />
6 PAHZZ 5305-01-129-4214 15434 3022590 .SCREW,CAPTIVE WITH CAPTIVE WASHER, 7<br />
5/16-18X1.00........................<br />
7 PAHZZ 3120-00-566-0480 15434 68365 .BUSHING,SLEEVE BIG CAM I.......... 2<br />
7 PAHZZ 3120-01-149-5414 15434 199586 .BUSHING,SLEEVE BIG CAM III........ 2<br />
8 PAHZZ 3020-01-146-0108 15434 3014788 .GEAR,SPUR.......................... 1<br />
9 PAOZZ 5305-01-010-2362 96906 MS18154-59 .SCREW,CAP,HEXAGON H BIG CAM I..... 1<br />
9 PAHZZ 5305-00-543-4372 80204 B1821BH038C075N .SCREW,CAP,HEXAGON H BIG CAM III... 5<br />
10 PAHZZ 5310-01-075-0991 15434 146161 .WASHER,FLAT........................ 1<br />
11 PAHZZ 5342-01-145-0645 15434 3012726 .RETAINER........................... 1<br />
12 PCHZZ 5330-01-051-4243 15434 145504 .PACKING,PREFORMED PART OF KIT<br />
2<br />
P/N 3010242.........................<br />
13 PAHZZ 5360-01-038-4659 15434 211939 .SPRING,HELICAL,COMP BIG CAM I..... 1<br />
13 PAHZZ 5360-01-145-7554 15434 3010146 .SPRING,HELICAL,COMP BIG CAM III... 1<br />
14 PAHZZ 2815-00-705-2856 15434 109333 .PLUNGER,PRESSURE RE BIG CAM I..... 1<br />
14 PAHZZ 5340-01-145-0802 15434 3012529 .PLUNGER,DETENT BIG CAM III........ 1<br />
15 PAHZZ 5360-01-148-0303 15434 3014756 .SPRING,HELICAL,COMP BYPASS VALVE.. 1<br />
16 PAHZZ 5310-01-144-6224 15434 3014754 .WASHER,FLAT........................ 1<br />
17 PAHZZ 4820-01-145-9457 15434 3014755 .DISK,VALVE......................... 1<br />
18 PAHZZ 2940-01-146-1995 15434 179063 .SEAT,BYPASS FILTER................. 1<br />
19 PAHZZ 3020-01-084-9640 15434 3014783 .GEAR,SPUR BIG CAM I............... 1<br />
19 PAHZZ 3020-01-146-0109 15434 3014787 .GEAR,SPUR BIG CAM III............. 1<br />
20 XDHZZ 15434 302136100 .SHAFT,SHOULDERED BIG CAM I........ 1<br />
20 PAHZZ 3040-01-145-9637 15434 3012532 .GEARSHAFT,SPUR BIG CAM III........ 1<br />
21 PAHZZ 5315-00-475-2574 15434 69519 .PIN,STRAIGHT,HEADLE................ 1<br />
22 PAHZZ 5315-00-043-1787 80205 MS35756-34 .KEY,WOODRUFF BIG CAM I............ 1<br />
22 XBHZZ 15434 183695 .KEY,WOODRUFF BIG CAM III.......... 1<br />
23 PAHZZ 3040-01-079-3469 15434 17741900 .SHAFT,SHOULDERED BIG CAM I........ 1<br />
23 XDHZZ 15434 3012531 .SHAFT,STRAIGHT BIG CAM III........ 1<br />
24 PAHZZ 3020-01-085-3779 15434 20483200 .GEAR,HELICAL....................... 1<br />
25 XDHZZ 15434 AR09832 BODY,OIL PUMP WITH BIG CAM I....... 1<br />
25 PAHZZ 3040-01-146-5935 15434 3014798 HOUSING,MECHANICAL BIG CAM III..... 1<br />
26 PAHZZ 3120-00-627-6697 15434 69521 .BEARING,SLEEVE BIG CAM III........ 2<br />
27 PAFZZ 5310-00-261-7340 15434 S-604 WASHER,LOCK BIG CAM III............ 9<br />
27 PAFZZ 5310-00-209-0965 96906 MS35338-47 WASHER,LOCK BIG CAM III............ 6<br />
28 PAFZZ 5305-00-068-0511 80204 B1821BH038C125N SCREW,CAP,HEXAGON H 0106 010A,BIG 13<br />
CAM I...............................<br />
28 PAFZZ 5305-00-137-3269 15434 S-108-A SCREW BIG CAM III.................. 3<br />
29 PAFZZ 5325-01-084-9033 15434 100475 RING,RETAINING...................... 1<br />
30 XDHZZ 15434 199589 COUPLING,SHAFT,RIGI BIG CAM I...... 1<br />
30 PAFZZ 3010-01-146-0113 15434 3023506 COUPLING,SHAFT,RIGI POWER STEERING 1<br />
PUMP,BIG CAM III....................<br />
31 PAHZZ 5305-00-426-4142 15434 S105 SCREW,CAP,HEXAGON H BIG CAM I...... 2<br />
32 PAHZZ 5310-00-637-9541 96906 MS35338-46 WASHER,LOCK PART OF KIT<br />
2<br />
P/N 302112400.......................<br />
33 PAHZZ 4720-01-079-3285 34623 MA145B21000 HOSE ASSEMBLY,NONME BIG CAM I...... 1<br />
13-1
TM 9-2815-225-34&P<br />
(1)<br />
ITEM<br />
NO<br />
(2)<br />
SMR<br />
CODE<br />
(3)<br />
NSN<br />
(4)<br />
CAGEC<br />
(5)<br />
PART<br />
NUMBER<br />
(6)<br />
DESCRIPTION AND USABLE ON CODE(UOC)<br />
(7)<br />
QTY<br />
33 PAFZZ 4710-01-146-0050 15434 3029848 TUBE,BENT,METALLIC BIG CAM III..... 1<br />
34 PFFZZ 5330-01-145-6913 15434 3029846 GASKET PART OF KIT P/N 3801235..... 1<br />
34 PCFZZ 5330-00-143-8376 15434 157551 GASKET PART OF KIT P/N 3801235..... 1<br />
35 PAFZZ 5305-00-068-0511 80204 B1821BH038C125N SCREW,CAP,HEXAGON H................. 2<br />
36 PAFZZ 5310-00-562-6557 15434 S622 WASHER,FLAT GEAR COVER ASSY TO<br />
4<br />
BLOCK,BIG CAM I.....................<br />
36 PAFZZ 5310-00-080-6004 96906 MS27183-14 WASHER,FLAT BIG CAM III............ 1<br />
37 XBHZZ 15434 105182 CLAMP,LOOP PUMP ASSY,OIL<br />
1<br />
LUBRICATING,BIG CAM I...............<br />
38 XBHZZ 15434 9674F SPACER CLAMP TO HOSE TO SUPPORT OIL 1<br />
PAN,PUMP ASSY,OIL LUBRICATING.......<br />
39 PAHZZ 5340-01-066-2947 15434 68038 BRACKET,ANGLE PUMP ASSY,OIL<br />
1<br />
LUBRICATING.........................<br />
40 PAHZZ 5310-00-521-8595 15434 S223 NUT,HEXAGON......................... 1<br />
41 XDHZZ 15434 300869 SCREW...............................<br />
42 PAHZZ 4730-00-202-8470 01276 2021-20-20S ADAPTER,STRAIGHT,PI PUMP ASSY,OIL 1<br />
LUBRICATING,BIG CAM I...............<br />
43 XDFZZ 15434 AR9832 BODY AND BUSHING.................... 1<br />
44 PAHZZ 2815-00-828-7013 15434 126304 YOKE,CAP RETAINING PUMP ASSY,OIL 1<br />
LUBRICATING, BIG CAM I..............<br />
45 PAHZZ 2815-00-406-8936 15434 109319 LOCK PLATE YOKE TO HOUSING,PUMP<br />
1<br />
ASSY,OIL LUBRICATING................<br />
46 PAFZZ 5305-00-795-9352 15434 3012479 SCREW,CAP,HEXAGON H BIG CAM I...... 2<br />
46 PAFZZ 5305-01-147-2443 15434 S-142-A SCREW,CAP,HEXAGON H BIG CAM III.... 2<br />
47 PAFZZ 5331-01-145-0715 15434 3029847 O-RING PART OF KIT P/N 3801235..... 1<br />
48 PAFZZ 5305-00-543-4372 80204 B1821BH038C075N SCREW,CAP,HEXAGON H BIG CAM III.... 2<br />
48 PAOZZ 5305-00-942-2196 80204 B1821BH038C100D SCREW,CAP,HEXAGON H BIG CAM I...... 6<br />
49 PFFZZ 5330-01-147-4071 15434 3031434 GASKET PUMP MOUNTING PART OF KIT 1<br />
P/N 3801235.........................<br />
50 PAFZZ 4720-01-152-0156 15434 AS0401100MS HOSE ASSEMBLY,NONME................. 1<br />
51 PAFZZ 4730-01-142-8524 15434 68139 ELBOW,PIPE TO TUBE.................. 1<br />
END OF FIGURE<br />
13-2/BLANK
TM 9-2815-225-34&P<br />
Figure 14. Air Aftercooler.<br />
1<br />
12<br />
25<br />
19<br />
1<br />
37<br />
36<br />
2<br />
4<br />
5<br />
6<br />
10<br />
9<br />
8<br />
7<br />
27<br />
39<br />
13<br />
38<br />
26<br />
25<br />
29<br />
32<br />
33<br />
28<br />
31<br />
25<br />
13<br />
23<br />
13<br />
11<br />
40<br />
24<br />
23<br />
1<br />
12<br />
13<br />
14<br />
19<br />
22<br />
20<br />
21<br />
35<br />
3<br />
30<br />
1<br />
15<br />
16<br />
17<br />
18<br />
11<br />
7<br />
11<br />
34<br />
13<br />
18
TM 9-2815-225-34&P<br />
(1)<br />
ITEM<br />
NO<br />
(2)<br />
SMR<br />
CODE<br />
(3)<br />
NSN<br />
(4)<br />
CAGEC<br />
(5)<br />
PART<br />
NUMBER<br />
(6)<br />
DESCRIPTION AND USABLE ON CODE(UOC)<br />
(7)<br />
QTY<br />
GROUP 0108 MANIFOLDS<br />
FIG. 14 AIR AFTERCOOLER<br />
1 PAOZZ 4730-00-555-8263 53496 5561 1-2A CLAMP,HOSE 13/16-1 1/2............. 8<br />
2 PFFZZ 4730-01-146-1065 15434 3013295 ELBOW,FLANGE TO HOS WATER<br />
1<br />
OUTLET,BIG CAM III..................<br />
3 PCFZZ 5330-01-066-5351 15434 215044 GASKET WATER OUTLET<br />
1<br />
CONNECTION PART OF KIT P/N 4024958.<br />
4 PBFZZ 2930-01-146-1083 15434 3046170 COVER,INTERCOOLER................... 1<br />
5 PAFZZ 5305-01-147-2444 15434 3005508 SCREW,CAP,HEXAGON H WITH CAPTIVE 24<br />
WASHER..............................<br />
6 XBFZZ 15434 3077201 GASKET AFTERCOOLER COVER........... 1<br />
7 PFOZZ 5330-01-066-3904 15434 195952 PACKING,PREFORMED PART OF KIT<br />
4<br />
P/N 4024958.........................<br />
8 PFOZZ 5330-01-147-4072 15434 3032348 GASKET WATER INLET CONNECTION PART 1<br />
OF KIT P/N 4024958..................<br />
9 PAOZZ 2930-01-146-1996 15434 3028282 CONNECTOR,WATER INL WATER INLET,BIG 1<br />
CAM III.............................<br />
10 PAOZZ 5305-00-068-0511 80204 B1821BH038C125N SCREW,CAP,HEXAGON H BIG CAM I...... 2<br />
10 PAOZZ 5305-01-072-8818 15434 3012471 SCREW WITH CAPTIVE WASHER, 3/8-16 X 2<br />
1 1/8,BIG CAM III...................<br />
11 PCOZZ 4720-01-085-6131 15434 155789 HOSE,NONMETALLIC.................... 4<br />
12 PAOZZ 5305-00-543-4372 80204 B1821BH038C075N SCREW,CAP,HEXAGON H HEXAGON CAP, 2<br />
3/8-16 X 1.00,BIG CAM III...........<br />
13 PAOZZ 5310-00-159-6209 96906 MS122032 WASHER,LOCK BIG CAM I.............. 3<br />
13 PAOZZ 5310-00-261-7340 15434 S-604 WASHER,LOCK BIG CAM III............ 2<br />
14 PAOZZ 4710-01-146-4083 15434 217933 TUBE,BENT,METALLIC WATER CROSSOVER. 1<br />
15 PAOZZ 5305-01-147-1215 15434 3019572 SCREW,CAP,HEXAGON H WITH CAPTIVE 3<br />
WASHER,BIG CAM III..................<br />
16 PAOZZ 4730-01-146-3109 15434 217932 ELBOW,FLANGE TO TUB WATER<br />
1<br />
OUTLET,BIG CAM III..................<br />
17 PCOZZ 5330-01-082-6984 15434 215045 GASKET WATER OUTLET................ 1<br />
18 PFOZZ 4730-01-146-1064 15434 215587 ADAPTER,STRAIGHT,FL WATER OUTLET... 1<br />
19 PAOZZ 5340-00-087-7486 15434 107460 CLAMP,LOOP.......................... 2<br />
20 PAOZZ 5305-00-944-8292 80205 MS35308-458 SCREW,CAP,HEXAGON H................. 1<br />
21 PAOZZ 5310-00-820-6653 15434 S-603 WASHER,LOCK 5/8 BIG CAM III........ 4<br />
22 PAOZZ 5342-01-145-9540 15434 217934 BRACKET,AFTERCOOLER................. 1<br />
23 PAOZZ 5310-00-521-8595 15434 S-223 NUT HE,AGON 3/8-16................. 2<br />
24 PAFZZ 5305-00-543-4372 80204 B1821BH038C075N SCREW,CAP,HEXAGON H BIG CAM I...... 4<br />
24 PAOZZ 5305-01-137-6706 15434 3012473 SCREW 3/8-16 X 1 3/4,BIG CAM III... 2<br />
25 PAOZZ 5310-00-261-7340 15434 S-604 WASHER,LOCK BIG CAM I.............. 1<br />
25 PAOZZ 5310-00-486-2505 15434 108330 WASHER,FLAT BIG CAM III............ 4<br />
26 PAOZZ 5310-00-080-6004 96906 MS27183-14 WASHER,FLAT......................... 4<br />
27 PAFZZ 5310-01-145-8403 15434 3011610 WASHER,FLAT......................... 8<br />
28 PAFZZ 5305-01-147-2445 15434 3030286 SCREW,CAP,HEXAGON H 5/8-18 X 1.50.. 8<br />
29 PAFZZ 5305-01-146-7285 15434 69047-A SCREW,CAP,SOCKET HE SOCKET HEAD<br />
1<br />
CAP, 3/8-16 X 1.50..................<br />
30 PAFZZ 5305-00-404-1390 15434 S149A SCREW,CAP,HEXAGON H BIG CAM I...... 6<br />
30 PAFZZ 5305-01-147-8729 15434 3028967 SCREW,CAP,HEXAGON H WITH CAPTIVE 6<br />
WASHER, 3/8-16 X 1.125,BIG CAM III..<br />
31 PAOZZ 5340-01-145-0773 15434 3035607 BRACKET,ANGLE TUBE SUPPORT,BIG CAM 1<br />
III.................................<br />
32 PBFZZ 4420-01-318-0852 15434 3036798 COOLER,FLUID,INDUST BIG CAM III.... 1<br />
33 PCFZZ 5330-01-086-3523 15434 3008591 GASKET INTAKE MANIFOLD PART OF KIT 3<br />
P/N 4024958 PART OF KIT P/N 3804280.<br />
34 XBFZZ 15434 214836 CORE,AFTERCOOLER BIG CAM I......... 1<br />
34 PAFZZ 2930-01-141-9277 15434 3068724 CORE,AFTERCOOLER BIG CAM III....... 1<br />
35 PAOZZ 4710-01-085-6132 15434 21504100 TUBE,BENT,METALLIC BIG CAM I....... 1<br />
14-1
TM 9-2815-225-34&P<br />
(1)<br />
ITEM<br />
NO<br />
(2)<br />
SMR<br />
CODE<br />
(3)<br />
NSN<br />
(4)<br />
CAGEC<br />
(5)<br />
PART<br />
NUMBER<br />
(6)<br />
DESCRIPTION AND USABLE ON CODE(UOC)<br />
(7)<br />
QTY<br />
35 PAOZZ 4710-01-146-1053 15434 3018099 TUBE,BENT,METALLIC WATER<br />
1<br />
TRANSFER,BIG CAM III................<br />
36 PAFZZ 5330-00-003-1771 15434 S684 GASKET BIG CAM I................... 3<br />
37 PAFZZ 5306-00-225-8499 96906 MS90725-34 BOLT,MACHINE 5/16-18 X 1.00........ 3<br />
38 PAFZZ 5310-00-134-4169 15434 63842 WASHER,FLAT......................... 3<br />
39 PAHZZ 5305-00-725-2317 80204 B1821BH038C150N SCREW,CAP,HEXAGON H 3/8-16 X 1.50.. 3<br />
40 PAFZZ 4730-00-018-9566 15434 S911B PLUG,PIPE........................... 1<br />
END OF FIGURE<br />
14-2/BLANK
TM 9-2815-225-34&P<br />
12<br />
3<br />
9<br />
6<br />
4<br />
1<br />
2<br />
8<br />
7<br />
11 10<br />
13<br />
5<br />
BIG CAM I<br />
1<br />
14<br />
2<br />
14<br />
3<br />
4<br />
6<br />
5<br />
BIG CAM III<br />
Figure 15. Exhaust Manifolds.
TM 9-2815-225-34&P<br />
(1)<br />
ITEM<br />
NO<br />
(2)<br />
SMR<br />
CODE<br />
(3)<br />
NSN<br />
(4)<br />
CAGEC<br />
(5)<br />
PART<br />
NUMBER<br />
(6)<br />
DESCRIPTION AND USABLE ON CODE(UOC)<br />
(7)<br />
QTY<br />
GROUP 0108 MANIFOLDS<br />
FIG. 15 EXHAUST MANIFOLDS<br />
1 PAFZZ 2815-00-920-8356 15434 151489 MANIFOLD,EXHAUST EXHAUST<br />
1<br />
MANIFOLDS,BIG CAM I.................<br />
1 PAFZZ 2815-01-146-1103 15434 3031186 MANIFOLD,EXHAUST REAR,BIG CAM III.. 1<br />
2 PAFZZ 2815-01-077-4463 15434 200566 MANIFOLD,CENTER SEC REAR,EXHAUST 1<br />
MANIFOLDS ASSEMBLY,BIG CAM I........<br />
2 PAFZZ 2815-01-146-3159 15434 3029614 MANIFOLD,EXHAUST CENTER,BIG CAM III 1<br />
3 PAFZZ 2815-00-920-2073 15434 151478 MANIFOLD,EXHAUST EXHAUST<br />
1<br />
MANIFOLDS,BIG CAM I.................<br />
3 PAFZZ 2815-01-146-0112 15434 3031187 MANIFOLD,EXHAUST FRONT,BIG CAM III. 1<br />
4 PAFZZ 5330-00-659-3178 15434 3020943 GASKET MANIFOLD PART OF KIT<br />
6<br />
P/N 4024958 PART OF KIT 3804280.....<br />
5 PAFZZ 5305-01-028-8869 15434 S155 SCREW,CAP,HEXAGON H BIG CAM I...... 8<br />
5 PAFZZ 5305-01-147-8730 15434 3043647 SCREW,CAP,HEXAGON H CAPTIVE<br />
12<br />
WASHER,BIG CAM III..................<br />
6 PAFZZ 2815-00-829-5227 15434 105199 DOWEL,MANIFOLD...................... 6<br />
7 PAFZZ 5305-00-843-9529 94012 110266 SCREW,CAP,HEXAGON H BIG CAM I...... 4<br />
8 PAFZZ 5310-00-887-8325 15434 114638 WASHER,KEY BIG CAM I............... 4<br />
9 PAFZZ 5340-00-132-3203 15434 200919 STRAP,RETAINING BIG CAM I.......... 2<br />
10 PAFZZ 3120-01-079-6527 15434 109594 BEARING,SLEEVE BIG CAM I........... 8<br />
11 PAFZZ 5340-00-767-4012 15434 116982 LOCKING PLATE,NUT A BIG CAM I...... 4<br />
12 PAFZZ 4730-01-085-7328 15434 217632 PLUG,PIPE BIG CAM I................ 2<br />
13 PAFZZ 5307-00-922-2626 15434 3010915 STUD,PLAIN BIG CAM I............... 4<br />
14 PAFZZ 15434 3027653 RING,EXHAUST BIG CAM III........... 2<br />
END OF FIGURE<br />
15-1
TM 9-2815-225-34&P<br />
1<br />
2<br />
<strong>and</strong><br />
3<br />
7<br />
6<br />
2<br />
8<br />
3<br />
4<br />
5<br />
23<br />
22<br />
10<br />
9<br />
20<br />
21<br />
16<br />
17<br />
13<br />
14<br />
13<br />
8<br />
11<br />
10<br />
19<br />
18<br />
15<br />
12<br />
17<br />
16<br />
Figure 16. Gear Cover.
TM 9-2815-225-34&P<br />
(1)<br />
ITEM<br />
NO<br />
(2)<br />
SMR<br />
CODE<br />
(3)<br />
NSN<br />
(4)<br />
CAGEC<br />
(5)<br />
PART<br />
NUMBER<br />
(6)<br />
DESCRIPTION AND USABLE ON CODE(UOC)<br />
(7)<br />
QTY<br />
GROUP 0109 ACCESSORY DRIVING<br />
MECHANISIMS<br />
FIG. 16 GEAR COVER<br />
1 PAFZZ 2815-01-159-0872 15434 3024442 GEAR COVER ASSEMBLY................. 1<br />
2 PAFZZ 3120-00-877-2213 15434 132770 .BEARING,SLEEVE..................... 1<br />
3 PFFZZ 4710-01-209-6742 15434 210416 .TUBE,METALLIC...................... 1<br />
4 PAFZZ 5365-01-147-0912 15434 65259-A SHIM PART OF KIT P/N AR01176....... V<br />
4 PAFZZ 5365-01-147-0913 15434 65259-B SHIM PART OF KIT P/N AR01176....... V<br />
4 PAFZZ 5365-00-507-3254 15434 65259-C SHIM 0.002 PART OF KIT P/N AR01176 V<br />
4 PAFZZ 5365-01-086-7788 15434 185573 SHIM PART OF KIT P/N AR01176....... V<br />
5 PCFZZ 5331-01-145-0716 15434 215705 O-RING PART OF KIT P/N 3801235..... 1<br />
6 PAFZZ 5330-00-135-6382 15434 211255 SEAL,PLAIN ENCASED PART OF KIT<br />
1<br />
P/N 3801235.........................<br />
7 PAFZZ 5305-01-145-8381 15434 3011713 SCREW,CAP,HEXAGON H 7/16-20 X 2 5/8 1<br />
8 PAFZZ 2815-00-772-9434 15434 70653 DOWEL,METALLIC...................... 1<br />
9 PAFZZ 5315-00-238-0882 15434 60408 PIN,STRAIGHT,HEADLE................. 1<br />
10 PAFZZ 4730-00-018-9566 15434 S-911-B PLUG,PIPE 1/8 NPTF................. 2<br />
11 PCFZZ 5330-01-145-6914 15434 3021704 GASKET PART OF KIT P/N 3801235..... 1<br />
12 PAFZZ 5305-01-147-4033 15434 3011711 SCREW,CAP,HEXAGON H WITH CAPTIVE 9<br />
WASHERS,7/16-20 X 1-3/8.(SUPRESSED -<br />
DUPP/N IN CHETPM, BLSB). BIG CAM I..<br />
12 PFFZZ 5305-01-240-7155 15434 3011712 SCREW,ASSEMBLED WAS 7/16-20 X 2<br />
9<br />
3/16 BIG CAM III....................<br />
13 PFHZZ 4730-00-042-8988 7X677 117244 PLUG,PIPE 1/4 NPT BIG CAM I........ 3<br />
13 PAFZZ 4730-00-010-3867 24617 219191 PLUG,PIPE 3/8 NPT BIG CAM III...... 1<br />
14 PFFZZ 5305-01-165-3300 15434 S-119-C SCREW,CAP,HEXAGON H................. 1<br />
15 XBFZZ 15434 218716 SPACER,PLATE........................ 8<br />
16 PFFZZ 5310-01-112-4306 15434 203760 WASHER,FLAT 15/32 I.D. BIG CAM I... 2<br />
16 PAFZZ 5310-01-145-8404 15434 3000082 WASHER,FLAT 15/32 BIG CAM III...... 6<br />
17 PAFZZ 5305-01-147-8731 15434 213456 SCREW,CAP,HEXAGON H ENGINE SUPPORT 6<br />
TO ENGINE...........................<br />
18 PAFZZ 2815-01-079-9146 15434 214306 SUPPORT,FRONT,ENGIN................. 1<br />
19 PAFZZ 5306-01-146-9866 15434 3058664 BOLT,MACHINE 7/16-20 X 2.50........ 2<br />
20 PAFZZ 5305-01-165-3892 15434 3011714 SCREW 7/16-20 X 3.00............... 3<br />
21 PAHZZ 5310-00-209-0965 96906 MS35338-47 WASHER,LOCK 7/16 BIG CAM I......... 1<br />
22 PAFZZ 5305-01-072-8816 15434 3011715 SCREW 3/8-16 X 13/16............... 3<br />
23 PAFZZ 2815-01-145-9401 15434 3008530 SUPPORT,CAMSHAFT.................... 1<br />
END OF FIGURE<br />
16-1
TM 9-2815-225-34&P<br />
11<br />
12<br />
thru<br />
32<br />
1<br />
2<br />
17 18<br />
3<br />
30<br />
31<br />
<strong>and</strong><br />
32<br />
10<br />
4<br />
9<br />
9<br />
8<br />
7<br />
5<br />
6<br />
22<br />
21 23<br />
20<br />
24<br />
16<br />
32<br />
19<br />
25<br />
✱ a<br />
28<br />
27<br />
26<br />
31<br />
12<br />
13 14 18<br />
29<br />
15<br />
✱ b<br />
✱ a PART OF ITEM 17<br />
✱ b PART OF ITEM 30<br />
Figure 17. Accessory Drive Pulley <strong>and</strong> Fan Clutch.
TM 9-2815-225-34&P<br />
(1)<br />
ITEM<br />
NO<br />
(2)<br />
SMR<br />
CODE<br />
(3)<br />
NSN<br />
(4)<br />
CAGEC<br />
(5)<br />
PART<br />
NUMBER<br />
(6)<br />
DESCRIPTION AND USABLE ON CODE(UOC)<br />
(7)<br />
QTY<br />
GROUP 0109 ACCESSORY DRIVING<br />
MECHANISIMS<br />
FIG. 17 ACCESSORY DRIVE PULLEY AND<br />
FAN CLUTCH<br />
1 PAOZZ 5305-01-145-8382 75078 012647 SCREW,CAP,HEXAGON H WITH CAPTIVE 1<br />
WASHER, SEE GROUP 0112..............<br />
2 PAOZZ 2930-01-097-6755 15434 217034 BRACE,FAN BRACKET................... 1<br />
3 PAOZZ 5310-01-144-6115 75078 001094 NUT,PLAIN,CONE SEAT................. 2<br />
4 PAOZZ 5365-01-147-5030 75078 001234 SPACER,SLEEVE SEE GROUP 0112....... 1<br />
5 PAOZZ 5305-01-091-2498 15434 166777 SCREW 1/2-13....................... 1<br />
6 PAOZZ 5310-00-470-6154 15434 S-285 NUT,PLAIN,HEXAGON 1/2-13........... 1<br />
7 PBOZZ 5342-01-098-0175 15434 208829 BRACKET,FAN SUPPORT................. 1<br />
8 PAOZZ 5305-01-145-0776 15434 3019574 SCREW,CAP,HEXAGON H WITH CAPTIVE 2<br />
WASHER..............................<br />
9 PAOZZ 5365-01-095-5666 75078 003251 SPACER,SLEEVE FAN BRACE, SEE GROUP 2<br />
0112................................<br />
10 PAHZZ 5310-01-145-8405 75078 001030 WASHER,FLAT......................... 1<br />
11 PAFFH 4310-01-092-9815 15434 3005133 DRIVE ACCESSORY,COM................. 1<br />
12 PAFZZ 5305-01-145-8383 15434 175833 .SCREW,CAP,HEXAGON H 3/8-16 X 1 1/8 6<br />
13 PAFZZ 5310-01-126-1045 15434 3012526 .NUT,SELF-LOCKING,HE................ 1<br />
14 PAFZZ 5310-01-124-6463 15434 193136 .WASHER,FLAT........................ 1<br />
15 PAFZZ 3020-01-146-3773 15434 3013336 .PULLEY,CONE ACCESSORY DRIVE....... 1<br />
16 PCFZZ 5330-01-129-6541 15434 3008947 .RUBBER STRIP....................... 1<br />
17 PAFZZ 3020-01-146-3163 15434 3023473 .PULLEY,FLAT ACCESSORY DRIVE....... 1<br />
18 PAFZZ 2930-00-401-9531 15434 190397 ..SLEEVE,PULLEY,PUMP................ 1<br />
19 PCFZZ 5330-00-026-2931 15434 3069101 .GASKET PART OF KIT P/N 3801235.... 1<br />
20 PAFZZ 3020-00-160-9092 15434 142689 .GEAR,HELICAL ACCESSORY DRIVE...... 1<br />
21 PAFZZ 3120-01-147-5275 15434 3026556 .BEARING,WASHER,THRU................ 1<br />
22 PAFZZ 4310-01-092-9816 15434 3000171 .SHAFT,AIR COMPRESSO ACCESSORY<br />
1<br />
DRIVE...............................<br />
23 PAFZZ 2815-01-124-0232 15434 70550 .PIN,PISTON......................... 2<br />
24 PAFZZ 5306-01-119-4271 15434 3000173 .BOLT,INTERNALLY REL SELF-LOCKING, 1<br />
3/8-16 X 1.00.......................<br />
25 PAFZZ 5310-00-486-2507 15434 170664 .WASHER,FLAT........................ 2<br />
26 PAFZZ 3010-01-085-2732 15434 3000174 .COUPLING HALF,SHAFT SPLINE<br />
1<br />
COUPLING............................<br />
27 PAFZZ 5310-00-081-9292 15434 116390 .WASHER,FLAT........................ 1<br />
28 PAFZZ 3120-01-144-7368 15434 3026557 .BEARING,WASHER,THRU................ 1<br />
29 PAFZZ 5305-01-119-8621 15434 3010590 .SCREW WITH CAPTIVE WASHER, 7/16-20 5<br />
X 1.125/1.063.......................<br />
30 PAFZZ 3040-01-129-4302 15434 AR-45724 .HOUSING,MECHANICAL ACCESSORY DRIVE 1<br />
31 PAFZZ 4730-00-018-9566 15434 S-911-B ..PLUG,PIPE......................... 2<br />
32 PAFZZ 3120-00-792-9834 15434 116391 ..BEARING,SLEEVE.................... 1<br />
END OF FIGURE<br />
17-1
TM 9-2815-225-34&P<br />
1<br />
2<br />
thru<br />
31<br />
2<br />
3<br />
thru<br />
23<br />
23<br />
13<br />
3<br />
35<br />
34<br />
22<br />
4<br />
5<br />
8<br />
33<br />
21<br />
20<br />
6<br />
7<br />
9<br />
18,19<br />
14<br />
17<br />
16<br />
10<br />
11<br />
12<br />
13<br />
✱ a<br />
15<br />
32<br />
24<br />
29,30,31<br />
28<br />
27 25<br />
26<br />
✱ a PART OF ITEM 1<br />
Figure 18. Engine Retarder.
TM 9-2815-225-34&P<br />
(1)<br />
ITEM<br />
NO<br />
(2)<br />
SMR<br />
CODE<br />
(3)<br />
NSN<br />
(4)<br />
CAGEC<br />
(5)<br />
PART<br />
NUMBER<br />
(6)<br />
DESCRIPTION AND USABLE ON CODE(UOC)<br />
(7)<br />
QTY<br />
GROUP 0112 ENGINE BRAKE<br />
FIG. 18 ENGINE RETARDER<br />
1 PAFHH 2815-01-085-2574 0B8S3 3804587 BRAKE ASSEMBLY,ENGI ENGINE BRAKE... 1<br />
2 PAFHH 2815-01-141-3261 75078 009917 .HOUSING,ENGINE RETA BRAKE......... 3<br />
3 PCHZZ 6150-01-114-7119 75078 002390 ..LEAD,ELECTRICAL................... 1<br />
4 PAHZZ 4810-01-225-6010 75078 013472 ..VALVE ASSEMBLY,NEED SOLENOID, BIG 1<br />
CAM III.............................<br />
5 PCHZZ 5331-01-086-1013 75078 20229 ..O-RING............................ 1<br />
6 PCHZZ 5331-01-085-3105 75078 001082 ..O-RING............................ 1<br />
7 PAHZZ 5330-01-086-6196 75078 001083 ..PACKING,PREFORMED................. 1<br />
8 PAHZZ 5310-01-157-3762 75078 001026 ..NUT,PLAIN,HEXAGON BIG CAM I...... 2<br />
8 PAHZZ 5310-01-146-7302 75078 009353 ..NUT,SELF-LOCKING,EX BIG CAM III.. 2<br />
9 PAHZZ 5305-01-186-7042 75078 001031 ..SETSCREW 0.375-<br />
2<br />
24X0.75IN.LG,RETARDER,ENGINE-JACOBS<br />
BR.,BIG CAM I.......................<br />
9 PAHZZ 5305-01-144-6206 75078 009916 ..SETSCREW BIG CAM III............. 2<br />
10 PAHZZ 5940-01-085-4426 75078 002299 ..TERMINAL,FEEDTHRU,I............... 1<br />
11 PAHZZ 5360-01-145-7607 75078 007447 ..SPRING,FLAT MASTER PISTON........ 2<br />
12 PAHZZ 5310-01-145-8405 75078 001030 ..WASHER,FLAT....................... 1<br />
13 PAHZZ 5305-01-145-8384 75078 001492 ..SCREW,CAP,HEXAGON H............... 2<br />
14 PAHZZ 2815-01-088-7328 75078 004089 ..PISTON,MASTER..................... 2<br />
15 PAHZZ 5325-01-087-8727 75078 001023 ..RING,RETAINING.................... 2<br />
16 PAHZZ 5340-01-085-4439 75078 008895 ..RETAINER,HELICAL CO SLAVE PISTON. 2<br />
17 PAHZZ 5360-01-084-9066 75078 001022 ..SPRING,HELICAL,COMP............... 2<br />
18 PAHZZ 2815-01-098-6755 75078 007623 ..PISTON,SLAVE...................... 2<br />
19 PAHZZ 2815-01-146-1997 75078 007696 ..PISTON,SLAVE SLAVE, FOR MILLED 2<br />
CYLINDER HEADS......................<br />
20 PAHZZ 4820-01-089-3939 75078 001521 ..CARTRIDGE,CHECK VAL BIG CAM I.... 2<br />
20 PAHZZ 4820-01-146-4593 75078 007505 ..VALVE,CHECK BIG CAM III.......... 2<br />
21 PAHZZ 5360-01-089-9103 75078 001519 ..SPRING CONTROL VALVE, OUTER...... 2<br />
22 PAHZZ 5360-01-145-7555 75078 007500 ..SPRING,HELICAL,COMP CONTROL<br />
2<br />
VALVE, INNER........................<br />
23 PAHZZ 2815-01-145-9402 75078 004136 ..PLATE,COVER,VALVE,D CONTROL VALVE 2<br />
24 PCFZZ 5330-01-086-3996 75078 13294 .GASKET BRAKE HOUSING.............. 3<br />
25 PCFZZ 5330-01-145-6083 75078 010180 .PACKING,PREFORMED.................. 3<br />
26 PAFZZ 2520-01-085-6128 75078 002969 .SCREW SHAFT LOCK................... 2<br />
27 PAFZZ 5307-01-109-5972 75078 1764 .STUD,SHOULDERED AND BIG CAM I..... 2<br />
27 PAFZZ 5306-01-107-6371 75078 3678 .BOLT,EXTERNALLY REL BIG CAM III... 1<br />
28 PAFZZ 5310-01-147-5072 75078 002514 .WASHER,BEAING...................... 1<br />
29 PFFZZ 5307-01-147-1316 75078 2856 .STUD,SHOULDERED.................... 2<br />
30 PAFZZ 5307-01-147-2821 75078 1232 .STUD,SHOULDERED.................... 4<br />
31 PAFZZ 5307-01-145-8449 75078 001199 .STUD,SHOULDERED.................... 8<br />
32 PAOZZ 15434 3045534 SEAL,RECTANGULAR.................... 1<br />
33 PAOZZ 5365-01-147-5030 75078 001234 SPACER,SLEEVE....................... 6<br />
34 PAOZZ 5310-01-144-6115 75078 001094 NUT,PLAIN,CONE SEAT................. 6<br />
35 PAFZZ 75078 002680 LOCKPLATE,ENGINE BR................. 6<br />
END OF FIGURE<br />
18-1
TM 9-2815-225-34&P<br />
13 14<br />
17 18<br />
OUTLET<br />
✱ b<br />
18<br />
16<br />
15<br />
1<br />
12<br />
14<br />
18<br />
12<br />
3<br />
✱ a<br />
INLET<br />
14 12<br />
11<br />
10<br />
3<br />
2<br />
4<br />
9<br />
7<br />
6<br />
8<br />
7<br />
5<br />
6<br />
2<br />
✱ a PART OF ITEM 13<br />
✱ b PART OF ITEM 17<br />
Figure 19. Air Compressor Lines <strong>and</strong> Fittings.
TM 9-2815-225-34&P<br />
(1)<br />
ITEM<br />
NO<br />
(2)<br />
SMR<br />
CODE<br />
(3)<br />
NSN<br />
(4)<br />
CAGEC<br />
(5)<br />
PART<br />
NUMBER<br />
(6)<br />
DESCRIPTION AND USABLE ON CODE(UOC)<br />
(7)<br />
QTY<br />
GROUP 0121 COMPRESSOR ASSEMBLY<br />
FIG. 19 AIR COMPRESSOR LINES AND<br />
FITTINGS<br />
1 PAOZZ 4730-01-079-3273 15434 300207400 ELBOW,PIPE TO HOSE AIR INTAKE...... 1<br />
2 PCOZZ 4720-00-918-9634 15434 61554 HOSE,PREFORMED...................... 2<br />
3 PAOZZ 4730-00-555-8263 53496 5561 1-2A CLAMP,HOSE.......................... 4<br />
4 PAOZZ 4710-01-146-3085 15434 217939 TUBE,BENT,METALLIC.................. 1<br />
5 PAOZZ 5305-00-226-4831 80204 B1821BH031C150N SCREW,CAP,HEXAGON H 5/16-18 X 1.50. 1<br />
6 PAOZZ 5310-00-407-9566 96906 MS35338-45 WASHER,LOCK......................... 2<br />
7 PAOZZ 5310-00-562-6558 15434 S-626 WASHER,FLAT......................... 2<br />
8 PAOZZ 5305-01-129-4214 15434 3022590 SCREW,CAPTIVE....................... 1<br />
9 PAOZZ 4730-01-085-4156 15434 196282 ELBOW,FLANGE TO HOS AIR COMPRESSOR 1<br />
INTAKE..............................<br />
10 PAOZZ 4730-00-018-9566 15434 S-911-B PLUG,PIPE........................... 1<br />
11 PAOZZ 5330-01-181-0630 15434 3201386 GASKET.............................. 1<br />
12 PAOZZ 4730-00-365-2690 15434 S-1002-A ADAPTER,STRAIGHT,TU................. 3<br />
13 PAOZZ 4710-01-095-8683 15434 21609300 TUBE ASSEMBLY,METAL OUTLET BIG CAM 1<br />
III.................................<br />
13 PAOZZ 4710-01-079-3492 15434 3038060 TUBE ASSEMBLY,METAL COMPRESSOR<br />
1<br />
COOLING BIG CAM I...................<br />
14 PAOZZ 5365-00-598-5255 15434 S-1003-A .BUSHING,NONMETALLIC................ 2<br />
15 PAOZZ 4730-00-138-3906 15434 187317 COUPLING,PIPE PLAIN STRAIGHT, 3/8 1<br />
NPT.................................<br />
16 PAOZZ 4730-00-374-4282 15434 S00100500A ELBOW,PIPE TO TUBE.................. 1<br />
17 PAOZZ 4710-01-146-3168 15434 3028642 TUBE ASSEMBLY,METAL COMPRESSOR<br />
1<br />
COOLING BIG CAM I...................<br />
17 PAOZZ 4710-01-079-3492 15434 3038060 TUBE ASSEMBLY,METAL OUTLET BIG CAM 1<br />
III.................................<br />
18 PAOZZ 5365-00-598-5255 15434 S-1003-A .BUSHING,NONMETALLIC................ 2<br />
END OF FIGURE<br />
19-1/BLANK
TM 9-2815-225-34&P<br />
8<br />
9<br />
thru<br />
53<br />
16<br />
17<br />
thru<br />
24<br />
23 24 25 26 29 30<br />
6<br />
1<br />
7<br />
5<br />
✱ a<br />
3<br />
4<br />
9<br />
53<br />
10<br />
2<br />
51<br />
52<br />
11 12<br />
1<br />
50<br />
48<br />
46<br />
49<br />
47<br />
13<br />
14<br />
44<br />
45<br />
43<br />
15<br />
38<br />
42<br />
41<br />
40<br />
39<br />
20<br />
17<br />
18<br />
19<br />
21<br />
22<br />
21<br />
24<br />
✱ b<br />
27<br />
28<br />
37<br />
✱ c<br />
36<br />
35<br />
30<br />
26<br />
✱ c<br />
31<br />
✱ a PART OF ITEM 8<br />
✱ b PART OF ITEM 23<br />
✱ c PART OF ITEM 25<br />
✱ d PART OF ITEM 29<br />
34<br />
33<br />
32<br />
Figure 20. Air Compressor <strong>and</strong> Governor Assembly (Sheet 1 of 2).
TM 9-2815-225-34&P<br />
57<br />
56<br />
55<br />
54<br />
58<br />
Figure 20. Air Compressor <strong>and</strong> Governor Assembly (Sheet 2 of 2).
TM 9-2815-225-34&P<br />
(1)<br />
ITEM<br />
NO<br />
(2)<br />
SMR<br />
CODE<br />
(3)<br />
NSN<br />
(4)<br />
CAGEC<br />
(5)<br />
PART<br />
NUMBER<br />
(6)<br />
DESCRIPTION AND USABLE ON CODE(UOC)<br />
(7)<br />
QTY<br />
GROUP 0121 COMPRESSOR ASSEMBLY<br />
FIG. 20 AIR COMPRESSOR AND GOVERNOR<br />
ASSEMBLY<br />
1 PAFZZ 5310-00-011-6122 12204 116122 WASHER,LOCK......................... 4<br />
2 PAFZZ 5305-01-147-4034 15434 S-122-C SCREW,CAP,HEXAGON H................. 2<br />
3 PAFZZ 5305-00-071-2056 80204 B1821BH044C175N SCREW,CAP,HEXAGON H................. 2<br />
4 PAFZZ 3010-01-079-3461 15434 199349 COUPLING,SHAFT,RIGI................. 1<br />
5 PAFZZ 5330-01-181-0631 15434 320-1850 GASKET.............................. 1<br />
6 PAFZZ 5310-01-112-4307 15434 69324 WASHER,FLAT......................... 2<br />
7 PAFZZ 5310-00-650-0187 15434 S-217 NUT,PLAIN,HEXAGON................... 2<br />
8 PAFFD 4310-01-141-0879 15434 3024365 COMPRESSOR,RECIPROC................. 1<br />
9 PAFZZ 5305-00-225-8507 80205 MS90725-43 .SCREW,CAP,HEXAGON H................ 4<br />
10 PAOZZ 5310-00-407-9566 96906 MS35338-45 .WASHER,LOCK........................ 2<br />
11 PAOZZ 5310-00-562-6558 15434 S-626 .WASHER,FLAT........................ 2<br />
12 PFFZZ 4310-01-146-5921 15434 153964 .COVER,AIR COMPRESSO................ 1<br />
13 PAFZZ 5330-00-131-7072 15434 3047159 .GASKET............................. 1<br />
14 PFFZZ 4310-01-146-1097 15434 218793 .CYLINDER HEAD,COMPR................ 1<br />
15 PAFZZ 5330-00-852-7347 15434 154018 .GASKET............................. 1<br />
16 AFFFF 15434 3018488 .PISTON,COMPRESSOR.................. 1<br />
17 KFFZZ 15434 650330 ..RING,PISTON PART OF KIT P/N AR- 1<br />
73350...............................<br />
18 KFFZZ 15434 1875350 ..RING, COMPRESSION, PART OF KIT 1<br />
P/N AR-73350........................<br />
19 KFFZZ 15434 180810 ..RING,PISTON PART OF KIT P/N AR- 1<br />
73350...............................<br />
20 PAFZZ 4310-01-271-5103 15434 3045670 ..PISTON,COMPRESSOR................. 1<br />
21 PAFZZ 5325-00-922-9101 15434 119859 ..RING,RETAINING.................... 2<br />
22 PAFZZ 4310-00-903-7174 15434 11981000 ..PIN,PISTON........................ 1<br />
23 PAFZZ 2815-00-369-7846 15434 3558655 ..CONNECTING ROD,PIST............... 1<br />
24 PAFZZ 3120-01-146-7196 15434 3018153 ...BUSHING,SLEEVE................... 1<br />
25 PAFZZ 4310-01-079-3319 15434 3558653 ..HOUSING,AIR COMPRES............... 1<br />
26 PAFZZ 3120-01-016-4883 15434 147610 ...BEARING,SLEEVE................... 1<br />
27 PFFZZ 9905-00-473-7260 15434 136403 ..PLATE,MARKING,BLANK............... 1<br />
28 PFFZZ 5305-00-804-6318 15434 S-2286 ..SCREW............................. 2<br />
29 PAFZZ 4310-01-079-3383 15434 AR1092200 ..CRANKSHAFT,COMPRESS............... 1<br />
30 PAFZZ 4730-00-964-7548 21450 444683 ...PLUG,PIPE........................ 1<br />
31 PAFZZ 5305-01-145-8359 15434 3019573 .SCREW,ASSEMBLED WAS................ 2<br />
32 PFFZZ 5330-00-129-9389 15434 176027 .GASKET............................. 1<br />
33 PAFZZ 5310-00-209-0965 96906 MS35338-47 .WASHER,LOCK........................ 4<br />
34 PAFZZ 5305-01-129-4384 15434 3015282 .SCREW,CAP,HEXAGON H................ 4<br />
35 PAFZZ 3010-01-085-2732 15434 3000174 .COUPLING HALF,SHAFT................ 1<br />
36 PAFZZ 3120-01-129-7659 15434 211662 .BEARING,WASHER,THRU................ 1<br />
37 PAFZZ 2530-01-130-2339 15434 3005152 .SUPPORT,AIR COMPRES................ 1<br />
38 PAFZZ 5365-00-369-4729 15434 183429 .SHIM............................... 1<br />
39 PAFZZ 5360-00-895-3216 15434 128080 .SPRING,HELICAL,COMP EXHAUST VALVE. 1<br />
40 PAFZZ 4820-00-445-0610 15434 127940 .DISK,VALVE......................... 1<br />
41 PCFZZ 5331-00-905-2679 15434 128085 .O-RING EXHAUST VALVE.............. 1<br />
42 PAFZZ 4820-00-909-4174 15434 144714 .SEAT,VALVE......................... 1<br />
43 PCFZZ 5330-01-060-9061 15434 211315 .PACKING,PREFORMED.................. 1<br />
44 PAFZZ 5360-00-129-9415 15434 190334 .SPRING,HELICAL,COMP INTAKE VALVE.. 1<br />
45 PAFZZ 3805-00-955-5320 15434 144948 .VALVE INTAKE COMPRE................ 1<br />
46 PAFZZ 4820-00-909-4175 15434 145028 .SEAT,VALVE......................... 1<br />
47 PAFZZ 5360-01-086-3480 15434 3023101 .SPRING,HELICAL,COMP UNLOADER VALVE 1<br />
48 PAFZZ 4310-01-084-7148 8X479 191037 .CAP,UNLOADER....................... 1<br />
49 PAFZZ 5331-00-941-3762 15434 127936 .O-RING............................. 1<br />
50 PCFZZ 5331-00-441-0145 15434 128086 .O-RING UNLOADER VALVE............. 1<br />
51 PAFZZ 4310-01-146-4155 15434 3046298 .BODY,UNLOADING VALV UNLOADER VALVE 1<br />
52 PAFZZ 5310-01-056-1371 1ML14 14978 .WASHER,FLAT........................ 2<br />
20-1
TM 9-2815-225-34&P<br />
(1)<br />
ITEM<br />
NO<br />
(2)<br />
SMR<br />
CODE<br />
(3)<br />
NSN<br />
(4)<br />
CAGEC<br />
(5)<br />
PART<br />
NUMBER<br />
(6)<br />
DESCRIPTION AND USABLE ON CODE(UOC)<br />
(7)<br />
QTY<br />
53 PAFZZ 5305-01-144-6233 15434 3021470 .SCREW,CAP,HEXAGON H WITH CAPTIVE 2<br />
WASHER, 5/16........................<br />
54 PAFZZ 5305-01-118-4285 24617 9418993 SCREW,CAP,HEXAGON H................. 2<br />
55 PAFZZ 5310-01-097-8039 24617 9417953 WASHER,LOCK......................... 2<br />
56 PAFFZ 2530-00-827-5934 06853 275707 GOVERNOR ASSEMBLY,A................. 1<br />
57 PCFZZ 5330-01-097-7791 06853 237303 GASKET.............................. 1<br />
58 PAFZZ 4730-00-277-8269 79470 400X3 ELBOW,PIPE TO TUBE.................. 1<br />
END OF FIGURE<br />
20-2/BLANK
TM 9-2815-225-34&P<br />
4<br />
5<br />
thru<br />
18<br />
5<br />
6<br />
7<br />
8<br />
3<br />
9<br />
2<br />
10<br />
1<br />
17<br />
18<br />
16<br />
11<br />
15<br />
12<br />
7<br />
13<br />
14<br />
Figure 21. Fuel Injector.
(1)<br />
ITEM<br />
NO<br />
(2)<br />
SMR<br />
CODE<br />
(3)<br />
NSN<br />
(4)<br />
CAGEC<br />
TM 9-2815-225-34&P<br />
(5)<br />
PART<br />
NUMBER<br />
(6)<br />
DESCRIPTION AND USABLE ON CODE(UOC)<br />
GROUP 03 FUEL<br />
GROUP 0301 CARBUREATOR, FUEL<br />
INJECTOR<br />
FIG. 21 FUEL INJECTOR<br />
1 PAFZZ 5340-00-238-5435 15434 191916 PLUNGER,DETENT...................... 6<br />
2 PAFZZ 3040-01-077-4976 15434 3003682 PLATE,RETAINING,SHA INJECTOR TO<br />
6<br />
CYLINDER HEAD,INJECTOR,FUEL,BIG CAM<br />
I...................................<br />
2 PAFZZ 5342-01-145-0646 15434 3028171 CLAMP BIG CAM III.................. 6<br />
3 PAFZZ 5305-01-086-7285 15434 202069 SCREW,CAP,SOCKET HE INJECTOR TO 12<br />
CYLINDER HEAD,INJECTOR,FUEL,BIG CAM<br />
I...................................<br />
3 PAFZZ 5305-01-145-0777 15434 3028279 SCREW,CAP,HEXAGON H INJECTOR<br />
12<br />
CLAMP,BIG CAM III...................<br />
4 PAFHH 2910-01-112-7712 15434 3054071 INJECTOR ASSEMBLY,F BIG CAM I...... 6<br />
4 PAFHH 2910-01-145-9403 15434 3047973 NOZZLE,FUEL INJECTI BIG CAM III.... 6<br />
5 PAHZZ 5305-01-079-7028 15434 212954 .SCREW.............................. 1<br />
6 PAHZZ 5310-01-079-6708 15434 3000465 .NUT,PLAIN,DODECAGON................ 1<br />
7 PAHZZ 5340-01-145-0647 15434 3047963 .PLUNGER,QUICK RELEA................ 1<br />
8 PAHZZ 5310-01-079-6529 15434 208525 .WASHER,SHOULDERED A BIG CAM I..... 1<br />
8 PAHZZ 5310-01-145-1114 15434 3015469 .WASHER BIG CAM III................ 1<br />
9 PAHZZ 5360-00-132-0245 15434 166009 .SPRING,HELICAL,COMP................ 1<br />
10 PAHZZ 2910-01-076-8632 15434 3000464 .ADAPTER,INJECTOR................... 1<br />
11 PCHZZ 5330-00-132-0276 15434 193736 .GASKET PART OF KIT P/N 4024958<br />
3<br />
PART OF KIT P/N 3804280.............<br />
12 PAHZZ 4820-01-070-9710 15434 167157 .BALL CHECK,FUEL INJ................ 1<br />
13 PAHZZ 2910-01-086-3974 15434 3012538 .CUP,INJECTOR INJECTOR,FUEL,BIG CAM 1<br />
I...................................<br />
13 PAHZZ 2910-01-146-1998 15434 3023556 .CUP,INJECTOR,FUEL BIG CAM III..... 1<br />
14 PAHZZ 5342-01-079-4678 15434 185138 .RETAINER,CUP....................... 1<br />
15 PAHZZ 5315-01-079-6506 15434 203426 .PIN,SPRING......................... 2<br />
16 PAHZZ 5325-00-815-1137 15434 174299 .RING,RETAINING..................... 1<br />
17 PAHZZ 4730-01-077-2016 15434 3008706 .STRAINER ELEMENT,SE................ 1<br />
18 PCHZZ 5330-00-132-0247 15434 173086 .GASKET............................. 1<br />
END OF FIGURE<br />
(7)<br />
QTY<br />
21-1
TM 9-2815-225-34&P<br />
1<br />
2 3 4 5<br />
13<br />
6 10<br />
9<br />
8 12<br />
13<br />
11<br />
22 7<br />
21<br />
2<br />
3<br />
8<br />
18<br />
17<br />
16<br />
15<br />
8<br />
7<br />
2<br />
3<br />
14<br />
BIG CAM I<br />
10<br />
20<br />
31<br />
23<br />
1<br />
25<br />
23<br />
23<br />
19<br />
24<br />
28<br />
27<br />
10<br />
23<br />
31<br />
30<br />
29<br />
25<br />
26<br />
Figure 22. Fuel Lines <strong>and</strong> Fittings.
TM 9-2815-225-34&P<br />
(1)<br />
ITEM<br />
NO<br />
(2)<br />
SMR<br />
CODE<br />
(3)<br />
NSN<br />
(4)<br />
CAGEC<br />
(5)<br />
PART<br />
NUMBER<br />
(6)<br />
DESCRIPTION AND USABLE ON CODE(UOC)<br />
(7)<br />
QTY<br />
GROUP 0302 FUEL PUMP<br />
FIG. 22 FUEL LINES AND FITTINGS<br />
1 PAOZZ 5310-00-521-8595 15434 S-223 NUT,HEXAGON......................... 2<br />
2 PAFZZ 5310-00-159-6209 96906 MS122032 WASHER,LOCK DAMPER TO GEAR<br />
2<br />
MOTOR,DAMPER,FUEL FILTER BIG CAM I..<br />
2 PAOZZ 5310-00-261-7340 15434 S-604 WASHER,LOCK BIG CAM III............ 3<br />
3 PAOZZ 5310-00-562-6560 15434 S631 WASHER,FLAT BIG CAM I.............. 4<br />
3 PAOZZ 5310-00-486-2505 15434 108330 WASHER,FLAT BIG CAM III............ 3<br />
4 PFOZZ 5342-00-858-3507 15434 147135 BRACKET,TUBE SUPPOR................. 1<br />
5 PAOZZ 5305-01-029-1193 15434 S-117 SCREW 3/8-16 X 3/4................. 1<br />
6 PAOZZ 5340-01-079-8097 15434 180371 CLAMP,LOOP.......................... 2<br />
7 PAOZZ 5306-01-204-3297 15434 137796 BOLT,MACHINE BIG CAM I............. 1<br />
7 PAOZZ 5305-00-795-9345 15434 S190C SCREW,CAP 3/8-24 X 5/8 BIG CAM III. 2<br />
8 PAOZZ 5340-00-719-4601 15434 180372 CLAMP,LOOP.......................... 3<br />
9 PBOZZ 4710-01-085-9348 15434 3015373 TUBE ASSEMBLY,METAL BIG CAM I...... 1<br />
9 PAOZZ 4710-01-146-3779 15434 3022821 TUBE ASSEMBLY,METAL BIG CAM III.... 1<br />
10 MOOZZ 19207 5414243-20 HOSE,NONMETALLIC BIG CAM I , MAKE 2<br />
FROM P/N 28430......................<br />
10 PAOZZ 4710-01-146-1115 15434 3038037 TUBE ASSEMBLY,METAL BIG CAM III.... 1<br />
11 PBOZZ 4710-01-079-3493 15434 216128 TUBE ASSEMBLY,METAL BIG CAM I...... 1<br />
11 PAOZZ 4710-01-146-1114 15434 202185 TUBE ASSEMBLY,METAL BIG CAM III.... 1<br />
12 PAOZZ 4730-01-131-4884 15434 S00109700 ADAPTER,STRAIGHT,PI WITH ADAPTER 1<br />
AND PLUG............................<br />
13 PAOZZ 4730-00-444-1710 15434 181213 ELBOW,PIPE TO TUBE.................. 2<br />
14 PAOZZ 4710-01-146-1116 15434 3013161 TUBE ASSEMBLY,METAL BIG CAM III.... 1<br />
15 PAOZZ 4730-01-146-3633 15434 301439800 TEE,TUBE............................ 1<br />
16 PBOZZ 4710-01-085-6134 15434 3015393 TUBE ASSEMBLY,METAL BIG CAM I...... 1<br />
16 PAOZZ 4710-01-146-1113 15434 3015389 TUBE ASSEMBLY,METAL BIG CAM III.... 1<br />
17 PAOZZ 4730-01-109-8501 15434 301439700 TEE,TUBE............................ 1<br />
18 PAOZZ 4710-01-085-9349 15434 3015375 TUBE ASSEMBLY,METAL BIG CAM I...... 1<br />
18 PAOZZ 4710-01-146-3169 15434 3015387 TUBE ASSEMBLY,METAL BIG CAM III.... 1<br />
19 PAOZZ 4730-01-106-4700 15434 129866 ADAPTER,STRAIGHT,TU................. 1<br />
20 PAOZZ 4730-01-142-8524 15434 68139 ELBOW,PIPE TO TUBE.................. 1<br />
21 PAOZZ 2910-01-146-0093 15434 3020760 VALVE............................... 1<br />
22 PAOZZ 4730-01-146-3040 15434 3018889 ADAPTER,STRAIGHT,PI................. 1<br />
23 PAOZZ 4730-00-278-9200 88044 AN737TW22 CLAMP,HOSE PART OF KIT<br />
4<br />
P/N 302112400.......................<br />
24 KFOZZ 15434 3020754 BODY,CHECK VALVE PART OF KIT<br />
1<br />
P/N 302112400.......................<br />
25 PAOZZ 5310-00-637-9541 96906 MS35338-46 WASHER,LOCK PART OF KIT<br />
1<br />
P/N 302112400.......................<br />
26 KFOZZ 15434 S689 WASHER,PLAIN BIG CAM I PART OF KIT 1<br />
P/N 302112400.......................<br />
27 KFOZZ 15434 S-109 SCREW,CAP,HEXAGON BIG CAM I PART 1<br />
OF KIT P/N 302112400................<br />
28 KFOZZ 15434 170970 CLAMP BIG CAM I PART OF KIT<br />
1<br />
P/N 302112400.......................<br />
29 KFOZZ 15434 S-151C SCREW,CAP,HEXAGON BIG CAM I PART 1<br />
OF KIT P/N 302112400................<br />
30 KFOZZ 15434 3020753 TANK,AIR BIG CAM I PART OF KIT<br />
1<br />
P/N 302112400.......................<br />
31 PAOZZ 4730-00-900-3296 72983 248X4 ADAPTER,STRAIGHT,PI PART OF KIT<br />
P/N 302112400.......................<br />
2<br />
END OF FIGURE<br />
22-1
TM 9-2815-225-34&P<br />
5<br />
10<br />
3<br />
8<br />
1<br />
2<br />
5<br />
4<br />
9<br />
6<br />
5<br />
7<br />
Figure 23. Fuel Pump.
TM 9-2815-225-34&P<br />
(1)<br />
ITEM<br />
NO<br />
(2)<br />
SMR<br />
CODE<br />
(3)<br />
NSN<br />
(4)<br />
CAGEC<br />
(5)<br />
PART<br />
NUMBER<br />
(6)<br />
DESCRIPTION AND USABLE ON CODE(UOC)<br />
(7)<br />
QTY<br />
GROUP 0302 FUEL PUMP<br />
FIG. 23 FUEL PUMP<br />
1 PAFZZ 5305-01-147-4034 15434 S-122-C SCREW,CAP,HEXAGON H 9/16-18 X 7/8.. 1<br />
2 PAFZZ 5310-00-011-6122 12204 116122 WASHER,LOCK......................... 1<br />
3 PFHZZ 5342-01-085-4153 15434 3001296 BRACKET,AIR COMPRES................. 1<br />
4 PAFZZ 5305-01-147-8732 15434 3012481 SCREW,CAP,HEXAGON H 7/16-14 X 1<br />
1<br />
1/2,BIG CAM III.....................<br />
5 PAFZZ 5310-01-112-4307 15434 69324 WASHER,FLAT......................... 4<br />
6 PAFHH 2910-01-141-9372 15434 3060202-3894 PUMP,FUEL,METERING "BUSHED GEAR." 1<br />
CAN BE USED W/ALL DIESEL FUELS. BIG<br />
CAM III.............................<br />
6 PAFHH 2910-01-065-3979 15434 FC3619RX PUMP,FUEL,ENGINE "NON-BUSHED GEAR" 1<br />
BIG CAM I...........................<br />
7 PAFZZ 5305-01-145-0777 15434 3028279 SCREW,CAP,HEXAGON H BIG CAM III.... 1<br />
7 PAFZZ 5305-01-129-4384 15434 3015282 SCREW,CAP,HEXAGON H BIG CAM I...... 2<br />
8 PAHZZ 5330-01-160-7460 15434 3035053 GASKET.............................. 1<br />
9 PAFZZ 3010-00-447-9799 15434 162426 INSERT,FLEXIBLE COU FUEL PUMP TO 1<br />
AIR COMPRESSOR......................<br />
10 PAHZZ 5305-01-113-1179 15434 206326 SCREW,CAP,HEXAGON H 7/16-14 X 1 1/4 1<br />
END OF FIGURE<br />
23-1
TM 9-2815-225-34&P<br />
35<br />
36<br />
thru<br />
42<br />
49<br />
50<br />
thru<br />
55<br />
62<br />
63<br />
thru<br />
68<br />
11<br />
2<br />
3<br />
1<br />
3<br />
4<br />
5<br />
6<br />
7<br />
8<br />
9<br />
10<br />
12<br />
13<br />
43<br />
14<br />
15<br />
30<br />
32<br />
31<br />
16<br />
17<br />
18<br />
19<br />
20<br />
21<br />
22<br />
29<br />
28<br />
27<br />
33<br />
34<br />
✱ a<br />
43<br />
44<br />
45<br />
26<br />
25<br />
3<br />
23<br />
42<br />
38<br />
36<br />
46<br />
47<br />
14 48<br />
50<br />
24<br />
41<br />
70<br />
40<br />
68 69<br />
67<br />
65 66<br />
64<br />
63<br />
39<br />
38<br />
43<br />
58<br />
37<br />
27<br />
55<br />
54<br />
53<br />
57<br />
51<br />
52<br />
61<br />
59<br />
60<br />
56<br />
29<br />
✱ a PART OF ITEM 35<br />
Figure 24. Fuel Pump Main Housing.
TM 9-2815-225-34&P<br />
(1)<br />
ITEM<br />
NO<br />
(2)<br />
SMR<br />
CODE<br />
(3)<br />
NSN<br />
(4)<br />
CAGEC<br />
(5)<br />
PART<br />
NUMBER<br />
(6)<br />
DESCRIPTION AND USABLE ON CODE(UOC)<br />
GROUP 0302 FUEL PUMP<br />
(7)<br />
QTY<br />
FIG. 24 FUEL PUMP MAIN HOUSING<br />
1 PAHZZ 5305-01-129-4385 15434 70772-B SCREW,CAP,HEXAGON H FILSTER HEAD, 2<br />
1/4-20 X 1.00.......................<br />
2 PAHZZ 5305-01-129-4218 15434 3012558 SCREW DRILLED FILSTER HEAD, 1/4-20 1<br />
X 1.00..............................<br />
3 PAHZZ 5310-00-562-6560 15434 S-631 WASHER,FLAT......................... 3<br />
4 PAHZZ 4820-01-079-3241 15434 301552200 CARTRIDGE,VALVE,CHE................. 1<br />
5 PAHZZ 2910-01-141-4967 15434 301552000 COVER,FUEL CONTROL.................. 1<br />
6 PAHZZ 5310-00-451-6643 15434 S-213-A NUT,FLYWHEEL........................ 1<br />
7 PAHZZ 2910-01-141-4029 15434 302317100 HOUSING,SPRING PUMP................. 1<br />
8 PAHZZ 5330-01-142-2784 15434 3023870 GASKET BIG CAM III PART OF KIT<br />
1<br />
P/N 3010242.........................<br />
9 PAHZZ 5310-01-145-0761 15434 214150 WASHER,FLAT......................... 1<br />
10 PAHZZ 4820-01-079-3320 15434 3013811 DIAPHRAGM,VALVE..................... 1<br />
11 PAHZZ 5330-01-072-8830 15434 3003156 SEAL,SPECIAL PART OF KIT<br />
1<br />
P/N 3010242.........................<br />
12 PAHZZ 2910-01-142-7455 15434 301381000 PISTON,AIR FLOW..................... 1<br />
13 PAHZZ 5310-01-142-2812 15434 3023088 WASHER,FLAT......................... 1<br />
14 PCHZZ 5331-00-970-3461 15434 68061-A O-RING PART OF KIT P/N 3010242..... 2<br />
15 PAHZZ 2910-01-126-9053 15434 3021676 PLUNGER,AIR FLOW.................... 1<br />
16 PAHZZ 5360-01-086-6113 15434 179834 SPRING,HELICAL,COMP BIG CAM I...... 1<br />
16 PAHZZ 5360-01-147-0054 15434 179822 SPRING,HELICAL,COMP BIG CAM III.... 1<br />
17 PAHZZ 5365-01-079-8373 15434 3001707 SHIM................................ 1<br />
18 PAHZZ 5325-00-558-9412 96906 MS16629-1100 RING,RETAINING...................... 1<br />
19 PAHZZ 15434 145505 PACKING,PREFORMED PART OF KIT<br />
1<br />
P/N 3010242.........................<br />
20 PCHZZ 5330-01-051-4243 15434 145504 PACKING,PREFORMED PART OF KIT<br />
1<br />
P/N 3010242.........................<br />
21 PCHZZ 5330-00-403-9896 15434 193734 PACKING,PREFORMED BIG CAM I........ 1<br />
21 PAHZZ 5330-00-599-2962 94135 12Z9026-5 PACKING,PREFORMED BIG CAM III...... 1<br />
22 PAHZZ 3040-01-086-1651 15434 214146 CYLINDER,ACTUATING,................. 1<br />
22 PAHZZ 2910-01-142-4953 15434 3021068 BARREL,AIR FLOW..................... 1<br />
23 PAHZZ 5360-01-134-5602 15434 3018655 SPRING,HELICAL,COMP................. 1<br />
24 PAHZZ 5325-00-256-2846 96906 MS16632-1050 RING,RETAINING...................... 1<br />
25 XDFZZ 15434 S105X SCREW,CAP........................... 6<br />
26 PAFZZ 5310-00-484-1718 15434 181466 WASHER,LOCK......................... 8<br />
27 PAFZZ 4730-01-124-3762 15434 3025460 PLUG,PIPE........................... 5<br />
28 PFHZZ 9905-00-733-7622 15434 105375 PLATE,IDENTIFICATIO................. 1<br />
29 PFFZZ 5305-00-804-6318 15434 S-2286 SCREW............................... 4<br />
30 PAFZZ 4730-00-042-8988 7X677 117244 PLUG,PIPE BIG CAM I................ 1<br />
30 PAHZZ 4730-00-555-8292 10001 12Z329PC92 PLUG,PIPE BIG CAM III.............. 1<br />
31 PAOZZ 5365-00-507-3271 15434 157088 PLUG,MACHINE THREAD................. 1<br />
32 PCHZZ 5330-00-961-9470 15434 154088 GASKET PART OF KIT P/N 3010242..... 1<br />
33 PAOZZ 5360-00-597-4570 15434 70700 SPRING,HELICAL,COMP BIG CAM III.... 1<br />
34 PAOZZ 2910-00-790-8736 15434 14648300 FILTER ELEMENT,FLUI................. 1<br />
35 XDHZZ 2910-01-086-3983 15434 AR41022 HOUSING,FUEL PUMP BIG CAM I........ 1<br />
35 PAHZZ 2910-01-146-1084 15434 3010042 BARREL,GOVERNOR BIG CAM III........ 1<br />
36 PAHZZ 3120-01-080-3275 15434 209760 .BUSHING,SLEEVE..................... 1<br />
37 PAHZZ 5342-00-400-5178 15434 163733 .CLIP,GOVERNOR BARRE................ 1<br />
38 PAHZZ 5315-00-844-0140 15434 118227 .PIN,HOLLOW......................... 4<br />
39 PAHZZ 2910-01-098-5118 15434 217798 .HOUSING,SPRING PACK................ 1<br />
40 PAHZZ 2910-01-147-9913 15434 3001847 .BARREL ASSEMBLY,GOV................ 1<br />
41 PAHZZ 3120-00-810-6032 15434 100193 .BEARING,SLEEVE TACHOMETER DRIVE... 1<br />
42 PAHZZ 2910-01-141-4028 15434 21413900 .BALL,PLUG BRASS.................... 2<br />
43 PAHZZ 5310-00-971-7989 96906 MS35691-5 NUT,PLAIN,HEXAGON................... 3<br />
44 PAHZZ 5340-00-716-4975 15434 110058 POST,ELECTRICAL-MEC................. 1<br />
24-1
TM 9-2815-225-34&P<br />
(1)<br />
ITEM<br />
NO<br />
(2)<br />
SMR<br />
CODE<br />
(3)<br />
NSN<br />
(4)<br />
CAGEC<br />
(5)<br />
PART<br />
NUMBER<br />
(6)<br />
DESCRIPTION AND USABLE ON CODE(UOC)<br />
(7)<br />
QTY<br />
45 PAHZZ 5305-01-109-9307 15434 195755 SCREW............................... 1<br />
46 PAHZZ 5325-00-256-2846 96906 MS16632-1050 RING,RETAINING...................... 1<br />
47 PAHZZ 2910-01-091-7507 15434 214144 VALVE,NEEDLE CARBUR................. 1<br />
48 PFHZZ 5310-00-005-6052 15434 S248 NUT,PLAIN,HEXAGON................... 1<br />
49 PAHZZ 2910-01-080-3149 15434 AR41010 SHAFT ASSEMBLY,THRO................. 1<br />
50 PFHZZ 5305-01-135-5446 15434 3006344 .SETSCREW 1/4-28UNF-3A............. 1<br />
51 PFHZZ 3040-01-086-1449 15434 3006343 .END,CONTROL R...................... 1<br />
52 PCHZZ 5331-01-072-8983 15434 213768 .O-RING PART OF KIT P/N 3010242.... 1<br />
53 PFHZZ 5305-01-072-8826 15434 3076040 .SCREW FUEL ADJUSTING.............. 1<br />
54 PAHZZ 3040-01-241-4696 15434 3046680 .SHAFT,SHOULDERED................... 1<br />
55 PAHZZ 5331-00-081-9289 15434 100478 .O-RING............................. 1<br />
56 PAHZZ 4320-01-098-5115 15434 3000446 COVER............................... 1<br />
57 PAHZZ 3110-01-079-8190 15434 213769 BALL,BEARING........................ 1<br />
58 PAHZ 4730-01-078-6364 15434 20063500 PLUG,PIPE BIG CAM I................ 2<br />
59 PAHZZ 5315-00-082-0448 15434 144178 PIN,SHOULDER,HEADLE BIG CAM III.... 1<br />
60 PAHZZ 5310-00-086 7859 15434 144179 WASHER,FLAT BIG CAM III............ 3<br />
61 PAHZZ 5360-01-095-3661 15434 143848 SPRING,HELICAL,COMP BIG CAM III.... 1<br />
62 PFHZZ 2910-01-070-9712 15434 3039070 PLUNGER ASSEMBLY,GO BIG CAM I...... 1<br />
62 PAHZZ 5342-01-145-1549 15434 3010810 PLUNGER BIG CAM III................ 1<br />
63 PAHZZ 2990-00-772-1778 15434 70690 .DRIVER,PLUNGER,GOVE................ 1<br />
64 PAHZZ 3120-01-160-7482 15434 3027633 .BEARING,SLEEVE BIG CAM I......... 1<br />
65 PAHZZ 5365-00-829-5604 15434 144302 .SPACER,FUEL PUMP BIG CAM III...... 1<br />
66 PAHZZ 5315-00-907-0711 72962 590220940406 .PIN,SPRING BIG CAM I.............. 1<br />
67 PAHZZ 2910-01-080-5570 15434 20335000 .PLUNGER,GOVERNOR BIG CAM I........ 1<br />
67 PAHZZ 2910-01-136-3331 15434 300938000 .PLUNGER,GOVERNOR BIG CAM III...... 1<br />
68 PAHZZ 5365-00-507-3224 15434 101841 .SHIM BIG CAM I.................... V<br />
68 PAHZZ 5365-00-507-3225 15434 101842 .SHIM BIG CAM I.................... V<br />
68 PAHZZ 5365-00-543-3744 15434 101843 .SPACER,RING BIG CAM I............. V<br />
68 XDHZZ 15434 3026733 .SHIM BIG CAM III.................. V<br />
69 PAHZZ 5360-01-086-6114 15434 138769 SPRING,HELICAL,COMP BIG CAM I...... 1<br />
69 PAHZZ 5360-01-138-6638 15434 138781 SPRING,HELICAL,COMP BIG CAM III.... 1<br />
70 PAHZZ 5305-00-063-5043 88044 AN565F428H24 SETSCREW............................ 1<br />
END OF FIGURE<br />
24-2/BLANK
TM 9-2815-225-34&P<br />
1<br />
2<br />
thru<br />
19<br />
3<br />
4<br />
thru<br />
9<br />
15<br />
20<br />
21<br />
6<br />
14<br />
13<br />
16<br />
8<br />
7<br />
12<br />
11<br />
5<br />
10<br />
11<br />
2<br />
4<br />
17<br />
9<br />
18<br />
19<br />
Figure 25. Fuel Gear Pump.
TM 9-2815-225-34&P<br />
(1)<br />
ITEM<br />
NO<br />
(2)<br />
SMR<br />
CODE<br />
(3)<br />
NSN<br />
(4)<br />
CAGEC<br />
(5)<br />
PART<br />
NUMBER<br />
(6)<br />
DESCRIPTION AND USABLE ON CODE(UOC)<br />
(7)<br />
QTY<br />
GROUP 0302 FUEL PUMP<br />
FIG. 25 FUEL GEAR PUMP<br />
1 PAFHD 2815-01-291-5753 15434 3034243 PUMP,FUEL GEAR "BUSHED." CAN BE<br />
1<br />
USED W/ALL DIESEL FUELS.............<br />
2 PCHZZ 5330-00-567-3463 15434 110855 .GASKET PART OF KIT P/N 3010242.... 1<br />
3 PAHZZ 2910-01-096-9200 15434 BM97497 .HOUSING ASSEMBLY,FU................ 1<br />
4 PAHZZ 5315-00-014-1244 24617 141244 ..PIN,STRAIGHT,HEADLE............... 2<br />
5 XAHZZ 15434 175867 ..COVER............................. 1<br />
6 XAHZZ 15434 175860 ..HOUSING........................... 1<br />
7 PAHZZ 5306-00-485-0790 15434 70790 ..BOLT,MACHINE...................... 2<br />
8 PAFZZ 5310-00-484-1718 15434 181466 ..WASHER,LOCK....................... 4<br />
9 XDHZZ 4730-00-278-2973 88900 11920-001-00 ..PLUG,PIPE......................... 1<br />
10 PAHZZ 4820-01-242-2579 15434 3050624 .VALVE,REGULATING,FL................ 1<br />
11 PAHZZ 3020-00-702-3882 15434 11936300 .GEAR,SPUR.......................... 2<br />
12 PAHZZ 3040-00-933-3012 15434 17586400 .IDLER,SHAFT........................ 1<br />
13 PCHZZ 5330-01-136-8569 15434 3069017 .GASKET PART OF KIT P/N 3010242.... 1<br />
14 XDHZZ 15434 3045049 .PLUG............................... 1<br />
15 PAHZZ 4820-01-164-7002 15434 3033740 .VALVE,CHECK........................ 1<br />
16 PAHZZ 5310-00-141-1795 88044 AN960-416 .WASHER,FLAT........................ 1<br />
17 PAHZZ 3120-01-215-9157 15434 3033724 .BEARING,SLEEVE..................... 4<br />
18 PAHZZ 3040-00-567-4354 15434 10021500 .SHAFT,SHOULDERED................... 1<br />
19 PAHZZ 3120-01-185-8586 15434 3033719 .BUSHING,SLEEVE..................... 1<br />
20 PAHZZ 5310-00-141-1795 88044 AN960-416 WASHER,FLAT......................... 4<br />
21 PAFZZ 5305-00-721-3698 15434 100129 SCREW,CAP,SOCKET HE................. 4<br />
END OF FIGURE<br />
25-1
TM 9-2815-225-34&P<br />
20 21 22<br />
23<br />
<strong>and</strong><br />
24<br />
23<br />
2<br />
3<br />
4<br />
24<br />
1<br />
5<br />
7<br />
8<br />
13<br />
6<br />
5<br />
9<br />
10<br />
11<br />
12<br />
✱ b<br />
21<br />
14<br />
25<br />
✱ a<br />
15<br />
21<br />
25<br />
18<br />
16<br />
17<br />
19<br />
✱ a PART OF ITEM 20<br />
✱ b PART OF ITEM 22<br />
Figure 26. Turbocharger <strong>and</strong> Component Parts.
TM 9-2815-225-34&P<br />
(1)<br />
ITEM<br />
NO<br />
(2)<br />
SMR<br />
CODE<br />
(3)<br />
NSN<br />
(4)<br />
CAGEC<br />
(5)<br />
PART<br />
NUMBER<br />
(6)<br />
DESCRIPTION AND USABLE ON CODE(UOC)<br />
(7)<br />
QTY<br />
GROUP 0305 SUPERCHARGER, BLOWER,<br />
TURBOCHARGER, OR ALTITUDE<br />
COMPENSATOR<br />
FIG. 26 TURBOCHARGER AND COMPONENT<br />
PARTS<br />
1 PAOZZ 5330-01-072-8998 15434 216487 GASKET CROSSOVER MOUNTING, PART OF 1<br />
KIT P/N 4024958 PART OF KIT P/N<br />
3804280.............................<br />
2 PAOZZ 5310-00-684-3463 96906 MS51092-1 WASHER,FLAT......................... 4<br />
3 PAOZZ 5305-00-068-0511 80204 B1821BH038C125N SCREW,CAP,HEXAGON H 3/8-16 X 1 1/4. 4<br />
4 PAOZZ 2990-01-236-2774 15434 3043984 CONNECTOR,EXHAUST P BIG CAM I...... 1<br />
4 XDHZZ 2990-01-146-1102 15434 3018686 CONNECTOR,EXHAUST BIG CAM III..... 1<br />
5 PAOZZ 4730-00-477-4160 63208 208326JB1 CLAMP,HOSE.......................... 2<br />
6 PCOZZ 4720-01-070-8149 55683 851-202994 HOSE,PREFORMED...................... 1<br />
7 PAFZZ 5307-00-922-2626 15434 3010915 STUD,PLAIN TURBOCHARGER MOUNTING... 4<br />
8 PAFZZ 5330-00-194-8385 15434 3069177 GASKET PART OF KIT P/N 4024958 PART 1<br />
OF KIT P/N 3804280..................<br />
9 PAFZZ 4730-01-127-6104 15434 3014354 ADAPTER,STRAIGHT,PI................. 1<br />
10 PCHZZ 4720-01-085-6293 15434 215195 HOSE ASSEMBLY,NONME BIG CAM I...... 1<br />
10 PAFZZ 4720-01-146-1071 15434 209955 HOSE ASSEMBLY,NONME BIG CAM III.... 1<br />
11 PAHZZ 5340-00-400-3449 15434 108722 CLAMP,LOOP BIG CAM I............... 1<br />
12 PAHZZ 5305-00-230-1939 15434 S118A SCREW BIG CAM I.................... 1<br />
12 PAFZZ 5305-00-068-0502 96906 MS90725-6 SCREW,CAP,HEXAGON H WITH CAPTIVE 1<br />
WASHER, 1/4-20 X 3/4,BIG CAM III....<br />
13 PAFZZ 5310-01-287-9737 15434 3056158 NUT,SLEEVE TURBOCHARGER MOUNTING, 4<br />
3/8-24, BIG CAM III.................<br />
14 PAFZZ 4730-01-146-3631 15434 302561100 ELBOW,TUBE OIL SUPPLY HOSE, BIG CAM 2<br />
III.................................<br />
15 PAFZZ 4730-01-146-7047 15434 3000560 ELBOW,PIPE TO TUBE BIG CAM III..... 1<br />
16 PAFZZ 4710-01-146-3167 15434 3035600 TUBE ASSEMBLY,METAL TURBOCHARGER 1<br />
DRAIN TUBE, BIG CAM III.............<br />
17 PAFZZ 4730-00-555-8263 53496 5561 1-2A CLAMP,HOSE BIG CAM III............. 2<br />
18 PCFZZ 4720-01-006-8626 15434 AC1600300NF HOSE,NONMETALLIC.................... 1<br />
19 PAFZZ 4730-01-079-3274 15434 300353600 ELBOW,PIPE TO HOSE TURBOCHARGER<br />
1<br />
DRAIN...............................<br />
20 PAFZZ 4710-01-158-7507 15434 3035595 TUBE ASSEMBLY,METAL BIG CAM III.... 1<br />
21 PCFZZ 5365-00-598-5255 15434 S-1003-A .BUSHING,NONMETALLIC................ 2<br />
22 PFFHH 2990-01-172-3005 15434 3801942 TURBOCHARGER,ENGINE BIG CAM I ONLY 1<br />
MODEL #NTC400.......................<br />
22 PAFHH 2990-01-155-7284 15434 3801904 TURBOCHARGER BIG CAM I ONLY MODEL 1<br />
T-50................................<br />
22 PAFHH 2950-01-141-0844 15434 3803279 TURBOSUPERCHARGER,E ASSEMBLY, T46- 1<br />
B, BIG CAM III......................<br />
23 PAHZZ 5305-00-804-6318 15434 S2286 .SCREW.............................. 4<br />
24 PAHZZ 2815-00-406-6737 15434 303689200 .PLATE.............................. 1<br />
25 PAFZZ 4730-00-365-2690 15434 S-1002-A ADAPTER,STRAIGHT,TU BY-PASS FILTER<br />
TUBE................................<br />
2<br />
END OF FIGURE<br />
26-1
TM 9-2815-225-34&P<br />
1<br />
2 3<br />
4<br />
5<br />
6<br />
7<br />
8<br />
6<br />
9<br />
19<br />
18<br />
17<br />
16<br />
15<br />
14<br />
13<br />
12<br />
11<br />
10<br />
Figure 27. Turbocharger Assembly.
TM 9-2815-225-34&P<br />
(1)<br />
ITEM<br />
NO<br />
(2)<br />
SMR<br />
CODE<br />
(3)<br />
NSN<br />
(4)<br />
CAGEC<br />
(5)<br />
PART<br />
NUMBER<br />
(6)<br />
DESCRIPTION AND USABLE ON CODE(UOC)<br />
(7)<br />
QTY<br />
GROUP 0305 SUPERCHARGER, BLOWER,<br />
TURBOCHARGER, OR ALTITUDE COMPENSATOR<br />
FIG. 27 TURBOCHARGER ASSEMBLY<br />
1 PAHZZ 5330-01-085-3580 15434 216802 SEAL,OIL,SLEEVE ..................... 1<br />
2 PAHZZ 5330-00-237-6266 15434 156444 SEAL,TURBO PART OF KIT P/N 3801096 . 1<br />
3 PAHZZ 4140-01-085-2607 15434 3002731 IMPELLER,FAN,CENTRI BIG CAM I ...... 1<br />
3 PAHZZ 4140-01-146-1035 15434 3031980 IMPELLER,FAN,CENTRI TURBOCHARGER,BIG 1<br />
CAM III .............................<br />
4 XBHZZ 15434 S-222-A NUT,SELF-LOCKING,HE ................. 1<br />
5 PAHZZ 5310-00-680-6874 72962 F1801-040 NUT,SELF-LOCKING,HE PART OF KIT<br />
2<br />
P/N 3801096 .........................<br />
6 PAHZZ 5310-00-562-6560 15434 S-631 WASHER,FLAT PART OF KIT P/N 3801096 4<br />
7 XBHZZ 15434 156416 STRAP,RETAINING ..................... 2<br />
8 PAHZZ 2990-01-085-4768 15434 3027308 HOUSING,COMPRESSOR BIG CAM I ....... 1<br />
8 XDHZZ 15434 201250 HOUSING,CENTRIFUGAL BIG CAM III .... 1<br />
9 PAHZZ 5305-00-411-9340 15434 194010 SCREW,CAP,HEXAGON H HEXAGON HEAD 2<br />
CAP PART OF KIT P/N 3801096 ........<br />
10 PAHZZ 2990-01-085-1622 15434 21773600 PLATE,DIFFUSER VANE BIG CAM I ...... 1<br />
10 PAHZZ 5330-01-155-3349 15434 216804 SEAL BIG CAM III ................... 1<br />
11 KFHZZ 15434 202456 PACKING,PREFORMED PART OF KIT<br />
1<br />
P/N 3801096 .........................<br />
12 KFHZZ 15434 170510 GASKET PART OF KIT P/N 3801096 ..... 1<br />
13 PAHZZ 3120-00-682-7706 15434 156420 BEARING,SLEEVE ...................... 1<br />
14 PAHZZ 3130-01-294-1400 15434 3038745 HOUSING,BEARING UNI BIG CAM I ...... 1<br />
14 XDHZZ 15434 3026034 HOUSING,BEARING UNI BIG CAM III .... 1<br />
15 KFHZZ 15434 202377 PACKING,FLAT FIBER PART OF KIT<br />
1<br />
P/N 3801096 .........................<br />
16 PAHZZ 2990-00-477-6159 15434 171570 SHIELD,HEAT ......................... 1<br />
17 KFHZZ 15434 3034736 SEAL,PLAIN PART OF KIT P/N 3801096 . 2<br />
18 PAHZZ 2835-01-086-1447 15434 214086 SHAFT,TURBINE,NONAI BIG CAM I ...... 1<br />
18 PAHZZ 2950-01-145-6822 15434 3032835 WHEEL AND SHAFT,IMP BIG CAM III .... 1<br />
19 PAHZZ 3040-01-086-1448 15434 204244 HOUSING,MECHANICAL BIG CAM I ....... 1<br />
19 PFHZZ 2990-01-146-3911 15434 3026993 TURBINE HOUSING BIG CAM III ........ 1<br />
END OF FIGURE<br />
27-1
1 28<br />
9<br />
TM 9-2815-225-34&P<br />
3<br />
2<br />
4<br />
5<br />
6<br />
7<br />
1 27<br />
29<br />
26<br />
1<br />
9<br />
8<br />
1<br />
10<br />
24<br />
22<br />
21<br />
23<br />
20<br />
19<br />
25<br />
15<br />
14<br />
11<br />
18<br />
17<br />
16<br />
13<br />
12<br />
Figure 28. Turbocharger Assembly, Big Cam III.
TM 9-2815-225-34&P<br />
(1)<br />
ITEM<br />
NO<br />
(2)<br />
SMR<br />
CODE<br />
(3)<br />
NSN<br />
(4)<br />
CAGEC<br />
(5)<br />
PART<br />
NUMBER<br />
(6)<br />
DESCRIPTION AND USABLE ON CODE(UOC)<br />
(7)<br />
QTY<br />
GROUP 0305 SUPERCHARGER, BLOWER,<br />
TURBOCHARGER, OR ALTITUDE<br />
COMPENSATOR<br />
FIG. 28 TURBOCHARGER ASSEMBLY, BIG<br />
CAM III<br />
1 PAHZZ 15434 3709510 RING,RETAINING...................... 4<br />
2 PFHZZ 15434 3521837 HOUSING,TURBINE..................... 1<br />
3 PCFZZ 5330-00-194-8385 15434 3069177 GASKET.............................. 1<br />
4 PAHZZ 15434 3522075 TURBINE WHEEL,TURBO................. 1<br />
5 PAHZZ 15434 3521441 SEAL RING,METAL..................... 2<br />
6 PAHZZ 5330-01-303-1600 15434 3521442 SEAL RING,METAL..................... 1<br />
7 PAHZZ 15434 3519155 SHIELD,HEAT......................... 1<br />
8 PAHZZ 15434 3756135 PIN,STRAIGHT,HEADLE................. 2<br />
9 PAHZZ 15434 3722366 BEARING,SLEEVE...................... 2<br />
10 PAHZZ 15434 3521440 COLLAR,THRUST....................... 1<br />
11 PAHZZ 2950-01-503-5597 15434 3529016 HOUSING,AIR COMPRES................. 1<br />
12 PAHZZ 5340-01-497-7593 15434 3520981 PLATE,MOUNTING...................... 2<br />
13 PAHZZ 5310-01-303-8583 15434 3519471 NUT,SELF-LOCKING,HE 7/16 UNF........ 1<br />
14 PAHZZ 5310-01-497-2856 15434 3521119 WASHER,LOCK......................... 10<br />
15 PAHZZ 5305-01-498-0704 0B8S3 3526653 SCREW,CAP,HEXAGON H 5/16-18 X 5/8... 10<br />
16 PAHZZ 2835-01-497-7320 15434 3527047 DISK AND HUB,GAS TU................. 1<br />
17 PAHZZ 15434 3723863 RING,RETAINING...................... 1<br />
18 PAHZZ 5330-01-497-4872 0B8S3 3759618 RETAINER,PACKING.................... 1<br />
19 PAHZZ 2815-01-497-6029 15434 3521439 DEFLECTOR,DIRT AND.................. 1<br />
20 PAHZZ 15434 3751948 O-RING.............................. 1<br />
21 PAHZZ 2520-01-497-7027 15434 3519401 BAFFLE,LUBRICATING.................. 1<br />
22 PAHZZ 15434 3519290 BEARING,WASHER,THRU................. 1<br />
23 PAHZZ 5330-01-043-4242 15434 201049 GASKET.............................. 1<br />
24 PAHZZ 5331-01-344-4226 15434 3037537 O-RING.............................. 1<br />
25 PAHZZ 5325-01-449-3299 15434 3718373 RING,RETAINING...................... 1<br />
26 PAHZZ 5310-01-270-8245 15434 3529372 NUT,PLAIN,HEXAGON 1/4-28 UNF........ 1<br />
27 PAHZZ 5340-01-K72-3663 15434 3803430 CLAMP,RIM CLENCHING................. 1<br />
28 PAHZZ 15434 3757753 BUSHING,SLEEVE...................... 1<br />
29 PAHZZ 2815-01-497-6028 15434 3522416 HOUSING,TURBO BEARI................. 1<br />
END OF FIGURE<br />
28-1
TM 9-2815-225-34&P<br />
4<br />
5<br />
thru<br />
17<br />
1<br />
2<br />
3<br />
6<br />
5<br />
7<br />
8<br />
17<br />
10<br />
9<br />
13<br />
12<br />
11<br />
16<br />
14<br />
15<br />
Figure 29. Solenoid Valve.
TM 9-2815-225-34&P<br />
(1)<br />
ITEM<br />
NO<br />
(2)<br />
SMR<br />
CODE<br />
(3)<br />
NSN<br />
(4)<br />
CAGEC<br />
(5)<br />
PART<br />
NUMBER<br />
(6)<br />
DESCRIPTION AND USABLE ON CODE(UOC)<br />
(7)<br />
QTY<br />
GROUP 0306 TANKS, LINES, FITTINGS<br />
AND HEADERS<br />
FIG. 29 SOLENOID VALVE<br />
1 PAFZZ 5305-00-509-8106 15434 S-189-C SCREW,CAP,SOCKET HE SOCKET HEAD<br />
2<br />
CAP, 1/4-20 X 1 3/4, BIG CAM III....<br />
2 PAFZZ 5310-00-484-1718 15434 181466 WASHER,LOCK......................... 2<br />
3 PAFZZ 5310-00-262-2986 15434 67684 WASHER,FLAT......................... 2<br />
4 PAOZZ 4810-01-187-4925 15434 3035362 VALVE,SOLENOID...................... 1<br />
5 PAFZZ 5305-00-138-9848 15434 187556 .SCREW,MACHINE SOLENOID MOUNTING... 4<br />
6 PAFZZ 5310-00-922-2017 30379 120217 .WASHER,LOCK........................ 4<br />
7 PAFZZ 2910-00-085-7436 15434 134074 .COIL ASSEMBLY,SHUT ELECTRICAL BIG 1<br />
CAM III.............................<br />
7 XDFZZ 15434 302109000 .COIL,ELECTRICAL BIG CAM I......... 1<br />
8 PAFZZ 5340-00-084-7787 15434 129839 .COVER,ACCESS SHUT OFF VALVE....... 1<br />
9 PCFZZ 5331-00-081-9299 15434 129888 .O-RING RECTANGULAR RING PART OF 1<br />
KIT P/N 3010242.....................<br />
10 PAFZZ 5310-00-082-1888 15434 129768 .WASHER,SPRING TENSI SHUT OFF VALVE 1<br />
11 PCFZZ 5331-00-132-0274 15434 190876 .O-RING PART OF KIT P/N 3010242.... 1<br />
12 PAFZZ 4820-01-146-1048 15434 3030970 .DISK,VALVE......................... 1<br />
13 PAFZZ 3040-01-085-2616 15434 3000266 .SHAFT,SHOULDERED SHUT OFF VALVE, 1<br />
BIG CAM III.........................<br />
14 PAFZZ 4730-00-011-3175 15434 70295 .PLUG,PIPE.......................... 1<br />
15 PCFZZ 5330-01-291-6537 12361 3903927 .PACKING,PREFORMED RECTANGULAR<br />
1<br />
RING PART OF KIT P/N 3010242.......<br />
16 PAFZZ 5355-00-082-1189 15434 129838 .KNOB SHUT OFF VALVE............... 1<br />
17 PFFZZ 4820-00-829-5600 15434 129826 .BODY,VALVE......................... 1<br />
END OF FIGURE<br />
29-1
TM 9-2815-225-34&P<br />
1<br />
2<br />
thru<br />
29<br />
48<br />
49<br />
thru<br />
52<br />
7<br />
8<br />
3 4 6<br />
3<br />
5<br />
9<br />
10<br />
11<br />
30<br />
12<br />
2<br />
18<br />
17<br />
16<br />
15<br />
14<br />
13<br />
25<br />
24<br />
23<br />
21<br />
20<br />
34<br />
33<br />
32 31<br />
26<br />
28<br />
19<br />
27<br />
36<br />
35<br />
29<br />
41<br />
37<br />
39<br />
38<br />
47<br />
49<br />
50<br />
51<br />
52<br />
46<br />
45 44 43 42<br />
36<br />
40<br />
Figure 30. Fuel Pump Front Cover, Governor, <strong>and</strong> Tach Drive.
TM 9-2815-225-34&P<br />
(1)<br />
ITEM<br />
NO<br />
(2)<br />
SMR<br />
CODE<br />
(3)<br />
NSN<br />
(4)<br />
CAGEC<br />
(5)<br />
PART<br />
NUMBER<br />
(6)<br />
DESCRIPTION AND USABLE ON CODE(UOC)<br />
(7)<br />
QTY<br />
GROUP 0308 ENGINE SPEED GOVERNOR AND<br />
CONTROL<br />
FIG. 30 FUEL PUMP FRONT COVER,<br />
GOVERNOR, AND TACH DRIVE<br />
1 PAFZZ 6680-01-085-2870 15434 3030267 COVER AND TACHOMETE BIG CAM I...... 1<br />
1 PAHHH 2910-01-146-1999 15434 3030269 COVER ASSEMBLY,FRON FUEL PUMP<br />
1<br />
FRONT,BIG CAM III...................<br />
2 PFHZZ 5342-01-085-4153 15434 3001296 .BRACKET,AIR COMPRES................ 1<br />
3 PAHZZ 5310-00-209-0965 96906 MS35338-47 .WASHER,LOCK........................ 4<br />
4 XBFZZ 15434 S151 .SCREW COVER,GOVERNOR AND<br />
4<br />
TACHOMETER DRIVE....................<br />
5 PAHZZ 5310-01-112-4307 15434 69324 .WASHER,FLAT COVER,GOVERNOR AN<br />
3<br />
TACHOMETER DRIVE....................<br />
6 PAHZZ 5305-01-113-1179 15434 206326 .SCREW,CAP,HEXAGON H................ 4<br />
7 PAHZZ 2910-01-086-7715 15434 3002110 .HOUSING,DRIVE ASSEM BIG CAM III... 1<br />
8 PAHZZ 3040-01-085-2871 15434 212607 .SHAFT,TACHOMETER DR BIG CAM I..... 1<br />
8 PAHZZ 3040-01-151-9348 15434 21690800 .SHAFT,TACHOMETER DR BIG CAM III... 1<br />
9 PCHZZ 5330-01-072-8828 15434 212603 .SEAL PART OF KIT P/N 3010242...... 1<br />
10 PAHZZ 5365-01-126-3334 15434 3004724 .SPACER BIG CAM III................ 1<br />
11 PAHZZ 3120-01-087-2539 15434 212609 .BEARING,SLEEVE BIG CAM III........ 1<br />
12 PAHZZ 3020-01-086-8780 15434 212610 .GEAR,HELICAL BIG CAM III.......... 1<br />
13 PAHZZ 3010-01-088-5727 15434 212639 .COUPLING,SHAFT,RIGI................ 1<br />
14 PAHZZ 3020-01-070-9003 15434 21260500 .GEAR,SPUR.......................... 1<br />
15 PAHZZ 5325-01-081-0662 15434 212604 .RING,RETAINING..................... 1<br />
16 PAHZZ 3110-00-516-5289 15434 S-16052 .BEARING,BALL,ANNULA................ 1<br />
17 PAHZZ 3120-00-904-9595 15434 163944 .BUSHING,SLEEVE..................... 1<br />
18 PAFZZ 6680-01-085-2870 15434 3030267 .COVER AND TACHOMETE BIG CAM I..... 1<br />
18 PAHZZ 2910-01-141-4337 15434 3803676 .HOUSING,FUEL PUMP BIG CAM III..... 1<br />
19 PAHZZ 5305-01-072-8831 15434 203619 .SCREW BIG CAM I................... 1<br />
19 PAHZZ 5305-01-112-9110 15434 3017051 .SCREW,CAP,HEXAGON H BIG CAM III... 8<br />
20 XBHZZ 15434 3045173 .SEAL,OIL PART OF KIT P/N 3010242.. 2<br />
21 PAHZZ 3040-01-070-9004 15434 212601 .SHAFT,SHOULDERED................... 1<br />
22 PAHZZ 5315-01-087-0534 15434 212668 .KEY,MACHINE........................ 1<br />
23 PAHZZ 3020-01-086-4158 15434 212602 .GEAR,HELICAL....................... 1<br />
24 PAHZZ 3010-01-080-1529 15434 212613 .COUPLING HALF,SHAFT................ 1<br />
25 PAHZZ 5310-00-809-3078 15434 146160 .WASHER,FLAT BIG CAM III........... 1<br />
25 PAHZZ 5310-00-809-3078 96906 MS27183-11 .WASHER,FLAT BIG CAM I............. 2<br />
26 PAHZZ 5305-01-114-9279 15434 S110 .SCREW,CAP,HEXAGON H 5/16-18 X 5/8 1<br />
BIG CAM I...........................<br />
27 PAFZZ 3010-00-447-9799 15434 162426 .INSERT,FLEXIBLE COU................ 1<br />
28 PAHZZ 5310-00-407-9566 96906 MS35338-45 .WASHER,LOCK COVER GOVERNOR AND<br />
1<br />
TACHOMETER DRIVE....................<br />
29 PFHZZ 5330-01-338-4829 15434 4026171 .GASKET............................. 1<br />
30 PCHZZ 5330-00-506-4866 15434 100764 GASKET PART OF KIT P/N 3010242..... 1<br />
31 PAHZZ 5315-00-082-0448 15434 144178 PIN,SHOULDER,HEADLE BIG CAM III.... 1<br />
32 PAHZZ 5310-00-086-7859 15434 144179 SHIM,WEIGHT,ASSIST.................. 1<br />
33 PAHZZ 5360-01-095-3661 15434 143848 SPRING,HELICAL,COMP................. 1<br />
34 PAHZZ 2910-01-090-9346 15434 3024991 CARRIER ASSEMBLY.................... 1<br />
35 PAHZZ 5305-01-112-9110 15434 3017051 SCREW,CAP,HEXAGON H BIG CAM III.... 3<br />
36 PAHZZ 5310-00-141-1795 88044 AN960-416 WASHER,FLAT......................... 3<br />
37 PBHZZ 2910-00-858-3522 15434 44678 COVER,SPRING PACK BIG CAM III...... 1<br />
38 PAHZZ 5330-01-072-8830 15434 3003156 SEAL,SPECIAL BIG CAM III........... 1<br />
39 PAHZZ 5342-01-143-6046 15434 3025459 PLUG,COVER BIG CAM III............. 1<br />
40 PAHZZ 5305-00-426-4142 15434 S105 SCREW,CAP,HEXAGON H BIG CAM I...... 1<br />
40 PAHZZ 5305-01-126-1128 15434 3017052 SCREW,CAP,HEXAGON H BIG CAM III.... 1<br />
41 PCHZZ 5330-00-562-1176 15434 70705 GASKET BIG CAM III PART OF KIT<br />
1<br />
P/N 3010242.........................<br />
42 PAHZZ 5325-00-807-2636 96906 MS16625-1100 RING,RETAINING...................... 1<br />
43 PAHZZ 5340-00-898-1497 15434 70713 RING RETAINING BIG CAM III......... 1<br />
30-1
TM 9-2815-225-34&P<br />
(1)<br />
ITEM<br />
NO<br />
(2)<br />
SMR<br />
CODE<br />
(3)<br />
NSN<br />
(4)<br />
CAGEC<br />
(5)<br />
PART<br />
NUMBER<br />
(6)<br />
DESCRIPTION AND USABLE ON CODE(UOC)<br />
(7)<br />
QTY<br />
44 PAHZZ 5365-00-507-3261 15434 70717-A SHIM BIG CAM III................... 1<br />
44 PAHZZ 5365-00-507-3262 15434 70717-B SHIM BIG CAM III 1<br />
44 PAHZZ 5365-00-462-4504 15434 189800 SHIM BIG CAM III................... 1<br />
45 PAHZZ 5365-00-507-3260 15434 70717 SPACER,RING BIG CAM III............ 1<br />
46 PAHZZ 5360-00-461-5738 15434 143251 SPRING,HELICAL,COMP BIG CAM I...... 1<br />
46 PAHZZ 5360-00-901-9644 15434 143253 SPRING,HELICAL,COMP BIG CAM III.... 1<br />
47 PAHZZ 5340-00-907-8964 15434 137370 PLUNGER,DETENT IDLE SPRING,BIG CAM 1<br />
III.................................<br />
48 PAHZZ 2910-00-803-2631 15434 BM70796 SPRING GUIDE,ASSEMB BIG CAM I...... 1<br />
49 PAHZZ 5360-01-147-4846 15434 3018767 .SPRING,HELICAL,COMP BIG CAM III... 1<br />
50 PAHZZ 5310-00-507-3259 15434 70715 .WASHER,FLAT BIG CAM III........... 1<br />
51 PAHZZ 2910-00-132-0769 15434 3038218 .GUIDE,CLIP ASSEMBLY BIG CAM III... 1<br />
52 PAHZZ 5305-00-506-5722 15434 70716 .SETSCREW BIG CAM III.............. 1<br />
END OF FIGURE<br />
30-2/BLANK
TM 9-2815-225-34&P<br />
1<br />
2<br />
thru<br />
16<br />
17 18<br />
10<br />
11<br />
3<br />
5<br />
6<br />
7<br />
8<br />
9<br />
13<br />
12<br />
3<br />
4<br />
2<br />
15<br />
14<br />
13<br />
12<br />
20<br />
16<br />
19<br />
18<br />
17<br />
Figure 31. Fuel Pump Damper, Head, <strong>and</strong> Fuel Filter.
TM 9-2815-225-34&P<br />
(1)<br />
ITEM<br />
NO<br />
(2)<br />
SMR<br />
CODE<br />
(3)<br />
NSN<br />
(4)<br />
CAGEC<br />
(5)<br />
PART<br />
NUMBER<br />
(6)<br />
DESCRIPTION AND USABLE ON CODE(UOC)<br />
(7)<br />
QTY<br />
GROUP 0309 FUEL FILTER<br />
FIG. 31 FUEL PUMP DAMPER, HEAD, AND<br />
FUEL FILTER<br />
1 PAFFF 2910-01-085-2570 15434 3026198 DAMPER AND HEAD ASS................. 1<br />
2 PAFZZ 5305-00-068-0509 80204 B1821BH025C125N .SCREW,CAP,HEXAGON H DAMPER TO GEAR 2<br />
MOTOR,DAMPER,FUEL FILTER,BIG CAM I..<br />
2 PAFZZ 5305-01-112-9110 15434 3017051 .SCREW,CAP,HEXAGON H BIG CAM III... 2<br />
3 PAHZZ 5310-00-484-1718 15434 181466 .WASHER,LOCK........................ 4<br />
4 XAFZZ 15434 205451 .HEAD, FILTER....................... 2<br />
5 PAFZZ 5305-00-207-2715 15434 S-174-C .SCREW,CAP,SOCKET HE SOCKET HEAD, 2<br />
1/4-20 X 3 1/2,BIG CAM III..........<br />
6 PCFZZ 5331-00-809-3276 15434 139988 .O-RING RECTANGULAR RING PART OF 1<br />
KIT P/N 3010242.....................<br />
7 PCFZZ 5340-00-951-3536 15434 202897 .DISK,SOLID,PLAIN FUEL PUMP DAMPER. 1<br />
8 PCFZZ 5331-00-809-2667 15434 100099 .O-RING RECTANGULAR RING PART OF 1<br />
KIT P/N 3010242.....................<br />
9 PAFZZ 5365-00-965-0870 15434 160514 .SPACER,RING........................ 1<br />
10 PAFZZ 5340-00-829-5617 15434 153338 .COVER,ACCESS....................... 1<br />
11 PAFZZ 5305-01-133-2060 15434 133538 .SCREW,CAP,SOCKET HE SOCKET HEAD, 1<br />
1/4-20 X 3 1/4......................<br />
12 PAFZZ 5310-00-159-6209 96906 MS122032 .WASHER,LOCK........................ 2<br />
13 PAFZZ 5310-00-141-1795 88044 AN960-416 .WASHER,FLAT........................ 2<br />
14 PAFZZ 5305-01-147-8726 15434 153346 .SCREW,CAP,SOCKET HE SOCKET HEAD, 1<br />
1/4-20 X 4.00.......................<br />
15 PAFZZ 4730-01-124-3762 15434 3025460 .PLUG,PIPE.......................... 5<br />
16 PAFZZ 5330-00-252-8888 9F512 691-10014 .GASKET RECTANGULAR RING PART OF 1<br />
KIT P/N 3010242.....................<br />
17 PAOZZ 2910-00-304-3427 15434 BM78793 FILTER ELEMENT,FLUI BIG CAM I...... 1<br />
17 PAOZZ 2910-01-146-1099 79396 33405 FILTER ELEMENT,FLUI BIG CAM III.... 1<br />
18 PAOZZ 5330-01-084-9068 15434 213079 .PACKING,PREFORMED DAMPER,FUEL<br />
1<br />
FILTER, BIG CAM I...................<br />
18 PCOZZ 5330-00-286-0487 33457 255622 .PACKING,PREFORMED BIG CAM III..... 1<br />
19 PAFZZ 4730-01-106-4700 15434 129866 ADAPTER,STRAIGHT,TU DAMPER,FUEL<br />
1<br />
FILTER..............................<br />
20 PAFZZ 15434 AR12228 FITTING FUEL INLET................. 1<br />
END OF FIGURE<br />
31-1
TM 9-2815-225-34&P<br />
1<br />
2<br />
thru<br />
20<br />
2<br />
3<br />
4<br />
5<br />
<strong>and</strong><br />
6<br />
17<br />
15<br />
9<br />
16<br />
14<br />
7<br />
21<br />
✱ a<br />
13<br />
3<br />
22<br />
5<br />
12<br />
7<br />
8<br />
24<br />
23<br />
11<br />
10<br />
22<br />
18<br />
19<br />
6<br />
9<br />
20<br />
✱ a PART OF ITEM 2<br />
Figure 32. Ether Quick-Start Kit.
TM 9-2815-225-34&P<br />
(1)<br />
ITEM<br />
NO<br />
(2)<br />
SMR<br />
CODE<br />
(3)<br />
NSN<br />
(4)<br />
CAGEC<br />
(5)<br />
PART<br />
NUMBER<br />
(6)<br />
DESCRIPTION AND USABLE ON CODE(UOC)<br />
(7)<br />
QTY<br />
GROUP 0311 WHEEL ASSEMBLY<br />
FIG. 32 ETHER QUICK-START KIT<br />
1 PFOOO 2815-01-087-4740 06991 8294151 QUICK START KIT ETHER.............. 1<br />
2 PAOZZ 2910-00-646-9727 53203 20000 .CYLINDER,ENGINE STA................ 1<br />
3 PCOZZ 5330-01-147-8754 06991 111025 ..GASKET............................ 1<br />
4 PAOZZ 2910-01-084-0243 6Y402 829-4151 .PARTS KIT,ETHER,STA ASSEMBLY...... 1<br />
5 PAOZZ 5340-01-145-1181 06991 913020 ..CLAMP,LOOP BIG CAM III........... 1<br />
6 PAOZZ 4730-01-146-1059 06991 125049 ..ELBOW,PIPE TO TUBE................ 1<br />
7 PAOZZ 5310-01-146-6150 06991 103031 .WASHER,FLAT........................ 2<br />
8 PAOZZ 5310-01-146-6147 06991 102030 .NUT,PLAIN,HEXAGON 5/16-18......... 1<br />
9 PCOZZ 4720-01-146-4126 06991 501096-04 .TUBING,NONMETALLIC 24 INCHES...... 1<br />
10 XBOZZ 5930-01-295-0912 6Y402 8293635 .SWITCH,THERMOSTATIC BIG CAM I..... 1<br />
10 PAOZZ 5930-01-095-9823 06991 309015 .SWITCH,PUSH ETHER START, SEE TM9- 1<br />
2320-283-20P, BIG CAM III...........<br />
11 PCOZZ 7690-01-080-7335 34623 M-A162-20018 .MARKER,IDENTIFICATI SEE TM9-2320- 1<br />
283-20P.............................<br />
12 PAOZZ 06991 501088-02 .SPACER,SLEEVE...................... 2<br />
13 PAOZZ 5342-01-146-9816 06991 108289 .CLAMP.............................. 1<br />
14 PAOZZ 5306-01-151-1023 06991 101037-05 .BOLT,MACHINE 5/16-18 X 1.00....... 1<br />
15 PAOZZ 2910-01-112-5797 06991 913024-06 .ATOMIZER,QUICK STAR................ 1<br />
16 PAOZZ 6620-01-203-4301 06991 321030-02 .THERMOSTAT,FLOW CON................ 1<br />
17 PAOZZ 4730-00-278-4822 72582 444042 .ELBOW,PIPE BIG CAM III............ 1<br />
18 PAOZZ 5310-01-146-7303 34623 MB362-20001 .WASHER,FLAT........................ 2<br />
19 PAOZZ 5306-00-418-2276 24617 272547 .BOLT,MACHINE 3/8-16 X 6 1/2....... 2<br />
20 PAOZZ 5310-00-637-9541 96906 MS35338-46 .WASHER,LOCK........................ 2<br />
21 PAOZZ 5310-00-013-1245 21450 131245 NUT,SELF-LOCKING,HE................. 1<br />
22 PAOZZ 24617 9419002 SCREW,CAP,HEXAGON H................. 2<br />
23 PAOZZ 5310-01-102-3270 24617 2436161 WASHER,FLAT......................... 1<br />
24 PAOZZ 5340-00-809-1490 96906 MS21333-98 CLAMP,LOOP.......................... 1<br />
END OF FIGURE<br />
32-1
TM 9-2815-225-34&P<br />
1<br />
2<br />
thru<br />
10<br />
11<br />
12<br />
thru<br />
18<br />
✱ b<br />
2<br />
3<br />
4<br />
10<br />
✱ a<br />
9<br />
8<br />
5<br />
6<br />
18<br />
12<br />
6<br />
7<br />
17<br />
14<br />
13<br />
BIG CAM I<br />
15<br />
16<br />
BIG CAM III<br />
✱ a PART OF ITEM 1<br />
✱ b PART OF ITEM 11<br />
Figure 33. Fuel Control Lever.
TM 9-2815-225-34&P<br />
(1)<br />
ITEM<br />
NO<br />
(2)<br />
SMR<br />
CODE<br />
(3)<br />
NSN<br />
(4)<br />
CAGEC<br />
(5)<br />
PART<br />
NUMBER<br />
(6)<br />
DESCRIPTION AND USABLE ON CODE(UOC)<br />
(7)<br />
QTY<br />
GROUP 0312 ACCELERATOR, THROTTLE OR<br />
CHOKE CONTROLS<br />
FIG. 33 FUEL CONTROL LEVER<br />
1 AOOOO 15434 AR51323 LEVER ASSEMBLY,THRO................. 1<br />
2 PAOZZ 2910-00-410-2268 34623 MA207-21-642 .STOP,THROTTLE LEVER................ 1<br />
3 PAOZZ 5360-00-436-7340 15434 173717 .SPRING,HELICAL,TORS................ 1<br />
4 PAHZZ 2910-00-432-1945 15434 3048296 .LEVER,REMOTE CONTRO BIG CAM I..... 1<br />
5 PAOZZ 5305-00-493-3959 15434 S-159-B .SCREW,CAP,HEXAGON H 1/4-28 X 1 1/2 1<br />
6 PAOZZ 3120-00-353-9164 15434 S2876 .BUSHING,SLEEVE BIG CAM I.......... 2<br />
7 PAOZZ 3040-01-154-9787 34623 5995177 .LEVER,REMOTE CONTRO................ 1<br />
8 PAOZZ 5310-00-562-6552 15434 S600 .WASHER,LOCK........................ 1<br />
9 PAOZZ 5310-00-971-7989 96906 MS35691-5 .NUT,PLAIN,HEXAGON.................. 1<br />
10 XDHZZ 15434 173708 .CONNECTING LINK,RIG................ 1<br />
11 PAOZZ 2910-01-146-2000 15434 3061420 LEVER ASSEMBLY,THRO FUEL CONTROL... 1<br />
12 PAOZZ 5310-00-971-7989 96906 MS35691-5 .NUT,PLAIN,HEXAGON.................. 1<br />
13 PAHZZ 5310-00-159-6209 96906 MS122032 .WASHER,LOCK........................ 1<br />
14 PAOZZ 5310-00-141-1795 58588 AN960-416 .WASHER,FLAT........................ 1<br />
15 PBHZZ 5340-01-208-9319 34623 MB70-20107 .BRACKET,ACCELERATOR................ 1<br />
16 PAOZZ 5310-01-102-7356 24617 9421077 .NUT,PLAIN,HEXAGON.................. 1<br />
17 PAOZZ 5305-01-088-6019 15434 3010596 .SCREW,ASSEMBLED WAS................ 1<br />
18 PAOZZ 5306-01-102-3599 24617 9421196 .BOLT,MACHINE....................... 1<br />
END OF FIGURE<br />
33-1
TM 9-2815-225-34&P<br />
8<br />
9<br />
4<br />
10<br />
11<br />
12<br />
13<br />
3<br />
5 6<br />
7<br />
14<br />
2<br />
26<br />
2<br />
1<br />
15<br />
24<br />
23<br />
27<br />
27<br />
30<br />
27<br />
20 19<br />
25<br />
24<br />
22<br />
21<br />
16<br />
17<br />
2<br />
8<br />
29<br />
28<br />
26<br />
19<br />
27<br />
17<br />
18<br />
Figure 34. Thermostat Housing, Water Manifold, <strong>and</strong> Component Parts.
TM 9-2815-225-34&P<br />
(1)<br />
ITEM<br />
NO<br />
(2)<br />
SMR<br />
CODE<br />
(3)<br />
NSN<br />
(4)<br />
CAGEC<br />
(5)<br />
PART<br />
NUMBER<br />
(6)<br />
DESCRIPTION AND USABLE ON CODE(UOC)<br />
(7)<br />
QTY<br />
GROUP 05 COOLING<br />
GROUP 0503 WATER MANIFOLD, HEADERS<br />
THERMOSTATS, AND HOUSING GASKET<br />
FIG. 34 THERMOSTAT HOUSING, WATER<br />
MANIFOLD, AND COMPONENT PARTS<br />
1 PAOZZ 2930-00-928-3595 15434 130118 MANIFOLD,FLUID COOL WATER.......... 1<br />
2 PCOZZ 5331-00-506-4874 15434 70624 O-RING PART OF KIT P/N 4024958 PART 4<br />
OF KIT P/N 3804280..................<br />
3 PAOZZ 2815-01-083-2123 15434 215042 MANIFOLD,WATER BIG CAM I........... 1<br />
3 PAOZZ 2930-01-146-4212 15434 3015114 MANIFOLD,FLUID COOL BIG CAM III.... 1<br />
4 PAOZZ 4820-01-210-9571 15434 214345 COCK,DRAIN.......................... 1<br />
5 PFOZZ 5330-01-040-2087 15434 208128 GASKET PART OF KIT P/N 4024958 PART 1<br />
OF KIT P/N 3804280..................<br />
6 PAOZZ 6685-01-141-0907 15434 201737 THERMOSTAT,FLOW CON BIG CAM III.... 1<br />
6 PAOZZ 6685-01-047-2811 15434 204586 THERMOSTAT,FLOW CON BIG CAM I...... 1<br />
7 PFOZZ 5330-00-864-5422 15434 186780 SEAL,THERMO PART OF KIT P/N 3804280 1<br />
8 PAOZZ 5305-01-085-8197 15434 3010595 SCREW,MACHINE....................... 6<br />
9 PAOZZ 15434 210916 ELBOW,FLANGE TO HOS BIG CAM I...... 1<br />
9 PAOZZ 2930-01-146-1085 15434 3018764 WATER OUTLET,ENGINE WATER OUTLET, 1<br />
BIG CAM III.........................<br />
10 PCOZZ 5330-01-145-5380 15434 3019158 GASKET.............................. 1<br />
11 PAOZZ 2930-01-084-6011 15434 211435 WATER OUTLET,ENGINE BIG CAM I...... 1<br />
11 PFOZZ 2930-01-150-7596 15434 3017748 WATER OUTLET,ENGINE BIG CAM III.... 1<br />
12 PAOZZ 4730-01-085-4156 15434 196282 ELBOW,FLANGE TO HOS BIG CAM I...... 1<br />
12 PAOZZ 4730-01-146-1060 15434 S-932-B ADAPTER,STRAIGHT,PI BIG CAM III.... 1<br />
13 PAOZZ 5305-01-086-7036 15434 3010597 SCREW WITH CAPTIVE WASHER, 3/8-16 X 4<br />
3 3/4...............................<br />
14 PAOZZ 4730-00-909-8627 34623 5583303 CLAMP,HOSE.......................... 2<br />
15 PAOZZ 4710-01-079-3198 15434 213485 TUBE,BENT,METALLIC BIG CAM I....... 1<br />
15 PAOZZ 4710-01-146-1054 15434 3018098 TUBE,BENT,METALLIC BIG CAM III..... 1<br />
16 PAOZZ 5331-00-159-1464 15434 3000521 O-RING BIG CAM III PART OF KIT<br />
1<br />
P/N 3801235.........................<br />
17 PCOZZ 5330-01-146-7314 15434 3024960 GASKET PART OF KIT P/N 3801235..... 1<br />
18 PAOZZ 2930-01-146-3033 15434 3028281 HOUSING,WATER INLET BIG CAM III.... 1<br />
19 PAOZZ 5305-01-113-0408 15434 3012470 SCREW,ASSEMBLED WAS WITH CAPTIVE 2<br />
WASHER, 3/8-16 X 3/4,BIG CAM III....<br />
20 PAFZZ 5310-00-081-4219 96906 MS27183-12 WASHER,FLAT BIG CAM III............ 2<br />
21 PAOZZ 5340-01-135-7250 15434 214617 CLAMP,RIM CLENCHING................. 1<br />
22 PAOZZ 5306-01-119-8870 15434 3022589 BOLT,MACHINE HEXAGON HEAD, WITH<br />
1<br />
CAPTIVE WASHER,BIG CAM III..........<br />
23 PCOZZ 4720-01-085-6129 15434 102522 HOSE,NONMETALLIC.................... 1<br />
24 PCOZZ 5331-01-077-5228 15434 212161 O-RING PART OF KIT P/N 3804280..... 2<br />
25 PAOZZ 4710-01-146-3086 15434 3024666 TUBE,BENT,METALLIC BIG CAM III..... 1<br />
26 PAOZZ 4730-00-404-2906 15434 130394 COUPLING,TUBE....................... 2<br />
27 PCOZZ 5330-01-145-5381 15434 3024709 GASKET BIG CAM III PART OF KIT<br />
6<br />
P/N 4024958 PART OF KIT P/N 3801235.<br />
28 PAOZZ 2930-01-087-8749 15434 3013000 MANIFOLD,FLUID COOL................. 1<br />
29 PAOZZ 5305-01-088-6019 15434 3010596 SCREW,ASSEMBLED WAS 3/8-16 X 1 1/4. 12<br />
30 PAOZZ 4730-00-221-2139 72452 1459-259 PLUG,PIPE........................... 1<br />
END OF FIGURE<br />
34-1
TM 9-2815-225-34&P<br />
1<br />
5<br />
2<br />
4<br />
13<br />
6<br />
3<br />
6<br />
13<br />
11<br />
12<br />
10<br />
8<br />
4<br />
7<br />
6<br />
7<br />
9<br />
5<br />
6<br />
Figure 35. Water Filter <strong>and</strong> Component Parts.
TM 9-2815-225-34&P<br />
(1)<br />
ITEM<br />
NO<br />
(2)<br />
SMR<br />
CODE<br />
(3)<br />
NSN<br />
(4)<br />
CAGEC<br />
(5)<br />
PART<br />
NUMBER<br />
(6)<br />
DESCRIPTION AND USABLE ON CODE(UOC)<br />
(7)<br />
QTY<br />
GROUP 0503 WATER MANIFOLD, HEADERS<br />
THERMOSTATS AND HOUSING GASKET<br />
FIG. 35 WATER FILTER AND COMPONENT<br />
PARTS<br />
1 PAOZZ 5305-01-088-6019 15434 3010596 SCREW,ASSEMBLED WAS 3/8-16 X 1 1/4. 4<br />
2 PAOZZ 5340-01-145-1597 15434 211448 BRACKET,ANGLE FILTER MOUNTING PART 1<br />
OF KIT P/N 5739124..................<br />
3 PAOZZ 3120-01-079-6527 15434 109594 BEARING,SLEEVE...................... 4<br />
4 PAOZZ 4820-01-227-7141 34623 5730765 VALVE,ANGLE BIG CAM I.............. 2<br />
4 PAOZZ 4820-01-045-6080 15434 179901 VALVE,ANGLE WATER SHUT-OFF, BIG CAM 2<br />
III.................................<br />
5 PAOZZ 4730-01-165-0749 15434 70470 ELBOW,TUBE.......................... 2<br />
6 PAOZZ 4730-00-908-3195 81343 SAEJ1508-06 CLAMP,HOSE BIG CAM I............... 4<br />
6 PAOZZ 4730-01-146-4016 15434 179904 CLAMP,HOSE BIG CAM III............. 4<br />
7 MOOZZ 34623 5710454 HOSE BIG CAM I,MAKE FROM HOSE, P/N 1<br />
2580-6..............................<br />
7 MOOZZ 4720-00-160-9649 15434 179912 HOSE,NONMETALLIC BIG CAM III,MAKE 1<br />
FROM HOSE, P/N 2580-6...............<br />
8 PAOZZ 4730-01-045-3083 15434 179903 ELBOW,PIPE TO HOSE BIG CAM III..... 1<br />
9 PAOZZ 4330-00-274-4712 33457 3305367 FILTER ELEMENT,FLUI PART OF KIT<br />
1<br />
P/N 5739124.........................<br />
10 PFOZZ 2940-01-227-7445 34623 5730769 HEAD,FLUID FILTER BIG CAM I........ 1<br />
10 PAOZZ 4330-01-020-3666 33457 204163 HEAD,FLUID FILTER BIG CAM III...... 1<br />
11 PAOZZ 5305-01-319-9287 15434 3043649 SCREW,CAP,HEXAGON H................. 2<br />
12 PAOZZ 4730-01-216-6440 15434 179902 COUPLING HALF,QUICK BIG CAM III.... 1<br />
13 MOOZZ 4720-00-187-4102 01276 2580-6 HOSE,NONMETALLIC MAKE FROM HOSE, P/N 1<br />
2580-6..............................<br />
END OF FIGURE<br />
35-1
TM 9-2815-225-34&P<br />
1<br />
2<br />
thru<br />
14<br />
13 14<br />
15<br />
16<br />
19<br />
20<br />
thru<br />
27<br />
32<br />
4<br />
3<br />
2<br />
30<br />
31<br />
17<br />
5<br />
12<br />
8<br />
9<br />
7<br />
6<br />
4<br />
18<br />
8<br />
10<br />
11<br />
14<br />
✱ a<br />
32<br />
20<br />
22<br />
24<br />
29<br />
26<br />
25<br />
21<br />
28<br />
27<br />
23<br />
✱ a PART OF ITEM 13<br />
Figure 36. Water Pump <strong>and</strong> Idler.
TM 9-2815-225-34&P<br />
(1)<br />
ITEM<br />
NO<br />
(2)<br />
SMR<br />
CODE<br />
(3)<br />
NSN<br />
(4)<br />
CAGEC<br />
(5)<br />
PART<br />
NUMBER<br />
(6)<br />
DESCRIPTION AND USABLE ON CODE(UOC)<br />
(7)<br />
QTY<br />
GROUP 0504 WATER PUMP<br />
FIG. 36 WATER PUMP AND IDLER PULLEY<br />
1 PAOFF 2930-01-146-3912 15434 3801708 PUMP,COOLING SYSTEM BIG CAM I AND 1<br />
BIG CAM III.........................<br />
2 PAFZZ 4320-01-079-3454 15434 3000888 .IMPELLER,PUMP,CENTR 4.50" DIA. BIG 1<br />
CAM I AND BIG CAM III PART OF KIT<br />
P/N 380171200.......................<br />
3 PCFZZ 5330-00-005-0407 15434 3071085 .PACKING WITH RETAIN PART OF KIT 2<br />
P/N 380171200 PART OF KIT P/N<br />
380171000...........................<br />
4 PAFZZ 4730-00-018-9566 15434 S-911-B .PLUG,PIPE.......................... 2<br />
5 PAFZZ 4730-00-010-3867 81348 WW-P-471AASBUC .PLUG,PIPE BIG CAM I............... 2<br />
5 PAFZZ 4730-01-161-5115 15434 3013786 .PLUG,PIPE BIG CAM III............. 1<br />
6 PAFZZ 5330-01-240-1630 15434 3038997 .SEAL,PLAIN......................... 1<br />
7 PAFZZ 3040-01-287-9736 15434 3050394 .SHAFT,SHOULDERED PART OF KIT<br />
1<br />
P/N 380171200.......................<br />
8 PAFZZ 3110-00-144-8828 24617 3305L1A .BEARING,BALL,ANNULA PART OF KIT 2<br />
P/N 380171000.......................<br />
9 PAFZZ 5325-00-420-9696 15434 112302 .RING,RETAINING..................... 1<br />
10 PAFZZ 5365-01-132-1984 15434 196844 .SPACER PART OF KIT P/N 380171200.. 1<br />
11 PAFZZ 2815-00-815-0355 15434 S16255 .RING,BEARING RETAIN PART OF KIT 1<br />
P/N 380171000.......................<br />
12 PCFZZ 5330-01-080-2992 15434 3038998 .SEAL,PLAIN ENCASED PART OF KIT<br />
1<br />
P/N 3801235.........................<br />
13 PAFZZ 3020-01-241-6905 15434 302586100 .PULLEY,GROOVE 4-5/16 DIA.BIG CAM I 1<br />
13 PAFZZ 3020-01-086-3417 15434 300550700 .PULLEY,GROOVE 4-11/16 DIA.BIG CAM 1<br />
I AND BIG CAM III...................<br />
14 PAFZZ 3120-01-083-6411 15434 203097 ..BEARING,SLEEVE.................... 1<br />
15 PAOZZ 5305-00-058-6604 15434 182706 SCREW,CAP,HEXAGON H................. 1<br />
16 PFOZZ 5330-01-066-5350 15434 3002385 GASKET PART OF KIT P/N 3801235..... 1<br />
17 PAOZZ 5310-00-763-8920 96906 MS51967-20 NUT,PLAIN,HEXAGON................... 1<br />
18 PAOZZ 5310-01-145-0762 15434 213082 WASHER,FLAT......................... 1<br />
19 PAOZZ 2930-01-262-5175 15434 3064919 ADJUSTING DEVICE,BE................. 1<br />
20 PAFZZ 5330-01-080-2992 15434 3038998 .SEAL,PLAIN ENCASED................. 1<br />
21 PAFZZ 2815-00-815-0355 15434 S-16255 .RING,BEARING RETAIN................ 1<br />
22 PAFZZ 5365-01-080-0409 15434 208120 .SPACER,SLEEVE...................... 1<br />
23 PCFZZ 5331-01-086-3991 15434 145506 .O-RING............................. 1<br />
24 PAFZZ 3110-00-144-8828 24617 3305L1A .BEARING,BALL,ANNULA................ 1<br />
25 PAFZZ 3040-01-079-3468 15434 208119 .SHAFT,SHOULDERED................... 1<br />
26 PAFZZ 3020-01-079-4206 15434 21539700 .PULLEY,GROOVE...................... 1<br />
27 PAFZZ 5365-00-404-2934 15434 S-965-E .PLUG,MACHINE THREAD................ 1<br />
28 PAOZZ 3030-01-065-9404 24161 K060436 BELT,V 45.50 INCHES LONG........... 1<br />
29 PAOZZ 5305-01-129-4386 15434 3012468 SCREW,CAP,HEXAGON H WITH CAPTIVE 5<br />
WASHER, 3/8-24 X 2-1/4..............<br />
30 PCOZZ 5330-01-146-7314 15434 3024960 GASKET PART OF KIT P/N 380171200 1<br />
PART OF KIT P/N 3801235 PART OF KIT<br />
P/N 380171000.......................<br />
31 PAOZZ 5305-01-147-4035 15434 3012469 SCREW,CAP,HEXAGON H WITH CAPTIVE 2<br />
WASHER, 3/8-24 X 3-1/4..............<br />
32 PAOZZ 5310-00-261-7340 15434 S604 WASHER,LOCK......................... 7<br />
END OF FIGURE<br />
36-1/BLANK
TM 9-2815-225-34&P<br />
(1)<br />
ITEM<br />
NO<br />
(2)<br />
SMR<br />
CODE<br />
(3)<br />
NSN<br />
(4)<br />
CAGEC<br />
(5)<br />
PART<br />
NUMBER<br />
(6)<br />
DESCRIPTION AND USABLE ON CODE(UOC)<br />
GROUP 94 REPAIR KITS<br />
GROUP 9401 REPAIR KITS<br />
(7)<br />
QTY<br />
FIG. KITS<br />
1 PAFZZ 5365-00-716-5496 15434 AR01176 SHIM SET ...........................<br />
SHIM ( 2 ) 16 - 4<br />
SHIM ( V ) 16 - 4<br />
SHIM ( V ) 16 - 4<br />
SHIM ( V ) 16 - 4<br />
2 PAFZZ 2815-00-913-2074 15434 AR-73350 RING SET,PISTON ....................<br />
RING, COMPRESSION, ( 1 ) 20 - 18<br />
RING,PISTON ( 1 ) 20 - 17<br />
RING,PISTON ( 1 ) 20 - 19<br />
3 PAHZZ 5330-01-075-0948 15434 3010242 GASKET SET FUEL PUMP GASKET .......<br />
GASKET ( 1 ) 24 - 32<br />
GASKET ( 1 ) 31 - 16<br />
GASKET ( 1 ) 25 - 2<br />
GASKET ( 1 ) 30 - 31<br />
GASKET ( 1 ) 30 - 42<br />
GASKET ( 1 ) 24 - 8<br />
GASKET ( 1 ) 25 - 13<br />
O-RING ( 1 ) 29 - 11<br />
O-RING ( 2 ) 24 - 14<br />
O-RING ( 1 ) 29 - 9<br />
O-RING ( 1 ) 24 - 52<br />
O-RING ( 1 ) 31 – 6<br />
O-RING ( 1 ) 31 – 8<br />
PACKING,PREFORMED ( 1 ) 29 - 15<br />
PACKING,PREFORMED ( 2 ) 13 - 12<br />
PACKING,PREFORMED ( 1 ) 24 – 19<br />
PACKING,PREFORMED ( 1 ) 24 – 20<br />
SEAL ( 1 ) 30 – 10<br />
SEAL,OIL ( 2 ) 30 – 21<br />
SEAL,SPECIAL ( 1 ) 24 - 11<br />
4 PAHZZ 5330-01-092-4143 15434 3018762 GASKET SET BIG CAM I ..............<br />
GASKET ( 1 ) 11 - 39<br />
GASKET ( 2 ) 11 - 3<br />
GASKET ( 1 ) 11 - 48<br />
GASKET ( 1 ) 11 - 26<br />
GASKET ( 1 ) 11 - 16<br />
GASKET ( 1 ) 13 – 2<br />
GASKET ( 3 ) 7 - 8<br />
PACKING,PREFORMED ( 2 ) 11 – 49<br />
PACKING,PREFORMED ( 2 ) 11 - 29<br />
SPACER,RING ( 1 ) 11 - 24<br />
5 PAHZZ 4820-01-158-0555 15434 302112400 VALVE,CHECK ........................<br />
ADAPTER,STRAIGHT,PI ( 2 ) 22 - 31<br />
BODY,CHECK VALVE ( 1 ) 22 - 24<br />
CLAMP ( 1 ) 22 - 28<br />
CLAMP,HOSE ( 4 ) 22 - 23<br />
SCREW,CAP,HEXAGON ( 1 ) 22 - 27<br />
SCREW,CAP,HEXAGON ( 1 ) 22 - 29<br />
TANK,AIR ( 1 ) 22 - 30<br />
WASHER,LOCK ( 1 ) 22 - 25<br />
WASHER,LOCK ( 2 ) 13 - 32<br />
WASHER,PLAIN ( 1 ) 22 - 26<br />
6 PAHZZ 2815-01-165-0765 15434 3801056<br />
RING SET,PISTON ....................<br />
RING,PISTON ( 6 ) 6 - 4<br />
RING,PISTON ( 6 ) 6 - 2<br />
1<br />
1<br />
1<br />
1<br />
1<br />
6<br />
KIT-1
TM 9-2815-225-34&P<br />
(1)<br />
ITEM<br />
NO<br />
(2)<br />
SMR<br />
CODE<br />
(3)<br />
NSN<br />
(4)<br />
CAGEC<br />
(5)<br />
PART<br />
NUMBER<br />
(6)<br />
DESCRIPTION AND USABLE ON CODE(UOC)<br />
(7)<br />
QTY<br />
RING,PISTON ( 6 ) 6 - 1<br />
RING,PISTON ( 6 ) 6 – 3<br />
7 PAHZZ 2990-01-271-0316 15434 3801096<br />
PARTS KIT,SUPERCHAR BIG CAM III ...<br />
GASKET ( 1 ) 27 - 12<br />
NUT,SELF-LOCKING ( 1 ) 27 – 5<br />
PACKING,PREFORMED ( 1 ) 27 - 11<br />
PACKING,FLAT FIBER ( 1 ) 27 - 15<br />
PLATE,DIFFUSER ( 1 ) 27 - 10<br />
SCREW,CAP HEXAGON H ( 1 ) 27 - 9<br />
SEAL,TURBO ( 1 ) 27 - 2<br />
SEAL,PLAIN ( 2 ) 27 – 17<br />
WASHER,FLAT ( 4 ) 27 - 6<br />
8 PAHZZ 2815-01-168-3742 15434 3801058 PISTON,INTERNAL COM ................<br />
PIN,PISTON ( 6 ) 6 - 7<br />
PISTON ( 6 ) 6 - 5<br />
RING,RETAINING ( 12) 6 - 6<br />
9 PFHZZ 3120-01-155-2531 15434 3801106 BEARING SET,SLEEVE CAMSHAFT .......<br />
BEARING,SLEEVE ( 1 ) 2 - 30<br />
BUSHING,SLEEVE ( 4 ) 2 - 30<br />
BUSHING,SLEEVE ( 2 ) 2 - 30<br />
10 PAHZZ 5330-01-150-9812 15434 3801235 GASKET AND SEAL SET COMPLETE<br />
OVERHAUL ...........................<br />
GASKET ( 1 ) 2 - 13<br />
GASKET ( 1 ) 4 – 1<br />
GASKET ( 3 ) 7 – 8<br />
GASKET ( 3 ) 7 - 8<br />
GASKET ( 3 ) 7 – 8<br />
GASKET ( 3 ) 7 – 8<br />
GASKET ( 1 ) 10 – 22<br />
GASKET ( 1 ) 10 – 10<br />
GASKET ( 1 ) 10 – 9<br />
GASKET ( 1 ) 10 – 30<br />
GASKET ( 1 ) 12 – 1<br />
GASKET ( 1 ) 12 – 30<br />
GASKET ( 1 ) 13 – 2<br />
GASKET ( 1 ) 13 – 49<br />
GASKET ( 1 ) 13 – 34<br />
GASKET ( 1 ) 13 – 34<br />
GASKET ( 1 ) 16 – 11<br />
GASKET ( 1 ) 17 – 19<br />
GASKET ( 1 ) 34 – 17<br />
GASKET ( 1 ) 34 – 27<br />
GASKET ( 1 ) 36 – 30<br />
O-RING ( 1 ) 2 – 39<br />
O-RING ( 1 ) 10 – 5<br />
O-RING ( 1 ) 10 - 23<br />
O-RING ( 1 ) 10 – 18<br />
O-RING ( 1 ) 13 – 47<br />
O-RING ( 1 ) 16 – 5<br />
PACKING,PREFORMED ( 1 ) 34 – 16<br />
SEAL ( 1 ) 4 – 4<br />
SEAL ( 1 ) 4 – 10<br />
SEAL,PLAIN ENCASED ( 1 ) 16 – 6<br />
SEAL,PLAIN ENCASED ( 1 ) 36 - 12<br />
6<br />
1<br />
1<br />
11 PAFZZ 2815-01-152-9219 15434 4024958<br />
KIT-2<br />
PARTS KIT,CYLINDER SINGLE HEAD<br />
GASKET .............................<br />
GASKET ( 3 ) 21 - 11<br />
GASKET ( 1 ) 14 – 3<br />
GASKET ( 3 ) 3 - 23<br />
1
TM 9-2815-225-34&P<br />
(1)<br />
ITEM<br />
NO<br />
(2)<br />
SMR<br />
CODE<br />
(3)<br />
NSN<br />
(4)<br />
CAGEC<br />
(5)<br />
PART<br />
NUMBER<br />
(6)<br />
DESCRIPTION AND USABLE ON CODE(UOC)<br />
(7)<br />
QTY<br />
GASKET ( 6 ) 15 - 4<br />
GASKET ( 1 ) 26 – 8<br />
GASKET ( 1 ) 14 - 8<br />
GASKET ( 3 ) 14 – 33<br />
GASKET ( 1 ) 34 - 5<br />
GASKET ( 1 ) 26 - 1<br />
GASKET ( 6 ) 34 - 27<br />
GASKET ( 3 ) 8 - 3<br />
0-RING ( 12) 3 - 22<br />
0-RING ( 4 ) 34 - 2<br />
PACKING,PREFORMED ( 4 ) 14 – 7<br />
12 PAFZZ 5330-01-086-7790 15434 3804280 GASKET SET UPPER ENGINE GASKET,<br />
VALVE GRIND ........................<br />
GASKET ( 12) 3 - 22<br />
GASKET ( 3 ) 3 - 23<br />
GASKET ( 3 ) 21 - 11<br />
GASKET ( 3 ) 8 - 32<br />
GASKET ( 6 ) 15 - 4<br />
GASKET ( 1 ) 26 - 8<br />
GASKET ( 1 ) 26 - 1<br />
GASKET ( 3 ) 14 - 33<br />
GASKET ( 1 ) 34 - 5<br />
O-RING ( 4 ) 34 - 2<br />
O-RING ( 2 ) 11 - 36<br />
O-RING ( 2 ) 34 - 24<br />
O-RING ( 2 ) 3 - 6<br />
SEAL,THERMAL ( 1 ) 34 – 7<br />
13 PAHZZ 2940-01-184-1877 34623 5739124 FILTER,FLUID .......................<br />
BRACKET,ANGLE ( 1 ) 35 - 2<br />
FILTER ELEMENT,FLUI ( 1 ) 35 - 9<br />
14 PAFZZ 2930-01-287-9733 15434 380171000 PARTS KIT,ENGINE WA ................<br />
BEARING,BALL,ANNULA ( 2 ) 36 - 16<br />
GASKET ( 1 ) 36 - 30<br />
GASKET ( 2 ) 36 - 8<br />
PACKING WITH RETAIN ( 2 ) 36 - 3<br />
RING,BEARING RETAIN ( 1 ) 36 - 11<br />
15 PAFZZ 2930-01-262-5153 15434 380171200<br />
PARTS KIT,ENGINE WA ................<br />
GASKET ( 1 ) 36 - 30<br />
IMPELLER,PUMP,CENTR ( 1 ) 36 - 2<br />
PACKING WITH RETAIN ( 2 ) 36 - 3<br />
SHAFT,SHOULDERED ( 1 ) 36 - 7<br />
SPACER ( 1 ) 36 – 10<br />
1<br />
1<br />
1<br />
1<br />
END OF FIGURE<br />
KIT-3/BLANK
TM 9-2815-225-34&P<br />
(1)<br />
ITEM<br />
NO<br />
(2)<br />
SMR<br />
CODE<br />
(3)<br />
NSN<br />
(4)<br />
CAGEC<br />
(5)<br />
PART<br />
NUMBER<br />
(6)<br />
DESCRIPTION AND USABLE ON CODE(UOC)<br />
(7)<br />
QTY<br />
GROUP 95 BULK<br />
GROUP 9501 BULK MATERIAL<br />
FIG. BULK<br />
1 PAOZZ 4720-00-541-4243 24161 28430 HOSE,NONMETALLIC V<br />
2 PAOZZ 4720-01-114-7728 19207 8710557 HOSE,NONMETALLIC V<br />
3 PAOZZ 4720-00-187-4102 01276 2580-6 HOSE,NONMETALLIC V<br />
END OF FIGURE<br />
BULK-1
TM 9-2815-225-34&P<br />
1<br />
2<br />
4<br />
5<br />
thru<br />
12<br />
16<br />
17<br />
thru<br />
19<br />
21<br />
22<br />
thru<br />
26<br />
3<br />
28<br />
5<br />
27<br />
29<br />
6<br />
12<br />
22 23 24<br />
25<br />
26<br />
11 10<br />
9<br />
8<br />
7<br />
13<br />
20<br />
17<br />
18<br />
19<br />
15<br />
14<br />
Figure 37. <strong>Direct</strong> Support Special Tools-1.
TM 9-2815-225-34&P<br />
(1)<br />
ITEM<br />
NO<br />
(2)<br />
SMR<br />
CODE<br />
(3)<br />
NSN<br />
(4)<br />
CAGEC<br />
(5)<br />
PART<br />
NUMBER<br />
(6)<br />
DESCRIPTION AND USABLE ON CODE(UOC)<br />
(7)<br />
QTY<br />
GROUP 2604 SPECIAL TOOLS<br />
FIG. 37 DIRECT SUPPORT SPECIAL<br />
TOOLS-1<br />
1 PEFZZ 6620-01-147-9954 15434 ST-1273 GAGE,PRESSURE,DIAL MANIFOLD<br />
PRESSURE............................<br />
2 PEFZZ 4910-01-097-6989 15434 3375180 DRIVER WATER PUMP...................<br />
3 PEFZZ 5120-00-896-8097 0B8S3 3822505 INSERTER,SEAL.......................<br />
4 PEFZZ 4910-01-098-1914 15434 ST-1242 PARTS KIT BUSHING D.................<br />
5 PEHZZ 4910-01-112-7509 15434 ST-1242-3 .TOOL,EMBEDDING BLOC................<br />
6 PEHZZ 4910-01-113-1066 15434 ST-1242-2 .CUP,BUSHING DRIVER.................<br />
7 PEHZZ 5315-01-110-7835 15434 ST-1242-6 .PIN,COTTER.........................<br />
8 PEHZZ 5120-01-119-2743 15434 ST-1242-4 .DRIVER,BEARING AND.................<br />
9 PEHZZ 4910-01-099-1487 15434 ST-1242-5 .KNOCK OUT RING TAPE................<br />
10 PEHZZ 4910-01-117-4885 15434 ST-1242-7 .RING,KNOCK OUT.....................<br />
11 PEHZZ 4910-01-118-2878 15434 ST-1242-8 .DRIVER,BEARING AND.................<br />
12 PEHZZ 4910-01-108-9130 15434 ST-1242-1 .MANDREL............................<br />
13 PEFZZ 5133-00-932-2089 15434 ST-788 CUTTING TOOL,BEAD...................<br />
14 PEFZZ 4910-00-150-5858 15434 3375425 EXTRACTOR,SLEEVE IN.................<br />
15 PEFZZ 5120-00-981-3108 15434 ST-1227 INSTALLER,SLEEVE....................<br />
16 PEFZZ 4910-00-981-3105 15434 ST-884 CUTTER,INJECTOR SLE.................<br />
17 PEFZA 4910-01-097-6957 15434 ST-884-1 .HOLDER.............................<br />
18 PEFZA 4910-01-098-5088 15434 ST-884-3 .CUTTER.............................<br />
19 PEFZA 4910-01-097-6958 15434 ST-884-6 .PILOT..............................<br />
20 PEFZZ 5120-00-150-7492 15434 ST-995 WRENCH,INJECTOR CUP INJECTOR CUP...<br />
21 PEFZZ 3441-00-922-6699 15434 ST-880 EXPANDER,TUBE.......................<br />
22 PEFZZ 5210-01-099-6339 15434 ST-880-1 .GAGE...............................<br />
23 PEFZZ 4910-01-097-6955 15434 ST-880-2 .ROLL...............................<br />
24 PEFZZ 15434 ST-880-3 .COLLAR.............................<br />
25 PEFZZ 5310-01-104-4549 15434 ST-880-6 .NUT................................<br />
26 PEFZZ 4910-01-097-6956 15434 ST-880-7 .MANDREL............................<br />
27 PEFZZ 4910-01-085-9211 15434 3375150 CHECKING TOOL,BLOWB.................<br />
28 PEFZZ 5210-00-999-1209 15434 ST-560 GAGE,PISTON RING GR.................<br />
29 PEFZZ 5120-00-104-1795 15434 ST-1179 HOLDING TOOL,INJECT.................<br />
END OF FIGURE<br />
37-1
TM 9-2815-225-34&P<br />
1<br />
2<br />
4 5<br />
8<br />
9<br />
thru<br />
14<br />
3<br />
16<br />
5<br />
15<br />
6<br />
13<br />
12<br />
7<br />
11<br />
14<br />
9<br />
10<br />
Figure 38. <strong>Direct</strong> Support Special Tools-2.
TM 9-2815-225-34&P<br />
(1)<br />
ITEM<br />
NO<br />
(2)<br />
SMR<br />
CODE<br />
(3)<br />
NSN<br />
(4)<br />
CAGEC<br />
(5)<br />
PART<br />
NUMBER<br />
(6)<br />
DESCRIPTION AND USABLE ON CODE(UOC)<br />
(7)<br />
QTY<br />
GROUP 2604 DS SPECIAL TOOLS<br />
FIG. 38 DIRECT SUPPORT SPECIAL<br />
TOOLS-2<br />
1 PEFZZ 5120-01-160-8863 0B8S3 3397929 WRENCH,STRAP OIL AND FUEL FILTER,<br />
SPIN-ON.............................<br />
2 PEFZZ 4910-00-999-1506 15434 ST-302 VISE,BALL JOINT.....................<br />
3 PEFZZ 4910-01-097-6987 15434 ST-1114 FIXTURE BEARING.....................<br />
4 PEFZZ 5120-00-999-1504 63704 2380 PULLER,MECHANICAL GOVERNOR WEIGHT..<br />
5 PEFZZ 4910-01-097-6930 15434 3375108 .PULLER BUSHING.....................<br />
6 PEFZZ 4910-01-097-6989 15434 3375180 DRIVER WATER PUMP...................<br />
7 PEFZZ 5120-01-072-2952 15434 3376845 WRENCH,BOX AND OPEN AIR COMPRESSOR.<br />
8 PEFFZ 5120-00-103-4687 15434 ST-669 ADAPTER,TORQUE WREN TORQUE WRENCH..<br />
9 PEFZZ 55719 F40B .HANDLE,SOCKET WRENC................<br />
10 PEFZZ 5120-01-122-6014 15434 ST-669-13 .SCREWDRIVER BIT....................<br />
11 PEFZZ 5120-00-865-0226 15434 TM-82 .BIT,SCREWDRIVER....................<br />
12 PFFZZ 15434 M-1302B-24 .SOCKET.............................<br />
13 PFFZZ 15434 M1302B18 .SOCKET.............................<br />
14 PFFZZ 15434 ST-6991 .DRIVER.............................<br />
15 PEFZZ 4910-01-097-6988 15434 ST-1159 MANDREL,SEAL,SLEEVE SEAL-WEAR<br />
SLEEVE..............................<br />
16 PEFZZ 4910-01-097-6972 15434 ST-1325 ATTACHMENT DIAL.....................<br />
END OF FIGURE<br />
38-1
TM 9-2815-225-34&P<br />
1<br />
2<br />
thru<br />
11<br />
8<br />
9<br />
10<br />
13<br />
14<br />
thru<br />
16<br />
5<br />
7<br />
11<br />
6<br />
18<br />
19<br />
thru<br />
27<br />
4<br />
3<br />
12<br />
2<br />
14<br />
16<br />
28<br />
15<br />
19<br />
20<br />
21<br />
22<br />
17<br />
23 24<br />
25<br />
26<br />
27<br />
Figure 39. <strong>Direct</strong> Support Special Tools-3.
TM 9-2815-225-34&P<br />
(1)<br />
ITEM<br />
NO<br />
(2)<br />
SMR<br />
CODE<br />
(3)<br />
NSN<br />
(4)<br />
CAGEC<br />
(5)<br />
PART<br />
NUMBER<br />
(6)<br />
DESCRIPTION AND USABLE ON CODE(UOC)<br />
(7)<br />
QTY<br />
GROUP 2604 SPECIAL TOOLS-3<br />
FIG. 39 DIRECT SUPPORT SPECIAL<br />
TOOLS-3<br />
1 PEFZZ 5120-00-113-5271 0B8S3 3377079 PULLER,MECHANICAL...................<br />
2 PEFZZ 4910-01-097-6970 15434 3375825 .TIP EXTRACTOR......................<br />
3 PEFZZ 5120-01-120-3682 15434 3375616 .ROD,INJECTOR SLEEVE................<br />
4 KFFZZ 15434 3375615 .COLLAR.............................<br />
5 PEFZA 4910-01-097-6969 15434 3375614 .COLLAR FORMING.....................<br />
6 PEFZZ 5365-01-103-7835 15434 ST-1244-9 .SPACER,RING........................<br />
7 PFFZZ 15434 ST-1244-1 .SUPPORT............................<br />
8 PEFZZ 3120-01-103-8752 15434 ST-1244-5 .BEARING,WASHER,THRU................<br />
9 PEFZZ 5310-01-104-4550 15434 ST-1244-4 .NUT................................<br />
10 PFFZZ 15434 ST-1244-3 .NUT................................<br />
11 PEFZZ 5120-01-099-6341 15434 ST-1244-8 .HAMMER,HAND........................<br />
12 PEFZZ 4910-01-097-6971 15434 3375282 DRIVER VALVE GUIDE..................<br />
13 PEFFF 3460-00-999-1210 15434 ST-691 MANDREL SET,MACHINE.................<br />
14 PFFZZ 15434 ST-691-1 .MANDREL............................<br />
15 PFFZZ 15434 ST-691-2 .BLOCK..............................<br />
16 PFFZZ 15434 ST691-3 .MANDREL............................<br />
17 PEFZZ 4910-01-097-6986 15434 ST-658 MANDREL WATER PUMP..................<br />
18 PEFZZ 5120-01-156-4183 15434 3376326 PULLER,MECHANICAL PULLEY<br />
INSTALLATION........................<br />
19 PEFZZ 4910-01-097-6977 15434 ST-386-2 .ARBOR..............................<br />
20 PEFZZ 5310-01-097-6978 15434 ST-386-3 .NUT,PLAIN,HEXAGON..................<br />
21 PEHZZ 4910-01-097-6984 15434 ST-386-11 .BALL THRUST BEARING................<br />
22 PEFZZ 4910-01-097-6979 15434 ST-386-5 .SPACER.............................<br />
23 PEFZZ 4910-01-097-6985 15434 3375205 .ADAPTER............................<br />
24 PEFZZ 4910-01-097-6983 15434 ST-386-10 .ADAPTER............................<br />
25 PEFZZ 4910-01-097-6982 15434 ST-386-9 .ADAPTER............................<br />
26 PEFZZ 4910-01-097-6981 15434 ST-386-8 .ADAPTER............................<br />
27 PEFZZ 4910-01-097-6980 15434 ST-386-6 .ADAPTER............................<br />
28 PEFZZ 4910-00-150-5797 15434 ST-633 HEAD,GUIDE,SPACER...................<br />
END OF FIGURE<br />
39-1/BLANK
TM 9-2815-225-34&P<br />
3<br />
4<br />
thru<br />
14<br />
1<br />
2<br />
1<br />
1<br />
1<br />
1<br />
4 5<br />
6<br />
7<br />
7<br />
7<br />
14<br />
13<br />
11<br />
10<br />
9<br />
8<br />
6<br />
12<br />
Figure 40. <strong>Direct</strong> Support Special Tools (Supplemental), Big Cam I (Sheet 1 of 2).
TM 9-2815-225-34&P<br />
16<br />
17<br />
thru<br />
20<br />
21<br />
15<br />
20<br />
19<br />
17 22<br />
18<br />
Figure 40. <strong>Direct</strong> Support Special Tools (Supplemental) Big Cam I (Sheet 2 of 2).
TM 9-2815-225-34&P<br />
(1)<br />
ITEM<br />
NO<br />
(2)<br />
SMR<br />
CODE<br />
(3)<br />
NSN<br />
(4)<br />
CAGEC<br />
(5)<br />
PART<br />
NUMBER<br />
(6)<br />
DESCRIPTION AND USABLE ON CODE(UOC)<br />
(7)<br />
QTY<br />
GROUP 2604 SPECIAL TOOLS<br />
FIG. 40 DIRECT SUPPORT SPECIAL TOOLS<br />
(SUPPLEMENTAL) BIG CAM I<br />
1 PEFZZ 15434 ST593 INDICATOR,ENGINE TI.................<br />
2 PFFZZ 5110-00-980-7347 0B8S3 3376464 REAMER,HAND.........................<br />
3 PEFZZ 5120-00-178-0948 15434 ST-1100 TOOL,GROOVING.......................<br />
4 PEFZZ 4910-01-097-6964 15434 ST-1100-10 .BODY...............................<br />
5 PEFZZ 5310-01-097-6961 15434 ST-1100-7 .NUT,PLAIN,KNURLED..................<br />
6 XAFZZ 15434 ST-1100-5 .NUT,PLAIN,KNURLED..................<br />
7 XAFZZ 15434 ST-1100-1 .NUT,PLAIN,KNURLED..................<br />
8 PEFZZ 4910-01-097-6962 15434 ST-1100-8 .SLEEVE ROD.........................<br />
9 PEFZZ 4910-01-097-6960 15434 ST-1100-6 .CAPS CREW..........................<br />
10 PEFZZ 4910-01-097-6965 15434 ST-1100-11 .ROD TOOL ADJUSTING.................<br />
11 PEFZZ 4910-01-097-6963 15434 ST-1100-9 .SPRING ROD.........................<br />
12 PEFZZ 4910-01-097-6968 15434 ST-1100-14 .CAP TOOL SETTING...................<br />
13 PEFZZ 15434 ST-1100-13 .HONING UNIT,CYLINDR................<br />
14 PEFZA 4910-01-097-6966 15434 ST-1100-12 .SPRING TOOL........................<br />
15 PEFZZ 4910-01-097-6976 15434 ST-1218 MANDREL O RING......................<br />
16 PEFZZ 5180-00-916-1813 15434 ST-249 MANDREL-BLOCK,CAM F.................<br />
17 XAFZZ 15434 ST-249-4 .BLOCK..............................<br />
18 PEFZZ 5120-01-106-9174 15434 ST-249-3 .SLEEVE,MANDREL.....................<br />
19 PEFZZ 5120-01-097-3204 15434 ST-249-2 .MANDREL............................<br />
20 PEFZZ 5120-01-106-9173 15434 ST-249-1 .MANDREL............................<br />
21 PEFZZ 5120-00-159-8916 15434 ST-659 INSERTER,SEAL.......................<br />
22 PEFZZ 93389 2304 REMOVAL TOOL,OIL FI.................<br />
KIT ADFFF 5180-01-071-0707 19207 5704993 TOOL KIT,GENERAL ME.................<br />
END OF FIGURE<br />
40-1
TM 9-2815-225-34&P<br />
4 5<br />
7<br />
8<br />
thru<br />
12<br />
14<br />
15<br />
thru<br />
23<br />
1<br />
2<br />
3<br />
24<br />
5<br />
16<br />
17<br />
15<br />
6<br />
18<br />
19<br />
21<br />
20<br />
23<br />
22<br />
13<br />
8<br />
12<br />
11<br />
9<br />
10<br />
Figure 41. General Support Common Tools-1.
TM 9-2815-225-34&P<br />
(1)<br />
ITEM<br />
NO<br />
(2)<br />
SMR<br />
CODE<br />
(3)<br />
NSN<br />
(4)<br />
CAGEC<br />
(5)<br />
PART<br />
NUMBER<br />
(6)<br />
DESCRIPTION AND USABLE ON CODE(UOC)<br />
(7)<br />
QTY<br />
GROUP 2604 SPECIAL TOOLS<br />
FIG. 41 GENERAL SUPPORT SPECIAL<br />
TOOLS-1<br />
1 PEHZZ 5120-00-999-1505 15434 ST-835 INSERTER,PREFORMED.................<br />
2 PEHZZ 4910-00-150-5801 15434 ST-853 DRIVER,GOVERNOR,CYL................<br />
3 PEHZZ 5120-00-896-8087 0B8S3 ST-1032 INSERTER,SEAL......................<br />
4 PEFZZ 5120-00-150-5810 0B8S3 3824211 INSERTER,SEAL......................<br />
5 PEHZZ 4910-01-097-6915 15434 ST-997-6 .PINS..............................<br />
6 PEHZZ 4910-01-118-3747 15434 3375204 THROTTLE SHAFT BALL................<br />
7 PEHZZ 5180-01-102-8418 0B8S3 3823114 TOOL KIT,FUEL PUMP.................<br />
8 PEHZZ 5305-01-097-6921 15434 ST-1259-6 .SCREW,CAP,HEXAGON H...............<br />
9 PEHZZ 4910-01-097-6940 15434 3375140 .TOOL AFC NO AIR ADJ...............<br />
10 PEHZZ 4910-01-097-6941 15434 3375146 .INSTALLING TOOL...................<br />
11 XAHZZ 15434 3375147 .FORMING TOOL......................<br />
12 PEHZA 4910-01-097-6939 15434 3375137 .TOOL AFC ADJUSTING................<br />
13 PEHZZ 15434 ST1065 HOLDER,TOOL........................<br />
14 PEHHZ 59770 EST1228 MANDREL,CAMSHAFT BU................<br />
15 PEHZZ 4910-01-098-1917 15434 ST-1228-3 .MANDREL SHANK BUSHI...............<br />
16 PEHZZ 4910-01-100-6191 15434 ST-1228-9 .DRIVER............................<br />
17 PEHZA 4910-01-097-6910 15434 ST-1228-13 .PULLEY ASSEMBLY BUS...............<br />
18 PEHZA 4910-01-098-1919 15434 ST-1228-5 .GUIDE BUSHING DRIVE...............<br />
19 PEHZZ 4910-01-097-6912 15434 3375154 .GUIDE.............................<br />
20 PEHZA 4910-01-098-1918 15434 ST-1228-4 .SHAFT ASSEMBLY....................<br />
21 PEHZZ 4910-01-097-6911 15434 ST-1228-14 .ROLL PIN..........................<br />
22 PEHZZ 4910-01-098-1916 15434 ST-1228-2 .ROD BUSHING DRIVER................<br />
23 PEHZZ 4910-01-098-1915 15434 ST-1228-1 .HAMMER SLIDE......................<br />
24 PEHZZ 4910-00-150-5805 34623 MA326-21373 ADJUSTING TOOL.....................<br />
END OF FIGURE<br />
41-1
TM 9-2815-225-34&P<br />
1<br />
2<br />
3<br />
4<br />
7<br />
6<br />
5<br />
Figure 42. General Support Common Tools-2.
TM 9-2815-225-34&P<br />
(1)<br />
ITEM<br />
NO<br />
(2)<br />
SMR<br />
CODE<br />
(3)<br />
NSN<br />
(4)<br />
CAGEC<br />
(5)<br />
PART<br />
NUMBER<br />
(6)<br />
DESCRIPTION AND USABLE ON CODE(UOC)<br />
(7)<br />
QTY<br />
GROUP 2604 SPECIAL TOOLS<br />
FIG. 42 GENERAL SUPPORT SPECIAL<br />
TOOLS-2<br />
1 PEHZZ 5120-00-150-7488 0B8S3 3376684 COUNTERBORE TOOL,CY.................<br />
2 PEHZZ 5120-01-120-5760 15434 ST-1059-17 TOOL BIT,COUNTER....................<br />
3 PEHZZ 5110-00-981-3107 15434 3376903 REAMING FIXTURE,SHA.................<br />
4 PEHZZ 6625-01-232-5469 15434 3376619 PARTS KIT,GAGE TEST.................<br />
5 PEHZZ 5220-00-795-3079 15434 ST1177 GAGE,PROFILE........................<br />
6 PEHZZ 5220-01-168-6878 15434 ST-903 GAGE,RING,PLAIN.....................<br />
7 PEHZZ 15434 3376669 CLAMP,CYLINDER LINE.................<br />
END OF FIGURE<br />
42-1
TM 9-2815-225-34&P<br />
1<br />
2<br />
thru<br />
8<br />
9<br />
10<br />
<strong>and</strong><br />
11<br />
12<br />
13<br />
thru<br />
15<br />
2<br />
3<br />
4<br />
10<br />
11<br />
8 7<br />
6<br />
5<br />
16<br />
15<br />
14<br />
14<br />
13<br />
Figure 43. General Support Common Tools-3.
TM 9-2815-225-34&P<br />
(1)<br />
ITEM<br />
NO<br />
(2)<br />
SMR<br />
CODE<br />
(3)<br />
NSN<br />
(4)<br />
CAGEC<br />
(5)<br />
PART<br />
NUMBER<br />
(6)<br />
DESCRIPTION AND USABLE ON CODE(UOC)<br />
(7)<br />
QTY<br />
GROUP 2604 SPECIAL TOOLS<br />
FIG. 43 GENERAL SUPPORT SPECIAL<br />
TOOLS-3<br />
1 PEHHH 4910-01-106-0492 15434 ST-1259 PULLER-INSTALLER OIL SEAL..........<br />
2 PEHZZ 4910-01-097-6919 15434 ST-1259-4 .TOOL SPACER RING OIL SEAL.........<br />
3 PEHZZ 4910-01-097-6916 15434 ST-1259-1 .PLATE TOP OIL SEAL................<br />
4 PEHZA 4910-01-097-6917 15434 ST-1259-2 .TOOL SPACER RING OIL SEAL.........<br />
5 PEHZZ 5305-01-097-6918 15434 ST-1259-3 .SETSCREW OIL SEAL.................<br />
6 PEHZZ 5305-01-098-1913 15434 ST-1259-7 .SCREW,CAP,HEXAGON H OIL SEAL......<br />
7 PEHZZ 5305-01-097-6920 15434 ST-1259-5 .SETSCREW OIL SEAL.................<br />
8 PEHZZ 5305-01-097-6921 15434 ST-1259-6 .SCREW,CAP,HEXAGON H OIL SEAL......<br />
9 PEHZZ 4910-01-097-6926 15434 3822696 FIXTORE TOP STOP TOP STOP INJECTOR.<br />
10 PEHZZ 4910-01-097-6927 15434 3375165 .TOOL ADJUSTING TOP STOP INJECTOR..<br />
11 PEHZZ 4910-01-097-6928 15434 3375166 .WRENCH CROWSFOOT TOP STOP INJECTOR<br />
12 PEHZZ 5180-01-074-0019 0B8S3 3822472 TOOL KIT,FUEL PUMP FRONT COVER AND<br />
MAIN SHAFT ASSEMBLY.................<br />
13 PEHZZ 4910-01-097-6936 15434 3375172 .INSTALLING TOOL FRONT COVER AND<br />
MAIN SHAFT ASSEMBLY.................<br />
14 PFHZZ 4910-01-097-6937 15434 3375173 .DRIVER MAIN SHAFT FRONT COVER AND<br />
MAIN SHAFT ASSEMBLY.................<br />
15 PEHZZ 4910-01-097-6938 15434 3375174 .DRIVER FRONT COVER FRONT COVER AND<br />
MAIN SHAFT ASSEMBLY.................<br />
16 PEHZZ 15434 3824942 TESTER,INTERNAL COM INJECTION<br />
TIMING..............................<br />
KIT ADHHH 5180-01-141-9274 19207 5704991 TOOL KIT,GENERAL ME.................<br />
END OF FIGURE<br />
43-1
TM 9-2815-225-34&P<br />
1<br />
2<br />
thru<br />
10<br />
12 13 15 16 17 18<br />
10<br />
2<br />
3<br />
4<br />
5<br />
6<br />
7<br />
11<br />
11<br />
9<br />
8<br />
11<br />
11<br />
17<br />
18<br />
12<br />
12<br />
13<br />
15<br />
12<br />
16<br />
14<br />
Figure 44. General Support Special Tools-1 (Supplemental), Big Cam I.
TM 9-2815-225-34&P<br />
(1)<br />
ITEM<br />
NO<br />
(2)<br />
SMR<br />
CODE<br />
(3)<br />
NSN<br />
(4)<br />
CAGEC<br />
(5)<br />
PART<br />
NUMBER<br />
(6)<br />
DESCRIPTION AND USABLE ON CODE(UOC)<br />
(7)<br />
QTY<br />
GROUP 2604 SPECIAL TOOLS<br />
FIG. 44 GENERAL SUPPORT SPECIAL<br />
TOOLS-1 (SUPPLEMENTAL) BIG CAM I<br />
1 PEHHH 4910-01-085-1011 15434 ST-1168 BORING MACHINE,ENGI COUNTER<br />
BORE,GENERAL SUPPORT SPECIAL TOOLS<br />
2 PEHZZ 3120-01-085-0762 15434 ST-1168-4 .BEARING,DRIVE......................<br />
3 PEHZZ 5305-01-084-4596 15434 ST-1168-6 .SETSCREW...........................<br />
4 PEHZZ 4910-01-085-0763 15434 ST-1168-3 .SHAFT,CHAIN DRIVE..................<br />
5 PAHZZ 3020-01-085-0761 15434 ST-1168-5 .SPROCKET WHEEL SEGM................<br />
6 PAHZZ 3020-01-084-7007 15434 ST-1168-7 .CHAIN,ROLLER.......................<br />
7 PEHZZ 3020-01-086-8269 15434 ST-1168-10 .SPROCKET,DRIVEN....................<br />
8 PEHZZ 4910-01-098-1912 15434 ST-1168-19 .TOOL BIT...........................<br />
9 PEHZZ 4910-01-086-8268 15434 ST-1168-8 .SNAP RING,SHAFT....................<br />
10 PAHZZ 4910-01-088-7904 15434 ST-1168-9 .SNAP RING,BEARING..................<br />
11 PEHZZ 5120-00-065-1031 15434 ST-544 PULLER,MECHANICAL...................<br />
12 PEHZZ 4910-01-085-0765 15434 3376904 BORING TOOL,CYLINDE.................<br />
13 PEHZZ 5133-01-084-6008 15434 ST-1287-10 .TOOL BIT...........................<br />
14 PEHZZ 4910-01-097-6914 15434 ST-1158 BUSHING MANDREL.....................<br />
15 PEHZZ 5120-01-120-5759 15434 3375834 GEAR PULLER ASSEMBL.................<br />
16 PEHZZ 4910-01-097-6909 15434 3375839 .PULLER JAW.........................<br />
17 PEHZZ 4910-01-085-0766 15434 ST-1318 CHAMFER TOOL,LOWER..................<br />
18 PEHZZ 5133-01-084-6009 15434 ST-1318-23 .BIT,LOWER LINER....................<br />
END OF FIGURE<br />
44-1
TM 9-2815-225-34&P<br />
1<br />
2<br />
3<br />
thru<br />
13<br />
14<br />
15<br />
thru<br />
18<br />
20<br />
21<br />
<strong>and</strong><br />
22<br />
3<br />
5 6<br />
15<br />
4<br />
13<br />
12<br />
7<br />
11<br />
10<br />
9<br />
8<br />
16<br />
17<br />
18<br />
27<br />
19<br />
21<br />
22<br />
26<br />
23<br />
24<br />
25<br />
Figure 45. General Support Special Tools-2 (Supplemental), Big Cam I.
TM 9-2815-225-34&P<br />
(1)<br />
ITEM<br />
NO<br />
(2)<br />
SMR<br />
CODE<br />
(3)<br />
NSN<br />
(4)<br />
CAGEC<br />
(5)<br />
PART<br />
NUMBER<br />
(6)<br />
DESCRIPTION AND USABLE ON CODE(UOC)<br />
(7)<br />
QTY<br />
GROUP 2604 SPECIAL TOOLS<br />
FIG. 45 GENERAL SUPPORT SPECIAL<br />
TOOLS-2 (SUPPLEMENTAL) BIG CAM I<br />
1 PEHZZ 4910-01-105-9165 15434 3375153 DRIVER..............................<br />
2 PEHHH 4910-01-085-7824 34623 MA326 21 180 BORING TOOL,BUSHING.................<br />
3 PAHZZ 4910-01-085-0751 15434 3375223 .GUIDE,BUSHING BORIN................<br />
4 PEHZZ 4910-01-084-6979 15434 3375229 .DRIVE ADAPTER,BORTO................<br />
5 PEHZZ 4930-01-085-3728 15434 3375220 .HOUSING,BORING TOOL................<br />
6 PEHZZ 5355-01-097-7072 15434 3375228 .KNOB...............................<br />
7 PEHZZ 15434 3375227 .DIAL,INDICATOR.....................<br />
8 PEHZZ 15434 3375226 .BIT,BORING TOOL,BUS................<br />
9 PAHZZ 4910-01-084-7222 15434 3375225 .CUTTER BIT,BORING M................<br />
10 PAHZZ 4910-01-084-7221 15434 3375207 .CUTTER BIT,BORING M................<br />
11 PEHZZ 5355-01-084-5323 15434 3375224 .KNOB...............................<br />
12 PEHZZ 4910-01-084-6977 15434 3375221 .GUIDE,BUSHING BORIN................<br />
13 PEHZZ 4910-01-084-6978 15434 3375222 .GUIDE,BUSHING......................<br />
14 PEHZZ 5120-01-120-3681 15434 3376177 TORQUE WRENCH,INJEC.................<br />
15 PEHZZ 5120-01-072-2955 15434 ST-1090 .WRENCH,TORQUE......................<br />
16 PEHZZ 5305-01-097-6924 15434 ST-1090-4 .SET SCREW..........................<br />
17 XAHZZ 15434 3376197 .SCREWDRIVER........................<br />
18 PEHZZ 4910-01-097-6923 15434 ST-1090-3 .WRENCH ALLEN.......................<br />
19 PEHZZ 4910-01-097-6925 15434 ST-1145 TORQUING TOOL.......................<br />
20 PEHHH 5120-01-097-6932 15434 ST-1326 PULLER SET,MECHANIC.................<br />
21 PEHZA 4910-01-097-6934 15434 ST-1326-2 .COLLAR.............................<br />
22 PEHZZ 4910-01-097-6933 15434 ST-1326-1 .COLLET.............................<br />
23 PEHZZ 5330-01-107-1841 15434 3375015 GASKET..............................<br />
24 PEHZZ 4910-01-097-6944 15434 3375230 INSTALLING TOOL.....................<br />
25 PEHZZ 15434 ST-422 INSERTER,PREFORMED..................<br />
26 PEHZA 4910-01-097-6935 15434 3375014 ADAPTER PLATE FUEL..................<br />
27 PEHZZ 4910-01-097-6931 15434 ST-1231 BLOCK WEIGHT........................<br />
END OF FIGURE<br />
45-1
TM 9-2815-225-34&P<br />
4<br />
5<br />
<strong>and</strong><br />
6<br />
1<br />
2<br />
8<br />
3<br />
7<br />
5<br />
6<br />
Figure 46. General Support Special Tools-3 (Supplemental).
TM 9-2815-225-34&P<br />
(1)<br />
ITEM<br />
NO<br />
(2)<br />
SMR<br />
CODE<br />
(3)<br />
NSN<br />
(4)<br />
CAGEC<br />
(5)<br />
PART<br />
NUMBER<br />
(6)<br />
DESCRIPTION AND USABLE ON CODE(UOC)<br />
(7)<br />
QTY<br />
GROUP 2604 SPECIAL TOOLS<br />
FIG. 46 GENERAL SUPPORT SPECIAL<br />
TOOLS-3 (SUPPLEMENTAL)<br />
1 PEHZZ 4910-01-097-6945 15434 3375271 MANDREL.............................<br />
2 PEHZZ 4910-01-086-9766 15434 ST-608 TURBO SUPPORT BLOCK.................<br />
3 XDHZZ 15434 ST-1095 SOCKET,SOCKET WRENCH................<br />
4 PEHZZ 5120-00-065-1031 15434 ST-544 PULLER,MECHANICAL...................<br />
5 XAHZZ 15434 ST-544-2 .SCREW VALVE........................<br />
6 PEHZZ 5120-01-100-0135 15434 ST-544-1 .REMOVER,BEARING AND................<br />
7 PEHZZ 5120-00-923-0856 15434 ST-851 HOLDER..............................<br />
8 PEHZZ 4910-01-074-0020 15434 3375855 TEMPLATE,FUEL PUMP LEVEL AND ANGLE.<br />
KIT ADHHH 5180-01-141-9274 19207 5704991 TOOL KIT,GENERAL ME.................<br />
KIT ADHHH 5180-01-069-6998 19207 5704994 TOOL KIT,GENERAL ME.................<br />
END OF FIGURE<br />
46-1
TM 9-2815-225-34&P<br />
1<br />
2<br />
9<br />
8<br />
3<br />
4<br />
7<br />
6<br />
Figure 47. <strong>Direct</strong> <strong>and</strong> General Support Special Tools-1.<br />
5
TM 9-2815-225-34&P<br />
(1)<br />
ITEM<br />
NO<br />
(2)<br />
SMR<br />
CODE<br />
(3)<br />
NSN<br />
(4)<br />
CAGEC<br />
(5)<br />
PART<br />
NUMBER<br />
(6)<br />
DESCRIPTION AND USABLE ON CODE(UOC)<br />
(7)<br />
QTY<br />
GROUP 2604 SPECIAL TOOLS<br />
FIG. 47 DIRECT AND GENERAL SUPPORT<br />
SPECIAL TOOLS-1<br />
1 PEFZZ 2815-00-362-2042 15434 ST-125 FIXTURE ENGINE LIFTING.............<br />
2 PEFZZ 4910-00-345-3708 15434 ST-257 INSERT KIT,VALVE SE VALVE SEAT<br />
INSERT..............................<br />
3 PEFAA OB8S3 ST-448 COMPRESSOR,VALVE SP.................<br />
4 PEFZZ 4920-00-711-9307 15434 ST583 FIXTURE,HOLDING,CYL.................<br />
5 PEHZZ 4910-01-150-9713 15434 3375455 BORING MACHINE,ENGI CYLINDER BLOCK<br />
COUNTERBORE.........................<br />
6 PEFZZ 4910-01-159-8701 15434 ST-749 PLATE,MOUNTING,AIR AIR COMPRESSOR<br />
MOUNTING............................<br />
7 PEFZZ 5120-01-164-3265 0B8S3 ST-1105 INSERTER AND REMOVE AIR COMPRESSOR<br />
BUSHING.............................<br />
8 PEFZZ 3460-00-999-1173 15434 ST-663 ARBOR SET,VALVE GUI.................<br />
9 PEFZZ 4910-00-999-1208 15434 ST662 CUTTER SET,COUNTERB VALVE SEAT<br />
INSERT..............................<br />
END OF FIGURE<br />
47-1
TM 9-2815-225-34&P<br />
1 2<br />
3<br />
10<br />
4<br />
9<br />
5<br />
8<br />
7<br />
6<br />
Figure 48. <strong>Direct</strong> Support Special Tools-2.
TM 9-2815-225-34&P<br />
(1)<br />
ITEM<br />
NO<br />
(2)<br />
SMR<br />
CODE<br />
(3)<br />
NSN<br />
(4)<br />
CAGEC<br />
(5)<br />
PART<br />
NUMBER<br />
(6)<br />
DESCRIPTION AND USABLE ON CODE(UOC)<br />
(7)<br />
QTY<br />
GROUP 2604 SPECIAL TOOLS<br />
FIG. 48 DIRECT SUPPORT SPECIAL<br />
TOOLS-2<br />
1 PEFZA 4910-00-925-0755 15434 ST824 CUTTER BIT,BORING M INJECTOR SEAT<br />
CUTTING.............................<br />
2 PEFZZ 7920-00-168-3244 0B8S3 ST-876 BRUSH,FUEL PASSAGE FUEL PASSAGE<br />
CLEANING............................<br />
3 PEFAA 4910-00-150-5843 15434 ST-1122 DRIVER,VALVE,INSERT VALVE SEAT<br />
INSERT STAKING TOOL.................<br />
4 PEFZZ 4910-00-150-5844 15434 ST-1124 DRIVER,ASSEMBLY,INS VALVE SEAT<br />
INSERT STAKING TOOL.................<br />
5 PEFZZ 4910-01-161-2115 15434 ST-1173 MANDREL,SEAL........................<br />
6 PEFZZ 5120-01-160-8867 0B8S3 ST-1191 INSERTER,SEAL.......................<br />
7 PEFZZ 5120-01-128-2678 0B8S3 3376663 PULLER,COUPLING.....................<br />
8 PEFZZ 4910-01-128-2691 15434 3824277 TESTER,VALVE VAC VALVE VACUUM......<br />
9 PEFZZ 5120-01-128-2679 0B8S3 ST-1279 EXTRACTOR,VALVE,SEA VALVE SEAT.....<br />
10 PEFZZ 5120-00-116-7604 0B8S3 3823024 PULLER,INJECTOR.....................<br />
END OF FIGURE<br />
48-1
TM 9-2815-225-34&P<br />
1<br />
2<br />
3<br />
4<br />
11<br />
5<br />
10<br />
9<br />
8<br />
6<br />
7<br />
Figure 49. <strong>Direct</strong> Support Special Tools-3.
TM 9-2815-225-34&P<br />
(1)<br />
ITEM<br />
NO<br />
(2)<br />
SMR<br />
CODE<br />
(3)<br />
NSN<br />
(4)<br />
CAGEC<br />
(5)<br />
PART<br />
NUMBER<br />
(6)<br />
DESCRIPTION AND USABLE ON CODE(UOC)<br />
(7)<br />
QTY<br />
GROUP 2604 SPECIAL TOOLS<br />
FIG. 49 DIRECT SUPPORT SPECIAL<br />
TOOLS-3<br />
1 PEFZZ 4910-01-142-4929 15434 3375182 TESTER VALVE SPRING.................<br />
2 PEFZZ 4910-01-143-2023 15434 3375192 EXPANSION PLUG DRIV 1 1/4 INCH PLUG<br />
3 PEFZZ 4910-01-143-3337 15434 3376816 EXPANSION PLUG DRIV EXPANSION PLUG,<br />
1 INCH PLUG.........................<br />
4 PEFZZ 4910-01-143-3336 15434 3376815 EXPANSION PLUG DRIV EXPANSION PLUG,<br />
3/4 INCH PLUG.......................<br />
5 PEFZZ 5120-01-155-3795 15434 3375257 PULLER,WATER PUMP I.................<br />
6 PEFZZ 5120-01-128-2675 15434 3375448 DRIVER,SEAL,WP......................<br />
7 PEFZZ 5210-01-157-2291 0B8S3 3376050 INDICATOR,DIAL......................<br />
8 PEFZZ 5120-01-156-4183 15434 3376326 PULLER,MECHANICAL...................<br />
9 PEFZZ 55719 SINL-200 SOCKET,SOCKET WRENC 5/8 INCH X 1/2<br />
DRIVE...............................<br />
10 PEFZZ 5120-01-163-1349 75078 011494 SOCKET,SOCKET WRENC SOLENOID VALVE.<br />
11 PEFZZ 4910-01-165-4541 15434 3375151 EXPANDER,OIL SEAL...................<br />
END OF FIGURE<br />
49-1
TM 9-2815-225-34&P<br />
1<br />
2<br />
3<br />
8<br />
4<br />
7<br />
6<br />
5<br />
Figure 50. General Support Special Tools-1.
TM 9-2815-225-34&P<br />
(1)<br />
ITEM<br />
NO<br />
(2)<br />
SMR<br />
CODE<br />
(3)<br />
NSN<br />
(4)<br />
CAGEC<br />
(5)<br />
PART<br />
NUMBER<br />
(6)<br />
DESCRIPTION AND USABLE ON CODE(UOC)<br />
(7)<br />
QTY<br />
GROUP 2604 SPECIAL TOOLS<br />
FIG. 50 GENERAL SUPPORT SPECIAL<br />
TOOLS-1<br />
1 PEHZZ 4910-00-977-7507 15434 ST-561 FIXTURE ASSEMBLY,CH CONNECTING ROD<br />
CHECKING............................<br />
2 PEHZZ 4910-01-146-7130 15434 ST-563 MANDREL.............................<br />
3 PEHZZ 5120-00-999-1503 0B8S3 3376135 BURNISHER,INJECTOR..................<br />
4 PEHZZ 5120-00-150-7486 0B8S3 3823871 EXPANDER,PISTON RIN PISTON RING....<br />
5 PEHZZ 4910-01-141-8388 15434 ST-1241 PLUNGER PROTUSION PLUNGER<br />
PROTRUSION CHECKING.................<br />
6 PEHZZ 4910-00-150-5819 15434 ST-1089 EXTENSION,INJECTOR..................<br />
7 PEHZZ 4910-00-150-5848 15434 ST-1134 EXTRACTOR,VALVE PIN DOWEL PIN......<br />
8 PEHZZ 5120-00-999-1206 80244 999-1206 DRIVER,CYLINDER LIN.................<br />
END OF FIGURE<br />
50-1
TM 9-2815-225-34&P<br />
1<br />
2<br />
3<br />
8<br />
4<br />
7<br />
6<br />
5<br />
Figure 51. General Support Special Tools-2.
TM 9-2815-225-34&P<br />
(1)<br />
ITEM<br />
NO<br />
(2)<br />
SMR<br />
CODE<br />
(3)<br />
NSN<br />
(4)<br />
CAGEC<br />
(5)<br />
PART<br />
NUMBER<br />
(6)<br />
DESCRIPTION AND USABLE ON CODE(UOC)<br />
(7)<br />
QTY<br />
GROUP 2604 SPECIAL TOOLS<br />
FIG. 51 GENERAL SUPPORT SPECIAL<br />
TOOLS-2<br />
1 PEHZZ 4910-01-147-7896 15434 ST-1261 CONVERSION KIT,INJE.................<br />
2 PEHZZ 4910-01-154-6406 15434 ST-1262 MASTER INJECTOR MASTER "K".........<br />
3 PEHZZ 4910-01-082-1346 15434 ST-1298 STAND ASSEMBLY,INJE.................<br />
4 PEHZZ 5120-01-128-2758 15434 3375162 COMPRESSOR,PISTON R PISTON RING....<br />
5 PEHZZ 6635-01-329-2210 15434 3375432 KIT,CRACK DETECTION<br />
6 PEHZZ 4910-01-165-6016 15434 3375601 GUIDE PIN,SPECIAL,C CONNECTING ROD<br />
GUIDE...............................<br />
7 PEHZZ 4910-01-143-2034 15434 3375959 VALVE DRIVER PRESS PRESSURIZING<br />
VALVE...............................<br />
8 PEHZZ 4910-01-152-2743 15434 3376011 FIXTURE,VALVE INSTA AFC PRESSURE<br />
VALVE...............................<br />
END OF FIGURE<br />
51-1
TM 9-2815-225-34&P<br />
1<br />
2<br />
3<br />
6<br />
4<br />
5<br />
Figure 52. General Support Special Tools-3.
TM 9-2815-225-34&P<br />
(1)<br />
ITEM<br />
NO<br />
(2)<br />
SMR<br />
CODE<br />
(3)<br />
NSN<br />
(4)<br />
CAGEC<br />
(5)<br />
PART<br />
NUMBER<br />
(6)<br />
DESCRIPTION AND USABLE ON CODE(UOC)<br />
(7)<br />
QTY<br />
GROUP 2604 SPECIAL TOOLS<br />
FIG. 52 GENERAL SUPPORT SPECIAL<br />
TOOLS-3<br />
1 PEHZZ 5120-01-143-2032 0B8S3 3376015 PULLER,MECHANICAL CYLINDER LINER,<br />
UNIVERSAL...........................<br />
2 PEHZZ 5210-01-157-3091 0B8S3 3823495 GAGE,DEPTH,DIAL IND.................<br />
3 PEHZZ 5120-01-128-2688 15434 3375599 PULLER,AFC BARREL...................<br />
4 PEHZZ 5120-01-029-6861 15434 3375375 INJECTOR,LEAKAGE DE INJECTOR<br />
LEAKAGE.............................<br />
5 PEHHH 4910-01-128-9810 05083 MODEL CD3 CALIBRATOR,INJECTOR INJECTOR TEST..<br />
6 PEFZZ 4910-01-097-6929 15434 3375232 WRENCH TORQUE.......................<br />
END OF FIGURE<br />
52-1
TM 9-2815-225-34&P<br />
1<br />
2<br />
3<br />
4<br />
5<br />
Figure 53. General Support Special Tools-4.
TM 9-2815-225-34&P<br />
(1)<br />
ITEM<br />
NO<br />
(2)<br />
SMR<br />
CODE<br />
(3)<br />
NSN<br />
(4)<br />
CAGEC<br />
(5)<br />
PART<br />
NUMBER<br />
(6)<br />
DESCRIPTION AND USABLE ON CODE(UOC)<br />
(7)<br />
QTY<br />
GROUP 2604 SPECIAL TOOLS<br />
FIG. 53 GENERAL SUPPORT SPECIAL<br />
TOOLS-4<br />
1 PEHZZ 3465-00-999-1501 15434 3376350 FIXTURE,HOLD-DOWN INJECTOR CUP<br />
SPRAY...............................<br />
2 PEHZZ 4910-01-175-5215 15434 ST790-362 LINK,FUEL INJECTOR..................<br />
3 PEHZZ 4730-01-174-5944 15434 ST790-363 ORIFICE,FUEL INJECT.................<br />
4 XDHZZ 15434 ST-1254 INJECTOR,ADAPTER,PO.................<br />
5 PFHZZ 5180-01-177-4415 33287 J 33113 KIT,K-CAM...........................<br />
END OF FIGURE<br />
53-1/BLANK
TM 9-2815-225-34&P 0059 00<br />
DIRECT SUPPORT AND GENERAL SUPPORT<br />
MAINTENANCE MANUAL<br />
INCLUDING REPAIR PARTS AND SPECIAL TOOLS LIST (RPSTL)<br />
FOR<br />
M915, M915A1, M915A4, M916, M920 VEHICLES<br />
NSN 2815-01-082-8125 P/N NTC400-3652-02 CUMMINS NTC-400 BIG CAM I DIESEL ENGINE<br />
W/CONTAINER<br />
NSN 2815-01-142-2745 P/N 11669835 CUMMINS NTC-400 BIG CAM III DIESEL ENGINE<br />
W/CONTAINER<br />
NATIONAL STOCK NUMBER (NSN) INDEX<br />
0059
TM9-2815-225-34&P<br />
CROSS REFERENCE INDEXES<br />
NATIONAL STOCK NUMBER INDEX<br />
STOCK NUMBER FIGURE NO ITEM NO STOCK NUMBER FIGURE NO ITEM NO<br />
2520-01-085-6128 18 26<br />
2520-01-090-4473 11 11<br />
2520-01-497-7027 28 21<br />
2530-00-827-5934 20 56<br />
2530-01-130-2339 20 37<br />
2590-00-590-7378 9 1<br />
2805-00-293-9699 3 2<br />
2815-00-005-7431 8 6<br />
2815-00-011-7786 2 1<br />
2 2<br />
2815-00-085-7434 3 10<br />
2815-00-132-0240 3 10<br />
2815-00-195-5894 8 12<br />
2815-00-195-5897 8 16<br />
2815-00-362-2042 47 1<br />
2815-00-369-7846 20 23<br />
2815-00-406-6737 26 24<br />
2815-00-406-8936 13 45<br />
2815-00-480-4347 6 7<br />
2815-00-484-8359 2 25<br />
2815-00-505-5119 7 24<br />
2815-00-603-1381 6 5<br />
2815-00-705-2856 13 14<br />
2815-00-772-9434 16 8<br />
2815-00-791-1453 11 22<br />
2815-00-815-0355 36 11<br />
36 21<br />
2815-00-828-7013 13 44<br />
2815-00-829-5227 15 6<br />
2815-00-851-7637 8 20<br />
2815-00-913-2074 KIT 2<br />
2815-00-920-2073 15 3<br />
2815-00-920-8356 15 1<br />
2815-00-962-5623 3 12<br />
2815-00-994-4427 6 1<br />
2815-00-994-4429 6 4<br />
2815-01-048-6702 7 18<br />
2815-01-077-4463 15 2<br />
2815-01-079-1632 4 13<br />
2815-01-079-3290 20 19<br />
2815-01-079-3380 7 5<br />
2815-01-079-9146 16 18<br />
2815-01-083-2123 34 3<br />
2815-01-085-1881 5 11<br />
2815-01-085-2569 8 1<br />
2815-01-085-2573 13 1<br />
2815-01-085-2574 18 1<br />
2815-01-085-2615 7 7<br />
2815-01-085-2618 3 15<br />
2815-01-085-3733 3 19<br />
2815-01-085-8282 3 1<br />
2815-01-086-4508 6 8<br />
2815-01-087-4740 32 1<br />
2815-01-088-7328 18 14<br />
2815-01-096-9198 8 2<br />
2815-01-098-6755 18 18<br />
2815-01-105-8768 2 6<br />
2815-01-124-0232 6 10<br />
17 23<br />
2815-01-127-1060 3 10<br />
2815-01-127-3597 3 10<br />
2815-01-127-3598 3 10<br />
2815-01-133-2445 12 2<br />
2815-01-141-0845 5 19<br />
2815-01-141-0919 12 2<br />
2815-01-141-3261 18 2<br />
2815-01-141-5299 13 1<br />
2815-01-141-9370 2 6<br />
2815-01-142-1732 9 4<br />
2815-01-142-2745 1 9<br />
2815-01-145-9401 16 23<br />
2815-01-145-9402 18 23<br />
2815-01-146-0102 5 5<br />
2815-01-146-0112 15 3<br />
2815-01-146-1024 9 5<br />
2815-01-146-1041 7 6<br />
2815-01-146-1049 7 5<br />
2815-01-146-1103 15 1<br />
2815-01-146-1997 18 19<br />
2815-01-146-3159 15 2<br />
2815-01-146-4164 3 26<br />
2815-01-146-5925 4 2<br />
2815-01-146-7039 7 14<br />
2815-01-152-9219 KIT 11<br />
2815-01-159-0872 16 1<br />
2815-01-159-1737 9 3<br />
2815-01-159-1789 3 16<br />
2815-01-160-5820 5 19<br />
2815-01-164-6103 9 3<br />
2815-01-165-0765 KIT 6<br />
2815-01-166-3415 7 11<br />
2815-01-168-3742 KIT 8<br />
2815-01-210-6947 8 30<br />
2815-01-241-4719 11 31<br />
2815-01-241-6580 6 2<br />
2815-01-241-6581 6 3<br />
2815-01-291-5753 25 1<br />
2815-01-303-4224 4 7<br />
2815-01-305-8530 7 16<br />
2815-01-354-2702 3 11<br />
2815-01-438-1517 1 1<br />
2815-01-490-0416 3 15<br />
2815-01-497-6028 28 29<br />
2815-01-497-6029 28 19<br />
2835-01-086-1447 27 18<br />
2835-01-497-7320 28 16<br />
2910-00-085-7436 29 7<br />
2910-00-132-0769 30 51<br />
2910-00-304-3427 31 17<br />
2910-00-410-2268 33 2<br />
2910-00-432-1945 33 4<br />
2910-00-646-9727 32 2<br />
2910-00-790-8736 24 34<br />
2910-00-803-2631 30 48<br />
2910-00-858-3522 30 37<br />
2910-00-928-3505 3 21<br />
2910-01-065-3979 23 6<br />
2910-01-070-9712 24 62<br />
2910-01-076-8632 21 10<br />
2910-01-080-3149 24 49<br />
2910-01-080-5570 24 67<br />
2910-01-084-0243 32 4<br />
1
TM9-2815-225-34&P<br />
CROSS REFERENCE INDEXES<br />
NATIONAL STOCK NUMBER INDEX<br />
STOCK NUMBER FIGURE NO ITEM NO STOCK NUMBER FIGURE NO ITEM NO<br />
2910-01-085-2570 31 1<br />
2910-01-086-3974 21 13<br />
2910-01-086-3983 24 35<br />
2910-01-086-7715 30 7<br />
2910-01-086-9757 7 22<br />
2910-01-090-9346 30 34<br />
2910-01-091-7507 24 47<br />
2910-01-096-9200 25 3<br />
2910-01-098-5118 24 39<br />
2910-01-112-5797 32 15<br />
2910-01-112-7712 21 4<br />
2910-01-126-9053 24 15<br />
2910-01-136-3331 24 67<br />
2910-01-141-4028 24 42<br />
2910-01-141-4029 24 7<br />
2910-01-141-4337 30 18<br />
2910-01-141-4967 24 5<br />
2910-01-141-9372 23 6<br />
2910-01-142-4953 24 22<br />
2910-01-142-7455 24 12<br />
2910-01-145-9403 21 4<br />
2910-01-146-0048 3 7<br />
2910-01-146-0093 22 21<br />
2910-01-146-1084 24 35<br />
2910-01-146-1099 31 17<br />
2910-01-146-1998 21 13<br />
2910-01-146-1999 30 1<br />
2910-01-146-2000 33 11<br />
2910-01-146-7955 2 37<br />
2910-01-147-9913 24 40<br />
2930-00-401-9531 17 18<br />
2930-00-928-3595 34 1<br />
2930-01-065-7113 11 30<br />
2930-01-084-6011 34 11<br />
2930-01-087-8749 34 28<br />
2930-01-097-6755 17 2<br />
2930-01-141-0918 10 1<br />
2930-01-141-9277 14 34<br />
2930-01-145-9537 10 4<br />
2930-01-145-9538 10 8<br />
2930-01-146-1081 10 28<br />
2930-01-146-1083 14 4<br />
2930-01-146-1085 34 9<br />
2930-01-146-1996 14 9<br />
2930-01-146-3033 34 18<br />
2930-01-146-3912 36 1<br />
2930-01-146-4212 34 3<br />
2930-01-150-7596 34 11<br />
2930-01-165-4581 11 27<br />
2930-01-231-1661 11 13<br />
2930-01-262-5153 KIT 15<br />
2930-01-262-5175 36 19<br />
2930-01-287-9733 KIT 14<br />
2940-01-019-4513 10 34<br />
11 43<br />
2940-01-065-7076 11 47<br />
2940-01-145-9398 10 12<br />
2940-01-145-9399 10 13<br />
2940-01-145-9400 10 14<br />
2940-01-145-9455 10 35<br />
2940-01-146-1995 11 34<br />
13 18<br />
2940-01-146-5846 10 25<br />
2940-01-184-1877 KIT 13<br />
2940-01-227-7445 35 10<br />
2950-01-141-0844 26 22<br />
2950-01-145-6822 27 18<br />
2950-01-503-5597 28 11<br />
2990-00-477-6159 27 16<br />
2990-00-772-1778 24 63<br />
2990-01-085-1622 27 10<br />
2990-01-085-4768 27 8<br />
2990-01-120-2883 4 2<br />
2990-01-146-1102 26 4<br />
2990-01-146-3911 27 19<br />
2990-01-155-7284 26 22<br />
2990-01-172-3005 26 22<br />
2990-01-236-2774 26 4<br />
2990-01-271-0316 KIT 7<br />
3010-00-447-9799 23 9<br />
30 27<br />
3010-01-079-3461 20 4<br />
3010-01-080-1529 30 24<br />
3010-01-085-2732 17 26<br />
20 35<br />
3010-01-088-5727 30 13<br />
3010-01-146-0113 13 30<br />
3020-00-160-9092 17 20<br />
3020-00-528-5053 5 12<br />
3020-00-702-3882 25 11<br />
3020-01-070-9003 30 14<br />
3020-01-077-2229 4 16<br />
3020-01-077-4411 4 12<br />
3020-01-079-4206 36 26<br />
3020-01-084-7007 44 6<br />
3020-01-084-9640 13 19<br />
3020-01-085-0761 44 5<br />
3020-01-085-3779 13 24<br />
3020-01-086-3417 36 13<br />
3020-01-086-4158 30 23<br />
3020-01-086-8269 44 7<br />
3020-01-086-8780 30 12<br />
3020-01-145-8568 7 2<br />
3020-01-146-0107 4 16<br />
3020-01-146-0108 13 8<br />
3020-01-146-0109 13 19<br />
3020-01-146-3163 17 17<br />
3020-01-146-3773 17 15<br />
3020-01-241-6905 36 13<br />
3030-01-065-9404 36 28<br />
3040-00-388-3126 7 13<br />
3040-00-567-4354 25 18<br />
3040-00-933-3012 25 12<br />
3040-01-070-9004 30 21<br />
3040-01-077-4976 21 2<br />
3040-01-079-1799 8 29<br />
3040-01-079-3468 36 25<br />
3040-01-079-3469 13 23<br />
3040-01-085-2616 29 13<br />
3040-01-085-2871 30 8<br />
3040-01-086-1448 27 19<br />
3040-01-086-1449 24 51<br />
2
TM9-2815-225-34&P<br />
CROSS REFERENCE INDEXES<br />
NATIONAL STOCK NUMBER INDEX<br />
STOCK NUMBER FIGURE NO ITEM NO STOCK NUMBER FIGURE NO ITEM NO<br />
3040-01-086-1651 24 22<br />
3040-01-129-4302 17 30<br />
3040-01-145-9637 13 20<br />
3040-01-146-0028 5 3<br />
3040-01-146-5935 13 25<br />
3040-01-151-9348 30 8<br />
3040-01-154-9787 33 7<br />
3040-01-241-4696 24 54<br />
3040-01-287-9736 36 7<br />
3110-00-144-8828 36 8<br />
36 24<br />
3110-00-516-5289 30 16<br />
3110-01-079-8190 24 57<br />
3120-00-353-9164 33 6<br />
3120-00-566-0480 13 7<br />
3120-00-589-3537 8 5<br />
8 15<br />
8 23<br />
8 19<br />
3120-00-627-6697 13 4<br />
13 26<br />
3120-00-659-7808 7 17<br />
3120-00-682-7706 27 13<br />
3120-00-791-1440 7 23<br />
3120-00-792-9834 17 32<br />
3120-00-810-6032 24 41<br />
3120-00-877-2213 16 2<br />
3120-00-904-9595 30 17<br />
3120-01-016-4883 20 26<br />
3120-01-079-5208 8 9<br />
3120-01-079-5451 7 27<br />
3120-01-079-6527 15 10<br />
35 3<br />
3120-01-079-6823 2 30<br />
3120-01-079-8194 7 3<br />
3120-01-080-3275 24 36<br />
3120-01-083-6411 36 14<br />
3120-01-085-0762 44 2<br />
3120-01-087-2539 30 11<br />
3120-01-087-3004 6 12<br />
3120-01-103-8752 39 8<br />
3120-01-129-7659 20 36<br />
3120-01-132-9339 4 6<br />
3120-01-143-9547 4 6<br />
3120-01-144-7368 17 28<br />
3120-01-144-8882 4 6<br />
3120-01-145-9132 4 6<br />
3120-01-146-7196 20 24<br />
3120-01-147-5275 17 21<br />
3120-01-147-8118 5 6<br />
3120-01-149-5414 13 7<br />
3120-01-155-2531 KIT 9<br />
3120-01-155-4442 6 12<br />
3120-01-155-8707 6 12<br />
3120-01-157-3316 6 12<br />
3120-01-160-7482 24 64<br />
3120-01-185-8586 25 19<br />
3120-01-193-7083 4 6<br />
3120-01-208-8102 2 30<br />
3120-01-208-8103 2 30<br />
3120-01-212-4472 7 21<br />
3120-01-214-7779 4 8<br />
3120-01-215-9157 25 17<br />
3130-00-408-9041 2 24<br />
3130-01-146-1150 2 25<br />
3130-01-146-1228 2 23<br />
3130-01-146-4504 2 24<br />
3130-01-294-1400 27 14<br />
3441-00-922-6699 37 21<br />
3460-00-999-1173 47 8<br />
3460-00-999-1210 39 13<br />
3465-00-999-1501 53 1<br />
3805-00-955-5320 20 45<br />
4140-01-085-2607 27 3<br />
4140-01-146-1035 27 3<br />
4310-00-903-7174 20 22<br />
4310-01-079-3319 20 25<br />
4310-01-079-3383 20 29<br />
4310-01-079-5245 20 17<br />
4310-01-084-7148 20 48<br />
4310-01-092-9815 17 11<br />
4310-01-092-9816 17 22<br />
4310-01-141-0879 20 8<br />
4310-01-146-1097 20 14<br />
4310-01-146-4155 20 51<br />
4310-01-146-5921 20 12<br />
4310-01-271-5103 20 20<br />
4320-01-079-3454 36 2<br />
4320-01-098-5115 24 56<br />
4330-00-274-4712 35 9<br />
4330-01-020-3666 35 10<br />
4330-01-146-1082 10 24<br />
4420-01-318-0852 14 32<br />
4710-01-079-3198 34 15<br />
4710-01-079-3492 19 13<br />
19 17<br />
4710-01-079-3493 22 11<br />
4710-01-085-6132 14 35<br />
4710-01-085-6134 22 16<br />
4710-01-085-9348 22 9<br />
4710-01-085-9349 22 18<br />
4710-01-092-0109 12 43<br />
4710-01-095-8683 19 13<br />
4710-01-142-1667 12 24<br />
4710-01-146-0049 12 15<br />
4710-01-146-0050 13 33<br />
4710-01-146-1052 12 6<br />
4710-01-146-1053 14 35<br />
4710-01-146-1054 34 15<br />
4710-01-146-1113 22 16<br />
4710-01-146-1114 22 11<br />
4710-01-146-1115 22 10<br />
4710-01-146-1116 22 14<br />
4710-01-146-3085 19 4<br />
4710-01-146-3086 11 37<br />
34 25<br />
4710-01-146-3167 26 16<br />
4710-01-146-3168 19 17<br />
4710-01-146-3169 22 18<br />
4710-01-146-3779 22 9<br />
4710-01-146-4083 14 14<br />
4710-01-158-7507 10 46<br />
3
TM9-2815-225-34&P<br />
CROSS REFERENCE INDEXES<br />
NATIONAL STOCK NUMBER INDEX<br />
STOCK NUMBER FIGURE NO ITEM NO STOCK NUMBER FIGURE NO ITEM NO<br />
26 20<br />
4710-01-181-1956 11 6<br />
4710-01-209-6742 16 3<br />
4720-00-187-4102 35 13<br />
BULK 3<br />
4720-00-278-4890 12 14<br />
4720-00-541-4243 BULK 1<br />
4720-00-918-9634 19 2<br />
4720-01-006-8626 26 18<br />
4720-01-070-8149 26 6<br />
4720-01-079-3285 13 33<br />
4720-01-085-2571 11 5<br />
4720-01-085-6129 34 23<br />
4720-01-085-6131 14 11<br />
4720-01-085-6293 26 10<br />
4720-01-114-7728 BULK 2<br />
4720-01-146-1071 26 10<br />
4720-01-146-4126 32 9<br />
4720-01-152-0156 13 50<br />
4730-00-010-3867 12 8<br />
16 13<br />
36 5<br />
4730-00-011-3175 29 14<br />
4730-00-018-9566 2 27<br />
3 24<br />
5 23<br />
11 35<br />
14 40<br />
16 10<br />
17 31<br />
19 10<br />
36 4<br />
4730-00-042-8988 10 6<br />
11 21<br />
16 13<br />
24 30<br />
4730-00-044-4715 12 10<br />
4730-00-057-5555 10 7<br />
4730-00-081-9618 2 9<br />
4730-00-138-3906 19 15<br />
4730-00-202-8470 13 42<br />
4730-00-203-0549 2 14<br />
4730-00-221-2139 2 19<br />
34 30<br />
4730-00-254-6227 11 50<br />
4730-00-277-8269 20 58<br />
4730-00-278-2973 25 9<br />
4730-00-278-4822 32 17<br />
4730-00-278-9200 22 23<br />
4730-00-338-6839 12 48<br />
4730-00-365-2690 10 44<br />
19 12<br />
26 25<br />
4730-00-374-4282 19 16<br />
4730-00-404-2906 34 26<br />
4730-00-404-2909 2 33<br />
4730-00-444-1710 3 25<br />
22 13<br />
4730-00-477-4160 26 5<br />
4730-00-555-8263 14 1<br />
19 3<br />
26 17<br />
4730-00-555-8292 24 30<br />
4730-00-801-8186 2 26<br />
4730-00-900-3296 22 31<br />
4730-00-908-3195 35 6<br />
4730-00-909-8627 34 14<br />
4730-00-954-1281 2 10<br />
4730-00-954-9510 35 12<br />
4730-00-964-7548 20 30<br />
4730-01-077-2016 21 17<br />
4730-01-078-6364 24 58<br />
4730-01-079-3273 19 1<br />
4730-01-079-3274 26 19<br />
4730-01-085-4156 19 9<br />
34 12<br />
4730-01-085-7328 15 12<br />
4730-01-106-4700 22 19<br />
31 19<br />
4730-01-109-8501 22 17<br />
4730-01-124-0293 8 27<br />
4730-01-124-3762 24 27<br />
31 15<br />
4730-01-127-6104 26 9<br />
4730-01-131-4884 22 12<br />
4730-01-142-8524 13 51<br />
22 20<br />
4730-01-146-1059 32 6<br />
4730-01-146-1060 34 12<br />
4730-01-146-1064 14 18<br />
4730-01-146-1065 14 2<br />
4730-01-146-3040 22 22<br />
4730-01-146-3109 14 16<br />
4730-01-146-3111 12 13<br />
4730-01-146-3631 26 14<br />
4730-01-146-3633 22 15<br />
4730-01-146-4016 35 6<br />
4730-01-146-7047 26 15<br />
4730-01-161-5115 2 16<br />
13 5<br />
36 5<br />
4730-01-163-7192 11 4<br />
4730-01-165-0749 35 5<br />
35 8<br />
4730-01-174-5944 53 3<br />
4730-01-214-7081 2 8<br />
5 18<br />
13 5<br />
4730-01-241-7258 11 2<br />
4730-01-309-3321 11 25<br />
4730-99-214-1783 12 8<br />
4810-01-187-4925 29 4<br />
4810-01-225-6010 18 4<br />
4820-00-276-9041 10 36<br />
11 12<br />
4820-00-445-0610 20 40<br />
4820-00-829-5600 29 17<br />
4820-00-909-4174 20 42<br />
4820-00-909-4175 20 46<br />
4820-01-045-6080 35 4<br />
4820-01-070-9710 21 12<br />
4820-01-079-3241 24 4<br />
4
TM9-2815-225-34&P<br />
CROSS REFERENCE INDEXES<br />
NATIONAL STOCK NUMBER INDEX<br />
STOCK NUMBER FIGURE NO ITEM NO STOCK NUMBER FIGURE NO ITEM NO<br />
4820-01-079-3320 24 10<br />
4820-01-089-3939 18 20<br />
4820-01-145-9457 13 17<br />
4820-01-146-1048 29 12<br />
4820-01-146-4593 18 20<br />
4820-01-158-0555 KIT 5<br />
4820-01-164-7002 25 15<br />
4820-01-210-3573 10 16<br />
4820-01-210-9571 34 4<br />
4820-01-227-7141 35 4<br />
4820-01-242-2579 25 10<br />
4910-00-150-5797 39 28<br />
4910-00-150-5801 41 2<br />
4910-00-150-5805 41 24<br />
4910-00-150-5819 50 6<br />
4910-00-150-5843 48 3<br />
4910-00-150-5844 48 4<br />
4910-00-150-5848 50 7<br />
4910-00-150-5858 37 14<br />
4910-00-345-3708 47 2<br />
4910-00-925-0755 48 1<br />
4910-00-977-7507 50 1<br />
4910-00-981-3105 37 16<br />
4910-00-999-1208 47 9<br />
4910-00-999-1506 38 2<br />
4910-01-074-0020 46 8<br />
4910-01-082-1346 51 3<br />
4910-01-084-6977 45 12<br />
4910-01-084-6978 45 13<br />
4910-01-084-6979 45 4<br />
4910-01-084-7221 45 10<br />
4910-01-084-7222 45 9<br />
4910-01-085-0751 45 3<br />
4910-01-085-0763 44 4<br />
4910-01-085-0765 44 12<br />
4910-01-085-0766 44 17<br />
4910-01-085-1011 44 1<br />
4910-01-085-7824 45 2<br />
4910-01-085-9211 37 27<br />
4910-01-086-8268 44 9<br />
4910-01-086-9766 46 2<br />
4910-01-088-7904 44 10<br />
4910-01-097-6909 44 16<br />
4910-01-097-6910 41 17<br />
4910-01-097-6911 41 21<br />
4910-01-097-6912 41 19<br />
4910-01-097-6914 44 14<br />
4910-01-097-6915 41 5<br />
4910-01-097-6916 43 3<br />
4910-01-097-6917 43 4<br />
4910-01-097-6919 43 2<br />
4910-01-097-6923 45 18<br />
4910-01-097-6925 45 19<br />
4910-01-097-6926 43 9<br />
4910-01-097-6927 43 10<br />
4910-01-097-6928 43 11<br />
4910-01-097-6929 52 6<br />
4910-01-097-6930 38 5<br />
4910-01-097-6931 45 27<br />
4910-01-097-6933 45 22<br />
4910-01-097-6934 45 21<br />
4910-01-097-6935 45 26<br />
4910-01-097-6936 43 13<br />
4910-01-097-6937 43 14<br />
4910-01-097-6938 43 15<br />
4910-01-097-6939 41 12<br />
4910-01-097-6940 41 9<br />
4910-01-097-6941 41 10<br />
4910-01-097-6944 45 24<br />
4910-01-097-6945 46 1<br />
4910-01-097-6955 37 23<br />
4910-01-097-6956 37 26<br />
4910-01-097-6957 37 17<br />
4910-01-097-6958 37 19<br />
4910-01-097-6960 40 9<br />
4910-01-097-6962 40 8<br />
4910-01-097-6963 40 11<br />
4910-01-097-6964 40 4<br />
4910-01-097-6965 40 10<br />
4910-01-097-6966 40 14<br />
4910-01-097-6968 40 12<br />
4910-01-097-6969 39 5<br />
4910-01-097-6970 39 2<br />
4910-01-097-6971 39 12<br />
4910-01-097-6972 38 16<br />
4910-01-097-6976 40 15<br />
4910-01-097-6977 39 19<br />
4910-01-097-6979 39 22<br />
4910-01-097-6980 39 27<br />
4910-01-097-6981 39 26<br />
4910-01-097-6982 39 25<br />
4910-01-097-6983 39 24<br />
4910-01-097-6984 39 21<br />
4910-01-097-6985 39 23<br />
4910-01-097-6986 39 17<br />
4910-01-097-6987 38 3<br />
4910-01-097-6988 38 15<br />
4910-01-097-6989 37 2<br />
38 6<br />
4910-01-098-1912 44 8<br />
4910-01-098-1914 37 4<br />
4910-01-098-1915 41 23<br />
4910-01-098-1916 41 22<br />
4910-01-098-1917 41 15<br />
4910-01-098-1918 41 20<br />
4910-01-098-1919 41 18<br />
4910-01-098-5088 37 18<br />
4910-01-099-1487 37 9<br />
4910-01-100-6191 41 16<br />
4910-01-105-9165 45 1<br />
4910-01-106-0492 43 1<br />
4910-01-108-9130 37 12<br />
4910-01-112-7509 37 5<br />
4910-01-113-1066 37 6<br />
4910-01-117-4885 37 10<br />
4910-01-118-2878 37 11<br />
4910-01-118-3747 41 6<br />
4910-01-128-2691 48 8<br />
4910-01-128-9810 52 5<br />
4910-01-141-8388 50 5<br />
4910-01-142-4929 49 1<br />
4910-01-143-2023 49 2<br />
5
TM9-2815-225-34&P<br />
CROSS REFERENCE INDEXES<br />
NATIONAL STOCK NUMBER INDEX<br />
STOCK NUMBER FIGURE NO ITEM NO STOCK NUMBER FIGURE NO ITEM NO<br />
4910-01-143-2034 51 7<br />
4910-01-143-3336 49 4<br />
4910-01-143-3337 49 3<br />
4910-01-146-7130 50 2<br />
4910-01-147-7896 51 1<br />
4910-01-150-9713 47 5<br />
4910-01-152-2743 51 8<br />
4910-01-154-6406 51 2<br />
4910-01-159-8701 47 6<br />
4910-01-161-2115 48 5<br />
4910-01-165-4541 49 11<br />
4910-01-165-6016 51 6<br />
4910-01-175-5215 53 2<br />
4920-00-711-9307 47 4<br />
4930-01-085-3728 45 5<br />
5110-00-980-7347 40 2<br />
5110-00-981-3107 42 3<br />
5120-00-065-1031 44 11<br />
46 4<br />
5120-00-103-4687 38 8<br />
5120-00-104-1795 37 29<br />
5120-00-113-5271 39 1<br />
5120-00-116-7604 48 10<br />
5120-00-150-5810 41 4<br />
5120-00-150-7486 50 4<br />
5120-00-150-7488 42 1<br />
5120-00-150-7492 37 20<br />
5120-00-159-8916 40 21<br />
5120-00-178-0948 40 3<br />
5120-00-865-0226 38 11<br />
5120-00-896-8087 41 3<br />
5120-00-896-8097 37 3<br />
5120-00-923-0856 46 7<br />
5120-00-981-3108 37 15<br />
5120-00-999-1206 50 8<br />
5120-00-999-1503 50 3<br />
5120-00-999-1504 38 4<br />
5120-00-999-1505 41 1<br />
5120-01-029-6861 52 4<br />
5120-01-072-2952 38 7<br />
5120-01-072-2955 45 15<br />
5120-01-097-3204 40 19<br />
5120-01-097-6932 45 20<br />
5120-01-099-6341 39 11<br />
5120-01-100-0135 46 6<br />
5120-01-106-9173 40 20<br />
5120-01-106-9174 40 18<br />
5120-01-119-2743 37 8<br />
5120-01-120-3681 45 14<br />
5120-01-120-3682 39 3<br />
5120-01-120-5759 44 15<br />
5120-01-120-5760 42 2<br />
5120-01-122-6014 38 10<br />
5120-01-128-2675 49 6<br />
5120-01-128-2678 48 7<br />
5120-01-128-2679 48 9<br />
5120-01-128-2688 52 3<br />
5120-01-128-2758 51 4<br />
5120-01-143-2032 52 1<br />
5120-01-155-3795 49 5<br />
5120-01-156-4183 39 18<br />
49 8<br />
5120-01-160-8863 38 1<br />
5120-01-160-8867 48 6<br />
5120-01-163-1349 49 10<br />
5120-01-164-3265 47 7<br />
5133-00-932-2089 37 13<br />
5133-01-084-6008 44 13<br />
5133-01-084-6009 44 18<br />
5180-00-916-1813 40 16<br />
5180-01-069-6998 46 KIT<br />
5180-01-071-0707 40 KIT<br />
5180-01-074-0019 43 12<br />
5180-01-102-8418 41 7<br />
5180-01-141-9274 43 KIT<br />
46 KIT<br />
5180-01-177-4415 53 5<br />
5210-00-999-1209 37 28<br />
5210-01-099-6339 37 22<br />
5210-01-157-2291 49 7<br />
5210-01-157-3091 52 2<br />
5220-00-795-3079 42 5<br />
5220-01-168-6878 42 6<br />
5305-00-058-6604 36 15<br />
5305-00-062-4378 3 17<br />
5305-00-063-5043 24 70<br />
5305-00-068-0502 26 12<br />
5305-00-068-0509 31 2<br />
5305-00-068-0511 10 32<br />
13 28<br />
13 35<br />
14 10<br />
26 3<br />
5305-00-071-2056 20 3<br />
5305-00-071-2517 10 40<br />
5305-00-091-4006 10 2<br />
5305-00-091-4009 5 13<br />
5305-00-137-3269 13 28<br />
5305-00-138-9848 29 5<br />
5305-00-165-8157 11 41<br />
5305-00-177-5552 11 18<br />
5305-00-207-2715 31 5<br />
5305-00-225-8507 20 9<br />
5305-00-226-4831 19 5<br />
5305-00-230-1939 26 12<br />
5305-00-269-3240 5 2<br />
5305-00-297-4022 8 24<br />
5305-00-339-1415 7 15<br />
5305-00-404-1388 10 33<br />
5305-00-404-1390 14 30<br />
5305-00-411-9340 27 9<br />
5305-00-426-4142 13 31<br />
30 40<br />
5305-00-477-6769 3 20<br />
5305-00-493-3959 33 5<br />
5305-00-506-5722 30 52<br />
5305-00-509-8106 29 1<br />
5305-00-543-4372 12 31<br />
13 9<br />
13 48<br />
14 12<br />
14 24<br />
6
TM9-2815-225-34&P<br />
CROSS REFERENCE INDEXES<br />
NATIONAL STOCK NUMBER INDEX<br />
STOCK NUMBER FIGURE NO ITEM NO STOCK NUMBER FIGURE NO ITEM NO<br />
5305-00-546-6698 2 35<br />
7 10<br />
12 22<br />
5305-00-638-8920 10 39<br />
5305-00-721-3698 25 21<br />
5305-00-725-2317 10 26<br />
14 39<br />
5305-00-782-9489 10 29<br />
5305-00-795-9336 4 14<br />
5 10<br />
5305-00-795-9345 22 7<br />
5305-00-795-9352 13 46<br />
5305-00-804-6318 1 7<br />
20 28<br />
24 29<br />
26 23<br />
5305-00-843-9529 15 7<br />
5305-00-942-2196 13 48<br />
5305-00-944-8292 12 21<br />
14 20<br />
5305-00-947-3437 8 4<br />
8 8<br />
8 14<br />
8 18<br />
8 22<br />
5305-01-010-2362 13 9<br />
5305-01-028-8869 15 5<br />
5305-01-029-1193 22 5<br />
5305-01-032-2311 12 33<br />
5305-01-072-8816 16 22<br />
5305-01-072-8818 14 10<br />
5305-01-072-8826 24 53<br />
5305-01-072-8831 30 19<br />
5305-01-079-7028 21 5<br />
5305-01-084-4596 44 3<br />
5305-01-085-8197 11 9<br />
12 28<br />
34 8<br />
5305-01-086-7036 11 42<br />
34 13<br />
5305-01-086-7285 21 3<br />
5305-01-088-6019 11 15<br />
11 38<br />
33 17<br />
34 29<br />
35 1<br />
5305-01-091-2498 17 5<br />
5305-01-097-6918 43 5<br />
5305-01-097-6920 43 7<br />
5305-01-097-6921 41 8<br />
43 8<br />
5305-01-097-6924 45 16<br />
5305-01-098-1913 43 6<br />
5305-01-109-9307 24 45<br />
5305-01-112-9021 2 11<br />
12 45<br />
5305-01-112-9110 30 19<br />
30 35<br />
31 2<br />
5305-01-112-9698 5 9<br />
5305-01-113-0408 34 19<br />
5305-01-113-1179 23 10<br />
30 6<br />
5305-01-114-6386 5 16<br />
5305-01-114-9279 30 26<br />
5305-01-118-4285 20 54<br />
5305-01-118-8826 9 2<br />
5305-01-119-8621 17 29<br />
5305-01-126-1128 30 40<br />
5305-01-129-4214 13 6<br />
19 8<br />
5305-01-129-4218 24 2<br />
5305-01-129-4384 20 34<br />
23 7<br />
5305-01-129-4385 24 1<br />
5305-01-129-4386 36 29<br />
5305-01-129-6901 8 31<br />
5305-01-130-6100 4 3<br />
5305-01-133-2060 31 11<br />
5305-01-135-5344 11 1<br />
5305-01-135-5446 24 50<br />
5305-01-137-6706 14 24<br />
5305-01-144-6204 2 36<br />
5305-01-144-6206 18 9<br />
5305-01-144-6232 10 19<br />
5305-01-144-6233 20 53<br />
5305-01-145-0776 17 8<br />
5305-01-145-0777 21 3<br />
23 7<br />
5305-01-145-1113 12 38<br />
5305-01-145-8358 12 36<br />
5305-01-145-8359 20 31<br />
5305-01-145-8379 3 28<br />
5305-01-145-8380 5 15<br />
5305-01-145-8381 16 7<br />
5305-01-145-8382 17 1<br />
5305-01-145-8383 17 12<br />
5305-01-145-8384 18 13<br />
5305-01-146-7285 14 29<br />
5305-01-147-1215 14 15<br />
5305-01-147-2443 13 46<br />
5305-01-147-2444 14 5<br />
5305-01-147-2445 14 28<br />
5305-01-147-4025 5 24<br />
5305-01-147-4033 16 12<br />
5305-01-147-4034 20 2<br />
23 1<br />
5305-01-147-4035 36 31<br />
5305-01-147-8726 31 14<br />
5305-01-147-8729 14 30<br />
5305-01-147-8730 15 5<br />
5305-01-147-8731 16 17<br />
5305-01-147-8732 23 4<br />
5305-01-165-3300 16 14<br />
5305-01-165-3892 16 20<br />
5305-01-179-2380 2 22<br />
5305-01-186-7042 18 9<br />
5305-01-203-6444 11 7<br />
5305-01-212-5210 12 36<br />
5305-01-240-7155 16 12<br />
5305-01-319-9287 35 11<br />
5305-01-498-0704 28 15<br />
7
TM9-2815-225-34&P<br />
CROSS REFERENCE INDEXES<br />
NATIONAL STOCK NUMBER INDEX<br />
STOCK NUMBER FIGURE NO ITEM NO STOCK NUMBER FIGURE NO ITEM NO<br />
5305-01-508-7097 10 20<br />
5306-00-225-8499 14 37<br />
5306-00-418-2276 32 19<br />
5306-00-485-0790 25 7<br />
5306-01-079-7027 6 11<br />
5306-01-102-3599 33 18<br />
5306-01-107-6371 18 27<br />
5306-01-119-4271 17 24<br />
5306-01-119-8870 34 22<br />
5306-01-146-9866 16 19<br />
5306-01-151-1023 32 14<br />
5306-01-204-3297 22 7<br />
5307-00-922-2626 15 13<br />
26 7<br />
5307-01-109-5972 18 27<br />
5307-01-145-8449 18 31<br />
5307-01-147-1316 18 29<br />
5307-01-147-2821 18 30<br />
5310-00-005-6052 24 48<br />
5310-00-011-6122 20 1<br />
23 2<br />
5310-00-013-1245 32 21<br />
5310-00-080-6004 5 7<br />
10 27<br />
12 27<br />
13 36<br />
14 26<br />
5310-00-081-4219 12 41<br />
34 20<br />
5310-00-081-8500 4 15<br />
5 14<br />
5310-00-081-9292 17 27<br />
5310-00-082-1882 2 21<br />
5310-00-082-1888 29 10<br />
5310-00-086-7859 24 60<br />
30 32<br />
5310-00-134-4168 5 17<br />
5310-00-134-4169 14 38<br />
5310-00-134-4171 5 8<br />
11 46<br />
5310-00-141-1795 25 16<br />
25 20<br />
30 36<br />
31 13<br />
33 14<br />
5310-00-159-6209 10 41<br />
14 13<br />
22 2<br />
31 12<br />
33 13<br />
5310-00-197-5304 2 29<br />
5310-00-209-0965 12 34<br />
13 27<br />
16 21<br />
20 33<br />
30 3<br />
5310-00-261-7340 2 34<br />
7 9<br />
10 3<br />
10 31<br />
11 17<br />
11 40<br />
12 17<br />
13 27<br />
14 13<br />
14 25<br />
22 2<br />
36 32<br />
5310-00-262-2986 29 3<br />
5310-00-285-8833 3 27<br />
5310-00-356-1447 2 21<br />
5310-00-407-9566 12 40<br />
19 6<br />
20 10<br />
30 28<br />
5310-00-426-3990 3 18<br />
5310-00-451-6643 12 16<br />
24 6<br />
5310-00-469-3998 5 21<br />
5310-00-470-6154 17 6<br />
5310-00-484-1718 24 26<br />
25 8<br />
29 2<br />
31 3<br />
5310-00-486-2505 14 25<br />
22 3<br />
5310-00-486-2507 17 25<br />
5310-00-507-3259 30 50<br />
5310-00-521-8595 13 40<br />
14 23<br />
22 1<br />
5310-00-562-6552 33 8<br />
5310-00-562-6557 13 36<br />
5310-00-562-6558 12 4<br />
19 7<br />
20 11<br />
5310-00-562-6560 10 42<br />
22 3<br />
24 3<br />
27 6<br />
5310-00-584-5272 1 3<br />
5 20<br />
11 8<br />
5310-00-637-9541 10 38<br />
12 46<br />
13 32<br />
22 25<br />
32 20<br />
5310-00-650-0187 20 7<br />
5310-00-680-6874 27 5<br />
5310-00-684-3463 26 2<br />
5310-00-732-0560 8 3<br />
8 7<br />
8 13<br />
8 17<br />
8 21<br />
5310-00-763-8920 36 17<br />
5310-00-809-3078 30 25<br />
5310-00-809-4085 12 35<br />
5310-00-820-6653 11 45<br />
12 17<br />
14 21<br />
8
TM9-2815-225-34&P<br />
CROSS REFERENCE INDEXES<br />
NATIONAL STOCK NUMBER INDEX<br />
STOCK NUMBER FIGURE NO ITEM NO STOCK NUMBER FIGURE NO ITEM NO<br />
5310-00-823-8803 12 18<br />
5310-00-828-4827 12 3<br />
5310-00-887-8325 15 8<br />
5310-00-922-2017 29 6<br />
5310-00-971-7989 24 43<br />
33 9<br />
33 12<br />
5310-01-056-1371 20 52<br />
5310-01-075-0991 13 10<br />
5310-01-079-6529 21 8<br />
5310-01-079-6708 21 6<br />
5310-01-097-6961 40 5<br />
5310-01-097-6978 39 20<br />
5310-01-097-8039 20 55<br />
5310-01-102-3270 32 23<br />
5310-01-102-7356 33 16<br />
5310-01-103-6042 10 37<br />
5310-01-104-4549 37 25<br />
5310-01-104-4550 39 9<br />
5310-01-112-4306 16 16<br />
5310-01-112-4307 20 6<br />
23 5<br />
30 5<br />
5310-01-124-6463 17 14<br />
5310-01-126-1045 17 13<br />
5310-01-126-9404 12 25<br />
5310-01-142-2812 24 13<br />
5310-01-144-6115 1 2<br />
17 3<br />
18 34<br />
5310-01-144-6224 13 16<br />
5310-01-145-0761 24 9<br />
5310-01-145-0762 36 18<br />
5310-01-145-1114 21 8<br />
5310-01-145-8403 14 27<br />
5310-01-145-8404 16 16<br />
5310-01-145-8405 17 10<br />
18 12<br />
5310-01-146-6147 32 8<br />
5310-01-146-6150 32 7<br />
5310-01-146-7302 18 8<br />
5310-01-146-7303 32 18<br />
5310-01-147-5072 18 28<br />
5310-01-157-3762 18 8<br />
5310-01-270-8245 28 26<br />
5310-01-287-9737 26 13<br />
5310-01-303-8583 28 13<br />
5310-01-497-2856 28 14<br />
5315-00-014-1195 2 18<br />
5315-00-014-1244 25 4<br />
5315-00-014-1284 5 22<br />
5315-00-043-1787 13 22<br />
5315-00-082-0448 24 59<br />
30 31<br />
5315-00-238-0882 16 9<br />
5315-00-281-7610 2 7<br />
5315-00-475-2574 13 21<br />
5315-00-532-9388 2 20<br />
5315-00-777-3544 7 20<br />
7 26<br />
5315-00-844-0140 24 38<br />
5315-00-866-5015 3 8<br />
5315-00-907-0711 24 66<br />
5315-01-058-4551 4 9<br />
5315-01-079-6506 21 15<br />
5315-01-079-6740 4 17<br />
5315-01-087-0534 30 22<br />
5315-01-110-7835 37 7<br />
5315-01-145-6080 7 4<br />
5315-01-210-0616 7 19<br />
5320-01-163-2277 8 11<br />
5325-00-256-2846 24 24<br />
24 46<br />
5325-00-420-9696 36 9<br />
5325-00-558-9412 24 18<br />
5325-00-804-2784 6 6<br />
5325-00-807-2636 30 42<br />
5325-00-815-1137 21 16<br />
5325-00-922-9101 20 21<br />
5325-01-081-0662 30 15<br />
5325-01-084-9033 13 29<br />
5325-01-087-8727 18 15<br />
5325-01-139-6738 11 28<br />
5325-01-241-4318 6 6<br />
5325-01-449-3299 28 25<br />
5330-00-003-1771 14 36<br />
5330-00-005-0407 36 3<br />
5330-00-005-0858 4 4<br />
5330-00-026-2931 17 19<br />
5330-00-064-4399 2 3<br />
5330-00-129-9389 20 32<br />
5330-00-131-7072 20 13<br />
5330-00-132-0247 21 18<br />
5330-00-132-0248 11 49<br />
5330-00-132-0276 21 11<br />
5330-00-135-6382 16 6<br />
5330-00-143-8376 13 34<br />
5330-00-171-7267 2 32<br />
5330-00-194-8385 26 8<br />
28 3<br />
5330-00-237-6266 27 2<br />
5330-00-246-0309 12 30<br />
5330-00-252-8888 31 16<br />
5330-00-286-0487 31 18<br />
5330-00-361-2955 4 1<br />
5330-00-403-9896 24 21<br />
5330-00-404-2920 5 27<br />
5330-00-406-7789 27 15<br />
5330-00-484-9937 27 11<br />
5330-00-506-4866 30 30<br />
5330-00-537-2382 2 13<br />
11 3<br />
5330-00-562-1176 30 41<br />
5330-00-567-3463 25 2<br />
5330-00-599-2962 24 21<br />
5330-00-632-6182 27 12<br />
5330-00-659-3178 15 4<br />
5330-00-852-7347 20 15<br />
5330-00-861-8592 8 32<br />
5330-00-864-5422 34 7<br />
5330-00-961-9470 24 32<br />
5330-01-040-2087 34 5<br />
9
TM9-2815-225-34&P<br />
CROSS REFERENCE INDEXES<br />
NATIONAL STOCK NUMBER INDEX<br />
STOCK NUMBER FIGURE NO ITEM NO STOCK NUMBER FIGURE NO ITEM NO<br />
5330-01-043-4242 28 23<br />
5330-01-046-1991 11 26<br />
5330-01-046-3144 11 16<br />
5330-01-049-0466 2 4<br />
5330-01-051-4243 13 12<br />
24 20<br />
5330-01-060-9061 20 43<br />
5330-01-066-3904 14 7<br />
5330-01-066-3910 13 2<br />
5330-01-066-5350 36 16<br />
5330-01-066-5351 14 3<br />
5330-01-072-8828 30 9<br />
5330-01-072-8830 24 11<br />
30 38<br />
5330-01-072-8998 26 1<br />
5330-01-075-0948 KIT 3<br />
5330-01-079-6514 10 30<br />
11 39<br />
5330-01-080-2992 36 12<br />
36 20<br />
5330-01-080-5021 3 23<br />
5330-01-082-6984 14 17<br />
5330-01-082-6985 5 25<br />
5330-01-084-9068 31 18<br />
5330-01-085-3580 27 1<br />
5330-01-086-3523 14 33<br />
5330-01-086-3996 18 24<br />
5330-01-086-6196 18 7<br />
5330-01-086-6197 11 29<br />
5330-01-086-7790 KIT 12<br />
5330-01-092-4143 KIT 4<br />
5330-01-097-7791 20 57<br />
5330-01-107-1841 45 23<br />
5330-01-129-6541 17 16<br />
5330-01-136-8569 25 13<br />
5330-01-142-2784 24 8<br />
5330-01-145-3983 7 8<br />
5330-01-145-3984 7 8<br />
5330-01-145-5374 27 17<br />
5330-01-145-5380 34 10<br />
5330-01-145-5381 34 27<br />
5330-01-145-6083 8 25<br />
18 25<br />
5330-01-145-6909 10 22<br />
5330-01-145-6910 10 10<br />
5330-01-145-6911 10 9<br />
5330-01-145-6913 13 34<br />
5330-01-145-6914 16 11<br />
5330-01-146-7172 7 8<br />
5330-01-146-7314 34 17<br />
36 30<br />
5330-01-146-9775 7 8<br />
5330-01-146-9928 7 8<br />
5330-01-147-0748 12 1<br />
5330-01-147-1274 13 2<br />
5330-01-147-4071 13 49<br />
5330-01-147-4072 14 8<br />
5330-01-147-8754 32 3<br />
5330-01-150-9812 KIT 10<br />
5330-01-155-3349 27 10<br />
5330-01-160-7460 23 8<br />
5330-01-164-0944 11 48<br />
5330-01-181-0630 19 11<br />
5330-01-181-0631 20 5<br />
5330-01-222-2306 10 45<br />
5330-01-240-1619 4 11<br />
5330-01-240-1630 36 6<br />
5330-01-285-4827 9 6<br />
5330-01-291-6537 29 15<br />
5330-01-303-1600 28 6<br />
5330-01-338-4829 30 29<br />
5330-01-497-4872 28 18<br />
5331-00-058-1767 2 5<br />
5331-00-081-9289 24 55<br />
5331-00-081-9299 29 9<br />
5331-00-132-0274 29 11<br />
5331-00-143-8485 3 22<br />
5331-00-159-1464 34 16<br />
5331-00-420-9624 4 5<br />
5331-00-441-0145 20 50<br />
5331-00-506-4874 34 2<br />
5331-00-809-2667 31 8<br />
5331-00-809-3276 31 6<br />
5331-00-905-2679 20 41<br />
5331-00-941-3762 20 49<br />
5331-00-970-3461 24 14<br />
5331-00-984-3756 8 28<br />
5331-01-072-4436 3 6<br />
5331-01-072-8983 24 52<br />
5331-01-077-5228 11 36<br />
34 24<br />
5331-01-085-3105 18 6<br />
5331-01-086-1013 18 5<br />
5331-01-086-3991 36 23<br />
5331-01-145-0715 13 47<br />
5331-01-145-0716 16 5<br />
5331-01-145-5377 2 38<br />
5331-01-145-6085 10 5<br />
5331-01-145-6086 10 18<br />
5331-01-154-4316 10 23<br />
5331-01-344-4226 28 24<br />
5340-00-050-1600 2 15<br />
5340-00-084-7787 29 8<br />
5340-00-087-7486 14 19<br />
5340-00-132-3203 15 9<br />
5340-00-238-5435 21 1<br />
5340-00-276-5847 2 31<br />
5340-00-400-3449 26 11<br />
5340-00-404-2940 8 10<br />
5340-00-404-2944 7 1<br />
5340-00-417-5800 12 26<br />
5340-00-485-0945 7 12<br />
5340-00-632-6239 3 5<br />
5340-00-716-4975 24 44<br />
5340-00-719-4601 22 8<br />
5340-00-767-4012 15 11<br />
5340-00-799-0843 2 12<br />
5340-00-809-1490 32 24<br />
5340-00-829-5617 31 10<br />
5340-00-839-0653 12 19<br />
5340-00-898-1497 30 43<br />
5340-00-907-8964 30 47<br />
10
TM9-2815-225-34&P<br />
CROSS REFERENCE INDEXES<br />
NATIONAL STOCK NUMBER INDEX<br />
STOCK NUMBER FIGURE NO ITEM NO STOCK NUMBER FIGURE NO ITEM NO<br />
5340-00-933-3009 3 3<br />
5340-00-951-3536 31 7<br />
5340-01-066-2947 13 39<br />
5340-01-079-8097 22 6<br />
5340-01-085-4439 18 16<br />
5340-01-086-6193 3 14<br />
5340-01-087-0681 3 9<br />
5340-01-087-0682 3 13<br />
5340-01-122-8002 5 26<br />
5340-01-135-7250 34 21<br />
5340-01-145-0647 21 7<br />
5340-01-145-0772 10 43<br />
5340-01-145-0773 14 31<br />
5340-01-145-0802 13 14<br />
5340-01-145-1181 32 5<br />
5340-01-145-1597 35 2<br />
5340-01-145-9362 2 17<br />
5340-01-145-9451 13 3<br />
5340-01-146-9992 12 5<br />
5340-01-147-5389 12 32<br />
5340-01-150-6248 12 37<br />
5340-01-153-9425 12 44<br />
5340-01-163-7118 8 26<br />
5340-01-208-9319 33 15<br />
5340-01-242-0805 11 10<br />
5340-01-342-3610 11 19<br />
5340-01-497-7593 28 12<br />
5340-01-K72-3663 28 27<br />
5342-00-400-5178 24 37<br />
5342-00-404-2946 1 5<br />
5342-00-858-3507 22 4<br />
5342-01-079-4678 21 14<br />
5342-01-085-4153 23 3<br />
30 2<br />
5342-01-098-0175 17 7<br />
5342-01-140-7158 12 29<br />
5342-01-143-6045 12 9<br />
5342-01-143-6046 30 39<br />
5342-01-145-0645 13 11<br />
5342-01-145-0646 21 2<br />
5342-01-145-1549 24 62<br />
5342-01-145-9540 12 20<br />
14 22<br />
5342-01-146-9816 32 13<br />
5355-00-082-1189 29 16<br />
5355-01-084-5323 45 11<br />
5355-01-097-7072 45 6<br />
5360-00-009-9270 3 4<br />
5360-00-129-9415 20 44<br />
5360-00-132-0245 21 9<br />
5360-00-436-7340 33 3<br />
5360-00-461-5738 30 46<br />
5360-00-597-4570 24 33<br />
5360-00-664-5343 11 23<br />
5360-00-895-3216 20 39<br />
5360-00-901-9644 30 46<br />
5360-01-038-4659 13 13<br />
5360-01-084-9066 18 17<br />
5360-01-086-3480 20 47<br />
5360-01-086-6113 24 16<br />
5360-01-086-6114 24 69<br />
5360-01-089-9103 18 21<br />
5360-01-095-3661 24 61<br />
30 33<br />
5360-01-134-5602 24 23<br />
5360-01-138-6638 24 69<br />
5360-01-145-3974 10 15<br />
5360-01-145-3975 10 17<br />
5360-01-145-7554 13 13<br />
5360-01-145-7555 18 22<br />
5360-01-145-7607 18 11<br />
5360-01-147-0054 24 16<br />
5360-01-147-4846 30 49<br />
5360-01-148-0303 13 15<br />
5360-01-200-0323 11 32<br />
5365-00-132-0273 6 9<br />
5365-00-197-9327 11 24<br />
12 11<br />
5365-00-369-4729 20 38<br />
5365-00-404-2934 36 27<br />
5365-00-428-6201 4 10<br />
5365-00-462-4504 30 44<br />
5365-00-488-0799 2 39<br />
5365-00-507-3224 24 68<br />
5365-00-507-3225 24 68<br />
5365-00-507-3254 16 4<br />
5365-00-507-3260 30 45<br />
5365-00-507-3261 30 44<br />
5365-00-507-3262 30 44<br />
5365-00-507-3271 24 31<br />
5365-00-543-3744 24 68<br />
5365-00-598-5255 19 14<br />
19 18<br />
26 21<br />
5365-00-695-1247 12 12<br />
5365-00-708-3434 11 14<br />
5365-00-716-5496 KIT 1<br />
5365-00-829-5604 24 65<br />
5365-00-965-0870 31 9<br />
5365-01-079-8373 24 17<br />
5365-01-080-0409 36 22<br />
5365-01-086-7788 16 4<br />
5365-01-095-5666 17 9<br />
5365-01-103-7835 39 6<br />
5365-01-126-3334 30 10<br />
5365-01-132-1984 36 10<br />
5365-01-147-0912 16 4<br />
5365-01-147-0913 16 4<br />
5365-01-147-2495 2 39<br />
5365-01-147-2496 2 39<br />
5365-01-147-2497 2 39<br />
5365-01-147-5030 1 4<br />
17 4<br />
18 33<br />
5365-01-147-9802 2 39<br />
5365-01-148-8353 2 39<br />
5365-01-150-6257 2 28<br />
5365-01-241-3903 9 7<br />
5930-01-095-9823 32 10<br />
5930-01-177-0346 10 21<br />
5930-01-295-0912 32 10<br />
5940-01-085-4426 18 10<br />
11
TM9-2815-225-34&P<br />
CROSS REFERENCE INDEXES<br />
NATIONAL STOCK NUMBER INDEX<br />
STOCK NUMBER FIGURE NO ITEM NO STOCK NUMBER FIGURE NO ITEM NO<br />
6150-01-114-7119 18 3<br />
6620-01-147-9954 37 1<br />
6620-01-203-4301 32 16<br />
6625-01-232-5469 42 4<br />
6635-01-329-2210 51 5<br />
6680-01-085-2870 30 1<br />
30 18<br />
6680-01-108-7410 12 23<br />
6685-01-047-2811 34 6<br />
6685-01-141-0907 34 6<br />
7690-01-080-7335 32 11<br />
7690-01-094-6720 1 8<br />
7920-00-168-3244 48 2<br />
8115-01-349-2459 1 10<br />
9905-00-473-7260 20 27<br />
9905-00-733-7622 24 28<br />
9905-01-147-0933 1 8<br />
12
TM9-2815-225-34&P<br />
CROSS REFERENCE INDEXES<br />
PART NUMBER INDEX<br />
PART NUMBER FIG. ITEM<br />
A77505 13 5<br />
AC1600300NF 26 18<br />
AN565F428H24 24 70<br />
AN737TW22 22 23<br />
AN960-416 25 16<br />
25 20<br />
30 36<br />
31 13<br />
33 14<br />
AR-09999 11 27<br />
AR-2308 8 6<br />
AR-45724 17 30<br />
AR-73350 KIT 2<br />
AR01176 KIT 1<br />
AR09832 13 25<br />
AR10172 13 1<br />
AR1092200 20 29<br />
AR12228 31 20<br />
AR41010 24 49<br />
AR41022 24 35<br />
AR51323 33 1<br />
AR8667 13 3<br />
AR9832 13 43<br />
AS0401100MS 13 50<br />
B1821BH025C125N 31 2<br />
B1821BH025C350N 10 40<br />
B1821BH031C150N 19 5<br />
B1821BH038C075N 12 31<br />
13 9<br />
13 48<br />
14 12<br />
14 24<br />
B1821BH038C100D 13 48<br />
B1821BH038C125N 10 32<br />
13 28<br />
13 35<br />
14 10<br />
26 3<br />
B1821BH038C150N 10 26<br />
14 39<br />
B1821BH038C200N 10 29<br />
B1821BH038C225N 10 39<br />
B1821BH038F150N 5 2<br />
B1821BH044C175N 20 3<br />
B1821BH044C425N 12 33<br />
B2568 2 20<br />
BM70796 30 48<br />
BM78793 31 17<br />
BM95159 8 12<br />
BM95160 8 16<br />
BM95161 8 2<br />
BM95162 8 20<br />
BM97497 25 3<br />
C3159X2 2 9<br />
COV-1109Z1 12 44<br />
EST1228 41 14<br />
F1801-040 27 5<br />
F40B 38 9<br />
FC3619RX 23 6<br />
H231 3 2<br />
J 33113 53 5<br />
13
TM9-2815-225-34&P<br />
CROSS REFERENCE INDEXES<br />
PART NUMBER INDEX<br />
PART NUMBER FIG. ITEM<br />
K060436 36 28<br />
M-1302B-24 38 12<br />
M-A162-20018 32 11<br />
M1302B18 38 13<br />
M39807 4 4<br />
MA145B21000 13 33<br />
MA207-21-642 33 2<br />
MA326 21 180 45 2<br />
MA326-21373 41 24<br />
MB320-20011 12 43<br />
MB362-20001 32 18<br />
MB70-20107 33 15<br />
MODEL CD3 52 5<br />
MS122032 10 41<br />
14 13<br />
22 2<br />
31 12<br />
33 13<br />
MS16625-1100 30 42<br />
MS16625-1200 6 6<br />
MS16629-1100 24 18<br />
MS16632-1050 24 24<br />
24 46<br />
MS18154-59 13 9<br />
MS21333-98 32 24<br />
MS27183-11 30 25<br />
MS27183-12 12 41<br />
34 20<br />
MS27183-14 5 7<br />
10 27<br />
12 27<br />
13 36<br />
14 26<br />
MS27183-16 12 35<br />
MS27183-21 12 18<br />
MS35308-458 12 21<br />
14 20<br />
MS35338-45 12 40<br />
19 6<br />
20 10<br />
30 28<br />
MS35338-46 10 38<br />
12 46<br />
13 32<br />
22 25<br />
32 20<br />
MS35338-47 12 34<br />
13 27<br />
16 21<br />
20 33<br />
30 3<br />
MS35338-48 1 3<br />
5 20<br />
11 8<br />
MS35338-8 11 17<br />
11 40<br />
MS35648-8 2 15<br />
MS35691-5 24 43<br />
33 9<br />
33 12<br />
MS35756-34 13 22<br />
14
TM9-2815-225-34&P<br />
CROSS REFERENCE INDEXES<br />
PART NUMBER INDEX<br />
PART NUMBER FIG. ITEM<br />
MS49005-4 2 10<br />
MS51092-1 26 2<br />
MS51967-20 36 17<br />
MS51968-14 8 3<br />
8 7<br />
8 13<br />
8 17<br />
8 21<br />
MS90725-34 14 37<br />
MS90725-43 20 9<br />
MS90725-6 26 12<br />
MS90725-90 12 39<br />
S-1002-A 10 44<br />
19 12<br />
26 25<br />
S-1003-A 19 14<br />
19 18<br />
26 21<br />
S-108-A 13 28<br />
S-109 22 27<br />
S-117 22 5<br />
S-119-C 16 14<br />
S-122-C 20 2<br />
23 1<br />
S-129 7 10<br />
12 22<br />
S-142-A 13 46<br />
S-151C 22 29<br />
S-159-B 33 5<br />
S-16052 30 16<br />
S-16255 36 21<br />
S-174-C 31 5<br />
S-189-B 5 15<br />
S-189-C 29 1<br />
S-199-B 10 33<br />
S-213-A 12 16<br />
24 6<br />
S-217 20 7<br />
S-222-A 27 4<br />
S-223 14 23<br />
22 1<br />
S-2286 1 7<br />
20 28<br />
24 29<br />
S-285 17 6<br />
S-603 12 17<br />
14 21<br />
S-604 10 3<br />
10 31<br />
12 17<br />
13 27<br />
14 13<br />
14 25<br />
22 2<br />
S-626 12 4<br />
19 7<br />
20 11<br />
S-631 10 42<br />
24 3<br />
27 6<br />
S-908 10 7<br />
15
TM9-2815-225-34&P<br />
CROSS REFERENCE INDEXES<br />
PART NUMBER INDEX<br />
PART NUMBER FIG. ITEM<br />
S-911-B 3 24<br />
16 10<br />
17 31<br />
19 10<br />
36 4<br />
S-915-A 2 26<br />
S-932-B 34 12<br />
S-965-E 36 27<br />
S-966E 2 14<br />
S00100500A 19 16<br />
S00109700 22 12<br />
S105 13 31<br />
30 40<br />
S105X 24 25<br />
S110 30 26<br />
S118A 26 12<br />
S126 11 18<br />
S129 2 35<br />
S1354 12 47<br />
S145 11 7<br />
S149A 14 30<br />
S151 30 4<br />
S152B 11 44<br />
S155 15 5<br />
S16255 36 11<br />
S190C 22 7<br />
S200 5 21<br />
S223 13 40<br />
S2286 26 23<br />
S248 24 48<br />
S2876 33 6<br />
S600 33 8<br />
S601 5 17<br />
S604 2 34<br />
7 9<br />
36 32<br />
S622 13 36<br />
S627 11 45<br />
S631 22 3<br />
S684 14 36<br />
S689 22 26<br />
S719 2 31<br />
S911B 2 27<br />
5 23<br />
11 35<br />
14 40<br />
S962 12 10<br />
SAEJ1508-06 35 6<br />
SINL-200 49 9<br />
ST-1032 41 3<br />
ST-1059-17 42 2<br />
ST-1089 50 6<br />
ST-1090 45 15<br />
ST-1090-3 45 18<br />
ST-1090-4 45 16<br />
ST-1095 46 3<br />
ST-1100 40 3<br />
ST-1100-1 40 7<br />
ST-1100-10 40 4<br />
ST-1100-11 40 10<br />
ST-1100-12 40 14<br />
16
TM9-2815-225-34&P<br />
CROSS REFERENCE INDEXES<br />
PART NUMBER INDEX<br />
PART NUMBER FIG. ITEM<br />
ST-1100-13 40 13<br />
ST-1100-14 40 12<br />
ST-1100-5 40 6<br />
ST-1100-6 40 9<br />
ST-1100-7 40 5<br />
ST-1100-8 40 8<br />
ST-1100-9 40 11<br />
ST-1105 47 7<br />
ST-1114 38 3<br />
ST-1122 48 3<br />
ST-1124 48 4<br />
ST-1134 50 7<br />
ST-1145 45 19<br />
ST-1158 44 14<br />
ST-1159 38 15<br />
ST-1168 44 1<br />
ST-1168-10 44 7<br />
ST-1168-19 44 8<br />
ST-1168-3 44 4<br />
ST-1168-4 44 2<br />
ST-1168-5 44 5<br />
ST-1168-6 44 3<br />
ST-1168-7 44 6<br />
ST-1168-8 44 9<br />
ST-1168-9 44 10<br />
ST-1173 48 5<br />
ST-1179 37 29<br />
ST-1191 48 6<br />
ST-1218 40 15<br />
ST-1227 37 15<br />
ST-1228-1 41 23<br />
ST-1228-13 41 17<br />
ST-1228-14 41 21<br />
ST-1228-2 41 22<br />
ST-1228-3 41 15<br />
ST-1228-4 41 20<br />
ST-1228-5 41 18<br />
ST-1228-9 41 16<br />
ST-1231 45 27<br />
ST-1241 50 5<br />
ST-1242 37 4<br />
ST-1242-1 37 12<br />
ST-1242-2 37 6<br />
ST-1242-3 37 5<br />
ST-1242-4 37 8<br />
ST-1242-5 37 9<br />
ST-1242-6 37 7<br />
ST-1242-7 37 10<br />
ST-1242-8 37 11<br />
ST-1244-1 39 7<br />
ST-1244-3 39 10<br />
ST-1244-4 39 9<br />
ST-1244-5 39 8<br />
ST-1244-8 39 11<br />
ST-1244-9 39 6<br />
ST-125 47 1<br />
ST-1254 53 4<br />
ST-1259 43 1<br />
ST-1259-1 43 3<br />
ST-1259-2 43 4<br />
ST-1259-3 43 5<br />
17
TM9-2815-225-34&P<br />
CROSS REFERENCE INDEXES<br />
PART NUMBER INDEX<br />
PART NUMBER FIG. ITEM<br />
ST-1259-4 43 2<br />
ST-1259-5 43 7<br />
ST-1259-6 41 8<br />
43 8<br />
ST-1259-7 43 6<br />
ST-1261 51 1<br />
ST-1262 51 2<br />
ST-1273 37 1<br />
ST-1279 48 9<br />
ST-1287-10 44 13<br />
ST-1298 51 3<br />
ST-1318 44 17<br />
ST-1318-23 44 18<br />
ST-1325 38 16<br />
ST-1326 45 20<br />
ST-1326-1 45 22<br />
ST-1326-2 45 21<br />
ST-249 40 16<br />
ST-249-1 40 20<br />
ST-249-2 40 19<br />
ST-249-3 40 18<br />
ST-249-4 40 17<br />
ST-257 47 2<br />
ST-302 38 2<br />
ST-386-10 39 24<br />
ST-386-11 39 21<br />
ST-386-2 39 19<br />
ST-386-3 39 20<br />
ST-386-5 39 22<br />
ST-386-6 39 27<br />
ST-386-8 39 26<br />
ST-386-9 39 25<br />
ST-422 45 25<br />
ST-448 47 3<br />
ST-544 44 11<br />
46 4<br />
ST-544-1 46 6<br />
ST-544-2 46 5<br />
ST-560 37 28<br />
ST-561 50 1<br />
ST-563 50 2<br />
ST-608 46 2<br />
ST-633 39 28<br />
ST-658 39 17<br />
ST-659 40 21<br />
ST-663 47 8<br />
ST-669 38 8<br />
ST-669-13 38 10<br />
ST-691 39 13<br />
ST-691-1 39 14<br />
ST-691-2 39 15<br />
ST-6991 38 14<br />
ST-749 47 6<br />
ST-788 37 13<br />
ST-835 41 1<br />
ST-851 46 7<br />
ST-853 41 2<br />
ST-876 48 2<br />
ST-880 37 21<br />
ST-880-1 37 22<br />
ST-880-2 37 23<br />
18
TM9-2815-225-34&P<br />
CROSS REFERENCE INDEXES<br />
PART NUMBER INDEX<br />
PART NUMBER FIG. ITEM<br />
ST-880-3 37 24<br />
ST-880-6 37 25<br />
ST-880-7 37 26<br />
ST-884 37 16<br />
ST-884-1 37 17<br />
ST-884-3 37 18<br />
ST-884-6 37 19<br />
ST-903 42 6<br />
ST-995 37 20<br />
ST-997-6 41 5<br />
ST1065 41 13<br />
ST1177 42 5<br />
ST583 47 4<br />
ST593 40 1<br />
ST662 47 9<br />
ST691-3 39 16<br />
ST790-362 53 2<br />
ST790-363 53 3<br />
ST824 48 1<br />
TM-82 38 11<br />
WW-P-471AASBUC 36 5<br />
001022 18 17<br />
001023 18 15<br />
001026 18 8<br />
001030 17 10<br />
18 12<br />
001031 18 9<br />
001082 18 6<br />
001083 18 7<br />
001094 1 2<br />
17 3<br />
18 34<br />
001199 18 31<br />
001234 1 4<br />
17 4<br />
18 33<br />
001492 18 13<br />
001519 18 21<br />
001521 18 20<br />
002299 18 10<br />
002390 18 3<br />
002514 18 28<br />
002680 18 35<br />
002969 18 26<br />
003251 17 9<br />
004089 18 14<br />
004136 18 23<br />
007447 18 11<br />
007500 18 22<br />
007505 18 20<br />
007623 18 18<br />
007696 18 19<br />
008895 18 16<br />
009353 18 8<br />
009916 18 9<br />
009917 18 2<br />
010180 8 25<br />
18 25<br />
011494 49 10<br />
011573 3 19<br />
012647 17 1<br />
19
TM9-2815-225-34&P<br />
CROSS REFERENCE INDEXES<br />
PART NUMBER INDEX<br />
PART NUMBER FIG. ITEM<br />
013472 18 4<br />
100099 31 8<br />
100129 25 21<br />
100193 24 41<br />
10021500 25 18<br />
100475 13 29<br />
100478 24 55<br />
100764 30 30<br />
101037-05 32 14<br />
101322 9 1<br />
101841 24 68<br />
101842 24 68<br />
101843 24 68<br />
101996 10 20<br />
102030 32 8<br />
102522 34 23<br />
103031 32 7<br />
103879 12 8<br />
105182 13 37<br />
105199 15 6<br />
105375 24 28<br />
106289 5 13<br />
107460 14 19<br />
107738 7 24<br />
107947 10 36<br />
11 12<br />
108289 32 13<br />
108330 14 25<br />
22 3<br />
108722 26 11<br />
109319 13 45<br />
109333 13 14<br />
109594 15 10<br />
35 3<br />
110058 24 44<br />
110266 15 7<br />
110855 25 2<br />
110907 11 14<br />
111025 32 3<br />
112302 36 9<br />
114638 15 8<br />
116122 20 1<br />
23 2<br />
116390 17 27<br />
116391 17 32<br />
11669835 1 9<br />
116982 15 11<br />
117244 10 6<br />
11 21<br />
16 13<br />
24 30<br />
118227 24 38<br />
118377 7 23<br />
118378 7 17<br />
118939 7 20<br />
7 26<br />
11920-001-00 25 9<br />
11936300 25 11<br />
11981000 20 22<br />
119859 20 21<br />
120217 29 6<br />
20
TM9-2815-225-34&P<br />
CROSS REFERENCE INDEXES<br />
PART NUMBER INDEX<br />
PART NUMBER FIG. ITEM<br />
120392 10 37<br />
1232 18 30<br />
123558 3 8<br />
12389942 1 10<br />
125049 32 6<br />
126304 13 44<br />
127316 4 15<br />
5 14<br />
127558 11 22<br />
127936 20 49<br />
127940 20 40<br />
128080 20 39<br />
128085 20 41<br />
128086 20 50<br />
129768 29 10<br />
129826 29 17<br />
129838 29 16<br />
129839 29 8<br />
129866 22 19<br />
31 19<br />
129888 29 9<br />
12Z329PC92 24 30<br />
12Z9026-5 24 21<br />
130118 34 1<br />
130394 34 26<br />
131026 3 22<br />
131245 32 21<br />
132019 2 12<br />
13264800 2 33<br />
132770 16 2<br />
13294 18 24<br />
133538 31 11<br />
134074 29 7<br />
134561 12 32<br />
135308 3 26<br />
136403 20 27<br />
137075 4 5<br />
137370 30 47<br />
137795 10 2<br />
137796 22 7<br />
138769 24 69<br />
138781 24 69<br />
139988 31 6<br />
140218 2 21<br />
140330 8 5<br />
8 15<br />
8 23<br />
8 19<br />
141244 25 4<br />
141284 5 22<br />
142110 11 20<br />
142689 17 20<br />
143251 30 46<br />
143253 30 46<br />
143848 24 61<br />
30 33<br />
144178 24 59<br />
30 31<br />
144179 24 60<br />
30 32<br />
144302 24 65<br />
21
TM9-2815-225-34&P<br />
CROSS REFERENCE INDEXES<br />
PART NUMBER INDEX<br />
PART NUMBER FIG. ITEM<br />
144714 20 42<br />
144948 20 45<br />
145028 20 46<br />
145504 13 12<br />
24 20<br />
145505 24 19<br />
145506 36 23<br />
1459-259 2 19<br />
34 30<br />
146160 30 25<br />
146161 13 10<br />
14648300 24 34<br />
147100 3 21<br />
147135 22 4<br />
147389 3 17<br />
147610 20 26<br />
149105PC183049 2 5<br />
14978 20 52<br />
151478 15 3<br />
151489 15 1<br />
153338 31 10<br />
153346 31 14<br />
153964 20 12<br />
154018 20 15<br />
154088 24 32<br />
155789 14 11<br />
156416 27 7<br />
156420 27 13<br />
156444 27 2<br />
157088 24 31<br />
157281 4 8<br />
157282 4 8<br />
157551 13 34<br />
160514 31 9<br />
162426 23 9<br />
30 27<br />
163733 24 37<br />
163944 30 17<br />
166009 21 9<br />
166777 17 5<br />
167157 21 12<br />
168306 8 4<br />
8 8<br />
8 14<br />
8 18<br />
8 22<br />
168319 8 24<br />
170226 1 5<br />
170296 3 3<br />
170510 27 12<br />
170664 17 25<br />
170970 22 28<br />
171570 27 16<br />
172034 3 5<br />
172648 5 27<br />
173086 21 18<br />
173368 11 49<br />
173708 33 10<br />
173717 33 3<br />
174299 21 16<br />
175755 6 6<br />
22
TM9-2815-225-34&P<br />
CROSS REFERENCE INDEXES<br />
PART NUMBER INDEX<br />
PART NUMBER FIG. ITEM<br />
175831 7 12<br />
175833 17 12<br />
175860 25 6<br />
17586400 25 12<br />
175867 25 5<br />
176027 20 32<br />
1764 18 27<br />
17741900 13 23<br />
178074 12 29<br />
179063 11 34<br />
13 18<br />
179822 24 16<br />
179834 24 16<br />
179901 35 4<br />
179902 35 12<br />
179903 35 8<br />
179904 35 6<br />
179912. 35 7<br />
180175 5 9<br />
180371 22 6<br />
180372 22 8<br />
180810 20 19<br />
181213 3 25<br />
22 13<br />
181466 24 26<br />
25 8<br />
29 2<br />
31 3<br />
182706 36 15<br />
183429 20 38<br />
183695 13 22<br />
185138 21 14<br />
185573 16 4<br />
186780 34 7<br />
187317 19 15<br />
187420 6 9<br />
1875350 20 18<br />
187556 29 5<br />
189800 30 44<br />
190334 20 44<br />
190397 17 18<br />
190876 29 11<br />
191037 20 48<br />
191916 21 1<br />
191970 6 7<br />
193136 17 14<br />
193625 12 2<br />
193734 24 21<br />
193736 21 11<br />
194010 27 9<br />
194037 8 10<br />
195755 24 45<br />
195952 14 7<br />
196282 19 9<br />
34 12<br />
196844 36 10<br />
199349 20 4<br />
199453 12 23<br />
199586 13 7<br />
199589 13 30<br />
20000 32 2<br />
23
TM9-2815-225-34&P<br />
CROSS REFERENCE INDEXES<br />
PART NUMBER INDEX<br />
PART NUMBER FIG. ITEM<br />
200064 12 26<br />
200566 15 2<br />
20063500 24 58<br />
200861 5 8<br />
11 46<br />
200919 15 9<br />
201049 28 23<br />
201250 27 8<br />
201737 34 6<br />
202069 21 3<br />
2021-20-20S 13 42<br />
202128 11 32<br />
202185 22 11<br />
20229 18 5<br />
202377 27 15<br />
202456 27 11<br />
202897 31 7<br />
202903 4 9<br />
203097 36 14<br />
203131 3 18<br />
203145 13 2<br />
20335000 24 67<br />
203426 21 15<br />
203619 30 19<br />
203760 16 16<br />
204163 35 10<br />
204165 4 14<br />
5 10<br />
204244 27 19<br />
204586 34 6<br />
20483200 13 24<br />
205451 31 4<br />
2062200 12 48<br />
206326 23 10<br />
30 6<br />
208084 8 11<br />
208119 36 25<br />
208120 36 22<br />
208128 34 5<br />
208326JB1 26 5<br />
208346 2 22<br />
208525 21 8<br />
208829 17 7<br />
209760 24 36<br />
209919 4 2<br />
209955 26 10<br />
210179 4 17<br />
210416 16 3<br />
210707 11 33<br />
210884 2 28<br />
21091500 11 31<br />
210916 34 9<br />
210966 11 10<br />
210967 11 19<br />
211255 16 6<br />
211315 20 43<br />
211435 34 11<br />
211448 35 2<br />
211662 20 36<br />
211918 4 12<br />
211939 13 13<br />
24
TM9-2815-225-34&P<br />
CROSS REFERENCE INDEXES<br />
PART NUMBER INDEX<br />
PART NUMBER FIG. ITEM<br />
211999 3 4<br />
212161 11 36<br />
34 24<br />
212601 30 21<br />
212602 30 23<br />
212603 30 9<br />
212604 30 15<br />
21260500 30 14<br />
212607 30 8<br />
212609 30 11<br />
212610 30 12<br />
212613 30 24<br />
212639 30 13<br />
212668 30 22<br />
212954 21 5<br />
213079 31 18<br />
213082 36 18<br />
213394 3 13<br />
213395 3 9<br />
213456 16 17<br />
213485 34 15<br />
213559 7 18<br />
213740. 2 2<br />
213768 24 52<br />
213769 24 57<br />
214086 27 18<br />
21413900 24 42<br />
214144 24 47<br />
214146 24 22<br />
214150 24 9<br />
214306 16 18<br />
214345 34 4<br />
214617 34 21<br />
214730 6 3<br />
214836 14 34<br />
214951 6 12<br />
214952 6 12<br />
214953 6 12<br />
21504100 14 35<br />
215042 34 3<br />
215044 14 3<br />
215045 14 17<br />
215090 2 3<br />
215195 26 10<br />
215233 7 3<br />
21539700 36 26<br />
215587 14 18<br />
215705 16 5<br />
215965 4 16<br />
21609300 19 13<br />
216128 22 11<br />
216165 4 2<br />
216296 8 26<br />
216487 26 1<br />
216524 3 14<br />
216802 27 1<br />
216804 27 10<br />
21690800 30 8<br />
217034 17 2<br />
217315 11 13<br />
21732300 4 13<br />
25
TM9-2815-225-34&P<br />
CROSS REFERENCE INDEXES<br />
PART NUMBER INDEX<br />
PART NUMBER FIG. ITEM<br />
217632 15 12<br />
21773600 27 10<br />
217798 24 39<br />
217929 7 6<br />
217932 14 16<br />
217933 14 14<br />
217934 12 20<br />
14 22<br />
217939 19 4<br />
218153 8 9<br />
218245 11 26<br />
218716 16 15<br />
218736 8 27<br />
218793 20 14<br />
218813 12 37<br />
219107 7 25<br />
219153 6 11<br />
219191 16 13<br />
2304 40 22<br />
237303 20 57<br />
2380 38 4<br />
2436161 32 23<br />
248X4 22 31<br />
255622 31 18<br />
2580-6 35 13<br />
BULK 3<br />
26384 12 30<br />
272547 32 19<br />
275707 20 56<br />
28430 BULK 1<br />
2856 18 29<br />
299670 10 34<br />
11 43<br />
3000082 16 16<br />
3000171 17 22<br />
3000173 17 24<br />
3000174 17 26<br />
20 35<br />
3000266 29 13<br />
3000446 24 56<br />
3000464 21 10<br />
3000465 21 6<br />
3000521 34 16<br />
3000560 26 15<br />
3000888 36 2<br />
3000907 11 6<br />
3001296 23 3<br />
30 2<br />
3001646 5 24<br />
3001707 24 17<br />
3001847 24 40<br />
3002069 7 19<br />
300207400 19 1<br />
3002110 30 7<br />
3002385 36 16<br />
3002731 27 3<br />
3002901 7 2<br />
3003156 24 11<br />
30 38<br />
3003480 1 6<br />
300353600 26 19<br />
26
TM9-2815-225-34&P<br />
CROSS REFERENCE INDEXES<br />
PART NUMBER INDEX<br />
PART NUMBER FIG. ITEM<br />
3003682 21 2<br />
3003814 11 11<br />
3004724 30 10<br />
3005133 17 11<br />
3005152 20 37<br />
300550700 36 13<br />
3005508 14 5<br />
3006182 9 2<br />
3006183 9 4<br />
3006187 9 3<br />
3006343 24 51<br />
3006344 24 50<br />
3006349 9 3<br />
3006358 9 5<br />
3006456 3 15<br />
3006457 3 15<br />
3006458 3 15<br />
3006745 11 28<br />
3007442 2 38<br />
3007713 11 29<br />
3007759 3 6<br />
3008017 10 30<br />
11 39<br />
3008047 2 25<br />
3008048 2 24<br />
3008049 2 23<br />
3008069 12 36<br />
3008468 12 8<br />
3008469 2 8<br />
5 18<br />
3008470 12 9<br />
3008530 16 23<br />
3008591 14 33<br />
3008596 12 13<br />
300869 13 41<br />
3008690 11 4<br />
3008706 21 17<br />
3008947 17 16<br />
3008998 2 4<br />
3009213 2 21<br />
300938000 24 67<br />
3010030 11 16<br />
3010042 24 35<br />
3010146 13 13<br />
3010242 KIT 3<br />
3010589 8 31<br />
3010590 17 29<br />
3010594 4 3<br />
3010595 11 9<br />
12 28<br />
34 8<br />
3010596 11 15<br />
11 38<br />
33 17<br />
34 29<br />
35 1<br />
3010597 11 42<br />
34 13<br />
3010810 24 62<br />
3010915 15 13<br />
26 7<br />
27
TM9-2815-225-34&P<br />
CROSS REFERENCE INDEXES<br />
PART NUMBER INDEX<br />
PART NUMBER FIG. ITEM<br />
301123300 11 2<br />
3011342 11 1<br />
3011610 14 27<br />
3011711 16 12<br />
3011712 16 12<br />
3011713 16 7<br />
3011714 16 20<br />
3011715 16 22<br />
3011934 3 7<br />
3011951 2 30<br />
3011952 2 17<br />
3012331 6 1<br />
301233200 6 2<br />
3012462 7 6<br />
3012468 36 29<br />
3012469 36 31<br />
3012470 34 19<br />
3012471 14 10<br />
3012473 14 24<br />
3012479 13 46<br />
3012481 23 4<br />
3012483 5 16<br />
3012526 17 13<br />
3012529 13 14<br />
3012531 13 23<br />
3012532 13 20<br />
3012538 21 13<br />
3012558 24 2<br />
3012726 13 11<br />
3013000 34 28<br />
3013161 22 14<br />
3013295 14 2<br />
3013331 7 19<br />
3013336 17 15<br />
3013591 2 37<br />
3013623 3 28<br />
3013786 2 16<br />
13 5<br />
36 5<br />
301381000 24 12<br />
3013811 24 10<br />
3013904 2 11<br />
12 45<br />
3013909 2 6<br />
3013930 6 8<br />
3014354 26 9<br />
301439700 22 17<br />
301439800 22 15<br />
3014614 4 16<br />
3014622 3 10<br />
3014623 3 10<br />
3014624 3 10<br />
3014625 3 10<br />
3014754 13 16<br />
3014755 13 17<br />
3014756 13 15<br />
3014778 13 2<br />
3014783 13 19<br />
3014787 13 19<br />
3014788 13 8<br />
3014798 13 25<br />
28
TM9-2815-225-34&P<br />
CROSS REFERENCE INDEXES<br />
PART NUMBER INDEX<br />
PART NUMBER FIG. ITEM<br />
3014964 13 3<br />
3015114 34 3<br />
3015282 20 34<br />
23 7<br />
3015373 22 9<br />
3015375 22 18<br />
3015387 22 18<br />
3015389 22 16<br />
3015393 22 16<br />
3015469 21 8<br />
301552000 24 5<br />
301552200 24 4<br />
3016637 5 19<br />
3016887 7 14<br />
3017049 12 36<br />
3017051 30 19<br />
30 35<br />
31 2<br />
3017052 30 40<br />
3017748 34 11<br />
3017750 8 32<br />
3017759 3 10<br />
3018098 34 15<br />
3018099 14 35<br />
3018153 20 24<br />
3018488 20 16<br />
3018655 24 23<br />
3018686 26 4<br />
3018690 10 11<br />
3018695 10 23<br />
3018697 10 43<br />
3018762 KIT 4<br />
3018764 34 9<br />
3018767 30 49<br />
3018889 22 22<br />
3019158 34 10<br />
3019218 4 8<br />
3019572 14 15<br />
3019573 20 31<br />
3019574 17 8<br />
3019955 2 39<br />
3019956 2 39<br />
3019957 2 39<br />
3019958 2 39<br />
3019959 2 39<br />
3019960 2 39<br />
3020183 4 11<br />
3020753 22 30<br />
3020754 22 24<br />
3020760 22 21<br />
3020943 15 4<br />
3021068 24 22<br />
302109000 29 7<br />
302112400 KIT 5<br />
302136100 13 20<br />
3021470 20 53<br />
3021581 11 30<br />
3021596 7 4<br />
3021656 10 24<br />
3021660 5 11<br />
3021676 24 15<br />
29
TM9-2815-225-34&P<br />
CROSS REFERENCE INDEXES<br />
PART NUMBER INDEX<br />
PART NUMBER FIG. ITEM<br />
3021704 16 11<br />
3021735 5 25<br />
3022377 12 24<br />
3022589 34 22<br />
3022590 13 6<br />
19 8<br />
3022821 22 9<br />
3023088 24 13<br />
3023101 20 47<br />
302317100 24 7<br />
3023473 17 17<br />
3023506 13 30<br />
3023512 10 4<br />
3023556 21 13<br />
3023870 24 8<br />
3024365 20 8<br />
3024442 16 1<br />
3024666 11 37<br />
34 25<br />
3024709 34 27<br />
3024960 34 17<br />
36 30<br />
3024991 30 34<br />
3025459 30 39<br />
3025460 24 27<br />
31 15<br />
302561100 26 14<br />
302586100 36 13<br />
3026034 27 14<br />
3026198 31 1<br />
3026556 17 21<br />
3026557 17 28<br />
3026733 24 68<br />
3026993 27 19<br />
3027282 1 8<br />
3027308 27 8<br />
302746000 10 8<br />
3027633 24 64<br />
3027653 15 14<br />
3028075 2 30<br />
3028171 21 2<br />
3028269 2 30<br />
3028279 21 3<br />
23 7<br />
3028281 34 18<br />
3028282 14 9<br />
3028642 19 17<br />
3028967 14 30<br />
3029614 15 2<br />
3029846 13 34<br />
3029847 13 47<br />
3029848 13 33<br />
3030038 3 16<br />
3030257 12 7<br />
3030267 30 1<br />
30 18<br />
3030269 30 1<br />
3030286 14 28<br />
3030803 10 15<br />
3030804 10 13<br />
303080500 10 16<br />
30
TM9-2815-225-34&P<br />
CROSS REFERENCE INDEXES<br />
PART NUMBER INDEX<br />
PART NUMBER FIG. ITEM<br />
3030806 10 14<br />
3030808 10 18<br />
3030970 29 12<br />
3031005 10 19<br />
3031186 15 1<br />
3031187 15 3<br />
3031434 13 49<br />
3031560 11 5<br />
3031749 5 5<br />
3031750 5 4<br />
3031751 5 1<br />
3031752 5 3<br />
3031753 5 6<br />
303195900 12 2<br />
3031980 27 3<br />
3032307 10 1<br />
3032348 14 8<br />
3032674 12 38<br />
3032681 7 7<br />
3032708 12 5<br />
3032835 27 18<br />
3033719 25 19<br />
3033724 25 17<br />
3033740 25 15<br />
3034243 25 1<br />
303457800 10 12<br />
3034579 10 45<br />
3034736 27 17<br />
3035028 10 21<br />
3035053 23 8<br />
3035362 29 4<br />
3035595 10 46<br />
26 20<br />
3035600 26 16<br />
3035607 14 31<br />
3035961 8 1<br />
3036005 5 19<br />
3036285 8 30<br />
3036798 14 32<br />
303689200 26 24<br />
3036933 7 21<br />
3036934 7 27<br />
3036935 7 16<br />
303724200 10 25<br />
3037537 28 24<br />
3038035 12 15<br />
3038037 22 10<br />
3038060 19 13<br />
19 17<br />
3038218 30 51<br />
3038745 27 14<br />
3038997 36 6<br />
3038998 36 12<br />
36 20<br />
3039070 24 62<br />
3039296 10 17<br />
3040180 3 23<br />
3041993 3 1<br />
3043647 15 5<br />
3043649 35 11<br />
3043984 26 4<br />
31
TM9-2815-225-34&P<br />
CROSS REFERENCE INDEXES<br />
PART NUMBER INDEX<br />
PART NUMBER FIG. ITEM<br />
3045049 25 14<br />
3045173 30 20<br />
3045534 18 32<br />
3045670 20 20<br />
3045979 10 5<br />
3046170 14 4<br />
3046298 20 51<br />
3046680 24 54<br />
3047159 20 13<br />
3047464 10 9<br />
3047465 10 10<br />
3047963 21 7<br />
3047973 21 4<br />
3048296 33 4<br />
3049024 7 5<br />
3050394 36 7<br />
3050624 25 10<br />
3054071 21 4<br />
3054841 9 6<br />
3055069 12 12<br />
3056158 26 13<br />
3056569 7 22<br />
3058664 16 19<br />
3060202-3894 23 6<br />
3060882 11 25<br />
3061420 33 11<br />
3064398 6 4<br />
3064919 36 19<br />
3065125 7 13<br />
3066796 7 11<br />
3067616 4 1<br />
3068724 14 34<br />
3069014 10 22<br />
3069017 25 13<br />
3069101 17 19<br />
3069177 26 8<br />
28 3<br />
3071085 36 3<br />
3074214 1 8<br />
3074400 7 8<br />
3074401 7 8<br />
3074402 7 8<br />
3074403 7 8<br />
3074404 7 8<br />
3076040 24 53<br />
3077201 14 6<br />
309015 32 10<br />
3095051 12 6<br />
3099083 12 1<br />
320-1850 20 5<br />
3201386 19 11<br />
321030-02 32 16<br />
33-5490-060-000 12 14<br />
3300908 11 47<br />
3305367 35 9<br />
3305L1A 36 8<br />
36 24<br />
3308958 11 48<br />
3313283 10 35<br />
33405 31 17<br />
3349819 3 23<br />
32
TM9-2815-225-34&P<br />
CROSS REFERENCE INDEXES<br />
PART NUMBER INDEX<br />
PART NUMBER FIG. ITEM<br />
3375014 45 26<br />
3375015 45 23<br />
3375108 38 5<br />
3375137 41 12<br />
3375140 41 9<br />
3375146 41 10<br />
3375147 41 11<br />
3375150 37 27<br />
3375151 49 11<br />
3375153 45 1<br />
3375154 41 19<br />
3375162 51 4<br />
3375165 43 10<br />
3375166 43 11<br />
3375172 43 13<br />
3375173 43 14<br />
3375174 43 15<br />
3375180 37 2<br />
38 6<br />
3375182 49 1<br />
3375192 49 2<br />
3375204 41 6<br />
3375205 39 23<br />
3375207 45 10<br />
3375220 45 5<br />
3375221 45 12<br />
3375222 45 13<br />
3375223 45 3<br />
3375224 45 11<br />
3375225 45 9<br />
3375226 45 8<br />
3375227 45 7<br />
3375228 45 6<br />
3375229 45 4<br />
3375230 45 24<br />
3375232 52 6<br />
3375257 49 5<br />
3375271 46 1<br />
3375282 39 12<br />
3375375 52 4<br />
3375425 37 14<br />
3375432 51 5<br />
3375448 49 6<br />
3375455 47 5<br />
3375599 52 3<br />
3375601 51 6<br />
3375614 39 5<br />
3375615 39 4<br />
3375616 39 3<br />
3375825 39 2<br />
3375834 44 15<br />
3375839 44 16<br />
3375855 46 8<br />
3375959 51 7<br />
3376011 51 8<br />
3376015 52 1<br />
3376050 49 7<br />
3376135 50 3<br />
3376177 45 14<br />
3376197 45 17<br />
3376326 39 18<br />
33
TM9-2815-225-34&P<br />
CROSS REFERENCE INDEXES<br />
PART NUMBER INDEX<br />
PART NUMBER FIG. ITEM<br />
49 8<br />
3376350 53 1<br />
3376464 40 2<br />
3376619 42 4<br />
3376663 48 7<br />
3376669 42 7<br />
3376684 42 1<br />
3376815 49 4<br />
3376816 49 3<br />
3376845 38 7<br />
3376903 42 3<br />
3376904 44 12<br />
3377079 39 1<br />
3397929 38 1<br />
3412285 10 28<br />
3519155 28 7<br />
3519290 28 22<br />
3519401 28 21<br />
3519471 28 13<br />
3520981 28 12<br />
3521119 28 14<br />
3521439 28 19<br />
3521440 28 10<br />
3521441 28 5<br />
3521442 28 6<br />
3521837 28 2<br />
3522075 28 4<br />
3522416 28 29<br />
3526653 28 15<br />
3527047 28 16<br />
3529016 28 11<br />
3529372 28 26<br />
3558653 20 25<br />
3558655 20 23<br />
3608833 4 7<br />
3678 18 27<br />
3709510 28 1<br />
3718373 28 25<br />
3722366 28 9<br />
3723863 28 17<br />
3725CP 6 12<br />
3751948 28 20<br />
3756135 28 8<br />
3757753 28 28<br />
3759618 28 18<br />
3801047 7 5<br />
3801056 KIT 6<br />
3801058 KIT 8<br />
3801096 KIT 7<br />
3801106 KIT 9<br />
3801235 KIT 10<br />
3801260 4 6<br />
3801261 4 6<br />
3801262 4 6<br />
3801263 4 6<br />
3801310 2 6<br />
3801433 8 29<br />
3801708 36 1<br />
KIT 14<br />
KIT 15<br />
3801826 2 1<br />
34
TM9-2815-225-34&P<br />
CROSS REFERENCE INDEXES<br />
PART NUMBER INDEX<br />
PART NUMBER FIG. ITEM<br />
3801904 26 22<br />
3801942 26 22<br />
3803279 26 22<br />
3803430 28 27<br />
3803512 3 11<br />
3803524 3 12<br />
3803676 30 18<br />
3804280 KIT 12<br />
3804414 6 5<br />
3804416 6 5<br />
3804500 6 2<br />
3804587 18 1<br />
3821572 13 1<br />
3822472 43 12<br />
3822505 37 3<br />
3822696 43 9<br />
3823024 48 10<br />
3823114 41 7<br />
3823495 52 2<br />
3823871 50 4<br />
3824211 41 4<br />
3824277 48 8<br />
3824942 43 16<br />
3903927 29 15<br />
400X3 20 58<br />
4024958 KIT 11<br />
4026171 30 29<br />
41044 12 29<br />
42645 2 25<br />
42646 2 24<br />
444042 32 17<br />
444683 20 30<br />
44678 30 37<br />
450517 11 41<br />
4797 5 12<br />
49X6X2 11 50<br />
501088-02 32 12<br />
501096-04 32 9<br />
5116M40 4 6<br />
538174 3 27<br />
5414243-20 22 10<br />
5561 1-2A 14 1<br />
19 3<br />
26 17<br />
5583303 34 14<br />
5704991 43 KIT<br />
46 KIT<br />
5704993 40 KIT<br />
5704994 46 KIT<br />
5710454 35 7<br />
5730765 35 4<br />
5730769 35 10<br />
5731317 2 36<br />
5739124 KIT 13<br />
57K3603 1 1<br />
590220940406 24 66<br />
5995177 33 7<br />
60408 16 9<br />
60575 4 10<br />
61554 19 2<br />
63842 14 38<br />
35
TM9-2815-225-34&P<br />
CROSS REFERENCE INDEXES<br />
PART NUMBER INDEX<br />
PART NUMBER FIG. ITEM<br />
64709 9 7<br />
650330 20 17<br />
65259-A 16 4<br />
65259-B 16 4<br />
65259-C 16 4<br />
66292 2 29<br />
67684 29 3<br />
67946 11 24<br />
12 11<br />
67963 2 32<br />
68038 13 39<br />
68061-A 24 14<br />
68139 13 51<br />
22 20<br />
68193 7 1<br />
68274 11 23<br />
68365 13 7<br />
68425 12 19<br />
68445 2 7<br />
68585 2 18<br />
68803-A 3 29<br />
69047-A 14 29<br />
691-10014 31 16<br />
69324 20 6<br />
23 5<br />
30 5<br />
69519 13 21<br />
69521 13 4<br />
13 26<br />
69736 7 15<br />
69832 12 3<br />
70089-1 2 13<br />
11 3<br />
70295 29 14<br />
70470 35 5<br />
70550 6 10<br />
17 23<br />
70624 34 2<br />
70653 16 8<br />
70657 5 26<br />
70690 24 63<br />
70700 24 33<br />
70705 30 41<br />
70713 30 43<br />
70715 30 50<br />
70716 30 52<br />
70717 30 45<br />
70717-A 30 44<br />
70717-B 30 44<br />
70772 3 20<br />
70772-B 24 1<br />
70790 25 7<br />
7374401 8 28<br />
829-4151 32 4<br />
8293635 32 10<br />
8294151 32 1<br />
851-202994 26 6<br />
8710557 BULK 2<br />
8710557-10 12 42<br />
913020 32 5<br />
913024-06 32 15<br />
36
TM9-2815-225-34&P<br />
CROSS REFERENCE INDEXES<br />
PART NUMBER INDEX<br />
PART NUMBER FIG. ITEM<br />
9417953 20 55<br />
9418993 20 54<br />
9419002 32 22<br />
9421077 33 16<br />
9421196 33 18<br />
9422277 12 25<br />
9674F 13 38<br />
999-1206 50 8<br />
37/38 BLANK<br />
37
TM 9-2815-225-34&P 0060 00<br />
DIRECT SUPPORT AND GENERAL SUPPORT<br />
MAINTENANCE MANUAL<br />
INCLUDING REPAIR PARTS AND SPECIAL TOOLS LIST (RPSTL)<br />
FOR<br />
M915, M915A1, M915A4, M916, M920 VEHICLES<br />
NSN 2815-01-082-8125 P/N NTC400-3652-02 CUMMINS NTC-400 BIG CAM III DIESEL ENGINE<br />
W/CONTAINER<br />
NSN 2815-01-142-2745 P/N 11669835 CUMMINS NTC-400 BIG CAM III DIESEL ENGINE<br />
W/CONTAINER<br />
EXPENDABLE AND DURABLE ITEMS<br />
INTRODUCTION<br />
This Work Package (WP) lists expendable <strong>and</strong> durable items needed to repair the Cummins NTC-400<br />
diesel engine. This list is for information only <strong>and</strong> is not authority to requisition the listed items. These<br />
items are authorized to you by CTA 50-970, Expendable/Durable Items.<br />
EXPLANATION OF COLUMNS<br />
Column 1—Item Number. Number assigned to each entry for referencing in Materials/Parts lists in<br />
WP Initial Setups.<br />
Column 2—National Stock Number (NSN). The number used to requisition an item.<br />
Column 3— Description. Provides information needed to identify the item.<br />
Column 4—Unit of Measure. Shows the unit of measure or count of an item, such as gallon, dozen,<br />
gross, etc.<br />
0060 00-1
TM 9-2815-225-34&P 0060 00<br />
EXPENDABLE AND DURABLE ITEMS (Contd)<br />
(1)<br />
ITEM<br />
(2)<br />
NATIONAL STOCK<br />
NUMBER<br />
(3)<br />
DESCRIPTION<br />
(4)<br />
UNIT OF<br />
MEASURE<br />
1 –— ACID: muriatic PT<br />
2 –— ACID: oxalic PT<br />
3<br />
6850-01-441-3218<br />
6850-01-441-3221<br />
6850-01-441-3223<br />
Table 1. Expendable <strong>and</strong> Durable Items List.<br />
ANTIFREEZE: permanent ethylene glycol -60° F inhibited,<br />
(0-A-548), type I, heavy-duty, single package (58536)<br />
(A-A-52624)<br />
1-gallon container<br />
5-gallon can<br />
55-gallon drum<br />
GAL.<br />
GAL.<br />
GAL.<br />
4<br />
5<br />
5350-00-221-0872<br />
5390-00-584-4554<br />
CLOTH, ABRASIVE (crocus): 9 in. x 11 in. sheets,<br />
(58536) A-A-1206<br />
50 sheets/package PG<br />
CLOTH: emery, 290-grit<br />
A-A-1049<br />
SH<br />
6<br />
7920-00-044-9281<br />
CLOTH, CLEANING: lint-free, <strong>general</strong> purpose, white,<br />
(81359) MIL-C-85043<br />
10-pound box<br />
LB<br />
7<br />
8030-00-251-3980<br />
ANTISEIZE COMPOUND: temperature-resistant lubricant,<br />
MIL-A-907, Loctite antiseize, 200° F (93° C), with brush top<br />
(05972) 76764<br />
1-pound can<br />
LB<br />
8<br />
5350-00-224-6692<br />
COMPOUND: lapping 280-grit, SSL-1682<br />
1-pound can<br />
LB<br />
9<br />
6850-00-664-9067<br />
COMPOUND: Prussian blue, MIL-L-83795<br />
1-pint can<br />
PT<br />
10<br />
6850-01-241-0651<br />
DEVELOPER: spotcheck, SKD-NF<br />
1-pint can<br />
PT<br />
11<br />
9150-00-698-2382<br />
FLUID: automatic transmission, type A, AOATF1562A<br />
1-quart can<br />
QT<br />
12<br />
6850-00-974-3788<br />
FLUID, CALIBRATION-INJECTOR TEST STAND, 45A<br />
1-pint can<br />
PT<br />
13<br />
9150-01-197-7698<br />
9150-01-197-7690<br />
9150-01-197-7689<br />
9150-01-197-7692<br />
9150-00-190-7369<br />
13 C GREASE, AUTOMOTIVE AND ARTILLERY:<br />
MIL-G-10924 (81349)<br />
2 1/4-oz tube<br />
1 3/4-pound can<br />
6 1/2-pound can<br />
35-pound can<br />
120-pound drum<br />
OZ<br />
LB<br />
LB<br />
LB<br />
LB<br />
14<br />
8030-00-081-2330<br />
LOCTITE: MIL-S-22473 (grade CV)<br />
50-cubic-centimeter bottle<br />
CC<br />
0060 00-2
TM 9-2815-225-34&P 0060 00<br />
EXPENDABLE AND DURABLE ITEMS (Contd)<br />
Table 1. Expendable <strong>and</strong> Durable Items List (Contd).<br />
(1)<br />
ITEM<br />
15<br />
(2)<br />
NATIONAL STOCK<br />
NUMBER<br />
9150-00-458-0075<br />
(3)<br />
DESCRIPTION<br />
(4)<br />
UNIT OF<br />
MEASURE<br />
LUBRICANT: high-pressure Brayco 300<br />
1/16 ounce OZ<br />
16<br />
9150-00-231-9045<br />
LUBRICANT: rust preventative<br />
1-gallon can<br />
GAL.<br />
17<br />
9150-00-265-9406<br />
CUTTING FLUID: (81348) C-O-376<br />
1-gallon can<br />
GAL.<br />
18<br />
9140-00-286-5294<br />
9140-00-286-5295<br />
9140-00-286-5296<br />
9140-00-256-5297<br />
FUEL: diesel, regular, DF-2, VV-F-800<br />
bulk<br />
5-gallon can<br />
55-gallon drum, 16-gauge<br />
55-gallon drum, 18-gauge<br />
GAL.<br />
GAL.<br />
GAL.<br />
GAL.<br />
19<br />
9150-00-189-6727<br />
9150-00-186-6668<br />
9150-00-191-2772<br />
9150-00-183-7807<br />
OIL, LUBRICATING: OE/HDO 10, MIL-L-2104C<br />
1-quart can<br />
5-gallon drum<br />
55-gallon drum, 18-gauge<br />
Bulk<br />
QT<br />
GAL.<br />
GAL.<br />
GAL.<br />
20<br />
9150-00-186-6681<br />
9150-00-188-9858<br />
9150-00-265-9476<br />
9150-00-189-6729<br />
9150-00-183-7808<br />
OIL, LUBRICATING: OE/HDO 30, MIL-L-2104C<br />
1-quart can<br />
5-gallon drum<br />
55-gallon drum, 16-gauge<br />
55-gallon drum, 18-gauge<br />
Bulk<br />
QT<br />
GAL.<br />
GAL.<br />
GAL.<br />
BULK<br />
21<br />
–—<br />
OIL, LUBRICATING: gear 60-80/140, MIL-L-2105C<br />
1-quart can<br />
5-gallon drum<br />
55-gallon drum<br />
QT<br />
GAL.<br />
GAL.<br />
22<br />
5350-00-543-3600<br />
PAPER: aluminum oxide 240-grit ALOXGRIT 80<br />
90 lbs per ream REAM<br />
23<br />
6810-00-227-0407<br />
PYRIDINE<br />
16-ounce bottle<br />
OZ<br />
24<br />
8030-00-247-2524<br />
SEALANT: gasket, MIL-S-45180<br />
2-ounce tube<br />
OZ<br />
25<br />
8030-00-204-9149<br />
SEALING COMPOUND: pipe sealant (05972) 59241<br />
250-cubic-centimeter bottle<br />
CC<br />
26<br />
8030-01-104-5392<br />
SEALING COMPOUND: liquid, type II, grade N,<br />
Loctite 242 (05972) 24221<br />
10-cubic-centimeter bottle<br />
CC<br />
0060 00-3
TM 9-2815-225-34&P 0060 00<br />
EXPENDABLE AND DURABLE ITEMS (Contd)<br />
(1)<br />
ITEM<br />
(2)<br />
NATIONAL STOCK<br />
NUMBER<br />
Table 1. Expendable <strong>and</strong> Durable Items List (Contd).<br />
(3)<br />
DESCRIPTION<br />
27 6810-00-985-7129 SODIUM CARBONATE (5 % solution): MIL-R-23679<br />
2-ounce bottle<br />
(4)<br />
UNIT OF<br />
MEASURE<br />
28 –— SOLUTION: soap —<br />
29 5340-00-450-5718 CAP AND PLUG SET: (19207) 10935405<br />
1 set EA<br />
OZ<br />
30 8030-00-231-2352 CORROSION PREVENTIVE COMPOUND: MIL-C-11796<br />
55-gallon drum<br />
GAL.<br />
31 5970-00-989-1485 TAPE: moisture proof (73030) H57495-618<br />
1 roll ROLL<br />
32 –— RUBBER GLOVES PR<br />
33 –— GREASE FITTING EA<br />
34 7930-01-011-2498 CLEANING COMPOUND, SOLVENT–DETERGENT<br />
19-ounce bottle<br />
OZ<br />
END OF WORK PACKAGE<br />
0060 00-4
TM 9-2815-225-34&P 0061 00<br />
DIRECT SUPPORT AND GENERAL SUPPORT<br />
MAINTENANCE MANUAL<br />
INCLUDING REPAIR PARTS AND SPECIAL TOOLS LIST (RPSTL)<br />
FOR<br />
M915, M915A1, M915A4, M916, M920 VEHICLES<br />
NSN 2815-01-082-8125 P/N NTC400-3652-02 CUMMINS NTC-400 BIG CAM I DIESEL ENGINE<br />
W/CONTAINER<br />
NSN 2815-01-142-2745 P/N 11669835 CUMMINS NTC-400 BIG CAM III DIESEL ENGINE<br />
W/CONTAINER<br />
TOOLS AND SPECIAL TOOLS<br />
SCOPE<br />
This Work Package (WP) lists common <strong>and</strong> special tools apart from the <strong>general</strong> mechanic’s tool kit<br />
needed to service the Cummins NTC-400 Big Cam I <strong>and</strong> Big Cam III diesel engines.<br />
EXPLANATION OF COLUMNS<br />
Column 1—Item Number. Number assigned to each entry for referencing in the Tools <strong>and</strong> Special<br />
Tools list in WP Initial Setups.<br />
Column 2—Item Name. Name or identification of special or common tool.<br />
Column 3—Part Number. Number used to requisition the tool or kit.<br />
Column 4—National Stock Number. Manufacturer’s part number or catalog number assigned to<br />
each tool or kit.<br />
0061 00-1
TM 9-2815-225-34&P 0061 00<br />
TOOLS AND SPECIAL TOOLS (Contd)<br />
(1)<br />
ITEM NO.<br />
(2)<br />
ITEM NAME<br />
1. General mechanics tool kit:<br />
automotive<br />
2. Maintenance <strong>and</strong> repair shop<br />
equipment: automotive<br />
3. Automotive <strong>maintenance</strong> <strong>and</strong> repair<br />
supplemental set no. 2<br />
Table 1. Tool Identification List.<br />
(3)<br />
PART NO.<br />
(4)<br />
NATIONAL STOCK NUMBER<br />
SC5180-90-CL-N26 5180-00-177-7033<br />
SC4910-95-CL-A74 4910-00-754-0654<br />
SC4910-95-CL-A63 4910-00-754-0707<br />
4. Air pressure tester — —<br />
5. Magnetic crack detector ST-1166 6635-01-128-2676<br />
6. Solenoid valve wrench 011494 5120-01-163-1349<br />
7. C-clamp — —<br />
8. Fuel injector puller 3376872 5120-00-116-7604<br />
9. Ball joint vise ST-302 4910-00-999-1506<br />
10. Fuel pump mounting plate 3375133 4910-00-977-7505<br />
11. Injector st<strong>and</strong> ST-1298 4910-01-082-1346<br />
12. Body <strong>and</strong> injector cup wrench ST-995 5120-00-150-7492<br />
13. Bearing disassembly fixture ST-1114 4910-01-097-6987<br />
14. Water pump bearing m<strong>and</strong>rel ST-658 4910-01-097-6986<br />
15. Water pump seal m<strong>and</strong>rel 3375448 5120-01-128-2675<br />
16. Oil seal driver ST-1191 5120-01-160-8867<br />
17. Oil seal pilot 3375180 4910-01-097-6989<br />
18. Air compressor wrench 3375159 5120-01-072-2952<br />
19. Turbocharger mounting plate — —<br />
20. Main shaft seal driver — —<br />
21. Front cover tachometer seal driver — —<br />
22. Main shaft gear <strong>and</strong> bearing<br />
3375175 5180-01-074-0019<br />
installation tool<br />
23. Oil seal assembly tool ST-419 5120-00-896-8097<br />
24. Plunger protrusion checking tool ST-1241 4910-01-141-8388<br />
25. Connecting rod bushing driver ST-1242 4910-01-098-1914<br />
26. Connecting rod checking fixture ST-561 4910-00-977-7507<br />
27. Piston ring groove gauge ST-560 5210-00-999-1209<br />
28. Piston ring exp<strong>and</strong>er ST-763 5120-00-150-7486<br />
0061 00-2
TM 9-2815-225-34&P 0061 00<br />
TOOLS AND SPECIAL TOOLS (Contd)<br />
(1)<br />
ITEM NO.<br />
Table 1. Tool Identification List (Contd).<br />
(2)<br />
ITEM NAME<br />
(3)<br />
PART NO.<br />
(4)<br />
NATIONAL STOCK NUMBER<br />
29. Oil seal exp<strong>and</strong>er 3375151 4910-01-165-4541<br />
30. Rocker lever block <strong>and</strong> m<strong>and</strong>rel set ST-691 3460-00-999-1210<br />
31. 0.250 in. (6.350 mm) radius gauge — —<br />
32. Split rod — —<br />
33. Puller/installer ST-1259 4910-01-106-0492<br />
34. Air compressor mounting plate ST-749 4910-01-159-8701<br />
35. Half coupling puller 3376663 5120-01-128-2678<br />
36. Air compressor bushing m<strong>and</strong>rel — —<br />
37. Line bore gauge — —<br />
38. Pressurizing valve driver 3375959 4910-01-143-2034<br />
39. M<strong>and</strong>rel — —<br />
40. Gear puller 3375834 5120-01-120-5759<br />
41. 0.125 in. (3.175 mm) diameter rod — —<br />
42. Lifting sling — —<br />
43. Lifting brackets — —<br />
44. Vibration damper guide pin — —<br />
45. Pulley installer — —<br />
46. Camshaft bushing driver kit 3376633 5120-01-146-7131<br />
47. Cylinder sleeve driver ST-1229 5120-00-999-1206<br />
48. Cylinder sleeve clamp ST-1154 9999-01-128-2866<br />
49. Gauge block 3376220 5210-01-157-3091<br />
50. Engine block counterbore tool 3375455 4910-01-150-9713<br />
51. Bore alignment checking bar ST-1157 4910-01-097-6913<br />
52. Universal cylinder liner puller 3376015 5120-01-143-2032<br />
53. Valve spring compressor ST-448 5120-01-145-7293<br />
54. Valve seat extractor ST-1279 5120-01-128-2679<br />
0061 00-3
TM 9-2815-225-34&P 0061 00<br />
TOOLS AND SPECIAL TOOLS (Contd)<br />
(1)<br />
ITEM NO.<br />
Table 1. Tool Identification List (Contd).<br />
(2)<br />
ITEM NAME<br />
55. Expansion plug driver 3375190<br />
3375191<br />
3375192<br />
(3)<br />
PART NO.<br />
(4)<br />
NATIONAL STOCK NUMBER<br />
4910-01-143-3336<br />
4910-01-143-3337<br />
4910-01-143-2023<br />
56. Valve vacuum tester ST-1257-A 4910-01-128-2691<br />
57. Manometer — —<br />
58. Blow-by check tool 3375150 4910-01-085-9211<br />
59. Engine dynamometer 0058 00-3 4910-01-159-8701<br />
60. Fuel pump idle adjusting tool 3375981 4910-00-150-5805<br />
61. Throttle shaft ball installing tool 3375204 4910-01-118-3747<br />
62. Camshaft pilot tools 3375268 5120-01-332-3597<br />
63. Pulley installation assembly tool 3376326 5120-01-156-4183<br />
64. Crankshaft seal driver ST-997 5120-00-150-5810<br />
65. Piston ring compressor 3375162 5120-01-128-2758<br />
66. Dial gauge attachment ST-1325 4910-01-097-6972<br />
67. Tilt Sling — —<br />
68. Main bearing cap puller ST-1178 5120-01-141-5777<br />
69. AFC barrel puller 3375599 5120-01-128-2688<br />
70. Big Cam III modification kit 57K2993 —<br />
END OF WORK PACKAGE<br />
0061 00-4
TM 9-2815-225-34&P 0062 00<br />
DIRECT SUPPORT AND GENERAL SUPPORT<br />
MAINTENANCE MANUAL<br />
INCLUDING REPAIR PARTS AND SPECIAL TOOLS LIST (RPSTL)<br />
FOR<br />
M915, M915A1, M915A4, M916, M920 VEHICLES<br />
NSN 2815-01-082-8125 P/N NTC400-3652-02 CUMMINS NTC-400 BIG CAM I DIESEL ENGINE<br />
W/CONTAINER<br />
NSN 2815-01-142-2745 P/N 11669835 CUMMINS NTC-400 BIG CAM III DIESEL ENGINE<br />
W/CONTAINER<br />
MANDATORY REPLACEMENT PARTS<br />
INTRODUCTION<br />
This work package lists m<strong>and</strong>atory replacement parts you will need to repair the Cummins NTC-400<br />
diesel engine.<br />
This work package includes a list of all m<strong>and</strong>atory parts referenced in the task initial setups <strong>and</strong><br />
procedures. These items must be replaced during <strong>maintenance</strong> whether or not they have failed.<br />
EXPLANATION OF COLUMNS<br />
Column (1) – Item Number. Number assigned to each entry in the listing is is referenced to the task<br />
initial setups “Material/Parts” heading.<br />
Column (2) – Nomenclature. Name or identification of the part.<br />
Column (3) – Part Number/CAGEC. The manufactures part number.<br />
Column (4) – National Stock Number. The national stock number of the part.<br />
Column (5) – Repair Parts WP. Reference to figure <strong>and</strong> item number in Repair Parts WP 0058 00<br />
0062 00-1
TM 9-2815-225-34&P 0062 00<br />
MANDATORY REPLACEMENT PARTS (Contd)<br />
(1)<br />
ITEM<br />
NO.<br />
Table 1. WP 0013 00 Cylinder Block M<strong>and</strong>atory Replacement Parts.<br />
(2)<br />
NOMENCLATURE<br />
(3)<br />
PART NUMBER<br />
(4)<br />
NATIONAL STOCK<br />
NUMBER<br />
(5)<br />
REPAIR PARTS<br />
WP 0058 00<br />
1. Gasket 215090 5330-00-064-4399 Fig. 2, item 3<br />
2. Black O-ring 3008998 5330-01-049-0466 Fig. 2, item 4<br />
3. Red O-ring 149105PC183049 5331-00-058-1767 Fig. 2, item 5<br />
4. Expansion plug 3008469 4730-01-214-7081 Fig. 2, item 8<br />
5. Expansion plug 3013786 4730-01-161-5115 Fig. 2, item 16<br />
6. Cap 3011952 5340-01-145-9362 Fig. 2, item 17<br />
7. Expansion plug 1459-259 4730-00-221-2139 Fig. 2, item 19<br />
8. Shim 3019955 5365-01-147-9802 Fig. 2, item 39<br />
(1)<br />
ITEM<br />
NO.<br />
Table 2. WP 0014 00 Cylinder Head M<strong>and</strong>atory Replacement Parts.<br />
(2)<br />
NOMENCLATURE<br />
(3)<br />
PART NUMBER<br />
(4)<br />
NATIONAL STOCK<br />
NUMBER<br />
(5)<br />
REPAIR PARTS<br />
WP 0058 00<br />
1. Upper valve spring retainer 170296 5340-00-933-3009 Fig. 3, item 3<br />
2. Valve spring 211999 5360-00-009-9270 Fig. 3, item 4<br />
3. Lower valve spring retainer 172034 5340-00-632-6239 Fig. 3, item 5<br />
4. Injector O-ring 3007759 5331-01-072-4436 Fig. 3, item 6<br />
5. Expansion plug 6 213395 5340-01-087-0681 Fig. 3, item 9<br />
6. Valve seat insert 3017759 2815-00-085-7434 Fig. 3, item 10<br />
7. Intake valve 3803512 2815-01-354-2702 Fig. 3, item 11<br />
8. Exhaust valve 3803524 2815-00-962-5623 Fig. 3, item 12<br />
9. Expansion plug 1 213394 5340-01-087-0682 Fig. 3, item 13<br />
10. Expansion plug 2 216524 5340-01-086-6193 Fig. 3, item 14<br />
11. Valve stem guide 3006456 2815-01-085-2618 Fig. 3, item 15<br />
12. Lockut 203131 5310-00-426-3990 Fig. 3, item 18<br />
13. O-ring 131026 5331-00-143-8485 Fig. 3, item 22<br />
0062 00-2
TM 9-2815-225-34&P 0062 00<br />
MANDATORY REPLACEMENT PARTS (Contd)<br />
(1)<br />
ITEM<br />
NO.<br />
Table 3. WP 0018 00 Pistons, Connecting Rods, <strong>and</strong> Bearings M<strong>and</strong>atory Replacement Parts.<br />
(2)<br />
NOMENCLATURE<br />
(3)<br />
PART NUMBER<br />
(4)<br />
NATIONAL STOCK<br />
NUMBER<br />
(5)<br />
REPAIR PARTS<br />
WP 0058 00<br />
1. Bushing 187420 5365-00-132-0273 Fig. 6, item 9<br />
2. Connecting rod bearing 214951 3120-01-155-4442 Fig. 6, item 12<br />
3. First compression ring 3012331 2815-00-994-4427 Fig. 6, item 1<br />
4. Second compression ring 301233200 2815-01-241-6580 Fig. 6, item 2<br />
5. Intermediate compression ring 214730 2815-01-241-6581 Fig. 6, item 3<br />
6. Oil control ring 3064398 2815-00-994-4429 Fig. 6, item 4<br />
Table 4. WP 0019 00 Camshaft, Camshaft Followers, <strong>and</strong> Pushrods M<strong>and</strong>atory Replacement Parts.<br />
(1)<br />
ITEM<br />
NO.<br />
(2)<br />
NOMENCLATURE<br />
(3)<br />
PART NUMBER<br />
(4)<br />
NATIONAL STOCK<br />
NUMBER<br />
(5)<br />
REPAIR PARTS<br />
WP 0058 00<br />
1. Thrust bearing 215233 3120-01-079-8194 Fig. 7, item 3<br />
2. Expansion plug 175831 5340-00-485-0945 Fig. 7, item 12<br />
(1)<br />
ITEM<br />
NO.<br />
Table 5. WP 0020 00 Rocker Levers <strong>and</strong> Rocker Lever Housing M<strong>and</strong>atory Replacement Parts.<br />
(2)<br />
NOMENCLATURE<br />
(3)<br />
PART NUMBER<br />
(4)<br />
NATIONAL STOCK<br />
NUMBER<br />
(5)<br />
REPAIR PARTS<br />
WP 0058 00<br />
1. O-ring 7374401 5331-00-984-3756 Fig. 8, item 28<br />
2. Bushing 140330 3120-00-589-3537 Fig. 8, item 15<br />
3. Ball socket seat 194037 5340-00-404-2940 Fig. 8, item 10<br />
0062 00-3
TM 9-2815-225-34&P 0062 00<br />
MANDATORY REPLACEMENT PARTS (Contd)<br />
(1)<br />
ITEM<br />
NO.<br />
Table 6. WP 0021 00 Oil Cooler M<strong>and</strong>atory Replacement Parts.<br />
(2)<br />
NOMENCLATURE<br />
(3)<br />
PART NUMBER<br />
(4)<br />
NATIONAL STOCK<br />
NUMBER<br />
(5)<br />
REPAIR PARTS<br />
WP 0058 00<br />
1. Lockwasher S-604 5310-00-261-7340 Fig. 10, item 3<br />
2. O-ring 3045979 5331-01-145-6085 Fig. 10, item 5<br />
3. Gasket 3047464 5330-01-145-6911 Fig. 10, item 9<br />
4. Gasket 3047465 5330-01-145-6910 Fig. 10, item 10<br />
5. Spring 3030803 5360-01-145-3974 Fig. 10, item 15<br />
6. Spring 3039296 5360-01-145-3975 Fig. 10, item 17<br />
7. Gasket 3069014 5330-01-145-6909 Fig. 10, item 22<br />
8. O-ring 3018695 5331-01-154-4316 Fig. 10, item 23<br />
9. Oil cooler core 3412285 2930-01-146-1081 Fig. 10, item 28<br />
10. Vent Valve 107947 4820-00-276-9041 Fig. 11, item 12<br />
11. Lockwasher 3010596 5305-01-088-6019 Fig. 11, item 15<br />
12. Gasket 3010030 5330-01-046-3144 Fig. 11, item 16<br />
13. Spring 68274 5360-00-664-5343 Fig. 11, item 23<br />
14. Gasket 218245 5330-01-046-1991 Fig. 11, item 26<br />
15. Retaining ring 3006745 5325-01-139-6738 Fig. 11, item 28<br />
16. O-ring 3007713 5330-01-086-6197 Fig. 11, item 29<br />
17. Element 3021581 2930-01-065-7113 Fig. 11, item 30<br />
18. Spring 202128 5360-01-200-0323 Fig. 11, item 32<br />
19. Lockwasher S-627 5310-00-820-6653 Fig. 11, item 45<br />
20. Gasket 3308958 5330-01-164-0944 Fig. 11, item 48<br />
21. O-ring 173368 5330-00-132-0248 Fig. 11, item 49<br />
0062 00-4
TM 9-2815-225-34&P 0062 00<br />
MANDATORY REPLACEMENT PARTS (Contd)<br />
(1)<br />
ITEM<br />
NO.<br />
Table 7. WP 0023 00 Oil Pump M<strong>and</strong>atory Replacement Parts<br />
(2)<br />
NOMENCLATURE<br />
(3)<br />
PART NUMBER<br />
(4)<br />
NATIONAL STOCK<br />
NUMBER<br />
1. Gasket 203145 5330-01-066-3910<br />
2. Gasket 3014778 5330-01-147-1274<br />
(5)<br />
REPAIR PARTS<br />
WP 0058 00<br />
Figure 13, item 2<br />
(Big Cam I)<br />
Figure 13, item 2<br />
(Big Cam III)<br />
3. Bushing 69521 3120-00-627-6697 Figure 13, item 4<br />
4. Bushing 68365 3120-00-566-0480 Figure 13, item 7<br />
5. O-ring 145504 5330-01-051-4243<br />
6. Pressure regulator spring 211939 5360-01-038-4659<br />
7. Pressure regulator spring 3010146 5360-01-145-7554<br />
8. Bypass Valve Spring 3014756 5360-01-148-0303<br />
Figure 13, item 12<br />
(Big Cam III)<br />
Figure 13, item 13<br />
(Big Cam I)<br />
Figure 13, item 13<br />
(Big Cam III)<br />
Figure 13, item 15<br />
(Big Cam III)<br />
9. Bushing 69521 3120-00-627-6697 Figure 13, item 26<br />
10. Lockwasher MS35338-47 5310-00-209-0965<br />
11. Lockplate 109319 2815-00-406-8936<br />
Figure 13, item 27<br />
(Big Cam III)<br />
Figure 13, item 45<br />
(Big Cam I)<br />
(1)<br />
ITEM<br />
NO.<br />
Table 8. WP 0024 00 Air Aftercooler M<strong>and</strong>atory Replacement Parts.<br />
(2)<br />
NOMENCLATURE<br />
(3)<br />
PART NUMBER<br />
(4)<br />
NATIONAL STOCK<br />
NUMBER<br />
(5)<br />
REPAIR PARTS<br />
WP 0058 00<br />
1. Gasket 215044 5330-01-066-5351 Fig. 14, item 3<br />
2. Gasket 3032348 5330-01-147-4072 Fig. 14, item 8<br />
3. Gasket 3077201 N/A Fig. 14, item 6<br />
4. O-ring 195952 5330-01-066-3904 Fig. 14, item 7<br />
(1)<br />
ITEM<br />
NO.<br />
Table 9. WP 0025 00 Exhaust Manifold M<strong>and</strong>atory Replacement Parts.<br />
(2)<br />
NOMENCLATURE<br />
(3)<br />
PART NUMBER<br />
(4)<br />
NATIONAL STOCK<br />
NUMBER<br />
(5)<br />
REPAIR PARTS<br />
WP 0058 00<br />
1. Spacer insert 3027653 N/A Fig. 15, item 14<br />
0062 00-5
TM 9-2815-225-34&P 0062 00<br />
MANDATORY REPLACEMENT PARTS (Contd)<br />
(1)<br />
ITEM<br />
NO.<br />
Table 10. WP 0026 00 Turbocharger M<strong>and</strong>atory Replacement Parts.<br />
(2)<br />
NOMENCLATURE<br />
(3)<br />
PART NUMBER<br />
(4)<br />
NATIONAL STOCK<br />
NUMBER<br />
(5)<br />
REPAIR PARTS<br />
WP 0058 00<br />
1. Sleeve 216802 5330-01-085-3580 Fig. 27, item 1<br />
2. Ring seal 156444 5330-00-237-6266 Fig. 27, item 2<br />
3. Locknut S-222-A N/A Fig. 27, item 4<br />
4. Impeller locknut F1801-040 5310-00-680-6874 Fig. 27, item 5<br />
5. Screw 194010 5305-00-411-9340 Fig. 27, item 9<br />
6. Diffuser plate 217736 2990-01-085-1622 Fig. 27, item 10<br />
7. O-ring 202456 5330-00-484-9937 Fig. 27, item 11<br />
8. Bearing insert pad 170510 5330-00-632-6182 Fig. 27, item 12<br />
9. Bearing 156420 3120-00-682-7706 Fig. 27, item 13<br />
10. Insulated packing 202377 5330-00-406-7789 Fig. 27, item 15<br />
11. Ring seal 3034736 5330-01-145-5374 Fig. 27, item 17<br />
(1)<br />
ITEM<br />
NO.<br />
Table 11. WP 0027 00 Turbocharger HT-3B M<strong>and</strong>atory Replacement Parts.<br />
(2)<br />
NOMENCLATURE<br />
(3)<br />
PART NUMBER<br />
(4)<br />
NATIONAL STOCK<br />
NUMBER<br />
(5)<br />
REPAIR PARTS<br />
WP 0058 00<br />
1. Retaining ring 3709510 N/A Fig. 28, item 1<br />
2. Seal ring 3521441 N/A Fig. 28, item 5<br />
3. Seal ring 3521442 5330-01-303-1600 Fig. 28, item 6<br />
4. Sleeve bearing 3722366 N/A Fig. 28, item 9<br />
5. Thrust collar 3521440 N/A Fig. 28, item 10<br />
6. Locknut 3519471 5310-01-303-8583 Fig. 28, item 13<br />
7. Lockwasher 3521119 5310-01-497-2856 Fig. 28, item 14<br />
8. Retaining ring 3723863 N/A Fig. 28, item 17<br />
9. Oil seal plate 3759618 5330-01-497-4872 Fig. 28, item 18<br />
10. Deflector 3521439 2815-01-497-6029 Fig. 28, item 19<br />
11. O-ring 3751948 N/A Fig. 28, item 20<br />
12. Oil baffle 3519401 2520-01-497-7027 Fig. 28, item 21<br />
13. Thrust bearing 3519290 N/A Fig. 28, item 22<br />
14. Retaining ring 3718373 5325-01-449-3299 Fig. 28, item 25<br />
15. Sleeve bushing 3757753 N/A Fig. 28, item 28<br />
0062 00-6
TM 9-2815-225-34&P 0062 00<br />
MANDATORY REPLACEMENT PARTS (Contd)<br />
(1)<br />
ITEM<br />
NO.<br />
Table 12. WP 0028 00 Front Gear Cover M<strong>and</strong>atory Replacement Parts.<br />
(2)<br />
NOMENCLATURE<br />
(3)<br />
PART NUMBER<br />
(4)<br />
NATIONAL STOCK<br />
NUMBER<br />
(5)<br />
REPAIR PARTS<br />
WP 0058 00<br />
1. Oil seal 211255 5330-00-135-6382 Fig. 16, item 6<br />
2. Crankshaft oil seal 3020183 5330-01-240-1619 Fig. 4, item 11<br />
3. O-ring 215705 5331-01-145-0716 Fig. 16, item 5<br />
4. Sleeve bushing 132770 3120-00-877-2213 Fig. 16, item 2<br />
Table 13. WP 0029 00 Accessory Drive <strong>and</strong> Accessory Drive Pulley M<strong>and</strong>atory Replacement Parts.<br />
(1)<br />
ITEM<br />
NO.<br />
(2)<br />
NOMENCLATURE<br />
(3)<br />
PART NUMBER<br />
(4)<br />
NATIONAL STOCK<br />
NUMBER<br />
(5)<br />
REPAIR PARTS<br />
WP 0058 00<br />
1. Sleeve 190397 2930-00-401-9531 Fig. 17, item 18<br />
2. Thrust bearing 3026557 3120-01-144-7368 Fig. 17, item 28<br />
3. Thrust bearing 3026556 3120-01-147-5275 Fig. 17, item 21<br />
4. Bushing 116391 3120-00-792-9834 Fig. 17, item 32<br />
(1)<br />
ITEM<br />
NO.<br />
Table 14. WP 0030 00 Engine Retarder M<strong>and</strong>atory Replacement Parts.<br />
(2)<br />
NOMENCLATURE<br />
(3)<br />
PART NUMBER<br />
(4)<br />
NATIONAL STOCK<br />
NUMBER<br />
(5)<br />
REPAIR PARTS<br />
WP 0058 00<br />
1. Spring 001519 5360-01-089-9103 Fig. 18, item 21<br />
2. Spring 007500 5360-01-145-7555 Fig. 18, item 22<br />
3. Seal ring 001083 5330-01-086-6196 Fig. 18, item 7<br />
4. Seal ring 001082 5331-01-085-3105 Fig. 18, item 6<br />
5. Seal ring 20229 5331-01-086-1013 Fig. 18, item 5<br />
6. Spring 007447 5360-01-145-7607 Fig. 18, item 11<br />
7. Spring 001022 5360-01-084-9066 Fig. 18, item 17<br />
8. Locknut 001026 5310-01-157-3762 Fig. 18, item 8<br />
0062 00-7
TM 9-2815-225-34&P 0062 00<br />
MANDATORY REPLACEMENT PARTS (Contd)<br />
(1)<br />
ITEM<br />
NO.<br />
Table 15. WP 0031 00 Air Compressor M<strong>and</strong>atory Replacement Parts.<br />
(2)<br />
NOMENCLATURE<br />
(3)<br />
PART NUMBER<br />
(4)<br />
NATIONAL STOCK<br />
NUMBER<br />
(5)<br />
REPAIR PARTS<br />
WP 0058 00<br />
1. O-ring 128086 5331-00-441-0145 Fig. 20, item 50<br />
2. O-ring 127936 5331-00-941-3762 Fig. 20, item 49<br />
3. Spring 3023101 5360-01-086-3480 Fig. 20, item 47<br />
4. Spring 190334 5360-00-129-9415 Fig. 20, item 44<br />
5. Lockwasher MS35338-45 5310-00-407-9566 Fig. 20, item 10<br />
6. Gasket 3047159 5330-00-131-7072 Fig. 20, item 13<br />
7. Gasket 154018 5330-00-852-7347 Fig. 20, item 15<br />
8. O-ring 211315 5330-01-060-9061 Fig. 20, item 43<br />
9. O-ring 128085 5331-00-905-2679 Fig. 20, item 41<br />
10. Spring 128080 5360-00-895-3216 Fig. 20, item 39<br />
11. Thrust bearing 211662 3120-01-129-7659 Fig. 20, item 36<br />
12. Lockwasher MS35338-47 5310-00-2090-965 Fig. 20, item 33<br />
13. Gasket 176027 5330-00-129-9389 Fig. 20, item 32<br />
14. Retaining ring 119859 5325-00-922-9101 Fig. 20, item 21<br />
15. Piston ring 180810 2815-01-079-3290 Fig. 20, item 19<br />
16. Piston ring 1875350 N/A Fig. 20, item 18<br />
17. Piston ring 650330 4310-01-079-5245 Fig. 20, item 17<br />
18. Bushing 3018153 3120-01-146-7196 Fig. 20, item 24<br />
19. Bearing 147610 3120-01-016-4883 Fig. 20, item 26<br />
20. Cap 191037 4310-01-084-7148 Fig. 20, item 48<br />
(1)<br />
ITEM<br />
NO.<br />
Table 16. WP 0032 00 Fuel Injector M<strong>and</strong>atory Replacement Parts<br />
(2)<br />
NOMENCLATURE<br />
(3)<br />
PART NUMBER<br />
(4)<br />
NATIONAL STOCK<br />
NUMBER<br />
(5)<br />
REPAIR PARTS<br />
WP 0058 00<br />
1. Spring 166009 5360-00-132-0245 Fig. 21, item 9<br />
2. Gasket 193736 5330-00-132-0276 Fig. 21, item 11<br />
3. Filter screen 3008706 4730-01-077-2016 Fig. 21, item 17<br />
4. Gasket 173086 5330-00-132-0247 Fig. 21, item 18<br />
0062 00-8
TM 9-2815-225-34&P 0062 00<br />
MANDATORY REPLACEMENT PARTS (Contd)<br />
(1)<br />
ITEM<br />
NO.<br />
Table 17. WP 0034 00 Solenoid Valve M<strong>and</strong>atory Replacement Parts.<br />
(2)<br />
NOMENCLATURE<br />
(3)<br />
PART NUMBER<br />
(4)<br />
NATIONAL STOCK<br />
NUMBER<br />
(5)<br />
REPAIR PARTS<br />
WP 0058 00<br />
1. Retangular ring seal 129888 5331-00-081-9299 Fig. 29, item 9<br />
2. O-ring 190876 5331-00-132-0274 Fig. 29, item 11<br />
3. Shutoff valve spring 129768 5310-00-082-1888 Fig. 29, item 10<br />
4. Valve disc 3030970 4820-01-146-1048 Fig. 29, item 12<br />
(1)<br />
ITEM<br />
NO.<br />
Table 18. WP 0035 00 Fuel Damper <strong>and</strong> Head M<strong>and</strong>atory Replacement Parts.<br />
(2)<br />
NOMENCLATURE<br />
(3)<br />
PART NUMBER<br />
(4)<br />
NATIONAL STOCK<br />
NUMBER<br />
(5)<br />
REPAIR PARTS<br />
WP 0058 00<br />
1. Retangular ring seal 139988 5331-00-809-3276 Fig. 31, item 6<br />
2. Retangular ring seal 100099 5331-00-809-2667 Fig. 31, item 8<br />
3. Fuel pump damper diaphragm 202897 5340-00-951-3536 Fig. 31, item 7<br />
4. Nylon washer 160514 5365-00-965-0870 Fig. 31, item 9<br />
(1)<br />
ITEM<br />
NO.<br />
Table 19. WP 0036 00 Fuel Gear Pump M<strong>and</strong>atory Replacement Parts.<br />
(2)<br />
NOMENCLATURE<br />
(3)<br />
PART NUMBER<br />
(4)<br />
NATIONAL STOCK<br />
NUMBER<br />
(5)<br />
REPAIR PARTS<br />
WP 0058 00<br />
1. Lockwasher 181466 5310-00-484-1718 Fig. 25, item 8<br />
2. Gasket 3069017 5330-01-136-8569 Fig. 25, item 13<br />
3. Pressure Valve 3050624 4820-01-242-2579 Fig. 25, item 10<br />
4. Bearing sleeve 3033724 3120-01-215-9157 Fig. 25, item 17<br />
5. Dowel ring 3033719 3120-01-185-8586 Fig. 25, item 19<br />
(1)<br />
ITEM<br />
NO.<br />
Table 20. WP 0037 00 Fuel Pump Governor Spring M<strong>and</strong>atory Replacement Parts.<br />
(2)<br />
NOMENCLATURE<br />
(3)<br />
PART NUMBER<br />
(4)<br />
NATIONAL STOCK<br />
NUMBER<br />
(5)<br />
REPAIR PARTS<br />
WP 0058 00<br />
1. Idling spring 3018767 5360-01-147-4846 Fig. 30, item 50<br />
2. Compression spring 143251 5360-00-461-5738 Fig. 30, item 47<br />
0062 00-9
TM 9-2815-225-34&P 0062 00<br />
MANDATORY REPLACEMENT PARTS (Contd)<br />
(1)<br />
ITEM<br />
NO.<br />
Table 21. WP 0038 00 Fuel Pump Front Cover <strong>and</strong> Governor M<strong>and</strong>atory Replacement Parts.<br />
(2)<br />
NOMENCLATURE<br />
(3)<br />
PART NUMBER<br />
(4)<br />
NATIONAL STOCK<br />
NUMBER<br />
(5)<br />
REPAIR PARTS<br />
WP 0058 00<br />
1. Spring 143848 5360-01-095-3661 Fig. 30, item 34<br />
2. Retaining ring 212604 5325-01-081-0662 Fig. 30, item 16<br />
3. Bearing S-16052 3110-00-516-5289 Fig. 30, item 17<br />
4. Shaft seal 3045173 N/A Fig. 30, item 21<br />
5. Seal 212603 5330-01-072-8828 Fig. 30, item 10<br />
6. Bushing 212609 3120-01-087-2539 Fig. 30, item 12<br />
7. Governor bushing 163944 3120-00-904-9595 Fig. 30, item 18<br />
(1)<br />
ITEM<br />
NO.<br />
Table 22. WP 0039 00 Fuel Pump Main Housing M<strong>and</strong>atory Replacement Parts.<br />
(2)<br />
NOMENCLATURE<br />
(3)<br />
PART NUMBER<br />
(4)<br />
NATIONAL STOCK<br />
NUMBER<br />
(5)<br />
REPAIR PARTS<br />
WP 0058 00<br />
1. Retaining ring MS16632-1050 5325-00-256-2846 Fig. 24, item 24<br />
2. O-ring 100478 5331-00-081-9289 Fig. 24, item 55<br />
3. Throttle shaft ball 213769 3110-01-079-8190 Fig. 24, item 57<br />
4. O-ring 213768 5331-01-072-8983 Fig. 24, item 52<br />
5. O-ring 68061-A 5331-00-970-3461 Fig. 24, item 14<br />
6. Cap seal ring 154088 5330-00-961-9470 Fig. 24, item 32<br />
7. Retaining ring MS16629-1100 5325-00-558-9412 Fig. 24, item 18<br />
8. O-ring 193734 5330-00-403-9896 Fig. 24, item 21<br />
9. O-ring 145504 5330-01-051-4243 Fig. 24, item 20<br />
10. O-ring 145505 N/A Fig. 24, item 19<br />
11. O-ring 100478 5331-00-081-9289 Fig. 24, item 55<br />
12. Gasket washer 3023870 5330-01-142-2784 Fig. 24, item 8<br />
13. Bellows 3013811 4820-01-079-3320 Fig. 24, item 10<br />
0062 00-10
TM 9-2815-225-34&P 0062 00<br />
MANDATORY REPLACEMENT PARTS (Contd)<br />
(1)<br />
ITEM<br />
NO.<br />
Table 23. WP 0040 00 Fuel Pump Assembly M<strong>and</strong>atory Replacement Parts.<br />
(2)<br />
NOMENCLATURE<br />
(3)<br />
PART NUMBER<br />
(4)<br />
NATIONAL STOCK<br />
NUMBER<br />
(5)<br />
REPAIR PARTS<br />
WP 0058 00<br />
1. Gasket 110855 5330-00-567-3463 Fig. 25, item 2<br />
2. Lockwasher 181466 5310-00-484-1718 Fig. 29, item 2<br />
3. Lockwasher 181466 5310-00-484-1718 Fig. 31, item 3<br />
4. Lockwasher 181466 5310-00-484-1718 Fig. 25, item 8<br />
5. Rectangular ring seal 691-10014 5330-00-252-8888 Fig. 31, item 16<br />
6. Rectangular ring seal 154087 5330-00-951-3538 Fig. 29, item 15<br />
7. Lockwasher 181466 5310-00-484-1718 Fig. 24, item 26<br />
8. Gasket 100764 5330-00-506-4866 Fig. 30, item 31<br />
9. Adjusting screw seal 3003156 5330-01-072-8830 Fig. 30, item 39<br />
10. Gasket 70705 5330-00-562-1176 Fig. 30, item 42<br />
11. Plastic bushing seal Not listed Not listed Not listed<br />
(1)<br />
ITEM<br />
NO.<br />
Table 24. WP 0041 00 Water Pump M<strong>and</strong>atory Replacement Parts.<br />
(2)<br />
NOMENCLATURE<br />
(3)<br />
PART NUMBER<br />
(4)<br />
NATIONAL STOCK<br />
NUMBER<br />
(5)<br />
REPAIR PARTS<br />
WP 0058 00<br />
1. Seat <strong>and</strong> seal 3071085 5330-00-005-0407 Fig. 36, item 3<br />
2. Seal 3038997 5330-01-240-1630 Fig. 36, item 6<br />
3. Bearing 3305L1A 3110-00-144-8828 Fig. 36, item 8<br />
4. Retaining ring 112302 5325-00-420-9696 Fig. 36, item 9<br />
5. Retaining ring S16255 2815-00-815-0355 Fig. 36, item 11<br />
6. Seal 3038998 5330-01-080-2992 Fig. 36, item 12<br />
7. Sleeve 203097 3120-01-083-6411 Fig. 36, item 14<br />
8. Seal 3038998 5330-01-080-2992 Fig. 36, item 20<br />
9. Retaining ring S-16255 2815-00-815-0355 Fig. 36, item 21<br />
10. O-ring 145506 5331-01-086-3991 Fig. 36, item 23<br />
11. Bearing 3305L1A 3110-00-144-8828 Fig. 36, item 24<br />
0062 00-11
TM 9-2815-225-34&P 0062 00<br />
MANDATORY REPLACEMENT PARTS (Contd)<br />
(1)<br />
ITEM<br />
NO.<br />
Table 25. WP 0042 00 Cylinder Block Components Installation M<strong>and</strong>atory Replacement Parts.<br />
(2)<br />
NOMENCLATURE<br />
(3)<br />
PART NUMBER<br />
(4)<br />
NATIONAL STOCK<br />
NUMBER<br />
(5)<br />
REPAIR PARTS<br />
WP 0058 00<br />
1. Gasket 3067616 5330-00-361-2955 Fig. 4, item 1<br />
2. Compression ring<br />
3012331<br />
(Part of 3801056)<br />
2815-00-994-4427 Fig. 6, item 1<br />
3. Gasket 3099083 5330-01-147-0748 Fig. 12, item 1<br />
4. Lockwasher 116122 5310-00-011-6122 Fig. 20, item 1<br />
5. Compression ring<br />
6. Piston ring<br />
301233200<br />
(Part of 3801056)<br />
214730<br />
(Part of 3801056<br />
2815-01-241-6580 Fig. 6, item 2<br />
2815-01-241-6581 Fig. 6, item 3<br />
7. Rear main seal M39807 5330-00-005-0858 Fig. 4, item 4<br />
8. Thrust Bearing (st<strong>and</strong>ard) 3019218 3120-01-214-7779 Fig. 4, item 8<br />
9. Piston ring<br />
3064398<br />
(Part of 3801056)<br />
2815-00-994-4429 Fig. 6, item 4<br />
10. Gasket 320-1850 5330-01-181-0631 Fig. 20, item 5<br />
11. Seal 137075 5331-00-420-9624<br />
Fig. 4, item 5<br />
(Big Cam III)<br />
12. O-ring 215705 5331-01-145-0716 Fig. 16, item 5<br />
13.<br />
14.<br />
Fourteen bearing halves–<br />
Main bearing set (st<strong>and</strong>ard)<br />
Cam follower housing gasket<br />
(st<strong>and</strong>ard)<br />
3801260 3120-01-132-9339 Fig. 4, item 6<br />
3074401 5330-01-145-3983 Fig. 7, item 8<br />
15. Lockwasher S604 5310-00-261-7340 Fig. 7, item 9<br />
16. Gasket 3021704 5330-01-145-6914 Fig. 16, item 11<br />
17. Gasket 3201386 5330-01-181-0630 Fig. 19, item 11<br />
18.<br />
Connecting rod bearing halves<br />
– Bearing set (st<strong>and</strong>ard)<br />
3725CP 3120-01-087-3004 Fig. 6, item 12<br />
19. Locknut 3012526 5310-01-126-1045 Fig. 17, item 13<br />
20. Keyway seal 3008947 5330-01-129-6541 Fig. 17, item 16<br />
21. Gasket 3069101 5330-00-026-2931 Fig. 17, item 19<br />
22. Lockplates 140218 5310-00-082-1882 Fig. 2, item 21<br />
23. Lockwasher MS35338-47 5310-00-209-0965 Fig. 16, item 21<br />
24. Lockwasher 3011715 5305-01-072-8816 Fig. 16, item 22<br />
25. O-ring 172648 5330-00-404-2920 Fig. 5, item 27<br />
26. Lockwasher MS35338-47 5310-00-209-0965<br />
Fig. 13, item 27<br />
(Big Cam I)<br />
0062 00-12
TM 9-2815-225-34&P 0062 00<br />
MANDATORY REPLACEMENT PARTS (Contd)<br />
Table 25. WP 0042 00 Cylinder Block Components Installation M<strong>and</strong>atory Replacement Parts (Contd).<br />
(1)<br />
ITEM<br />
NO.<br />
(2)<br />
NOMENCLATURE<br />
(3)<br />
PART NUMBER<br />
(4)<br />
NATIONAL STOCK<br />
NUMBER<br />
27. Lockwasher S-604 5310-00-261-7340<br />
(5)<br />
REPAIR PARTS<br />
WP 0058 00<br />
Fig. 13, item 27<br />
(Big Cam III)<br />
28. Lockwasher MS35338-46 5310-00-637-9541 Fig. 13, item 32<br />
29. Gasket 3029846 5330-01-145-6913 Fig. 13, item 34<br />
30. Lockwasher MS35338-45 5310-00-407-9566 Fig. 12, item 40<br />
31. O-ring 3029847 5331-01-145-0715 Fig. 13, item 47<br />
32. Gasket 3031434 5330-01-147-4071 Fig. 13, item 49<br />
(1)<br />
ITEM<br />
NO.<br />
Table 26. WP 0043 00 Cylinder Head <strong>and</strong> Cylinder Head<br />
Components Installation M<strong>and</strong>atory Replacement Parts.<br />
(2)<br />
NOMENCLATURE<br />
(3)<br />
PART NUMBER<br />
(4)<br />
NATIONAL STOCK<br />
NUMBER<br />
(5)<br />
REPAIR PARTS<br />
WP 0058 00<br />
1. O-ring 131026 5331-00-143-8485 Fig. 3, item 22<br />
2. Cylinder head gasket 3349819 5330-01-080-5021 Fig. 3, item 23<br />
3. Gasket 3017750 5330-00-861-8592 Fig. 8, item 32<br />
4. Gasket 3054841 5330-01-285-4827 Fig. 9, item 6<br />
5. Gasket 13294 5330-01-086-3996 Fig. 18, item 24<br />
6. O-ring 193736 5330-00-132-0276 Fig. 21, item 11<br />
(1)<br />
ITEM<br />
NO.<br />
Table 27. WP 0044 00 Fuel Pump Testing <strong>and</strong> Calibration M<strong>and</strong>atory Replacement Parts.<br />
(2)<br />
NOMENCLATURE<br />
(3)<br />
PART NUMBER<br />
(4)<br />
NATIONAL STOCK<br />
NUMBER<br />
(5)<br />
REPAIR PARTS<br />
WP 0058 00<br />
1. Snapring MS16625-1100 5325-00-807-2636 Fig. 30, item 43<br />
2. Gasket 70705 5330-00-562-1176 Fig. 30, item 42<br />
3. Throttle shaft cover plate 3000446 4320-01-098-5115 Fig. 24, item 56<br />
0062 00-13
TM 9-2815-225-34&P 0062 00<br />
MANDATORY REPLACEMENT PARTS (Contd)<br />
(1)<br />
ITEM<br />
NO.<br />
Table 28. WP 0045 00 Engine Accessories Installation M<strong>and</strong>atory Replacement Parts.<br />
(2)<br />
NOMENCLATURE<br />
(3)<br />
PART NUMBER<br />
(4)<br />
NATIONAL STOCK<br />
NUMBER<br />
(5)<br />
REPAIR PARTS<br />
WP 0058 00<br />
1. Gasket 3008591 5330-01-086-3523 Fig. 14, item 33<br />
2. Lockwasher S-604 5310-00-261-7340<br />
Fig. 14, item 25<br />
(Big Cam I)<br />
3. Gasket 3035053 5330-01-160-7460 Fig. 23, item 8<br />
4. Lockwasher MS122032 5310-00-159-6209<br />
5. Lockwasher 116122 5310-00-011-6122<br />
6. Lockwasher S631 5310-00-562-6560<br />
7. Lockwasher MS35338-46 5310-00-637-9541<br />
Fig. 14, item 13<br />
(Big Cam III)<br />
Fig. 23, item 2<br />
(Big Cam I)<br />
Fig. 24, item 3<br />
(Big Cam III)<br />
Fig. 23, item 25<br />
(Big Cam I)<br />
(1)<br />
ITEM<br />
NO.<br />
1.<br />
Table 29. WP 0048 00 Big Cam III Engine Installation M<strong>and</strong>atory Replacement Parts.<br />
(2)<br />
NOMENCLATURE<br />
Starter positive terminal<br />
lockwasher<br />
2. Air cleaner housing locknut<br />
3. Hood hinge locknut<br />
4.<br />
Air cleaner housing bracket<br />
locknut<br />
(3)<br />
PART NUMBER<br />
(4)<br />
NATIONAL STOCK<br />
NUMBER<br />
MS35338-47 5310-00-209-0965<br />
M45913/<br />
1-4CG5C<br />
M45913/<br />
1-4CG5C<br />
5310-00-088-1251<br />
5310-00-088-1251<br />
P52-6824 5310-01-347-7051<br />
5. Radiator <strong>support</strong> rod locknut MS35338-67 5310-001-011-6121<br />
6. Air cleaner element P15-3551 2940-01-333-0724<br />
7.<br />
8.<br />
9.<br />
Radiator crossmember mount<br />
locknut<br />
Starter ground terminal<br />
lockwasher<br />
Transmission modulator cable<br />
clamp locknut<br />
9422305 5310-01-130-4274<br />
35510 5310-00-582-5965<br />
10218 5310-01-156-7841<br />
(5)<br />
REPAIR PARTS<br />
WP 0058 00<br />
Fig. 33, item 2<br />
TM 9-2320-283-24P<br />
Fig. 32, item 5<br />
TM 9-2320-302-24P<br />
Fig. 205, item 7<br />
TM 9-2320-302-24P<br />
Fig. 32, item 9<br />
TM 9-2320-302-24P<br />
Fig. 22, item 12<br />
TM 9-2320-283-24P<br />
Fig. 32, item 15<br />
TM 9-2320-302-24P<br />
Fig. 22, item 16<br />
TM 9-2320-283-24P<br />
Fig. 33, item 32<br />
TM 9-2320-283-24P<br />
Fig. 58, item 47<br />
TM 9-2320-283-24P<br />
0062 00-14
TM 9-2815-225-34&P 0062 00<br />
MANDATORY REPLACEMENT PARTS (Contd)<br />
(1)<br />
ITEM<br />
NO.<br />
(2)<br />
NOMENCLATURE<br />
(3)<br />
PART NUMBER<br />
(4)<br />
NATIONAL STOCK<br />
NUMBER<br />
1. Ground strap starwasher 178551 5310-00-061-1258<br />
2.<br />
Alternator adjusting rod<br />
lockwasher<br />
MS35338-47 5310-00-209-0965<br />
3. Drive belts 9451-2 3030-00-844-3603<br />
4. Trunion retaining pin MS24665-283 5315-00-842-3044<br />
5.<br />
6.<br />
7.<br />
8.<br />
9.<br />
Table 30. WP 0049 00 Big Cam I Engine Installation M<strong>and</strong>atory Replacement Parts.<br />
Starter motor terminal<br />
lockwasher<br />
Transmission shift control<br />
cable lockwasher<br />
Transmission shift control<br />
cable locknut<br />
Transmission modular control<br />
bracket lockwasher<br />
Transmission modulator<br />
control link retaining pin<br />
35510 5310-00-582-5965<br />
9421021 5310-01-096-6987<br />
24617 5310-00-251-4503<br />
MS35340-49 5310-00-933-8123<br />
MS24665-281 5315-00-839-2326<br />
(5)<br />
REPAIR PARTS<br />
WP 0058 00<br />
Fig. 51, item 5<br />
TM 9-2320-283-24P<br />
Fig. 29, item 7<br />
TM 9-2320-283-24P<br />
Figure 29, item 9<br />
TM 9-2320-283-24P<br />
Fig. 58, item 30<br />
TM 9-2320-283-24P<br />
Fig. 33, item 32<br />
TM 9-2320-283-24P<br />
Fig. 58, item 35<br />
TM 9-2320-283-24P<br />
Fig. 58, item 36<br />
TM 9-2320-283-24P<br />
Fig. 58, item 41<br />
TM 9-2320-283-24P<br />
Fig. 58, item 50<br />
TM 9-2320-283-24P<br />
0062 00-15
TM 9-2815-225-34&P 0062 00<br />
MANDATORY REPLACEMENT PARTS (Contd)<br />
Table 31. WP 0046 00 Removing Engine from Maintenance St<strong>and</strong> M<strong>and</strong>atory Replacement Parts.<br />
(1)<br />
ITEM<br />
NO.<br />
(2)<br />
NOMENCLATURE<br />
(3)<br />
PART NUMBER<br />
(4)<br />
NATIONAL STOCK<br />
NUMBER<br />
(5)<br />
REPAIR PARTS<br />
WP 0058 00<br />
1. Gasket 70089-1 5330-00-537-2382 Fig. 11, item 3<br />
2. Water transfer hose 3031560 4720-01-085-2571 Fig. 11, item 5<br />
3. Gasket 70089-1 5330-00-537-2382 Fig. 2, item 13<br />
4. O-ring 3007442 5331-01-145-5377 Fig. 2, item 38<br />
5. Gasket 3008017 5330-01-079-6514 Fig. 11, item 39<br />
6. Lockwasher 3010596 5305-01-088-6019 Fig. 11, item 38<br />
7. Lockwasher MS35338-48 5310-00-584-5272 Fig. 11, item 8<br />
8. Lockwasher S-604 5310-00-261-7340 Fig. 10, item 31<br />
9. Gasket 3020943 5330-00-659-3178 Fig. 15, item 4<br />
10. Lockplate 114638 5310-00-887-8325 Fig. 15, item 8<br />
11. Lockplate 116982 5340-00-767-4012 Fig. 15, item 11<br />
12. Gasket 3069177 5330-00-194-8385 Fig. 26, item 8<br />
13. Hose 851-202994 4720-01-070-8149 Fig. 26, item 6<br />
14. Gasket 216487 5330-01-072-8998 Fig. 26, item 1<br />
15. Gasket 26384 5330-00-246-0309 Fig. 12, item 30<br />
16. Lockwasher S-603 5310-00-820-6653 Fig. 12, item 17<br />
17. Lockwasher MS35338-47 5310-00-209-0965 Fig. 12, item 34<br />
END OF WORK PACKAGE<br />
0062 00-16
TM 9-2815-225-34&P<br />
INDEX<br />
Subject<br />
WP Sequence No.-Page No.<br />
H (Contd) A<br />
Accessory Drive <strong>and</strong> Accessory Drive Pulley . . . . . . . . . . . . . . . . . . . . . WP 0029 00-1<br />
Air Aftercooler . . . . . . . . . . . . . . . . . . . . . . . . . . . . . . . . . . . . . . . . . . . . . . WP 0024 00-1<br />
Air Compressor . . . . . . . . . . . . . . . . . . . . . . . . . . . . . . . . . . . . . . . . . . . . . WP 0031 00-1<br />
B<br />
Big Cam I Engine Installation . . . . . . . . . . . . . . . . . . . . . . . . . . . . . . . . . WP 0049 00-1<br />
Big Cam III Engine Installation . . . . . . . . . . . . . . . . . . . . . . . . . . . . . . . WP 0048 00-1<br />
Big Cam I Engine Removal . . . . . . . . . . . . . . . . . . . . . . . . . . . . . . . . . . . WP 0007 00-1<br />
Big Cam III Engine Removal . . . . . . . . . . . . . . . . . . . . . . . . . . . . . . . . . . WP 0008 00-1<br />
Block, Cylinder . . . . . . . . . . . . . . . . . . . . . . . . . . . . . . . . . . . . . . . . . . . . . WP 0013 00-1<br />
C<br />
Camshaft, Camshaft Followers, <strong>and</strong> Pushrods . . . . . . . . . . . . . . . . . . . . WP 0019 00-1<br />
Cooler, Oil . . . . . . . . . . . . . . . . . . . . . . . . . . . . . . . . . . . . . . . . . . . . . . . . . WP 0021 00-1<br />
Crankshaft Cleaning <strong>and</strong> Inspection . . . . . . . . . . . . . . . . . . . . . . . . . . . . WP 0016 00-1<br />
Cylinder Block . . . . . . . . . . . . . . . . . . . . . . . . . . . . . . . . . . . . . . . . . . . . . . WP 0013 00-1<br />
Cylinder Block Components Installation . . . . . . . . . . . . . . . . . . . . . . . . WP 0042 00-1<br />
Cylinder Block Components Removal . . . . . . . . . . . . . . . . . . . . . . . . . . . WP 0012 00-1<br />
Cylinder Head . . . . . . . . . . . . . . . . . . . . . . . . . . . . . . . . . . . . . . . . . . . . . . WP 0014 00-1<br />
Cylinder Head <strong>and</strong> Cylinder Head Components Installation . . . . . . . . WP 0043 00-1<br />
Cylinder Head <strong>and</strong> Cylinder Head Components Removal . . . . . . . . . . . WP 0011 00-1<br />
E<br />
Engine Accessories Removal . . . . . . . . . . . . . . . . . . . . . . . . . . . . . . . . . . WP 0010 00-1<br />
Engine Accessories Installation . . . . . . . . . . . . . . . . . . . . . . . . . . . . . . . . WP 0045 00-1<br />
Engine Installation, Big Cam I . . . . . . . . . . . . . . . . . . . . . . . . . . . . . . . . WP 0049 00-1<br />
Engine Installation, Big Cam III . . . . . . . . . . . . . . . . . . . . . . . . . . . . . . . WP 0048 00-1<br />
Engine Removal, Big Cam I . . . . . . . . . . . . . . . . . . . . . . . . . . . . . . . . . . . WP 0007 00-1<br />
Engine Removal, Big Cam III . . . . . . . . . . . . . . . . . . . . . . . . . . . . . . . . . WP 0008 00-1<br />
Engine Retarder . . . . . . . . . . . . . . . . . . . . . . . . . . . . . . . . . . . . . . . . . . . . WP 0030 00-1<br />
Engine Testing . . . . . . . . . . . . . . . . . . . . . . . . . . . . . . . . . . . . . . . . . . . . . WP 0047 00-1<br />
Equipment Description <strong>and</strong> Data . . . . . . . . . . . . . . . . . . . . . . . . . . . . . . WP 0002 00-1<br />
Exhaust Manifold . . . . . . . . . . . . . . . . . . . . . . . . . . . . . . . . . . . . . . . . . . . WP 0025 00-1<br />
Expendable <strong>and</strong> Durable Items . . . . . . . . . . . . . . . . . . . . . . . . . . . . . . . . WP 0060 00-1<br />
INDEX-1
TM 9-2815-225-34&P<br />
INDEX (Contd)<br />
Subject<br />
WP Sequence No.-Page No.<br />
H (Contd) F<br />
Flexplate, Flywheel, Flywheel Housing, <strong>and</strong><br />
Rear Cover Cleaning <strong>and</strong> Inspection . . . . . . . . . . . . . . . . . . . . . . . . . WP 0017 00-1<br />
Front Gear Cover . . . . . . . . . . . . . . . . . . . . . . . . . . . . . . . . . . . . . . . . . . . WP 0028 00-1<br />
Fuel Damper <strong>and</strong> Head . . . . . . . . . . . . . . . . . . . . . . . . . . . . . . . . . . . . . . WP 0035 00-1<br />
Fuel Gear Pump . . . . . . . . . . . . . . . . . . . . . . . . . . . . . . . . . . . . . . . . . . . . WP 0036 00-1<br />
Fuel Injector . . . . . . . . . . . . . . . . . . . . . . . . . . . . . . . . . . . . . . . . . . . . . . . WP 0032 00-1<br />
Fuel Pump Assembly . . . . . . . . . . . . . . . . . . . . . . . . . . . . . . . . . . . . . . . . WP 0040 00-1<br />
Fuel Pump Disassembly . . . . . . . . . . . . . . . . . . . . . . . . . . . . . . . . . . . . . . WP 0033 00-1<br />
Fuel Pump Front Cover <strong>and</strong> Governor . . . . . . . . . . . . . . . . . . . . . . . . . . WP 0038 00-1<br />
Fuel Pump Governor Spring . . . . . . . . . . . . . . . . . . . . . . . . . . . . . . . . . . WP 0037 00-1<br />
Fuel Pump Main Housing . . . . . . . . . . . . . . . . . . . . . . . . . . . . . . . . . . . . WP 0039 00-1<br />
Fuel Pump Testing <strong>and</strong> Calibration . . . . . . . . . . . . . . . . . . . . . . . . . . . . WP 0044 00-1<br />
G<br />
General Information . . . . . . . . . . . . . . . . . . . . . . . . . . . . . . . . . . . . . . . . . WP 0001 00-1<br />
General Maintenance Instructions . . . . . . . . . . . . . . . . . . . . . . . . . . . . . WP 0051 00-1<br />
I<br />
Illustrated List of Manufactured Items . . . . . . . . . . . . . . . . . . . . . . . . . WP 0052 00-1<br />
M<br />
M<strong>and</strong>atory Replacement Parts . . . . . . . . . . . . . . . . . . . . . . . . . . . . . . . . WP 0062 00-1<br />
Mounting Engine on Maintenance St<strong>and</strong> . . . . . . . . . . . . . . . . . . . . . . . . WP 0009 00-1<br />
N<br />
National Stock Number (NSN) Index . . . . . . . . . . . . . . . . . . . . . . . . . . . WP 0059 00-1<br />
O<br />
Oil Cooler . . . . . . . . . . . . . . . . . . . . . . . . . . . . . . . . . . . . . . . . . . . . . . . . . . WP 0021 00-1<br />
Oil Pan, Dipstick, Oil Suction Tubes, <strong>and</strong> Breather Tube . . . . . . . . . . . WP 0022 00-1<br />
Oil Pump . . . . . . . . . . . . . . . . . . . . . . . . . . . . . . . . . . . . . . . . . . . . . . . . . . WP 0023 00-1<br />
P<br />
Pistons, Connecting Rods, <strong>and</strong> Bearings . . . . . . . . . . . . . . . . . . . . . . . . . WP 0018 00-1<br />
Preventive Maintenance Checks <strong>and</strong> Services (PMCS) Introduction . . WP 0005 00-1<br />
Preventive Maintenance Checks <strong>and</strong> Services (PMCS) Instructions . . WP 0006 00-1<br />
INDEX-2
TM 9-2815-225-34&P<br />
INDEX (Contd)<br />
Subject<br />
WP Sequence No.-Page No.<br />
R<br />
References . . . . . . . . . . . . . . . . . . . . . . . . . . . . . . . . . . . . . . . . . . . . . . . . . WP 0054 00-1<br />
Removing Engine from Maintenance St<strong>and</strong> . . . . . . . . . . . . . . . . . . . . . . WP 0046 00-1<br />
Repair Parts Introduction . . . . . . . . . . . . . . . . . . . . . . . . . . . . . . . . . . . . WP 0056 00-1<br />
Repair Parts Scope . . . . . . . . . . . . . . . . . . . . . . . . . . . . . . . . . . . . . . . . . . WP 0057 00-1<br />
Repair Parts <strong>and</strong> Special Tools List (RPSTL) . . . . . . . . . . . . . . . . . . . . WP 0058 00-1<br />
Rocker Levers <strong>and</strong> Rocker Lever Housing . . . . . . . . . . . . . . . . . . . . . . . WP 0020 00-1<br />
S<br />
Solenoid Valve . . . . . . . . . . . . . . . . . . . . . . . . . . . . . . . . . . . . . . . . . . . . . . WP 0034 00-1<br />
T<br />
Theory of Operation . . . . . . . . . . . . . . . . . . . . . . . . . . . . . . . . . . . . . . . . . WP 0003 00-1<br />
Tools <strong>and</strong> Special Tools . . . . . . . . . . . . . . . . . . . . . . . . . . . . . . . . . . . . . . WP 0061 00-1<br />
Torque Limits . . . . . . . . . . . . . . . . . . . . . . . . . . . . . . . . . . . . . . . . . . . . . . WP 0052 00-1<br />
Troubleshooting . . . . . . . . . . . . . . . . . . . . . . . . . . . . . . . . . . . . . . . . . . . . WP 0004 00-1<br />
Turbocharger . . . . . . . . . . . . . . . . . . . . . . . . . . . . . . . . . . . . . . . . . . . . . . . WP 0026 00-1<br />
Turbocharger HT-3B . . . . . . . . . . . . . . . . . . . . . . . . . . . . . . . . . . . . . . . . WP 0027 00-1<br />
W<br />
Water Pump . . . . . . . . . . . . . . . . . . . . . . . . . . . . . . . . . . . . . . . . . . . . . . . WP 0041 00-1<br />
Wear Limits . . . . . . . . . . . . . . . . . . . . . . . . . . . . . . . . . . . . . . . . . . . . . . . WP 0053 00-1<br />
INDEX-3/4 blank
RECOMMENDED CHANGES TO<br />
PUBLICATIONS AND BLANK FORMS<br />
For use of this form, see AR 25-30; the proponent<br />
agency is ODISC4.<br />
Use Part II (reverse) for Repair Parts <strong>and</strong><br />
Special Tools Lists (RPSTL) <strong>and</strong> Supply<br />
Catalogs/Supply Manuals (SC/SM).<br />
DATE:<br />
1 January 2006<br />
TO: (Forward to proponent of publication or form)<br />
(include ZIP code)<br />
AMSTA-LC-CI Tech Pubs, TACOM-RI<br />
1 Rock Isl<strong>and</strong> Arsenal<br />
Rock Isl<strong>and</strong>, IL 61299-7630<br />
FROM: (Activity <strong>and</strong> location) (include ZIP code)<br />
Co. B, 1st BN, 2nd Brigade<br />
Ft. Hood, TX 76445<br />
PUBLICATION/FORM NUMBER<br />
TM 9-2815-225-34&P<br />
PART I - ALL PUBLICATIONS (EXCEPT RPSTL AND SC/SM) AND BLANK FORMS<br />
DATE<br />
21 July 2005<br />
TITLE<br />
ENGINE, DIESEL: 6 CYLINDER IN-LINE<br />
TURBOCHARGED, CUMMINS MODEL NTC-400<br />
ITEM PAGE PARA- LINE FIGURE TABLE RECOMMENDED CHANGES AND REASON<br />
NO. NO. GRAPH NO.* NO. NO. (Provide exact wording of recommended changes, if possible).<br />
0007 00-3 Figure 3, Item X should show a flat washer. Currently<br />
shows a lockwasher.<br />
0007 00-9 Cleaning <strong>and</strong> inspection, step 5, reference to brush holder<br />
(8) is wrong reference. Reference should be changed<br />
to (10).<br />
SAMPLE<br />
*Reference to line numbers within the paragraph or subparagraph.<br />
TYPED NAME, GRADE, OR TITLE<br />
Pat Smith<br />
TELEPHONE EXCHANGE/AUTOVON,<br />
PLUS EXTENSION<br />
AV272-4162<br />
SIGNATURE<br />
Pat Smith<br />
DA FORM 2028, FEB 74<br />
REPLACES DA FORM 2028, 1 DEC 68, WHICH WILL BE USED.<br />
USAPPC V3.00
TO: (Forward direct to addressee listed in publication)<br />
AMSTA-LC-CI Tech Pubs, TACOM-RI<br />
1 Rock Isl<strong>and</strong> Arsenal<br />
Rock Isl<strong>and</strong>, IL 61299-7630<br />
FROM: (Activity <strong>and</strong> location)<br />
(include ZIP code)<br />
DATE:<br />
PUBLICATION/FORM NUMBER<br />
TM 9-2815-225-34&P<br />
PART II - REPAIR PARTS AND SPECIAL TOOLS LISTS AND SUPPLY CATALOGS/SUPPLY MANUALS<br />
DATE<br />
21 July 2005<br />
TITLE<br />
ENGINE, DIESEL: 6 CYLINDER IN-LINE<br />
TURBOCHARGED, CUMMINS MODEL NTC-400<br />
TOTAL NO.<br />
OF MAJOR<br />
PAGE COLM LINE NATIONAL REFERENCE FIGURE ITEM ITEMS RECOMMENDED<br />
NO. NO. NO. STOCK NUMBER NO. NO. NO. SUPPORTED ACTION<br />
SAMPLE<br />
PART III - REMARKS<br />
(Any <strong>general</strong> remarks or recommendations, or suggestions for improvement of publications <strong>and</strong> blank forms.<br />
Additional blank sheets may be used if more space is needed.)<br />
TYPED NAME, GRADE, OR TITLE<br />
TELEPHONE EXCHANGE/AUTOVON,<br />
PLUS EXTENSION<br />
SIGNATURE<br />
USAPPC V3.00
RECOMMENDED CHANGES TO<br />
PUBLICATIONS AND BLANK FORMS<br />
For use of this form, see AR 25-30; the proponent<br />
agency is ODISC4.<br />
Use Part II (reverse) for Repair Parts <strong>and</strong><br />
Special Tools Lists (RPSTL) <strong>and</strong> Supply<br />
Catalogs/Supply Manuals (SC/SM).<br />
DATE:<br />
TO: (Forward to proponent of publication or form)<br />
(include ZIP code)<br />
AMSTA-LC-CI Tech Pubs, TACOM-RI<br />
1 Rock Isl<strong>and</strong> Arsenal<br />
Rock Isl<strong>and</strong>, IL 61299-7630<br />
FROM: (Activity <strong>and</strong> location) (include ZIP code)<br />
PUBLICATION/FORM NUMBER<br />
TM 9-2815-225-34&P<br />
PART I - ALL PUBLICATIONS (EXCEPT RPSTL AND SC/SM) AND BLANK FORMS<br />
DATE<br />
21 July 2005<br />
TITLE<br />
ENGINE, DIESEL: 6 CYLINDER IN-LINE<br />
TURBOCHARGED, CUMMINS MODEL NTC-400<br />
ITEM PAGE PARA- LINE FIGURE TABLE RECOMMENDED CHANGES AND REASON<br />
NO. NO. GRAPH NO.* NO. NO. (Provide exact wording of recommended changes, if possible).<br />
*Reference to line numbers within the paragraph or subparagraph.<br />
TYPED NAME, GRADE, OR TITLE<br />
TELEPHONE EXCHANGE/AUTOVON,<br />
PLUS EXTENSION<br />
SIGNATURE<br />
DA FORM 2028, FEB 74<br />
REPLACES DA FORM 2028, 1 DEC 68, WHICH WILL BE USED.<br />
USAPPC V3.00
TO: (Forward direct to addressee listed in publication)<br />
AMSTA-LC-CI Tech Pubs, TACOM-RI<br />
1 Rock Isl<strong>and</strong> Arsenal<br />
Rock Isl<strong>and</strong>, IL 61299-7630<br />
FROM: (Activity <strong>and</strong> location)<br />
(include ZIP code)<br />
DATE:<br />
PUBLICATION/FORM NUMBER<br />
TM 9-2815-225-34&P<br />
PART II - REPAIR PARTS AND SPECIAL TOOLS LISTS AND SUPPLY CATALOGS/SUPPLY MANUALS<br />
DATE<br />
21 July 2005<br />
TITLE<br />
ENGINE, DIESEL: 6 CYLINDER IN-LINE<br />
TURBOCHARGED, CUMMINS MODEL NTC-400<br />
TOTAL NO.<br />
OF MAJOR<br />
PAGE COLM LINE NATIONAL REFERENCE FIGURE ITEM ITEMS RECOMMENDED<br />
NO. NO. NO. STOCK NUMBER NO. NO. NO. SUPPORTED ACTION<br />
PART III - REMARKS<br />
(Any <strong>general</strong> remarks or recommendations, or suggestions for improvement of publications <strong>and</strong> blank forms.<br />
Additional blank sheets may be used if more space is needed.)<br />
TYPED NAME, GRADE, OR TITLE<br />
TELEPHONE EXCHANGE/AUTOVON,<br />
PLUS EXTENSION<br />
SIGNATURE<br />
USAPPC V3.00
TM 9-2815-225-34&P<br />
By Order of the Secretary of the Army:<br />
Official:<br />
PETER J. SCHOOMAKER<br />
General, United States Army<br />
Chief of Staff<br />
SANDRA R. RILEY<br />
Administrative Assistant to the<br />
Secretary of the Army<br />
0430611<br />
Distribution:<br />
To be distributed in accordance with the Initial Distribution Number (IDN) 371461 requirements for<br />
TM 9-2815-225-34&P.
THE METRIC SYSTEM AND EQUIVALENTS<br />
LINEAR MEASURE<br />
1 Centimeter = 10 Millimeters = 0.01 Meters =<br />
0.3937 Inches<br />
1 Meter = 100 Centimeters = 1,000 Millimeters =<br />
39.37 Inches<br />
1 Kilometer = 1,000 Meters = 0.621 Miles<br />
SQUARE MEASURE<br />
1 Sq Centimeter = 100 Sq Millimeters = 0.155 Sq Inches<br />
1 Sq Meter = 10,000 Sq Centimeters = 10.76 Sq Feet<br />
1 Sq Kilometer = 1,000,000 Sq Meters = 0.386 Sq Miles<br />
CUBIC MEASURE<br />
1 Cu Centimeter = 1,000 Cu Millimeters = 0.06 Cu Inches<br />
1 Cu Meter = 1,000,000 Cu Centimeters = 35.31 Cu Feet<br />
LIQUID MEASURE<br />
1 Milliliter = 0.001 Liters = 0.0338 Fluid Ounces<br />
1 Liter = 1,000 Milliliters = 33.82 Fluid Ounces<br />
TEMPERATURE<br />
5/9 (°F -32) = °C<br />
212° Fahrenheit is equivalent to 100° Celsius<br />
90° Fahrenheit is equivalent to 32.2° Celsius<br />
32° Fahrenheit is equivalent to 0° Celsius<br />
9/5 °C +32 = °F<br />
WEIGHTS<br />
1 Gram = 0.001 Kilograms = 1,000 Milligrams = 0.035<br />
Ounces<br />
1 Kilogram = 1,000 Grams = 2.2 Lb<br />
1 Metric Ton = 1,000 Kilograms = 1 Megagram = 1.1 Short Tons<br />
APPROXIMATE CONVERSION FACTORS<br />
TO CHANGE . . . . . . . . . . . . . . . . . . . . TO . . . . . . . . . . . . . . . . . . . . . . . .MULTIPLY BY<br />
Inches . . . . . . . . . . . . . . . . . . . . . . . . . Centimeters . . . . . . . . . . . . . . . . . 2.540<br />
Feet . . . . . . . . . . . . . . . . . . . . . . . . . . Meters . . . . . . . . . . . . . . . . . . . . . 0.305<br />
Yards . . . . . . . . . . . . . . . . . . . . . . . . . Meters . . . . . . . . . . . . . . . . . . . . . 0.914<br />
Miles . . . . . . . . . . . . . . . . . . . . . . . . . . Kilometers . . . . . . . . . . . . . . . . . . 1.609<br />
Square Inches . . . . . . . . . . . . . . . . . . Square Centimeters . . . . . . . . . . 6.451<br />
Square Feet . . . . . . . . . . . . . . . . . . . . Square Meters . . . . . . . . . . . . . . . 0.093<br />
Square Yards . . . . . . . . . . . . . . . . . . . Square Meters . . . . . . . . . . . . . . . 0.836<br />
Square Miles . . . . . . . . . . . . . . . . . . . Square Kilometers . . . . . . . . . . . . 2.590<br />
Acres . . . . . . . . . . . . . . . . . . . . . . . . . . Square Hectometers . . . . . . . . . . 0.405<br />
Cubic Feet . . . . . . . . . . . . . . . . . . . . . Cubic Meters . . . . . . . . . . . . . . . . 0.028<br />
Cubic Yards . . . . . . . . . . . . . . . . . . . . Cubic Meters . . . . . . . . . . . . . . . . 0.765<br />
Fluid Ounces . . . . . . . . . . . . . . . . . . . Milliliters . . . . . . . . . . . . . . . . . . . 29.573<br />
Pints . . . . . . . . . . . . . . . . . . . . . . . . . . Liters . . . . . . . . . . . . . . . . . . . . . . 0.473<br />
Quarts . . . . . . . . . . . . . . . . . . . . . . . . Liters . . . . . . . . . . . . . . . . . . . . . . 0.946<br />
Gallons . . . . . . . . . . . . . . . . . . . . . . . . Liters . . . . . . . . . . . . . . . . . . . . . . 3.785<br />
Ounces . . . . . . . . . . . . . . . . . . . . . . . . Grams . . . . . . . . . . . . . . . . . . . . . . 28.349<br />
Pounds . . . . . . . . . . . . . . . . . . . . . . . . Kilograms . . . . . . . . . . . . . . . . . . . 0.454<br />
Short Tons . . . . . . . . . . . . . . . . . . . . . Metric Tons . . . . . . . . . . . . . . . . . 0.907<br />
Pound-Feet . . . . . . . . . . . . . . . . . . . . . Newton-Meters . . . . . . . . . . . . . . 1.356<br />
Pounds Per Square Inch . . . . . . . . . . Kilopascals . . . . . . . . . . . . . . . . . . 6.895<br />
Miles Per Gallon . . . . . . . . . . . . . . . . Kilometers Per Liter . . . . . . . . . . 0.425<br />
Miles Per Hour . . . . . . . . . . . . . . . . . Kilometers Per Hour . . . . . . . . . . 1.609<br />
TO CHANGE . . . . . . . . . . . . . . . . . . . . TO . . . . . . . . . . . . . . . . . . . . . . . .MULTIPLY BY<br />
Centimeters . . . . . . . . . . . . . . . . . . . . Inches . . . . . . . . . . . . . . . . . . . . . . 0.394<br />
Meters . . . . . . . . . . . . . . . . . . . . . . . . Feet . . . . . . . . . . . . . . . . . . . . . . . . 3.280<br />
Meters . . . . . . . . . . . . . . . . . . . . . . . . Yards . . . . . . . . . . . . . . . . . . . . . . 1.094<br />
Kilometers . . . . . . . . . . . . . . . . . . . . . Miles . . . . . . . . . . . . . . . . . . . . . . . 0.621<br />
Square Centimeters . . . . . . . . . . . . . Square Inches . . . . . . . . . . . . . . . 0.155<br />
Square Meters . . . . . . . . . . . . . . . . . . Square Feet . . . . . . . . . . . . . . . . . 10.764<br />
Square Meters . . . . . . . . . . . . . . . . . . Square Yards . . . . . . . . . . . . . . . . 1.196<br />
Square Kilometers . . . . . . . . . . . . . . . Square Miles . . . . . . . . . . . . . . . . 0.386<br />
Square Hectometers . . . . . . . . . . . . . Acres . . . . . . . . . . . . . . . . . . . . . . . 2.471<br />
Cubic Meters . . . . . . . . . . . . . . . . . . . Cubic Feet . . . . . . . . . . . . . . . . . . 35.315<br />
Cubic Meters . . . . . . . . . . . . . . . . . . . Cubic Yards . . . . . . . . . . . . . . . . . 1.308<br />
Milliliters . . . . . . . . . . . . . . . . . . . . . . Fluid Ounces . . . . . . . . . . . . . . . . 0.034<br />
Liters . . . . . . . . . . . . . . . . . . . . . . . . . Pints . . . . . . . . . . . . . . . . . . . . . . . 2.113<br />
Liters . . . . . . . . . . . . . . . . . . . . . . . . . Quarts . . . . . . . . . . . . . . . . . . . . . 1.057<br />
Liters . . . . . . . . . . . . . . . . . . . . . . . . . Gallons . . . . . . . . . . . . . . . . . . . . . 0.264<br />
Grams . . . . . . . . . . . . . . . . . . . . . . . . . Ounces . . . . . . . . . . . . . . . . . . . . . 0.035<br />
Kilograms . . . . . . . . . . . . . . . . . . . . . . Pounds . . . . . . . . . . . . . . . . . . . . . 2.205<br />
Metric Tons . . . . . . . . . . . . . . . . . . . . Short Tons . . . . . . . . . . . . . . . . . . 1.102<br />
Newton-Meters . . . . . . . . . . . . . . . . . Pound-Feet . . . . . . . . . . . . . . . . . . 0.738<br />
Kilopascals . . . . . . . . . . . . . . . . . . . . . Pounds Per Square Inch . . . . . . . 0.145<br />
Kilometers Per Liter . . . . . . . . . . . . . Miles Per Gallon . . . . . . . . . . . . . 2.354<br />
Kilometers Per Hour . . . . . . . . . . . . . Miles Per Hour . . . . . . . . . . . . . . 0.621<br />
INCHES<br />
0 1 2 3 4 5 6<br />
0<br />
1 2 3 4 5 6 7 8 9 10 11 12 13 14 15<br />
CENTIMETERS
PIN: 077560-000


